synopsys工具安装教程
sentaurus work bench用法

sentaurus work bench用法Sentaurus Workbench是Synopsys公司开发的一款集成化的半导体器件和工艺模拟平台。
它具有强大的功能和灵活的使用方式,可以用于半导体器件的设计、优化和验证。
本文将逐步介绍Sentaurus Workbench的使用方法。
第一步,安装和启动Sentaurus Workbench。
首先,从Synopsys官方网站下载Sentaurus Workbench安装文件,并按照说明进行安装。
安装完成后,双击桌面上的快捷方式,启动Sentaurus Workbench。
第二步,创建新工程。
在Sentaurus Workbench的欢迎界面,点击“New Project”按钮。
在弹出的对话框中,选择工程的存储位置和名称,然后点击“OK”按钮。
一个空白的工程将被创建。
第三步,导入设计文件。
选择“Project”菜单,然后点击“Add Existing Design Files”。
在弹出的对话框中,选择要导入的设计文件,例如SPICE 文件或者Layout文件。
导入完成后,设计文件将显示在工程的文件列表中。
第四步,设置工艺参数。
选择“Process”菜单,然后点击“Edit Process”.在弹出的对话框中,设置工艺参数,例如材料赝势模型、离子注入参数和金属堆叠信息等。
这些参数将影响到后续的器件模拟和分析。
第五步,配置仿真设置。
选择“Simulation”菜单,然后点击“Edit Simulation Settings”。
在弹出的对话框中,设置仿真的相关参数,例如仿真类型(DC、AC、Transient等)、分析范围和步长等。
这些参数将决定仿真的精度和效率。
第六步,设计器件模型。
选择“Device”菜单,然后点击“Edit Device Models”。
在弹出的对话框中,定义和编辑所需的器件模型,例如MOS、BJT和二极管等。
通过选择合适的模型参数,可以快速搭建起准确的器件模型。
舍不得说的PDF文件:Synopsys OptSim工具介绍说明书

DATASHEET Overview The Synopsys OptSim tool is an award-winning photonic integrated circuit and fiber-optic system simulator. With state-of-the-art time- and frequency-domain split-step algorithms, OptSim provides engineers around the globe with a native photonic-domain environment to design and optimize photonic circuits and systems. OptSim can be used as a standalone solution with its own graphical user interface (Windows and Linux), or integrated into the OptoCompiler Photonic IC design platform (Linux). When used as an OptoCompiler-integrated simulator, OptSim:•Supports electro-optic (E-O) co-simulation with Synopsys PrimeSim HSPICE and PrimeSim SPICE electrical circuit simulators •Integrates seamlessly with the PrimeWave Design Environment for advanced simulation, analyses, and visualization including parametric scans, Monte Carlo and corner analyses •Provides single- and multimode fiber-optic system modeling capabilities.When used as a standalone simulator, OptSim’s GUI provides functionalities of schematic entry, simulation setup, and visualization.Introduction Photonic integration is an answer to the ever-increasing demands for more bandwidth, better energy efficiency, smaller footprint, and improved reliability. The adaptation of photonic ICs (PICs) is rapidly growing acrossindustry segments such as telecom, data centers, optical interconnects,automotive, sensing, aerospace & defense, artificial intelligence (AI), andphotonic computing. PICs are becoming complex and the component count isincreasing at a rapid pace. Co-packaged optics (CPO) and xPU I/O are drivingmore complex trade-offs between electronics and photonics. Gone are the dayswhen it was sufficient to model photonics on the back of an envelope, withsome homegrown code, or as electronics in electrical circuit simulators. WithOptSim, you use the most comprehensive optical simulator with the industry’sbest electrical circuit simulators on the respective portions of the design withinthe OptoCompiler platform.Features at a Glance•E lectronic-photonic co-design via Synopsys PrimeSim HSPICE and PrimeSim SPICE•Simulation of single and multimode fiber optic systems and photonic integrated circuits•Seamless integration with OptoCompiler and PrimeWave Design Environment•Extensive libraries of photonic andelectronic components and analysistools•Support for numerous foundryprocess design kits (PDKs)•Support for custom photonics (PDKsand devices) via Photonic DeviceCompiler•Support for hierarchical design and bidirectional signal flow•Design for manufacturing via MonteCarlo and corner analyses OptSim Electro-Optic Co-Simulation of Photonic Integrated Circuits and Fiber-Optic SystemsDesigning single- and multimode fiber-optic systems requires capabilities to support advanced intensity- and phase-modulation for both single- and multi-channel transmission with direct and coherent detection. The interplay of polarization-dependent transmission impairments with noise, crosstalk, and multi-path interference (MPI) can create challenges to the channel capacity. In addition to PIC modeling capabilities, OptSim provides rich libraries of components and powerful analyses options to facilitate the design of a diverse range of system applications such as coherent telecom systems, RF-over-fiber, high-speed Ethernet, passive-optical-networks, and free-space optics.Figure 1: Photonic and electronic circuit and system simulation from the OptoCompiler cockpitFeatures•Works with foundry model libraries and provides a complete library of generic model templates of integrated photonics devices, enabling engineers to tailor models to measured behavior. In addition to supporting PIC design models and features, OptSim provides a rich library of single- and multimode fiber-optic system design models to support testing a PIC at the system levelFigure 2: The OptSim library includes electrical and photonic models to simulate circuits and systems•Models bidirectional signal flow for both optical (single- and multi-wavelength) and electrical signals•Models multipath interference (MPI), reflections, and resonances from network and PIC devices•Supports Monte Carlo and corner analyses•Supports simulation of design hierarchies•Supports measurement- and datafile-driven modeling of active and passive photonic components, electroniccomponents, and circuits•Supports custom design, combining foundry models and custom devices•Co-simulation with PrimeSim HSPICE and PrimeSim SPICE enables simulation of electronics in the PIC using industry-leading electrical circuit simulators together with the simulation of photonic circuits in OptSimFigure 3: Co-simulating electronic and photonic circuits in OptSim•OptSim is integrated with the Synopsys PrimeWave Design Environment, for both electrical and photonic netlists allowing setup of test benches, specifying simulation engine and parameters, performing scans and analyses for both electrical, photonic, and combined schematicsFigure 4: Setting up a testbench and simulation in PrimeWave Design Environment•OptSim results and waveforms (logical, electrical, and optical) can be viewed in both the PrimeWave Design Environment WaveView and OptSim Viewer©2021 Synopsys, Inc. All rights reserved. Synopsys is a trademark of Synopsys, Inc. in the United States and other countries. A list of Synopsys trademarks isavailable at /copyright .html . All other names mentioned herein are trademarks or registered trademarks of their respective owners.Figure 5: OptSim: Viewing simulation waveforms in PrimeWave Design Environment WaveView•Standalone OptSim (Windows, Linux) has its own graphical user interface and provides an intuitive simulation experienceFigure 6: OptSim GUI: Simulation of a PAM4 fiber-optic systemApplications:•Single- and multi-stage PICs for photonic computing, optical neural networks, life sciences, photonic sensor PICs •Segmented-electrode (SE) and traveling-wave Mach-Zehnder modulators (TW-MZM), optical filters, ring resonators,ring modulators•Transceivers for coherent and non-coherent fiber optic communication systems (such as NRZ, RZ, m-PAM, BPSK, QPSK,m-QAM, and OFDM)•Single- and multimode fiber-optic systems and circuits•Free-space optics, RF-over-fiber: Intermodulation distortion (IMD), dynamic range, sensitivity•Datacenter and automotive interconnects•Photonic systems with multipath interference (MPI), reflections, and resonancesPlatform Support•Linux: Red Hat Enterprise (64-bit), CentOS (64-bit)•Windows (64-bit): Standalone OptSim。
WindowsSubsystemforLinux运行Ubuntu并安装Synopsys软件

WindowsSubsystemforLinux运行Ubuntu并安装Synopsys软件Windows Subsystem for Linux运行EDA软件导言大家用什么方式来运行Linux?安装各种EDA安装包呢?常见的可能是双系统、虚拟机、服务器、docker,或者试试WSL2?这些方案除了服务器亦安没有搭建体验过,其他的方案均测试过,WSL是一个很好的运行Linux的方案,本文主要介绍WSL安装,以及给大家一个完整的WSL备份压缩包,内部已经安装VCS2018,Verdi2018,DC2018,VCS_MAX2018,仅供学习使用。
什么是WSL2?即Windows Subsystem for Linux,在win系统下能运行linux的环境,比如安装ubuntu,并和win有极强的交互性。
相比较wsl1,wsl2有了很大的进步,能运行大多数linux命令行,工具和应用,并且使用了真正的linux内核,几乎具备linux的完整功能,它的目标是提高文件系统性能,以及添加完全的系统调用兼容性。
安装有win系统要求:win10 2004及更高版本(内部版本19041及更高版本)或win11。
以管理员运行PowerShell执行wsl --install即可,当然还需要在windows功能中勾选:•适用于Linux的Window子系统•虚拟机平台有重启要求的按照要求重启,安装非常简单,具体大家到官网看教程,还会有wsl的命令行介绍。
https:///zh-cn/windows/wsl/install到微软商店搜WSL或Linux会出现Ubuntu这些发行版本,亦安安装了Ubuntu18.04和Ubuntu20.04,这个根据自己的需求,但如果需要安装Centos,微软商店不支持,则需要到以下网站下载:https:///mishamosher/CentOS-WSL优势•交互性强,比如说,子系统可以完全访问win下的文件。
saber2012安装教程
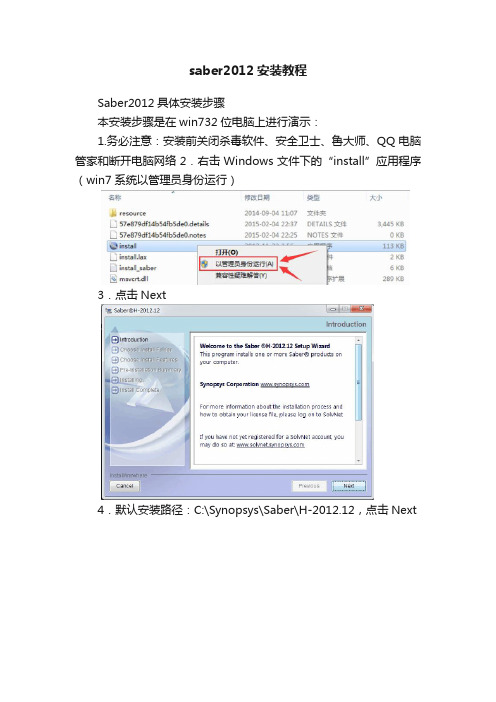
saber2012安装教程Saber2012具体安装步骤本安装步骤是在win732位电脑上进行演示:1.务必注意:安装前关闭杀毒软件、安全卫士、鲁大师、QQ电脑管家和断开电脑网络2.右击Windows文件下的“install”应用程序(win7系统以管理员身份运行)3.点击Next4.默认安装路径:C:\Synopsys\Saber\H-2012.12,点击Next5.勾选上Component Library,点击Next6.点击Install7.接下来就是漫长的安装过程…….8.点击No.9.点击Done.Saber2012破解步骤破解之前,请确保网络已断开且杀毒软件、安全卫士、QQ管家、鲁大师等已退出1、破解文件在license文件夹中,将整个license文件夹复制到C 盘2、运行license\Synopsys SSS Feature Keygen文件夹中KeyGen.exeHOSTID中其余的删除,只保留前12位数字字母,如:0026c789731d得到HOSTID0026c789731d将0026c789731d这串数字复制…(备注:每台电脑的HOSTID 均不同)3、运行EFA LicGen0.4b目录内LicGen.exe按打开…\EFA LicGen0.4b\packs\Synopsys.lpd文件点选Custom项,并将第2步得到的HOSTID粘贴到文本框内点击点击保存为synopsys.dat到sssverify.exe所在目录【备用】4、运行cmd:开始>搜索栏输入cmd,回车出现DOS窗口A.输入C:,按回车(C:是sssverify.exe所在盘符,根据你license 文件实际位置而定)B.输入sssverify.exe文件的所在路径,输入CD C:\license\Synopsys SSS Feature Keygen,按回车;(也可将路径复制,然后先输入CD,空格1个,再右击粘贴路径,这样就不用打字了)C.输入sssverify synopsys.dat,按回车得到SECRET DATA:00f4000084d600008d005、再次运行KeyGen.exe,将之前得到的HOSTID和上一步得到的SECRET DATA输入点击会在KeyGen.exe所在文件下生成一个License.dat文件,如图:此文件内synopsys.dat和license.dat就是我们需要的6、用记事本打开上述两个文件将license.dat的这部分(最尾部分)复制后追加到synopsys.dat的最尾部分然后保存synopsys.dat(最终注册文件),拷贝synopsys.dat到C:\Synopsys文件夹下7、最后一步WIN7系统:右击桌面上计算机图标→属性→高级系统设置→高级→环境变量→新建<用户变量>变量名:LM_LICENSE_FILE变量值:C:\Synopsys\synopsys.dat(为synopsys.dat保存位置)点击《确定》点击《确定》这样就OK了………注意:有防火墙的要放行:Aim.exet和aimsh.exe访问网络,否则不能启动…。
verdi使用手册

verdi使用手册Verdi是一款功能强大的EDA工具,主要用于数字电路设计和仿真。
以下是一份简明的Verdi使用手册,帮助您快速上手并充分利用该软件的各项功能:Verdi简介Verdi是由Synopsys公司开发的一款集成电路设计和验证工具。
它具有直观的用户界面和强大的调试功能,可帮助工程师快速定位和解决设计中的问题。
以下是Verdi的一些主要功能特点:1. 信号跟踪:通过Verdi,用户可以轻松跟踪信号路径。
Verdi安装步骤1. 下载Verdi安装包。
2. 运行安装程序。
3. 按照安装向导的提示进行安装。
4. 完成安装后,根据需要选择安装插件。
Verdi配置环境变量在安装完成后,需要配置环境变量以便能够在命令行中使用Verdi。
具体步骤如下:1. 打开终端或命令提示符窗口。
2. 设置VERDI_HOME环境变量,指向Verdi的安装目录。
3. 将Verdi的执行文件路径加入到PATH环境变量中。
Verdi使用基础1. 打开Verdi软件。
2. 在菜单栏中选择“文件”>“新建”>“项目”,然后选择适当的项目类型。
3. 在项目浏览器中,右键单击项目并选择“新建”>“设计”,然后选择适当的设计类型。
4. 在设计编辑器中,开始设计和仿真电路。
可以使用Verdi的各种工具和功能来创建、编辑和验证电路。
5. 在完成设计后,使用Verdi的仿真工具对电路进行仿真,以验证其功能和性能。
6. 在仿真过程中,可以使用Verdi的调试工具来检查和分析电路的行为。
7. 如果需要修改电路,可以在设计编辑器中直接进行修改,然后重新进行仿真和调试。
8. 在完成电路设计和仿真后,可以导出设计数据以供其他EDA工具使用。
9. 最后,关闭Verdi软件并保存项目文件。
以上是Verdi使用手册的基本内容,供您参考。
使用Verdi进行数字电路设计和仿真需要一定的专业知识和经验,建议您在使用过程中仔细阅读相关文档和教程,以提高使用效果和效率。
图解详说proteus 7.4 安装全过程

图解详说proteus 7.4 安装全过程文章发表于:2009-04-27 22:24Proteus(海神)的ISIS是一款Labcenter出品的电路分析实物仿真系统,可仿真各种电路和IC,并支持单片机,元件库齐全,使用方便,是不可多得的专业的单片机软件仿真系统。
该软件的特点:①全部满足我们提出的单片机软件仿真系统的标准,并在同类产品中具有明显的优势。
②具有模拟电路仿真、数字电路仿真、单片机及其外围电路组成的系统的仿真、RS一232动态仿真、1 C调试器、SPI调试器、键盘和LCD系统仿真的功能;有各种虚拟仪器,如示波器、逻辑分析仪、信号发生器等。
③目前支持的单片机类型有:68000系列、8051系列、AVR系列、PIC12系列、PIC16系列、PIC18系列、Z80系列、HC11系列以及各种外围芯片。
④支持大量的存储器和外围芯片。
总之该软件是一款集单片机和SPICE分析于一身的仿真软件,功能极其强大,可仿真51、AVR、PIC。
软件安装过程和破解方法:1、解压文件2、双击“proteus_setup74.exe”,开始安装。
3、点击“Next”4、点击“Yes”5、选择第一项后,点击“Next”。
6、点击“Next”。
7、选择第一项。
8、浏览“7.4 破解”文件夹中“Grassington North Yorkshire.lxk”,点击“打开”。
9、点击第三项“Install”。
10、点击“是”11、点击“Close”。
12、点击“Next”。
13、选择安装路径。
14、选择安装组件。
15、点击“Next”。
16、等上一会儿吧。
17、两项都不选择,点击“Finish”。
18、运行“7.4 破解”文件夹中的“LXK Proteus 7.4 SP3 PRO v1.6.2.exe”,点击“U pdate”。
19、破解成功,点击“确定”。
20、安装成功,可以使用了!21、软件版本为“7.4 SP3”。
tessent手册
tessent手册在软件行业中,随着技术的不断发展,软件测试变得愈发重要。
作为一种先进的自动化测试工具,Tessent在测试领域担任着重要的角色。
本手册将介绍Tessent的基本概念、使用方法以及其中的一些高级特性。
通过本手册,用户将能够充分了解Tessent,并且能够灵活应用于实际的项目中。
一、Tessent简介Tessent是由Synopsys公司开发的一款全面的测试解决方案。
它提供了一系列的工具和方法,帮助用户在设计和验证过程中进行测试策略的制定、功能仿真、逻辑综合和门级综合、自动测试生成以及测试数据压缩等。
Tessent不仅具有强大的自动化能力,而且能够有效降低测试成本和提高测试覆盖率。
二、Tessent的基本概念1. DFT(Design for Testability)设计测试性是Tessent的核心思想之一。
通过在设计阶段就考虑测试的需求,可以使芯片具备更好的可测试性,提高故障的检测能力。
Tessent提供了一系列的DFT工具和技术,如扫描链、BIST(内置自测)、ATPG(自动生成测试向量)等。
2. Tessent工具链Tessent由多个工具组成,通过这些工具的协同配合,可以实现全面的测试覆盖。
其中一些重要的工具包括DFT Compiler(用于将DFT插入设计中)、TestKompress(用于测试压缩)和FastScan(用于扫描链测试)等。
3. ATPG(Automatic Test Pattern Generation)自动生成测试向量是Tessent最重要的功能之一。
ATPG可以根据设计的规格和测试需求自动生成用于测试的刺激数据,简化了测试工作的复杂度,并提高了测试的效率。
4. TetraMAXTetraMAX是Tessent中一个非常重要的模块,用于进行故障模拟和故障覆盖率分析。
通过TetraMAX,用户可以对设计进行精确的故障模拟,并评估测试向量的覆盖率,进而进行进一步的测试优化。
VCS仿真指南
VCS仿真指南
VCS(Verification Continuity Simulator)是一款由Synopsys开发的仿真工具,用于验证硬件设计的正确性。
本指南旨在帮助初学者快速上手VCS仿真工具,完成硬件设计的验证工作。
本指南为第二版,对于第一版中的错误和不足之处进行了修正和补充。
一、VCS概述
1.什么是VCS?
VCS是一款基于Verilog和SystemVerilog硬件描述语言的仿真器,用于验证硬件设计的正确性。
VCS提供了高性能的仿真引擎和全面的仿真调试功能。
2.安装VCS
请参考VCS官方的安装指导手册进行安装,确保安装正确。
3.编写测试代码
使用Verilog或SystemVerilog语言编写测试代码,设计测试用例来验证硬件模块的功能。
可以使用assert语句来检查设计是否满足预期行为。
二、编译和仿真流程
1.编译测试代码
使用vcs命令将测试代码编译成仿真可执行文件。
例如:
```
vcs -sverilog testbench.sv design.sv -o simv
```
其中,testbench.sv为测试代码,design.sv为设计代码,simv为编译后的仿真执行文件。
2.运行仿真
运行编译后的仿真可执行文件,启动仿真。
例如:
```
./simv
```
3.调试仿真
在仿真过程中,可以使用一些命令对仿真进行调试,例如:
```
finish - 结束仿真
restart - 重新开始仿真
```。
Synopsys_Design_Compiler使用
Synopsys Design Compiler使用一、介绍:美国Synopsys公司发布的“Design Compiler”软件,简称“DC”,是一种逻辑合成工具。
通过改进电路延迟时间的计算方法,缩小了逻辑合成时的时序与布局完成后的最终时序之间的偏差。
DC得到全球60多个半导体厂商、380多个工艺库的支持。
据最新Dataquest的统计,Synopsys的逻辑综合工具占据91%的市场份额。
DC是十二年来工业界标准的逻辑综合工具,也是Synopsys最核心的产品。
它使IC设计者在最短的时间内最佳的利用硅片完成设计。
它根据设计描述和约束条件并针对特定的工艺库自动综合出一个优化的门级电路。
它可以接受多种输入格式,如硬件描述语言、原理图和网表等,并产生多种性能报告,在缩短设计时间的同时提高设计性能。
二、要求:由于实训没有硬性要求VHDL文件,本人挑选了已经预先做好的洗衣机时控电路,利用Synopsys Design Compiler工具,进行优化分析,通过这一过程熟悉软件的使用。
三、过程:设置优化运行库,鉴于老师在练习手册上面提供的例子,我们使用库LSI-10K,因此在打开VHDL文件前,需要作以下设置Setup->Defaults,填入以下信息。
在File->read打开要分析优化的VHDL文件,这里我选择一个洗衣机时控电路NewWasher.vhd 如下所示(分别为不同层次的视图:顶层、器件、门级电路)在Tools->Design Optimization中设置好兼顾平衡的约束条件(左图),确定编译后,产生了右边经过优化的门级电路图。
接下来,把优化过的图形转换为VHDL文件和DB文件输出,另存到指定位置File->Save As如右图,生成了新的DB文件和vhd文件。
接下来,是要设定CLK的周期,根据分析、优化、编译出来的Slack Time 松弛数值和Area面积数值,选取最合适的平衡点。
synopsys DC在虚拟机下的安装说明
Synopsys DC200809 安装说明By:方奇Email: fangqi-gz@说明:Windows版本:win7 64 家庭高级版。
虚拟机:VMware 7.1.4。
(最好到官方网站上下原本,有32位和64位)Linux :RHEL4-U4-i386-AS。
(迅雷搜搜)一、软件下载。
包括以下部分/thread-301143-1-1.html,解压后有两部分:/thread-301143-1-1.html/thread-301143-1-1.html,也包括两部分:/thread-301143-1-1.html,解压也包括两部分:二、安装(虚拟机安装RHEL省去)最好在root下安装,可以免去很多不必要的麻烦。
按下面步骤进入root&su口令***这里输入你自己的密码就进入到root下了#开始安装1.目录结构,本人在linux的根目录下建了/usr/synopsys文件夹,需要说明的是必须用管理员的身份进入usr文件夹才能在其中新建文件夹。
下面是我的目录结构,仅供查考/usr/synopsys |---installer|---10.9.3|---scl_v10.9.3_commom.tar|---scl_v10.g.3.linux.tar|---license|---B-2008.09|---sdc_200809_linux|---scd_200809_common2.安装installer,将installer2.0 解压到installer 文件夹即可。
解压后出现以下文件:3.安装SCL 在终端root下出现安装界面选中scl解压所在文件夹,这里的source为/usr/synopsys/10.9.3/scl_v10.9.3_linux然后一直next,过程中有些选项都不需要管,也不需要填,直到选中安装目标路径,这里的安装路径是/usr/synopsys/10.9.3同样把scl_common文件安装到10.9.3。
- 1、下载文档前请自行甄别文档内容的完整性,平台不提供额外的编辑、内容补充、找答案等附加服务。
- 2、"仅部分预览"的文档,不可在线预览部分如存在完整性等问题,可反馈申请退款(可完整预览的文档不适用该条件!)。
- 3、如文档侵犯您的权益,请联系客服反馈,我们会尽快为您处理(人工客服工作时间:9:00-18:30)。
前言:这是本人经过两个星期的奋斗,从对linux命令的生涩到熟练,对后端工具的陌生到熟悉的一段战斗史!!!下面我把我的操作过程详细写下,供大家学习参考!!
一:准备工作
所需平台
1、vmware9
2、RHEL(红帽企业版)6.3
Synopsys 工具
1、installer_v3.0(安装synopsys EDA tools 的图形界面的安装工具)
2、scl_10.9.3(synopsys license 管理工具,用于启动tools 的features)
3、dc_2009.06(逻辑综合工具)
4、icc_2009.06(布局布线工具)
5、pt_2012.12(时序分析工具)
License生成工具
1、EFA LicGen 0.4b
2、Synopsys SSS Feature Keygen
3、Synposys.src(最新的据我所知是40kb大小,有比较全的features)
二:搭建RHEL
1、安装vmware:本章节详见另一个文档。
文档名为“vmware安装手册”。
还有一份汉化包,需要可自行下载。
2、安装RHEL:本章详见另一个文档。
文档名为“RHEL6.3安装手册”。
Ps:有一个页面会让你选择安装的软件包,这个时候人工勾上所有的软件包,不然启eda 工具的时候会发现很多系统库找不到。
三:vmware tools安装
1、以root用户进入linux,找到左上角的VM选项,下拉之后选择安装wmware
tools。
过一会儿会弹出来一个框框,显示vmwaretools-9.2.2-893683.tar.gz
然后新开一个终端,输入cd /media 你会看到vmwaretools-9.2.2-893683.tar.gz就在那里。
然后把他拷贝出来,后解压安装。
具体命令可以网上搜索。
四:license制作
License制作要用到上述的材料,具体详见另一个文档。
文档名为“license制作”。
将license文件,即synopsys.dat文件放到linux下的共享文件夹。
五:软件安装
注意:安装之前先确保可以使用共享文件夹,一般是cd /mnt/hgfs/共享文件夹名字。
拷贝文件都是从这里开始的。
1. 目录结构,本人以用户登录,建了/homr/hy/eda/synopsys 文件夹,下面是文件夹内部的
目录结构,仅供参考以及便于后面的说明
/eda/synopsys | ---- installer3.0
| ---- scl
| ---- license
| ---- dc200906
2. 安装installer,将installer
3.0 解压到installer 文件夹即可;
3、安装SCL
首先将scl下的两个tar包(scl_v10.9.3_common.tar 和scl_v10.9.3_linux.tar)放到scl/temp
文件夹中,不用解压缩,installer 会自动分析压缩包的。
然后进入到installer 文件中,运行./setup.sh 然后会提示选择安装源,选择
/eda/synopsys/scl/temp,按照提示继续向下,最后会提示安装路径,选择
/eda/synopsys/scl
即可。
4、然后安装DC。
将DC2009.06 的common 和linux 平台文件解拷贝到同一目录
/home/hy/eda/synopsys /dc2009.06 下.
切换到installer/3.0 目录里执行./setup.sh,启动installer 的图形安装界面。
当选择源
文件时,
选择common 和linux 两个文件所在的目录。
5、安装icc和pt都是同样的步骤。
六:修改环境变量
到此为止,需要的软件和license都已具备。
接下来才是关键之处,装软件并不会花太多时间,但是license的配置不当会让人很头疼。
注意:此时要以用户名登陆。
(A)修改synopsys.dat文件
这一步在license制作中已经做过,注意修改前两行的路径和hostname以及最后一行的hostid即可。
(B)编辑.bashrc文件(在主目录下:/home/hy/.bashrc)
使用vi打开.bashrc文件,在其末尾加上如下内容:
export SNPSLMD_LICENSE_FILE=27000@none
export
LM_LICENSE_FILE=/home/hy/eda/synopsys/license/synopsys.dat
###############################################
export dc_home=/home/hy/eda/synopsys/dc0906/dc
export PATH=$dc_home/bin:$dc_home/linux/bin:$PATH
export icc_home=/home/hy/eda/synopsys/icc0906/icc
export PATH=$icc_home/bin:$icc_home/linux/bin:$PATH
export pt_home=/home/hy/eda/synopsys/pt1212/pt
export PATH=$pt_home/bin:$pt_home/linux/bin:$PATH
第一行的none是我的主机名字,在linux下键入hostname即可得到主机名。
第二行是license文件的路径,注意不要打错了。
(C)编辑rc.local文件(所在目录为:/etc/rc.local)
此文件的作用是:当开启服务器后,就启动license管理程序:lmgrd。
使用vi打开rc.local文件,添加一下内容:
/home/hy/eda/synopsys/scl/10.9.3/linux/bin/lmgrd –c
/home/hy/eda/synopsys/license/synopsys.dat
-l /home/hy/eda/synopsys / lmgrd.log
具体路径由自己定.
改完rc.local后,用source .bashrc来更新.bashrc.
设置完后重启计算机,在/home/hy/eda/synopsys目录下的lmgrd.log 文件会
记录license 启动的情况.正常的话在文件末尾会有提示SSS feature 有效.
此时安装完成,在终端输入:dc_shell,如出现dc启动界面,那么恭喜你,安装成功了。
倘若出现报错,或者有一个出现报错,另外两个正常,请看附言,或许可以解决你的问题。
七:附言
按上述安装好后,如出现安装错误,一般都是license错误,或者环境变
量设置错误,或者没有启动license。
(1)如何检查license是否正确?
进入scl 目录下的linux/bin ,可以找到sssverify 这个文件,运行
"./sssverify
/home/hy/eda/synopsys/license/synopsys.dat",如果license 的SSS
feature 是正确的话,应该会给出类似于下面的提示信息。
#####################################
Checking the integrity of the license file....
Valid SSS feature found.
License file integrity check PASSED!
You may now USE this license file to start your license server.
Please don't edit or manipulate the contents of this license file.
#####################################
如果license是正确的,但仍有错误,则可以检查lmgrd.log来判断
licnese是否启动。
(2)查看lmgrd.log文件,具体路径为/home/hy/eda/synopsys / lmgrd.log,用vi打开,如果设置正确,会出现下列文字:
(snpslmd) Checking the integrity of the license file....
(snpslmd) Valid SSS feature found.
(snpslmd) The feature is needed to enable the other keys in your
license file.
注意,如果找不到lmgrd.log或者无内容,则要回过去检查
rc.local文件是否写正确。
正确的rc.local文件是只有一行的,我
当时就是因为换行来了一个回车,结果lmgrd.log死活不出来。
最后,仔细检查一下.bashrc文件,看看环境变量是否设置正确,
hostname是否写正确,仔细看看路径,有没有少一个$符号之类
的。
So,祝安装成功!!。