BigAnt使用手册 For AndroidV1.1
AudioToolkit V1.1.0使用说明书

话筒设置
在IP话筒的面板上按下菜单按键,移动光标选择设置,输入密码1234,然后选择广播模式,移动光标至本地广播,点击确认按键,然后再点击取消按键退出。
离线下载
1.打开离线下载工具,点击搜索,可以看见在线的同网段设备,然后点击保存
2.选择分区表,点击编辑。
3.在弹出界面中,输入分区编号、分区名称以及组号,再勾选设备添加进分区
里,然后点击添加,最后点击保存
4.点击保存之后,可以看见保存的分区和分区里的设备。
5.点击地址簿,选择编辑
6.在弹出界面中,输入地址簿编号、地址簿名称以及备注,再勾选设备添加进
地址簿里,然后点击添加,最后点击保存
7.点击保存之后,可以看见保存的地址簿和地址簿里的设备。
这时选择地址簿
下载。
8.在弹出界面中,输入话筒的IP地址,然后选择一个地址簿,点击下载。
成功
后即可退出。
9.下载成功以后,选择设备更新。
在弹出界面中点击全选,然后点击更新。
更
新成功后即可退出。
Android Auto 说明书

Android Auto ™ Connect a compatible Android phone to the system. Use the interface dial to make a phone call, listen to music, and more. Visit the Android Auto website for more information.Park in a safe place before connecting your Androidsmartphone and launching any compatible apps.1.Download the Android Auto app to your phone.2.Connect the phone to the USB port (2.5A) The phone is automatically paired. A tutorial also appears.Use these buttons to control Android Auto:•Smartphone: Enter Android Auto.•Interface dial: Select an item. Press the dial tomake the selection.•Back: Return to the previous screen.Maps (Navigation): View Google Maps and operate navigation. You can only use this system or the pre-installed navigation system to set a destination with routing guidance. You cannot enter destinations using the keyboard while thevehicle is moving.Phone : Make phone calls or listen to voicemail. While connected to Android Auto, calls can only be made through Android Auto, not through Bluetooth HandsFreeLink.Home (Google Now): Display useful information organized by Android Auto into simple cards that appear only when needed.Music : Play music from compatible apps. Select this icon to switch between music apps.Return to HOME screen : Go back to the vehicle system HOME screen.Voice : Use voice commands via Google Voice Search to operate Android Auto. You can also press and hold the Talk button on the steering wheel to say voice commands.Depending on use, Android Auto can share certain vehicle information (e.g., vehicle location, speed, and other operating conditions) with Google and its service providers. See Google privacy policy for details regarding Google’s use and handling of data uploaded by Android Auto. Use of Android Auto is at user’s own risk, and is subject to agreement to the Android Auto terms of use, which are presented to the user when the Android Auto application is downloaded to the user’s Android phone. Android Auto vehicle integration is provided “as is,” and Acura cannot guarantee Android Auto operability or functionality now or in the future due to, among other conditions, changes in Android Auto software/Android operating system, service interruptions, or incompatibility or obsolescence of vehicle-integrated hardware or software. See dealer for details. Only use Android Auto when conditions allow you to do so safely. See your Owner’s Manual on the Owner Information CD or at forfurther license and warranty terms.。
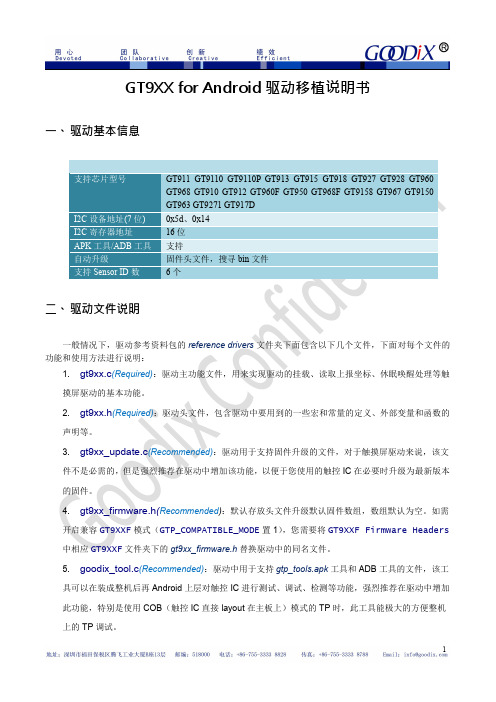
GT9XX驱动移植说明书_for_Android_2014011401
键,先在 ON/OFF define 中打开 GTP_HAVE_TOUCH_KEY 开关,然后再参照以下设置按 键,按键的功能和顺序请在 GTP_KEY_TAB 中按需调整。
//*********************PART1:ON/OFF define************************* #define GTP_HAVE_TOUCH_KEY 1 //*********************PART2:TODO define**************************** …… //STEP_4(optional):If this project have touch key,Set touch key config. #if GTP_HAVE_TOUCH_KEY
static struct i2c_board_info i2c_devs0[] __initdata = {
{ I2C_BOARD_INFO("Goodix-TS", 0x5d),}, };
4. 修改参考代码:一般情况下,移植过程中只需修改 gt9xx.h 文件中的内容即可,打开该头文件,按 照注释中的提示移植,重点注意 TODO part 的修改即可。 (1) STEP1 替换配置信息表(REQUIRED):将对应于您正在使用 TP 的配置信息(一般为 TP 厂提
#define GTP_MAX_WIDTH 800 #define GTP_MAX_HEIGHT 480 #define GTP_MAX_TOUCH 5 #define GTP_INT_TRIGGER 0 #else #define GTP_MAX_WIDTH 4096 #define GTP_MAX_HEIGHT 4096 #define GTP_MAX_TOUCH 5 #define GTP_INT_TRIGGER 1 #endif
mini2440 开发板之 andriod 说明书

mini2440开发板之andriod使用手册潘应云(南京师范大学,panyingyun@,QQ:29548754,848682821)提供第一部分:内核映像及文件系统介绍 (1)第二部分:使用说明 (1)开发平台:RedHat 9.0 + mini2440开发板使用内核版本类型:linux-2.6.25-android-1.0_r1.tar.gz下载地址:/p/android/downloads/list交叉编译器:arm-2008q3-72-arm-none-linux-gnueabi-i686-pc-linux-gnu.tar.bz2下载地址:/sgpp/lite/arm/portal/release642或者直接复制下面地址/sgpp/lite/arm/portal/package3686/public/arm-none-eabi/arm-2 008q3-66-arm-none-eabi-i686-pc-linux-gnu.tar.bz2第一部分:内核映像及文件系统介绍1、zImage:andriod内核映像文件。
支持触摸屏(目前没有校屏程序,点击不太准),支持nfs文件系统启动,支持RTC(可以正确显示google时钟),支持DM9000网卡,支持yaffs文件系统,电源管理等。
2、nfs_root_andriod.tar.gz:nfs方式启动文件系统,可以看到很绚丽的google大钟和google浏览器。
3、final_config.rar:内核配置文件(可以自己用命令mv final config .config 放到内核下进行编译)。
(为何不提供yaffs文件系统而采用NFS启动方式:主要原因是mini2440开发板提供的nand flash太小,只有64M空间,这里需要至少80M的空间)第二部分:使用说明(注意:开发环境和redhat9.0系统的安装大家可以参考mini2440开发板手册。
Orbix Enterprise Integrator 1.1 安装指南说明书

Installation GuideVersion 1.1, July 2003Orbix, IONA Enterprise Integrator, Enterprise Integrator, Orbix E2A Application Server, Orbix E2A XMLBus, XMLBus , are trademarks or registered trademarks of IONA Tech-nologies PLC and/or its subsidiaries.IONA, IONA Technologies, the IONA logo, Making Software Work Together, IONAe-Business Platform, and Total Business Integration are trademarks or registered trade-marks of IONA Technologies PLC and/or its subsidiaries.Java and J2EE are trademarks or registered trademarks of Sun Microsystems, Inc. in the United States and other countries.CORBA is a trademark or registered trademark of the Object Management Group, Inc. in the United States and other countries. All other trademarks that appear herein are the property of their respective owners.While the information in this publication is believed to be accurate, IONA Technologies PLC makes no warranty of any kind to this material including, but not limited to, the implied warranties of merchantability and fitness for a particular purpose. IONA Technologies PLC shall not be liable for errors contained herein, or for incidental or consequential damages in connection with the furnishing, performance or use of this material.COPYRIGHT NOTICENo part of this publication may be reproduced, stored in a retrieval system or transmitted, in any form or by any means, photocopying, recording or otherwise, without prior written consent of IONA Technologies PLC. No third party intellectual property right liability is assumed with respect to the use of the information contained herein. IONA Technologies PLC assumes no responsibility for errors or omissions contained in this book. This publica-tion and features described herein are subject to change without notice.Copyright © 2001–2003 IONA Technologies PLC. All rights reserved.All products or services mentioned in this manual are covered by the trademarks, service marks, or product names as designated by the companies who market those products.Updated: 01-Aug-2003ContentsChapter 1 Installing IONA Artix1 Before You Begin2 Prerequisites3 Installing IONA Artix6 Licensing IONA Artix Manually9 Setting up the IONA Artix Environment10 Installing Artix With IONA Application Server Platform12iCONTENTS iiCHAPTER 1Installing IONAArtixThis chapter describes the prerequisites for successfulinstallation of IONA Artix.In this chapter This chapter discusses the following topics:Prerequisites page3Installing IONA Artix page6Licensing IONA Artix Manually page9Setting up the IONA Artix Environment page101CHAPTER 1 | Installing IONA ArtixBefore You BeginRead the Release Notes Before installing IONA Artix, visit the Documentation Web Page at:/support/docs/artix/1.1/index.xmland check for updates to this Installation Guide.2Prerequisites PrerequisitesOperating Systems Table1 shows the required patches and C++ and Java Runtimes for allsupported Operating Systems:Table 1:Supported Operating SystemsPlatform Required OS Patches; C++/Java RuntimeEnvironmentx86/Windows NT 4.0SP6a;C++ drivers msvcrt.dll, msvcirt.dll, andmsvcp60.dll;Java (JRE or SDK) 1.4.1x86/Windows 2000SP3;C++ drivers msvcrt.dll, msvcirt.dll, andmsvcp60.dll;Java (JRE or SDK) 1.4.1x86/Windows XP C++ drivers msvcrt.dll, msvcirt.dll, andmsvcp60.dll;Java (JRE or SDK) 1.4.1SPARC/Solaris 8108827-12;108434-09: (32 bits C++ runtime);108827-12 (libthread patch);Java (JRE or SDK) 1.4.1 and its recommendedOS patches.SPARC/Solaris 9Java (JRE or SDK) 1.4.1 and its recommendedOS patches.3CHAPTER 1 | Installing IONA ArtixTable 1:Supported Operating SystemsPlatform Required OS Patches; C++/Java RuntimeEnvironmentPA-RISC/HP-UX 11PHSS_25170: aCC runtime;PHSS_24627: aCC runtime;PHSS_21075: varargs.h and +DA2.0W;PHSS_23699: libcl;PHSS_24303: dld;PHCO_24148: libc;Java (JRE or SDK) 1.4.1 and its recommendedOS patches.PA-RISC/HP-UX 11i PHSS_24638: aCC runtimePHCO_24402: 1.0 libc cumulative header filepatch 60PHCO_25452: 1.0 libc cumulative patch23632PHSS_24304: 1.0 ld(1) and linker toolscumulative patch 21234Java (JRE or SDK) 1.4.1 and its recommendedOS patches.x86/RedHat Linux 7.2GCC 3.2 runtime (libstdc++.so.5 andlibgcc_s.so[.1]); GCC 3.2 development;Java (JRE or SDK) 1.4.1Java Runtime Requirements The Java 2 Platform, Standard Edition (J2SE), previously called the JavaDevelopment Kit (JDK), contains the basic development kit and runtime forbuilding and running Java applications.Artix supports Java 2 Platform, Standard Edition (J2SE) version 1.4.1 orhigher for development on all supported platforms.Be sure to set JAVA_HOME to point to your JDK installation.For information on installing J2SE or the required patched, see Sun’s Javasite at /j2se.4Prerequisites5Development RequirementsIf you plan to use the Artix development tools or run any of the demos, you will need the following C++ compiler, depending on your platform:Additional Requirements Artix has the following additional requirements:•Artix support for the propagation of transaction contexts requires the presence of the IONA Application Server Platform (ASP), Standard or Enterprise Edition. Artix can use any version of ASP to provide this transaction functionality. ASP must be installed before Artix.•Running the demos and examples for IBM VisualAge MQSeries or BEA Tuxedo requires that MQSeries or Tuxedo be installed.Disk spaceA development installation of Artix takes the following disk space (plus some temporary disk space for unzipping the installer).UNIX: If the required space is not available in /tmp , you can set a different partition for use by InstallAnywhere by setting the environment variable IATEMPDIR to point to this partition.Table 2:C++ Compilers Supported by Artix PlatformC++ CompilerRequired PatchesWindows NT, 2000, and XP Microsoft Visual C++ 6.0SP 3Windows NT, 2000, and XP Microsoft Visual C++ 7.0HP-UX 11 and 11i aC++ A.03.31Solaris 8 & 9Sun C++ 5.3 (part of Forte 6 Update 2)111685-01Red Hat LinuxBinutils package 2.13[.9]Windows 33 MB Solaris 16 MB HP-UX21MBCHAPTER 1 | Installing IONA Artix6Installing IONA ArtixNotes•On UNIX platforms, the installer can be run in console mode if no windowing environment is available. To run in console mode use the -i console command line option.•Artix can be installed into the same directory tree as other IONAproducts, but installing the IONA Application Server Platform 6.0 after installing Artix may cause Artix to become unstable. (See “Installing Artix With IONA Application Server Platform” on page 12 for more details).Procedure To install Artix complete the following steps:1.Download the appropriate package file for your platform and uncompress it.2.Go to the folder into which you uncompressed the installation package and run the installer:WindowsTable 3:Artix Installation PackagesPlatform Installation PackageWindows artix_11_Windows.zip HP-UX artix_11_HP-UX.tar Solaris artix_11_SunOS.tar Red Hat Linuxartix_11_Linux.tarNote:If you copy the installer files to another location make sure and copy both the installer file and the associated folder for your platform.artix.exeInstalling IONA ArtixUnixartix.binor for console mode:artix.bin-i3.Click Next to begin the installation.4.Read the license agreement.5.Accept the licensing agreement by selecting "I accept the terms of theLicense Agreement" and click Next.6.Enter the name of the folder into which you want Artix installed andclick Next.Note:It is strongly recommended that you install Artix into the same directory tree as your other IONA products.7.On Windows systems, you will be asked to select where on the Startmenu to place shortcuts. Select a location and click Next.8.Choose what type of installation you want and click Next:♦Developer Tools and Runtime♦Runtime Tools Only9.UNIX: Specify the root folder for all of your Artix projects. You shouldhave read and write access to this location. Click Next.10.Windows: Specify if you want to set the system environment variablesIT_PRODUCT_DIR and PATH for all users on this system, just the current user, or not at all. Click Next.♦IT_PRODUCT_DIR specifies the root folder of your Artix installation.♦PATH is appended with the Artix bin directories.11.Specify if you would like to associate .iap files with Artix Designer..iap files are the project files used by Artix to store project information.Click Next.12.Review your installation information then click Install.CHAPTER 1 | Installing IONA Artix13.When the installer finishes installing the Artix files, it launches theLicense Installer. Click Browse to locate your license file. The licenseinstaller will append your licenses automatically to any existing IONAlicense file or create a new file in the default location. If you wish toinstall the licenses by hand click Cancel. For more information see“Licensing IONA Artix Manually” on page9.14.Click Done to finish the installer.Licensing IONA Artix Manually Licensing IONA Artix ManuallyGetting a license You should receive your license file by e-mail. This file will need to be savedto a location on your hard drive. If you have other IONA products installed,this license file will be used to extend the license file you already haveinstalled. The license file needs to be accessible by all systems where Artixprocesses run.Installing the license Adding Artix licenses to an existing license fileIf you already have licensed IONA products you will have a valid license file.To ensure that your existing licenses are not overwritten by the ArtixLicenses, you will want to use a text editor to append the Artix licenses toyour existing license file.Installing to the default locationTo install the license file to the default location, copy the license file to thefollowing location:Windows%IT_PRODUCT_DIR%\artix\1.1\etc\licenses.txtUNIX/etc/opt/iona/licenses.txtYou must set IT_LICENSE_FILE to point to your license.Windowsset IT_LICENSE_FILE=license_fileUNIXexport IT_LICENSE_FILE=license_fileWARNING:If you have other licensed IONA products installed, settingIT_LICENSE_FILE may cause your existing products to stop working.Please see “Adding Artix licenses to an existing license file” on page9.CHAPTER 1 | Installing IONA Artix Setting up the IONA Artix EnvironmentEnvironment variablesYou must set the environment variable IT_PRODUCT_DIR to point to your Artix installation.Windows Depending on how you responded, this may have been set during the installation.UNIX Setting the Artix runtimeenvironmentBefore you can run any Artix-based processes you must set up the runtime environment. To set the runtime environment do the following:Windows UNIX This script modifies the system path so that the Artix bin directory is in the path and also modifies the shared library path to include the Artix shared library directory.Verifying the environmentTo verify that the Artix environment is correctly set up, cd to IT_PRODUCT_DIR and type the command:You should see the following:set IT_PRODUCT_DIR=install_dir export IT_PRODUCT_DIR=install_dir >cd %IT_PRODUCT_DIR%\artix\1.1\bin >artix_env %cd $IT_PRODUCT_DIR/artix/1.1/bin %.artix_env wsdltocppSetting up the IONA Artix EnvironmentWSDL URL has to be specifed!WSDLToCPP Usage:java artix.WSDLToCppClient[options]{WSDL-URL}[-e Web-service-name][-t port][-b binding-name][-d output-directory][-n namespace][-impl[-m{-NAME|-UNIX}]|-jp plugin-class-name][-f][-v][-license][-?]CHAPTER 1 | Installing IONA ArtixInstalling Artix With IONA Application Server PlatformInstallation It is recommended that you install Artix into the same directory tree asApplication Server Platform 6.0. You should install Application ServerPlatform 6.0 first.Also, if you are going to apply Application Server Pack 6.0 service pack 1,you should install it before installing Artix.Environment variables All IONA products use two environment variables to get their configurationand licensing information: IT_PRODUCT_DIR and IT_LICENSE_FILE. If youaccept all installer defaults and follow the procedure to add your Artixlicense to your existing license file (“Adding Artix licenses to an existinglicense file” on page9), there will be no conflicts.However, if you choose to install Artix in a different directory tree thanApplication Server Platform 6.0 or choose to keep your Artix licensesseparate from your ASP licenses, you will need to set IT_PRODUCT_DIR andIT_LICENSE_FILE to point to the correct locations.IDL compiler Currently, the Artix IDL compiler and the Application Server Platform 6.0IDL compiler use separate configuration files. It is suggested that you setyour environment to Artix using the artix_env script to use the Artix IDLcompiler. To use the Application Server Platform IDL compiler, set yourenvironment for an Application Server Platform domain.You can merge the configuration files for the two IDL compilers, but that isnot supported at this time.。
安卓系统使用教程
安卓系统手机全面使用教程~~~~~~~~~~扫盲贴相信很多朋友在购买了安卓系统手机之后,都被这样那样的小问题困扰着·~~发此贴的目的就是为了解决题,如果写的不够好不够详细请大家提出来我再做补充。
这里我们以HTC G10 为例,那些比较细致的,比如安装电池,SIM卡,TF卡之类的内容,这里就略过了一:按键用途介绍HOME键,小房子-在任何程序或者界面内按此键可以立即回到待机主界面设置界面,MENU-打开设置菜单。
返回键,不用多做介绍了吧搜索键,同上。
安卓机器都差不多摸索下就可以。
二:设置篇。
1. 语言设置,这里以其他语言设置中文为例。
请看截图~~~~首先我们看到的是英文待机界面按MENU键调出设置菜单点击设置键菜单往下拉选择LANGUAGE选项选择第一项选择中文这样语言就设置好咯~~~2.网络设置--安装海卓APN软件设置如下图选择一键设置APN信息就行了,如果不行的话,打开手机设置-无线和网络设置-移动网络设置-数据漫游打开就以了。
如果某天你突然不能上网了建议重新设置下APN信息,最好重启下就可以上网了备注:安卓系统吸流量比较厉害,见过N个不到1个星期欠费500+的人了,都是流量费用,建议不上网的时关闭GPRS上网海卓内有开关的不用多说,当然也可以创建小插件到桌面上,后面会有说到。
3.输入法设置----这个在我第一次用安卓手机的时候也让我纠结了一下首先在91里下载安装自己比较喜欢的输入法,这里推荐搜狗和讯飞语音输入法,狗狗就是拼音,讯飞有拼语音,及手写输入。
安装好之后设置如下图进到设置选择语言和键盘勾选已安装的输入法进入到短信界面新建短信-长按文字输入窗口不松跳出输入法选项选择自己喜欢的输入法就可以了以后不需要重复选择。
4.桌面图标设置-可以把自己常用的图标拖放到桌面上以方便使用打开主程序菜单选择自己想要放在桌面的程序长按不松直接就出现在待机菜单上了放在自己喜欢的位置上就可以了在待机界面上长按程序图标不松拖到垃圾桶就可以删除该图标。
SBIG ESrvWin 软件操作手册说明书
ESrvWin Software Operating ManualVersion 1.1June 18, 2003Santa Barbara Instrument Group147 A Castilian DriveSanta Barbara, CA 93117Phn: (805) 571-7244 Fax: (805) 571-1147 Web: Email:<*************>IntroductionThank you for buying SBIG’s ESrvWin Software (E thernet Serv er for Win dows). This package allows you to talk to your Parallel Port or USB based SBIG Camera (ST-7, ST-8, etc.) on a remote Ethernet Equipped PC through an Ethernet network as though it were connected directly to your PC. This makes it easy to talk to a camera/server in your backyard observatory from the comfort of your house. While the Parallel and USB Ports of most computers can be extended to 50 feet and possibly further, Ethernet cables on networks can be hundreds of feet in length.What’s RequiredSBIG’s ESrvWin software is a 32-Bit Console program that runs under 32 bit Windows, including Windows 95/98, Windows Me, Windows NT, Windows 2000 and Windows XP.A typical installation is shown in the figure below:You’ll need a computer in the remote site with 32 Bit Windows, an Ethernet card and a Parallel or USB port, depending on the type of camera you have. That’s where you run the ESrvWin software. On the Local side, you’ll need 32 Bit Windows and an Ethernet connection. That’s where you run the CCDOPS software. That’s all there is to it!SetupYou need to install the CCDOPS Version 5 and ESrvWin software from the floppy disks or CD-ROMS they came on. Install these programs on both the Remote Server and the Local PC. That way you can run CCDOPS from the Server while you’re setting up the Telescope and focusing the camera and then exit CCDOPS and run the ESrvWin software for remote use. Installing CCDOPS and ESrvWin varies depending on the version of Windows you are running:• Windows NT/ Windows 2000/Windows XPo Log in as the Administratoro Run the CCDOps Installero Make sure you Update your drivers in the SBIG Driver Checker program by clicking the Update button.• Windows 95/98/Meo Run the CCDOps Installero Make sure you Update your drivers in the SBIG Driver Checker program by clicking the Update button.ESrvWinAs mentioned above, the ESrvWin program is a 32-Bit Console program. You can run it by double clicking on the icon or you can run it from the DOS prompt. The program has default settings (serving LPT1) that are invoked by double-clicking the icon. From the DOS prompt you can configure the program with the following command line:C:\>ESRVWIN [LPTPORT] [u]where [LPTPORT] is an optional 1, 2 or 3 indicating the LPT Port you want served and [u]is an optional switch indicating that you want to server the USB port. Again, if you don’t provide one or the other optional parameters EsrvWin it defaults to serving LPT1.In the section below, CCDOPS will need to know the IP address of the remote server. When you run ESrvWin it shows you this information as shown below:C:\ >Program Files\SBIG\CCDOPS5\ESRVWINESRVWIN.EXE Parallel/USB Server Ver 1.1...Usage:ESrvWin [lptPort] [u] (lptPort=1,2 or 3, u=USB)Determining LPT1 address...(Addr=0x0378 - OK)Opening SBIGUDrv driver for LPT1...(OK)Server Name :matts866p3Server Address:192.168.0.24Waiting for client to link (hit Ctrl-Break to abort)...CCDOPSRun CCDOPS and use the Graphics/Comm Setup item in the Misc menu. Select Ethernet for the Interface and enter the IP Address as reported by ESrvWin then hit the OK button:At this point you should be able to use the Establish Link command in the Camera Menu to establish a link to the camera as reported in the lower-right corner of the CCDOPS window:At this point you can use CCDOPS just like the camera were attached to your local LPT or USB port.Note that you can run ESrvWin and CCDOPS on the remote server machine to get this working. Then exit from CCDOPS on the remote server and run it on the local machine. If you are not able to establish a link try the following trouble-shooting guide: • Make sure you are using CCDOPS Version 5 or later (with the Gold Icon, not theBlack Icon) or that your third party software has been updated to support SBIG’sUniversal Driver with Ethernet connectivity.• Make sure your drivers are up to date by downloading the SBIG Driver Checker software from our web site and Updating your drivers.• Make sure that both machines (remote and local) are plugged into the Ethernet network and have different IP addresses. Use the Ping utility to verify that the twomachines can talk to one another.• Make sure the camera is connected to the remote server and is powered up. Try talking to the camera from CCDOPS on the remote machine without ESrvWinrunning, configuring CCDOPS to use the LPT or USB port directly rather that theEthernet port.• Check the settings you have used for the IP address on the local machine and that ESrvWin is running and that CCDOPS is not running on the remote machine.。
Kiwi 2+ Android用户手册说明书
Your smartphone is now a powerful automotive tool.Kiwi 2+ Android User ManualV0.99ContentsSetup (2)1.Locate your car’s OBDII port and plug in Kiwi 2+ (2)2.Pair Kiwi 2+ (2)unch your favorite app and enjoy (2)4.Configuring specific apps (3)Troubleshooting (4)Kiwi 2+ Indicator Lights (4)Kiwi 2+ does not have power (no lights) (4)Kiwi 2+ will not connect (BT continues to blink after app is launched) (5)Kiwi 2+ connected, but does not receive data from OBDII port (5)Apps for All (6)OBD Car Doctor– simple, intuitive OBD tools and gauges (6)Torque– for the car enthusiast who wants it all. (7)Harry’s LapTimer– for the driver that lives for the track (8)OBD Auto Doctor– The most popular app available for Android, iOS, and Windows (9)DashCommand– a comprehensive tuner's toolbox. (10)SetupConfiguring Kiwi 2+1.Locate your car’s OBDII portand plug in Kiwi 2+Most cars have OBD located on the driver’s side below the steering wheel.By OBD standards the connector must be located within three feet of the driver and must not require any tools to be revealed. If your OBD port is not visible in plain sight trying looking under the dash, behind ashtrays, and around/in fuse boxes.2.Pair Kiwi 2+Open your Android phone’s Bluetooth Settings and select Scan.Select PLXDevices and pair. If prompted for a passkey enter 1234unch your favorite app and enjoySome apps may need additional configuration. Please see the next section for details. Need help choosing an app? Skip to Apps for All (Page 6)4.Configuring specific appsTorque Lite / Torque Pro 1.Go to the Torque home screen (says TORQUE across the top)2.Click the gear icon in the bottom left corner of the screen3.Select Settings > OBD2 Adapter Settings > Connection Type4.Make sure that Bluetooth is selected5.Select Choose Bluetooth Device6.Select your Kiwi (PLXDevices–XXXX)Torque should automatically connect and reconnect in the future.OBD Auto Doctor 1.From the OBD Auto Doctor home screen select your phones menu button (usually or ) and select Settings2.Verify that the selected Connection Method is Bluetooth3.Under Bluetooth device select Search/Change4.Select your Kiwi (PLXDevices–XXXX)5.Select your phones back button6.Select CONNECTOBD Auto Doctor should now connect with your Kiwi 2+ and ECU.Harry's LapTimer Rookie / Petrolhead / Grand Prix 1.From LapTimer’s home screen select Admin > Sensor list (You can also select the menu button in button in the top right corner of any screen and select Switch view … > Settings)2.Select the Add Bluetooth () button3.Select your Kiwi (PLXDevices–XXXX)(If Harry’s does not automatically connect, click on the sensors name leave the field blank and select Set and OK)4.Select OBDHarry's should automatically connect and reconnect in the future.OBD Car Doctor 1.Select the menu button at the top right corner of the screen and select Configuration > Connection > Connection mode2.Make sure that Bluetooth (not Kiwi 3) is selected3.Select BT connection4.Select your Kiwi (PLXDevices–XXXX)5.Tap your phone’s back button twice to return to the main menu6.Select connectDashCommand 1. Select Connect (DashCmd can take up to 30 seconds to connect.)2.If DashCommand fails to connect select Settings >OBD-II Input Type and ensure that ELM is selectedTroubleshootingKiwi 2+ Indicator LightsKiwi 2+ does not have power (no lights)A.Disconnect and reconnect Kiwi 2+ ensuring that the device is firmly connected toyour car’s OBDII port.B.Test your Kiwi 2+ in another vehicle (again ensuring that the device is firmlyconnected to the OBDII port)a.If Kiwi 2+ works on the other vehicle– Kiwi 2+’s hardware is functioningproperly. Check with your local car manufacturer/dealer to verify the healthof your car’s OBD port.Kiwi 2+ will not connect(BT continues to blink after app is launched)A.Make sure your vehicle is turned on.B.Verify that your Bluetooth is turned on (On most devices go to Settings > Bluetooth)C.Verify that the app version you have is currentApp VersionDashCommand 4.6.12OBD Car Doctor 5.0.0OBD Auto Doctor 2.6.2Harry's LapTimer 19.0.29Torque 1.8.80D.Relauncha.Restart you smart deviceb.Disconnect and reconnect Kiwi 2+ ensuring that the device is firmlyconnected to your car’s OBDII port (PWR should be solid and BT shouldbe blinking)c.Relaunch the app on your smart deviceKiwi 2+ connected, but does not receive data from OBDII port Array(PWR and BT are solid but OBD and APP are idle)A.Verify that your vehicle is turned onB.Follow the troubleshooting steps for ‘Kiwi 2+ will not connect’ (above)Apps for AllChoose the Right App for YouKiwi 2+ supports a variety of industryapps for every level of car enthusiast.The following apps can be downloadedfrom iTunes App Store, Google PlayStore, and Windows App Store(depending on operating systemavailability).OBD Car Doctor– simple, intuitive OBD tools and gauges Operating System: Android and iOS / iPhoneOBD Car Doctor (free) features:§Check engine light code readerand reset§Real-time gauges and dataincluding speed, rotation,temperature, pressure, andlambda§Fuel economy trackerOBD Car Doctor Pro features:§Real-time parameter recording§Multiple parameters display§Parameter recorder (with background mode)§View and sending recorded parameters traces§GPS supportTorque– for the car enthusiast who wants it all.Operating System: AndroidTorque Lite (free) features:§Fully customizable real-timegauges§Check engine light codereader and reset§Massive fault code databasefor lookup of fault codes fromdifferent manufacturers§Dynamometer (Dyno)including horsepower, torque,and transmission temp§Turbo boost feature forvehicles that support MAP and MAF sensorsTorque Pro features:§Support for more vehicles and ECU types§Cleaner user interface without ads§Alarms and warnings (for example if your coolant temperature goes over 120ºC)§Video Track Recorder with real-time gauges and mapping overlay§Fully customizable dashboard, profiles, and themes§AIDL API for third party apps,§Horsepower, Torque, 0-60 , and quarter mile tests§Data logging / graphing§Map / track views§ABS / Knock sensor§And much more ...Harry’s LapTimer– for the driver that lives for the track Operating System: Android and iOSHarry’s LapTimer Rookiefeatures:§Lap time and data recording§Support for dozens ofexternal GPS and OBDsensors§State of the art predictive laptiming§Repository of more than 750tracks world wide§Upgradeable to Petrolhead and Grand Prix editionsHarry’s LapTimer Petrolhead features:§Everything from Rookie Edition§Video recording and overlaying (including Picture in Picture)§Realtime / Online View showing your peers§Enhanced data analytics§Full range of timer and specialized viewsHarry’s LapTimer GrandPrix features:§Everything from Petrolhead and Rookie Editions§Professional sensor support (>20 Hz GPS, engine data)§Video reference lap comparison§MultiCam for iOS devices, GoPro HERO and Sony cams§Even more enhanced data analyticsOBD Auto Doctor– The most popular app available for Android, iOS, and WindowsOperating Systems: Android, iOS / iPhone, and Windows PhoneOBD Auto Doctor (free with in-app purchases) features:§Smog readiness monitor indicates whether or notyour car is ready for emissions testing§Diagnostic Trouble Codes (DTCs) reader forreading, freeze framing, and clear the codes andMIL§Fuel consumption monitor for gas and diesel§Real-time OBD-II parameter and sensor fordetecting abnormalities§OBD-II monitor including numerical or graphicalpresentation§Support for multiple electronic control units suchas engine, transmission, etc.10 DashCommand– a comprehensive tuner's toolbox.Operating Systems: iPhone onlyDashCommand features:§Performance gauges includingengine speed, corrected vehicle speed, open/closed loop, boost/vacuum combo,acceleration, braking, and torque§Fuel economy includinginstant fuel economy, averagefuel economy, distance to empty, time to empty, fuel level %, fuel remaining, fuel flow rate gauge§Engine gauges including timing/spark advance, engine coolant temp, intake airtemp, ambient air temp, manifold absolute pressure, mass air flow, fuel trims (short and long term), percent engine load, catalyst temp, fuel pressure, air/fuel ratio T §Trip computer that maintains stats for up to 5 trips and includes distance travelled,fuel consumed, average fuel economy, fuel cost, elapsed time, drive time, average carbon dioxide emission rate, total carbon dioxide emission, start date & time §Emissions Testing allowing you to read and clear diagnostic trouble codes and know your IM readiness status§Professional skid pad showing lateral and acceleration/braking Gs with min/max indicators.§And much more ...。
Android Auto 使用说明书
FeaturesAndroid AutoWhen you connect an Android phone to the Display Audio system via the 1.5A USB port, Android Auto is automatically initiated. When connected via Android Auto, you can use the audio/information screen to access the Phone, Google Maps (Navigation), Google Play Music, and Google Now functions. When you first use Android Auto, a tutorial will appear on the screen.We recommend that you complete this tutorial while safely parked before using Android Auto.1Android AutoTo use Android Auto, you need to download the Android Auto app from Google Play to your smartphone.Only Android 5.0 (Lollipop) or later versions are compatible with Android Auto.Bluetooth A2DP cannot be used with Android Auto phone.Park in a safe place before connecting your Android phone to Android Auto and when launching any compatible apps.To use Android Auto, connect the USB cable to the 1.5A USB port. The USB port in the center console storage will not enable Android Auto operation.When your Android phone is connected to Android Auto, it is not possible to use the Bluetooth ® Audio. However, other previously paired phones can stream audio via Bluetooth ® while Android Auto is connected.Featuresa Maps (Navigation)Display Google Maps and use the navigation function just as you would with your Android phone. When the vehicle is in motion, it is not possible to make keyboard entries. Stop the vehicle in a safe location to undertake a search or provide other inputs.Only one navigation system (pre-installed navigation or Android Auto) can give directions at a time. When you are using one system, directions to any prior destination set on the other system will be canceled, and the system you are currently using will direct you to your destination.The audio/information screen shows you turn-by-turn driving directions to your destination.b Phone (Communication)Make and receive phone calls as well as listen to voicemail.c Google Now (Home screen)Display useful information organized by Android Auto into simple cards that appear just when they’re needed.■Android Auto Menu1Android AutoFor details on countries and regions where Android Auto is available, as well as information pertaining to function, refer to the Android Auto homepage.Screens may differ depending on the version of the Android Auto app you are using.Android Auto Operating Requirements & LimitationsAndroid Auto requires a compatible Android phone with an active cellular connection and data plan. Your carrier’s rate plans will apply.Changes in operating systems, hardware, software, and other technology integral to providing Android Auto functionality, as well as new or revisedgovernmental regulations, may result in a decrease or cessation of Android Auto functionality and services. Honda cannot and does not provide any warranty or guarantee of future Android Auto performance or functionality.It is possible to use 3rd party apps if they arecompatible with Android Auto. Refer to the Android Auto homepage for information on compatible apps.Android Auto IconModels with navigation systemFeaturesd Music and audioPlay Google Play Music and music apps that are compatible with Android Auto.To switch between music apps, press this icon.e Go back to the Home Screen.f VoiceOperate Android Auto with your voice.When you connect an Android phone to the unit via the 1.5A USB port, Android Auto is automatically initiated.■Enabling Android AutoEnable Once : Allows only once. (Prompt shows again next time.)Always Enable : Allows anytime. (Prompt does not show again.)Cancel : Does not allow this consent.You may change the consent settings under the Smartphone settings menu.■Auto Pairing Connection1Enabling Android AutoOnly initialize Android Auto when you safely parked. When Android Auto first detects your phone, you will need to set up your phone so that auto pairing is possible. Refer to the instruction manual that came with your phone.You can use the method below to change Android Auto settings after you have completed the initial setup:Press the button Select Settings Smartphone Android AutoUse of user and vehicle informationThe use and handling of user and vehicle information transmitted to /from your phone by Android Auto isgoverned by the Google’s Privacy Policy.Features Press and hold the talk button to operate Android Auto with your voice.■Operating Android Auto with Voice Recognition1Operating Android Auto with Voice RecognitionBelow are examples of commands you can give withvoice recognition:•Reply to text.•Call my wife.•Navigate to Honda.•Play my music.•Send a text message to my wife.•Call flower shop.For more information, please refer to the AndroidAuto homepage.You can also activate the voice recognition functionby pressing the icon in the upper-right corner ofthe screen.(Talk) button:Press and hold to operate Android Auto with your voice.Press and release to activate standard voice recognition system.(Hang-up/back) button:Press to deactivate voice recognition.FeaturesLegal Information on Apple CarPlay/Android AutoUSE OF APPLE CARPLAY IS SUBJECT TO YOUR AGREEMENT TO THE CARPLAY TERMS OF USE, WHICH ARE INCLUDED AS PART OF THE APPLE iOS TERMS OF USE. IN SUMMARY, THE CARPLAY TERMS OF USE DISCLAIM APPLE AND ITS SERVICE PROVIDERS’ LIABILITY IF THE SERVICES FAIL TO PERFORM CORRECTLY OR ARE DISCONTINUED, STRICTLY LIMIT APPLE AND ITS SERVICE PROVIDERS’ OTHER LIABILITIES, DESCRIBE THE KINDS OF USER INFORMATION (INCLUDING, FOR EXAMPLE, VEHICLE LOCATION, VEHICLE SPEED, AND VEHICLE STATUS) BEING GATHERED AND STORED BY APPLE AND ITS SERVICE PROVIDERS, AND DISCLOSE CERTAIN POSSIBLE RISKS ASSOCIATED WITH THE USE OF CARPLAY, INCLUDING THE POTENTIAL FOR DRIVER DISTRACTION. SEE APPLE’S PRIVACY POLICY FOR DETAILS REGARDING APPLE'S USE AND HANDLING OF DATA UPLOADED BY CARPLAY.USE OF ANDROID AUTO IS SUBJECT TO YOUR AGREEMENT TO THE ANDROID AUTO TERMS OF USE WHICH MUST BE AGREED TO WHEN THE ANDROID AUTO APPLICATION IS DOWNLOADED TO YOUR ANDROID PHONE. IN SUMMARY, THE ANDROID AUTO TERMS OF USE DISCLAIM GOOGLE AND ITS SERVICE PROVIDERS’ LIABILITY IF THE SERVICES FAIL TO PERFORM CORRECTLY OR ARE DISCONTINUED, STRICTLY LIMIT GOOGLE AND ITS SERVICE PROVIDERS’ OTHER LIABILITIES, DESCRIBE THE KINDS OF USER INFORMATION (INCLUDING, FOR EXAMPLE, VEHICLE LOCATION, VEHICLE SPEED, AND VEHICLE STATUS) BEING GATHERED AND STORED BY GOOGLE AND ITS SERVICE PROVIDERS, AND DISCLOSE CERTAIN POSSIBLE RISKS ASSOCIATED WITH THE USE OF ANDROID AUTO, INCLUDING THEPOTENTIAL FOR DRIVER DISTRACTION. SEE GOOGLE’S PRIVACY POLICY FOR DETAILS REGARDING GOOGLE’S USE AND HANDLING OF DATA UPLOADED BY ANDROID AUTO.■OWNER’S MANUAL LICENSE/LIABILITY STATEMENTSFeatures YOU EXPRESSLY ACKNOWLEDGE AND AGREE THAT USE OF APPLE CARPLAY OR ANDROID AUTO (“THE APPLICATIONS”) IS AT YOUR SOLE RISK AND THAT THE ENTIRE RISK AS TO SATISFACTORY QUALITY, PERFORMANCE, ACCURACY AND EFFORT IS WITH YOU TO THE MAXIMUM EXTENT PERMITTED BY APPLICABLE LAW, AND THAT THE APPLICATIONS AND INFORMATION ON THE APPLICATIONS IS PROVIDED “AS IS” AND “AS AVAILABLE,” WITH ALL FAULTS AND WITHOUT WARRANTY OF ANY KIND, AND HONDA HEREBY DISCLAIMS ALL WARRANTIES AND CONDITIONS WITH RESPECT TO THE APPLICATIONS AND INFORMATION ON THE APPLICATIONS, EITHER EXPRESS, IMPLIED OR STATUTORY, INCLUDING, BUT NOT LIMITED TO, THE IMPLIED WARRANTIES AND/OR CONDITIONS OF MERCHANTABILITY, SATISFACTORY QUALITY, FITNESS FOR A PARTICULAR PURPOSE, ACCURACY, QUIET ENJOYMENT, AND NON-INFRINGEMENT OF THIRD PARTY RIGHTS. NO ORAL OR WRITTEN INFORMATION OR ADVICE GIVEN BY HONDA OR AN AUTHORIZED REPRESENTATIVE SHALL CREATE A WARRANTY. AS EXAMPLES, AND WITHOUT LIMITATION, HONDA DISCLAIMS ANY WARRANTY REGARDING THE ACCURACY OF DATA PROVIDED BY THE APPLICATIONS, SUCH AS THE ACCURACY OF DIRECTIONS, ESTIMATED TRAVEL TIME, SPEED LIMITS, ROAD CONDITIONS, NEWS, WEATHER, TRAFFIC, OR OTHER CONTENT PROVIDED BY APPLE, GOOGLE, THEIR AFFILIATES, OR THIRD PARTY PROVIDERS; HONDA DOES NOT GUARANTEE AGAINST LOSS OF APPLICATION DATA, WHICH MAY BE LOST AT ANY TIME; HONDA DOES NOT GUARANTEE THAT THE APPLICATIONS OR ANY SERVICES PROVIDED THROUGH THEM WILL BE PROVIDED AT ALL TIMES OR THAT ANY OR ALL SERVICES WILL BE AVAILABLE AT ANY PARTICULAR TIME OR LOCATION. FOR EXAMPLE, SERVICES MAY BE SUSPENDED OR INTERRUPTED WITHOUT NOTICE FOR REPAIR, MAINTENANCE, SECURITY FIXES, UPDATES, ETC., SERVICES MAY BE UNAVAILABLE IN YOUR AREA OR LOCATION, ETC. IN ADDITION, YOU UNDERSTAND THAT CHANGES IN THIRD PARTY TECHNOLOGY OR GOVERNMENT REGULATION MAY RENDER THE SERVICES AND/OR APPLICATIONS OBSOLETE AND/OR UNUSABLE. TO THE EXTENT NOT PROHIBITED BY LAW, IN NO EVENT SHALL HONDA OR ITS AFFILIATES BE LIABLE FOR PERSONAL INJURY, OR ANY INCIDENTAL, SPECIAL, INDIRECT OR CONSEQUENTIAL DAMAGES WHATSOEVER, INCLUDING, WITHOUT LIMITATION, DAMAGES FOR LOSS OF PROFITS, CORRUPTION OR LOSS OF DATA, FAILURE TO TRANSMIT OR RECEIVE ANY DATA, BUSINESS INTERRUPTION OR ANY OTHER COMMERCIAL DAMAGES OR LOSSES, ARISING OUT OF OR RELATED TO THE APPLICATIONS OR YOUR USE OF OR INABILITY TO USE THE APPLICATIONS OR INFORMATION ON THE APPLICATIONS, HOWEVER CAUSED, REGARDLESS OF THE THEORY OF LIABILITY (CONTRACT, TORT OR OTHERWISE) AND EVEN IF HONDA WERE ADVISED OF THE POSSIBILITY OF SUCH DAMAGES. SOME STATES AND JURISDICTIONS DISALLOW THE EXCLUSION OR LIMITATION OF LIABILITY FOR DAMAGES, SO THESE LIMITATIONS AND EXCLUSIONS MAY NOT APPLY TO YOU. IN NO EVENT SHALL HONDA’S TOTAL LIABILITY TO YOU FOR ALL DAMAGES (OTHER THAN AS MAY BE REQUIRED BY APPLICABLE LAW IN CASES INVOLVING PERSONAL INJURY) EXCEED THE AMOUNT OF FIVE DOLLARS ($5.00). THE FOREGOING LIMITATIONS WILL APPLY EVEN IF THE ABOVE STATED REMEDY FAILS OF ITS ESSENTIAL PURPOSE.■DISCLAIMER OF WARRANTIES; LIMITATION ON LIABILITY。
GT9XX驱动移植说明书_for_Android_2014011401
3. gt9xx_update.c(Recommended):驱动用于支持固件升级的文件,对于触摸屏驱动来说,该文
件不是必需的,但是强烈推荐在驱动中增加该功能,以便于您使用的触控 IC 在必要时升级为最新版本 的固件。
4. gt9xx_firmware.h(Recommended):默认存放头文件升级默认固件数组,数组默认为空。如需
开启兼容 GT9XXF 模式(GTP_COMPATIBLE_MODE 置 1),您需要将 GT9XXF Firmware Headers 中相应 GT9XXF 文件夹下的 gt9xx_firmware.h 替换驱动中的同名文件。
5. goodix_tool.c(Recommended):驱动中用于支持 gtp_tools.apk 工具和 ADB 工具的文件,该工
obj-y += gt9xx.o gt9xx_update.o goodix_tool.o
3. 添加设备:找到 kernel 中初始化 I2C 总线的板级文件,如本驱动的开发平台 real6410 开发板是位 于 arch/arm/mach-s3c6410/ mach-smdk6410.c 文件中,如需要将触摸屏驱动挂载 I2C0 总线上,则按 以下方法添加 TP 的 i2c 设备驱动即可,0x5d 为该型号触控 IC 的 i2c 从设备地址,具体为多少需参阅 该型号芯片的 datasheet,”Goodx-TS”为 i2c 设备驱动名,必须与驱动参考代码中的 GTP_I2C_NAME 保持相同。
static struct i2c_board_info i2c_devs0[] __initdata = {
{ I2C_BOARD_INFO("Goodix-TS", 0x5d),}, };
- 1、下载文档前请自行甄别文档内容的完整性,平台不提供额外的编辑、内容补充、找答案等附加服务。
- 2、"仅部分预览"的文档,不可在线预览部分如存在完整性等问题,可反馈申请退款(可完整预览的文档不适用该条件!)。
- 3、如文档侵犯您的权益,请联系客服反馈,我们会尽快为您处理(人工客服工作时间:9:00-18:30)。
用户使用手册For Android V4.0
BigAnt用户手册For Android
目录
第一章 Android客户端的安装 (3)
1.1 Android软件环境 (3)
1.2 Android客户端安装方法 (3)
1.3 BigAnt登陆服务器设置 (3)
第二章 Android客户端的基本应用 (4)
2.1 客户端用户登录 (4)
2.2 通讯录 (5)
2.3 文档 (10)
2.4 即时通讯 (12)
2.5 消息中心 (16)
2.6 设置 (17)
2.7 搜索联系人 (19)
3
第一章 Android 客户端的安装
1.1 Android 软件环境
1.1.1 BigAnt 服务端版本为3.0及其以上版本;
1.1.2 手机安卓系统为4.0以及其以上版本。
1.2 Android 客户端安装方法
1.2.1 将安卓版本安装包保存到手机中,在手机的文件管理器中找到该安装文件并运行即可;
1.2.2 通过Android 应用管理软件将手机与电脑连接,直接在电脑上双击Android 安装包即可通过应用管理软件安装BigAnt 应用到手机。
1.3 BigAnt 登陆服务器设置
点击手机上的BigAnt 应用图标打开BigAnt 如下左图:
图1.1 登录界面 图1.2 登录设置 点击左图中的登录设置按钮打开如右图界面,服务器地址和端口与PC 端设置一致即可,设置后点击【保存设置】。
第二章 Android客户端的基本应用
本章主要介绍Android客户端的基本应用,例如用户登录、各个模块的基本功能等等,通过本章的介绍,用户可以实现BigAnt Android客户端大部分功能的应用。
2.1 客户端用户登录
点击手机上的BigAnt应用图标打开BigAnt如下图,帐号和密码与PC端登录填写的一致即可:
图2.1 BigAnt登录向导
支持客户端记住帐号、密码,其中,如果用户是该手机的主要使用者,则推荐将“自动登录”选项选中,那么,当打开应用时系统会自动为您登录,可以省略输入帐号和密码的登录步骤,直接进入BigAnt主界面。
如果您是在公网登陆BigAnt,服务器一栏请输入贵公司的固定IP或是域名。
2.2 通讯录
通讯录包括:单位联系人、个人联系人、个人群三个基本模块,如下图所示:
2.2.1 企业联系人
(1)组织和人员展示
企业联系人显示本单位内部所有的组织结构信息,可以在该模块下找到相应部门下的用户:
图2.2 通讯录图2.3 查看部门下人员
(2)打开聊天窗口:
在图2.3中显示的人员列表中点击某个人,将打开与他的聊天窗口,如下图:
图2.4 聊天窗口
(3)查看人员信息
在人员上“长按”将弹出【查看详细资料】菜单如图2.5所示,点击该菜单将切换到人员信息窗口如图2.6所示:
图2.5 查询资料菜单图2.6查询资料窗口点击图2.6中的【发送消息】按钮也可以打开对话窗口。
2.2.2 个人联系人
个人联系人中显示的是用户自己设置的联系人分组和成员如下图,其展示方式与企业联系人类似:
图2.7个人联系人
2.2.3 群组
群组中显示当前用户所有的固定群如图2.8,点击群可以打开群组聊天界面如图2.9:
图2.8群组列表图2.9 群组聊天
2.3 文档
文档包括【单位文档】和【个人文档】,用户可以在此查看、下载自己或公司保存的文件夹和文件,如图2.10所示:
图2.10 文档
点击文件夹将显示该文件夹下的文件和文件夹,如图2.11:
图2.11 文件夹
点击文件将打开文件信息页面,点击下载即可下载该文件,如下图:
图2.12 查看文件信息
2.4 即时通讯
BigAnt Android客户端即时通讯包括一对一聊天、临时群组会话、固定群组会话、接收系统公告等,且即时通讯支持发送表情、发送文件、发送语音短信。
2.4.1 一对一聊天
点击人员打开聊天窗口后进入一对一聊天模式如下图:
图2.13 一对一聊天
点击上图中左下角的表情按钮可以选择表情,如图:
图2.14 发送表情
点击加号按钮可以选择文件或录制语音短信发送,如下图:
图2.14 发送文件、语音短信
2.4.2 临时群组会话
在一对一聊天模式下,点击窗口右上角的按钮,打开选择人员的窗口,如下图:
图2.15 选择人员
可以选择人员将选中后确定,建立一个临时群组,临时群将在【消息中心】中显示,如下图:
图2.16 临时群组
2.4.3 固定群组
固定群组参照2.2.3 。
2.5 消息中心
消息中心显示所有的Android客户端聊天记录,包括一对一聊天记录,临时群记录、固定群记录和公告记录等,如下图:
图2.17 消息中心
2.6 设置
系统设置包括修改个人签名、修改密码、消息提醒设置、关于BigAnt和退出登录等功能,如下图:
图2.18 设置
2.6.1 修改签名
图2.19 修改签名2.6.2 修改密码
图2.20 修改密码2.6.3 消息提醒设置
图2.21 消息提醒设置
2.6.4 关于BigAnt
图2.22 关于BigAnt
2.7 搜索联系人
在组织结构比较复杂的情况下我们可以通过客户端的上搜索输入框输入用户的帐号或
用户名进行模糊查询,快速定位到用户,如下图:
图2.23 搜索联系人。