TF2000设计安装手册
HDSAMS2000系列安装配置手册
HDSAMS2000系列安装配置手册概述本文档为 HDSAMS2000 系列设备的安装与配置手册。
HDSAMS2000 系列是一款高性能的存储设备,具有优秀的扩展性和可靠性,适用于大型企业级应用场景。
本文将指导您完成:•设备的物理安装•设备的网络配置•设备的存储配置物理安装硬件配置在进行设备的物理安装前,需要确认您购买的设备配置是否满足您的要求。
以下为 HDSAMS2000 设备常用配置:•处理器:Intel Xeon E5 v3•存储:16 x 3.5 英寸热插拔 SAS/SATA HDD 或 32 x 2.5 英寸热插拔SAS/SATA HDD•内存:最大 512GB DDR4 ECC 内存•网络适配器:4 x 1GbE 或 2 x 10GbE + 2 x 1GbE物理连接将设备放置在机架中,并根据具体情况接入电源线和网线。
设备启动1.按下电源按钮以启动设备。
2.在设备启动时,系统将运行自检程序,您可以在屏幕上观察到相关信息。
3.当启动过程完成后,您可以尝试访问设备的管理界面。
网络配置HDSAMS2000 通过网络进行管理和访问。
网络接口HDSAMS2000 设备通常配备 4 个网络接口,其中 2 个是 10GbE,另外两个是1GbE。
您可以将这些接口连接到不同的网络中,以满足您的网络需求。
例如,您可以将其中一个 10GbE 接口连接到数据中心核心交换机,将另一个 10GbE 接口连接到存储区网络,将两个 1GbE 接口连接到管理网络。
IP 地址在配置网络之前,您需要为设备分配一个 IP 地址。
可以在设备的管理界面中进行以下操作:1.选择“网络设置”。
2.修改 IP 地址和子网掩码,然后单击“保存”。
VLAN 配置为了让您的网络更加灵活,HDSAMS2000 还支持 VLAN 配置。
您可以在设备的管理界面中进行以下操作:1.选择“网络设置”。
2.选择“VLAN”,然后单击“添加”。
3.输入 VLAN ID 和 VLAN 名称,然后单击“保存”。
威谱TDMx2000技术手册V3.4

威谱数字电话交换系统威谱通讯商务平台TDMx-2000型技术手册广州市华谱电子科技有限公司目录1.系统概述 (1)1.1. 系统简介 (1)1.2. 优势功能 (1)1.3. 产品规格 (2)1.3.1. 外观介绍 (2)1.3.2. 电源要求 (2)1.3.3. 环境要求 (2)1.3.4. D、F系列传输距离 (2)1.3.5. B2、X系列传输距离 (2)1.3.6. H系列传输距离 (2)1.3.7. 外形尺寸 (3)1.3.8. 重量 (3)1.3.9. 系统拓扑结构 (3)1.4. 结构与容量配置 (4)1.4.1. TDMx-2000型B2系列机柜 (4)1.4.2. TDMx-2000 型B2系列容量配置 (5)1.4.3. TDMx-2000 型X系列容量配置 (5)1.4.4. TDMx-2000型H系列容量配置 (6)1.4.5. TDMx-2000型D系列容量配置 (6)1.4.6. TDMx-2000型D系列DM主机容量配置 (7)1.4.7. TDMx-2000型F系列容量配置 (9)1.4.8. 机柜间连接 (11)1.4.9. 安装前的准备 (12)1.4.10. 主机安装 (12)2.常用功能码操作说明 (15)3.数据简易配置(仅限于B2、H、X系列) (17)3.1. 自动装机 (17)3.2. 恢复出厂数据(D/DM/F系列) (17)3.3. 恢复出厂IP地址 (17)4.威谱系统管理平台 (17)4.1. 管理软件登录 (17)4.2. 库下载 (18)4.3. 端口维护 (18)4.4. 功能表维护 (18)4.5. 路由表维护 (19)4.6. 服务等级维护 (19)4.7. 前缀码表维护 (19)4.8. 主机设置 (20)4.9. 库上传 (21)4.10. 语音导航配置 (22)4.11. 重启 (22)4.12. 保存库 (23)4.13. 打开库 (23)4.14. 导出库 (23)4.15. 导入库 (23)4.16. 上传音乐 (23)5.常用编程实例 (24)5.1.1. 分机号码设定 (24)5.1.2. 分机服务等级设定 (24)5.1.3. 内线使用模式 (24)5.1.4. 呼叫转移、呼叫等待设定 (24)5.1.5. 数字话机设定 (25)5.1.6. 同组代接设定 (25)5.1.7. 工作组设定 (25)5.1.8. 通话时间限制设定 (25)5.1.9. 群功能保护设定 (26)5.1.10. 通话音量调节 (26)5.1.11. PC话务台权限设定 (26)5.1.14. 不同线路呼入不同语音功能 (28)5.1.15. 内置电脑话务员的应用 (28)5.1.16. 电脑话务员语音的录制 (29)5.1.17. PRI数字中继设定 (32)5.1.18. 数字中继呼入模式 (32)5.1.19. 数字中继汇接 (33)5.1.20. 数字中继混合通道模式 (35)5.1.21. 一号信令的设置方法 (35)5.1.22. VPN (36)5.1.23. 出局号及IP加发的设定 (37)5.1.24. 默认出局号修改 (37)5.1.25. 计费设定 (37)5.1.26. IVR语音导航设定 (38)5.1.27. 数字录音系统设定(限H、D、F系列) (39)5.1.28. 公共寻线组设定 (39)5.1.29. 呼入加拨前缀设定 (39)5.1.30. 自动外转外呼叫功能 (39)5.1.31. 随身密码 (40)5.1.32. 强插、强拆、监听功能 (40)5.1.33. 分机局向限制 (40)5.1.34. 分机来电显示限制 (40)5.1.35. 话机修改服务等级 (40)5.1.36. 电话修改网管号码 (41)5.1.37. 模拟中继直接转移 (41)5.1.38. 缩位拨号 (41)5.1.39. 路由允许码设置 (41)5.1.40. 语音叫醒功能 (42)5.1.41. 内外线振铃区分 (42)5.1.42. 统一拨0出局 (42)5.1.43. 直出中继 (42)5.1.44. 智能路由设置 (43)5.1.45. 内外线直拨 (43)5.1.46. GSM、CDMA无线中继卡设定 (44)5.1.47. 白名单功能 (46)5.1.48. 经理秘书功能 (47)5.1.49. 服务等级跳转功能 (48)5.1.50. 号码分析功能 (48)5.1.51. 黑名单功能 (48)6.电脑命令行编程 (49)6.1. 电脑连接 (49)6.1.1. 通过串口连接 (49)6.2. 登录 (50)6.2.1. 通过超级终端串口登录 (50)6.2.2. 通过超级终端TCP/IP登录 (50)6.3. 输入规则 (50)6.4. 自动装机 (51)6.5. 显示网络配置信息 (51)6.6. 配置网络 (52)6.7. 更改口令 (52)6.8. 配置呼叫控制参数 (52)6.9. 系统日期/时间参数配置 (53)6.10. 系统计费开关 (53)6.11. 功能码维护 (54)6.12. 读取设备序列号 (54)6.13. 激活设备 (54)6.14. 重启系统 (55)6.15. 退出系统 (55)7.系统升级 (55)7.1. 下载 (55)7.4. 主控板 (56)7.5. 扩展主控板 (57)7.6. 二次电源板 (57)7.7. 模拟用户板 (58)7.8. 环路中继板 (59)7.9. 数字用户板(二代) (60)7.10. 信令板 (60)7.11. 数字中继板(E1) (61)8.机器常见故障 (61)8.1. 常见程序故障的排除 (62)1.系统概述1.1.系统简介威谱数字电话交换系统TDMx-2000型是广州市华谱电子科技有限公司自主研发的高科技产品,它集数字交换技术、网络技术、数据库技术、CTI技术于一体,既保证了技术的先进性,又保留了使用的简易性和系统的经济性,是传统程控电话交换机的升级换代产品。
SDK2000视频卡安装说明
SDK2000视频卡安装说明__BY HBL视频卡驱动装好后,请运行“视频卡测试”文件夹中相应的驱动补丁程序。
若打开停车场在线监控界面,没有图像(蓝屏和黑屏也是图像)出现,请打开对应的视频卡测试软件,进行测试。
注:运行驱动补丁程序,请先关闭停车场主程序。
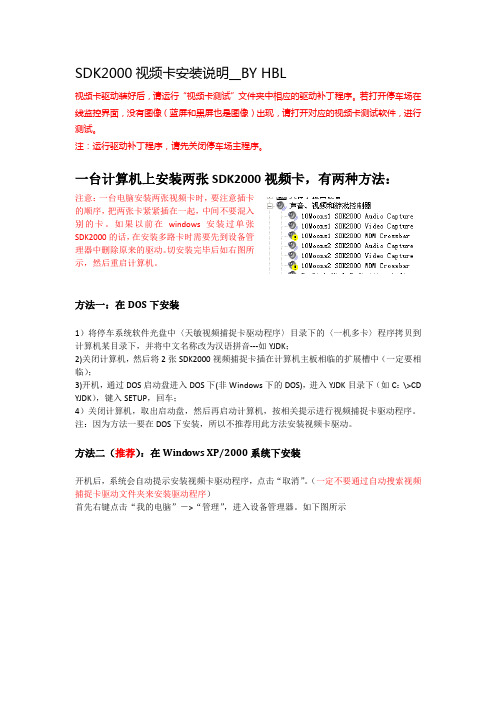
一台计算机上安装两张SDK2000视频卡,有两种方法:注意:一台电脑安装两张视频卡时,要注意插卡的顺序,把两张卡紧紧插在一起,中间不要混入别的卡。
如果以前在windows安装过单张SDK2000的话,在安装多路卡时需要先到设备管理器中删除原来的驱动。
切安装完毕后如右图所示,然后重启计算机。
方法一:在DOS下安装1)将停车系统软件光盘中〈天敏视频捕捉卡驱动程序〉目录下的〈一机多卡〉程序拷贝到计算机某目录下,并将中文名称改为汉语拼音---如YJDK;2)关闭计算机,然后将2张SDK2000视频捕捉卡插在计算机主板相临的扩展槽中(一定要相临);3)开机,通过DOS启动盘进入DOS下(非Windows下的DOS),进入YJDK目录下(如C:\>CD YJDK),键入SETUP,回车;4)关闭计算机,取出启动盘,然后再启动计算机,按相关提示进行视频捕捉卡驱动程序。
注:因为方法一要在DOS下安装,所以不推荐用此方法安装视频卡驱动。
方法二(推荐):在Windows XP/2000系统下安装开机后,系统会自动提示安装视频卡驱动程序,点击“取消”。
(一定不要通过自动搜索视频捕捉卡驱动文件夹来安装驱动程序)首先右键点击“我的电脑”->“管理”,进入设备管理器。
如下图所示先安装第一张视频卡,右键点击第一个“多媒体视频控制器”,-》“更新驱动程序”->“从列表或指定位置安装”然后“下一步”-》“不要搜索。
我要自己选择要安装的驱动程序”-》“下一步”,在如下图所示对话框里,点击“从磁盘安装”-》点击如下图所示“浏览”选择“\视频卡驱动\SDK2000\multi\”目录-》点“打开”-》点“确定”得到如下图所示:-》型号里选择“10Moons1 SDK2000 Video Capture”-》下一步即可。
genesis2000安装说明书
联系电话:13425100767
编著:罗湘禄
QQ:154908727
2
启程 CAM 培训中心
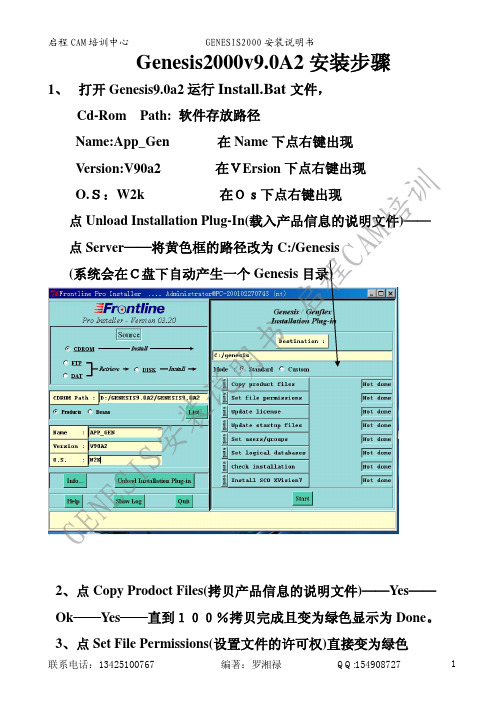
GENESIS2000 安装说明书
训 Harware Fingerprint:8F67-5SDF(八位数每台电脑都不一样)
Name: (用户名)(CAM) Key: (密码)
CAM培
程 这个对话框先不管它!后面一步做完后再来输入
程 7、点 Set Logical Databases(设置逻辑参数)——点 NO——点 启 Instuction Need——Close(不需要说明文件)
8、点 Check Installation ——选择 No Installations needed——Close
书 9、点 Install Sco Xvision7——选择 No——完成 明 手动安装:在 D:\Genesis9.0a2\X_Mang 下运行 Xmgr139e.Exe—点 装说 Next—Yes;出现对话框: GENESIS安
制到对话框中;—点 Next 直到完成。
10、在桌面上点 (Xmanager 1.3.9)下——将
(Xmanager)
复制到桌面
11、在桌面上点 Xmanager 1.3.9 下—— 点(Xconfig)——
X.Config——X.Dm——勾选中 Do Not Use Xdm(Passive)——点
误问题,显示为 Error,这步需要到 Windows 系统中手动复制解密
文件更新,步骤如下:
A、将 D:\Genesis9.0a2\Products\App_Gen 下的
(N84a0-3406-0000-00AD)文件复制到 C:\Genesis\Share\ License
宝利通RMX2000安装配置手册

RMX 2000-安装配臵手册-V5丄3[Polycom PGS 】宝利8HT通—2013 年 1 月一文档修正记录A文档属性M文档变更记录(描述本次文档维护人变更记录)卜修订内容(描述本次修订的各具体内容)目录第1章RMX 2000产品介绍................. .. (5)1.1产品功能.......................... .. (5)1.2硬件架构........................... .. (5)1.3系统容量........................... .. (6)1.4 RMX 2000面板介绍................. .. (7)1.4.1前面板介绍................. .. (7)1.4.2后面板介绍.................. . (8)1.4.3面板LED介绍............... .. (8)1.5 RMX 2000机框介绍................. .. (9)1.6媒体板卡类型..................... . (10)1.6.1板卡容量.................... .. (10)1.6.2板卡支持软件版本........... (12)1.7硬件更换........................... (13)1.7.1退出杆...................... (13)1.7.2安装新板卡.................. (14)第2章RMX 2000配臵安装................. .. (15)2.1安装前的准备....................... (15)2.2 上电,进行第一次登陆.............. (15)2.3 RMX 2000 管理界面................ .. (19)2.4建立会议模板....................... . (21)2.5添加地址簿......................... (29)2.6召开即时会议....................... (30)第3章操作管理会议 ........................ (32)3.1会议属性管理....................... (32)3.2与会者管理......................... (34)3.3与会者属性......................... (36)3.4修改分屏/演讲者................... (38)3.4.1修改分屏.................... (38)3.4.2更换演讲者.................. (39)3.5会议模式........................... (40)3.5.1演讲者模式.................. (40)3.5.2相同分屏模式............... (41)第4章故障排查............................ (42)4.1与会者观看的画面质量不咼...... (42)版本编号:V5.0 34.2与会者听不到声音 (43)4.3无法呼叫与会者 (44)4.4 RMX 2000与外部网络不通 (44)4.5告警查看 (45)4.5.1系统告警 (45)4.5.2与会者告警 (46)4.6 了解你的系统 (46)第1章RMX 2000 产品介绍通过本章节的介绍,我们可以对RMX 2000的硬件结构有一个初步的了解1.1产品功能Polycom RMX 2000 提供的功能包括:基于Linux?基于ATCA标准的基座支持标准网络接口(IP、ISDN和LAN )并具备多个端口H.323、SIP 视频、PSTN 和ISDN电信级高可用性、冗余支持、在线升级能力和动态资源分配能力1.2硬件架构RMX 2000高度3U,宽度为19英寸,建议工作在0-40度,相对湿度为15%-90% 的稳定环境中。
Windwos2000AdvancedServer操作系统安装手册

Windwos2000AdvancedServer操作系统安装⼿册Windwos 2000 Advanced Server操作系统安装⼿册⼀、安装前准备⼯作了解服务器硬件配置系统认真阅读服务器硬件⼚家提供的⽂档,了解系统的确切配置:处理器内存软盘硬盘SCSI 适配器Raid 适配器显⽰适配器⽹卡、HBA卡cdromBIOS 设置准备硬件驱动程序查阅服务器硬件⼿册及附带的随机驱动光盘,获取硬件驱动。
SCSI 适配器for Windwos 2000 驱动RAID 适配器for Windwos 2000驱动⽹卡for Windwos 2000 驱动HBA卡Windwos 2000⼆、安装Windwos 2000 Advanced Server设置服务器⽀持CDROM启动,将Windwos 2000 Advanced Server安装光盘插⼊光盘驱动器。
安装Windwos 2000 Advanced Server⼀些服务器的SCSI(RAID)适配器驱动不包括在WINDOWS 2000中。
安装前检查服务器相关⽂档,以确定是否需要制作安装SCSI(RAID)适配器。
插⼊Windwos 2000 Advanced Server安装光盘。
设置服务器⽀持CDROM启动,打开服务器电源。
如果不需要SCSI(RAID),系统将继续安装。
如需要SCSI(RAID),键⼊需要F6。
系统经过⼀系列加载⼯作后,系统将提⽰插⼊SCSI(RAID)盘系统将驱动加载到内核。
键⼊"S".将SCSI(RAID)盘插⼊软驱中.按回车键.系统显⽰已找到的SCSI驱动程序. 按回车键继续. 选择第⼀个选项"要开始安装WIN2000,按ENTER", 按回车键继续.系统显⽰许可协议,按F8继续.如果硬盘尚未划分,按" C",创建磁盘分区。
输⼊磁盘分区的⼤⼩容量。
按回车键继续.选择⽤FAT⽂件系统格式化磁盘分区。
RAM System 2000用户手册说明书
INSTALLING THE RAM SYSTEM 2000 Thanks for purchasing the RAM System 2000. Please make sure the following items are in the box when you open it.•This manual.•RAM System 2000 main unit.•Power Supply labelled HA-PSU03.•Bluetooth antenna.•IEC Cable.Depending on your system requirements, you will need several TRS cables to hook up your system. Please check your input sources and output destinations and buy the correct cables.Additionally, please insert the Bluetooth antenna in its threaded connector in case it comes unplugged from the factory.The power supply is of the auto switching type so it works worldwide without adjusting anything. In case your country uses a different mains cable other than the one provided in the box, just get the correct one and you are done. Plugging the unit will display a welcome message and firmware unit´s version. Please note that after turning on the unit, MUTE will always be engaged regardless of the level shown on the red knob. This is to prevent damage of your speakers due to excessive level on startup.Any time you plug the unit on, the status of the RAM System will be that of the last time it was turned off, so there is no need to reset preset levels or talkback gain. Last input and output chosen is also stored.GENERAL DESCRIPTIONThe Heritage Audio RAM SYSTEM 2000 is a professional monitor controller in a convenient tabletop format. With its matrix of inputs and outputs, coveringbalanced and unbalanced analog, Spdif digital and the innovative professional quality HA Bluetooth technology, the System 2000 will cover all the monitoring needs of the most demanding professional facilities at a price never heard before.The level control is taken care of by means of microprocessor controlled gold plated relays, giving an exceptional resolution of 64dB of attenuation in 1dB steps. Keeping active electronics to a minimum, the attenuator is buffered using state of the art Burr Brown circuitry for negligible coloration and no noise.Headphone monitoring is as critical as main speaker is. Usually a weak part even in the most expensive units, the RAM System 2000 employs very high current drivers in a diamond buffer configuration which are able to drive any headphones to very high levels without coloration or noise. It has 2 amplifiers individually configurable.INPUT FEATURESThe RAM System 2000 has the following stereo inputs:•INPUT 1: Balanced, accessible on a pair of TRS Jack connectors.•INPUT 2: Exactly as Input 1.•INPUT 3: Balanced by default, it can be configured as unbalanced -10dBV by pressing SHIFT + IN3. The same key combination wouldreturn this input to its balanced +4 configuration.•DIGITAL: Transformer isolated, it is available on the RCA connector on the back of the unit. It is able to read signals up to 24 bit/ 96Khzand gets the word clock from the input source.•BLUETOOTH: This input features the same architecture found in the acclaimed Heritage Audio BT-500. If you are not familiar with it, theBT-500 is an Audio Streaming device in a convenient 500 Seriesformat. It streams audio from your Bluetooth-equipped device anddelivers a fully balanced, +22dBu stereo output. Integration of mobiledevices intro a professional studio environment has never beeneasier. More info on the Bluetooth features later.MONITORING OUTPUT FEATURESThe RAM System 2000 features 3 pairs of balanced outputs labelled OUT1, OUT2 and OUT3, available via TRS jacks on the back of the unit.An additional SUBWOOFER output is available on a balanced TRS as well. It follows the input selected, and outputs a mono, unfiltered combination of both channels.ADDITIONAL OUTPUTSIn addition to the monitoring outputs, the RAM System 2000 features the following outputs:•MIX OUTPUT: It follows the input signal and is taken PRE FADER, meaning its level is unaffected by the monitoring attenuation. It istherefore ideal for recording the mix at the same time, or as anadditional cue send.•CUE OUTPUT: Working in tandem with the CUE INPUT, it works as a traditional CUE send, where the CUE Output follows the CUE inputplus the Talkback signal when this is in use.SIGNAL MONITORING FACILITIESAs previously explained, the heart of the RAM System 2000 is its microprocessor controlled, ladder type attenuator. This can be accessed in 2 ways:•Using the Red Level Knob: As in any traditional monitoring system.Fully clockwise it performs at unity gain (maximum level) whilstreducing it in 1dB steps up to 64. After this the unit turns Mute on.•Using the LEVEL PRESET OPTIONS: The RAM System 2000 has the ability to store 2 different level presets, which override the Red Levelknob position. Pressing SHIFT + OUT3 (Level Preset) will ask for whichof the 2 presets wants to be stored (1 or 2). Confirmation is given bypressing the corresponding key, OUT1 (Level Preset 1) or OUT2(Level Preset2).Pressing SHIFT + OUT1 (Level Preset1) will make themonitoring level that of the stored preset, same for preset 2.ADDITIONAL MONITORING FEATURESThe RAM System has the usual MUTE, DIM and MONO functions often found in this type of units with expanded flexibility as follows:•MUTE: Global Mute, equivalent to rotary knob all fully counter clockwise.•MUTE L, MUTE SUB and MUTE R: Individual Mute functions per speaker. Pressing SHIFT + any individual MUTE will function as aSOLO for that given speaker.•DIM: Attenuates further 20 dB from the attenuation marked by either the red knob or the level preset.•MONO: Accessible as SHIFT + MUTE, it outputs a mono signal to the selected output.TALKBACK FACILITIESThe RAM System 2000 features talkback facilities in a similar fashion to the large format consoles. Talkback signal can be assigned to the Mix signal (following Input selected), by pressing TB MIX. It can also be assigned to the dedicated CUE input by pressing TB CUE, or at both at the same time,pressing TB ALL. All 3 buttons are momentary (they do not engage), so need to be pressed for the talkback to function. This avoids sending embarrassing comments to the talent by mistake.The talkback signal is taken from the Electret microphone found in the front panel and further amplified. Controls for talkback mic gain are SHIFT + TBMIX for lowering the gain and SHIFT + TBCUE for raising it.Pressing any of the talkback keys will activate the DIM function in order to avoid feedback from the mic to the speakers.HEADPHONE MONITORINGYour RAM System 2000 provides with 2 different headphone amplifiers, placed at the left and right front panel ends. They are capable of extremely loud levels without distortion, noise or coloration of any kind so, before plugging your headphones in, make sure the headphone level is at its minimum setting, and adjust accordingly.Each headphone amplifier can have 2 different sources. MIX (following the selected input source), or CUE(following the CUE input on the back panel connectors).This allows for different monitoring mixes for the talent and the recording engineer.Selecting is possible by means of the red button located close to each of the headphone jacks. (Button pressed: CUE, button depressed: MIX).UNDERSTANDING THE BLUETOOTH INPUT There is still a popular misconception that Bluetooth is detrimental to the audio quality. Although this has been true in the past, it is no longer the case. Bluetooth is just a “wireless serial port” and, as so, has no ability to interactwith your sound quality. However, in order to fit the heavy data traffic that digital audio needs, digital audio compression is applied. This is the real source for audio degradation in Bluetooth connections.This being said, modern Bluetooth technology allows for very high quality codecs taking care of the audio data and, which is more important, pre coded data (such as that in iTunes) is kept unmolested.NO MORE MINI JACKSEmploying last generation audio specific Bluetooth technology, the best Codecs your devices can support and a state of the Art, Burr Brown based analog signal path, it solves the already classic, irritating problem of connecting your iOS or Android device to your Studio setup.To this day this has been solved using mini jack to XLRs adaptor cables, but the limitations of mobile devices’ analog audio paths have become clearly apparent.Listening to references on the iTunes Store, recordings sent by email, Spotify, You Tube, you name it. You do it every day, all the time. Nevertheless integration has been non convenient to say the least, until now.SOUND QUALITY OVER BLUETOOTHThe RAM System 2000 Bluetooth device automatically recognizes your device´s best Codec option and uses it for streaming.Apple´s iTunes Store and You Tube use AAC* as native so streaming from an iPhone or iPad will result in a lossless transmission, much better than an analog wired connection!!Vast majority of Android devices have already adopted the amazing sounding “Qualcomm® aptX™ audio” Codec **, which is nearly lossless and the standard that wireless high quality headsets and sound bars are adopting. For a complete list of devices currently supporting aptX please visit:/products/browse/categoriesIn case your device can´t support neither AAC nor aptX, the BT-500 will stream audio using the classic SBC codec.(*) Heritage Audio is an official AAC licensee.(**) Heritage Audio is an official aptX licensee.BURR BROWN´S PEDIGREE IN THE ANALOG PATHThe RAM System 2000 Bluetooth device substitutes your mobile device´s analog circuitry with a state of the art, fully differential Burr Brown balanced output stage which delivers a full 0dBfs = +22dBu output able to drive a load of 600 ohms. This allows direct level comparisons while mastering or mixing with Apple´s iTunes Store or mobile stored reference mixes.SYNCHRONIZING YOUR DEVICE WITH THE RAM SYSTEM 2000Synchronizing your mobile device with the RAM System 2000 is as simple as pairing any other Bluetooth device. It will appear as “HERITAGE RAM 2000” on your Bluetooth devices´ list.You Tube hosts nice tutorials about how to do so in both Android and iOS if you need help.The System 2000 automatically selects the best Codec supported by your mobile device, so no configuration is needed.OPERATIONWhenever a device is paired with the RAM System 2000, the “SYNC” LED will light. From then on, your mobile device takes over the transmission, including Transport control (PLAY, STOP, etc.) and Level (Volume).Active streaming is confirmed by corresponding Codec LED being turned on. Please note Codec IS NOT configurable. It is automatically chosen from the best available option on your mobile device.Devices can only be paired one at a time. Whenever a different device needs to be paired, Bluetooth needs to be reset, so SHIFT + BT buttons must be pressed down.SUMMARY OF SOFT FUNCTIONSWhile main functions in the RAM System 2000 are simply accessible by pressing the corresponding key, several others are accessible as a combination, employing the SHIFT key for this purpose. These have been described all along this manual, however for easy recall, they are listed below:•SHIFT + IN 3: Turns IN 3 from balanced +4 dBu nominal to unbalanced -10 dBV nominal. Pressing again does the opposite.•SHIFT + BT: Resets the Bluetooth connection.•SHIFT + MUTE L: Solos the speaker L.•SHIFT + MUTE SUB: Solos the SUB.•SHIFT + MUTE R: Solos the speaker R.•SHIFT + OUT 1: Sets the Level Preset 1.•SHIFT + OUT 2: Sets the Level Preset 2.•SHIFT + OUT 3: Saves level preset (confirmation of preset 1 or 2 needs to follow).•SHIFT + MUTE: Activates MONO listening.•SHIFT + TB MIX: Lowers the talkback mic gain.•SHIFT + TB CUE: Raises the talkback mic gain.TECHNICAL SPECIFICATIONS •Maximum analog input level: Over +27.5 dBu•Digital input: Up to 24 bit/96 Khz. 0dBfs = +22 dBu at the output, all fader up.•Bluetooth input: AAC, aptX or SBC, 0dBfs=+22dBu at the output, all fader up.•DIM attenuation: -20db.•Maximum output level: Over +27 dBu into 600 ohms.•Noise: Better than -99 dBu.•THD: Better than .001% at 1Khz, balanced input to balanced output, all fader up.DISCLAIMER-Qualcomm is a trademark of Qualcomm Incorporated, registered in the United States and other countries, used with permission.-aptX is a trademark of Qualcomm Technologies International, Ltd., registered in the United States and other countries, used withpermission.-AAC and Bluetooth® trademarks are the property of their respective owners.-Heritage Audio is a non-exclusive licensee of Qualcomm® aptX™ audio.-Heritage Audio is a non-exclusive licensee of AAC.LIMITED 2 YEAR WARRANTYHeritage Audio RAM SYSTEM 2000 is warranted by Heritage Audio SL to be free from defects in materials and workmanship for the period of 2 years to the original purchaser. In the event of such defects, the product will be repaired without charge or, at our option, replaced with a new one if delivered to Heritage Audio prepaid, together with a copy of the sales slip or other proof of purchase date. The warranty excludes problems due to normal wear, abuse, shipping damage or failure to use the product in accordance with the specifications.Heritage Audio shall not be liable for damages based upon inconvenience, loss of use of the product, loss of time, interrupted operation or commercial loss or any other damages, whether incidental, consequential or otherwise. This warranty is not transferable.Ardemans, 42. Local28028 MadridSpain**********************。
SAP2000入门手册
2-1
SAP2000 入门手册
关于本手册
本手册用来帮助提高SAP2000的使用效率。下一章介绍图形界面的基本概念和 程序基本使用。
SAP2000使用教程帮助新用户获得使用SAP2000建模、 分析、 设计的初步经验。 在用SAP2000做实际工程之前,强烈推荐阅读本手册并实践教程中的过程。 更多的信息可以从SAP2000联机帮助中找到,也可以从程序中附带的其它手册 中获得。这些手册以Adobe Acrobat PDF格式存放于SAP2000光盘中,也可以通过程 序的帮助菜单上查看。包括: CSI分析参考手册,包含了程序高级建模和分析信息。 SAP2000各种设计手册,包含了程序支持的设计规范的详细设计信息。 SAP2000校验手册,包含了程序功能演示和分析的准确性校核。
致谢
首先感谢许许多多的结构工程师,在过去的若干年中,他们 提供了很有价值的反馈信息,这些反馈信息使该产品得到提升, 达到了目前的水平。 要特别感谢加州大学 Berkeley 分校名誉教授, Edward L. Wilson 博士。 他提出了最初的 SAP 系列程序的概念并进行了程序 开发。他持续的创意产生了许多独一无二的概念,在该版本中已 实现了这些概念。
程序版本和功能
最新版本的SAP2000有四个不同类型的分析版本: SAP2000 Basic, SAP2000Plus, SAP2000 Advanced和SAP2000 Ultimate。这些版本共用同一个用户图形界面。 程序具有强大的功能,如快速求解器、力和位移加载、变截面框架单元、单拉 支撑、线弹簧和面弹簧、后张拉预应力筋、精确分层壳单元、特征值和Ritz振型分 析、 适用于斜的几何形式的多个坐标系统、 不同的约束选项、 连接独立定义的网格、 完全耦合的 6x6 弹簧刚度、在一次运行中组合或包络多个动力分析选项。 SAP2000 Plus 增加了无限制功能、移动荷载、活荷载分析功能、完整系列有限 元单元、频域分析(稳态分析和功率谱密度分析)和时程及屈曲分析选项。可包含 多基激励的地动效应。 SAP2000 Advanced 扩展了 Plus 版的功能,增加了64位的分析求解器(需要64 位的处理器)、非线性连接单元(缝、钩、隔振器、阻尼器、多段线性塑性)、用 于框架单元中的分段线性塑性铰、纤维铰、悬链线索单元、非线性壳单元、几何非 线性。分析功能包含材料和几何效应的静力非线性分析,含pushover分析;振型叠 加或直接积分的非线性时程分析。
2000标准负荷测量仪仪表说明书
本手册主要介绍2000标准负荷(扭矩)测量仪的连线、校准、设置和使用方法,请用户在使用前仔细阅读。
一、2000标准负荷测量仪简介2000标准负荷(扭矩)系列测量仪是一款经过10年大量实践检验被最广泛认知的基础力学测量仪器,10年来先进的测量器具在基础力学测量领域中的推广应用和称重传感器在性能、质量、产能以及在世界市场上份额的增加,该系列仪器有着不可磨灭的贡献,应用领域包括:精密力值测量;扭矩测量、材料性能测试、应力应变测量、峰值测量以及基于应变原理传感器的生产检测领域。
相关的产品更新信息请参阅第3页。
2000A型仪表为最常用的测力计配套仪表,具有很高的可靠性和性能价格比,6或40个数据通道,额定显示分度5万,重复性、线性<0.01%FS, AD转换速率50~500次/秒,mV/V量值准确度:0.030%+0.020%(准确度采用相对于读数+相对于量程的不确定度描述方法,以下同),温度系数:<20ppm+10ppm,该款仪表主要应用于当量准确度为0.3%的标准测力计和常规力值测量。
2000B型仪表提供更高的准确度和测量效率,适用于当量准确度为0.1%的标准测力计、标准叠加式测力机和高要求测量需求,6或40个数据通道,显示分度20万,重复性、线性<0.005%FS,mV/V量值准确度:0.015%+0.010%,温度系数:<10ppm+5ppm。
2000D型仪表为扭矩测量仪表,6或40个数据通道,额定显示分度5万,重复性、线性<0.01%FS,AD转换速率50次/秒~500次/秒,mV/V量值准确度:0.030%+0.020%,温度系数:<20ppm+10ppm。
2000E型仪表为应变式传感器检测、补偿和调整的专用仪表,可直接显示传感器输出信号mV/V 的测量值,信号输入范围:-12mV/V~+12mV/V,最小分辨率:0.01 V/V(等效于6.5位数字电压表),重复性、线性<0.005%FS,mV/V量值准确度:0.015%+0.010%,温度系数:10ppm+5ppm,内置传感器供桥电源,可替代“稳压电源+数字万用表”的传感器检测、补偿和调整方法。
健伍TS-2000中文说明书
销售市场代码
K 型:美国 E 型:欧洲 E2 型:西班牙
市场代码打印在包装箱上。
第 105 页的参考规格有不同代码的可用频率信息。
FCC 警告 本设备会产生或使用无线电射频能量。变更或修改本设 备可能会导致有害的干扰,除非修改本手册中明确允许 修改的部分。如果有未经授权的变更或修改可能会失去 操作这些设备的权力。
FM 和 AM 模式)。 · 内置天调用于 HF/50MHz 频段。 · 内置 9600/1200 bps TNC 用于 DX 数据包通信和 Sky
Command Ⅱ+操作。 · DX P.C.T.用于 DX 搜索。 · 方便的卫星通信键。 · 锋利的 DSP 滤波器用于 CW 操作时可达 50Hz。
不但用户界面友好,在技术上这部电台也是非常先进的, 而且有些功能是最新推出的。本手册既是您现在的学习 指导手册,也是今后一段时间里很好的参考书。
特点
· 从 HF 到 1.2GHz(TS-2000/TS-B2000 可选)所有业余 无线电频段都可以全模式操作并具有 DSP 功能。
· 双重高速数字信号处理(DSP)单元。 · 可调的 DSP 滤波频率。 · 高速数字自动增益控制(AGC)。 · 独立的副段接收 144MHz 和 430(440)MHz 频段(仅
TS-2000:HF/ VHF/ UHF 全模式多频段电台 TS-2000X:HF/ VHF/ UHF/ 1.2 GHz 全模式多频段电台 TS-B2000:HF/ VHF/ UHF 全模式多频段电台
- 1、下载文档前请自行甄别文档内容的完整性,平台不提供额外的编辑、内容补充、找答案等附加服务。
- 2、"仅部分预览"的文档,不可在线预览部分如存在完整性等问题,可反馈申请退款(可完整预览的文档不适用该条件!)。
- 3、如文档侵犯您的权益,请联系客服反馈,我们会尽快为您处理(人工客服工作时间:9:00-18:30)。
3.1 火警电话系列......................................................................................................... - 45 3.1.1 多线制消防电话总机 .............................................................................. - 45 3.1.2 多线制消防电话分机、插孔..................................................................... - 45 3.1.3 多线制消防电话通讯系统接线图: .......................................................... - 46 3.1.4 多线制消防电话通讯系统设计方案: ...................................................... - 47 3.1.5 总线制消防电话总机:............................................................................ - 48 3.1.6 总线制消防电话分机、插孔: ................................................................. - 48 3.1.7 总线制消防电话通讯系统接线图: .......................................................... - 49 3.1.8 总线制消防电话通讯系统设计方案: ...................................................... - 50 -
2.6 控制器安装及接线 ..................................................................................................- 35 2.6.1 TF2000 控制器机箱安装: .........................................................................- 35 2.6.2 TF2000S 控制器机箱安装........................................................................- 36 2.6.3 控制器内部接线.......................................................................................- 36 -
2.1.4.4 TF2013D 手动火灾报警按钮...........................................................-消火栓按钮 .....................................................................- 22 2.1.4.6 TF2014 普通消火栓按钮 .................................................................- 23 2.1.4.7 TF2012D 智能声光报警器及 TF2012 普通声光报警器..................- 24 2.1.4.8 TF2016 总线隔离器 .......................................................................- 25 2.1.4.9 TF2017B 切换模块 ........................................................................- 26 2.1.5 TF2151 火灾显示盘 .................................................................................- 27 -
TF2000 系列控制器设计安装手册
目
录
第 1 章 产品简介.............................................................................................................- 1 -
1.1 概述 ..........................................................................................................................- 1 -
2.4 TF-NET 网络系统 ....................................................................................................- 30 -
2.5 TF-NET-S 光纤转换模块 .........................................................................................- 32 -
2.2 控制器系统图..........................................................................................................- 29 -
2.3 智能图形显示终端 ..................................................................................................- 29 -
2.7 设备调试.................................................................................................................- 42 2.7.1 外部接线要求 ..........................................................................................- 42 2.7.2 控制器检查..............................................................................................- 42 2.7.3 设备安装 .................................................................................................- 43 2.7.4 系统接地 .................................................................................................- 43 2.7.5 接入外线 .................................................................................................- 43 -
1.2 产品特点...................................................................................................................- 2 -
1.3 电气参数...................................................................................................................- 6 -
西安特菲尔电子有限公司
-1-
TF2000 系列控制器设计安装手册 2.7.6 注意事项 ................................................................................................ - 44 2.7.7 接线的检查方法...................................................................................... - 44 2.7.8 通电检查 ................................................................................................ - 44 -
第 2 章 设备配置及安装 .................................................................................................- 9 -
2.1 系统配置....................................................................................................................- 9 2.1.1 系统构成 ....................................................................................................- 9 2.1.2 智能探测器...............................................................................................- 11 2.1.3 普通探测 ..................................................................................................- 14 2.1.4 模块 .........................................................................................................- 15 2.1.4.1 TF2011D 消防联动输入模块 ...........................................................- 15 2.1.4.2 TF2011AD 智能探测器输入模块 ....................................................- 17 2.1.4.3 TF2010AD 消防联动输出模块 ........................................................- 19 -