Reaper教程2
EZdrummer 2 使用手册说明书
A BOUT THIS MANUALScreenshots included in this manual may differ from the actual product.Macintosh, Mac OS X and Audio Units are registered trademarks of Apple Computer, Inc. Windows is a trademark of Microsoft Corporation. VST is a trademark of Steinberg Media T echnology AG. RTAS is a trademark of Avid Corp. All other trademarks held by their respective owners.This manual is copyright T oontrack Music AB. No duplication, copying and distribution is permitted without written consent from the originator.EZdrummer2TABLE OF CONTENTS1 - INTRODUCTION 61.1 What is EZdrummer? 61.2 Recording Notes 72 - INSTALLATION 82.1 EZdrummer at a glance 82.2 System Requirements 82.3 Installing EZdrummer for Windows 82.4 Installing EZdrummer for Macintosh 92.5 Authorizing EZdrummer on your computer 93 - QUICK START GUIDE 103.1 Loading a Kit 103.2 Browsing the MIDI Library 113.3 Building your Drum T rack 113.4 Mixing the Kit 134 - ADDITIONAL FUNCTIONALITY 144.1 Advanced Routing 144.2 Help Menu 144.3 Adding MIDI Grooves to the Browser 154.4 Key Mapping 154.5 Expanding EZdrummer 16EZdrummer3EZdrummer 4CREDITSToontrack Development Team:Andreas Sundgren (name & concept)Erik Phersson (project management)Mattias Eklund (audio recordings and editing)Henrik Kjellberg (audio recordings)Olof Westman (programming)Rogue Marechal (support & testing)Fredrik Ärletun (graphic artist)Produced and engineered by:Neil Dorfsman, Pat Thrall, Mattias Eklund & Henrik Kjellberg. Played by Nir ZExternal consultants:Keith More (MIDI programming and velocity sweep concept) Philippe Decuyper (general expertise)Fredrik Hägglund - www.diod.nu (flash tutorial)Manual written by:Rogue Marechal & Andreas Sundgren.Proofreading by Chuck Butler.Betatesters (to whom our undying gratitude goes):Kevin Afflack, Marcello Azevedo, T ony Artimisi, Damian Blunt, Chuck Butler, Ray Campbell, John Christensen, Eric Colvin, Philippe Decuyper, Martin Fido, Lewis Gilbert, Chaim Goldman, Scott Griggs, Mark Heath, Svein Hyttebakk, Martin Keller, Joseph King, Mark King, Kenny Lee, Emmanuel Lorant, David Modisette, Motoyoshi Matsumoto, Murray McDowall, Jeffrey Naness, Kirk Pennak, John Rammelt, Robert Rainey, Marcel Ritsema, Chris Ryan, Daniel Shattuck, Fred Schendel, James Thompson.Additional Thanks:All our hard working distributors and supporting families.EZdrummer51 - INTRODUCTION1.1 What is EZdrummer?Somebody once suggested that we make a light version of Superior (Drummer). A great suggestion! Superior was and still is a monster of a box, designed with the mad scientist music producer in mind. When the time came around to actually realize the idea of a smaller drum sampler we decided to take the concept one step further. So, EZdrummer is a Superior LE and at the same time it isn’t. The experience gained from developing Superior Drummer is all there: sounds recorded and produced in partnership with the best in the business, microphone control, humanizing features, and TPC (T oontrack Percussive Compression) keeps RAM and disc space requirements to a minimum.We’ve also decided to take user friendliness above and beyond:In it’s most basic mode of operation, EZdrummer can yield a great drum track in just a few clicks. The microphone levels are all pre-set. Using the built in MIDI features you can create a drum sequence from a choice of thousands MIDI files by simply opening EZdrummer, selecting the file of your choice, and dragging it into your host.The internal mixer allows EZdrummer to work in both stereo and multitrack mode without the user having to step out of one version of the plug-in and into another. It also gives you control of levels between mics and ambience and overhead microphone leakage. Bringing all this to the user is an interface that we think speaks for itself.So who’s EZdrummer for? We think everyone. Combining quintessential features and advanced handling as well as low system requirements, EZdrummer is an entry level product but also ideal for the pros who need to be mobile. With EZdrummer we’ve taken the first step into the next generation of acoustic drum samplers. The journey starts here.Andreas Sundgren, T oontrack development teamEZdrummer6EZdrummer71.2 Recording NotesIn 2005 T oontrack Music was contacted by Pat Thrall with a request to record drums for the Superior Drummer software engine at the New Y ork studio where Pat had his professional home. We all knew Pats work (with Glenn Hughes, Black Crowes, etc) and jumped at the opportunity to work with one of our hero.We became even more excited when Pat enrolled Neil Dorfsman, another long-time hero of ours, to add his talents, passion, and experience to the recordings. Neil has been around since the 70s recording and producing artists like Kiss (oh the stories...), Bruce Springsteen, Dire Straits, Sting etc. Enough said?Pat also brought along renowned live and session drummer Nir Z, whose credits include such diverse acts as Genesis and Joss Stone, to play his GMS drums for the sessions. The team was rounded out by Mattias Eklund and Henrik Kjellberg from T oontrack Music, and together they performed a number of test recordings throughout 2005.The sounds for EZdrummer were finally recorded and produced at Avatar Studios New Y ork (formerly known as Power Station) on the 1st of October, 2005, by PatThrall, Neil Dorfsman, and Nir Z. Needless to say the recordings ended up every bit as great (and better) as expected.The timeless quality of the sound, the consistency of the playing and recording, and the legendary atmosphere from a studio that has seen many of the greats create their masterpieces within its walls, all make for a worthy start of the next generation of Toontrack Acoustic Drum samplers.EZdrummer82 - INSTALLATION 2.1 EZdrummer at a glancedfhEZdrummer is a state-of-the-art sample player powering a collection of stunning drum sounds played by a top notch session drummer and world class producers at Avatar Studios, New Y ork:• 7500 sound files at 16-bit / 44.1kHz equivalent to 5Gb of uncompressed wav files • Instant access to a large MIDI library with drag’n’drop functionality• Possibility for the user to add their own MIDI files to the library• Internal mixer with stereo and multitrack routing into the host• Preset mix modes for quick sound changes• Interface visualizes the drums and allows quick audition of the kit• Automatically combines drum hit randomizing and non-cycling• Controls for instant changes to MIDI data, extending groove context relevance • Operates in General MIDI and extend beyond the limits imposed by the standard • Direct manual, tutorial and internet help desk access from the program interface • First EZX expansion pack included with EZdrummer2.2 System Requirements• 1,5Gb free hard disc space, DVD drive• Windows XP , PIII/Athlon 1,8GHz with 512 Mb of Ram• Mac OS X 10.4, G4 1GHz with 512 Mb of Ram• Display capable of 800x600• A software sequencer or virtual instrument host• (recommended) sound card with ASIO or CoreAudio driver2.3 Installing EZdrummer for WindowsRun the EZdrummer Installer and optional EZX Cocktail Installer located in the \Install\ folder of the DVD and follow instructions.The plugin will be installed by default in the appropriate location for the currently installed host program. Y ou should however verify that this is the case and perform a custom install to change the destination target if this is not adequate for your host program (see your host manual for details).The sounds themselves, as well as various resources, are installed by default in:C:\Program Files\T oontrack\EZdrummer\Sounds\. Y ou may choose to install in a different location but samples cannot be relocated at a later stage.T o uninstall simply re-run the installer located on the media that came with thisproduct or use your operating system’s removal facility.EZdrummer92.4 Installing EZdrummer for MacintoshRun the EZdrummer Installer and optional EZX Cocktail Installerlocated in the /Install/ folder of the DVD and follow instructions. Please ensure you are logged in as an administrator before proceeding.The plugin will be installed in the default location for your operating system and should not be moved to remain available to all users and programs. The sounds themselves are installed in /Library/Application Support/EZdrummer/Sounds/ and cannot be relocated. Doing so will render the program unusable.T o uninstall simply run the EZdrummer Uninstaller provided and select thecomponents you wish to remove (it is possible to uninstall EZX Cocktail only using the appropriate Uninstaller).2.5 Authorizing EZdrummer on your computerOn first launching EZdrummer you will be presented with the authorization screen. Simply follow the instructions and, if this is your first T oontrack product, create a new user account at /register/1) Key in the Computer ID exactly as shown in the interface and serial number found on the DVD packaging. Add a short description (this can be anyting you want, for example ‘Studio B computer’).2) Generate the Authorization Code online. Y ou will receive a confirmation email. T ype in or paste the code if your application supports it.3) Y ou will be greeted with a congratulation message once EZdrummer has been authorized successfully.**********************************with your Computer ID and serial number if the authorization process fails for whatever reason.EZdrummer 103 - Quick Start GuideUsing EZdrummer is quite simple, and in this tutorial we’ll show you how to perform the most common operations. By the time you finish, you’ll know how to create a killer drum track in no time.Before you start you should ensure that your system is configured for basic audio and MIDI playback. Should you be unable to complete this tutorial, check first that your program is correctly set up and that you are able to audition other virtual instruments.3.1 Loading a KitWhen the plugin is first started the default drumcounter emphasized in the above screenshot will inform you of how much memory the kit uses.A visual representation will occupy the greatest part of theinterface of EZdrummer. If you want to hear what thedrums sound like simply click on them in the interface.If you would like to select a different drum at a certainposition (or the whole kit) simply click the constructionbar on each part of the kit and select from the menu thatcomes up:3.2 Browsing the MIDI Librarydries out? Stay in this window! All the levels between the drums in the kit are preset and the sounds are already mixed so you don’t have to worry about that... just concentrate on the music.Click the ‘Open Grooves’ button. The browser will open, allowing you to access the MIDI files that come with EZdrummer. Even without the optional expansion packs, EZdrummer ships with thousands of MIDI files to choose from.Finding the MIDI groove you want for your song could not be any easier: simply choose the overall style... let’s try the POP/ROCK library, and choose a “POP/ROCK Straight” feel in 4/4 time. Finally, select one of the Playing Variations.player section and listen to the loop. Note the beat indicator underneath the groove description.Change of tempos in your sequencer will automatically be reflected in EZdrummer’s. Instant access to a ‘double time’ or ‘half time’ variation of the groove is also available at the push of a button:example, if the playing is too aggressive for that laid back bridge youhad in mind), you can effortlessly refine the dynamics, from soft tohard at the twist of a knob using the velocity sweep control.3 through the grooves with the up/down navigationarrows. EZdrummer will seamlessly play the pat-terns as you browse through them.Once you have found the right groove to lift yoursong, simply drag and drop the MIDI file to yoursequencer right where it belongs. EZ! And there isno reason to stop there:Combine different patterns and join them together with amazing fills. We reckon you will have built your first track before dinner’s ready... how many times did that happen last year?Once you’ve dragged some MIDI files to a track, your sequencer will replay the grooves in the order they were placed. Of course, EZdrummer will synchronize to your sequencer’s master tempo, so you can change your mind and speed the song up, or slow it down, at any time.When EZdrummer is receiving MIDI information from the host, as aresult of playing back a sequence or playing an external MIDI controller,the activity LED will flash to confirm that the link is working properly.Still if you prefer your track machine-like we won’t stop you!EZdrummer3.4 Mixing the Kittrack, EZdrummer includes an internal mixer, similar tohardware you’ve probably used.Just like a real mixer you use the faders to set the levels of the different drums in the mix. Horizontal sliders at the top adjust the placement of the instruments. The global control to the left of the channel strips toggle between audience and drummer’s perspective, the latter being the default.Also like with a hardware mixer, you can mute one of the tracks to listen to a subset of the drums making up the kit. Or you can solo any drum, to hear it on its own.Y ou control how much of the room you want to be part of your drum track withthe fader farthest to the right. T urning the leakage in the snare bottom or overhead microphones OFF is also possible for that extra ‘dry’ sound.Y ou can also group the channels to slide, mute or ‘solo’ as a group.For example, to adjust the volume of all the toms at the sametime, multi-select their channels by clicking them one after theother. Click on any channel once more to deselect it.If you don’t want to mix the whole kit from scratch, there are preset mixers to change the overall character of your drum kit. Just choose one of the mixer configurations in the PRESETS pull-down menu in the upper left corner of the interface. Once you are happy with your mix, you can save a snapshot for use in your other projects. Simply select ‘Save As’ from the pull down menu and type a suitable description.4 - Additional Functionality4.1 Advanced RoutingEZdrummer routes into your host on one stereo track by default.Y ou can however route any instrument or microphone toany of the 8 available stereo tracks mapped to EZdrummer’soutputs. This will allow you to benefit from the maximumflexibility that your sequencer has to offer.T o perform the above click one of the mixer tracks andselect multichannel. This will select the most appropriaterouting for the kit. Of course your host has to be set upaccordingly to capture these outputs (see your application’smanual for details).Y ou are not limited to this configuration howeverand are free to assign drums to the track of yourchoosing by selecting the appropriate entry in thepull menu for each of the indivual channels.An alternative is to start in stereo mode andseparate a single instrument from the mix.As an exercise, go back to the stereo mode andthen try sending the kick to track 2:The kick will appear on track 2, the rest of the kitremaining on track 1, the default stereo pair.4.2 Help MenuThe help menu [?] gives you quick access to additional resources:- T ool Tips: turn the contextual tips ON or OFF- Visual Hits: turn the drum animation ON or OFF- PDF Manual: opens this manual in your PDF viewer application- Flash T utorial: a short walkthrough of EZdrummer- Online Support: opens the support website in the default browser- User MIDI folder: opens the MIDI folder reserved for your own MIDIIn addition specific resources, such as keyboard layout and recording notes will be available in product specific subfolders.4.3 Adding MIDI Grooves to the BrowserFuture expansion packs will of course ship with more MIDI grooves that are relevant to the genres they aim to address. Y ou may however extend and customize the library at any time with 3rd party MIDI packs or your own.The process is very straightforward: selecting the ‘User MIDI folder’ from the Help Menu will automatically open the relevant folder on your Desktop. Simply place your MIDI files in that location, and organize them in subfolders labelled as you see fit.On a related subject, note that grooves included in EZdrummer are not GM compliant and will not play back properly on GM devices. The hi-hat programming in particular makes use of the full extent of EZdrummer available articulations.4.4 Key MappingEZdrummer is a flexible tool that will not only allow Array you to build your drum track using the includedMIDI grooves library but also create patterns andfills from scratch in your sequencer.The layout on the left details the instruments andtechniques available for triggering from an externalMIDI controller or pencil in in your application‘piano roll’.Note that the map does extend below 20 and above65. These notes are reserved for use with futureEZX-s and should not be used with the defaultRock/Pop kit.If GM compatibility is important to you you shouldalways program the map between C1 and C3 only.This is to ensure playback on GM compatible devicesis accurate (cymbal chokes notwithstanding).Specificallly, all notes in this range are GM compliantswith the following exceptions: 39, 54, 58, 60.4.5 Expanding EZdrummerThey contain additional MIDI files toThe sounds are tweaked with specificThe first EZXT o access the expansion packs already installed on yourcomputer click the EZX display in the main window.When loading an EZX, an interactive picture of the drumkit contained in that expansion will appear in the main window of EZdrummer, giving instant access to all the prelistening and construction features specific to that particular expansion.Several EZX-s are planned or already in the works and will be announced shortly at . For now enjoy EZdrummer and your first EZX, and please let us know what expansion packs you would like to see released in the future. We will be delighted to hear from you!Why not check out Superior Drummer, EZdrummer’s bigger brother, the widely acclaimed professional line from T oontrack Music. Superior Drummer gives you even more control over your drum track with an endless variety of sounds that can be mixed to fit any style and any song. T urn to the back of this manual for a brief overview of what pros around the world use! More details at NEW! NEW!。
R2 RepeatMp3 复读软件使用说明
R2 RepeatMP3 使用说明
R2 RepeatMP3 专为提高听力而打造的复读软件。
软件提供两种复读方式:1.波形复读 2.lrc复读(注意:只能播放MP3格式的文件。
)
支持Windows7 Windows8 (32 or 64)
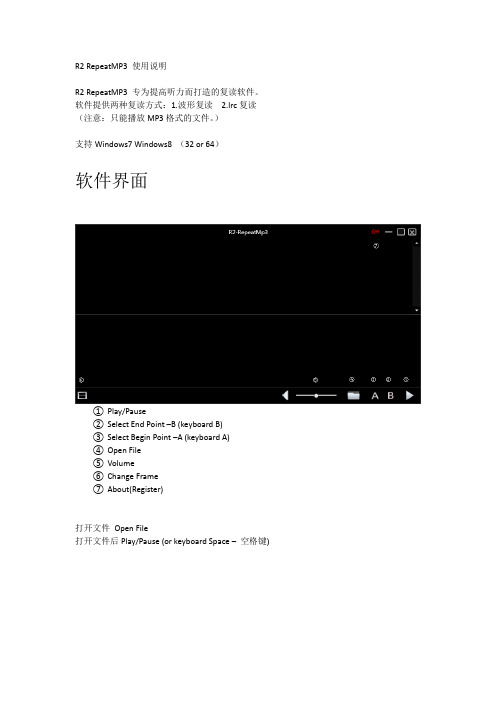
软件界面
①Play/Pause
②Select End Point –B (keyboard B)
③Select Begin Point –A (keyboard A)
④Open File
⑤Volume
⑥Change Frame
⑦About(Register)
打开文件Open File
打开文件后Play/Pause (or keyboard Space –空格键)
波形复读
鼠标在波形区域拖动选择某一句复读选择句子(单句)
鼠标在波形区域拖动选择多个句子复读选择句子(多句)
or 键盘A 开始键盘B 结束A-B选择复读
Lrc 复读
鼠标在Lrc区域拖动选择某一句复读选择句子(单句)
鼠标在Lrc区域拖动选择多个句子复读选择句子(多句)
退出复读状态
双击Lrc区域某一句
Or
单击波形区域某一点。
reActPSNv2.26使用教程
reActPSNv2.26使用教程reActPSN v2.26使用教程【多玩“天空の印痕”会员著】reActPSN是PS3上非常实用的软件,可以用来离线激活PSN游戏已达到免费游戏的目的。
写在使用之前:1. 警告:reActPSN各模式中,风险最大的是第四篇,刷DEX的话如果出现操作错误将有可能导致机器变砖!2. 提醒:↓模式中,最坏的情况是vsh文件损坏,由于XMB是由vsh管理,所以可能导致开机进不去XMB界面,解决方法是进恢复模式重刷系统(提醒一下,初次刷自制系统请在充分理解刷机教程每一步的前提下进行,否则后果自负)但无砖机危险3. 除1、2之外的其他模式修改的都不是系统文件,无危险鉴于有玩家初次使用reActPSN时是在一些不太成熟的CFW下(如Rogero 4.30CEX v1.xx)使用↓模式,这样容易造成死机,无法进入XMB界面等问题,请一定刷个成熟系统(已 patchvsh ),还有记得备份FLASH!(说明:经咨询,3.55CFW下备份FLASH最好,当然你愿意的话也可在4.xxCFW下多备份些FLASH,E3救砖关键在于备份的质量,即最终备份的bin文件的完整性,bin文件不完整的话去刷E3那就是铁砖一块了,感谢凯罗桑兄的指点)已经黑屏无法进入XMB界面的,请进入恢复模式重刷系统如何备份FLASH在2L有讲解,记得多备份几次进行Hash对比刷系统请仔细参照论坛精品帖在成熟的系统(已 patch vsh )下,再使用reActPSN,不要用↓模式了正文中,长按的时间至少为6秒,第四篇至少为8秒——————————————————————————————————————————————————————一、导入激活授权篇+导出授权/破解文件篇(基础篇)1)导入篇前提条件:1. patch vsh(如果还是不确定自己系统是否已经patch vsh,那么请询问论坛各位机友进行确认,或者刷那些已patch vsh的成熟系统(如Rogero 4.30CEX v2.05,Rogero 4.40CEXv1.03,rebug REX 4.30.2,rebug 4.41.2等等)2. 生成act.dat文件,具体方法有:①上PSN下载DLC等②刷写Rogero 4.40CEX v1.03可免上PSN直接进行授权③在 3.55CFW(非 3.55TB)下配合vsh.self.patcher.for.reActPSN2.pkg+reActPSN2.0(这是早期的方法,不推荐)④将伪装签名的act.dat文件拷入aa用户下的exdata文件夹内(没有exdata文件夹则新建或者将下载的文件夹复制到000000xx下,如何判断aa用户对应的文件夹请看2L的FAQ) actdat文件.rar (174 Bytes, 下载次数: 58) (此为我备份的伪装签名的act.dat文件,其他人应该也可用)注意:自制上PSN就请做好被BAN的准备万事具备,接下来是正式导入激活授权了1. 新建用户,命名为“aa”(注意英文输入,并且不要有空格和引号,以前有aa用户的可以删除,删除前确认自己所有rap授权文件已备份好)2. U盘根目录装exdata文件夹,里面放入rap授权文件,插入靠近光驱的USB口,注意另一个USB口不要接其他任何存储设备3. 登入aa用户,安装相关pkg,XMB界面按○键进入reActPSN 程序(初次授权短按○键进入就行,不用按L1,以后追加授权时长按L1)4. aa用户变成reActPSN v2.0 xxrif yyedat5. 根据你想激活的内容,进入相关游戏或选择相关主题等,确认是否成功激活授权注1:安装pkg与导入激活授权这两者之间没有严格的顺序注2:reActPSN v2.0 xxrif yyedat不意味着一定授权成功,只代表reActPSN软件检测并统计出你内置硬盘hdd0/home/000000xx下的授权文件数量2)导出篇导出的目的是为了分享或备份①R2导出模式此模式会导出内置硬盘里hdd0/game/目录下所有被破解的NPDRM文件(主要是edat),复制到U盘/reActPSN/FixedNPD/目录下,耗时较长,特别是你装了很多免授权文件的情况下因此建议大家用更方便的FTP或mMOS方法导出,但作为reActPSN的一大功能,我还是将它添加到教程里来1. 插上U盘到靠近光驱的USB口2. XMB界面短按○键打开reActPSN 2.26,然后马上长按住手柄的R2键,这时会黑屏,不用担心,只是在复制文件而已3. 复制完成后会返回XMB界面注:如果有人等太长时间发现还是黑屏,不用怕,可以轻按电源键关机,亲测无事②L2导出模式注意:经我多次验证,此模式确实有BUG,导出的授权不可用,暂时请勿用此模式,想导出分享的朋友请用 rif2rap 工具转换1. 插上U盘到靠近光驱的USB口2. XMB界面短按○键打开reActPSN 2.26,然后马上长按住手柄的L2键3. 黑屏几秒钟后就会返回XMB界面PS那些自制机购买过PSN上的DLC等内容,想分享给大家的,可以按照如下方法:1. 先在网络设定里将ProxyServer地址设为PC的IP地址,PC端打开CCProxy、PS3ProxyServer 或类似的软件,然后PS3上PSN,选择下载内容,PC端监听出下载地址,然后PS3就可以退出下载,退出PSN了,具体可以参考助平霜月帖子:/doc/5d13583292.html,/thread-29314109-1-1.html2. PS3内置硬盘里的rif、edat等授权文件用MMOS或FTP导出,rif 文件还要在PC上用 rif2rap 工具转换rif2rap 教程:/doc/5d13583292.html,/thread-29782200-1-1.html这样一来,就有了pkg下载地址+rap授权(极少数情况下有edat 授权),这就是论坛上分享DLC的过程了,大家要知道,论坛上及国外网站分享的DLC不是天上掉下来的,是那些热心人花钱然后分享给大家的,而一键免授权文件在没有授权文件的支持下也弄不出来(接下来的第二篇里会讲解如何制作免授权文件)[pagesplitxx]二、加密文件破解篇(进阶篇)注意1:请备份好自己的游戏(防止破解失败后,游戏无法启动,如80010017错误等)注意2:4.xx CFW 请慎用降级破解△+L1功能(因为会与一些其他方式的破解文件冲突)注意3:奖杯控请慎用←模式(强制删除当前用户的奖杯)首先我们需要知道以下几点:1. reActPSN △模式、△+L1模式、△+L2模式破解的文件必须在hdd0/game目录下,其他地方包括外置硬盘上的文件是不会破解的,所以请确认你想破解的DLC、游戏本体等等这些文件全部都放到hdd0/game目录下,不要放到其他位置(路径必须为hdd0/game/TITLE_ID/ 比如hdd0/game/BLAS50582)如hdd0/game/BLAS50582)1.1 如果是没出补丁的游戏,必须把游戏文件都放入此目录,请去掉文件夹的所有中文名,文件夹只保留游戏ID(如BLAS50582)1.2 如果是有官方升级补丁的游戏,那么恭喜,安装升级补丁之后,这个游戏就不用放进内置hdd0/game目录了,补丁里有EBOOT、SFO文件,一般PS3系统读取的是这些而不是你游戏本体里的同名文件2. U盘尽量插在靠近光驱的USB口,U盘根目录的exdata文件夹里放入相关rap文件,另一个USB 口不要接其他任何存储设备3. reActPSN破解edat、self等NPDRM密钥保护的文件的话是基于你U盘里的rap文件,而不是你内置硬盘里已经激活的rif、edat 等文件,包括破解DLC、主题、PS1==都是如此4. 需授权PSN游戏或DLC在破解前最好先导入授权,不导入也可以,但会增加某些游戏的破解难度5. MMOS下双击EBOOT.BIN可以实现游戏加载6. △模式为平级破解;△+L1模式破解到3.41,需要安装SFO降级pkg(2.26版会自动生成,不需要自己打包了);△+L2模式破解到4.20,也需要安装SFO降级pkg(2.26版会自动生成,不需要自己打包了)好了,理解了以上信息,正式进入破解步骤:①△模式破解PSN游戏为免授权操作步骤:1. 安装PSN游戏,若有升级补丁,建议一并安装2. 将U盘插在靠近光驱的USB口,U盘根目录的exdata文件夹里放入相关rap文件,另一个USB口不要接其他任何存储设备3. 导入授权(也可不导入,但会增加破解难度)4. XMB界面短按○键打开reActPSN 2.26,然后马上长按住手柄的△键,会发现reActPSN正在破解你PS3里hdd0/game目录下的所有EBOOT.BIN文件,这一步很关键,因为它会驻留内存,是破解NPDRM文件的关键一步5. 进入PSN游戏,然后退出游戏6. 在XMB界面再次短按○键打开reActPSN 2.26,然后马上长按住手柄的△键,会发现reActPSN 在破解edat、self等NP加密文件7. 破解完成后进入游戏,如果能玩游戏说明破解成功,破解至此完成;若出现奖杯错误,则执行第8步8. XMB界面短按○键打开reActPSN 2.26,然后马上长按住手柄的←键,系统自动重启,再多进几次游戏破解成功后,FTP或mMOS或R2模式导出,如果想方便大家,可以将这些文件打包成pkg格式(推荐用JjKkYu的TrueAncestor PKG Creator v1.01),这样就是PSN游戏破解补丁文件了没激活成功的话,请多试几遍,记住按照三角模式—>进游戏check—>三角模式的顺序来就行②△模式破解DLC为免授权操作步骤:1. 若无升级补丁,则将游戏文件夹只保留游戏ID(如BLAS50582),复制到hdd0/game;若有升级补丁,安装升级补丁,不需要把游戏本体复制了2. 将U盘插在靠近光驱的USB口,U盘根目录的exdata文件夹里放入相关rap文件,另一个USB口不要接其他任何存储设备3. 导入授权(也可不导入,但会增加破解难度)4. XMB界面短按○键打开reActPSN 2.26,然后马上长按住手柄的△键,会发现reActPSN正在破解你PS3里hdd0/game目录下的所有EBOOT.BIN文件,这一步很关键,因为它会驻留内存,是破解NPDRM文件的关键一步5. 进入游戏,看看DLC是否激活,然后退出游戏(目的是让系统执行NPDRM过程,并让内存里的相关信息被reActPSN记录捕获到)6. 在XMB界面再次短按○键打开reActPSN 2.26,然后马上长按住手柄的△键,会发现reActPSN 在破解edat、self等NP加密文件7. 检查DLC是否破解为免授权,方法有很多,其中一个简单的方法是进MMOS,右键--十六进制查看器检查edat文件,如有Fixedby reActPSN字样,说明破解成功破解成功后,FTP或mMOS或R2模式导出,如果想方便大家,可以将这些文件打包成pkg格式(推荐用JjKkYu的TrueAncestor PKG Creator v1.01),这样就是一键免授权pkg了没激活成功的话,请多试几遍,记住按照三角模式—>进游戏check—>三角模式的顺序来就行③○模式破解PS1、PSP、THEME、PSN Demo(C00)操作步骤:1. U盘根目录装exdata文件夹,里面放入rap授权文件,插入靠近光驱的USB口,注意另一个USB口不要接其他任何存储设备2. XMB界面短按○键打开reActPSN 2.26,然后马上长按住手柄的○键3. 等待返回XMB界面,成功的话会显示"破解xxPS1 yyPSP zz主题" xx yy zz代表破解的数目早期的一些 PSN 试玩版游戏(特征是在XMB界面按△键会显示购买选项,pkg内有C00目录)可以不需要rap授权文件或官方edat授权文件,直接使用○模式破解成完整可玩版,感兴趣的同学可以自行尝试;另一种类型(游戏内内购)的PSN游戏也可用此模式破解,但需要授权文件[pagesplitxx]三、PS2 Remaster篇!NEWX模式导入2.26版reActPSN的X模式大幅度优化,可以说很完美了。
雷蛇手机2高级用户指南说明书

RAZER PHONE 2雷蛇手机 2高级用户指南Razer Phone 2 雷蛇手机 2 闪亮登场:我们的全新旗舰手机具备无线充电功能、防水功能、带Chroma™ 幻彩灯光效果的 Razer 雷蛇徽标,以及采用真空腔均热板散热系统的升级版处理器。
它既是一款可以满足日常使用需求的旗舰手机,也是一款可提供卓越沉浸式游戏体验的游戏手机。
目录1.内含物品 (3)2.简要介绍 (4)3.技术规格 (5)4.了解手机功能 (7)5.设置 RAZER PHONE 2 雷蛇手机 2 (9)6.使用 RAZER PHONE 2 雷蛇手机 2 (12)7.配置手机 (18)8.个性化 RAZER 雷蛇徽标灯光效果 (50)9.安全与维护 (54)10.法律声明 (56)1.内含物品▪Razer Phone 2 雷蛇手机 2*▪锂离子电池(内置)▪快速充电器(不同地区可能会有所不同)▪USB-C 充电线缆▪USB-C 音频适配器▪SIM 卡弹出针▪重要产品信息指南*可能预安装了 SIM 卡,具体取决于你的运营商。
2.简要介绍你现在拥有了一台很棒的设备。
请马上在线注册,充分发挥设备的所有功能!你将获得 Razer 雷蛇的独家优惠,手机的 1 年有限保修*,以及其他福利。
立即通过/cn-zh/warranty进行注册产品序列号位于手机塑料包装的标签上。
如果遇到问题,请通过/cn向 Razer 雷蛇支持团队提出问题*消费者法。
本有限保修会赋予你特定的法律权利,以及你所在国家、省或州特有的其他权利。
除非法律允许,否则 Razer 雷蛇不会排除、限制或暂停你可以拥有的其他权利。
为充分了解你的权利,你应该适时参阅你所在国家、省或州的相关法律。
如想了解更多的保修条款和条件,请访问/warranty3.技术规格4.了解手机功能麦克风前置摄像头环境光传感器扬声器microSD/SIM 卡托盘音量控制键电源键/指纹传感器USB-C 端口闪光灯双后置摄像头镜头采用 Razer Chroma TM雷蛇幻彩技术的 Razer 雷蛇徽标USB-C 音频适配器USB-C 充电线缆SIM 卡弹出针快速充电器5.设置 RAZER PHONE 2 雷蛇手机 2安装 SIM 卡/MICROSD 卡1.插入 SIM 卡弹出针。
雷蛇魔音海妖 V2 X 高级用户指南说明书

RAZER SEIREN V2 X 雷蛇魔音海妖 V2 X高级用户指南优秀的清晰度,屏蔽各种噪音烦扰,让你在众多主播中脱颖而出。
用Razer Seiren V2 X 雷蛇魔音海妖V2 X传播出色的音质——这款麦克风集中了直播所需的所有必要技术,可栩栩如生地呈现你的声音,是你直播装备的理想之选。
目录1. 内含物品/要求 (3)2. 简要介绍 (5)3. 技术规格 (6)4. 入门指南 (7)5. 使用麦克风 (9)6. 配置 RAZER SEIREN V2 X 雷蛇魔音海妖 V2 X (10)7. 安全与维护 (21)8. 法律声明 (22)1. 内含物品/要求内含物品▪Razer Seiren V2 X 雷蛇魔音海妖 V2 XA.麦克风静音按钮B.麦克风增益控制旋钮C. 3.5 毫米耳机端口D.Type C 端口E.支杆F.螺纹接口▪桌上立架底座▪Type C 转 Type A 线缆▪重要产品信息指南要求产品要求▪具有一个可用 USB 端口的电脑Razer Synapse 雷云要求▪Windows® 10 64 位(或更高版本)▪互联网连接,用于软件安装2. 简要介绍你现在拥有了一台很棒的设备,并且附带一年的有限保修。
即刻通过/cn-zh在线注册,充分发挥设备的所有功能,并获得 Razer 雷蛇的独家福利。
产品的序列号位于此处。
如果遇到问题,请通过/cn向 Razer 雷蛇支持团队提出问题。
3. 技术规格麦克风▪所需电源/功耗:5V/350mA▪采样率:48KHz▪比特率:24▪振膜舱:25 毫米电容式麦克风▪指向模式:超心形指向麦克风▪频响范围:20Hz ~ 20KHz▪灵敏度:-34dB(1V/Pa,1kHz 时)▪最大声压级:120dB▪信噪比:105dBk(A 加权)4. 入门指南1.将 Razer Seiren V2 X 雷蛇魔音海妖 V2 X 牢固地固定在桌上立架底座上。
2.用 Type C 转 Type A 线缆将麦克风连接到电脑的 USB 端口。
springtomize2教程

springtomize2教程Springtomize 2教程介绍:Springtomize 2是一款功能强大的iOS设备定制工具。
它允许用户自定义各种设备设置,如图标布局,文件夹样式,通知中心,控制中心等。
本教程将向您展示如何使用Springtomize 2来个性化和优化您的iOS设备。
1. 安装和配置Springtomize 2首先,您需要从Cydia应用商店下载和安装Springtomize 2。
安装完成后,您将在设备的主屏幕上找到该应用程序。
启动Springtomize 2,并按照屏幕上的指示完成基本配置。
您还可以根据个人喜好选择不同的主题和样式。
2. 自定义图标和布局Springtomize 2提供了一系列选项,让您可以自定义设备的图标和布局。
您可以调整图标的大小,形状,颜色和透明度。
通过单击“图标”选项,您可以轻松选择您想要修改的图标,并编辑它们的属性。
此外,您还可以更改图标的排列方式和布局。
3. 设置通知中心和控制中心Springtomize 2还允许您自定义通知中心和控制中心的外观和功能。
您可以选择显示或隐藏特定小工具和快捷方式,并调整它们的顺序。
您可以更改通知中心和控制中心的背景颜色和样式,以与主题和图标保持一致。
4. 个性化壁纸和锁屏Springtomize 2还提供了广泛的选项来个性化设备的壁纸和锁屏。
您可以选择不同的壁纸效果,如模糊,黑暗,光线等。
您还可以更改锁屏上显示的时间和日期格式,添加自定义文本和小部件。
5. 修改应用程序和文件夹Springtomize 2允许您对应用程序和文件夹进行各种修改。
您可以更改应用程序的标签名称,隐藏应用程序图标,更改文件夹的样式和布局,以及调整文件夹中应用程序的排序方式。
这些选项可以帮助您更好地组织和管理设备上的应用程序和文件夹。
6. 定制多任务界面Springtomize 2还提供了定制多任务界面的功能。
您可以更改多任务界面的背景颜色和样式,选择显示或隐藏特定应用程序的快照,并调整应用程序的排列方式。
雷蛇利维坦巨兽V2用户指南说明书
雷蛇利维坦巨兽高级用户指南雷蛇利维坦巨兽是一款多驱动单元的条形游戏音箱和低音炮,提供 THX® Spatial Audio 空间音效和Razer Chroma™ 雷蛇幻彩 RGB 效果。
即刻以各种你能想象得到的方式武装你的装备。
借助低延迟蓝牙 5.2 的支持,在视觉和听觉方面体验出色的沉浸感,还可在电脑和移动设备之间无缝切换使用。
目录1. 内含物品/要求 (3)2. 简要介绍 (6)3. 技术规格 (7)4. 入门指南 (8)5. 使用条形音箱 (13)6. 通过 RAZER SYNAPSE 雷云配置 RAZER LEVIATHAN V2 雷蛇利维坦巨兽 V2 (17)7. 安全与维护 (27)8. 法律声明 (28)1. 内含物品/要求内含物品▪Razer Leviathan V2 雷蛇利维坦巨兽 V2顶部前部后部音源按钮蓝牙按钮电源按钮音量控制按钮采用 Razer Chroma TM雷蛇幻彩 RGB 技术的条形音箱灯光效果电源端口Type-C 端口低音炮输出端口▪ 低音炮后向式重低音端口低音炮接口▪ Type-C 转 Type-A 线缆▪ 用于调整条形音箱角度的可拆卸式脚钉扁平式脚钉(已预安装)凸起式脚钉▪电源适配器 + 当地电源线▪重要产品信息指南要求产品要求▪USB-A 端口或▪带有蓝牙 5.0 连接的设备Razer Synapse 雷云要求▪Windows® 10 64 位(或更高版本)▪互联网连接,用于软件安装Razer Audio 音频/Razer Chroma 雷蛇幻彩 RGB 应用程序要求▪带蓝牙 5.0 连接功能的 iOS 12/Android 8.1 Oreo(或更高版本)设备▪互联网连接,用于应用安装2. 简要介绍你现在拥有了一台非常棒的设备,并且附带两年的有限保修。
即刻通过/cn-zh在线注册,充分发挥设备的所有功能,并获得 Razer 雷蛇的独家福利。
红警2rues(md)提取教程
红警2提取教程
可以修改红警游戏的单位参数。
1.首先下载一个XCC Mixer,用于提取红警游戏以及其他MO文件游戏的的工具。
2.接着打开。
出现以下界面:
它会显示你电脑的所有磁盘。
3.点击磁盘,打开你的红警目录。
(即你的游戏安装的所在文件夹)
4. 进到红警目录,选择双击打开。
如:
5.进去后,双击local. mix进入这个子文件包。
6. 找到文件,鼠标在它上面点右键,点提取文件。
7. 选择保存位置,一般指定红警目录。
8. 点保存即完成文件提取。
就会出现在你的红警目录中,接着就可以借助代码来修改游戏。
二、如果要提取MOD的规则文件,则直接打开它的目录,找通常在expandmd**.mix之中。
通常有好几个expandmd**.mix,一个一个找,就能找到。
例如,我们来提取一个MOD的规则文件,如心灵终结。
打开它的目录,看到expandmd**.mix,有五个。
一个一个找,我最终在双击后,看到了。
倒数第三个就是它。
鼠标在它上面点右键,点提取文件。
点保存即完成文件提取。
使用“保存在”可以保存在其他地方,选择保存位置,一般指定红警目录。
RE-2用户指南说明书
Op e r a ting In s trucTa b le of Con t entsQuick Set-Up (1)Sys t em De s crip t ion (1)De t ailed Com p o n ents De s crip t ion (2)Re c eiver Setup and Operation (2)Re c eiver Push-But t on Ref e r e nce Sheet (3)Handheld Trans m it t er (4)Body pack Trans m it t er (6)Ap p roval In f or m a t ion (6)Dis p lay Screens and Func t ions (7)Re c eiver Main Op e r a t i ng Screen (7)Re c eiver Con t rols and Func t ions (7)Trans m it t er Dis p lay s and Con t rols (7)Trans m it t er On/Off Lock-out (8)Guide l ines and R ec o m m en d a t ions for Best Per f or m ance (8)Trou b le Shoot i ng Guide (9)Tech n i c al Spec i f i c a t ions (11)Ac c es s o r ies and Parts (14)Fac t ory Ser v ice/War r anty (Lim i ted) (15)Sec t ion 1 - Quick Set-UpQuick Set-up: Re c eiver1.Do not con n ect the re c eiver to any other equip m ent yet!2.Con n ect the two an t en n as to the re c eiver.3.Plug the power sup p ly into the back of the re c eiver andinto an out l et4.Press the POWER switch. Dis p lay will light up.5.Press and hold the SET but t on un t il ClearScan TM showsand starts flash i ng on the right side of the screen.6.When ClearScan TM stops flash i ng, the re c eiver will au t o m at -i c ally set it s elf and dis p lay the clear e st group and chan n el.7.If y ou are us i ng a gui t ar, turn off the re c eiver. Press andhold SET while you turn the receiver on. A gui t ar sym b ol will ap p ear in the dis p lay to in d i c ate in s tru m ent mode.8.Turn the re c eiver off and con n ect the mixer or other au d iosys t em to the re c eiver XLR Con n ec t or or the ¼ inch Line Level Jack.9.Set the au d io mixer or other sy s t em in p ut level to min i-mum.10.Press the Power switch but t on in again.Re c eiver “Quick Set-up” is com p lete.Quick set-up: Trans m it t er1.With the Power Switch on the trans m it t er OFF, in s tall afresh al k a l ine bat t ery into the trans m it t er.2.Place the trans m it t er Power Switch to the ON po s i t ion.3.The Red Bat t ery Low Light near the dis p lay will flash onand then off. The dis p lay will also come on and dis p lay a group and chan n el.4.Press the SET but t on once and the Group num b er wille the up and down ar r ows to change the Group num b erto match the Group num b er dis p lay ed on the re c eiver.Press SET and the Chan n el Num b er will flash.e the up and down ar r ow but t ons to change the Chan n elto match the re c eiver. Press Set and noth i ng will be flash -ing. The chan n el is now set.7.If y ou are us i ng a body pack trans m it t er, plug the mi c ro -phone into the trans m it t er con n ec t or. If us i ng a gui t ar, turn the trans m it t er off and wait un t il dis p lay is blank. Hold SET down and turn the trans m it t er on. A gui t ar sy m b ol should ap p ear on the dis p lay. Plug the cord into the trans -mit t er and gui t ar.Trans m it t er “Quick Set-up” is com p lete.Quick set-up:Sys t em Op e r a t ion1.With the trans m it t er and re c eiver on, mon i t or the dis p layscreen. Note that the RF (1-100) Bar graph should in d i c ate near the 100 mark. The AF Bar should show very lit t le, if any, in d i c a t ion un t il you talk or sing into the mi c ro p hone.Ad j ust the trans m it t er gain con t rol if nec e s s ary to cause the AF Bar Graph to peak near -6 to -3 but not over +3 for best per f or m ance.2.Set the mixer/amp gain.3.Talk or sing into the mi c ro p hone or play the gui t ar at anor m al vol u me. You should hear au d io com i ng out of the sy s t em.4.If us i ng the un b al a nced 1/4" out p ut, you may have to ad -just the gain (via the con t rol next to the con n ec t or on the back panel) to match the level found when sing i ng or play -ing with a wired con n ec t ion."Quick Set-up" is now com p lete.Please en j oy your RE-2 sys t em.Sec t ion 2 - Sys t em De s crip t ionThe RE-2 Wire l ess Mi c ro p hone sy s t em com b ines fre q uency agil i ty and ease of use like no other. The RE-2 trans m it t ers and re c eiv e rs op e r a te over a 24 MHz band w idth in the UHF por t ion of the Ra d io Fre q uency spec t rum.Sys t em Fea t ures In c lude:The high qual i ty au d io cir c uitry and ad v anced Ra d io Fre -quency (RF) sig n al pro c ess i ng of f er broad c ast qual i ty sig -nal-to-noise and au d io clar i ty.•Ad v anced ClearScan TM tech n ol o gy for se l ect i ng the clear e st avail a ble chan n els in intermodulation free groups.•Com p letely pro g ram m a b le in25kHz steps for over 950 pos s i b le fre q uen c ies.•LCD Dis p lay s for ease of view i ng-Group, Chan n el, Fre -quency, Bat t ery Sta t us, Di v er s ity Ac t iv i ty, Au d io Me t er and RF Me t er.•Pat e nted Phase Di v er s ity Sy s t em•Ad j ust a ble Un b al a nced Line Level 1/4 inch out p ut jack •Bal a nced XLR out p ut jack for fixed Mi c ro p hone Level or ad j ust a ble Line Level •Front Panel Power ON/OFF Switch•Front Panel Soft w are Con t rol of Squelch set t ings •Dou b le Squelch (Am p li t ude and Tone) sy s t em pre v ents false squelch•Lock o ut fea t ure to pre v ent ac c i d en t al chan n el changes •"Smart" bat t ery fea t ure in the trans m it t er means there is no wrong ori e n t a t ion•Power Lock On fea t ure pre v ents ac c i d en t al turn off •Bat t ery level dis p layed at the re c eiverSec t ion 3 - De t ailed Com p o n ents De s crip t ionR e c eiver Setup and Op e r a t ion1.Place the re c eiver and an t en n as where there is a clear lineof sight to the area where the trans m it t er will be used. Ro -tate the an t en n as to sep a r ate them by 90 de g rees.2.Con n ect the power sup p ly cord to the re c eiver. Plug thepower sup p ly into an AC out l et. Turn the re c eiver on and con f irm that it is ON by check i ng the main dis p lay screen. Cau t ion: Please make sure the AC power sup p ly is the cor -rect volt a ge for your lo c al re q uire m ents be f ore it is plugged into the wall.3.Man u al Chan n el Change.Press the SET but t on and theGroup num b er will start to flash. The Up and DOWN but -tons al l ow y ou to scroll through the fac t ory set group.When the group you de s ire is dis p layed, press SET to se -lect that group and the Chan n el Num b er will start flash i ng.Scroll to the de s ired chan n el and press SET to se l ect. The num b ers will stop flash i ng and the new group and chan n el are in s talled.4.Fre q uency As s ign m ent (Out s ide of pre s et Groups andChan n els), press SET and UP at the same time and the group and chan n el will go blank and the Fre q uency will start flash i ng. Use UP/DOWN to scroll in 25 KHz steps to the de s ired fre q uency. Press SET and the fre q uency will be se l ected and stop flash i ng. Press Set and UP at the same time to re t urn to group and chan n el op e r a t ion. Hint: hold -ing in the Up or Down key will in c rease the speed of the scroll. Just re l ease and press again for fine con t rol 5.Ad v anced ClearScan:TM This fea t ure au t o m ates the pro -cess of find i ng a clear group of inter-mod u l a t ion free chan n els and the clear e st chan n els within those groups.a.ClearScan TM, for Groups: From the main dis p layscreen, push SET once and the Group Num b er willflash. While Group is flash i ng, press and hold SET un -til ClearScan TM ap p ears, re l ease the set key. When thescan is com p leted, the dis p lay will show the groupwith the most clear chan n els and the Chan n el num b erwill in d i c ate how many clear chan n els are in thatgroup. Use the UP/DOWN key s and to view othergroups and press SET to se l ect a group. The Groupwill be set and the Chan n el will start to flash. Se l ect achan n el man u a lly or use ClearScan TM for Chan n els.ClearScan TM for Chan n els: To scan for the clear e stchan n el in a group, press and hold set while the Chan -nel is flash i ng un t il ClearScan TM ap p ears, re l ease theSET but t on. When the scan is com p lete, the dis p laywill show the clear e st avail a ble chan n el. UseUP/DOWN to scroll through the other avail a ble chan -nels rank from clear e st to least clear (but still avail a blefor use, ClearScan TM will not dis p lay any chan n el thatcan't be used). Press SET to se l ect the chan n el.b.c.Auto ClearScan:TM This func t ion will find the clear -est group and chan n el with the press of just one but t on.With noth i ng flash i ng, press and hold the SET but t onun t il ClearScan ap p ears on the right side of the screen.When the scan is com p lete, the re c eiver will be set tothe clear e st chan n el in the clear e st group.1.Power ON/OFF2.Graph i c al Dis p laya.Chan n el Dis p layb.Fre q uencyc.Bat t ery Strength In d i c a t ord.Di v er s ity In d i c a t ore.RF Strength ofSig n al In d i c a t orf.Au d io Level In d i c a t or3.Dis p lay Con t rol But t ons(Set/Up/Down)4.Power Con n ec t or5.XLR Bal a nced Mic/Line Level Au d io Out p utLine Level Ad j ust a ble6.Un b al a nced Line Level Au d io Out p utCon n ec t or with Level Ad j ust m ent7.TNC An t enna In p ut Con n ec t ors8.Power Cord Re t ainerRE-2Fig u re 2 - RE-2 Back Panel2Fig u re 1 - RE-2Front PanelProper An t enna OrientationR E-2R e c eiver Con t rols,Con n ec t ors,and In d i c a t orsNOTE: Groups x,x,x, and x are set up to work with the other US fre q uency band (A and B). These groups are listed last no mat t er how many open chan n els are avail -able. If you are us i ng a mix of Band A and Band B, scroll down to these groups and use the clear e st group.6.Change Lock-Out: By press i ng and hold i ng the UP andDOWN ar r ow keys to g ether for 3 sec o nds, the SET key is dis a bled.To re a c t i v ate the SET key, sim p ly press and hold the UP and DOWN keys again for 3 sec o nds. This fea t ure can be use f ul when the re c eiver is in a lo c a t ion where un -au t ho r ized per s on n el have ac c ess to the re c eiver.7.For set up, make sure the mixer or amplifier in p ut used forthe RE-2 is muted or turned down to a min i m um level.8.Plug an au d io ca b le (not sup p lied) into the 3 pin XLR or1/4 inch out p ut of the RE-2.a.NOTE: The XLR con n ec t or is the pre f erred con n ec -tion since the out p ut is bal a nced and will be more im -mune to noise for lon g er runs of ca b le al t hough ei t hercan be used with good re s ults. If the 1/4 inch con n ec t oris used, ad j ust the out p ut level on the back panel to 12o'clock (mid w ay in the range) to start and ad j ust later ifnec e s s ary.Now re f er ahead to trans m it t er setup and re t urn to step 9 when that is com p leted.9.With the trans m it t er on, speak into the mi c ro p hone or playthe guitar. Turn up the level on the mixer or am p li f ier un t il you are able to hear the de s ired sig n al. If no au d io is pres -ent, re p eat setup and re f er to the trou b le s hoot i ng sec t ion.NOTE: If the 1/4 inch out p ut is used, it may be nec e s s ary to ad j ust the re c eiver out p ut un t il the vol u me level from the wire l ess sy s t em ap p rox i m ates the level of an equiv a-lent wired mi c ro p hone/in s tru m ent.10.Squelch Ad j ust m ent - The squelch set t ing can be used tomax i m ize range or im m u n ity to noise. Press and hold Up for 3 sec o nds. The cur r ent squelch set t ing will be dis -play ed.Ad j ust the squelch us i ng the UP/DOWN key s.Max i m um squelch(9)max i m izes noise im m u n ity but lim -its the range. Min i m um squelch (1) will max i m ize the range but al l ow more noise to break through the squelch. Press SET to save the new squelch set t ing.R e c eiver Push-But t on R ef e r e nce SheetDis p lay Sta t us But t on Press Func t ion Ac t i v ated Edit Ac c ept Noth i ng Flash i ng Press and hold SET Auto ClearScanän/a n/a Noth i ng Flash i ng SET Edit Group -Group will flash??SETGroup Flash i ng Press and hold SET ClearScanä Group - list clear groups in or d er??SET Group Flash i ng SET Edit Chan n el - Chan n el will flash??SET Chan n el Flash i ng Press and hold SET ClearScanä Chan n el - list clear chan n els in or d er??SET Noth i ng Flash i ng Press and hold Up Edit Squelch Set t ing??SET Noth i ng Flash i ng Press and hold Up & Down Edit Lock - Se c ure will ap p ear n/a n/a Edit Lock On Press and hold Up & Down Re t urn to Ac c ess Mode n/a n/a Power Off Press and hold SET Tog g le be t ween Gui t ar and V oice mode n/a n/a Noth i ng Flash i ng Press SET and Up Tog g le to Fre q uency Mode - Freq will flash??SET Fre q uency Flash i ng Press and hold SET ClearScanä Band - Clear Scan will flash n/a SET ClearScanä Band Run n ing Press SET End ClearScanä Band af t er next full scan n/a n/a ClearScanä Band Re s ults n/a8Clear e st fre q uen c ies listed??SET Fre q uency Mode Press SET and Up Re t urn to Group and Chan n el Mode n/a n/a Noth i ng Flash i ng Press and hold Down Dis p lay Soft w are Re v i s ion n/a n/aHandheld Trans m it t er HTU-2Fig u re 3Handheld Trans m it t erHTU-2 Con t rols, Con n ec t ors, and In d i c a t orsHandheld Trans m it t er Setup and Op e r a t ion1.In s ert Bat t ery. Re m ove the bat t ery com p art m ent cover byun s crew i ng it com p letely. In s ert a 9V bat t ery, ter m i n al end first into the bat t ery com p art m ent.NOTE: The HTU-2 unique de s ign al l ows the bat t ery to be in s erted and used re g ard l ess of the pos i t ive and neg a t ive ter m i n al po s i t ion.2.With bat t ery com p art m ent still open, turn the unit soyou can see the dis p lay and the con t rol panel. Turn the unit on by slid i ng the power switch for w ard to the on po s i t ion.The bat t ery low LED will light for a sec o nd and the dis -play will show the Group and Chan n el num b ers.3.Change the group and chan n el num b ers to match those dis p lay ed on the re c eiver by press i ng SET. The Group num b er will flash and can be changed with the UP/DOWN key s. Once the de s ired group num b er is show i ng, press SET to se l ect and the Chan n el num b er will flash. Se l ect the Chan n el and press SET again. The flash i ng will stop and the chan n el is now set.4.Other Screens: Press SET and DOWN at the same time to dis p lay the bat t ery level. Press SET and DOWN again to dis p lay fre q uency. Press them one more time to re t urn to Group and Chan n el .Fig u re 4Trans m it e r5.Fre q uency Edit Mode - Press SET from the fre q uencydis p lay screen to en t er fre q uency edit mode. Press the Up and Down to ad j ust fre q uency in 25 kHz in c re m ents. Hold -ing the Up or Down but t ons down will auto step the fre -quency ; slowly at first, then quickly. You can also en t er fre q uency edit mode by press i ng SET and UP at the same time from ei t her the Group and Chan n el or Bat t ery sta t us dis p lay screens. Press i ng SET and UP at the same time form the Fre q uency dis p lay screen will en t er Group and Chan n el edit mode.6.Power Lock Out - Press SET, UP, and DOWN at the same time and hold 3 sec o nds to lock the power switch on. To turn the unit off, place the power switch in the OFF po s i -tion and push SET, UP, or DOWN. To re m ove the lock,press SET, UP, and DOWN again at the same time and hold 3 sec o nds . A one-time only ON-LOCK mode can also be en t ered by quickly cy c ling the power switch three times.7.Set Key Lock-Out , by press i ng and hold i ng the UP andDOWN ar r ow keys to g ether for 3 sec o nds, the SET key is dis a bled. To re a c t i v ate the SET key sim p ly press and hold the UP and DOWN keys again for 3 sec o nds.SET45683121. Main Dis p lay - LCD (Chan n el, Fre q uency or Bat t ery Level In d i c a t ion)2. Bat t ery Low LED - Lights when bat t ery is low 3. Power On/Off Switch 4. Set Switch5. Chan n el/Fre q uency Up Switch6. Chan n el/Fre q uency Down Switch7. Mi c ro p hone Gain8. 9V Bat t ery Holder9. Bat t ery Cover - Screw type.8.Ver i fy re c ep t ion. With the trans m it t er and re c eiver on andmatch i ng Group and Chan n el, the main re c eiver dis p lay should be in d i c at i ng a RF sig n al on the bar graph. Speak into the mi c ro p hone and the Au d io Me t er bar graph should in d i c ate au d io sig n al pres e nce. If the level me t ers do not show re c ep t ion, make sure the chan n els are match i ng and re f er to the trou b le shoot i ng sec t ion.9.Ad j ust m ent of the trans m it t er au d io gain - If nec e s s aryThe trans m it t er au d io gain is fac t ory set at the mid d le of the range, which should be suit a ble for most ap p li c a t ions.For loud or soft speak e rs/sing e rs, a gain ad j ust m ent may be nec e s s ary. Have the speaker or singer use the mi c ro -phone in a nor m al per f or m ance level voice. The Au d io Me t er in the main re c eiver dis p lay screen should show peaks around the -3dB level. If the me t er peaks all the way to the right or well be l ow the -3dB level, ad j ust the trans -mit t er au d io gain.Bodypack Trans m it t er-BPU-2Fig u re 5Bodypack Trans m it t erBPU-2Con t rols, Con n ec t ors, and In d i c a t orsTo ad j ust the trans m it t er gain, gently in s ert the pro v ided screw d river (or other 3/32 - 2.5 mm screw d river) into the ad j ust m ent hole op p o s ite the dis p lay screen. Turn lightly un t il the screw d river tip goes into the ad j ust m ent level con t rol. Gently turn coun t er c lock w ise un t il the con t rol stops (the mi c ro p hone out p ut is at min i m um but not off).Slowly turn the gain con t rol up (clock w ise) while speak -ing/sing i ng into the mi c ro p hone and the au d io me t er shows peaks around -3 dB.NOTE: Op e r a t i ng with the trans m it t er au d io gain set as high as pos s i b le (with o ut dis t or t ion or peaks all the way to the right end of the me t er) will re s ult in the best per f or -mance and high e st sig n al to noise ra t io.10.Test Per f or m ance. Go back to Sec t ion 3. Re c eiver Setupand Op e r a t ion - Step 9 to com p lete sys t em set up and test.Fig u re 6Con t rol ViewFig u re 7Top ViewOFF4231.An t enna - flex i b le 1/4 wave an t enna2.Power On/Off Switch3.Bat t ery Low LED In d i c a t or4.TA4Au d io Con n ec t or5.LCD Dis p lay (Chan n el, Fre q uency orBat t ery Level Indication)6. Dis p lay Con t rol But t ons (Set/Up/Down)7.Belt Clip (Re m ov a ble,not shown)8.9V Bat t ery Compartment9.Au d io Gain AdjustmentBodypack Trans m it t er Setupand Op e r a t ion1.In s ert Bat t ery. Pinch the bat t ery door tabs in w ard andpull the door open. In s ert a 9V bat t ery as in d i c ated by the +/- in the holder.2.With bat t ery com p art m ent still open, turn the unit on withPower switch on the top panel. The bat t ery low LED will light for a sec o nd and the dis p lay will show the Group and Chan n el num b ers.3.Change the group and chan n el num b ers to match thosedis p lay ed on the re c eiver by press i ng SET. The Group num b er will flash and can be changed with the UP/DOWN key s. Once the de s ired Group num b er is show i ng, press SET to se l ect and the Chan n el num b er will flash. Se l ect the Chan n el and press SET again, the flash i ng will stop and the chan n el is now set.4.Set Key Lock-Out. By press i ng and hold i ng the UP andDOWN ar r ow keys to g ether for 3 sec o nds, the SET key is dis a bled. To re a c t i v ate the SET key, sim p ly press and hold the UP and DOWN keys again for 3 sec o nds.5.Ver i fy re c ep t ion. With the trans m it t er and re c eiver on andmatch i ng Group and Chan n el, the main re c eiver dis p lay should be in d i c at i ng a RF sig n al on the bar graph. If the level me t er does not show re c ep t ion, make sure the chan -nels are match i ng and re f er to the trou b le shoot i ng sec t ion.6.At t ach the Mi c ro p hone or Guitar.Mi c ro p hone:Plug the mi c ro p hone ca b le into the top panel of the BPU-2. Speak into the mi c ro p hone and the Au d io Me t er bar graph should in d i c ate au d io sig n al pres e nce.Gui t ar: Turn off the bodypack, press and hold SET while you turn the bodypack on. A gui t ar sym b ol will ap p ear in the dis p lay to in d i c ate in s tru m ent mode. Re p eat the pro -cess hold i ng SET on the re c eiver as it is pow e red up to re -turn to voice mode. Plug in the MAC-G3 gui t ar ca b le.Strum the gui t ar and the Au d io Me t er bar graph on the re -ceiver should in d i c ate au d io sig n al pres e nce.7.Ad j ust m ent of the Trans m it t er Au d io Gain-(if nec e s -sary). The trans m it t er au d io gain is fac t ory set at the mid -dle of the range, which should be suit a ble for most ap p li c a t ions. For loud or soft speak e rs/sing e rs, a gain ad -just m ent may be nec e s s ary.Have the speaker or singer use the mi c ro p hone in a nor m al per f or m ance level voice. The Au d io Me t er in the main re -ceiver dis p lay screen should show peaks around the -3 dB level. If the me t er peaks all the way to the right or well be -low the -3 dB level, ad j ust the trans m it t er au d io gain.To ad j ust the trans m it t er gain, gently in s ert the pro v ided screw d river (or other screw d river) into the ad j ust m ent po -ten t i o m e t er.Gently turn coun t erclock w ise un t il the con t rol stops (the mi c ro p hone out p ut is at min i m um but not off).Slowly turn the gain con t rol up (clock w ise) while speak -ing/sing i ng into the mi c ro p hone or strum m ing the guitar and the au d iome t er shows peaks around -3 dB.NOTE: Op e r a ting with the trans m it t er au d io gain set as high as pos s i b le (with o ut dis t or t ion or peaks all the way to the right end of the me t er) will re s ult in the best per f or -mance and high e st sig n al to noise ra t io.Other Screens: Press SET and DOWN at the same time to dis p lay the bat t ery level. Press SET and DOWN again to dis p lay fre q uency. Press them one more time to re t urn to Group and Chan n el.8.Fre q uency Edit Mode - Press SET from the fre q uencydis p lay screen to en t er fre q uency edit mode. Press the Up and Down to ad j ust fre q uency in 25 kHz in c re m ents. Hold -ing the Up or Down but t ons down will auto step the fre -quency; slowly at first, then quickly. You can also en t er fre q uency edit mode by press i ng SET and UP at the same time from ei t her the Group and Chan n el or Bat t ery sta t us dis p lay screens. Press i ng SET and UP at the same time form the Fre q uency dis p lay screen will en t er Group and Chan n el edit mode.9.Power Lock Out - Press and hold SET, UP, and DOWN atthe same time and hold for 3 sec o nds to lock the power switch on. To turn the unit off, place the power switch in the OFF po s i t ion and push SET, UP, or DOWN. To re -move the lock, press SET, UP, and DOWN again at the same time and hold for 3 sec o nds. A one-time only ON-Lock mode can also be en t ered by quickly cy c ling the power switch three times.10.Test Per f or m ance - Go back to Sec t ion 3 - Re c eiver Setup& Op e r a t ion, Step 9 to com p lete sys t em set up and test.AP P R OV AL IN F OR M A T IONThe Elec t ro-V oice/Telex Trans m it t ers are Ty pe Ac c epted un d er United States Fed e ral Com m u n i c a t ions Com m is s ion CFR 47, Part 74 and In d us t ry Can a da RSS123.The Elec t ro-V oice/Telex Re c eiver is ap p roved un d er United States Fed e ral Com m u n i c a t ions Com m is s ion CFR 47, Part 15 and In d us t ry Can a da RSS210.Li c ens i ng of Elec t ro-Voice/Telex equip m ent is the us e rs re s pon s i b il i ty and Licensability de p ends upon the us e rs clas s i f i -ca t ion, us e rs ap p li c a t ion and fre q uency se l ected. Elec t ro-Voice/Telex strongly urges the user to con t act the ap p ro p ri a te tele c om m u n i c a t ions au t hor i ty for any de s ired clar i f i c a t ion.CAU T ION: Any changes or mod i f i c a t ions made to the above equip m ent could void the us e rs au t hor i ty to op e r a te the equip m ent.Sec t ion 4 - Re c eiverFig u re 8Main Op e r a t i ng ScreenSquelch Ad j ust m ent ScreenFig u re 9Squelch Adjustment ScreenTrans m it t er Dis p lay and Con t rolsFig u re 10Trans m it t er Dis p lay and Con t rols1. Squelch Level ·············1-10 1.[UP] + [DOWN] ad j ust the squelch level2. SET saves the squelch level shown and re t urns youto the main screenDis p lay:Con t rols:1.Press and hold SET for 3 sec o nds starts Auto ClearScan ™2.Press SET once, Group starts flash i ng, ad j ust with UP andDOWN 2.a With Group flash i ng, press and hold SET for 3sec onds to start Group Scan .3.Press SET twice, Chan n el starts flash i ng, ad j ust with UP andDOWN 3.a With Chan n el flash i ng, press and hold SET for 3sec o nds to start Chan n el Scan 4.Press SET and UP at the same time to en t er Fre q uency Mode 5.Press and hold UP for 3 sec o nds to ad j ust Squelch6.Press and hold SET dur i ng power up to en t er In s tru m ent Mode7.[UP] + [DOWN] for 3 sec o nds Sets/Re s ets Edit Lock o ut1.Group Num b er ···········10 fac t ory set2.Chan n el Num b er··········01 to 103.Fre q uency ···············Dis p lay ed in Mega H ertz4.Bat t ery Sta t us············100 to 0 Pct in25 Pct steps/Flash if low5.Au d io VU Me t er ·········-30 VU to + 3 VU6.RF Sig n al Strength ········1µV to 100 µV7.An t enna Di v er s ity Stat us ···left or right an t enna 8. ClearScan ™·············In d i c ates Scan is in prog r ess 9.Gui t ar Sy m b ol ···········In d i c ates In s tru m ent ModeCon t rols:Dis p lay:1.Group and Chann el 2.Bat t ery Level in Per c ent a ge 3.Fre q uency1.Press SET once, GP will flash, use UP and DOWN to ad j ust2.Press SET again to ac c ept GP, CH will flash, ad j ust with UP/DOWN3.Press SET again to ac c ept CH and chan n el will be in s talled4.Press SET and DOWN at the same time to change dis p lay mode5.Press SET and UP to en t er Fre q uency Set Mode6.Press SET and DOWN to re t urn to the Group/Chan n el Mode7.Press and hold UP and DOWN for 3 sec o nds to lock out SET8.Press and hold UP and DOWN again to ac t i v ate SET9.Press and hold UP, DOWN, and SET to lock power (see Sec t ion 4)10.Press and hold UP, DOWN, and SET to un l ock powerDis p lay:Controls:Trans m it t er On/Off Lock-OutThere are two On/Off lock o ut modes avail a ble, One Time and Everytime.One Time: Cy c le the power switch 3 times in un d er 3 sec o nds and On-Loc will be dis p layed for a sec o nd and then re t urn to nor m al op e r a t ion. The power switch alone will no lon g er turn the unit off. To turn the unit off, put the power switch in the off po s i t ion (On-Loc will be dis p layed) open the bat t ery door and press [Set], [Up], or [Down] and the unit will power down. The next time the unit is pow e red on, the power switch will op e r a te nor m ally.Everytime Use: With the unit on and op e r a t i ng in the nor m al mode, press and hold [Set], [Up], and [Down] for 3 sec o nds. On-Loc will be dis p layed and the power switch alone will no lon g er turn the unit off. To turn the unit off, put the power switch in the off po s i t ion, (On-Loc will be dis p lay ed), open the bat t ery door and press [Set], [Up], or [Down] and the unit will power down. The next time the unit is pow e red on, the On-loc func t ion will still be on. To en a ble the power switch, press and hold [Set], [Up], and [Down] for 3 sec o nds (On-Off will be dis p layed).Guide l ines and R ec o m m en d a t ionsfor Best Per f or m anceCom p at i b il i tyThe trans m it t er and re c eiver must be of the same fre q uency band and set to the same group and chan n el in or d er to work to g ether. The RE-2 is avail a ble in two fre q uency bands, A and B. The band in f or m a t ion is avail a ble in the Group/Chan n el edit screen on the re c eiver, the bot t om la b el on the handheld trans m it t er, and on the back panel la b el on the bodypack.Us i ng Mul t i p le Wire l ess Sys t emsIf two or more RE-2 sys t ems and/or other UHF/VHF wire l ess sys t ems are be i ng used in the same lo c a t ion, proper fre q uency co o r d i n a t ion is nec e s s ary to avoid in t er f er e nce.All chan n els in the RE-2 fac t ory set groups are de s igned to work together, so if chan n els from just one group are used no fur t her coordination is re q uired. Con t act your dealer or Telex for as -sis t ance if you are plan n ing more sys t ems or us i ng the RE-2 with other wire l ess equip m ent.IM P OR T ANT NOTE: Al w ays use the small e st pre s et group that meets your needs. For in s tance, if you want to set up 6 units, use one of the groups of 8 fre q uen c ies. The smaller the pre s et group, the more com p at i b le the fre q uen c ies are.Mul t i p le Sys t emsand Ad v anced ClearScan TMBe c ause all of the chan n els in the fac t ory set groups are com -pat i b le,Ad v anced ClearScan TM can be used to set up mul t i p le sy s t ems quickly and with con f i d ence. When set t ing up more than one sys t em, set up the first sys t em us i ng the ClearScan TM All func t ion. Once the work i ng Group has been es t ab l ished, leave the first trans m it t er on, set the next re c eiver Group to the work i ng Group and run ClearScan TM Group. This will pro v ide the next clear e st chan n el in that group. Set the trans m it t er to match, leave it on and re p eat un t il all the sys t ems are set up. If you run out of clear chan n els in one group but need to set up more sys t ems, contact your dealer or Telex for as s is t ance in choos -ing ad d i t ional fre q uen c ies.Po t en t ial Sources of In t er f er e nceThere are many po t en t ial sources of in t er f er e nce for y our wire l ess sy s t em.Any elec t ronic prod u ct that con t ains dig i t al cir c uitry in c lud i ng dig i t al sig n al pro c es s ors (re v erb/multi-effects units), elec t ronic key b oards, dig i t al light i ng con t rol l ers, CD and DVD play e rs, and com p ut e rs, all emit RF en e rgy that can ad v ersely af f ect the per f or m ance of your wire l ess sys t em. It is al w ays best to place the re c eiver as far away as pos s i b le from these de v ices to min i m ize po t en t ial prob l ems.An a l og and Dig i t al Tele v i s ion stations can also in t er f ere with your wire l ess sys t em. The RE-2 is de s igned to op e r a te over 24 MHz of RF band w idth, which cov e rs four TV chan n els. The fac t ory pre s ets on the RE-2 are op t i m ized for conditions where one or pos s i b ly two of the four stations are cov e red in your area. If three of the four sta t ions are used in your area, it will se v erely limit the num b er of sys t ems that will op e r a te to -gether and you should be us i ng a dif f er e nt band.Bat t ery R ec o m m en d a t ionsFresh9-volt al k a l ine bat t er i es form a qual i ty man u f ac t urer will yield the best per f or m ance from your RE-2 trans m it t ers. Re c harge a ble 8.4-volt Ni-Cad bat t er i es can be used but will re s ult in much shorter op e r a t ion time.When the trans m it t ers are turned on, the red bat t ery LED will flash once if the bat t ery is good. If the light does not light or stays lit con t in u o usly, the bat t ery is weak or dead. If the light co m es on dur i ng use, the bat t ery is weak e n i ng and should be re p laced as soon as pos s i b le. If sound qual i ty de g rades during use, it may be the re s ult of a weak e n i ng bat t ery.Cau t ion: The bat t ery level in d i c a t ors, on the trans m it t ers and re c eiver dis p lays, are based on the use of al k a l ine bat -ter i es. Use of other bat t ery types will re s ult in false read -ings on these in d i c a t ors al t hough the bat t ery low LED on the trans m it t ers will op e r a te nor m ally.Re c eiver and An t enna Place m entDo not place the re c eiver near a large metal ob j ect or sur f ace. Lo c ate the re c eiver as close as pos s i b le to the area where the trans m it t er will be used. Ide a lly, po s i t ion the re c eiver/an t en n as within sight of the trans m it t er. When us i ng mul t i p le sys t ems, do not al l ow an t en n as to cross or touch each other. For best re -sults with mul t i p le re c eiv e rs, use an APD4 an t enna split t er. (See Sec t ion 7).。
雷蛇北海巨妖萌猫版 V2高级用户指南说明书
RAZER KRAKEN KITTY V2雷蛇北海巨妖萌猫版 V2高级用户指南借助新推出的Razer Kraken Kitty V2雷蛇北海巨妖萌猫版V2,以酷炫的猫咪风格为自己打造出极为可爱的直播形象。
采用 Razer Chroma™雷蛇幻彩 RGB 技术的独特猫耳,再加上直播时的响应式灯光效果和极为清晰的麦克风,让你轻松脱颖而出,吸引大家的注意力。
目录1. 内含物品 (3)2. 要求 (4)3. 简要介绍 (4)4. 技术规格 (5)5. 设置 RAZER KRAKEN KITTY V2 雷蛇北海巨妖萌猫版 V2 (6)6. 入门指南 (8)7. 雷云配置 RAZER KRAKEN KITTY V2 雷蛇北海巨妖萌猫版 V2 (10)8. 安全与维护 (22)9. 法律条款 (23)1. 内含物品▪ Razer Kraken Kitty V2 雷蛇北海巨妖萌猫版 V2A.采用 Razer Chroma TM雷蛇幻彩RGB 技术的响应式直播猫耳和耳罩B.可调节的带衬垫头梁C.混合面料和人造皮革软垫B Type A 连接线E.Razer™ HyperClear 雷蛇灵晰技术心形指向麦克风F.音量控制拨轮G.麦克风静音键▪重要产品信息指南2. 要求产品要求▪USB Type A 端口RAZER SYNAPSE 雷云/STREAMER COMPANION 主播伴侣应用程序*要求▪Windows® 10 64 位(或更高版本)▪互联网连接,用于软件安装* 要求带幻彩互联 (Chroma Connect) 模块的 Razer Synapse 雷云。
3. 简要介绍注册你的产品并获得专享福利/cn-zh/warranty产品的序列号位于此处。
4. 技术规格耳机▪耳朵:固定猫耳▪RGB:Razer Chroma™雷蛇幻彩 RGB(耳朵和耳罩)▪频响范围:20 Hz – 20 kHz▪阻抗:32 Ohm▪灵敏度: 92.5 dB SPL/mW@1KHz▪驱动单元:定制的动态 40 毫米驱动单元▪椭圆形耳罩:全耳包裹设计,采用舒适的面料和人造皮革▪耳罩内径:61 x 43 毫米▪连接类型:USB Type A麦克风▪频响范围:100 Hz – 10 kHz▪信噪比:≥ 60 dB▪灵敏度 (@1 kHz):-42 dBV/Pa▪拾音模式:单向耳罩控制键▪音量增大和减小▪麦克风静音切换键使用音频▪使用有线音频:USB Type A▪环绕声:仅适用于 Windows® 10 64 位系统(或更高版本)5. 设置 RAZER KRAKEN KITTY V2 雷蛇北海巨妖萌猫版 V21. 将 Razer 雷蛇耳麦连接到电脑上的任意一个 USB 端口。
- 1、下载文档前请自行甄别文档内容的完整性,平台不提供额外的编辑、内容补充、找答案等附加服务。
- 2、"仅部分预览"的文档,不可在线预览部分如存在完整性等问题,可反馈申请退款(可完整预览的文档不适用该条件!)。
- 3、如文档侵犯您的权益,请联系客服反馈,我们会尽快为您处理(人工客服工作时间:9:00-18:30)。
REAPER补完计划:几个大家可能关心的问题大伟
昨夜卖血传我一个reaper,今天我已经开始用它来混我的新歌了。
上面这句的话的意思是说,Reaper是一个非常容易上手的软件来的。
第一个问题 VSTi的通道问题:
因为Reaper每一轨都是全能选手(不分音频轨、midi轨、aux轨等等),但是呢,实际上在运用的时候,当然还是有midi轨和音频轨之分的,(要能直接给midi加音频效果器就神了)比如说kontakt16out有十六个音频的出口,可以在音序器里分配给不同的轨道来加效果。
Reaper里面分配VSTi音频通道的方法简单说就是——和水果一样。
没用过水果的可以去问楼主怎么做。
好冷。
好我们接着讲,加了VSTi乐器以后呢,点这个,打开Fxchain——
如上图,在左侧选中插件名字的情况下,右键——Buld multich…..
观众反映:“这哪是康泰克!!!!”
好,点完以后会出现这个——
就是该插件的音频通道,该是立体声是立体声,该是几个是几个(废话)。
这时候呢,音序器自动建立了若干个通道——
可以往上写MIDI,也可以给Y加效果器~
第二个问题R uting Matrix
很方便的连接内部连线的模式,菜单——View——show routing Matrix,或者直接Alt+R, R uting Matrix就出现在屏幕下放了,同样,通过标签来切换回调音台或者浏览器或者卷帘窗。
这个还是比较直观的,比如在横向音轨1和纵向音轨2的地方选上的话,就是把1的内容发送到2去。
跟IO里面设置是一样的。
我是觉得很方便。
所以特意说说。
第三个问题关于这个东西
Folder,文件夹,不过和其他音序器里文件夹不是一个概念。
这个Folder相当于一个group track,在它之下的轨道受它的效果器影响。
是这样用的,看图
新建了一个通道,就是图中的“人声辅助”,把它放在想让它统治的音轨上边,(托拽即可),然后点小文件夹图标,这时候Folder这轨的左边就会出现,说明它已经有手下啦,观众朋友们问了,怎么在它下方的所有轨道都成了它的下级了?是这样的,找到最后一个你要设定在Folder里面的音轨,点它的小文件夹图标,一下,两下,变成了这样子,红的,就OK了,这个就代表,此Folder到此为止。
具体的信号处理流程,去“第二个问题”里提到的矩阵看一看,就一目了然了。
第四个问题先想想。
未完待续。
回见~。