K26 User Guide V1.0 EN 147003370 (10.04.09)_zhaoyang_web
中兴RRU本地版本加载指导书
RRU本地加载版本及版本切换1、设置本机IP地址:100.191.2.174,子网掩码255.255.0.0。
2、打开ServUAdmin,新建域rru(名字可随意取),域IP地址100.191.2.174(即本机IP),余下步骤全部默认,完成。
3、在该新建域内的“用户”点击右键新建用户,用户名与之前新建域名一致,密码最好不留空,可设置易记密码(如123),主目录设置为电脑磁盘下任意一个根目录,余下全部默认,完成。
4、在该新建的用户名右边窗口,点击“目录访问”标签,其最右侧有“读取,写入,追加,删除,执行,列表,创建,移除,继承”全部选中,点击应用,完成。
5、找到要加载的RRU版本,从版本目录中拷贝CPU版本到FTP目录下(即刚才新建用户的主目录),并且更名为riiccup.swv,从版本目录中拷贝FPGA版本FTP目录下,并且更名为riicfpga.swv。
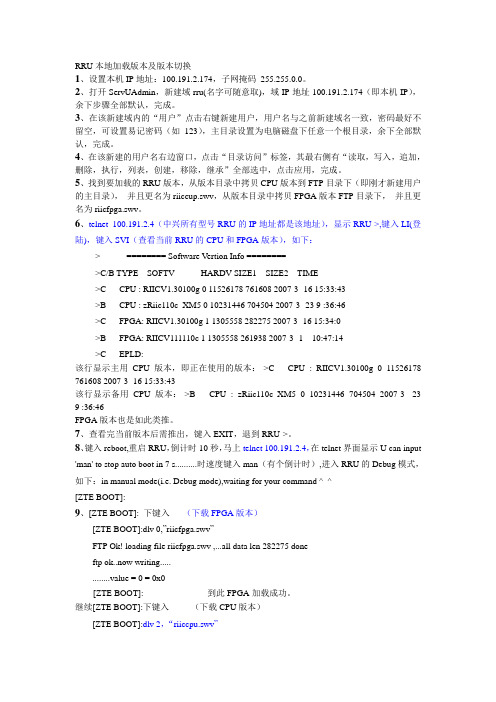
6、telnet 100.191.2.4(中兴所有型号RRU的IP地址都是该地址),显示RRU->,键入LI(登陆),键入SVI(查看当前RRU的CPU和FPGA版本),如下:-> ======== Software Vertion Info ========->C/B TYPE SOFTV HARDV SIZE1 SIZE2 TIME->C CPU : RIICV1.30100g 0 11526178 761608 2007-3 -16 15:33:43->B CPU : zRiic110c_XM5 0 10231446 704504 2007-3 -23 9 :36:46->C FPGA: RIICV1.30100g 1 1305558 282275 2007-3 -16 15:34:0->B FPGA: RIICV111110c 1 1305558 261938 2007-3 -1 10:47:14->C EPLD:该行显示主用CPU版本,即正在使用的版本:->C CPU : RIICV1.30100g 0 11526178 761608 2007-3 -16 15:33:43该行显示备用CPU版本:->B CPU : zRiic110c_XM5 0 10231446 704504 2007-3 -23 9 :36:46FPGA版本也是如此类推。
PWR Commons用户指南说明书

PWR Commons User GuideBy Orektic Solutions LLPContentsI Introduction2I.I Orektic (2)I.II Enzigma LLC (2)II Product Introduction3 III Product Features4 IV Product Versions5 V Configuration Guide6 V.I Installation Steps (6)V.II Pre-requisites (6)V.III Step by Step Walkthrough (7)V.III.1Add the Remote Site Setting (7)V.III.2Setup (9)V.III.2.1Status: (9)VI Contact Us14I.I OrekticOrektic is known for state-of-the-art cloud-based,SAAS solutions that help our clients to transform the way they do business.We exist to solve the critical issues facing our clients,both large and small.Our unique approach is not only what differentiates us,but also what makes us successful.We provide a broad range of services and solutions to help organizations facilitate change,achieve their vision,and optimize performance and productivity.From implementing new business strategies to ultra-efficient work processes,Orektic is ready to tackle any challenge and put you on the path to success.With state-of-the-art cloud-based,SAAS solutions transform the way you do business.Orektic is one of the software companies from the Enzigma group.I.II Enzigma LLCEnzigma LLC is the exclusive reseller of Orektic productsII Product Introduction•PWR Commons is basically a utility that will act as a base package for all the PWR Products •This package contains all the common code and configuration which is going to be used in all our PWR Products•This package will be a Prerequisite for all the PWR Products as anyone who wants to install any PWR products must install this base package first•Using PWR Commons,subscribers can maintain or upgrade versions of PWR Commons as well as other subscribed PWR products•Easy to install and upgrade the Orektic Products •Easy to manage all the Orektic Products •User-Friendly UI•Productivity-enhancing featureVersion Release Date DescriptionPWR Commons 1.1003/23/2023Improvements in getAllObject API PWR Commons 1.903/17/2023Implementation of PWR Commons UI andfunctionalityPWR Commons 1.801/17/2023Added PWR Forms publish functionality PWR Commons 1.712/29/2022Implementation of Post installationPWR Commons 1.612/20/2022Test method fixesPWR Commons 1.512/20/2022Sharing Violation Vulnerability issue PWR Commons 1.412/05/2022CRUD/FLS Enforcement Vulnerability issue PWR Commons 1.311/23/2022Implementation of Licence FunctionalityPWRCommons1.211/17/2022Minor bug fixesV.I Installation StepsTo install PWR Commons managed package do follow the mentioned steps here:1.To install PWR Commons which is the Pre-requisite Package for all PWR Products2.To install PWR Commons click here3.Enter the credentials for the org in which you want to install and log in.4.Select Install for All Users or Installs for Admins Only or Install for Specific Profiles and then clickon the Install button.5.Click on Done once the installation is completed.6.It may take some time to complete the installation package.You will be notified through Emailonce the installation is completed.7.You can find the PWR Commons package in the Installed Package in Setup of your Salesforceinstance.V.II Pre-requisitesTo get started,you need to make sure you are all good with the list of prerequisites mentioned below. As a prerequisite,the Salesforce admin needs to make sure that the Salesforce org is already set up with their domain name.In case your org is not set up with the Domain Name then the contents of the Package will not be available for use.To enable the domain name open Setup from the Quick Find box,find“MyDomain”and set up a Domain Name for your org.For more details and information,please click hereV.III Step by Step WalkthroughIn order to use PWR Commons you need to add the Remote Site URL first.So to do this please follow the following mentioned stepsV.III.1Add the Remote Site Setting1.After successfully installing the Managed Package click on the App Launcher to open"PWRCommons"2.You can able to see the page as shown in the below imageFigure5.3.1:Add the Remote site setting3.Copy the Underlined URL as shown in the above image4.On the right upside Click on"Setup"Figure5.3.2:Add the Remote site setting5.In the"Quick Find Box"Search"Remote Site Settings"6.Click on"New Remote Site"Figure5.3.3:Add the Remote site setting7.Give Name to site e.g."pwrcommonsremoteurl"and Paste the Copied URL8.Click On Save.Figure5.3.4:Add the Remote site settingV.III.2SetupThis is a PWR Commons setup from where you can easily manage versions of PWR Products.After Successfully adding the remote site settings you can able to see the list of all the PWR Products in"Setup".With all the required details e.g.•Installed Version:The version of the PWR Products installed in your salesforce instance•Latest Version:The latest version of PWR products which are publicly available•Required Version:The Required version of Commons for particular PWR Product•Status:The status tells you whether you need an upgrade for the PWR Products or not,whether the package is not upgradeable,and if no upgrade is required,etcAs shown in the below imageFigure5.3.5:SetupAs shown in the above image you can see the list of all PWR products along with their installed version and the latest version of PWR Products with the required commons version to run the applications and status.V.III.2.1Status:1.Install Now:The Install Now button is used to install the PWR Product in your Salesforceinstance.Only when you have installed the required version of Commons in your Salesforce instance,you can see the"Install Now"button associated with the product name,and when you click on it,it simply lets you install the ProductFigure5.3.6:SetupAs shown in the above image,you can see the Install Now button enabled for"PWR Forms"because the required version of Commons for PWR Forms is1.9and you have the1.9version of Commons installed in your Salesforce instance,and the Latest Version of PWR Forms is1.4,so when you click on the Install Now button,you will be able to install the latest version of PWR Forms and the Install Now button will be disabled and the Status will appear as"No Upgrade Required"as shown in below figureFigure5.3.7:Setup2.Upgrade PWR Commons and then Application Package:For PWR Components,you cansee that the Upgrade Now button is enabled because the required version of Commons is2.0and you have the1.9version installed in your Salesforce instance,and then only you can upgrade PWR Components,which have the latest version,until the Status will be appear as"Upgrade PWR Commons and then Application Package"Figure5.3.8:SetupBut after the upgradation of the Required Commons,the Upgrade Now button will be enabled for the Installed Version of PWR Components,and after successfully upgrading the Installed Version with the Latest Version of PWR Components,the status will appear as"No Upgrade Required"3.Upgrade Required:The Upgrade Now button lets you upgrade the PWR Products to the latestversion of the latest version that is publicly available As shown in the below image,the Upgrade Now button is enabled for"PWR Commons"because The latest version of PWR Commons is2.0;the installed version is1.9,so that status will appear as"Upgrade Required"Figure5.3.9:Setup4.No Upgrade Required:No Upgrade Required status tells you that you have installed the latesta version of the PWR Product along with the latest or the above required version commons isinstalled in your Salesforce instance as shown in the below image As you can see,in the PWRRollups Product the required version of Commons is1.9,and we have the installed version of1.9, the latest version is2.3,and the installed version is2.3,which means you have already installedupdated versions so the status will appear as"No Upgrade Required"Figure5.3.10:Setup5.Not Upgradable:Not Upgradable status tells you that the package or the application is notupgradable because when the latest version of a particular Product is available,older than the the installed version,that may happen because of some technical issue;in that case,that status willappear as"Not Upgradable"Figure5.3.11:SetupAs in the above image,because the latest version of the FTP Attachments is older than theinstalled version,so the status will be appear as"Not Upgradable"VI Contact UsFor more information visit You can also schedule a product demo to know more about PWR Commons.If you have any concerns or queries then please contact us on*******************。
KIEN301和6M3024M 工业以太网交换机用户手册

2009 年 4 月第 2 版 2009 年 7 月第 3 版 资料编号:27030034-30
前言
KIEN3016M 和 KIEN3024M 是东土科技股份有限公司自主研发的两款光电汇合型 一体化管理型工业以太网交换机。该产品主要是针对工业领域内星型网络、树形 网络以及链形网络的应用而开发的。其高性能的交换引擎,坚固而封闭的机箱设 计,无风机但高效的单肋形机箱散热表面,电源输入端过流、过压及 EMC 防护, RJ45 端口优良的 EMC 防护性能,使得 KIEN3016M 和 KIEN3024M 能够适应严酷 而危险的工业环境。同时也非常适用于组建小区宽带网络。 《KIEN3016M/3024M 工业以太网交换机用户手册》主要介绍 KIEN3016M 和 KIEN3024M 工业以太网交换机的技术原理、性能指标、安装调试、Web 管理软件 介绍等方面的内容,供用户在系统开通、扩容和日常维护时参考,同样适用于用 户 培 训 以 及 相 关 技 术 人 员 的 学 习 , 是 广 大 用 户 认 识 和 了 解 KIEN3016M 和 KIEN3024M 工业以太网交换机的实用教材。 本手册主要包括以下内容: 第一章介绍了 KIEN3016M 和 KIEN3024M 的概况及系统特点; 第二章介绍了 KIEN3016M 和 KIEN3024M 的性能指标及业务功能; 第三章介绍了 KIEN3016M 的硬件结构; 第四章介绍了 KIEN3024M 的硬件结构; 第五章介绍了 KIEN3016M 和 KIEN3024M 的安装过程; 第六章介绍了 KIEN3016M 和 KIEN3024M 的现场测试方法; 第七章介绍了 KIEN3016M 和 KIEN3024M 的组网方式和系统配置; 第八章介绍了 KIEN3016M 和 KIEN3024M 的 WEB 管理软件功能介绍; 第九章介绍了 KIEN3016M 和 KIEN3024M 的串口控制台管理功能; 附录 A 介绍了 KIEN3016M 和 KIEN3024M 的双绞线和管脚分配的规则; 附录 B 介绍了 KIEN3016M 和 KIEN3024M 的线缆类型和规格; 附录 C 介绍了在本书中所用到的缩略语。
EdgeLogix -RPI-1000 用户手册说明书

———————————————————————————————————————————EdgeLogix-RPI-1000 User Manual V1.0 Industrial Edge controller for IIoTExplanation of symbols usedThe following symbols are used in these instructions:NOTENOTE indicates tips, recommendations and useful information on specific actionsand facts.NOTICENOTICE indicates a situation which may lead to property damage if not avoided.CAUTIONCAUTION indicates a dangerous situation of riskContents1.Introduction (1)1.1 Features (1)1.2 Interfaces summary (2)1.2.1 Front view (2)1.2.2 Top view (3)1.3 Product label (4)1.4 Block Diagram (5)2.Installation and Wiring (6)2.1 Mounting (6)2.2 Connectors and Interfaces (7)2.2.1 Power supply (7)2.2.2 Left connector (8)2.2.3 Connectors of Signal Board (10)2.2.4 HDMI (11)2.2.5 Ethernet (12)2.2.6 USB HOST (12)2.2.7 Console (USB TYPEC) (12)2.2.8 LED (13)2.2.9 SMA Connector (14)2.2.10 SIM card slot (14)2.2.11 LCD panel and keyboard (15)2.3 GPIO Multiplex (16)2.4 Mainboard (17)2.4.1 Mini PCIe (18)2.4.1.1 Mini-PCIe 1 (19)2.4.1.2 Mini-PCIe 2 (20)2.4.2 PCIe subsystem (21)2.4.3 LCD board (21)2.4.4 Signal board (21)3.Drivers and Programming (21)3.1 LED (21)3.2 Serial Port (RS232 and RS485) (21)3.3 Cellular over Mini-PCIe (22)3.4 WDT (24)3.4.1 Block Diagram of WDT (24)3.4.2 How it works (25)3.5 RTC (25)3.5.1 Wiring (25)3.5.2 How it works (25)3.6 LoraWAN over Mini-PCIe (26)3.7 Signal board (26)4.Software Basics (26)5.Applications (26)6.Electrical specifications (26)7.Mechanical (26)1.IntroductionEdgeLogix-RPI-1000, modular, open-architecture edge controllers manage complex interfaces across assets and devices or into the cloud directly, with legacy and next generation industry control system. EdgeLogix-RPI-1000 provides performance and scalability for a wide range of industrial applications, including motion control, networking, IO and IIoT in a compact model, as while as the advantages of traditional IEC-61131-3 programming with the flexibility of Linux.The EdgeLogix-RPI-1000 Series covers all the functions required of logic computing, including easy operation and compatibility with a variety of control and measurement applications. This flexible device for ultra-reliable measurement and control of industry users the customized logic and control needed to meet application requirements. Industry-leading configurability and programmability fulfill standard to complex requirements while secure, built-in flow measurement calculations make it easier than ever to prove compliance. In addition, cloud-enabled functionality for licensing simplifies day-to-day operations. Digitally transform your operation by streamlining complex processes with the agile, intuitive EdgeLogix. This new controller is also p art of Seeed Studio’s next-generation EdgeLogix Series measurement and control platform that offers a common set of configuration tools, to expedite setup and facilitate commonly performed tasks.1.1 Features•Rugged, reduced-maintenance hardware•High isolation, surge, and short circuit protection•Open architecture support custom programming•Ethernet, I/O ,4G/LTE, CANopen and Modbus bridging•Natively Supports Modbus & CANopen Protocols•Cloud Connectivity to IIoT Cloud Platforms•Display for commissioning and diagnostics•IEC 61131-3 compliant programs support (under developing).•Flexible of local BUS extension•Neural Processing Unit (NPU) enables Artificial Intelligence for automation•Wide power supply from 10.8 to 36V DCThese features make the EdgeLogix designed as a cost-effective controller that provides the functions required for a variety of field automation applications. The EdgeLogix monitors, measures, and controls equipment in a remote environment. It is ideal for applications requiring flow computation; Proportional, Integral, and Derivative (PID) control loops; logic sequencing control; and a gateway with flexible wireless and field sensors expansion.1.2 Interfaces summary1.2.1Front view1. 4.3-inch LCD panel2.X30, up connector of Signal Board3.X40, down connector of Signal Board4.X3, Ethernet port 35.X2, Ethernet port 26.X1, Ethernet port 17.Dual USB 2.0 port8.X10, Left connector, Multi-Func phoenix connector9.Key board10.3x dual color LED1.2.2Top view1.Antenna A42.Antenna A33.Antenna A24.Antenna A15.HDMI port to monitor6.LocalBUS port7.Main power supply8.Console of Type-C9.TF card slot10.SIM card slot1.3 Product label1.4 Block DiagramThe processing core of the EdgeLogix-RPI-1000 is a Raspberry CM4 board. A customized carrier board implements the specific features. Refer to next figure for the block diagram.2.Installation and Wiring2.1 MountingThe 35mm DIN-rail mount is the primary method, as while as the wall mount.• The entire power supply must be disconnected and electrostatic discharge must take place on the housing or ground connection before removing any covers or components from the device and installing or removing any accessories, hardware or cables.• Remove the power cable from the device.2.2 Connectors and Interfaces2.2.1Power supplyConnect the device to the voltage supply according to the following figure.1.24V, main power supply+2.GND, main power supply-3.EARTH, connect to earth2.2.2Left connectorLeft connector is a Multi-Func phoenix connector.NOTE 1:24awg to 16awg cable are suggested.NOTE 2:All RS485 signals are isolated with other signals. NOTE 3: All DO and DI signals are isolated.◆Characteristics of Isolated RS485 Interface⚫Can used as Modbus/RTU Master or Modbus/RTU Extension .⚫Supported Function Codes: #01, #02, #03, #04, #05, #06, #07, #0F, #10 .⚫Maximum 32 devices on bus (1 master and 31 extensions) .⚫Built-in asymmetrical protection against transient voltages resulting from electro-static discharge (ESD), electrical fast transients (EFT), and lighting.⚫Terminal resistor of 120 OHM has been installed default.◆Characteristics of RS232 Interface⚫The RS-232 serial interface communication standard has been in use for many⚫years. It is one of the most widely used connections for serial data transmitting⚫because it is simple and reliable.⚫The RS232 serial interface standard still retains its popularity and remains in widespread⚫use. It is still found on some computers and many interfaces, often being⚫used for applications ranging from data acquisition to supply a serial data communication⚫facility in general computing environments.⚫The interfaces intended to operate over distances of up to 15 meters.◆Characteristics of I/O Interface⚫DC voltage for input is 24V (+- 10%).⚫DC voltage for output should be under 60V, the current capacity is 500ma.⚫Channel 1 and channel 2 of input are isolated to each other.⚫Channel 1 and channel 2 of output are isolated to each other.2.2.3Connectors of Signal BoardThe signal board is fully isolated with main PCB board. It contains X30, X40 and X6 of connectors.X30 is used as DIO signals. The following figure shows details of wiring.X30 wiring◆Characteristics of DI and DO Interface⚫The power supply of DI should be 5-36V DC,24V default.⚫The power supply of DO should be 10.8-60V DC,24V default, and the current of each channel is 1A.X40 wiringNOTE: All “GND” signals are connected together and isolated with main power island.X6 connectorX6 connector is used for Local Bus extensions, such as DO, DI, AO, AO or RTD module can be connected in this bus.2.2.4HDMIDirectly connected to the Raspberry PI CM4 board with TVS array. The default display in EdgeLogix-RPI-1000conforms to the HDMI standard.2.2.5EthernetEthernet interface is same as Raspberry PI CM4,10/100/1000-BaseT supported, available through the shielded modular jack. Twisted pair cable or shielded twisted pair cable can be used to connect to this port.2.2.6USB HOSTThere are two USB interfaces at the connector panel. The two ports share the same electronic fuse. NOTE: Max current for both ports is limited to 1600ma.2.2.7Console (USB TYPEC)CM4 USB-UART Bridge USB TYPECThe design of console used a USB-UART converter, most OS of the computer have the driver, if not, the link below may be useful:/products/CH9102.htmlThis port is used as a Linux console default. You can log into the OS use the settings of 115200,8n1(Bits: 8, Parity: None, Stop Bits: 1, Flow Control: None).A terminal program such as putty is needed, too.The default user name is pi and password is raspberry.2.2.8LEDEdgeLogix-RPI-1000 use three green/red dual color LED as outside indicators.LED1: green as power indicator and red when 4G/LTE active.LED2: green as signal indicator and red as user programmable led connected to GPIO13, high active and programmable.LED3: LED3 is used for Local BUS, it is to be defined in future. It indicates the communication between main and extensions.2.2.9SMA ConnectorThere are four SMA Connector holes for antennas. The antenna types are very depended on what modules fitted into the Mini-PCIe socket. The A1 is recommended for WI-FI signal from CM4 module and A2 for cellular.NOTES:The functions of the antennas are not fixed, maybe adjusted to cover other usage.2.2.10SIM card slotThe sim card is only needed in cellular (4G/LTE or others based on cellular technology) mode.NOTES: O nly Standard Sim card is accepted, pay attention to the card size.2.2.11 LCD panel and keyboardThe LCD display allows you to view meter data and perform basic configuration, or used for system diagnosis.◆LCD panelThe LCD display has the resolution of 800x480 pixel. It has an individual display controller connector to main CPU (Raspberry PI CM4) via SPI interface. The program model is full open to customers.SPI RGBKey x 4The backlight dims after a defined period of inactivity. When the meter detects an unacknowledged activehigh priority alarm, the display flashes until the alarm is acknowledged. ◆Home buttonPressing the home button takes you to the associated menu screen. If you are in a data screen, pressing the home button takes you to the display menu, and pressing home twice takes you to the summary display screen. If you are in a setup screen, pressing home takes you to the setup menu, and pressing home again takes you to the display menu. Function keys◆ Arrow buttonThe two arrow keys can be used for navigation and selection.◆ Enter buttonNormally used as confirm or Enter.2.3 GPIO MultiplexOverview of the GPIO usage from CM4, most of the GPIO have the fixed function as list.The Mainboard spans the inner width of the device and has outward-facing ports on frond and up sides. It is mounted to the heat sink with four M3x6 pan head screws.EdgeLogix-RPI-1000 itself has two mini-PCIe card slots, one for 4G/LTE with SIM cad support and the other has SPI signals.The orange area is the rough PCIe add-on card position, only one M2x5 screw is needed.The table below show all the signals. Full size Mini-PCIe card are supported.NOTE 1: All blank signals are NC (not connect).NOTE 2: 4G_PWR is the individual power supply for Mini-PCIe card. It can be shut down or turn on by the GPIO22 of CM4, the control signal is high active.NOTE 3:4G_LED signal is connected to LED1 internallyNOTE 1: SPI1 signals are used only for LoraWAN card, such as SX1301, SX1302. NOTE 2:All PCIe signals are optional.2.4.2PCIe subsystemThe CM4 itself has only on channel of PCIe 1x. The design of EdgeLogix-RPI-1000 use a switch to extern 3 NIC cards and one optional channel to mini PCIe 2 slots.2.4.3LCD board2.4.4Signal board3.Drivers and Programming3.1 LEDThe is a LED used as user indicator, refer to 2.2.8.Use LED2 as a mexample to test the function.$ sudo -i #enable root account privileges$ cd /sys/class/gpio$ echo 13 > export #GPIO21 which is user LED of LED2$ cd gpio13$ echo out > direction$ echo 1 > value # turn on the user LED, HIGH activeOR$ echo 0 > value # turn off the user LED3.2 Serial Port (RS232 and RS485)There are two individual serial ports in the system. The /dev/ttyACM1 as RS232 port and/dev/ttyACM0 as RS485 port. Use RS232 as a example.$ python>>> import serial>>> ser=serial.Serial('/dev/ttyACM1',115200,timeout=1)>>> ser.isOpen()true>>> ser.isOpen()>>> ser.write('1234567890')103.3 Cellular over Mini-PCIe◆Use Quectel EC20 as a example and follow the steps:1.Insert the EC20 into Mini-PCIe socket and sim card in related slot, connect the antenna.2.Log in the system via console use pi/raspberry.3.Turn on the power of Mini-PCIe socket and release the reset signal.$ sudo -i #enable root account privileges$ cd /sys/class/gpio$ echo 22 > export #GPIO22 which is POW_ON signal$ echo 5 > export #GPIO5 which is reset signal$ cd gpio22$ echo out > direction$ echo 1 > value # turn on the power of Mini PCIeAND$ cd gpio5$ echo out > direction$ echo 1 > value # release the reset signal of Mini PCIeNOTE: Then the LED of cellular is start to flash.4.Check the device:$ lsusb$ Bus 001 Device 005: ID 2c7c:0125 Quectel Wireless Solutions Co., Ltd. EC25 LTE modem ……$ dmesg$……[ 185.421911] usb 1-1.3: new high-speed USB device number 5 using dwc_otg[ 185.561937] usb 1-1.3: New USB device found, idVendor=2c7c, idProduct=0125, bcdDevice= 3.18 [ 185.561953] usb 1-1.3: New USB device strings: Mfr=1, Product=2, SerialNumber=0[ 185.561963] usb 1-1.3: Product: Android[ 185.561972] usb 1-1.3: Manufacturer: Android[ 185.651402] usbcore: registered new interface driver cdc_wdm[ 185.665545] usbcore: registered new interface driver option[ 185.665593] usbserial: USB Serial support registered for GSM modem (1-port)[ 185.665973] option 1-1.3:1.0: GSM modem (1-port) converter detected[ 185.666283] usb 1-1.3: GSM modem (1-port) converter now attached to ttyUSB2[ 185.666499] option 1-1.3:1.1: GSM modem (1-port) converter detected[ 185.666701] usb 1-1.3: GSM modem (1-port) converter now attached to ttyUSB3[ 185.666880] option 1-1.3:1.2: GSM modem (1-port) converter detected[ 185.667048] usb 1-1.3: GSM modem (1-port) converter now attached to ttyUSB4[ 185.667220] option 1-1.3:1.3: GSM modem (1-port) converter detected[ 185.667384] usb 1-1.3: GSM modem (1-port) converter now attached to ttyUSB5[ 185.667810] qmi_wwan 1-1.3:1.4: cdc-wdm0: USB WDM device[ 185.669160]qmi_wwan 1-1.3:1.4 wwan0: register 'qmi_wwan' at b-1.3, WWAN/QMI device,xx:xx:xx:xx:xx:xxxx:xx:xx:xx:xx:xx is the MAC address.$ ifconfig -a……wwan0: flags=4163<UP,BROADCAST,RUNNING,MULTICAST> mtu 1500inet 169.254.69.13 netmask 255.255.0.0 broadcast 169.254.255.255inet6 fe80::8bc:5a1a:204a:1a4b prefixlen 64 scopeid 0x20<link>ether 0a:e6:41:60:cf:42 txqueuelen 1000 (Ethernet)RX packets 0 bytes 0 (0.0 B)RX errors 0 dropped 0 overruns 0 frame 0TX packets 165 bytes 11660 (11.3 KiB)TX errors 0 dropped 0 overruns 0 carrier 0 collisions 05.How to use AT command$ miniterm --- Available ports:--- 1: /dev/ttyAMA0 'ttyAMA0'--- 2: /dev/ttyttyACM0 'CP2105 Dual USB to UART Bridge Controller'--- 3: /dev/ttyttyACM1 'CP2105 Dual USB to UART Bridge Controller'--- 4: /dev/ttyUSB0 'Android'--- 5: /dev/ttyUSB1 'Android'--- 6: /dev/ttyUSB2 'Android'--- 7: /dev/ttyUSB3 'Android'--- Enter port index or full name:$ miniterm /dev/ttyUSB3 115200Some useful AT command :⚫AT //should return OK⚫AT+QINISTAT //return the initialization status of (U)SIM card, the response should be 7⚫AT+QCCID //returns the ICCID (Integrated Circuit Card Identifier) number of the (U)SIM card6.How to dial$su root$ cd /usr/app/linux-ppp-scripts$./quectel-pppd.shThen the 4G led is flashing.If success, the return like this:7.Add the router path$ route add default gw 10.64.64.64 or your gateway XX.XX.XX.XXThen have a test$ ping 3.4 WDT3.4.1Block Diagram of WDTThe WDT module have three terminals, input, output and LED indicator.Note:3.4.2How it works1.System POWER ON.2.Delay 200ms.3.Send WDO a negative pulse with 200ms low level to reset the system.4.Pull up WDO.5.Delay 120 seconds while the indicator flashing (typical 1hz).6.Turn off the indicator.7.Wait for 8 pulses at WDI to active WDT module and light the LED.8.Get Into WDT-FEED mode, at least one pulse should be feed into WDI in at least every 2 seconds, ifnot, the WDT module should output a negative pulse to reset the system.9.Goto 2.3.5 RTC3.5.1WiringThe chip of RTC is PCF8563 or other compatible. It is mounted on the system I2C bus.The OS itself has the driver inside, only we need are some configurations.3.5.2How it worksOpen /etc/rc.local AND add 2 lines:echo " pcf8563 0x51" > /sys/class/i2c-adapter/i2c-1/new_devicehwclock -sThen reset the system and the RTC is working.Note:1.make sure the i2c-1 driver point is open, and the point is closed default.2. the estimated backup time of the RTC is 10 days.3.6 LoraWAN over Mini-PCIe3.7 Signal board4.Software Basics5.Applications6.Electrical specifications6.1 Power consumptionThe power consumption of the EdgeLogix-RPI-1000 strongly depends on the application, the mode of operation and the peripheral devices connected. The given values have to be seen as approximate values. The following table shows power consumption parameters of the EdgeLogix-RPI-1000:Note: On condition of power supply 24V, no add-on card in sockets and no USB devices.6.2 Power supply7.Mechanical。
DRRU261、DRRU268用户指南

TD-SCDMADRRU261/DRRU268 用户指南产品安全重要申明请严格遵守安全注意事项,以防触电甚至生命危险!系统遵循EN 60950 / IEC 60950标准。
所有与本系统相连的设备必须遵守相关的安全标准。
本电气设备的AC 电源线带有危险电压。
某些部件运行温度很高。
不遵守安装指导和安全注意事项会导致严重的人身伤害和财产损失。
只有接受过培训并且具有相应资格的人员才可以安装和维护系统。
注意经测试,本设备符合EN 301489 规定的限制,对应FCC Part 15 Class B,EN55022 Class B。
这些限制旨在防止设备商用运行时产生的有害干扰。
设备会产生和释放射频能量。
如果不按照《手册使用指南》中列出的手册安装和使用设备。
可能对无线通信产生有害干扰。
系统安装选址,应严格遵守国家和本地的建筑规范和建筑物/屋顶的净载荷容量要求。
在所有地区,尤其是住宅区,要严格遵守相关的电磁场强度(EMF)要求,否则会危害人体健康。
商标文中使用的所有标示都可能是商标。
第三方私自使用这些商标将构成侵权。
Copyright (C) TD Tech 2005.由于产品版本升级或其它原因,本手册内容会不定期进行更新。
除非另有约定,本手册仅作为使用指导,本手册中的所有陈述、信息和建议不构成任何明示或暗示的担保。
前言版本说明本手册对应产品版本为: TD-SCDMA DRRU261/DRRU268。
发布记录读者对象本书适合下列人员阅读:∙NodeB安装员∙系统工程师∙站点维护员1 DRRU261/DRRU268用户指南概述本文档提供RRU硬件介绍、硬件安装操作指导、相关线缆的安装布放指导、及硬件安装检查checklist、RRU部件维护操作指导以供参考。
本文档适用于DRRU261和DRRU268。
内容简介∙ 1.1 安全注意事项∙ 1.2 DRRU261/DRRU268硬件介绍DRRU261/DRRU268硬件介绍包括设备介绍和线缆介绍。
AVCS-User-Guide
User GuideIncluding the ADMIRALTY Information OverlayS-63 Edition 1.11Quick Start Guide 3 Electronic Navigational Charts (ENCs) 3 Before You Start 3 ECDIS Containing Existing ENCs 3 Step 1: Install the Public Key 4 Step 2: Install Permits 4 Step 3: Install AVCS ENCs 4 Step 4: Update AVCS 4 Step 5: Install the ADMIRALTY Information Overlay 5 Step 6: Maintain your Holdings 52ADMIRALTY Vector Chart Service Overview 6 2.1Introduction 6 2.2AVCS Overview 6 2.3Quality 6 2.4Carriage Compliant 6 2.5Electronic Navigational Charts 6 2.6Licensing 63Getting Started 7 3.1General 7 3.2Media formats for AVCS 7 3.3New AVCS Customers 7 3.4The AVCS Licence 83.5The ‘Schedule A’8 3.6Data Cleansing 9 3.7Public Key 94Installing and Maintaining the Chart Outfit 10 4.1New ENC Permits 10 4.2Updating 10 4.3Base Discs 10 4.4README.TXT File 10 4.5Cancelled ENCs 11 4.6Adding Chart Coverage 115ADMIRALTY Information Overlay 126S-58 Recommended ENC Validation Checks 13 6.1Important Information for Users 137Security Scheme Errors (SSE) 14 7.1Common Error Codes 14 7.2Decryption Failure 14 7.3Conversion Errors 148Getting Help 16 8.1Technical Support 16 8.2Feedback 17UKHO 2016 All Rights ReservedThe copyright in this document, which contains information of a proprietary nature, is vested in UKHO. The content of this document may not be used for purposes other than that for which it has been supplied and may not be reproduced, either wholly or in part, in any way whatsoever.1Quick Start GuideThis Quick Start guide is designed to help you to load and maintain your ADMIRALTY Vector Chart Service (AVCS) data easily and quickly. It describes the basic steps necessary to use AVCS in any ECDIS. However the functionality for loading and maintaining AVCS will differ from one ECDIS to another and this guide should be used in conjunction with the User Manual supplied by your ECDIS manufacturer.For a more detailed guide to AVCS installation and troubleshooting information, refer to sections 2 – 8 of this document and the User Manual supplied by the manufacturer of your ECDIS.Electronic Navigational Charts (ENCs)AVCS is comprised entirely of Electronic Navigational Charts (ENCs) issued by Government Hydrographic Offices. It is designed to be used in conjunction with a type approved ECDIS to provide a primary navigation tool that meets the requirements of SOLAS Chapter V.Before You StartWhen subscribing to AVCS for the first time your ADMIRALTY Chart Agent will provide the following materials:CD Users> AVCS User Guide including the Quick Start Guide (this document)> AVCS Base Discs (a set of ‘Base’ CDs)> AVCS Update Disc> ADMIRALTY Information Overlay (AIO) CD (if you have a compatible display system and the Overlay has been added to your licence)> End-User Licence Agreement for digital data servicesDVD Users> AVCS User Guide including the Quick Start Guide (this document)> AVCS DVDs (2 discs containing both base ENCs and updates)> ADMIRALTY Information Overlay (AIO) CD (if you have a compatible display system and the Overlay has been added to your licence)> End-User Licence Agreement for digital data servicesAll usersAn e-mail or hard media containing:> Schedule A (a PDF document listing the Folios and Units that you have licensed, not required if you are using ADMIRALTY e-Navigator Planning Station)> A set of ENC Permit files (PERMIT.TXT and ENC.PMT) for each ECDIS equipment> AVCS Certificate (a PDF or printed document showing your vessel and licence details)ECDIS Containing Existing ENCsIf ENCs are already installed on the ECDIS it is strongly recommended that these are removed from the system database to avoid any conflicts. If the option is available it is also recommended that users should remove any installed permits. Please see your ECDIS User Manual for more information.Step 1: Install the Public KeyIn order to load ENCs from AVCS onto an ECDIS the correct public key must be installed. For AVCS ENCs authenticated using the S-63 1.1 standard the IHO Public Key must be used and the user should check that the IHO Public Key is installed on the ECDIS.New ECDIS are supplied with the IHO Public Key pre-installed. However users transferring from another service may find that the system is using the PRIMAR Public Key. In this case the IHO Public Key must be installed before AVCS ENCs can be loaded.The IHO Public Key is contained in the root folder on any AVCS S-63 1.1 Media.The procedure for installing the Public Key is different on each ECDIS and will be detailed in your ECDIS User Manual. Specific instructions for some common models of ECDIS are available by following this link:/AVCSStep 2: Install PermitsBefore loading AVCS ENCs, the ENC Permits must be installed on the system. The permits are supplied by your ADMIRALTY Chart Agent and consist of 2 files for each ECDIS:> PERMIT.TXT> ENC.PMTAVCS customers with multiple ECDIS on board should be careful to load the correct permits into the corresponding system.Failure to install the correct permit will result in an error being reported similar to the following:> CRC failure permit could not be read> Failure to uncompress ENC data file> Decryption failedStep 3: Install AVCS ENCsThe AVCS data is supplied on CD or DVD. Each Base CD contains ENCs from one or more producer nations (countries) and is labelled with the country names. The DVDs contain worldwide ENCs and all available updates. Note that some countries (such as the United Kingdom) produce data worldwide so the Base discs do not directly correspond to a geographical area.It is only necessary to load the discs that contain licensed ENCs, as listed in the Schedule A or e-Navigator Planning Station. The ECDIS will manage the installation of all ENC cells based on the installed ENC Permits.Customers should be aware that, depending on the manufacturer, ECDIS manage the import of ENCs differently. Step 4: Update AVCSUpdates to the ENCs in AVCS are available free of charge online and on disc.Updates can be downloaded online using e-Navigator Planning Station (which is an integrated catalogue, holdings management, ordering and updating system). Contact your ADMIRALTY Chart Agent.All base ENCs and updates are contained on the AVCS DVDs, which are issued every week. In order to update the ECDIS only the latest AVCS DVDs held should be used and run as an update.Base CDs contain all base charts and updates valid at the time of issue. Subsequent chart editions and updates are contained on the latest Update CD. Both Base CDs and Update CD are labelled with the week number of the data that they contain.Depending on your ECDIS, you now need to load the updates from the Base CDs and the Update CD, or just from the Update CD.Step 5: Install the ADMIRALTY Information OverlayThe ADMIRALTY Information Overlay (AIO) is a digital dataset that is designed to be displayed over ENCs in ECDIS and other chart display systems to provide additional information to the navigator. The Overlay contains all ADMIRALTY Temporary & Preliminary Notices to Mariners (T&P NMs) and ENC Preliminary Notices to Mariners (EP NMs), which highlight navigationally significant differences between ENCs and ADNIRALTY paper charts.The Overlay can be displayed on compatible ECDIS equipment and also in ADMIRALTY e-Navigator Planning Station. Please see the UKHO website at /AVCS for an up to date list of compatible equipment, or consult your ECDIS supplier.The Overlay data is held on a single CD and is installed and updated in the same way as ENCs. Please notify your ADMIRALTY Chart Agent if you wish to use the Overlay on any compatible ECDIS so that the Overlay permit can be added to the ENC Permit files for that equipment.The Overlay permit will be loaded at the same time as the ENC Permits in Step 2. Follow Steps 3 and 4 to install the ADMIRALTY Information Overlay CD.Step 6: Maintain your HoldingsYour ADMIRALTY Chart Agent will supply you with updates to your AVCS data weekly.For customers using the AVCS DVDs, all base charts and updates are contained on the DVDs and new discs are issued every week. In order to update the ECDIS only the latest AVCS DVDs held should be installed.For customers using the AVCS CD each weekly Update CD is cumulative and only the most recent disc should be installed.The AIO CD is cumulative and only the most recent disc should be installed.A new set of ENC Permits will also be supplied by your ADMIRALTY Chart Agent whenever an ENC has a new edition or you are entitled to access additional ENCs. The new permits relate directly to the discs of the same week number. The permits may be received from your ADMIRALTY Chart Agent by e-mail or on hard media.The ENC Permits may be received before you have received the relevant Update discs. It is recommended that you should not install new permits unless they are accompanied by the appropriate DVDs or CDs. The permits will be accompanied by a Schedule A that identifies the week number for which the permits are valid. Failure to use the correct set of permits with an Update disc may result in an error being reported similar to the following:> There is no valid permit for this version of the cell/chart> Edition number is not valid> Permit is for an older version of the cell/chartENC updates are also available by email and over the Internet through ADMIRALTY e-Navigator Planning Station or the AVCS Online Updating Service. AIO updates are also available through e-Navigator.If new ENC Permits have been received, they should be loaded in to the ECDIS before the DVDs or Update CD is loaded.Periodically the AVCS Base CDs are re-issued to free up space on the Update CD. Customers who already subscribe to AVCS should treat these as though they were update CDs and load each in turn. The ECDIS will only load the additional new editions and updates necessary to bring the system database up-to-date.2ADMIRALTY Vector Chart Service Overview2.1 IntroductionThis section of the guide is intended to provide more detailed instructions and troubleshooting information for the ADMIRALTY Vector Chart Service and provide answers to some questions that users may have after installing AVCS.AVCS ENCs are produced and distributed according to well-defined international standards. However each ECDIS manufacturer has implemented the ENC import module of these standards differently.As a result the functionality for loading and maintaining AVCS will differ from one ECDIS to another and this guide provides generic information to assist in managing and maintaining AVCS holdings. This guide should be used in conjunction with the User Manual supplied by your ECDIS manufacturer.2.2 AVCS OverviewThe ADMIRALTY Vector Chart Service (AVCS) brings together Electronic Navigational Charts (ENCs) from national Hydrographic offices around the world and new ENC coverage produced by UKHO in co-operation with Foreign Governments to provide comprehensive, official, worldwide coverage.2.3 QualityAVCS meets customer requirements for a comprehensive, world-wide, fully carriage compliant electronic chart service. AVCS continues to develop in response to customer feedback through an ongoing programme of enhancements.UKHO has instituted a programme of assessment by its professional cartographers where the content of the ENC is compared to relevant paper charts. Any navigationally significant differences are communicated to users of AVCS through AIO. No other electronic chart service offers this level of reassurance.2.4 Carriage CompliantAVCS only contains ENC data that meets Safety of Life at Sea (SOLAS) Carriage Requirements for use within Electronic Chart Display and Information Systems (ECDIS).2.5 Electronic Navigational ChartsElectronic Navigational Charts (ENCs) are digital vector charts produced to the International Hydrographic Organization's (IHO's) standards (S-57 Version 3.1 and ENC Product Specification). They are referred to World Geodetic System 1984 Datum (WGS84) and are regularly updated with official update information distributed digitally.Hydrographic offices do not take any responsibility for the accuracy or reliability of privately produced, unofficial charts.2.6 LicensingThe ENCs in AVCS are provided under a licence agreement that allows their use for defined periods of time. AVCS Folios and ENC Units may be added to an AVCS licence at any time for periods of 3, 6, 9 or 12 months (where data supply agreements allow). This offers maximum choice and the flexibility to match your chart holdings to your operational patterns.You will be provided with an AVCS media pack, containing world-wide AVCS data and receive weekly updates.3Getting Started3.1 GeneralAVCS ENCs are distributed on both CD and DVD media and are encrypted according to the International Hydrographic Organization (IHO) S-63 1.1 Data Protection Scheme.The CD service comprises 9 base discs containing all ENCs and updates held in AVCS at the time of issue, these are issued at intervals of approximately 8 weeks. In each week between bases, a cumulative update disc is issued containing all AVCS updates issued since the most recent base.The DVD service is a snapshot of all data available from AVCS provided on 2 discs on a weekly basis. It contains all base and update cells applicable at the time of issue. In this respect the DVD contents are equivalent to an AVCS base release every week rather than bundling a single base release together with the weekly cumulative update. This simplifies the work for the ECDIS in reading the data into the system.These two AVCS formats are shown in the diagram at 3.2.3.2 Media formats for AVCS3.3 New AVCS CustomersWhen subscribing to AVCS for the first time your ADMIRALTY Chart Agent will provide the following materials:CD Service> AVCS User Guide including the Quick Start Guide (this document)> AVCS Base Discs (a set of CDs labelled ‘Base’)> AVCS Update Disc> AIO CD (if you have a compatible display system and the Overlay has been added to your licence)> End-user Licence Agreement for digital data services (EULA)DVD Service> AVCS User Guide including the Quick Start Guide (this document)> AVCS DVDs (2 discs containing both base ENCs and updates)> AIO CD (if you have a compatible display system and the Overlay has been added to your licence)> End-user Licence Agreement for digital data services (EULA)In addition a number of type specific AVCS Installation Guides are available for download by following the link below and selecting the Display Systems tab: /AVCSThe latest base and update CDs or the latest DVDs will contain all of the ENCs in AVCS. However these cannot be accessed by the ECDIS until valid ENC Permits are installed.3.4 The AVCS LicenceIn addition to the AVCS media your ADMIRALTY Chart Agent will provide you with an AVCS License Pack containing the following:> A ‘Schedule A’ this is a PDF document listing the Folios and ENC Units that the user is licensed to use and which Base CDs must be used to install the user’s licensed ENCs.> A set of ENC Permit files (PERMIT.TXT and ENC.PMT) for each ECDIS on the AVCS Licence.> A Certificate, carrying the UKHO crest, which certifies that all charts supplied in AVCS are ENCs that conform to the requirements of SOLAS Chapter V.Each permit is unique and is the method which gives the user access to the required ENCs.The ENC Permits will be supplied in a zipped file and t he contents of this file will depend on the user’s bridge configuration as each AVCS licence allows for use on up to 5 ECDIS. When extracted one or more set of permit files (PERMIT.TXT and ENC.PMT) will be copied automatically into folder(s) named MASTER, BACKUP, RESERVE1, RESERVE2 and RESERVE3 depending on the number of ECDIS configured on the bridge.The permits may be supplied on physical media, separately by email or directly from e-Navigator. The contents should be extracted to removable media, e.g. USB flash drive, that is capable of being read by the ECDIS system.There are currently 9 AVCS Base CDs and the DVDs contain 9 equivalent Volumes. It is unlikely that users will need to install data from every one of the CDs or the equivalent folders on the DVDs to load all of their licensed ENCs. Reference to the Schedule A can avoid the unnecessary loading of CDs and save the user time.3.5 The ‘Schedule A’The Home CD column of the Schedule A document informs the user which Base CDs or Volumes on the DVDs are required to install all licensed ENCs. A sample of the information contained in the Schedule A is provided below:Cell Title Home CD AVCS UpdateGB301820 Isles of Scilly and Western Approaches AVCS Base 3 N/AGB301840 Land's End to Falmouth AVCS Base 3 AVCS UpdateGB302020 Falmouth to Looe AVCS Base 3 N/ACell Title Home CD AVCS UpdateGB202868 Tokongkemudi to Natuna Utara AVCS Base 9 N/AGB202870 Pulau-Pulau Leman to Badas AVCS Base 9 AVCS UpdateGB202872 Selat Karimata and Approaches AVCS Update N/ANote: If the user does NOT have a copy of the Schedule A they should refer to the media.txt file at the root level of the AVCS disc to determine which Volume contains the data for a given Producer Code. If in any doubt the complete set of AVCS Base CDs must be installed to ensure that all licensed ENCs are imported to the system.3.6 Data CleansingNew AVCS customers who had previously subscribed to other ENC services are strongly recommended to remove (purge) all ENC Permits and ENCs from the system before installing AVCS. Previously installed ENCs may become out of date if they are not licensed in AVCS. If the system is not purged redundant ENCs may remain in the system database (SENC) and be available for use, even if the previous licence has expired. Instructions on how to remove permits and ENCs are described in the ECDIS operator’s manual or the ECDIS specific AVCS Installation guide.3.7 Public KeyBackgroundIn order to load ENCs from AVCS onto an ECDIS the correct Public Key must be installed. This allows the ECDIS to authenticate the source and integrity of encrypted ENCs from Service Providers. For AVCS ENCs authenticated using the S-63 1.1 standard the IHO public key must be used. If the correct Public Key is not installed the ECDIS will report an Authentication Failure.The Public Key can be formatted in one of two ways:> ASCII text file (.PUB)> X509 Certificate (.CRT)Check the Public KeyBefore installing AVCS ENCs encrypted using S-63 1.1 the user must check that the IHO Public Key is installed on the ECDIS. If the IHO Public Key is not present on the system then it will have to be installed before AVCS ENCs can be loaded.New ECDIS are supplied with the IHO Public Key pre-installed. However users transferring from another service may find that the system is using the PRIMAR Public Key. In this case the IHO Public Key must be installed before AVCS ENCs can be loaded.The IHO Public Key is contained in the root folder on any AVCS S-63 1.1 media.The procedure for installing the Public Key is different on each ECDIS and will be detailed in your ECDIS User Manual. Specific instructions for some common models of ECDIS are available by following this link: /AVCS4Installing and Maintaining the Chart Outfit4.1 New ENC PermitsYou will automatically be issued with all necessary ENC Permits for access to new or replaced ENCs on your AVCS license. Please ensure that you load the new permits before installing the latest media to ensure your ECDIS can use the latest ENCs.When updating AVCS new permits should only be installed on the ECDIS when the corresponding media has been received.4.2 UpdatingThe ADMIRALTY Vector Chart Service can be updated in one of four ways:CD Issued weekly, the Update CD contains all the latest ‘Notice s to Mariners’ corre ctions, New Editions and any New Charts issued since the last Base disc.DVD Issued weekly, the DVDs contain all the latest base and update information for AVCS on 2 discs.e-Navigator Planning Station Allows the user to create a custom exchange set cont aining the latest ‘Notice s to Mariners’ corrections, New Editions and New Charts issued since the last time they updated their AVCS holdings.AVCS Online Updating Service Allows the user to create a custom exchange set containing the latest ‘Notice s to Mariners’ corrections, New Editions and New Charts issued since the last time they updated their AVCS holdings.If you are using the AVCS CD or DVD service and you receive multiple discs at the same time, you only need to use the most recent one because they are cumulative.If replacement AVCS Base CDs have been issued, containing New Editions or Updates, subsequent Update CDs cannot be installed until the Base discs have been installed.Stored Routes and UpdatesUpdates applied to the ECDIS may have a navigational impact on an area covered by a stored route. It is important to check the effect of any updates on these routes prior to their use. ECDIS is able to automatically check route safety where licensed AVCS data is available.4.3 Base DiscsFor users of the CD service, the UKHO periodically issues a full set of AVCS Base discs on CD in order to integrate newly available data that has been issued on the Update CD. When this happens, all currently available Base discs are issued simultaneously. All New Editions and updates are then included on the replacement AVCS Base discs and no accompanying Update CD will be issued in that week.On receipt of re-issued AVCS Base CDs, only an update routine needs to be run on each disc and there is no requirement to reload all charts.The AVCS DVDs contain all base ENCs and updates available so there is no distinction between Base and Update discs.4.4 README.TXT FileAll AVCS discs contain a ‘README.TXT’ file which includes important safety information that should be read before using the service. For example it includes a caution concerning ENCs derived from charts which are not on WGS84 or a compatible datum.The file is located in the ENC_ROOT folder and contains the following information:> Specific charting practices of some ENC producers which may be significant to navigation.> Specific updating practices of some ENC producers such as delays between the issue of paper NMs and ENC updates.> Identified overlaps between ENCs which may cause problems in display systems.> ENCs which have been withdrawn from service for any reason and which should not be used (permits will not normally be issued for these ENCs).> Specific licence and disclaimer text required by some ENC producers.The README.TXT file is updated every week and changes are highlighted in a ‘Latest Corrections’ section at the beginning. The file should be read as part of the weekly ENC update process to ensure that all relevant changes are understood.The latest README.TXT file can also be viewed in ADMIRALTY e-Navigator Planning Station.4.5 Cancelled ENCsPeriodically ENCs are cancelled as part of the continuous maintenance of ENC coverage worldwide. Normally cancelled ENCs are automatically replaced and you will experience no loss of coverage in your ECDIS.It is strongly recommended that you choose to delete any cancelled ENCs from the SENC as failure to do so may result in the ECDIS displaying out of date data in preference to more up to date data.4.6 Adding Chart CoverageAdditional AVCS Folios and Units may be purchased during the subscription period through your chosen ADMIRALTY Chart Agent who will supply new ENC Permits to ‘unlock’ the newly added data. These permit files are cumulative so as well as unlocking the new coverage they will also hold the permits necessary to unlock all your existing coverage.5ADMIRALTY Information OverlayThe ADMIRALTY Information Overlay (AIO) is a digital dataset that is designed to be displayed over ENCs in ECDIS and other chart display systems to provide additional information during passage planning. The Overlay contains all ADMIRALTY Temporary & Preliminary Notices to Mariners (T&P NMs) and highlights navigationally significant differences between ENCs and ADMIRALTY paper charts.The Overlay makes passage planning simpler by clearly showing where important Temporary or Preliminary changes may impact a voyage. It also draws attention to areas where differences between ENCs and paper charts may affect the passage plan.All ADMIRALTY T&P NMs that are in force are included in the Overlay. Each NM is displayed as a simple polygon (usually rectangular) with hatched fill which indicates the area affected by the NM. Each NM carries the same NM number that is used in the ADMIRALTY Notices to Mariners Bulletin.The full text of the NM is included as an associated text file which can be displayed by selecting the 'Temporary Notice to Mariners' or 'Preliminary Notice to Mariners' feature in the ECDIS Pick Report. Any associated diagrams can also be viewed through the Pick Report.The T&P NMs that are shown in the Overlay relate specifically to ADMIRALTY paper charts and are overlaid on ENCs to alert users to the availability of this information when passage planning. AIO may not contain all T&P NMs issued by the ENC producer and there may be a time delay between the publication or cancellation of national T&P NMs and the publication or removal of the equivalent ADMIRALTY T&P NMs. Many ENC producers include some or all of their T&P NMs in their ENCs and care should be taken to understand what has already been included in the ENCs in use. A list of ENC producers whose policy is to include T&P NM information in their ENCs can be found at /AVCS and in the \INFO folder on all AVCS discs. Please note that official ENCs remain the primary source of information for navigation at all times.ENC Preliminary (EP) NMs highlight navigationally significant differences between ENCs and ADMIRALTY paper charts. These NMs are displayed in the same way as T&P NMs, as a simple polygon (usually rectangular) with hatched fill which indicates the area affected by the NM. Each NM is allocated a unique EP NM number.The full text of the NM can be viewed in the ECDIS Pick Report against the Information attribute. Where additional information is needed to explain the NM an associated picture file displays an image showing the ENC superimposed over the current paper chart information.The Overlay can be displayed on compatible ECDIS equipment and also in ADMIRALTY e-Navigator Planning Station. Please see the UKHO website at /AVCS for an up to date list of compatible equipment, or consult your ECDIS supplier.The Overlay data is held on a single CD and is installed and updated in the same way as ENCs. Please notify your ADMIRALTY Chart Agent if you wish to use the Overlay on any compatible ECDIS so that the Overlay permit can be added to the permit files for that equipment.6S-58 Recommended ENC Validation Checks6.1 Important Information for UsersThe International Hydrographic Organization (IHO) is aware that some ECDIS system manufacturers have mistakenly incorporated some or the entire suite of ENC validation checks listed in IHO publication S-58 - Recommended ENC Validation Checks. This has resulted in mariners being presented with misleading error messages indicating that officially produced and released ENC data contains errors, when it does not. In some cases, official ENC data is even being reported as not suitable for navigational use.The majority of the checks in S-58 are intended for use in the ENC validation software that is used by Hydrographic Offices or Regional ENC Coordinating Centres. These S-58 checks were not intended to be used in ECDIS software. The introduction to S-58 reads, in part “…specifies the checks that, at a minimum, producers of ENC validation tools should include in their validation software. This software will be used by hydrographic offices to help ensure that their ENC data are compliant with the S-57, Appendix B1 ENC Product Specification...”.Of particular concern are the S-58 checks classified as warnings. These checks are intended to highlight apparent discrepancies in the data so that HO’s or RENCs can investigate them further. Upon inv estigation, the data will usually be found to be correct and no change to the ENC data is required. Such investigations are carried out by the ENC producer, as well as by the Regional ENC Coordinating Centre before the data is released. Once an ENC has been officially released, it is therefore not necessary or recommended that these checks be performed again by ECDIS software, since any warnings of this type that are generated will be incorrect and will be misleading for the user.Many ECDIS manufacturers still implement the full suite of tests identified in S-58. This can result in unnecessary errors and warnings being presented to the user either on screen or in a log file. Users should only report instances where an ENC has failed to load; these are normally identified by the ECDIS as a fatal error or ENC failed import. In these instances the UKHO will seek to resolve this with the ENC producer.。
迅饶 WEB 组态网关 HMI1002-ARM-4G 安装说明书
安装说明书WEB 组态网关(一网两串:1个网口、2个RS232/485)型号: HMI1002-ARM-4G 一、 硬件参数二、 网关图三、 接线说明电源:交直流 AC/DC 12~24V ;网口:默认IP 地址192.168.1.88;全隔离RS485接口:2个全隔离RS485接口 A 接正(+) B 接负(-) GND(接地线) 全隔离RS232接口:2路全隔离RS232接口 Rx (2) TX (3)GND (5) (注:RS232与RS485为复用关系)四、 安装示意图导轨式五、 网关使用配置步骤(参考X2View 组态软件操作说明书)注:使用上网或报警功能时,需安装天线。
⚫登录网关Web 服务器(网线接到网口,默认IP 地址:192.168.1.88 登录用户名:admin 密码:admin123456) ⚫进入Web 服务器后下载X2View 组态软件或登陆迅饶官网/服务与支持/下载中心/WEB 组态软件X2View ,下载软件(该软件为绿色免安装) ⚫ 使用X2View 组态软件配置相应工程(具体操作请参考Help 文件夹下的PDF 文档) ⚫ 工程文件上传到网关六、 支持常见设备类型七、 采集端支持200多种的协议 (部分协议见下表)八、 常见问题问1:如何修改网关的IP 地址?答1:网关出厂默认的IP 地址192.168.1.88,子网掩码255.255.255.0,默认网关192.168.1.1。
用户第一次使用的时候用电脑和网关之间用网线直连,然后把电脑IP 地址改到和网关同一个网段内(如电脑上的IP 改为192.168.1.55),在ping 通网关IP 地址的情况下,打开浏览器,输入网关IP 地址192.168.1.88,登录网关的Web 服务器,在“网口设置”一栏设置IP 地址。
问2:网关IP 忘记了怎么办?答2:重置IP :当用户忘记网关IP 地址,可长按网关Reset 按钮直到网关“嘀嘀嘀”响,网口暂时恢复默认IP 地址,此时通过网口登录http://192.168.1.88/login.html 查看网关原IP 地址。
机动车合格证管理信息系统说明
目录第一部分 (1)机动车合格证管理信息系统说明 (1)第一章 ........................................................................................ 背景21.1车购税“配置序列号” (2)1.2系统概述 (3)1.3合格证打印开发接口 (4)1.4上传服务开发接口 (5)1.5U盾升级开发接口 (5)第二章 ........................................................................ 相关技术概要52.1网络服务WebService (5)2.2ActiveX (6)2.3U盾 (6)第二部分 (7)机动车合格证管理信息系统v4.0客户端使用手册 (7)第一章机动车合格证管理信息系统V4.0的安装与卸载 (8)1.1.系统安装 (8)1.2系统卸载 (11)第二章机动车合格证管理信息系统V4.0的启动和退出 (11)2.1启动系统 (11)2.2退出系统 (12)第三章机动车合格证管理信息系统V4.0整体介绍 (13)3.1界面各操作区域图示 (13)3.2菜单图示 (14)3.2.1“操作”菜单 (14)3.2.2“视图”菜单 (14)3.2.3“设置”菜单 (15)3.2.4“工具”菜单 (15)第四章系统设置、升级以及硬件信息备案 (15)4.1系统设置 (15) (16) (18) (19)4.1.4U盾刷新设置 (20) (21)4.2注册硬件信息 (22)4.3系统升级 (22)第五章合格证打印 (23)5.1新增合格证 (23) (24) (25) (26)5.2打印旧合格证 (27)5.3数据管理 (27) (27) (29) (31) (32) (33) (33) (34)第六章上传合格证 (34)6.1新增 (35)6.2补传 (35)6.3修改 (36)6.4撤销 (37)6.5已上传数据 (37)第七章查询 (38)7.1本地数据查询 (38)7.2远程数据查询 (39) (40) (41)7.2.3依据上传日期查询 (42) (43)7.2.5依据发证日期查询 (44)第八章U盾 (45)8.1在线升级 (46)8.2输入证书升级U盾 (46)8.3启动U盾信息管理器 (46)第九章基础数据 (47)9.1车型数据维护 (47)9.2用户维护 (49)9.3配置信息维护 (49)9.4配置信息维护 (51)第十章视图 (55)10.1窗口列表 (55)10.2选项卡方式显示子窗口 (55)10.3在线工具 (56)第十一章工具 (57)11.2扫描合格证信息 (57)11.3撤销申请历史 (57)11.4系统诊断 (58)11.5网址导航 (58) (59) (59) (60)第三部分 (61)机动车整车/底盘出厂合格证打印接口v3.0设计说明 (61)第一章升级内容 (62)第二章打印接口设计的目标 (62)第三章打印接口升级注意事项 (62)第四章打印接口的详细设计 (62)4.1系统实现的技术原理 (62)4.2系统拓扑结构图 (63)4.3系统使用加密措施 (63)4.4系统的功能模块 (63) (63) (63) (63)4.5打印接口提供的属性和方法 (64)第五章、系统的安全性 (64)第六章、打印接口安装说明 (64)第七章、打印接口使用说明 (66)7.1VehCert的属性 (66)7.2VehCert的方法或函数 (70)7.3打印接口在不同开发环境下的调用举例 (71)第四部分 (77)机动车合格证上传代理服务4.0使用说明 (77)第一章客户端的安装 (78)1.1安装所需的软硬件环境 (78)1.2系统客户端的安装 (78)1.3系统客户端的卸载 (80)第二章机动车合格证上传代理服务4.0的启动和停止 (82)2.1服务监视器的启动 (82)2.2服务监视器的停止 (87)2.3使用Windows服务来操作机动车合格证上传代理服务器882.3.1服务监视器的启动 (88)2.3.2服务监视器的停止 (90)第三章机动车合格证上传代理服务4.0的基本应用 (91)第五部分 (99)机动车合格证信息上传二次开发接口升级说明 (99)总体情况 (100)第一章 ............................................. 合格证上传代理服务模式简介1001.1网络服务(WebService)模式: (100)1.2 .......................................................................... 兼容模式:1011.3 .......................................................................... 模式比较:101第二章 ........................... 机动车合格证上传WebService服务说明1022.1方法 (102)2.1.1HelloWord (102)2.1.2HelloWorld_Remote (103)2.1.3QueryCertificateByWZHGZBH (104)2.1.4QueryCertificateByDate (105) (106)2.1.6UploadOverTime_Ent (107)2.1.7UploadUpdate_Ent (108)2.1.8UploadDelete_Ent (109)2.2数据结构 (110)2.2.1rqlx (110)2.2.2tns:QueryResult (111)2.2.3s1:CertificateInfo (112)2.2.4s1:OperateResult (116)2.2.5s1:ArrayOfNameValuePair (116)2.2.6VEHICLE_STATUS (117)第三章兼容模式介绍 (118)3.1兼容模式概述 (118)第四章应用实例演示 (119)第六部分 (120)U盾信息管理套件使用说明 (120)第一章U盾管理套件的安装 (121)1.1安装所需的软硬件环境 (121)1.2系统客户端的安装 (121)1.3系统客户端的卸载 (123)第二章U盾信息管理套件的基本应用 (125)第七部分 (133)机动车合格证数字认证U盾刷新开发接口说明 (133)第一章 ......................................... 机动车合格证数字认证U盾概述134第二章 .................................................................. U盾同步刷新模式1352.1精简模式: (135)2.2证书模式: (136)第三章U_Gardian.dll开发接口库介绍 (138)3.1属性 (138)3.2方法 (139)第四章U盾证书服务 (140)4.1服务描述: (140)4.2调用示例 (141)第八部分 (142)车税临时配置序列号申报系统说明 (142)1.1简介 (143)1.2概念介绍 (143)1.3配置编码使用规则 (143)2.1登录 (143)2.2首页 (144)2.3申报页面 (145)2.4配置信息 (147)2.5临时配置信息 (148)2.6转正情况: (149)第九部分 (151)1.1 .......................................................................... 系统登录:1521.2 ...................................................................企业信息维护:1521.3 .......................................................................... 数据管理:1531.4 ....................................................... 合格证正面样式管理:1551.5 .......................................................................... 用户管理:1571.6 ........................................................................... U盾管理:1591.7 ...................................................................... 关于本系统:1611.8 .......................................................................... 注销系统:161第一部分机动车合格证管理信息系统说明第一章背景为加强机动车生产企业及产品管理,进一步规范机动车产品合格证管理,加强生产一致性管理,促进机动车行业持续、健康发展;提高车辆购置税征收管理效率,优化纳税服务;规范生产企业车辆信息报送工作,国家税务总局、工业和信息化部决定完善机动车整车出厂合格证信息管理系统。
K3日常问题解决手册 ( 1 )
K3日常问题解决手册目录第一章k3的安装及卸载问题 71.1 K3安装所需要的环境 71.2 K3对于sql语言排序规则的要求 71.3 在安装SQL Server SP3,出现无论用windows认证还是混和认证,都出现密码错误的情况。
查看临时目录下的sqlsp.out,会发现以下描述: 71.4 SQL Server安装过程中出现“以前进行的程序创建了挂起的文件操作,运行安装程序前,必须重新启动”。
71.5 安装SQL2004 SP4补丁包时双击运行SETUP.bat后提示“已有一个安装实例在运行,无法执行此安装向导”。
71.6 SQL服务器更改计算机名称后,不能msql服务启动。
81.7 如何不重新安装sql而更改sql的语言排序规则。
81.8 SQL server安装过程中,安装程序安装到:安装程序正在安装ms数据访问组件时,屏幕出现错误提示:“command line option syntax error,type command/? for help”然后点确定继续,结果到:安装程序正在安装HTML帮助时,屏幕又出现标题为html help 1.32 update错误警对话框提示:“command line option syntax error,type command/? for help”,再点确定继续,安装程序开始复制文件,复制完文件后又出现错误提示:无法找到动态连接库sqlunirl.dll(sqlunirl.dll 是MDAC的一个组件),请指定路径点确定后安装程序停止运行,让查看安装日志。
81.9 K3多语言版本对操作系统的适应性。
81.10 K3安装过程中报如图错误: 101.11 在win2003英文操作系统上(区域语言选项为英文)安装k310.2,点击环境检测无响应,直接对忽略环境检测,执行对k3产品的安装时报错,在进程中杀掉IKernel.exe无效如图: 101.12 安装k3产品时,安装过程中报如图错误: 111.13 安装完K/3,组件没有正确注册,不能正常运行K/3;在添加/删除程序中卸载K/3 时出现提示如图: 111.14 如何处理克隆安装的系统。
戴尔服务器部署工具包说明书
######################################################################DELL(TM) OPENMANAGE(TM) DEPLOYMENT TOOLKIT README FOR EMBEDDED LINUX ######################################################################Version 2.6Release Date: September 2008This file contains updated information for your "Dell OpenManageDeployment Toolkit User's Guide" and any other technicaldocumentation included with the Deployment Toolkit (DTK).The DTK documentation includes the "Command LineInterface Reference Guide" and the "User's Guide." See the DellSupport website at "" for the most currentinformation.######################################################################CONTENTS######################################################################* Criticality* Compatibility/Minimum Requirements* Release Highlights - Features* Release Highlights - Fixes* Installation* Upgrading* User Notes* Known Issues###################################################################### CRITICALITY######################################################################3 - OptionalDell recommends that you review the specifics about the update todetermine if it applies to your system. The update contains changesthat may impact only certain configurations, or provides newfeatures that may/may not apply to your environment.###################################################################### COMPATIBILITY/MINIMUM REQUIREMENTS######################################################################The Deployment Toolkit version 2.6 supports the following DellPowerEdge(TM) systems:650, 1600SC, 1650, 1655MC, 2600, 2650, 4600, 6600, 6650, 700, 750,1750, 800, 830, 840, 850, 860, 1800, 1850, 1855, 2800, 2850, 6800,6850, 1900, 1950, 1955, 2900, 2970, 6950, SC1435, 2950, T105, R200,R900, M600, M605, T605, R300, T300, R805, R905, M805 and M905.NOTE: M805 and M905 are scheduled to be available in second halfof 2008.NOTE: Other systems may be supported with this release. See the DellSupport website at "" to verify the supportedsystems and to download the latest version of the toolkit.The sample scripts included with DTK have been tested with thedeployment of the following operating systems:- Red Hat(R) Enterprise Linux(R) Server version 3(32- and 64-bit)- Red Hat Enterprise Linux Server version 4 (32- and 64-bit)- Red Hat Enterprise Linux Server version 5 (32- and 64-bit)- SUSE(R) Linux Enterprise Server version 10 (64-bit)====================================================================== Installation Prerequisites====================================================================== Before installing the DTK components for embedded Linux, ensurethat you have:* The DTK ISO image, which contains the utilities, sample scripts,sample configuration files, and documentation you need to deployyour Dell system.* A Linux workstation that has at least 200 MB of free hard-drivespace.When building customized Linux ISOs, you might need to incorporatethe following Red Hat Package Managers (RPMs) and scripts providedby DTK to ensure a successful build:* dell.tar.gz - Dell Deployment Toolkit which contains the DTK toolsand sample scripts.* omreg.cfg - Configuration file for instrumentation software. Editthis file, if required, to point to where the DTK tools are placed.The modified file should be under the location "/etc."* start-hapi.sh - Startup script to load and configure the HAPIdrivers. You need to run this script to load the OpenIPMI Modulesand to create files required by HAPI.* start-raid.sh - Contains basic setup for RAID to work. You need torun this script to create device nodes required by RAIDCFG andfiles required by HAPI.* start-stage3.sh - A sample DTK startup script that loads allthe modules and drivers required for the ISO to work. You willhave to replicate this setup in your customized Linux ISO.* srvadmin-hapi RPM - Contains a set of libraries and drivers usedby DTK tools to interact with the hardware.* srvadmin-omilcore RPM - Contains a set of libraries and driversused by DTK tools to interact with the hardware.If you have the DTK CD mounted under "/mnt/cdrom," you can extractthe DTK tools, scripts, and other essentials to build your customizedISO image under the "tools" folder at the root of the CD.====================================================================== Deployment Prerequisites====================================================================== Before installing DTK components, ensure that you have:* Advanced knowledge of Linux and Linux scripting (BASH), Linuxnetworking, installing and working with RPMs, and creating andmodifying loop file systems.* Any third party deployment system or tool.* A workstation that has-At least 500 MB of free hard-drive space-A writable CD drive and CD-writing software (optional)-Network access* A minimum BIOS version is recommended on some of the platforms forall the DTK options to work correctly. In general, it is goodpractice to use the latest ("n") version of BIOS firmware orthe "n-1" version that is available on "."###################################################################### RELEASE HIGHLIGHTS - FEATURES######################################################################The new features for DTK version 2.6 include:* Support for Dell PowerEdge systems M805 and M905.NOTE: Other systems may be supported with this release. Check"" to verify the supported systems and todownload the latest version of the toolkit.###################################################################### RELEASE HIGHLIGHTS - FIXES######################################################################N/A###################################################################### INSTALLATION######################################################################For complete installation instructions, see the "Dell OpenManageDeployment Toolkit User's Guide."###################################################################### UPGRADING######################################################################When upgrading from a previous release (1.x) of the DTK, ensure thatyou create the new DTK version 2.x environment separately from yourprevious version of DTK. This step is necessary because theenvironments and requirements for DTK version 2.x are completelydifferent.######################################################################USER NOTES######################################################################This section provides information that can help enhance yourexperience with the DTK.* The sample scripts are provided as examples for customers that wantto develop their own deployment process. Some customers may findthat the scripts work well in their environment, while somecustomers may need to develop their own scripts entirely fromscratch. Customers deploying multiple systems need to provide uniqueinformation for each server when appropriate. For example, systemhost names, IP addresses, and BIOS asset tags need to be unique foreach system. The batch scripts and configuration files needto be modified to reflect the unique information for each systembeing deployed. Many options are available to optimize thisprocess.* In the previous releases, you could use a system profilegenerated on a specific Dell system to deploy only that same systemmodel. Beginning this release, you can use a system BIOSconfiguration profile generated for all systems belonging to thesame generation.For example, "syscfg_x8xx.ini" for x8xx systems, "syscfg_x9xx.ini"for x9xx systems, and so on.* The "sshd" port is left open on the server after the DTK CD isbooted. You can log in as "root" without a password. This is doneso that scripts can be debugged easily. However, it could be asecurity issue to leave the CD booted on a system.====================================================================== TOOL NOTES====================================================================== * SYSCFG:- Some options may not be present on all systems, which maybe due to the BIOS version or hardware feature set. The usageinformation generated by running SYSCFG without arguments shows only those options that are valid for your system.- The "--devseq" option is present only if you have anavailable, bootable hard-disk partition. If this option ispresent in the configuration file, but not present on yoursystem, you will receive a usage error.- If you perform operations that change the "--redmem"option, reboot the system immediately. This is applicableto command line usage as well as "--infile" usage.NOTE: Additionally, the "--redmem" option should not beissued with any other command and should beimmediately followed by a system reboot. This isimportant when you develop scripts that can alterthe "--redmem" setting.- For options that use text strings such as username,password, hostname, and community string, using characterssuch as <space>, "<," ">," "|," "=" on the command line can bemisinterpreted by the command line parser and may cause errors.To avoid such errors, use only alphanumeric characters.- If you set the username using syscfg username option,Serial Over LAN(SOL) access for the corresponding userwill be enabled by default. You can disable SOL accessfor a user using"syscfg solaction --userid=<userid>--action=disable" command.- The maximum reliably supported baud rates ( --solbitrate ) are:- 19200 for PowerEdge x8xx systems.- 57600 for PowerEdge x9xx systems without Dell RemoteAccess Controller 5 (DRAC 5).- 115200 for PowerEdge x9xx systems with DRAC 5.If you enter an unsupported baud rate, you may receive anerror, "Parameter out of range."* RAIDCFG:- When creating virtual disks, the chunk (stripe) size is alwaysin KB. Do not specify any units for the chunk size.- When providing multiple physical disks for the "createvirtual disk" command, do not separate the disks with spaces.For example, "-ad=1:4, 1:5" causes an error. The correct wayto input multiple physical disks is "-ad=1:4, 1:5, 1:6" or"-ad=1:4:0, 1:5:0, 1:6:0".- If you change the controller mode from SCSI to RAID mode,expect data loss to occur. Back up any data you want to savebefore changing the modes.###################################################################### KNOWN ISSUES###################################################################### RAIDCFG Issues:* You cannot delete a virtual disk on CERC SATA 2S when RAID 1 iscreated. The virtual disk can be cleared from the controller BIOS.* Because of an issue in the kernel, for PowerEdge 1855 systems,you must reboot your system after you create a virtual disk, touse the created virtual disk. This only affects PERC 4/IMcontrollers.(116779)SYSCFG Issues:* Demand based power management (DBPM) option does not work onPowerEdge 1855 with BIOS firmware versions earlier than A05.* The suboption for "powerctl," "softshutdown," causes your systemto reboot. If you use a customized kernel with AdvancedConfiguration and Power Interface (ACPI) support, this optionwill work as designed.* Using the "solcfgparams" option may produce an error message saying"Hardware subsystem error" when an invalid value is used. This doesnot indicate a problem with the hardware. Check the option valueand try again.* On PowerEdge 700 systems, the console redirection option in theBIOS has the arguments" off," "serial port 1," and "RAC;"the equivalent arguments in DTK are "off," "serial port 1,"and "serial port 2."When the argument is set to "serial port 2" in DTK, the optioncorresponds to "RAC" in the BIOS setup.* The "--solbitrate" option in "solcfgparams" and the"--msgcommbitrate" option in "serialcfgparams" accept a baudrate of 57600, but tools such as "ipmish" and "solproxy" do notfunction at this baudrate for PowerEdge x8xx systems.* On PowerEdge 1950, 2950, and PowerVault NX 1950 systems withinternal USB, BIOS setting configuration for internal USB Port ispossible only if User Accessible/external (UA) USB ports are set to"All Ports On." If UA USB ports are not set to "All Ports On"and you try to configure the BIOS setting for the internal USB portusing SYSCFG, the configuration will appear to be successfulbut the changes will not take effect after the next reboot. IfUA USB ports settings are changed from "All Ports On" to"All Ports Off" or "Only Back Ports On," the USB port willbe automatically Set to "Off" during the next reboot.RACADM Issues:* The "racadm gettracelog" option may cause the system to hang. Youmay need to restart the system.Operating system installation issues:* Installation of legacy Red Hat Enterprise Linux operating systemsmay fail due to lack of support for new hardware. You shouldmodify the '%post' section of "ks.cfg" to update to a newerversion of the kernel or install the drivers from this section.* The default root password for Linux installation is "root123."This could be changed to be encrypted in the template "ks.cfg"provided.* The Red Hat Enterprise Linux operating system installation mayfail on systems equipped with multiple RAID and/or SCSIcontrollers, whether installed on the system board or in PCIslots. This failure may occur when using "Server Setup" orperforming a manual installation. When two or more RAID orSCSI controllers are present, install Red Hat EnterpriseLinux with only one configured RAID or SCSI controller.Configure the other controllers after you install the RedHat Enterprise Linux operating system.Instrumentation issues:* The "/opt/dell/srvadmin" directory in the DTK ISO image should bewritable. This enables the instrumentation services towork properly.* The file "omreg.cfg" should be present in the "/etc/" directoryfor the tools to function properly. This is applicable if DTKis being customized to fit in an embedded Linux environmentother than the Dell-provided embedded Linux.###################################################################### Information in this document is subject to change without notice.(C) 2008 Dell Inc. All rights reserved.Reproduction in any manner whatsoever without the written permissionof Dell is strictly forbidden.Trademarks used in this text: "Dell," "PowerEdge," "PowerVault," and "OpenManage" are trademarks of Dell Inc.; "Red Hat" and "Red Hat Enterprise Linux" are registered trademarks of Red Hat, Inc;SUSE is a registered trademark of Novell, Inc. in the UnitedStates and other countries.Other trademarks and trade names may be used in this document to refer to either the entities claiming the marks and names or their products. Dell Inc. disclaims any proprietary interest in trademarks and trade names other than its own.The sample scripts provided with the Dell OpenManage Deployment Toolkit are provided "as is." Dell disclaims any and all warranties, express, implied or statutory, with respect to the sample scripts, including, but not limited to, the implied warranties of merchantability, fitness for a particular purpose, title and any warranty of non-infringement. Use the sample scripts at your own risk. Dell shall not be liable for any direct or indirect damages incurred in using the sample scripts. In no event shall Dell or its suppliers be responsible for any direct or indirect damages whatsoever (including, without limitation, damages for loss of profits, loss of use, loss of data, business interruption, orother pecuniary loss, nor for punitive, incidental, consequential,or special damages of any kind, under any part of this agreement, even if advised or aware of the possibility of such damage.August 2008。