烽火mr622kk说明书
鸿峰对讲机说明书

鸿峰对讲机说明书一、操作说明1、对讲机顶部的天线旁边方形的小按钮是开机键,长按,听到提示音,即为打开状态;2、开机键旁边,有一个可以旋转的钮,上面写了123456这些数字,可通过旋转来调节频道,需要调到几频道就转到哪个数字上去;3、对讲机面板上有“+”和“-”号的按钮,可调节音量大小;4、一直处于开机状态时,对讲机会自动接收该频道的消息。
5、对讲机左侧有一个圆形的按钮,一般是橙红色或者其他较为鲜艳的颜色,需要讲话时就一直按着该按钮,讲话结束松开即可,自己讲话时无法接收到他人信息,同一频道也无法接受多人同时讲话;6、对讲机电量不足时,会不断发出“滴答”的电子音,右侧有充电插口,充电状态时请关闭对讲机,以保护电池;7、长期使用后对讲机的电池易损坏,需定期更换,按住对讲机背面的“open”按键,朝着箭头指示的方向用力推,即可卸下旧电池,再安装新电池;8、对讲机背面有夹子,可夹在工作服左胸的口袋上或者左上臂的位置,正面朝外以便于接收消息;9、对讲机为电子设备,不可在易燃易爆的环境中使用,存在安全隐患,进入之前必须关闭电源;二、电池信息电池首次使用由于电池在出厂时没有进行完全充电,请在使用前对新电池进行充电。
一般情况下,电池在首次使用时,需充电12个小时,镍镉、镍氢及锂离子电池使用慢充或快充充电器充电时均可按此执行。
建议新电池在前三次使用时按上述方法操作。
当发现电池电力低时,需对电池进行充电。
三、适用电池类型请使用HYT指定的电池进行充电;使用其它电池可能会发生爆炸,导致人体伤害。
四、电池贮存需知1、由于电池会有自放电现象,电池在长时间不用时请将电池充满电再进行贮存,避免其电池电量过放而损坏电池。
2、电池处于贮存状态时,请在贮藏约6个月时将电池取出进行补电。
以避免电解质过放影响电池容量。
3、需注意电池贮存环境的温湿度。
请在室温、阴凉、干燥的条件下贮存电池,以减小电池的自放电。
五、充电器充电过程说明如果装上电池,对讲机指示灯红灯闪,每隔30秒“嘟”三声,表示电量不足。
烽火ONU设备AN5006-07 用户手册

欢迎加入通信管线设计交流群 14555563144
AN5006-07 EPON 远端机 用户手册
表格
表 1 AN5006-07 产品类型................................................................................... 3 表 2 AN5006-07 设备同轴电缆接口指标 ............................................................. 7 表 3 AN5006-07 设备 GE 光接口的发送指标 ...................................................... 7 表 4 AN5006-07 设备 GE 光接口的接收指标 ...................................................... 8 表 5 AN5006-07 设备支持的以太网指标 ............................................................. 8 表 6 AN5006-07 设备的机械尺寸和重量 ............................................................. 8 表 7 AN5006-07 设备的电源和功耗 .................................................................... 9 表 8 AN5006-07 设备的环境指标 ........................................................................ 9 表 9 FE 接口指示灯说明 ................................................................................... 14 表 10 前面板指示灯说明(C1A-X 型) ............................................................. 15 表 11 AN5006-07 设备装箱清单........................................................................ 20
网件r6200安装指南说明书
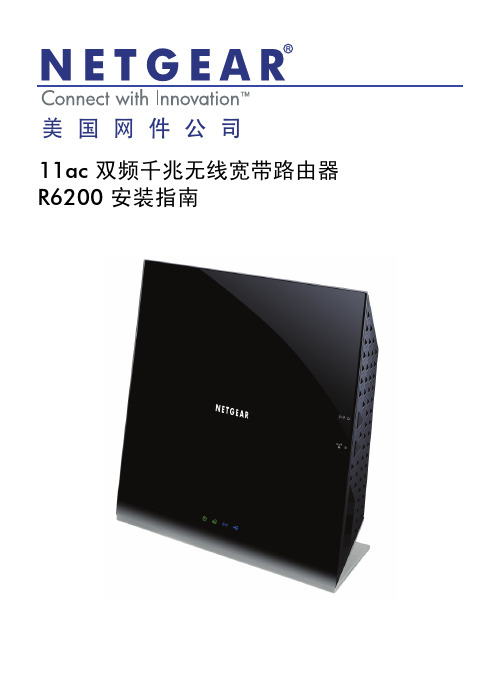
美国网件公司11ac 双频千兆无线宽带路由器R6200 安装指南包装内容注意:•某些国家销售的R6200包装中附有一张资源CD 。
•路由器使用前,请撕开其表面的塑料薄膜。
网线R6200电源适配器目录路由器安装 . . . . . . . . . . . . . . . . . . . . . . . . . . . . . . . . . . . . . . . . .4第一步将R6200接入网络 . . . . . . . . . . . . . . . . . . . . . . . . .4第二步登录路由器管理界面 . . . . . . . . . . . . . . . . . . . . . . . .5第三步将路由器连上因特网 . . . . . . . . . . . . . . . . . . . . . . . .6第四步预设无线密码 . . . . . . . . . . . . . . . . . . . . . . . . . . . . .11第五步计算机成功连接无线网络 . . . . . . . . . . . . . . . . . . . .12 ReadySHARE®︱易共享 •USB存储功能 . . . . . . . . . . . . . . . .13 NETGEAR Genie™ 精灵 . . . . . . . . . . . . . . . . . . . . . . . . . . . . .15路由器安装本节将介绍路由器的安装使用方法。
只需5步即可完成全部设置,让您享受上网冲浪的乐趣。
第一步将R6200接入网络1. ADSL/ Cable Modem接入,连接方式如下:使用一条网线将Modem连接到路由器的因特网端口(黄色标识),2. 若宽带网线到户,没有Modem,连接方式如下:使用一条网线将计算机连接到路由器的局域网端口,运营商提供的宽带线或宽带接口,直接连接到路由器的因特网端口(黄色标识)。
6R使用说明书

6R使用说明书一、部分按键的部分功能简介F/W 短暂按压后屏幕左下方出现“F”图标,持续2-3秒后消失,在该时间内按压其它键,用于启用其它按键的第二功能。
连续按压超过1秒钟,左下方的“F”图标和屏幕上方的频道号均闪动,可进行频道储存操作。
BAND 在VFO状态下短暂按压用于选择波段,该波段最后一次使用的频率将自动记忆。
连续按压超过1秒钟,启动VFO扫描动作。
MODE 短暂按压用于改变接收模式,在AUTO/WFM/AM/FM间选择合适的接收模式。
0/SET 按压F/W后按之,进入设置菜单。
V/M 切换VFO和信道存储模式二、记忆存储:1. 在VFO模式下选择需要的频率,如果需要存储如CTCSS或者DCS,发射功率,收发频差等也可在此时设置好。
2. 按压“F/W”键一秒钟3. 放开“F/W”键五秒钟内,旋转“DIAL”旋钮选择需要的记忆频道(按“P/DMR”键选择频道号码的百位)。
此时如果频道号闪动,说明您当前选择的这个信道是空闲未存储的。
4. 按压“F/W”键,频率将被存储。
5. 此时VX-6R仍然保持在VFO模式下,输入新的频率并保存,只需重复以上的操作。
一般微处理器将自动选择下一未存储的信道。
三、存储独立的收发频率:1. 先选择一个频率作为接收频率存储起来(例如将145.325MHz存储在101信道中)。
2. 然后再选择一个频率作为发射频率(例如438.325MHz)。
3. 按压“F/W”键一秒钟。
4. 放开“F/W”键五秒钟内,旋转“DIAL”旋钮选择存储接收频率的频道(选择到101信道)。
5. 按压“PTT”键的同时按压“F/W”键,则发射频率被存储。
此时进入MR模式,旋转“DIAL”旋钮选择101信道,可看到液晶屏幕上方显示“[+][-]”,这是异频操作的标志。
此时接收频率为145.325MHz,发射频率为438.325MHz。
四、删除存储的频率1.选择一个需要删除的存储频道。
2.按压“F/W”键一秒钟。
无线路由器说明书

8FCC NOTE :This device complies with Part 15 of the FCC Rules. Operation is subject to the following two conditions: (1) this device may not cause harmful interference, (2) this device must accept any interference received,including interference that may cause undesired operation . The manufacturer is not responsible for any radio or tv interference caused by unauthorized modifications or Note: When finish the default mode please go directly to Step.8Confirm indicator rapidly blinkStep.3If this interface does not appear, please refresh the APP.Enter “Go to add”Step.5.Wait till device is connected successfully.Step.6. Device added successfully you can modify device name.Step.1. turn on the phone's Bluetooth functionStep.4password to join your network.Enter Wi-Fi xxxxModify switch nameStep.2password to join your network.Enter Wi-Fi Step.4.Wait till device is connected successfully.Step.3 Power on the device and confirm Step.3Step.2Step.4Step.7Step.6Step.5Step.812SwitchAPP operation interface introductionClick here you can modify the switch nameALL ON/OFFIf you want to connect to Amazon Alexa, Google Home, please follow the instructions to find the guide in the app.(Here are the matching videos and detailed steps)11If you have any questions, please check the “FAQ&Feedback” in the app, maybe you can find a solutionStep D :Give a name to the switch and tap”Completed”. you will find the device you’ve named is shown on the app home page. Tap the device to enter the setting page.Note: The name you give to the device will be the name for voice control on AmazonAlexa or Google Home later. For example, the device is named”Switch” in this user guide.Modify switch nameCD302SwitchSwitchGoogle Play, or scan the QR code below and install it.The free app”Smart Life” is compatible with mobile devices the support IOS8.0 above, Android 4.4 above .Enter the register interface, input the email address/phone number for getting the verification code to register an account. Please just login if you already have a Smart Life account.。
烽火 S2024M-2FX交换机使用手册v1.2
目录安全事项 (V)1 产品简介........................... 错误!未定义书签。
2 安装 (4)3 WEB网管介绍 (6)3.1登录W EB管理 (6)3.2主界面(H OME) (7)3.2.1 面板 (7)3.2.2 功能主菜单 (8)3.3端口状态(P ORT S TATES) (8)3.4端口统计(P ORT S TATISTICS) (10)3.5系统管理(A DMINISTRATOR) (11)3.5.1 IP地址(IP Address) (11)3.5.2 交换机设置(Switch Settings) (12)3.5.2.1 基本信息 (12)3.5.2.2 模块信息 (12)3.5.2.3 高级 (13)3.5.2.4 其它配置 (14)3.5.3 Console口信息(Console Port Information).. 153.5.4 端口设置 (16)3.5.5 链路聚合(Trunking) (17)3.5.5.1 链路聚合设置 (17)3.5.5.2 链路聚合信息 (18)I3.5.5.3 活动状态 (20)3.5.6 信息过滤(Filter Database) (21)3.5.6.1 IGMP Snooping (21)3.5.6.2 GVRP信息表 (21)3.5.6.3 静态MAC地址 (22)3.5.6.4 动态MAC地址 (23)3.5.6.5 MAC地址过滤 (23)3.5.7 VLAN配置(VLAN Configuration) (24)3.5.7.1 基于端口的VLAN (25)3.5.7.2 IEEE802.1Q的VLAN (25)3.5.8 生成树(Spanning Tree) (29)3.5.9 端口监听(Port Sniffer) (31)3.5.10 SNMP (31)3.5.11 安全管理(Security Manager) (33)3.5.12 802.1X配置(802.1X Configuration) (33)3.5.13 软件升级(TFTP Update Firmware) (36)3.5.14 备份配置(Configuration Backup) (36)3.5.15 恢复出厂值(Reset System) (37)3.5.16 重启(Reboot) (38)4 CONSOLE配置 (39)4.1主菜单 (39)4.2交换机配置(S WITCH S TATIC C ONFIGURATION) (41)4.2.1 端口配置(Port Configuration) (41)4.2.2 链路聚合(Trunk Configuration) (43)4.2.3 VLAN配置(VLAN Configuration) (44)4.2.3.1 VLAN 配置(VLAN Configure) (44)II4.2.3.2 创建VLAN 组(Create a VLAN Group) (45)4.2.3.3 编辑/删除VLAN(Edit/Delete a VLAN group) 484.2.3.4 VLAN组分类(Groups Sorted Mode) (49)4.2.4 其它配置(Misc Configuration) (51)4.2.4.1 MAC生存时间(MAC Age Interval) (51)4.2.4.2 广播风暴控制(Broadcast Storm Filtering)524.2.4.3 传输时延(Max transmit delay bound) (52)4.2.4.4 端口绑定(Port Security) (53)4.2.5 系统管理(Administration Configuration) (54)4.2.5.1 修改用户名(Change Username) (55)4.2.5.2 修改密码(Change Password) (55)4.2.5.3 设备信息(Device Information) (56)4.2.5.4 IP配置(IP Configuration) (56)4.2.6 端口镜像(Port Mirroring Configuration) (57)4.2.7 优先级配置(Priority Configuration) (59)4.2.8 MAC地址配置(MAC Address Configuration) (59)4.2.8.1 设置静态MAC地址(Static MAC Address).. 604.2.8.2 MAC地址过滤(Filtering MAC Address) (61)4.3相关协议配置(P ROTOCOL R ELATED C ONFIGURATION) (62)4.3.1 生成树协议(STP) (62)4.3.1.1 使能STP(STP Enable) (62)4.3.1.2 系统配置(System Configuration) (63)4.3.1.3 端口配置(Perport Configuration) (64)4.3.2 SNMP (65)4.3.2.1 系统属性(System Options) (65)4.3.2.2 公共名(Community Strings) (66)4.3.2.3 Trap管理(Trap Managers) (67)III4.3.3 GVRP (69)4.3.4 IGMP (69)4.3.5 LACP (70)4.3.5.1 工作端口配置(Working Port Setting) (71)4.3.5.2 当前状态(State Activity) (72)4.3.5.3 LACP状态(LACP Status) (73)4.3.6 802.1X配置(802.1X Configuration) (73)4.3.6.1 启用802.1X(Enable 802.1X function) (74)4.3.6.2 系统配置(System Configuration) (74)4.3.6.3 其他配置(Misc Configuration) (75)4.4状态和统计(S TATUS AND C OUNTERS) (76)4.4.1 端口状态(Port Status) (76)4.4.2 端口统计(Port Counters) (77)4.4.3 系统信息(System Information) (78)4.5重启(R EBOOT S WITCH) (79)4.5.1 恢复出厂值(Default) (79)4.5.2 重启(Restart) (79)4.6软件升级(TFTP U PDATE F IRMWARE) (80)4.6.1 固件升级(TFTP Update Firmware) (81)4.6.2 保存配置文件(Restore Configure File) (82)4.6.3 升级配置文件(Upload Configure File) (83)IV安全事项在安装和使用本产品之前,请仔细阅读以下事项。
单模 多模转换器 说明书

单模/多模转换器SINGLE/MULTI-MODE CONVERTER用户手册MANUAL目录一、简介二、面板及指示灯外观说明三、技术指标单模/多模转换器使用说明书一、简介本公司推出的多模/单模转换器,可用于光纤传输的模式转换,也可用于波长转换,如:将850nm多模转为1310nm单模,该种转换可以实现不同光纤之间的交叉连接、光信号的再生和传输距离的延伸。
可以用于速率达155Mbps、622Mbps、1.25Gbps 的数据传输中的单、多模转换和中继。
当采用1550nm波长的激光源时,每次中继距离可达到120Km。
适用于ATM、Ethernet、Token、Ring、PABX、OC1/OC3、FDDI和SONET等多种协议和制式的数据传输。
622M多模/单模转换器典型应用:用于联通CDMA基站中BBU和RFU的连接:二、面板及指示灯外观说明本公司目前推出的多模/单模转换器有带内置开关电源的单体机型和集中供电的机架式两种(机架式与单体机型面板指示灯相同):面板说明:PWR:电源指示灯;FXL:单模/多模光口连接指示灯;MM:多模光口;其中TX和RX分别为发送和接收;SM:单模光口;其中TX和RX分别为发送和接收;三、技术指标数据传输速率:155Mbps、622Mbps、1.25Gbps光器件:发送LED/ELED/LASER接收PIN Diode波长:多模:850nm/1310nm单模:1310nm/1550nm 光连接器:ST,FC,SC传输距离:多模850nm 0~2KM;1310nm 0~5KM;单模1310nm 25KM;40KM;60KM;80KM;120KM;电源:100V~275V AC 50~60Hz或-48VDC可选温度:工作温度:0℃~60℃存储温度:-10℃~70℃。
Meraki MR66户外云管理无线局域网说明书

The Meraki MR66 is an enterprise class, dual-concurrent 802.11n cloud managed accesspoint designed for high-density deployments in harsh outdoor locations and industrialindoor environments. The MR66 features dual-concurrent, dual-band operation andadvanced 802.11n technologies such as MIMO and beamforming, delivering the highcapacity, throughput and reliable coverage required by the most demanding businessapplications, even in harsh environments.MR66 and Meraki Cloud Management: A Powerful CombinationThe MR66 is managed via the Meraki cloud, with an intuitive browser-based interfacethat lets you get up and running quickly without training or certifications. Since theMR66 is self-configuring and managed over the web, it can even be deployed at aremote location without on-site IT staff.The MR66 is monitored 24x7 via the cloud, which delivers real-time alerts if your networkencounters problems. Remote diagnostics tools also enable real-time troubleshootingover the web.The MR66’s firmware is always kept up to date from the cloud. New features, bugfixes, and enhancements are delivered seamlessly over the web, so you never haveto manually download software updates or worry about missing security patches. Product Highlights• Ideal for outdoor and industrial indoor environments• Dual-concurrent 802.11n radios with up to 600 Mbps throughput • Point-to-point links with optional panel antennas • High performance multi-radiomesh routing• Layer 7 application fingerprintingand QoS• Built-in enterprise security, guestaccess, and NAC• Self-configuring, plug-and-playdeployment• Automatic cloud-based RF optimizationwith spectrum analysis• Real-time WIPS with Air Marshal802.11n Access PointRecommended Use CasesOutdoor coverage for high client density corporate campuses, educational institutions, and parks • Provide high-speed access to a large number of clients• Point-to-multi-point mesh Indoor coverage for industrial areas(e.g., warehouses, manufacturingfacilities)• Reliable coverage for scanner guns,security cameras, and POS devices• High speed-access for iPads, tabletsand laptopsZero-touch point-to-point• Build a long-distance bridge betweentwo networks• Extend hotspot networks via mesh whilesimultaneously serving clientsFeaturesDual enterprise class 802.11n radios, up to 600 MbpsThe MR66 features two powerful radios and advanced RF design for enhanced receive sensitivity. Combined with 802.11n technolo-gies including MIMO and beamforming, the MR66 delivers up to 600 Mbps throughput and up to 50% increased capacity compared to typical rugged enterprise-class 802.11g access points, meaning fewer access points are required for a given deployment. In addition, dual-concurrent 802.11n radios and band steering technology allow the MR66 to automatically serve legacy 802.11b/g clients using the 2.4 GHz radio and newer 802.11n clients using the 5 GHz radio, thus providing maximum speed to all clients.Rugged industrial designThe MR66 is designed and tested for salt spray, vibration, extreme thermal conditions, shock and dust and is IP67-rated, making it ideal for extreme environments. Despite its rugged design, MR66 has a low profile and is easy to deploy.Application-aware traffic shapingThe MR66 includes an integrated layer 7 packet inspection, classification, and control engine, enabling you to set QoS policies based on traffic type. Prioritize your mission critical applications, while setting limits on recreational traffic, e.g. peer-to-peer and video streaming.Automatic cloud-based RF optimization with spectrum analysisThe MR66’s sophisticated, automated RF optimization meansthat there is no need for the dedicated hardware or RF expertise typically required to tune a wireless network. An integrated spectrum analyzer monitors the airspace for neighboring WiFi devices as well as non-802.11 interference – microwave ovens, Bluetooth headsets, etc. The Meraki cloud then automatically optimizes the MR66’s chan-nel selection, transmit power, and client connection settings, provid-ing optimal performance even under challenging RF conditions. Integrated enterprise security and guest accessThe MR66 features integrated, easy-to-configure security technologies to provide secure connectivity for employees and guests alike. Advanced security features such as AES hardware-based encryption and WPA2-Enterprise authentication with 802.1X and Active Directory integration provide wire-like security with the convenience of wireless mobility. One-click guest isolation provides secure, Internet-only access for visitors. Our policy firewall (Identity Policy Manager) enables group or device-based, granular access policy control. PCI compliance reports check network settings against PCI requirements to simplify secure retail deployments. Secure wireless environments using Air MarshalMeraki wireless comes equipped with Air Marshal, a built-in wireless intrusion prevention system (WIPS) for threat detection and attack remediation. APs will scan their environment opportunistically or in real-time based on intuitive user-defined preferences. Alarms and auto-containment of malicious rogue APs are configured via flexible remediation policies, ensuring optimal security and performance in even the most challenging wireless environments.High performance meshThe MR66’s advanced mesh technologies like multi-channel routing protocols and multiple gateway support enable scalable, high throughput coverage of hard-to-wire areas with zero configuration. Mesh also improves network reliability - in the eventof a switch or cable failure, the MR66 will automatically revert to mesh mode, providing continued gateway connectivity to clients. Self-configuring, self-optimizing, self-healingWhen plugged in, the MR66 automatically connects to the Meraki cloud, downloads its configuration, and joins your network. It self optimizes, determining the ideal channel, transmit power, and client connection parameters. It also self heals, responding automatically to switch failures and other errors.Low profile, environmentally friendly designIn addition to eliminating excess packaging and documentation, 90% of the access point materials are recyclable. A maximum power draw of only 10.5 watts and a cloud-managed architecture mean that pollution, material utilization and your electric bill arekept to a minimum.SpecificationsRadioOne 802.11b/g/n and one 802.11a/n radioDual concurrent operation in 2.4 and 5 GHz bandsMax throughput rate 600 Mbit/s2.4 GHz 26 dBm peak transmission power5 GHz 24 dBm peak transmission powerMax transmission power is decreased for certain geographies to comply with local regulatory requirementsOperating bands:FCC (US) EU (Europe)2.412-2.484 GHz 2.412-2.484 GHz5.150-5.250 GHz (UNII-1) 5.470-5.600, 5.660-5.725 GHz (UNII-2)5.725 -5.825 GHz (UNII-3)802.11n Capabilities2 x 2 multiple input, multiple output (MIMO) with two spatial streamsMaximal ratio combining (MRC)BeamformingPacket aggregationCyclic shift diversity (CSD) supportPowerPower over Ethernet: 24 - 57 V (802.3af compatible)Power consumption: 10.5 W maxPower over Ethernet injector sold separatelyMountingMounts to walls and horizontal and vertical polesMounting hardware includedPhysical SecuritySecurity screw includedEnvironmentOperating temperature: -4°F to 122°F (-20°C to 50°C)IP67 environmental ratingPhysical Dimensions10.5” x 7.6” x 2.2” (267mm x 192mm x 57mm)Weight: 1.9 lb (862g)Interfaces1x 100/1000 Base-T Ethernet (RJ45) with 48V DC 802.3af PoEFour external N-type antenna connectorsSecurityIntegrated policy firewall (Identity Policy Manager)Mobile device policiesAir Marshal: Real-time WIPS (wireless intrusion prevention system) with alarmsRogue AP containmentGuest isolationTeleworker VPN with IPsecPCI compliance reportingWEP, WPA, WPA2-PSK, WPA2-Enterprise with 802.1XTKIP and AES encryptionVLAN tagging (802.1q)Quality of ServiceWireless Quality of Service (WMM/802.11e)DSCP (802.1p)Layer 7 application traffic shaping and firewallMobilityPMK and OKC credential support for fast Layer 2 roamingL3 roamingLED Indicators4 signal strength1 Ethernet connectivity1 power/booting/firmware upgrade statusRegulatoryFCC (US), IC (Canada), CE (Europe), C-Tick (Australia/New Zealand)Cofetel (Mexico), TK (Turkey)RoHSMean Time Between Failure (MTBF)450,000 hoursWarranty1 year hardware warranty with advanced replacement includedOrdering InformationMR66-HW: Meraki MR66 Cloud-Managed Dual-Radio 802.11n Ruggedized Access Point POE-INJ-3-XX: Meraki 802.3af Power over Ethernet Injector (XX = US, EU, UK or AU) ANT-10: Meraki 5/7 dBi Omni Antenna, Dual-band, N-type, Set of 2ANT-11: Meraki 14 dBi Sector Antenna, 5 GHz MIMO, N-typeANT-13: Meraki 11 dBi Sector Antenna, 2.4 GHz MIMO, N-typeNote: Meraki Enterprise license required.。
- 1、下载文档前请自行甄别文档内容的完整性,平台不提供额外的编辑、内容补充、找答案等附加服务。
- 2、"仅部分预览"的文档,不可在线预览部分如存在完整性等问题,可反馈申请退款(可完整预览的文档不适用该条件!)。
- 3、如文档侵犯您的权益,请联系客服反馈,我们会尽快为您处理(人工客服工作时间:9:00-18:30)。
烽火mr622kk说明书
烽火MR622KK说明书
一、产品概述
烽火MR622KK是一款高性能的路由器产品,具备卓越的网络连接能力和稳定性。
它采用了先进的技术和设计,提供了高速的网络传输速率和可靠的信号覆盖范围,适用于各类网络环境。
二、产品特点
1. 高速传输:烽火MR622KK支持千兆以太网接口,提供了快速稳定的网络连接,可满足大流量数据传输的需求。
2. 宽带覆盖:采用了双频WiFi技术,支持2.4GHz和5GHz频段,提供更广阔的无线信号覆盖范围,保证了网络连接的稳定性和速度。
3. 安全保护:烽火MR622KK内置了多种安全防护机制,包括防火墙、入侵检测和反病毒功能,保障网络数据的安全性和隐私。
4. 多功能路由:支持多种网络连接方式,包括ADSL、光纤和以太网等,可根据用户需求进行灵活配置。
5. 便捷管理:烽火MR622KK提供了易于操作的WEB管理界面,用户可以通过浏览器进行路由器的配置和管理,方便快捷。
三、产品配置
1. 路由器主机:烽火MR622KK主机采用紧凑的设计,外观简洁大方,适合各类环境安装和摆放。
2. 电源适配器:提供稳定可靠的电源供应,保证设备正常运行。
3. 网络线缆:提供各类网络连接线缆,如网线、光纤线等,满足不同网络连接需求。
4. 快速安装指南:详细介绍了设备的安装步骤和配置方法,方便用户快速上手使用。
四、使用指南
1. 连接网络:根据网络类型,选择合适的连接方式,如ADSL拨号、光纤连接或以太网连接,确保设备与网络正常连接。
2. 配置路由器:通过浏览器输入设备IP地址,进入设备管理界面,按照快速安装指南的步骤进行路由器的基本配置,包括网络名称、密码等。
3. 网络管理:在设备管理界面中,用户可以进行高级设置,如端口转发、MAC地址过滤等,根据需求进行网络管理,提高网络效率。
4. 无线网络设置:通过设备管理界面,设置无线网络名称和密码,选择合适的频段和信道,优化无线信号覆盖范围和速度。
5. 安全设置:在设备管理界面中,开启防火墙功能,设置访问控制列表,增加网络安全性,防止网络攻击和数据泄露。
6. 远程管理:通过设备管理界面,开启远程管理功能,便于用户在外出时远程管理设备,保证网络安全和稳定。
五、常见问题解答
1. 如何重置路由器?在设备背面有一个“Reset”按钮,按住该按
钮约10秒钟,设备会恢复到出厂默认设置。
2. 如何设置访客WiFi?在设备管理界面中,找到访客WiFi设置选项,设置访客WiFi的名称和密码,限制访客对主网络的访问权限。
3. 如何扩展WiFi信号覆盖范围?可以通过添加WiFi信号扩展器或设置WiFi中继器来增强WiFi信号的覆盖范围。
4. 如何查看设备的IP地址?可以通过在计算机上运行“ipconfig”命令或在设备管理界面中查看路由器的IP地址。
5. 如何更新路由器固件?在设备管理界面中,找到固件升级选项,选择最新的固件文件进行升级。
六、注意事项
1. 在使用设备之前,请仔细阅读快速安装指南和使用手册,确保正确使用设备。
2. 定期检查和更新路由器的固件,以获取最新的功能和安全性。
3. 确保路由器通风良好,避免长时间运行过热。
4. 避免将路由器放置在潮湿、高温和有磁场干扰的环境中,以免影响设备性能和寿命。
5. 注意保护路由器的登录密码和WiFi密码,避免被他人盗用和攻击。
总结:
烽火MR622KK作为一款高性能的路由器产品,具备卓越的网络连接能力和稳定性,为用户提供了高速的网络传输速率和可靠的信号
覆盖范围。
通过简单的配置和管理,用户可以轻松地构建稳定安全的网络环境。
同时,用户在使用过程中也需要注意一些常见问题和注意事项,以保证设备的正常运行和网络的安全性。
希望本说明书能够帮助用户更好地了解和使用烽火MR622KK路由器。