c语言编写坦克大战源代码
C#坦克大战实现(可编辑)
C#坦克大战实现记记事事本本CC##坦坦克克大大战战实实现现2010-12-18 21:06 910人阅读评论 0 收藏举报记得在大学学java时,同学在下载了很多java的视频,看到里面有些是介绍简单游戏开发的,马士兵老师讲的,挺感兴趣的。
一起看了看视频写了写程序。
现在毕业了,因为工作中用的是C#,最近很想拿C#把以前写的坦克大战重写下,来熟悉熟悉C#的基本语法。
程序很简单,跟java代码相比没有多大改动实现方法如下1.在form中添加一个panel,在panel的 Paint方法中得到Graphics对象2.通过Graphics对象再panel画出坦克,子弹等相关内容3.添加timer控件来控制panel的重画实现坦克,子弹的运动4.根据电脑按下的方向键,确定出坦克的方向,panel重画时根据坦克的方向修改坦克的X,Y轴坐标,来实现坦克的移动5.通过Rectangle的IntersectsWith函数来进行碰撞检测,实现子弹打击坦克具体实现代码1.在项目里面添加枚举类型////// 表示方向的的枚举类型///public enum Direction L, U, D, R, STOP 2.添加子弹类的相关常量,属性////// 子弹X轴的速度,单位PX///public static int XSPEED 10;////// 子弹Y轴的速度,单位PX///public static int YSPEED 10;////// 子弹的宽度///public static int WIDTH 10;1////// 子弹的高度///public static int HEIGHT 10;////// 子弹的坐标///int x, y;////// 子弹的方向///Direction dir;////// 子弹的存活状态///private bool live true;////// TankClient窗体实例///private TankClient tankClient; ////// 敌我双方的标记///private bool good;3.添加draw方法来画出子弹public void Draw Graphics gif !livetankClve this ;2return;//通过画椭圆函数在界面上显示子弹g.FillEllipse Brushes.Black, x, y, Missile.WIDTH, Missile.HEIGHT ;Move ;4.添加子弹打击坦克的方法public bool HitTank Tank t//用IntersectsWith来检测两个矩形相碰撞if GetRectangle .IntersectsWith t.GetRectangle && t.Live && this.live && this.good! t.Goodt.Live false;this.live false;return true;return false;5.添加坦克类相关属性,常量////// 坦克x轴的速度///public static int XSPEED 5; ////// 坦克y轴的速度///public static int YSPEED 5;////// 坦克的宽度///public static int WIDTH 30;3////// 坦克的高度///public static int HEIGHT 30;////// 坦克的坐标///private int x, y;////// 标记上下左右键是否按下///private bool l false, u false, r false, d false;////// 坦克的方向///private Direction dir Direction.STOP ;////// 坦克炮筒方向///private Direction ptDir Direction.D ; ////// TankClient窗体实例///TankClient tankClient;////// 标记敌我双方///private bool good;///4/// 控制敌人坦克不规则运行时使用 ///private int step 0;////// 标记坦克的存活状态///private bool live true;6.在tank类中实现画坦克方法public void Draw Graphics g if !liveif !goodtankClve this ; return;if good//通过FillEllipse来画坦克g.FillEllipse Brushes.Red, x, y, WIDTH, HEIGHT ;elseg.FillEllipse Brushes.Blue, x, y, WIDTH, HEIGHT ;//根据炮筒坦克来画出坦克的炮筒switch ptDircase Direction.D:g.DrawLine Pens.Black, x + WIDTH / 2, y + HEIGHT / 2, x + WIDTH / 2, y + HEIGHT ;break;case Direction.U :g.DrawLine Pens.Black, x + WIDTH / 2, y + HEIGHT / 2, x + WIDTH / 2, y ;5break;case Direction.L:g.DrawLine Pens.Black, x + WIDTH / 2, y + HEIGHT / 2, x, y + HEIGHT / 2 ;break;case Direction.R:g.DrawLine Pens.Black, x + WIDTH / 2, y + HEIGHT / 2, x + WIDTH, y + HEIGHT / 2 ;break;Move ;7.键盘按键处理的相关代码public void KeyPressed KeyEventArgs eKeys key e.KeyCode; switch keycase Keys.Right: r true;break;case Keys.Left: l true;break;case Keys.Up:u true; break;case Keys.Down: d true; break;LocateDirection ;8.tank发子弹的方法public Missile Fireif !live return null;int x this.x + WIDTH / 2 - Missile.WIDTH / 2;6int y this.y + HEIGHT / 2 - Missile.HEIGHT / 2;Missile missile new Missile x, y, good, ptDir, tankClient ;tankCl missile ;return missile;9.主窗体类加入坦克myTank new Tank 50, 20, true, this ;//放到前面 this不能用 //y轴比java的减少了30for int i 0; i 15; i++//添加10个坦克x轴间距为40pxtanks.Add new Tank 50+40* i+1 ,20,false,this ; //y轴比java的减少了3010.主窗体类中调用子弹打击坦克的方法for int i 0; i missiles.Count; i++ Missile m missiles[i];m.HitTank myTank ;m.HitTanks tanks ;m.Draw g ;11.主窗体处理按键代码private void Form1_KeyDown object sender, KeyEventArgs emyTank.KeyPressed e ;12.控制重画代码private void timer1_Tick object sender, EventArgs e//间隔50毫秒控制panel的重画panel1.Invalidate ;13.这是主要代码基本完成,但是游戏会有闪烁问题可以通过双缓冲来解决,C#解决时很省事,一个函数就能解决7this.SetStyleControlStyles.OptimizedDoubleBuffer |ControlStyles.ResizeRedraw |ControlStyles.AllPaintingInWmPaint, true ;顺便改了个手机版本的但是手机版本的没能解决双缓冲问题,屏幕有些闪烁,朋友们可以自己改进代码下载如果你发现有什么不合理的,需要改进的地方,邮件联系328452421@ (常年不在线,邮件联系)朱晓。
python+pygame实现坦克大战小游戏的示例代码(可以自定义子弹速度)
python+pygame实现坦克⼤战⼩游戏的⽰例代码(可以⾃定义⼦弹速度)python+pygame实现坦克⼤战⼩游戏—可以⾃定义⼦弹速度:运⾏环境–python3.7、pycharm;源码需要请:点赞留⾔邮箱;正常版⼦弹速度:普通速度版加速版⼦弹速度:⼦弹加速版另外还有多种道具,⽀持两⼈⼀起玩。
main()⽅法如下:def main():pygame.init()pygame.mixer.init()resolution = 630, 630screen = pygame.display.set_mode(resolution)pygame.display.set_caption("Tank Game ")# 加载图⽚,⾳乐,⾳效.background_image = pygame.image.load(r"..\image\background.png")home_image = pygame.image.load(r"..\image\home.png")home_destroyed_image = pygame.image.load(r"..\image\home_destroyed.png")bang_sound = pygame.mixer.Sound(r"..\music\bang.wav")bang_sound.set_volume(1)fire_sound = pygame.mixer.Sound(r"..\music\Gunfire.wav")start_sound = pygame.mixer.Sound(r"..\music\start.wav")start_sound.play()# 定义精灵组:坦克,我⽅坦克,敌⽅坦克,敌⽅⼦弹allTankGroup = pygame.sprite.Group()mytankGroup = pygame.sprite.Group()allEnemyGroup = pygame.sprite.Group()redEnemyGroup = pygame.sprite.Group()greenEnemyGroup = pygame.sprite.Group()otherEnemyGroup = pygame.sprite.Group()enemyBulletGroup = pygame.sprite.Group()# 创建地图bgMap = wall.Map()# 创建⾷物/道具但不显⽰prop = food.Food()# 创建我⽅坦克myTank_T1 = myTank.MyTank(1)allTankGroup.add(myTank_T1)mytankGroup.add(myTank_T1)myTank_T2 = myTank.MyTank(2)allTankGroup.add(myTank_T2)mytankGroup.add(myTank_T2)# 创建敌⽅坦克for i in range(1, 4):enemy = enemyTank.EnemyTank(i)allTankGroup.add(enemy)allEnemyGroup.add(enemy)if enemy.isred == True:redEnemyGroup.add(enemy)continueif enemy.kind == 3:greenEnemyGroup.add(enemy)continueotherEnemyGroup.add(enemy)# 敌军坦克出现动画appearance_image = pygame.image.load(r"..\image\appear.png").convert_alpha()appearance = []appearance.append(appearance_image.subsurface(( 0, 0), (48, 48)))appearance.append(appearance_image.subsurface((48, 0), (48, 48)))appearance.append(appearance_image.subsurface((96, 0), (48, 48)))# ⾃定义事件# 创建敌⽅坦克延迟200DELAYEVENT = EREVENTpygame.time.set_timer(DELAYEVENT, 200)# 创建敌⽅⼦弹延迟1000ENEMYBULLETNOTCOOLINGEVENT = EREVENT + 1 pygame.time.set_timer(ENEMYBULLETNOTCOOLINGEVENT, 1000)# 创建我⽅⼦弹延迟200MYBULLETNOTCOOLINGEVENT = EREVENT + 2pygame.time.set_timer(MYBULLETNOTCOOLINGEVENT, 200)# 敌⽅坦克静⽌8000NOTMOVEEVENT = EREVENT + 3pygame.time.set_timer(NOTMOVEEVENT, 8000)delay = 100moving = 0movdir = 0moving2 = 0movdir2 = 0enemyNumber = 3enemyCouldMove = Trueswitch_R1_R2_image = TruehomeSurvive = Truerunning_T1 = Truerunning_T2 = Trueclock = pygame.time.Clock()while True:for event in pygame.event.get():if event.type == pygame.QUIT:pygame.quit()sys.exit()# 我⽅⼦弹冷却事件if event.type == MYBULLETNOTCOOLINGEVENT:myTank_T1.bulletNotCooling = True# 敌⽅⼦弹冷却事件if event.type == ENEMYBULLETNOTCOOLINGEVENT:for each in allEnemyGroup:each.bulletNotCooling = True# 敌⽅坦克静⽌事件if event.type == NOTMOVEEVENT:enemyCouldMove = True# 创建敌⽅坦克延迟if event.type == DELAYEVENT:if enemyNumber < 4:enemy = enemyTank.EnemyTank()if pygame.sprite.spritecollide(enemy, allTankGroup, False, None):breakallEnemyGroup.add(enemy)allTankGroup.add(enemy)enemyNumber += 1if enemy.isred == True:redEnemyGroup.add(enemy)elif enemy.kind == 3:greenEnemyGroup.add(enemy)else:otherEnemyGroup.add(enemy)if event.type == pygame.KEYDOWN:if event.key == pygame.K_c and pygame.KMOD_CTRL:pygame.quit()sys.exit()if event.key == pygame.K_e:myTank_T1.levelUp()if event.key == pygame.K_q:myTank_T1.levelDown()if event.key == pygame.K_3:myTank_T1.levelUp()myTank_T1.levelUp()myTank_T1.level = 3if event.key == pygame.K_2:if myTank_T1.speed == 3:myTank_T1.speed = 24else:myTank_T1.speed = 3if event.key == pygame.K_1:for x, y in [(11,23),(12,23),(13,23),(14,23),(11,24),(14,24),(11,25),(14,25)]: bgMap.brick = wall.Brick()bgMap.brick.rect.left, bgMap.brick.rect.top = 3 + x * 24, 3 + y * 24bgMap.brickGroup.add(bgMap.brick)if event.key == pygame.K_4:for x, y in [(11,23),(12,23),(13,23),(14,23),(11,24),(14,24),(11,25),(14,25)]:bgMap.iron = wall.Iron()bgMap.iron.rect.left, bgMap.iron.rect.top = 3 + x * 24, 3 + y * 24bgMap.ironGroup.add(bgMap.iron)# 检查⽤户的键盘操作key_pressed = pygame.key.get_pressed()# 玩家⼀的移动操作if moving:moving -= 1if movdir == 0:allTankGroup.remove(myTank_T1)if myTank_T1.moveUp(allTankGroup, bgMap.brickGroup, bgMap.ironGroup): moving += 1allTankGroup.add(myTank_T1)running_T1 = Trueif movdir == 1:allTankGroup.remove(myTank_T1)if myTank_T1.moveDown(allTankGroup, bgMap.brickGroup, bgMap.ironGroup): moving += 1allTankGroup.add(myTank_T1)running_T1 = Trueif movdir == 2:allTankGroup.remove(myTank_T1)if myTank_T1.moveLeft(allTankGroup, bgMap.brickGroup, bgMap.ironGroup): moving += 1allTankGroup.add(myTank_T1)running_T1 = Trueif movdir == 3:allTankGroup.remove(myTank_T1)if myTank_T1.moveRight(allTankGroup, bgMap.brickGroup, bgMap.ironGroup): moving += 1allTankGroup.add(myTank_T1)running_T1 = Trueif not moving:if key_pressed[pygame.K_w]:moving = 7movdir = 0running_T1 = TrueallTankGroup.remove(myTank_T1)if myTank_T1.moveUp(allTankGroup, bgMap.brickGroup, bgMap.ironGroup): moving = 0allTankGroup.add(myTank_T1)elif key_pressed[pygame.K_s]:moving = 7movdir = 1running_T1 = TrueallTankGroup.remove(myTank_T1)if myTank_T1.moveDown(allTankGroup, bgMap.brickGroup, bgMap.ironGroup): moving = 0allTankGroup.add(myTank_T1)elif key_pressed[pygame.K_a]:moving = 7movdir = 2running_T1 = TrueallTankGroup.remove(myTank_T1)if myTank_T1.moveLeft(allTankGroup, bgMap.brickGroup, bgMap.ironGroup): moving = 0allTankGroup.add(myTank_T1)elif key_pressed[pygame.K_d]:moving = 7movdir = 3running_T1 = TrueallTankGroup.remove(myTank_T1)if myTank_T1.moveRight(allTankGroup, bgMap.brickGroup, bgMap.ironGroup): moving = 0allTankGroup.add(myTank_T1)if key_pressed[pygame.K_j]:if not myTank_T1.bullet.life and myTank_T1.bulletNotCooling:fire_sound.play()myTank_T1.shoot()myTank_T1.bulletNotCooling = False# 玩家⼆的移动操作if moving2:moving2 -= 1if movdir2 == 0:allTankGroup.remove(myTank_T2)myTank_T2.moveUp(allTankGroup, bgMap.brickGroup, bgMap.ironGroup) allTankGroup.add(myTank_T2)running_T2 = Trueif movdir2 == 1:allTankGroup.remove(myTank_T2)myTank_T2.moveDown(allTankGroup, bgMap.brickGroup, bgMap.ironGroup) allTankGroup.add(myTank_T2)running_T2 = Trueif movdir2 == 2:allTankGroup.remove(myTank_T2)myTank_T2.moveLeft(allTankGroup, bgMap.brickGroup, bgMap.ironGroup) allTankGroup.add(myTank_T2)running_T2 = Trueif movdir2 == 3:allTankGroup.remove(myTank_T2)myTank_T2.moveRight(allTankGroup, bgMap.brickGroup, bgMap.ironGroup) allTankGroup.add(myTank_T2)running_T2 = Trueif not moving2:if key_pressed[pygame.K_UP]:allTankGroup.remove(myTank_T2)myTank_T2.moveUp(allTankGroup, bgMap.brickGroup, bgMap.ironGroup) allTankGroup.add(myTank_T2)moving2 = 7movdir2 = 0running_T2 = Trueelif key_pressed[pygame.K_DOWN]:allTankGroup.remove(myTank_T2)myTank_T2.moveDown(allTankGroup, bgMap.brickGroup, bgMap.ironGroup) allTankGroup.add(myTank_T2)moving2 = 7movdir2 = 1running_T2 = Trueelif key_pressed[pygame.K_LEFT]:allTankGroup.remove(myTank_T2)myTank_T2.moveLeft(allTankGroup, bgMap.brickGroup, bgMap.ironGroup) allTankGroup.add(myTank_T2)moving2 = 7movdir2 = 2running_T2 = Trueelif key_pressed[pygame.K_RIGHT]:allTankGroup.remove(myTank_T2)myTank_T2.moveRight(allTankGroup, bgMap.brickGroup, bgMap.ironGroup) allTankGroup.add(myTank_T2)moving2 = 7movdir2 = 3running_T2 = Trueif key_pressed[pygame.K_KP0]:if not myTank_T2.bullet.life:# fire_sound.play()myTank_T2.shoot()# 画背景screen.blit(background_image, (0, 0))# 画砖块for each in bgMap.brickGroup:screen.blit(each.image, each.rect)# 花⽯头for each in bgMap.ironGroup:screen.blit(each.image, each.rect)# 画homeif homeSurvive:screen.blit(home_image, (3 + 12 * 24, 3 + 24 * 24))else:screen.blit(home_destroyed_image, (3 + 12 * 24, 3 + 24 * 24))# 画我⽅坦克1if not (delay % 5):switch_R1_R2_image = not switch_R1_R2_imageif switch_R1_R2_image and running_T1:screen.blit(myTank_T1.tank_R0, (myTank_T1.rect.left, myTank_T1.rect.top)) running_T1 = Falseelse:screen.blit(myTank_T1.tank_R1, (myTank_T1.rect.left, myTank_T1.rect.top)) # 画我⽅坦克2if switch_R1_R2_image and running_T2:screen.blit(myTank_T2.tank_R0, (myTank_T2.rect.left, myTank_T2.rect.top))running_T2 = Falseelse:screen.blit(myTank_T2.tank_R1, (myTank_T2.rect.left, myTank_T2.rect.top))# 画敌⽅坦克for each in allEnemyGroup:# 判断5⽑钱特效是否播放if each.flash:# 判断画左动作还是右动作if switch_R1_R2_image:screen.blit(each.tank_R0, (each.rect.left, each.rect.top))if enemyCouldMove:allTankGroup.remove(each)each.move(allTankGroup, bgMap.brickGroup, bgMap.ironGroup)allTankGroup.add(each)else:screen.blit(each.tank_R1, (each.rect.left, each.rect.top))if enemyCouldMove:allTankGroup.remove(each)each.move(allTankGroup, bgMap.brickGroup, bgMap.ironGroup)allTankGroup.add(each)else:# 播放5⽑钱特效if each.times > 0:each.times -= 1if each.times <= 10:screen.blit(appearance[2], (3 + each.x * 12 * 24, 3))elif each.times <= 20:screen.blit(appearance[1], (3 + each.x * 12 * 24, 3))elif each.times <= 30:screen.blit(appearance[0], (3 + each.x * 12 * 24, 3))elif each.times <= 40:screen.blit(appearance[2], (3 + each.x * 12 * 24, 3))elif each.times <= 50:screen.blit(appearance[1], (3 + each.x * 12 * 24, 3))elif each.times <= 60:screen.blit(appearance[0], (3 + each.x * 12 * 24, 3))elif each.times <= 70:screen.blit(appearance[2], (3 + each.x * 12 * 24, 3))elif each.times <= 80:screen.blit(appearance[1], (3 + each.x * 12 * 24, 3))elif each.times <= 90:screen.blit(appearance[0], (3 + each.x * 12 * 24, 3))if each.times == 0:each.flash = True# 绘制我⽅⼦弹1if myTank_T1.bullet.life:myTank_T1.bullet.move()screen.blit(myTank_T1.bullet.bullet, myTank_T1.bullet.rect)# ⼦弹碰撞⼦弹for each in enemyBulletGroup:if each.life:if pygame.sprite.collide_rect(myTank_T1.bullet, each):myTank_T1.bullet.life = Falseeach.life = Falsepygame.sprite.spritecollide(myTank_T1.bullet, enemyBulletGroup, True, None) # ⼦弹碰撞敌⽅坦克if pygame.sprite.spritecollide(myTank_T1.bullet, redEnemyGroup, True, None):prop.change()bang_sound.play()enemyNumber -= 1myTank_T1.bullet.life = Falseelif pygame.sprite.spritecollide(myTank_T1.bullet,greenEnemyGroup, False, None): for each in greenEnemyGroup:if pygame.sprite.collide_rect(myTank_T1.bullet, each):if each.life == 1:pygame.sprite.spritecollide(myTank_T1.bullet,greenEnemyGroup, True, None) bang_sound.play()enemyNumber -= 1elif each.life == 2:each.life -= 1each.tank = each.enemy_3_0elif each.life == 3:each.life -= 1each.tank = each.enemy_3_2myTank_T1.bullet.life = Falseelif pygame.sprite.spritecollide(myTank_T1.bullet, otherEnemyGroup, True, None): bang_sound.play()enemyNumber -= 1myTank_T1.bullet.life = False#if pygame.sprite.spritecollide(myTank_T1.bullet, allEnemyGroup, True, None):# bang_sound.play()# enemyNumber -= 1# myTank_T1.bullet.life = False# ⼦弹碰撞 brickGroupif pygame.sprite.spritecollide(myTank_T1.bullet, bgMap.brickGroup, True, None):myTank_T1.bullet.life = FalsemyTank_T1.bullet.rect.left, myTank_T1.bullet.rect.right = 3 + 12 * 24, 3 + 24 * 24 # ⼦弹碰撞 brickGroupif myTank_T1.bullet.strong:if pygame.sprite.spritecollide(myTank_T1.bullet, bgMap.ironGroup, True, None):myTank_T1.bullet.life = FalsemyTank_T1.bullet.rect.left, myTank_T1.bullet.rect.right = 3 + 12 * 24, 3 + 24 * 24 else:if pygame.sprite.spritecollide(myTank_T1.bullet, bgMap.ironGroup, False, None): myTank_T1.bullet.life = FalsemyTank_T1.bullet.rect.left, myTank_T1.bullet.rect.right = 3 + 12 * 24, 3 + 24 * 24 # 绘制我⽅⼦弹2if myTank_T2.bullet.life:myTank_T2.bullet.move()screen.blit(myTank_T2.bullet.bullet, myTank_T2.bullet.rect)# ⼦弹碰撞敌⽅坦克if pygame.sprite.spritecollide(myTank_T2.bullet, allEnemyGroup, True, None):bang_sound.play()enemyNumber -= 1myTank_T2.bullet.life = False# ⼦弹碰撞 brickGroupif pygame.sprite.spritecollide(myTank_T2.bullet, bgMap.brickGroup, True, None):myTank_T2.bullet.life = FalsemyTank_T2.bullet.rect.left, myTank_T2.bullet.rect.right = 3 + 12 * 24, 3 + 24 * 24 # ⼦弹碰撞 brickGroupif myTank_T2.bullet.strong:if pygame.sprite.spritecollide(myTank_T2.bullet, bgMap.ironGroup, True, None):myTank_T2.bullet.life = FalsemyTank_T2.bullet.rect.left, myTank_T2.bullet.rect.right = 3 + 12 * 24, 3 + 24 * 24 else:if pygame.sprite.spritecollide(myTank_T2.bullet, bgMap.ironGroup, False, None): myTank_T2.bullet.life = FalsemyTank_T2.bullet.rect.left, myTank_T2.bullet.rect.right = 3 + 12 * 24, 3 + 24 * 24 # 绘制敌⼈⼦弹for each in allEnemyGroup:# 如果⼦弹没有⽣命,则赋予⼦弹⽣命if not each.bullet.life and each.bulletNotCooling and enemyCouldMove:enemyBulletGroup.remove(each.bullet)each.shoot()enemyBulletGroup.add(each.bullet)each.bulletNotCooling = False# 如果5⽑钱特效播放完毕并且⼦弹存活则绘制敌⽅⼦弹if each.flash:if each.bullet.life:# 如果敌⼈可以移动if enemyCouldMove:each.bullet.move()screen.blit(each.bullet.bullet, each.bullet.rect)# ⼦弹碰撞我⽅坦克if pygame.sprite.collide_rect(each.bullet, myTank_T1):bang_sound.play()myTank_T1.rect.left, myTank_T1.rect.top = 3 + 8 * 24, 3 + 24 * 24each.bullet.life = Falsemoving = 0 # 重置移动控制参数for i in range(myTank_T1.level+1):myTank_T1.levelDown()if pygame.sprite.collide_rect(each.bullet, myTank_T2):bang_sound.play()myTank_T2.rect.left, myTank_T2.rect.top = 3 + 16 * 24, 3 + 24 * 24each.bullet.life = False# ⼦弹碰撞 brickGroupif pygame.sprite.spritecollide(each.bullet, bgMap.brickGroup, True, None):each.bullet.life = False# ⼦弹碰撞 ironGroupif each.bullet.strong:if pygame.sprite.spritecollide(each.bullet, bgMap.ironGroup, True, None):each.bullet.life = Falseelse:if pygame.sprite.spritecollide(each.bullet, bgMap.ironGroup, False, None):each.bullet.life = False# 最后画⾷物/道具if prop.life:screen.blit(prop.image, prop.rect)# 我⽅坦克碰撞⾷物/道具if pygame.sprite.collide_rect(myTank_T1, prop):if prop.kind == 1: # 敌⼈全毁for each in allEnemyGroup:if pygame.sprite.spritecollide(each, allEnemyGroup, True, None):bang_sound.play()enemyNumber -= 1prop.life = Falseif prop.kind == 2: # 敌⼈静⽌enemyCouldMove = Falseprop.life = Falseif prop.kind == 3: # ⼦弹增强myTank_T1.bullet.strong = Trueprop.life = Falseif prop.kind == 4: # 家得到保护for x, y in [(11,23),(12,23),(13,23),(14,23),(11,24),(14,24),(11,25),(14,25)]:bgMap.iron = wall.Iron()bgMap.iron.rect.left, bgMap.iron.rect.top = 3 + x * 24, 3 + y * 24bgMap.ironGroup.add(bgMap.iron)prop.life = Falseif prop.kind == 5: # 坦克⽆敌prop.life = Falsepassif prop.kind == 6: # 坦克升级myTank_T1.levelUp()prop.life = Falseif prop.kind == 7: # 坦克⽣命+1myTank_T1.life += 1prop.life = False# 延迟delay -= 1if not delay:delay = 100pygame.display.flip()clock.tick(60)总结到此这篇关于python+pygame实现坦克⼤战⼩游戏---可以⾃定义⼦弹速度的⽂章就介绍到这了,更多相关python+pygame实现坦克⼤战⼩游戏内容请搜索以前的⽂章或继续浏览下⾯的相关⽂章希望⼤家以后多多⽀持!。
一个C#控制台小游戏(源码解析)

⼀个C#控制台⼩游戏(源码解析)前⼏天我发布游戏exe⽂件,这⼏天整理了⼀下代码——,就马上来写博了。
好了,开始正题了程序类图如下:Program:程序类——main⽅法Game:游戏类——游戏运⾏、⾓⾊基本信息调⽤From:地图类——描绘游戏边框、提⽰信息Tank:坦克类——坦克绘制、⾏为、碰撞处理EnemyTank:敌⽅坦克类——坦克绘制、⾏为、碰撞处理Bullet:⼦弹类——⼦弹绘制、⾏为、碰撞处理Point:位置结构——记录坦克、⼦弹位置Direction:⽅向类——记录坦克、⼦弹⽅向当然这个游戏主要组成也是:地图,坦克绘制、⾏动、碰撞,⼦弹绘制、⾏动、碰撞,下⾯⼀⼀讲解: 1.Map/// <summary>/// 绘制边框/// </summary>public void DrawBorder(){Console.ForegroundColor = ConsoleColor.Gray;Console.CursorVisible = false;Console.SetCursorPosition(Left, Top);Console.Write("┎" + new string('━', width) + "┒");for (int i = 0; i <= height; i++){if (i != height){Console.SetCursorPosition(left, top + i + 1);Console.Write("┃" + new string(' ', 2 * width) + "┃");}else{Console.SetCursorPosition(left, top + i + 1);Console.Write("┗" + new string('━', width) + "┛");}}Config.Config.func();} 其中 Console.ForegroundColor——获取或设置当前控制台颜⾊Console.CursorVisible——⽤来指⽰光标是否可见Console.SetCursorPosition(, )——设置光标的位置(以上三个在后⾯绘制都要⽤到,⽤法我就不再讲解了)看代码我可以知道者将获得⼀个框框的图案,这就是游戏的地图2.获取键盘事件/// <summary>/// 获得键盘按键状态/// </summary>/// <returns></returns>public bool StartInput(){ConsoleKeyInfo key;while (true){key = Console.ReadKey(true);if (!HandleInput(key)){return false;}}return true;} 这个⽅法在Game类中是打开即加载,他是我们控制坦克上下左右和发射⼦弹⽅法,其中 Console.ReadKey(true);可以获得按下的键盘,内容是不断循环的,其中HandleInput(key)⽅法是控制坦克⾏为的⽅法,没执⾏⼀次,坦克⾛⼀步或者发射⼦弹,当返回false就跳出改⽅法3.物体之间碰撞的判断/// <summary>/// 判断是否碰到边框或者敌⽅坦克/// </summary>/// <param name="type"></param>/// <returns></returns>public int Collide(MoveType type){int tan = 0;//左if (type == MoveType.Left){if ( x <= 1){tan = x;}else{if (From.Map[x - 2, y-1] == 3 || From.Map[x - 2, y] == 3 || From.Map[x - 2, y+1] == 3){tan = x;}else{x -= 1;tan = x;}}}//右if (type == MoveType.Right){if (x >= From.Width - width + 1){tan = x;}else{if (From.Map[x + 2, y-1] == 3 || From.Map[x + 2, y] == 3 || From.Map[x + 2, y+1] == 3){tan = x;}else{x += 1;tan = x;}}}//上if (type == MoveType.Up){if (y <= 1){tan = y;}else{if (From.Map[x - 1, y - 2] == 3 || From.Map[x, y - 2] == 3 || From.Map[x + 1, y - 2] == 3){tan = y;}else{y -= 1;tan = y;}}}//下if (type == MoveType.Down){if ( y > From.Height - 3){tan = y;}else{if (From.Map[x - 1, y + 2] == 3 || From.Map[x, y + 2] == 3 || From.Map[x + 1, y + 2] == 3){tan = y;}else{y += 1;tan = y;}}}return tan;} 物体之间的碰撞。
坦克大战游戏编程实现
坦克大战游戏编程实现游戏编程实现坦克大战坦克大战是一款经典的电子游戏,在游戏中,玩家将控制一个坦克,通过操作坦克的移动和攻击,与其他玩家或电脑进行战斗。
本文将介绍如何使用编程语言实现坦克大战游戏。
设计思路在实现坦克大战游戏之前,首先需要明确游戏的基本要素和规则。
玩家将操作一个坦克,通过键盘或操纵杆控制坦克的移动和攻击。
游戏画面由地图、坦克、子弹等元素构成。
坦克可以向前、向后、向左、向右移动,可以发射子弹进行攻击。
玩家需要躲避敌方坦克的攻击,同时尽可能击败敌方坦克。
编程实现坦克的移动和攻击可以通过编程语言来实现。
以下是使用Java语言来编写坦克大战游戏的示例代码:```javapublic class TankGame extends JFrame {private Tank tank; // 玩家坦克private List<Tank> enemyTanks; // 敌方坦克列表private List<Bullet> bullets; // 子弹列表public TankGame() {// 初始化游戏窗口this.setSize(800, 600);this.setDefaultCloseOperation(JFrame.EXIT_ON_CLOSE); this.setVisible(true);// 初始化玩家坦克tank = new Tank(400, 500);// 初始化敌方坦克列表enemyTanks = new ArrayList<>();enemyTanks.add(new Tank(100, 100));enemyTanks.add(new Tank(300, 200));// 初始化子弹列表bullets = new ArrayList<>();// 添加键盘监听器,控制坦克移动和攻击this.addKeyListener(new KeyListener() {@Overridepublic void keyPressed(KeyEvent e) {int keycode = e.getKeyCode();switch (keycode) {case KeyEvent.VK_UP:tank.moveUp();break;case KeyEvent.VK_DOWN: tank.moveDown();break;case KeyEvent.VK_LEFT: tank.moveLeft();break;case KeyEvent.VK_RIGHT: tank.moveRight();break;case KeyEvent.VK_SPACE: bullets.add(tank.fire());break;default:break;}// 重新绘制游戏画面repaint();}@Overridepublic void keyReleased(KeyEvent e) { }@Overridepublic void keyTyped(KeyEvent e) { }});}// 绘制游戏画面public void paint(Graphics g) {super.paint(g);// 绘制玩家坦克tank.draw(g);// 绘制敌方坦克for (Tank enemyTank : enemyTanks) { enemyTank.draw(g);}// 绘制子弹for (Bullet bullet : bullets) {bullet.draw(g);}}public static void main(String[] args) {new TankGame();}}```在上述示例代码中,我们创建了一个继承自JFrame的主窗口,并在窗口中添加了一个玩家坦克、敌方坦克和子弹的列表。
易语言坦克大战代码

.否则
.如果(动画框1.键是否被按下(#下光标键))
动画框1.置角度(集坦克红, 180)
动画框1.前进(集坦克红, 5)
.否则
.如果(动画框1.键是否被按下(37))
动画框1.置角度(集坦克红, 270)
动画框1.前进(集坦克红, 5)
.否则
.如果(动画框1.键是否被按下(39))
播放音乐(#发射1, )
动画框1.置角度(集炮弹红,动画框1.取角度(集坦克红))
动画框1.自动前进(集炮弹红, 10, 20, , ,真, 2,真, , )
.如果真结束
.否则
.如果结束
.如果结束
.如果结束
.如果结束
.如果结束
' 1左2上3右4下5空格6不动!
这次的命令=取随机数(1, 100)
'蓝方移动
动画框1.置物体位置(集坦克蓝,碰撞前横坐标,碰撞前纵坐标,真)
返回()
.如果真结束
.子程序_动画框1_碰撞到边界,逻辑型
.参数物体标识值,整数型
.参数碰撞前横坐标,整数型
.参数碰撞前纵坐标,整数型
.参数边界类型,整数型
.如果真(物体标识值=集坦克红)
动画框1.置物体位置(集坦克红,碰撞前横坐标,碰撞前纵坐标,真)
版本2
.支持库iext2
.程序集窗口程序集1
.程序集变量集坦克红,整数型
.程序集变量集炮弹红,整数型
.程序集变量集红方分数,
.程序集变量集蓝方分数,整数型
.子程序__启动窗口_创建完毕
置随机数种子()
集坦克红=动画框1.创建物体(动画物体坦克红, 300, 200, , )
Python3+pygame实现的90坦克大战代码完整有演示效果
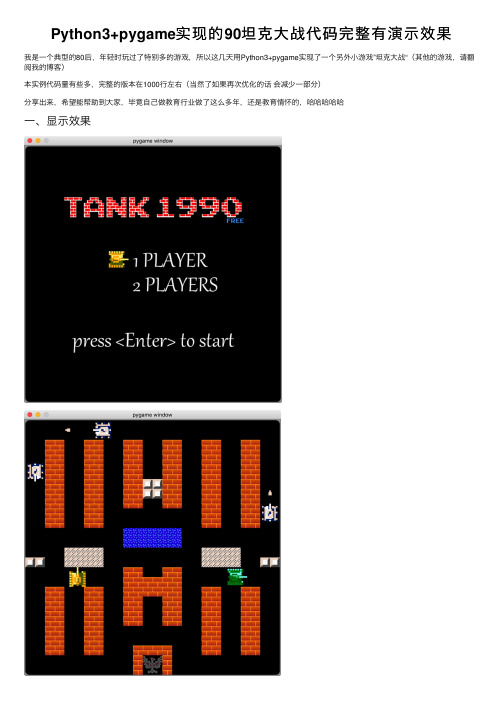
Python3+pygame实现的90坦克⼤战代码完整有演⽰效果我是⼀个典型的80后,年轻时玩过了特别多的游戏,所以这⼏天⽤Python3+pygame实现了⼀个另外⼩游戏”坦克⼤战“(其他的游戏,请翻阅我的博客)本实例代码量有些多,完整的版本在1000⾏左右(当然了如果再次优化的话会减少⼀部分)分享出来,希望能帮助到⼤家,毕竟⾃⼰做教育⾏业做了这么多年,还是教育情怀的,哈哈哈哈哈⼀、显⽰效果⼆、代码下⾯代码⽤到了⼀些素材(游戏背景⾳乐、图⽚等等),可以到我的⽹站下载,谢谢⼤家的⽀持完整代码如下(注意:为了⽅便下载以及编写更简单,没有采⽤多模块的⽅式,全部代码全部放到main.py⽂件中) """作者:it项⽬实例⽹⽹站:"""import randomimport sysimport pygame# 屏幕的宽、⾼WIDTH = 630HEIGHT = 630# 边界值BORDER_LEN = 3# 字体FONTPATH = 'resources/font/font.ttf'class Iron(pygame.sprite.Sprite):"""铁墙类"""# 定义精灵组,将所有的砖墙实例对象添加到⾥⾯group = pygame.sprite.Group()def__init__(self, position):# 调⽤⽗类的初始化⽅法,这样才能够实现必要的初始化操作super().__init__()self.image = pygame.image.load("resources/images/scene/iron.png")# 当使⽤碰撞判断⽅法时,pygame就需要知道当前要检测的物体的位置,所以这个rect属性⼀定要设置self.rect = self.image.get_rect()self.rect.topleft = position# 添加到精灵组self.group.add(self)@classmethoddef show(cls, screen):for temp in cls.group:screen.blit(temp.image, temp.rect)class Ice(pygame.sprite.Sprite):"""冰类"""# 定义精灵组,将所有的实例对象添加到⾥⾯group = pygame.sprite.Group()def__init__(self, position):# 调⽤⽗类的初始化⽅法,这样才能够实现必要的初始化操作super().__init__()# 因为是12x12的⼩图⽚,所以需要制作⼀个24x24的imageimage = pygame.Surface((24, 24))for i in range(2):for j in range(2):image.blit(pygame.image.load("resources/images/scene/ice.png"), (12 * i, 12 * j))self.image = image# 当使⽤碰撞判断⽅法时,pygame就需要知道当前要检测的物体的位置,所以这个rect属性⼀定要设置 self.rect = self.image.get_rect()self.rect.topleft = position# 添加到精灵组self.group.add(self)@classmethoddef show(cls, screen):for temp in cls.group:screen.blit(temp.image, temp.rect)class River(pygame.sprite.Sprite):"""河流类"""# 定义精灵组,将所有的实例对象添加到⾥⾯group = pygame.sprite.Group()def__init__(self, position):# 调⽤⽗类的初始化⽅法,这样才能够实现必要的初始化操作super().__init__()# 因为是12x12的⼩图⽚,所以需要制作⼀个24x24的imageimage = pygame.Surface((24, 24))for i in range(2):for j in range(2):image.blit(pygame.image.load("resources/images/scene/river1.png"), (12 * i, 12 * j))self.image = image# 当使⽤碰撞判断⽅法时,pygame就需要知道当前要检测的物体的位置,所以这个rect属性⼀定要设置 self.rect = self.image.get_rect()self.rect.topleft = position# 添加到精灵组self.group.add(self)@classmethoddef show(cls, screen):for temp in cls.group:screen.blit(temp.image, temp.rect)class Tree(pygame.sprite.Sprite):"""树类"""# 定义精灵组,将所有的实例对象添加到⾥⾯group = pygame.sprite.Group()def__init__(self, position):# 调⽤⽗类的初始化⽅法,这样才能够实现必要的初始化操作super().__init__()# 因为是12x12的⼩图⽚,所以需要制作⼀个24x24的imageimage = pygame.Surface((24, 24))for i in range(2):for j in range(2):image.blit(pygame.image.load("resources/images/scene/tree.png"), (12 * i, 12 * j))self.image = image# 当使⽤碰撞判断⽅法时,pygame就需要知道当前要检测的物体的位置,所以这个rect属性⼀定要设置 self.rect = self.image.get_rect()self.rect.topleft = position# 添加到精灵组self.group.add(self)@classmethoddef show(cls, screen):for temp in cls.group:screen.blit(temp.image, temp.rect)class Brick(pygame.sprite.Sprite):"""砖墙类"""# 定义精灵组,将所有的砖墙实例对象添加到⾥⾯group = pygame.sprite.Group()def__init__(self, position):# 调⽤⽗类的初始化⽅法,这样才能够实现必要的初始化操作super().__init__()self.image = pygame.image.load("resources/images/scene/brick.png")# 当使⽤碰撞判断⽅法时,pygame就需要知道当前要检测的物体的位置,所以这个rect属性⼀定要设置self.rect = self.image.get_rect()self.rect.topleft = position# 添加到精灵组self.group.add(self)@classmethoddef show(cls, screen):for temp in cls.group:screen.blit(temp.image, temp.rect)class Bullet(pygame.sprite.Sprite):"""⼦弹类"""# 定义精灵组,将所有的砖墙实例对象添加到⾥⾯group = pygame.sprite.Group()group_enemy = pygame.sprite.Group()def__init__(self, _type, direction, position):super().__init__()# ⼦弹图⽚if direction == "up":image_path = "resources/images/bullet/bullet_up.png"elif direction == "down":image_path = "resources/images/bullet/bullet_down.png"elif direction == "left":image_path = "resources/images/bullet/bullet_left.png"elif direction == "right":image_path = "resources/images/bullet/bullet_right.png"self.image = pygame.image.load(image_path)# ⼦弹位置self.rect = self.image.get_rect()self.rect.center = position # 设置⼦弹的初始位置的中⼼点# ⼦弹⽅向self.direction = direction# ⼦弹移动速度self.speed = 8# 将⼦弹添加到精灵组if _type == "player":self.group.add(self)else:self.group_enemy.add(self)@classmethoddef auto_move(cls):for temp in cls.group:if temp.rect.x < BORDER_LEN or temp.rect.x > WIDTH - BORDER_LEN or temp.rect.y < BORDER_LEN or temp.rect.y > HEIGHT - BORDER_LEN: cls.group.remove(temp)print("⼦弹超出边界,移除⼦弹")continueif temp.direction == "up":temp.rect = temp.rect.move((0, -temp.speed))elif temp.direction == "down":temp.rect = temp.rect.move((0, temp.speed))elif temp.direction == "left":temp.rect = temp.rect.move((-temp.speed, 0))elif temp.direction == "right":temp.rect = temp.rect.move((temp.speed, 0))for temp in cls.group_enemy:if temp.rect.x < BORDER_LEN or temp.rect.x > WIDTH - BORDER_LEN or temp.rect.y < BORDER_LEN or temp.rect.y > HEIGHT - BORDER_LEN: cls.group_enemy.remove(temp)print("⼦弹超出边界,移除⼦弹")continueif temp.direction == "up":temp.rect = temp.rect.move((0, -temp.speed))elif temp.direction == "down":temp.rect = temp.rect.move((0, temp.speed))elif temp.direction == "left":temp.rect = temp.rect.move((-temp.speed, 0))elif temp.direction == "right":temp.rect = temp.rect.move((temp.speed, 0))# ⼦弹碰砖墙(如果相碰,那么就移除当前⼦弹以及砖墙)pygame.sprite.groupcollide(cls.group, Brick.group, True, True)pygame.sprite.groupcollide(cls.group_enemy, Brick.group, True, True)# ⼦弹碰铁墙(如果相碰,那么只移除⼦弹)for bullet in cls.group:if pygame.sprite.spritecollide(bullet, Iron.group, False, None):cls.group.remove(bullet)for bullet in cls.group_enemy:if pygame.sprite.spritecollide(bullet, Iron.group, False, None):cls.group_enemy.remove(bullet)@classmethoddef show(cls, screen):"""显⽰⼦弹"""for temp in cls.group:screen.blit(temp.image, temp.rect)for temp in cls.group_enemy:screen.blit(temp.image, temp.rect)@classmethoddef move_and_show(cls, screen):"""移动、显⽰⼦弹"""cls.auto_move()cls.show(screen)class PlayerTank(pygame.sprite.Sprite):"""我⽅坦克类"""# 定义类属性,存储我⽅坦克(如果是单⼈模式就只有1个,如果是双⼈模式就有2个)player_group = list()# 定义精灵组,⽤来碰撞等判断group = pygame.sprite.Group()def__init__(self, player, top_left):"""实现初始化功能"""# 调⽤⽗类的初始化⽅法,这样才能够实现必要的初始化操作super().__init__()# 坦克的图⽚image_path = "resources/images/playerTank/tank_T1_0.png"if player == "player1"else"resources/images/playerTank/tank_T2_0.png" self.tank_all_image = pygame.image.load(image_path).convert_alpha()self.image = self.tank_all_image.subsurface((0, 0), (48, 48))# 当使⽤碰撞判断⽅法时,pygame就需要知道当前要检测的物体的位置,所以这个rect属性⼀定要设置self.rect = self.image.get_rect()self.rect.topleft = top_left# 记录初始位置,以便在被击中后能够重新在默认位置出现self.origin_position = top_left# 定义移动的步长self.step_length = 8# 坦克的默认⽅向self.direction = "up"# 默认朝上# 移动缓冲, ⽤于避免坦克连续移动过快导致不⽅便调整位置self.move_cache_time = 4self.move_cache_count = 0# 坦克轮⼦转动效果self.switch_count = 0self.switch_time = 2self.switch_image_index = Falseself.image_postion_index = 0# 发射⼦弹的间隔self.is_bullet_cooling = False # 如果是第⼀次发射⼦弹,则不在冷却时间内,可以正常发射self.bullet_cooling_count = 0self.bullet_cooling_time = 30# 我⽅坦克⽣命次数self.life_num = 3# 标记此坦克是否显⽰self.is_show_flag = True# 将当前对象添加到类属性中,这样就可以通过类对象访问到我⽅坦克self.__class__.player_group.append(self) # 或者self.player_group.append(self)也是可以的# 添加到精灵组self.group.add(self)def update_direction(self):"""更新坦克的朝向"""if self.direction == 'up':self.image = self.tank_all_image.subsurface((0, 0), (48, 48))self.image_postion_index = 0elif self.direction == 'down':self.image = self.tank_all_image.subsurface((0, 48), (48, 48))self.image_postion_index = 48elif self.direction == 'left':self.image = self.tank_all_image.subsurface((0, 96), (48, 48))self.image_postion_index = 96elif self.direction == 'right':self.image = self.tank_all_image.subsurface((0, 144), (48, 48))self.image_postion_index = 144def move(self, direction, group_list):"""根据键盘调整坦克⽅向,然后移动"""# 如果要移动的⽅向与当前坦克的朝向不同,则先调整朝向if self.direction != direction:self.direction = directionself.update_direction()return# 移动缓冲self.move_cache_count += 1if self.move_cache_count < self.move_cache_time:returnelse:self.move_cache_count = 0# 移动坦克# 复制⼀份当前玩家坦克的坐标,如果碰到障碍物之后,可以进⾏恢复rect_ori = self.rectif direction == "up":self.rect = self.rect.move((0, -self.step_length))elif direction == "down":self.rect = self.rect.move((0, self.step_length))elif direction == "left":self.rect = self.rect.move((-self.step_length, 0))elif direction == "right":self.rect = self.rect.move((self.step_length, 0))# 检测碰撞"砖墙"、"铁墙"、"冰"、"河流"。
Robocode坦克大战源码

山东师创实训文件:Robocode Eclipse Creating a Project for your RobotsFirst, select File->New->Project in the menu.In the New Project dialog, select Java Project then click Next.Type in a name for your project. A project can contain just one robot or many robots, so choose a name to suit your plans. Here we use the name MyRobots as the name for the new project. When you have written the name of the new project then click Next. But do not click Finish yet!Oops! I clicked Finish. What to do?If you clicked Finish by mistake, you can find the rest of the screens shown by right-clicking on the project named MyRobots, then select Properties, and then select Java Build Path.New ProjectSelect the Libraries tab, then click on Add External JARs:Browse to the robocode directory, select the libs directory and then click the Open.Next, select the robocode.jar and then click the Open.Now you must select the Javadoc location: (None) under robocode.jar and click Edit...Type in (or browse to) the path for robocode.jar again. Optionally, enter the location of Robocode's Javadocs. The window should now look like this:Click OK, then click Finish to build your project.Congratulations! Your new project is ready. :-)Adding your Robot Project to RobocodeStart up Robocode and select Preferences from the Options menu, select the Development Options tab, and then type in the path to your robots project.Click Finish, then start a new battle (and perhaps press F5 in order to refresh the list of robots), and voila! There's your robot.You can edit your robot in Eclipse as much as you want. Just remember to save it (CTRL-S) before switching back to Robocode. Robocode will use the latest compiled version, every time you start a new battle.Eclipse is very powerful, and will assist you greatly in writing robots (or anything else, for that matter). For instance, try hitting CTRL-SPACE when you can't remember the exact wording of something:Creating a Robot in EclipseOk, so we have a project now, and it's time to create a robot (or many robots!) in it.First, right-click on the MyRobots project, and select New -> Class:Next, fill in the package name (Robocode suggests your initials), a Robot Name (here I have FnlBot), and change the Superclass field to robocode.Robot:Click Finish, and you'll see your robot class, like this:You can now edit your robot however you like.You can save your robot as often as you like by hitting CTRL-S, or selecting File->Save. There's no need to explicit select Compile (as in the Robot Editor for Robocode) anymore, since Eclipse automatically takes care of this task for you, when you make changes to your files.Have fun playing around with Eclipse. Since there's no better way to learn than by playing around, I'll leave you to it!If you want help starting a robot you should check out the My First Robot tutorialThe only thing left is to make sure that Robocode sees your robot.Running your robot from EclipseRight-click on your project, move the mouse-pointer down to Run As in the menu that opens and click Run....Now the following window will show up:Click on the Java Application on the left side, and afterwards the New button (New launch configuration).Now you should change the name of your launch configuration to something you remember, e.g. MyRobots - Robocode.In the Main class field you must write robocode.Robocode, which is the main class of Robocode used for playing the game.Next, you must click on the Arguments tab.Here you write -Xmx512M eCanonCaches=false -Ddebug=true into the VM arguments text box. The -Xmx512M tells the Java VM that Robocode can use up to maximum 512 MB RAM off the heap, -Ddebug=true tells Robocode that it should not give you skipped turns just because you paused robot in debugger, and eCanonCaches=false is a workaround to prevent SecurityExceptions to occur when robots try to access a file.Finally, you must click on the Other radio button under Working directory, and then write the full path to the folder where Robocode is installed in the text file beside Other.Now you press "Run", and Robocode will (hopefully) start up. In Robocode you start your robot by selecting Battle->New from the menu or by using the hotkey Ctrl+N. Next, you select your robot and some other opponent robots, and press "Start Battle".The next time you want to run your robot(s) in Robocode from Eclipse, you simply run your launch configuration like this:An easier way is just to click on the "green play button" without the popup menu. This will start the last launch configuration automatically, which should be your project.Debugging your robot with EclipseIn some situations, you might want to debug your robot by setting break points (e.g. conditional breakpoints), step through lines of codes and see how the values of your variables changes as the code goes along, or just check if an event handler is ever being called.Fortunately, this is possible to do with Robocode!Before you can start debugging with Eclipse, you must be able to run your robot from Eclipse. So if you have not already set up your project accordingly to Running your robot from Eclipse, you must do this before you are able to proceed with debugging.Notice: You must also add -Ddebug=true to the VM argument too. This will slow your Robocode down a little, but if this flag is missing, the Robocode will freeze when it reaches the breakpoint.In the following example we set a breakpoint in the first line of the run() method of a robot. In this case, the robot is a simple Robot where each command takes exactly 1 turn to execute before it processes the next.Right-click in the border area of the source editor till a popup menu shows up, where you can select Toggle Breakpoint.When the breakpoint has been set, a blue bullet will be shown beside the line to break at.Now, let's try to start debugging our robot.You start debugging by clicking on the debug button that looks like a "bug" and selecting your launch configuration. Alternatively, you could just click on the debug button, which will start debugging from the last launch configuration that was started.When Robocode has started up, you start your robot by selecting New from the Battle menu or by using the hotkey Ctrl+N. Next, you select your robot and perhaps some opponent robots, and press Start Battle.Notice:As soon as the battle begins, it is important that you must press the Pause/Debug button at the bottom of the battle window.This will pause Robocode making debugging possible. If you do not pause Robocode, the game will run, and the robot that you debug will be seen as inactive when it hits a breakpoint, as it has not been active for some time. Besides, when Robocode is paused the internal time is also put on hold, which can be critical when debugging.In this example, Eclipse should already have switched into the Debug Perspective. If this is the first time you debug with Eclipse, it might ask you if you want to switch into the Debug Perspective. Here I normally answer Yes.In the Debug Perspective, the execution of your robot should already have stopped at our breakpoint.If Eclipse has not stopped at our breakpoint, you should resume the battle by clicking on the Pause/Debug button until Eclipse stops at our breakpoint, and then click on the Pause/Debug button again to pause the battle.Now we want to step to the next line after our breakpoint. Therefore we press the Step Over button or alternatively press the F5 key.Nothing happens? Well, Robocode is still paused, so we will not be able to proceed the debugging before we continue the battle. However, we do not want Robocode to rush with continuing the battle, playing lot's of turns before we get the chance of getting to the next line after our breakpoint. We just want to execute one turn at a time when debugging.Here the Next Turn button becomes handy, which is located next to the Pause/Debug button at the bottom of the battle window. This button can only be activated when the game is paused, and is used for letting Robocode execute to the next turn of the battle, i.e. it performs a single turn.In our case, we should carefully click on the Next Turn button approximately 4 times (might be more or less times) until Eclipse steps to the next line of code after our breakpoint. The reason why you have to hit the button several times is because it takes several turns until the robot has finished turning.Now we have made a single step with our robot. So now we could set a breakpoint on the fire(1) line in the onScannedRobot() method, which is the event handler that is called whenever our robot scans another robot.Here we don't want to make one turn at the time. Instead, we just resume the game by clicking on the Pause/Resume button.When our robot scans another robot, Eclipse will jump right to the breakpoint set in onScannedRobot().。
基于C语言的坦克大战
基于C语言的坦克大战游戏是人类日常生活不可或缺的元素,游戏的方式随着时代的变迁也在改变。
在信息时代,以计算机为载体的游戏成为主流,特别是当今生活节奏加快的今天,生活和工作压力常常使人焦虑不安,而游戏能使人精神放松,舒缓压力。
标签:C语言;游戏;坦克大战1 技术简介目前主流的语言是Java、C++等等,这两门语言都是高级語言的一种。
是可以撰写跨平台应用程序的面向对象的程序设计语言。
Java语言具有很长丰富的语法特征,如模块和类模块,是一种解释型语言,他不会生成机器码,所以移植性特别好。
但高级语言存在体积庞大的特点,不适合对空间严格要求的场合。
C语言是一种历史悠久的计算机语言,同时使用范围广,它的出现就是解决了汇编语言晦涩难记的弊端,它既具有高级语言的特征又具有基层语言的功能,同时跨平台性也丝毫不比大型语言差。
C语言的指针更可以灵活操作内存空间,而高级语言则将其封装起来,使用起来限制太多,同时这也是C语言的缺点所在2 需求分析需求分析即是根据用户的要求来确定软件的。
分配软件元素,是软件定义时期的最后一个阶段,它的基本任务是确定系统必须做什么,是对要做的系统确定一个完整的、具体的、清晰的、准确的要求。
可以分为需求的提出,需求的描述,需求的评审等阶段。
需求分析也是设计数据结构的起点,需求分析的结果将直接影响到程序功能的设计。
需求分析的任务是通过详细调查现实世界要处理的对象(坦克、子弹、墙等),充分了解游戏的运行情况,开发游戏的各种需求,然后在此基础上确定游戏的功能。
调查的重点是“数据”和“处理”,通过调查、收集与分析,获得开发游戏的如下要求:信息要求、处理要求、安全性与健壮性要求。
(1)游戏整体分析.本游戏主要包括己方坦克和敌方坦克,还有我方基地,砖墙,铁墙,绿草,开始画面,游戏胜利画面,游戏结束画面。
我方坦克和对方坦克可以向上、向下、向左、向右移动,游戏的玩家通过键盘来控制坦克的移动和发射子弹,对方坦克通过A*算法移动和发射子弹。
- 1、下载文档前请自行甄别文档内容的完整性,平台不提供额外的编辑、内容补充、找答案等附加服务。
- 2、"仅部分预览"的文档,不可在线预览部分如存在完整性等问题,可反馈申请退款(可完整预览的文档不适用该条件!)。
- 3、如文档侵犯您的权益,请联系客服反馈,我们会尽快为您处理(人工客服工作时间:9:00-18:30)。
#include "tank.h"#include "ConOperator.h"#include <time.h>#include <windows.h>#include <conio.h>#include <iostream>using namespace std;TankGame::TankGame(int w, int h){// 设定当前关数no = 1;// 设定游戏整体高宽wide = w;high = h;HANDLE hStdOut = GetStdHandle(STD_OUTPUT_HANDLE);COORD sizePos = {2 * wide, high};SetConsoleScreenBufferSize(hStdOut, sizePos);// 分配游戏空间状态表gameSpace = new GameSpace*[high];for (int i = 0; i != high; i++)gameSpace[i] = new GameSpace[wide];// 添加围墙wall = new Wall(gameSpace, wide, high);wall->draw();}void TankGame::load_init(){// 初始化游戏空间for (int y = 1; y != high-1; y++) {for (int x = 1; x != wide-1; x++) {gameSpace[y][x].have = false;gameSpace[y][x].kind = 0;gameSpace[y][x].no = 0;}}// 添加地图map.load(gameSpace, no);// 初始化自己坦克me.init_xy();me.trans_direction(1);me.set_no(0);me.init_move(gameSpace, wide / 2 - 2, high - 5);// 按顺序诞生敌人坦克creatPlace = 0;for (int i = 0; i != 3; i++) {freezeTime[i] = REBIRTHTIME;enemy[i].init_xy();enemy[i].set_kind(2);enemy[i].set_no(i+1);reset(enemy[i]);}// 数目初始化leftCount = 17;existCount = 3;// 显示图片me.draw_tank();for (int i = 0; i != 3; i++)enemy[i].draw_tank();map.draw();}TankGame::~TankGame(){if (wall)delete wall;if (gameSpace) {for (int i = 0; i != high; i++)delete[] gameSpace[i];delete[] gameSpace;}}void TankGame::reset(Tank& tank){bool success = false;int t = 3;while (t && !success) {creatPlace++;if (creatPlace == 4)creatPlace = 1;// 诞生地点选择switch (creatPlace) {case 1:tank.trans_direction(3); //朝下if (tank.reset(gameSpace,1,1))success = true;break;case 2:tank.trans_direction(3);if (tank.reset(gameSpace,wide / 2 - 2, 1))success = true;break;case 3:tank.trans_direction(3);if (tank.reset(gameSpace,wide - 4, 1))success = true;break;}if (!success)t--;}}void TankGame::start(){char command;enter_picture(command);if (command != ENTER)return;while (me.blood > 0) {// init data for runingload_init();// run a taskruning_a_task();// determine why returnif (me.blood > 0) {no++;if (no > map.total) {success_gameover();break;}char command;turn_to_next_task(command);if (command != ENTER)break;}else game_over();}}//voidvoid TankGame::runing_a_task(){while ((leftCount || existCount) && me.blood) {clock_t now = clock();char command = -1; // 主人命令while (clock() - now < TIME_UNIT) // 小于一个时间片,暂停update_keyBoard_char(command);/*更新敌人坦克*/for (int i = 0; i != 3; i++) {if (enemy[i].blood == 0)continue;if (enemy[i].freezeTime == 0) {enemy[i].rand_direction(gameSpace); // 产生随机方向}else {if (enemy[i].speed == 0) {enemy[i].move(gameSpace);if (bullet[i+1].disapper) {int shot = -1;bullet[i+1] = enemy[i].rand_shot(gameSpace,i+1, shot);if (shot == 0)me.be_shot(gameSpace);bullet[i+1].registration(gameSpace);}enemy[i].freezeTime--;} else {enemy[i].speed--;}}}/*更新自己坦克*/if (command >=0 && command < 4) {me.trans_to_direction(command);me.move(gameSpace);}/*更新子弹*/for (int i = 0; i !=4; i++) {if (!bullet[i].disapper) { // 存在的子弹int shot;bullet[i].move(gameSpace, shot); // 运行,是否射中if (shot == 0)me.be_shot(gameSpace);else if (shot >= 1 && shot <= 3) {enemy[shot-1].be_shot(gameSpace);existCount--;} else if (shot >= 7 && shot <= 10) {bullet[shot-7].unregistration(gameSpace);bullet[shot-7].clear();bullet[shot-7].init(bullet[shot-7].kind);}}}/*自己产生子弹*/if (bullet[0].disapper) {if (command == 32) {int shot;bullet[0] = me.make_bullet(gameSpace,0, shot);if (shot >= 1 && shot <= 3) {enemy[shot-1].be_shot(gameSpace);existCount--;}bullet[0].registration(gameSpace);}}/*诞生缺损敌人*/if (leftCount > 0) {for (int i = 0; i != 3; i++) {if (enemy[i].blood == 0) {if (freezeTime[i] == 0) {freezeTime[i] = REBIRTHTIME;reset(enemy[i]);existCount++;leftCount--;}else freezeTime[i]--;}}}}}void TankGame::update_keyBoard_char(char& c){if (_kbhit()) {c = getch();if (c == -32) {c = getch();if (c != UP && c != DOWN && c != LEFT && c != RIGHT)c = -1;else if (c == RIGHT)c = 0;else if (c == UP)c = 1;else if (c == LEFT)c = 2;elsec = 3;}elsec = 32;}}void TankGame::enter_picture(char &command){string captions[6];captions[0] = "◥◣◢◤■■■■■◥◣◢◤";captions[1] = " ◥◣◢◤◢◤◥◣◢◤";captions[2] = " ◥◣◢◤◢◤◥◣◢◤";captions[3] = " ◢◤◢◤◢◤◥◣";captions[4] = " ◢◤◢◤◢◤◥◣";captions[5] = " ◢◤■■■■■◢◤◥◣";string s = " ";color(0x0e);for (int i = 0; i != 6; i++)grid(7, 6 + i, captions[i]);Frame frame(30,15);frame.draw_frame(4,19,0x09);string sentence[3];sentence[0] = "This small game is made by yzx in 2010.";sentence[1] = "Wlecome to play it.";sentence[2] = "All Rights Reserved.";color(0x0e);for (int i = 0; i != 3; i++) {for (int k = 0; k != sentence[i].size(); k++) {grid(14+k,21+2*i,sentence[i][k]);sleep(50);}sleep(1000);}grid(7, 28,"Enter : 开始ESC : 退出");while (true) {if (_kbhit()) {command = getch();if (command == ENTER || command == ESC)break;}}// clear screen picture in wallclear_picture();}void TankGame::turn_to_next_task(char& command){clear_picture();color(0x0e);grid(18, 20, "第");grid(20, 20, no);grid(22, 20, "关");while (true) {if (_kbhit()) {command = getch();if (command == ENTER || command == ESC)break;}}grid(18, 20," ");}void TankGame::success_gameover(){clear_picture();Frame frame(30,15);frame.draw_frame(4,10,0x09);string sentence[3];sentence[0] = "Congratulations for Successfully finishing all tasks";sentence[1] = "Thank you for using it deeply.";sentence[2] = "And welcome to use it next time.";color(0x0e);for (int i = 0; i != 3; i++) {for (int k = 0; k != sentence[i].size(); k++) {grid(12+k,14+2*i,sentence[i][k]);sleep(50);}sleep(1000);}while (true) {if (_kbhit()) {char command = getch();if (command == ENTER || command == ESC)break;}}}void TankGame::game_over(){clear_picture();Frame frame(30,15);frame.draw_frame(4,15,0x09);string sentence[4];sentence[0] = "Game over, but you can try it again.";sentence[1] = "Thank you for using it deeply.";sentence[2] = "And welcome to use it next time.";sentence[3] = "All rights reserved.(Violators will be prosecuted.) .";color(0x0e);for (int i = 0; i != 4; i++) {for (int k = 0; k != sentence[i].size(); k++) {grid(13+k,18+2*i,sentence[i][k]);sleep(50);}sleep(1000);}while (true) {if (_kbhit()) {char command = getch();if (command == ENTER || command == ESC)break;}}}void TankGame::clear_picture(){int cirX = wide / 2;int cirY = high / 2;int depth = cirY > cirX ? cirY + 2 : cirX + 2;int lx, rx, uy, by;int l, r, u, b;for (int i = 0; i != depth; i++) {lx = cirX - i;rx = cirX + i;uy = cirY - i;by = cirY + i;uy <= 0 ? u = 1 : u = uy;by >= high - 1 ? b = high - 2 : b = by;lx <= 0 ? l = 1 : l = lx;rx >= wide -1 ? r = wide - 2 : r = rx;if (rx < wide - 1) {for (int k = u; k <= b; k++)grid(rx, k, " ");}if (lx > 0) {for (int k = u; k <= b; k++)grid(lx, k, " ");}if (by < high - 1) {for (int k = l; k <= r; k++)grid(k, by, " ");}if (uy > 0) {for (int k = l; k <= r; k++)grid(k, uy, " ");}}}void TankGame::test(){for (int y = 0; y != 40; y++) {for (int x = 0; x != 40; x++) {if (gameSpace[y][x].have)// && gameSpace[y][x].kind == 3)grid(x, 42+y, (char)gameSpace[y][x].no);elsegrid(x, 42+y, " ");}}}。