4通道数字卡拉OK前级说明书V2.3
4 CHANNELS DIGITAL VIDEO RECORDER 4 门数字录像机 说明书
USER MANUAL4 CHANNELS DIGITAL VIDEO RECORDER4门数字录像机使用手册为了正确的操作使用,请仔细阅读这本使用说明书。
为了达到本机器正常的使用以及最佳效能,请仔细阅读这本使用说明书。
使用者安装警语:美国联邦通讯委员会规章(FCC Compliance):您已被受权使用此通过美国联邦通讯委员所认证的设备,但您若未经过被授权的厂商并自行改变或修正本设备,将可能导致美国联邦通讯委员会规章无效(美国联邦通讯委员会规章第十五篇)。
免责声明:1. 本使用手册之内容,著作人不负任何明示或暗示之担保或保证责任。
2. 本使用手册虽然经过详细的校对,但仍有可能会发生错误,故恳请消费者及业界先进不吝赐教,以利本使用手册内容之正确及完整性。
警告,注意及版权说明警告z为避免火灾或电击危险,请勿将本机器使用或放置于潮湿或水气多的地方。
z请勿将任何物品放入或插入本机器的通气或散热孔。
注意1. 请勿将本机器置于高温,潮湿或多灰尘以及阳光直接照射的地方。
2. 避免危险请勿自行修理或更换零件。
此一位于四边行内的闪电标记系用来指示或警告使用者本机器内具有”危险电压”,若有任何磁性物质接近将可能导致电击的危险.此一位于四边行内的惊叹号标记则是用来指示或警告使用者需注意本手册所指示的操作或维护说明.使用者需自行确认当地政府所规范的影像或音源讯号,以避免触犯当地法规.版权说明本操作手册所使用或提及的商标系属于该公司所拥有的。
目录1介绍 (6)1.1特色 (6)1.2规格 (6)2硬件 (9)2.1前端按键面板 (9)2.2后端连接说明 (10)2.3前面板自动跳台、窗口缩放、PTZ、备份及随身碟信息按键进阶说明 (10)2.4摄影机及屏幕连接 (11)2.5外部警报连接 (11)2.6红外线遥控器 (13)2.7PTZ (PAN, TILT AND ZOOM) 摄影机 (14)3系统设定 (15)3.1使用者图形接口(GUI)架构图 (15)3.2实时画面显示暨弹出式选单说明 (17)3.3摄影机设定 (19)3.4位移侦测设定(MOTION SETUP) (21)3.5录像设定(RECORD SETUP) (22)3.6警报设定(ALARM SETUP) (25)3.7硬盘管理设定HARD DISK SETUP (25)3.8网络设定(NETWORK SETUP) (27)3.9备份设定(BACKUP SETUP) (29)3.10系统设定(SYSTEM SETUP) (33)4DVR 回放 (37)4.1时间回放 (38)4.2事件回放 (39)5备份回放 (40)5.1主画面设定 (40)5.2光盘备份回放 (44)5.3USB 与本地端备份及回放 (45)5.4备份影像至AVI (46)6网络远程浏览及回放 (47)6.1于PC端设定 IP 地址 (47)6.2选择性MICROSOFT INTERNET EXPLORER 浏览器设定 (49)6.3登录远程DVR (50)6.4远程操作功能 (51)6.5组态设定 (56)7.3GPP的应用与设定 (64)附录A:录像时间容量对照表(小时) (66)CIF (66)FIELD (67)附录B:HDD 相容列表 (68)附录C:错误讯息列表 (69)1 介绍1.1 特色z H.264 影像压缩格式。
KTV-4专业数字KTV功放 说明书
使用说明书(针对火灾,电击或伤害人体的指示)注意-:1.2.-3.4.-5.6.7.8.9.10.11.A.B.C.D.E.12.13.-使用该电器产品时,有以下基本的预防措施:以下包括使用该产品前请详细阅读全部的安全事项;本产品应当接地,如果出现故障时,电流经最小的接地电阻流入大地,以减小电击;本产品的电源线和电源插头都配备安全接地,电源插头应当牢固插入适当的电源座,此电源座应当完全按当地的条例来安装和接地。
接地装置连接不当会导致电击;如果你对产品是否正确接地存在任何疑问,请委托合格电工或维修人员检查;请不要尝试私自更改产品的电源插头,如果不适合电源插座,可委托合格电工安装适当的电源插座。
为了减小伤害的风险,当产品在小孩附近使用时,要严密监管;请勿在湿度很大的地方使用机器例如靠近浴缸,洗面盆,厨房水槽,警告湿度很大的地下室或者靠近游泳池和湖泊。
该产品应当安装于通风良好的地方。
该产品必须远离热源,例如电暖炉,电热毯或者其它产生热量的产品。
该产品的电源类型必须符合操作指示或者产品上标明的类型。
该产品要配备一条两端的电源线(一端的插片长过另一端)。
这是安全装置。
如果你无法把电源插头插入电源插座,请联系电工来更换旧插座。
请勿破坏电源插头的安全装置。
长时间不使用时,请把电源线从电源插座中拔出,从电源插座拔出电源线时,请勿拉扯电源线,应当抓住电源插头将其拔出。
细心护理,请勿让杂物或液体从其缝隙掉进机内。
当有下列情况时,应委托合格维修人员修理:电源线或电源插头已被损坏;杂物或液体已掉进机内;产品已被雨淋;产品已不能正常操作或在演出中出现明显变化;产品已跌坏或外观损坏当出现没在用户维修指南中描述的情况时,请勿尝试私自修理,应当委托合格的维修人员修理。
警告勿让重物积压或踩踏电源线,切忌拉、拨或强力扭曲电源线。
请勿滥用电源线,不合格的电源线可能导致火灾或对人构成伤害。
在等边三角形内的电击符号有意警惕用户在产品内部存在非绝缘的危险电压,有可能对人体造成相当危险的电击。
Soundcraft Vi4声艺Vi4数字调音台中文快速使用说明书
TRIM 输入信号经过 A/D 转换后的增益调整,调整正范围是-36~+18dB。LO Cut 输入信号
在 A/D 转换前插入低切开关。
LO CUT 低切滤波器,调整范围是 20~600Hz。IN 开关。 HI CUT 高切滤波器,调整范围是 1.0~20kHz。IN 开关。
1
一、接口说明
LOCAL BOX 接口说明:
3 路 MIC 输入接口 5 路监听输出接口 8 路 模拟输入/输出接口 8 Ch AES/EBU 数字输入/输出接口
STAGE BOX 接口说明:
48 路 MIC 输入接口 16 路模拟输出接口 8 Ch AES/EBU 输出接口
Vi4 调音台如图所示可分为 4 个部分,其中 3 个为输入控制,一个为主控制部分。输入 部分主要负责输入通道的调控,兼顾部分输出设置。而主控部分主要负责输出通道的调控及 系统设置。
1、4 段全频 PEQ 设置 --------------------------------------------------------- 11 2、输出效果器设置 ---------------------------------------------------------- 11 3、31 段 GEQ 设置 ------------------------------------------------------------ 11 4、输出动态设置 ------------------------------------------------------------- 12 5、输出声像设置 -------------------------------------------------------------12
模拟调音台说明书4通道现场模拟调音台
我们身边的调音台有很多种,有模拟的有数字的,那么模拟调音台怎么用呢/下面我们就来介绍一下Onyx 24.4 调音台地基本操作方法:Onyx 24.4 调音台是Mackie模拟调音台SR24.4 的升级产品。
保留了24- 输入通道;在话放、电路结构、Perkins EQ 等设计上做了重大提升;同时增加了内置可分配的立体声压缩/ 限幅器部分;采用100mm Panasonic 推子。
Mackie Onyx 24.4 前部图Mackie Onyx 24.4 输入输出接口图Mackie Onyx 24.4 高度图Mackie 倾力打造出Onyx4-Bus 系列。
从电子元件和集成电路芯片的选择, 到机械构件的设计, 全部体现高标准的要求。
各级电路之间采用平衡式级连, 极大提高了信噪比和整体电声性能, 具有在同类产品中超乎寻常的音质表现。
值得一提的还有:Onyx 4-Bus 系列采用了Onyx 话筒前置放大器、Perkins EQ 电路和全新THAT Corporation 4301可分配的立体声压缩/ 限幅器。
总之,全新的理念,全新的产品,用户尽可在这一新型系列上自由挥洒。
Onyx 话筒前置放大器原来的SR 系列采用的是在同类产品中领先的XDR 话筒前置放大器, 新型Onyx4-Bus 系列则进一步提升采用Onyx 话筒前置放大器, 音质更纯净, 具有更高的保真度和射频抑制比(RFI)、更大的输入信号余量、更宽的动态范围。
例如, 技术指标可达到:123dB 动态范围;-129.5dBm 等效输入噪声;0.0007% 总谐波失真...... 时间和实践已经向业内证实了Onyx 前置话筒放大器的卓越性能。
Perkins EQ:“英国式均衡”之声, 滤波控制更强大由资深音频设计师Cal Perkins( 和Greg Mackie 先生一起, 开创Mackie产品鼻祖的一流设计大师) 主持设计的Onyx EQ 电路—— Perkins EQ, 采用经典的Wein 电桥振荡电路, 具有更大的滤波和相位调节功能, 再现六、七十年代风靡全球的英国式调音台之声。
LA 4 数字功放中文说明书
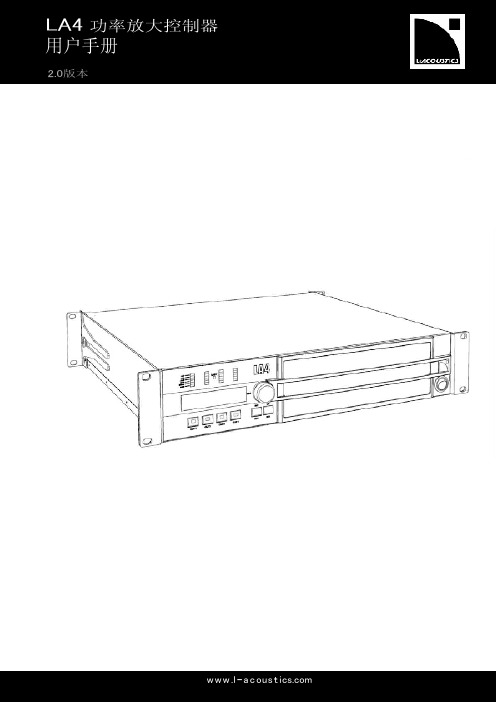
LA4功率放大控制器2.0版本1 安全警告适用于L-ACOUSTICS LA4功率放大控制器的所有详细的信息,在此部分都以“此产品”代替。
1.1 符号说明1.1.1 手册使用的符号本手册中潜在的危险用以下的符号表示:闪电符号表明遭受电击会有生命危险。
此外,产品也会受到严重的破坏。
电压警告符号表明太靠近产品可能会对用户或他人产生危险。
此外,产品也可能受损。
小心符号旨在提醒用户相关的信息以防产品可能发生损坏。
重要符号表示的是关于产品使用的重要建议。
1.1.2 产品上的符号由于产品是电子设备,使用者会有潜在的危险。
因此用户必须十分注意标示在产品盖子的符号:靠近NL4FC Speakon ®连接头插座的闪电符号表示产品会产生很高的输出电压,用户有潜在的生命危险。
本产品和音箱的连接需要用一个现成的导线。
当功放正在操作时,切勿在没有拔掉本 产品的连接头的情况下触摸任何音箱的明线。
1.2 重要安全指示1. 阅读本用户手册2. 留意所有的安全警告3. 遵循所有的指示4. 用户切勿使用没有得到L-ACOUSTICS®认可的设备或者配件5. 环境只能在符合EN55103-2标准的E1,E2,E3,E4环境下使用本产品。
电压电压电压6. 无线电干扰本产品的样机已经经过测试并符合EMC指示的限制规定。
这些限制意在对产品提供合理的保护,使产品免受电气设备产生的有害干扰。
尽管如此,在特定安装的情况下,干扰还是有可能发生的。
7. 电源线保护电源线损坏或发生磨损时,切勿使用本产品。
电源线必须妥当安置,避免受到踩踏或重物压下,尤其是插头和从功放拉线出来的位置。
8. 交流电源在120/230V,50-60Hz的交流电下使用本产品。
日本为100V,50-60Hz。
9. 接地本产品只能通过使用交流电的接地插座连接,切勿损坏插座的接地脚。
如果当地的插座老旧,请联系合格的电工进行维修。
本产品适合使用接地插头;切勿损坏连接母插头到本产品底盘的接地线。
MK 4数字微声头部用户手册说明书

Instruction manualB142536ᕡᕣᕢAad be c fiP o diP h o n ei P a dHirose STUSB Typ AHirose ST DMKW 4*als optie verkrijgbare toebehoren / дополнительные аксессуары /备选附件MZP 40*510101520+10-10-20-302010020050050MK 4 digital | 1The MK 4 digitalThe MK 4 digitalThe MK 4 digital is a large diaphragm true condenser studio micro-phone for very detailed, professional studio recordings. The MK 4digital connects directly to iOS devices and Mac or Windows computers and is ideal for home recording and professional studio use, as well as for mobile recording.The MK 4 digital allows you on the one hand to make recordings using professional audio production software, while, on the other hand, A pogee offers special recording apps designed to be used as an i nterface and control application for iOS devices.Features• Large-diaphragm capsule (1") in true condenser design, internally shock-mounted for low handling noise• 24-carat gold-plated diaphragm• Apogee A/D conversion and mic preamp technology• Rugged metal housing• Designed for mobile recording• Excellent sound quality• Made in GermanyAreas of application• Speech/vocals• Acoustic guitars• Guitar amplifiers• Grand pianos• Strings• Wind instruments• Drums and percussionPackage contents and product overview A ** Diagrams can be found on the cover pages.a MK 4 digital microphoneb MZQ 4 microphone clampc Lightning cabled USB cable (Type A)e Pouchf Instruction manual 1 Sound inlet basket 2 Thread for mounting 3 Hirose ST socketPutting the MK 4 digital into operationPutting the MK 4 digital into operation Mounting the MK 4 digital B*To mount the MK 4 digital using the microphone clamp:1. Screw the MZQ 4 microphone clamp to a solid and sturdy stand2. Place the MK 4 digital from above into the microphone clamp and screw it tight.3. To orient the MK 4 digital, always loosen the wing screw.To suppress structure-borne noise, you can use the MKS 4 shock mount, which is available as an optional accessory:4. Screw the shock mount to a solid and sturdy stand5. Place the MK 4 digital from above into the inner shock mount cage and screw it tight.6. To orient the MK 4 digital, always loosen the wing screw. Connecting the MK 4 digital C*You can connect the MK 4 digital to an iOS device (iPhone, iPad or iPod touch) or to a Mac or Windows computers.If you want to use an iOS device for your recordings:X Connect the Hirose ST connector of the Lightning cable to the MK 4 digital and connect the Lightning connector to the iOS device.If you want to use a Mac or Windows computer for your recordings:X Connect the Hirose ST connector of the USB cable to the MK 4 digital and connect the USB connector to the Mac or PC.*Diagrams can be found on the cover pages.2 | MK 4 digitalPreparing recordingsDepending on your device, you can use different applications to make recordings and configure your MK 4 digital.1. iOS devices: Apogee MetaRecorder, Apogee Maestro or other com-patible core audio apps2. Mac and Windows computer: other audio production softwareX When using Apogee MetaRecorder or Apogee Maestro, observe the following chapters in the isntallation and configuration of the apps.Connecting headphones or a headsetTo avoid feedback when making recordings on iOS devices, the input signal of the MK 4 digital must not be sent to the device loudspeaker, but must be sent to headphones or a headset. If you want to make recordings on a Mac or Windows computer, you can also use monitor-ing loudspeakers.CAUTION Limited recording quality due to a wrongly-selected audio sourceThe Apogee MetaRecorder and Apogee Maestro apps usethe last connected device as the audio source. If you areusing a headset for monitoring, recordings can inadver-tently be made via the headset’s microphone.X Connect the headphones or the headset to your iOSdevice before connecting the MK 4 digital.X Make sure that the MK 4 digital is recognized as thelast connected device by the app.To be able to monitor the input signal on an iOS device, you also have to activate the monitoring function in your recording app (see chapter “Preparing recordings using Apogee MetaRecorder” or “Preparing recordings using Apogee Maestro”).X Connect headphones or a headset to the headphone connection of your iOS device.During the recording, you can monitor the input signal via the headphones or the headset.If you want to use monitoring loudspeakers on a Mac or Windows c omputer:X Set up the loudspeakers in the range of the lowest sensitivity of the MK 4 digital (see diagram D on the cover pages).MK 4 digital | 3Installing the Apogee MetaRecorder or Apogee Maestro app The Apogee Maestro app allows you to configure the MK 4 digital, while the Apogee MetaRecorder app allows you to make professional recordings. If desired, you can also use all other compatible apps with recording function.If you want to use an iOS device (iPhone, iPad or iPod touch) for your recordings:X Install the Apogee MetaRecorder and Apogee Maestro apps from the App Store.Preparing recordings using Apogee MetaRecorderTo configure settings for the recording:X Start the Apogee MetaRecorder appand tap on the Rec/Play tab 1.X Make sure that the MK 4 digital isconnected and recognized by theapp. In this case, the name of theMK 4 digital 2 is displayed belowthe microphone icon 3.X Tap on the microphone icon 3 todisplay the input level slider 4.X Move the input level slider 4 tothe left or right to adjsut the desiredinput level.To activate the monitoring function:X Tap the Settings tab 5.X Activate the Input Monitorf unction 6.Further information on theconfiguration and operationof the app can be found inthe Apogee Knowledgebaseat http://www.apogeedigital.com/knowledgebase or in theinstruction manuals at/apps.MK 4 digital4 | MK 4 digitalMaking recordingsPreparing recordings using Apogee MaestroTo activate the monitoring function:select the Sennheiser MK 4 digitalfrom the main menu.X Activate the ON button 1 under theInput Monitoring menu item.To configure settings for the recording:X Turn the gain control 2 to adjust thedesired input gain. Fine adjsutmentcan be done using the + and – but-tons 3.The level indicator 4 allows you tocheck the current setting of the inputlevel.Further information on the configuration and operation ofthe app can be found in the Apogee Knowledgebase at/knowledgebase or in theinstruction manuals at /apps. Making recordingsUsing the MK 4 digital E*X Orient the MK 4 digital towards the mouth or audio source.XMK 4 digital | 5Cleaning and maintaining the MK 4 digitalMaking recordings using an appIf you are using an iPhone or an iPad, it is recommended toset the device to flight mode to prevent incoming calls frominterrupting the recording.X Start the Apogee MetaRecorder app or another compatible core audio app.The MK 4 digital is automatically recognized and selected as the input device.X If you haven’t done so already, connect a pair of headphones to the headphone socket of the iOS device or the Mac or Windows computer.During the recording, you can monitor the input signal via the headphones.X Tap on the Record button 1 tostart the recording.Cleaning and maintaining the MK 4 digitalCAUTION Damage to the product due to liquidsLiquids entering the product can short-circuit the elec-tronics or damage the mechanics. Solvents or cleansingagents can damage the surfaces of the product.X Keep all liquids away from the product.X Do not use any solvents or cleansing agents.X Only clean the product only with a dry cloth.When not using the MK 4 digital for extended periods of time:X Store the MK 4 digital in a dry, clean and dust-free place at room temperature.Accessories are available from your Sennheiser partner.A list of suitable accessories can be found on our websiteat .6 | MK 4 digitalSpecificationsSpecificationsApogee PureDigital analog-to-digital converterBit depth16/24 bitsSampling frequency44.1/48/88.2/96 kHzLatency platform-dependentplatform-dependentJitter of the audio outputsignalDC offset of the audio data none (zero)Conversion multibit DeltaSigmaPreamplification0 dB to 50 dBPower supply powered by iOS device or Mac/WindowscomputerMK 4 digital microphoneTransducer principle externally polarized condenser microphone Diameter of diaphragm25.4 mm/1"Acoustic operating principle pressure gradient transducerPick-up pattern cardioidFrequency response20 Hz to 20,000 HzSensitivity min. gain: –61 dBFS (80 dB SPL, 1 kHz)max. gain: –11 dBFS (80 dB SPL, 1 kHz) Noise level min. gain: –117 dBFS(A)max. gain: –79 dBFS(A)Max. SPL min. gain: 141 dBmax. gain: 91 dBConnector Hirose to Apple MFi Lightning connectorHirose to USB Type AWeight approx. 485 gDiameter approx. 57 mmLength approx. 160 mmOperating temperature0°C to +40°CStorage temperature–20°C to +70°CPolar digram and frequency response curveThe polar digram and the frequency response curve F can be found on the cover pages.MK 4 digital | 78 | MK 4 digitalManufacturer DeclarationsManufacturer DeclarationsWarrantySennheiser electronic GmbH & Co. KG gives a warranty of 24 months on this product. For the current warranty conditions, please visit our website at or contact your Sennheiser partner.In compliance with the following requirements•WEEE Directive (2012/19/EU)Please dispose of this product at the end of its operational lifetime by taking it to your local collection point or recycling center for such equipment.CE Declaration of Conformity•• RoHS Directive (2011/65/EU)• EMC Directive (2014/30/EU)The declaration is available at /download.In compliance withEuropeEMC EN 55032, EN 55103/-2USAFCC 47 CFR 15 subpart B CAN ICES-3 (B)/NMB-3(B)CanadaIndustry Canada ICES-003China 15Australia/ New ZealandKorea MSIP-REM-SE9-MK4A/S: 1544-1699Statements regarding FCC and Industry CanadaThis device complies with Part 15 of the FCC Rules and with RSS-210 of Industry Canada. Operation is subject to the following two conditions: (1) this device may not cause harmful interference, and (2) this device must accept any interference received, including interference that may cause undesired operation.This class B digital apparatus complies with the Canadian ICES-003Changes or modifications made to this equipment not expressly approved by Sennheiser electronic Corp. may void the FCC authorization to operate this equipment.13。
CASAMAN专业数字卡拉OK混音音频放大机用户手册说明书
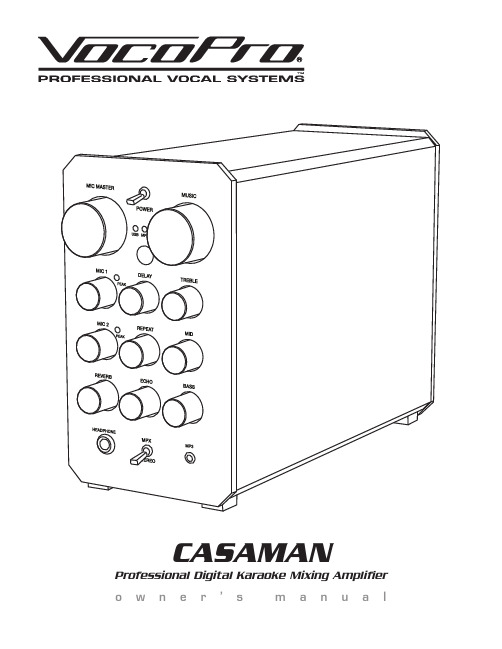
o w n e r’s m a n u a lWelcomeAnd thank you for purchasing the CASAMAN from VocoPro, your ultimate choice in Karaoke entertainment! With years of experience in the music entertainment business, VocoPro is a leading manufacturer of Karaoke equipment, and has been providing patrons of bars, churches, schools, clubs and individual consumers the opportunity to sound like a star with full-scale club models, in-home systems and mobile units. All our products offer solid performance and sound reliability, and to reinforce our commitment to customer satisfaction, we have customer service and technical support professionals ready to assist you with your needs. We have provided some contact information for you below.VocoPro1728 Curtiss CourtLa Verne, CA 91750Toll Free: 800-678-5348TEL: 909-593-8893FAX: 909-593-8890VocoPro Company Email DirectoryCustomer Service & General Information****************Tech Support***********************Remember Our WebsiteBe sure to visit the VocoPro website for the latest information on new products, packages and promos. And while you're there don't forget to check out our Club VocoPro for Karaoke news and events, chat rooms, club directories and evena KJ Service directory!We look forward to hearing you sound like a PRO, with VocoPro, the singer’s ultimate choice.FOR YOUR RECORDSPlease record the model number and serial number below, for easy reference, in case of loss or theft. These numbers are located on the rear panel of the unit. Space is also provided for other relevant informationModel NumberSerial NumberDate of PurchasePlace of PurchaseBasic OperationsUsing the MPX/Stereo SwitchThe MPX switch will change the Casaman into pseudo-stereo mode, the Left Channel audio being sent through both Left and Right speakers. It is intended for use with Multiplexed tracks, songs designed to have the main vocals removed . If used with non-Multiplexed tracks, it may cause the audio to be unintelligible or sound improper .Connecting to a Computer via USBIF USING A PC:Playing music to the Casaman.When connected via USB to the computer, the appropriate driverswill install automatically and will change the sudio settings required to send the audio to the Casaman .Note: These settings revert to normal once the Casaman is disconnected from the computer.Recording Audio from the Casaman.- When connected via USB to the computer, any audio (music and microphone signal) playedthrough the Casaman will stream back to the computer .- Use a recording program to capture the audio the Casaman is sending to the computer .IF USING A MAC:Playing music to the Casaman.Please refer to your Apple computer manual for detailed instructions regarding audio settings.- When connected via USB to a MAC, the appropriate sound settings must be altered to select“USB Audio Codec” as the primary output destination .- Use a music program to playback tracks and the audio will stream to the Casaman via the USB cable .Recording Audio from the Casaman.- When connected via the USB to a MAC, the appropriate sound settings must be altered to select “USB Audio Codec” as the primary input source .- Once the settings are changed, any audio (music and microphone) played through the Casaman will stream back to thecomputer .- Use a recording program to capture the audio the Casaman is sending to the computer .Installing a Stereo Expansion Module- Locate the stereo expansion port.- Remove the metal cover plate and locate the 6-pin ribbon cableinside .- Firmly press the 6-pin ribbon cable into the 6-pin socket on the expansion module.- Slide expansion module into the bay and secure it with the two screws .Note: When the expansion module is installed, the mic+music will be overlaid on any other input source in use.PEAKMIC 2REPEAT MIDBASSECHOREVERBHEADPHONESTEREOMP3MPX DELAY MIC 1MIC MASTERPEAKPEAKUSB MP3POWER AUXMIC 2REPEAT MID BASSCASAMANECHO REVERB HEADPHONE STEREO MP3Stereo Music Expansion PortbyMPX TREBLEMUSICInstalling the Wireless Microphone Module1 . Locate the wireless module bay .2 . Remove the metal cover plate and locate the 6-pin ribbon cable inside.3 . Firmly press the 6-pin ribbon cable into the wireless mic module .4 . Slide the wireless module into the bay and secure it with the two screws .Note: The wireless microphone signals will be mixed over any wired microphones that may be plugged into the Casaman.Note: Mic 1 & 2 volume knobs will affect both wired and wireless microphones plugged into the Casaman. If both are connected, the wireless microphone volume must be controlled from the wireless microphone module.Connecting a SubwooferPowered Subwoofers: The Sub Out jack is meant for use with what’s known as an activesubwoofer; one in which the amplifier is built into the subwoofer. Plug the mono- Sub Out into either Left or Right channel inputs of the active subwoofer.Non-powered Subwoofers: If used with a direct amplifier and a passive subwoofer, a ¼-to-RCA cable is needed to connect the Casaman Sub Out to the input of the subwoofer amplifier.DELAY MIC 1MIC MASTERPEAKPEAKUSB MP3POWERAUXMIC 2REPEAT MIDStereo MusicExpansion PorTREBLE MUSIC23456CASAMAN Owner’s Manual © VocoPro 2014v1.0.0818。
四通道网络数字功放-介绍说明
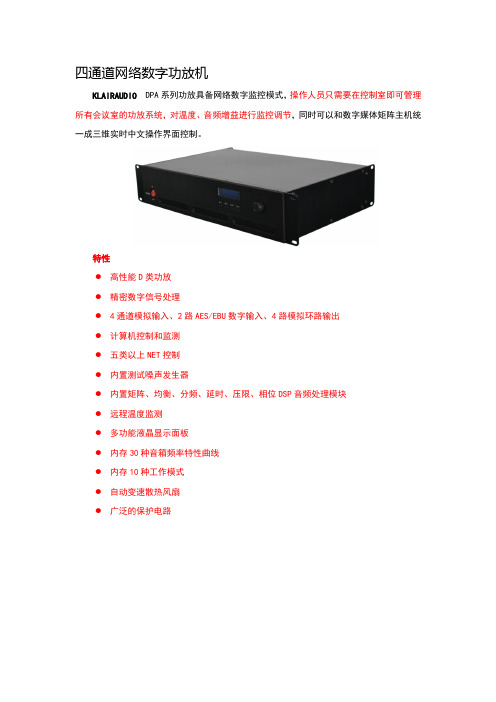
四通道网络数字功放机KLAIRAUDIO DPA系列功放具备网络数字监控模式,操作人员只需要在控制室即可管理所有会议室的功放系统,对温度、音频增益进行监控调节,同时可以和数字媒体矩阵主机统一成三维实时中文操作界面控制。
特性●高性能D类功放●精密数字信号处理●4通道模拟输入、2路AES/EBU数字输入、4路模拟环路输出●计算机控制和监测●五类以上NET控制●内置测试噪声发生器●内置矩阵、均衡、分频、延时、压限、相位DSP音频处理模块●远程温度监测●多功能液晶显示面板●内存30种音箱频率特性曲线●内存10种工作模式●自动变速散热风扇●广泛的保护电路(1)标准机柜安装孔,当将该设备放入标准机柜时,可以用螺钉穿过此孔将设备和机柜固定在一起。
(2)电源开关(POWER),用于开启或者关闭交流电源,开启电源后,开关上方的红色电源指示灯会立即点亮,5秒左右等待后设备进入正常工作状态;关闭该开关后,电源指示灯熄灭。
注意:请勿连续重复接通、关闭电源开关,否则可能导致本机或者外围设备损坏!(3)通风窗口,为保障整机通风、散热状况良好,请勿堵塞通风口或在其前面放置任何障碍物。
(4)(5)(6)(7)各通道音量控制旋钮,用于控制各通道的输出音量大小及静音。
顺时针旋转输出音量增大,逆时针旋转输出音量减小。
(8)LED显示面板,用于显示参数设置旋钮开关所调节的内容。
(9)参数设置旋钮开关,用于设置各通道音量大小、静音、输出通道选择、整体音量调节等。
(1)NET网口插座,用于机器的调试、监测和控制。
(2)(3)(4)(5)各通道XLR(公卡侬)音频信号环出插座,可用于功放级联、音频监听等。
(6)(7)(8)(9)各通道四芯音箱音频信号输出插座,用于连接各种类型的无源扬声器。
(10)为保证功率放大器的工常工作,本机设计了先进的风冷模式,开启本机电源后风机低速运转,当机器工作到一定温升状况下,风机高速运转,以迅速降低机器工作温度。
- 1、下载文档前请自行甄别文档内容的完整性,平台不提供额外的编辑、内容补充、找答案等附加服务。
- 2、"仅部分预览"的文档,不可在线预览部分如存在完整性等问题,可反馈申请退款(可完整预览的文档不适用该条件!)。
- 3、如文档侵犯您的权益,请联系客服反馈,我们会尽快为您处理(人工客服工作时间:9:00-18:30)。
按三次“ ”键可以调整音乐的参量均衡4参数
MUS EQ5 Q: 1.40 PK F: 5K04 G: 0.0
MUS EQ6 Q: 1.40 PK F: 12K13 G: 0.0
按四次“ ”键可以调整音乐的参量均衡5参数 按五次“ ”键可以调整音乐的参量均衡6参数
产品性能
* 5路 话 筒 输 入,带 独 立 增 益 控 制,话 筒 通 道 具 有 总 音 量 控 制 、 静 音 、 可 选 类 型 的 低 切 、9段 参 量 均 衡 、 激 励 、 限 幅 器 、 噪 声 门 、 相 位 ,6级 反 馈 抑 制 器 等 处 理 模 块 *话 筒 效 果 有 总 音 量 控 制,限 制 器; E c h o带5段 参 量 均 衡 , 还 有 立 体 声 和 单 回 声 模 式 可 选 , 延 时 和 重 复 参 数 独 立 可 调; R E V E R B有 预 延 时 、 时 间 、 相 位 、 激 励 和 高 低 切 参 数 调 整;另 外 还 有 饱 满 度 效 果 处 理
按十次“ ”键可以调整效果的参量均衡2参数
按十一次“ ”键可以调整效果的参量均衡3参数
EFX EQ4 Q: 0.59 PK
F: 2K00
G: 0.0
EFX EQ5 Q: 0.59 PK F: 8K00 G: 0.0
MUS EQ1 Q: 1.40 PK F: 80.6 G: 0.0
MUS EQ2 Q: 1.40 PK F: 203.1 G: 0.0
前面板说明
2
1
3
45
6
7
1 麦克风输入座 用 来 插 接 麦 克 风1 , 2 , 3的 输 入 信 号
2 麦克风输入增益控制 可 控 制 麦 克 风1 - 5的 输 入 增 益
3 主菜单控制按钮 可 编 辑M I C , M U S I C , E F F E C T , L / R , C E N T E R , S U B菜 单 , 并 存 储 和 调 用 用 户 及 出 厂 预 设
按四次“ ”键可以调整话筒的参量均衡5参数 按五次“ ”键可以调整话筒的参量均衡6参数 按六次“ ”键可以调整话筒的参量均衡7参数 按七次“ ”键可以调整话筒的参量均衡8参数
MIC EQ9 Q: 1.60 PK F: 12K13 G: 0.0
按八次“ ”键可以调整话筒的参量均衡9参数
INPUT SELECT
AUTO 按八次“ ”键可以选择音乐输入手动和自动的切换:包括AUTO,DVD,BGM
DVD GAIN
0.0dB 按九次“ ”键可以调整DVD的输入电平:调整范围是-60dB到0dB
5
操作指导
BGM GAIN
0.0dB 按十次“ ”键可以调整BGM的输入电平:调整范围是-60dB到0dB
MIC EQ5 Q: 1.60 PK F: 793.7 G: 0.0
MIC EQ6 Q: 1.60 PK F: 1K52 G: 0.0
MMIICC EEQQ77 QQ:: 11..6600 PPK FF:: 120KK7008 GG:: 00..00
MIC EQ8 Q: 1.60 PK F: 6K35 G: 0.0
MUS LIMIT
+12.0dB 按六次“ ”键可以调整音乐增益的限制参数:调节范围是-60dB到+12dB
MUS LOW CUT BYPASS
按七次“ ”键可以调整音乐的低切参数:斜率可选BYPASS/BUTTERWORTH/BESSEL/LINK-
19.7HZ 6dB--24dB,频率调节范围是20HZ-20KHZ
4
操作指导
EFX EQ1 Q: 0.59 PK F: 32.7 G: 0.0
EFX EQ2 Q: 0.59 PK F: 125 G: 0.0
EFX EQ3 Q: 0.59 PK F: 500 G: 0.0
按九次“ ”键可以调整效果的参量均衡1:包括Q值,频率,滤波器类型以及增益参数可 调,按一下“EFFECT/EDIT"键即可切换至每个参数栏,旋转可改变参数
按一次“ ”键可以调整左回声的参数:重复调节范围是0-100%,延时调节范围是0-400ms
RIGHT ECHO REP:52% T:199ms
按二次“ ”键可以调整右回声的参数:重复调节范围是0-100%,延时调节范围是0-400ms
ECHO PHASE
0 按三次“ ”键进入ECHO相位调整界面:选择范围0和180
LEFT ECHO REP:52% T:199ms
直至出现“Y”按确认后即可保存。
RECALL键
按一次“RECALL”键和旋转“EFFECT/EDIT”编码器可选择调用预设程序U01-U16或原厂预设 程序F01-F04,再按一次为确认调用。
EFFECT键
按一下“EFFECT”键进入ECHO的音量和模式选择界面:增益调节范围是0-100;模式选择有 单回声(MONO)和立体声(STEREO)两种。下面是以立体声(STEREO)模式来介绍功能操作 的;单回声(MONO)模式的时候只有一个重复参数和一个延时参数可调,其它功能和操作顺序 都一致
MUS EQ3 Q: 1.40 PK F: 601.5 G: 0.0
MUS EQ4 Q: 1.40 PK F: 2K00 G: 0.0
按十二次“ ”键可以调整效果的参量均衡4参数
按十三次“ ”键可以调整效果的参量均衡5参数
MUSIC键
按一下“MUSIC”键可进入音乐参量均衡参数的设置界面:包括Q值,频率,滤波器类型以及 增益参数可调,按一下“EFFECT/EDIT"键即可切换至每个参数栏,旋转可改变参数 按一次“ ”键可以调整音乐的参量均衡2参数
7 MIC4/5输入插座 M I C 4 / 5输 入 插 座,连 接 无 线 话 筒 建 议 使 用 此 输 入 插 座
2
遥控器说明
F01 1
F03
F02
F04
Mu+sic EFFE+CT
M+ic
2
- - - Music EFFECT Mic
Input
Mute
3
U01
U02
U03
4
U04
U05
U06
40
HC:14K25 L:125.0
EFX DOUBLE 10%
按六次“ ”键可以调整REVERB的激励和高切低切参数:激励的调节范围是0-50;高切的调 整范围是2K-20K;低切的调整范围是20HZ-400HZ
按七次“ ”键可以调整厚度效果的参数:调节范围是0-100%
EFX LIMIT
100
按八次“ ”键可以调整效果音量的限制参数:调节范围是0到100
中文
用户手册
4通道数字卡拉OK前级
4CH Digital Karaoke Pre Amplifier
遥控器说明
功能方框图 P C软 件 安 装 及 连 机 步 骤 P C软 件 界 面 说 明
配件清单 上位机串行口通信协议
1 1 2 3 4-9 9 10-13 14-20 21 21 22-24 25
MIC EQ2 Q: 1.60 PK F: 125.0 G: 0.0
按一次“ ”键可以调整话筒的参量均衡2参数
MIC EQ3 Q: 1.60 PK F: 250.0 G: 0.0
按二次“ ”键可以调整话筒的参量均衡3参数
MIC EQ4 Q: 1.60 PK F: 396.9 G: 0.0
按三次“ ”键可以调整话筒的参量均衡4参数
4 主菜单翻页键,退出键 进入编辑菜单后可按“ ”键翻页,EXIT为退出键
5 红外摇控接收窗口 6 LCD显示屏
显示所有操作功能菜单 7 EFFECT/ MIC/ MUSIC总音量调节
可控制效果量的大小及人声和音乐音量的大小
1
后面板说明
1
2
34Βιβλιοθήκη 5671 电源线
电源输入:9 0 V ~2 5 0 V , 5 0 ~6 0 H z
2 电源开关
3 RS232接口 用 来 与P C /点 歌 系 统 连 接,进 行 远 程 控 制
4 中置,超低音输出 可连接中置,超低音扩声系统
5 主输出端子 左右平衡式输出,可连接主扩音系统使用
6 音频输入端 D V D , B G M音 频 输 入 端 口,可 切 换 至 手 动 或 自 动 状 态
* 2路 立 体 声 音 乐 输 入,可 选 择 自 动 和 手 动 切 换 模 式, B G M和D V D具 有 单 独 输 入 音 量 控 制 *音 乐 通 道 具 有 总 音 量 控 制 、 静 音 、 低 切 、6段 参 量 均 衡 、B B E激 励 、 限 幅 器 、 噪 声 门 等 处 理 模 块 *输 出 总 线 : 主 输 出 左 和 右 、 中 置 输 出 、 超 低 音 输 出 *主 输 出 左 和 右 具 有5段 参 量 均 衡 、 左 右 延 时 、 独 立 音 量 控 制 、 相 位 等 处 理 模 块 *中 置 输 出 具 有 人 声/音 乐 比 例 调 节 、 独 立 音 量 控 制 、4段 参 量 均 衡 、 延 时 、 相 位 等 处 理 模 块 *超 低 音 输 出 具 有 可 选 类 型 的 低 切 、 高 切 、4段 参 量 均 衡 、 独 立 音 量 控 制 、A G C自 动 增 益 控 制 , 话 筒 音 乐 比例,延时、相位等处理模块 *24-bit、∑- AD/DA转换、32位DSP芯片处理 * 2 * 1 6字 符L C D屏 幕 显 示,定 制 的 灯 键 一 体 设 计,使 用 户 的 操 作 更 方 便 快 捷 * 4个 工 厂 预 设( K T V 1 - 4) , 1 6个 用 户 预 设( U 0 1 - U 1 6 ) *具 有R S 2 3 2远 程 控 制 端 口,红 处 遥 控 接 收 功 能 *具 有 保 存 和 调 用 单 独 预 设 文 件,整 机 数 据 上 传 和 下 载 功 能 *面 板 和 软 件 操 作 锁 , 断 电 记 忆 功 能 , 使 系 统 更 安 全 * P C中 英 文 操 作,更 人 性 化 的 设 计