水星船外机中文说明书
SGR-W500-I 用户手册

第五章 高级功能配置 ........................................................................................... 16
RADIUS 服务器 ............................................................................................................16 VAP(虚拟多 AP)设定 ...............................................................................................18 Bridge 模式下的安全设定 .............................................................................................23 启用 802.1Q VLAN.......................................................................................................24 无线端访问控制.............................................................................................................25 配置为路由器.................................................................................................................26 高级设置.........................................................................................................................26 速率加速功能.................................................................................................................28 管理代理.........................................................................................................................29 Smart WDS 功能 ............................................................................................................30
HS9008-104-009 操作手册 (A) 2012.11.28
HS9008-104-009 操作手册 (A) 2012.11.28REV DESCRIPTION 版本说明DATE 日期REV.版本DESCRIPTION简述EDIT编制CHKD.校对RVE.审核DESIGNER 设计单位SHANGHAI HANSAIL MARINE & OFFSHORE DESIGN CO.,LTD 上海航盛船舶设计有限公司BUILDER 承造单位南通润邦海洋工程装备有限公司SHIP’S No.盛邦1001DETAILDESIGN详细设计操作手册HS9008-104-009SUB. 专业SIG.签字UNI.会签SIG.签字DATE日期EDIT 编制胡辽军REV.版本WEIGHT(kg)重量(公斤)SCALE比例CHKD.校对周锋 A目录1前言 (8)1.1编写目的和用途 (8)1.2执行/参考规范 (8)2总则 (9)2.1平台基本信息 (9)2.2主要性能指标 (9)2.3平台坐标系 (12)2.4设计环境条件及设计载荷 (13)2.5水密区域的划分及水密要求 (17)2.6倾斜试验结果 (24)2.7起重机重量 (25)2.8桩腿 (26)2.9升降能力 (27)3拖航状态 (28)3.1拖航状态 (28)3.2拖航环境条件 (28)3.3许用重心高度 (28)3.4可变载荷 (29)3.5拖航前准备工作 (31)3.6拖曳设备 (31)3.7拖带操作基本原则 (31)3.8拖航应急措施 (32)4升船作业状态 (33)4.1升船准备 (33)4.2升船作业程序 (36)5降船及拔桩作业 (37)5.1降船作业 (37)5.2桩靴喷冲 (37)5.3拔桩作业 (37)6吊装作业状态 (38)6.1吊装作业状态 (38)7打桩作业状态 (41)7.1打桩作业状态 (41)8.1待命作业状态环境条件 (44)8.2待命前应采取的措施 (45)8.3人员撤离 (46)9风暴自存状态 (47)9.1风暴自存状态环境条件 (47)9.2风暴状态来临前应采取的措施 (48)10升降装置 (49)10.1概述 (49)10.2升降系统 (49)10.3液压系统 (52)10.4电气控制、监视系统 (53)10.5平台升降操作方法 (55)11锚系泊和拖曳设备 (70)11.1锚设备 (70)11.2系泊设备 (70)11.3拖曳设备 (71)11.4拖力眼板及导缆孔 (71)12消防和救生设备 (72)12.1救生艇及艇架 (72)12.2救生筏 (72)12.3其它救生及消防杂件 (72)13管系和通风系统 (73)13.1概述 (73)13.2柴油管系 (74)13.3滑油管系 (75)13.4冷却水管系 (75)13.5压缩空气管系 (76)13.6排气管系 (76)13.7船舶管系 (76)14通讯和报警系统 (81)14.1VHF无线电话 (81)14.2航行气象告警接收机 (81)14.3中/高频无线电装置 (81)14.4卫星紧急无线电示位标 (81)14.5广播 (81)14.7通用报警系统 (81)14.8火灾探测及报警系统 (82)14.9CO2施放报警系统 (82)14.10自动电话系统 (82)14.11机舱组合报警系统 (82)14.12卫星电视系统 (82)14.13轮机员呼叫系统 (82)15电源和配电系统 (83)15.1电源设备 (83)15.2配电设备 (86)16演习和训练 (88)16.1救生演习 (88)16.2训练须知 (88)16.3记录 (88)17应急状态的处理 (89)17.1应急状态 (89)17.2漂浮状态破舱进水时,应立即采取的措施 (89)17.3火灾警报发出时,应立即采取的措施 (89)17.4关于平台可能产生不均匀沉陷的问题 (90)17.5值班及应急信号 (90)17.6紧急疏散程序 (90)18附录1:拖航阻力计算 (91)18.1平台主要要素 (91)18.2拖船主要要素 (91)18.3拖航阻力计算 (91)18.4系柱拖力计算 (94)18.5结论 (95)19附录2:风、浪、流载荷结果汇总表 (97)19.1作业和自存工况下环境载荷产生的滑移力汇总表 (97)19.2作业和自存工况下环境载荷产生的倾覆力矩汇总表 (97)20附录3:调载计算 (98)20.1纵倾计算 (98)20.2稳性计算 (98)20.3纵倾和稳性计算示例 (99)21附录4:静水力曲线表 (103)23附录6:主要附图 (105)23.1舱容图 (105)23.2甲板载荷图 (105)23.3液压系统原理图 (105)1前言1.1编写目的和用途本手册是为海上风电作业平台编写的操作手册,其目的是使平台工作人员了解本平台的设计工作条件,熟悉平台在拖航、预压、举升、下降、拔桩、作业及风暴自存等状态下的各种操作要领,及对可能出现的意外情况所采取的应急措施,确保平台及人员的安全。
船外发动机说明书

船外发动机说明书型号2B 3.5BMFSOB No.003-11084-4 使用前感谢您购买本公司的船外用发动机。
本说明书对于正确的使用和发挥发动机的最大性能起到了关键的作用;同时,也记载了怎样安全使用船外发动机和保养、养护发动机的各个事项。
请您在使用本产品前仔细的阅读,以便保障能对本产品安全正确的使用。
注意事项●请您仔细阅读并理解这本说明书。
●为了防止本说明书丢失、破损请放在安全的地方保管。
●当您转让此产品时,请将本说明书一起交给下一位所有者。
●乘船时请带好本说明书。
●请您仔细阅读并理解质量保证书的内容。
●请保管质量保证书。
●在没有规格和外观改良的预告而变更的情况时,请预先谅解。
●有关这本说明书的内容,请联络船外机销售店、营业点、办事处等。
●关于船的说明书不在本说明书之内,请参阅根据不同的型号配备单独说明书。
●为了安全的航行,请做定期的零部件和各种检查。
●本说明书记载了各种特别需要注意的安全事项,请您一定仔细阅读。
! 危险不回避就会造成死亡以及重伤等重大事故,防范于未然的注意事项。
! 警告不回避就有可能造成死亡一击重伤等重大事故,防范于未然的注意事项。
! 注意不回避就会造成轻伤和设备损坏可能性的事故,防范于未然的注意事项。
●关于警告标签张贴位置,请参照在第十页的《警告标识》。
●当警告标识掉色或脱落时,请及时更换。
目录1当您使用的时候2主要零件3各部位名称4警告标识张贴位置5安装1船外发动机的安装6开动前的准备和注意事项1燃料和机油2空转3ESG(转速控制器)7运行1起步的要领2暖机运行3前进后退4停止5平衡调整6放下尾翼8船外发动机的安装和搬运1船外发动机的安装和搬运2利用拖车搬运船外发动机9调整1助力转向泵的重量调整2高度调节杆的调整10检查和保养1日常检查2定期检查3长期保管4船外发动机被水淹没时5寒冷时的保管11故常和对策12附属品13专用零配件14技术参数一览索引当您使用的时候主要参数各部位名称警告标识张贴位置组装运行前的准备运行船外发动机的安装与搬运调整检查与保养故障排除零部件专用零配件技术参数一览当您使用的时候为了您安全的使用(1)当您驾驶需要驾驶证的船只时,请必须携带驾驶证。
Sperry Marine NAVIPILOT 4500N使用手册说明书

NAVIPILOT 4500NNetworked, adaptive and self-tuning Heading Control SystemNAVIPILOT 4500N is Sperry Marine’s new networked, self-adaptive heading control system that combines industry-leading performance with easier deployment and operation. It keeps your vessel more efficiently on course, reduces fuel consumption,emissions and workload on the bridge.With a colour touchscreen, it’s intuitiveto use and heading control functionalityis safely operated with a dial wheel andbuttons to avoid unintended changes.NAVIPILOT 4500N still delivers theheading control performance thatSperry Marine is renowned for, to keepyour vessel more efficiently on course.Keep your vessel more efficiently on course, reduce fuelconsumption, emissions and workload on the bridgeStay compliant• T ype approved to applicableMED standardImprove ease of use• I ntuitive 7” colour touch screenfor improved readability• Swipe between screens forimproved accessibility of settings• H armonized alarm managementto reduce frequency and operatorworkload, with guidance onrequired actionIncrease reliability• S elf-monitors for faults andsystem configuration via integrateddiagnostics for efficient supportOptimise operationalschedule• A daptive and self-tuning system thatcontinuously monitors and optimisesheading control performance to keepthe vessel more efficiently on courseReduce through-life costs• E asy to install with reducedcomponents, standard networkcabling and connectionsImprove flexibility• H eading control available as astandalone system or additional toNAVIGUIDE 4000 manual steeringsystem, for new builds or retrofitsReduce emissions• I ndustry-leading heading controlperformance with minimisedrudder movement required duringmanoeuvres, less force back,reduced need for propulsionenergy and less fuel consumption The NAVIPILOT 4500N has a continuous self-tuning adaptation for accurate steering and efficient fuelconsumption which enables the system to monitor performance and to automatically adjust rudder gainand counter rudder settings as needed, to keep the tuning optimized even if the vessel behavior is affectedby changes in loading and trim or by changing weather conditions.• A ll vessels have unique behaviour eventhose of the same design• T rim changes during voyage due to fuelusage changing weight of the vesselSelf-tuning fully adaptive feature adjusting to the vessel conditionReal-time self-tuning adaption for most accurate steering and efficientconsumption despite external and internal factors:• D ifferent cargo loading parameters fromone voyage to the next• L onger term changes in behaviour asthe vessel agesIntroduction to the NAVIPILOT 4500N new features on the touch displayKeep an eye on the main display indicating the actual heading from GYRO, the selected heading, as well as Autopilot active status.Easy access to the Autopilot control parameters without losing sight of the essential heading control information thanks to the split screen approach. Change your parameters in the Home and Dimming menus. If alerts are present in the system they will bedisplayed here automatically, including comprehensive operator guidance.Safety relevant functionality (eg.: changing headings) accessible by buttons and wheel. For easy Sperry Marine was one of the first companies to design and develop an autopilot with the aim of increasing profits by reducing the running costs of the ship using a fully self-tuning adaptive headingcontrol system. The ultimate version with new modern design provides additional ease of use to the crew whilst permanently indicate all information required by contemporary navigation demands:General integration optionsCombined with our Fiber Optic Gyro Compasses, the autopilot will be provided with the most stable and accurate heading data available on the market, meaning the autopilot does not need to over-correct. With the result of an overall reduction in rudder movements.VisionMaster / ECDISNAVIPILOT 4500N can be integrated with our VisionMaster ECDIS for advanced Track Control functionality, according to applicable MED standards:- Enhance safety and reduce operator workload with pre-programmed routes for repetitive courses- Simplify operations on more complex voyages with multiple waypoints or lots of manoeuvres- Reduce fuel consumption further with enhanced voyage planning that incorporates weather and sea conditionsNAVIGUIDE 4000 steering control systemNAVIPILOT 4500N can be integrated with our versatile manual steering control system NAVIGUIDE 4000 that provides all required manual steering modes. NAVIGUIDE 4000 can be interfaced with a wide range of steering gears and can thus be adapted to customer needs.The complete system can be easily used in any new build as an integral part of our Integrated Bridge System offering or in in retrofits to enhance our existing system or any third party’s systems.Our NAVIPILOT 4500N can be used on any kind of vessels, of all size and for all type of operations.Suitable for every operating scenarioNAVIGAT 2500Integrate with our NAVIGAT 2500fiber optic gyro compasses foreven higher system performanceand efficiency.NAVIGAT 200Providing more redundancywith our Network HeadingManagement System.VisionMaster IntegratedBridge SystemThe intelligent bridge forthe connected ship.NAVIGAT 3500Adding highest heading accuracyand motion reference data toyour bridge, especially whensailing in high lattitude. VisionMaster ECDISC reate a Track Control System throughintegration of NAVIPILOT 4500N withVisionMaster ECDIS to automatetrack keeping.NAVIGAT 100Single gyro headinginput compliance.You may also be interested in:Global Service and SupportSperry Marine provides service and support on a 24/365 basis at every major port worldwide, at anchor, offshore and at sea.All Marine Service Engineers are all certified to ensure they install, maintain and repair our products to the industry’s highest standards on a consistent global basis. Please see /services for full details of all our service locations.Find out morePlease visit for more information on Sperry Marine’s complete range of products and services.If you would like a quotation, please email sales@.BR-78/EXP-SD-2023-680。
水星船外机中文说明书

承蒙阁下选购水星公司生产的舷外机,这是世界上最好的舷外机之一。
从此,您可尽情享受游艇乐趣,您的投资必定物超所值。
自 1939 年以来,水星公司就已在造艇技术和舷外机生产方面占据世界领先地位。
依靠数十年的经验,我们一直致力于生产上乘产品。
这也是本公司以严格的质量控制、优异的产品质量、经久耐用的性能以及优良的售后服务著称于世的原因所在。
在您启用舷外机之前,请仔细阅读本手册。
编写这本手册的目的,就是在操作、安全使用和维护保养方面,为您提供帮助。
能为您制造舷外机,我们水星公司的全体同仁均感到十分荣幸。
祝您驾艇游乐,永远愉快、安全。
再次感谢阁下对水星公司的厚爱。
美国环保局排放控制规范美国水星公司生产的舷外机,均由美国环保局(EPA )认定,符合新舷外机空气污染控制规范的要求。
此项认定是经过一定的调节使之符合工厂标准而达到的。
因此,必须严格遵循产品的工厂维修程序,并尽可能使之恢复到设计的初衷。
排放控制设备和系统的维护、更换或修理,可由任何艇用发动机修理部门或个人进行。
发动机上贴有“排放控制信息”标签,以作为美国环保局认证的永久性证明。
©2005 M e r c u r y M a r i n e 4/5/6 四冲程舷外机 90-10211060 205您所购买的产品享有水星公司提供的有限保修,保修条款载于本手册的“保修说明”部分。
保修声明包对保修范围、不保修项目、保修期、享受保修的最佳条件、重要免责声明和损害赔偿限制,以及其它相关信息做出了说明。
请认真阅读这一重要部分。
本手册中包含的说明和技术规格,均为手册付印时的有效资料。
不断改进提高,是水星公司方针之一。
因此,本公司有权随时废止某些型号,修改技术规格、设计、方法或工艺程序,恕不另行通知,也不为此承担任何义务。
美国威斯康星州方迪拉克市,水星公司美国威斯康星州方迪拉克市© 2005,Mercury MarineMercury,Mercury Marine,MerCruiser,Mercury MerCruiser,Mercury Racing,Mercury Precision Parts,Mercury Propellers,Mariner,Quicksilver,#1 On The Water,Alpha,Bravo,Pro Max,OptiMax,Sport‑Jet,K‑Planes,MerCathode,RideGuide,SmartCraft,Zero Effort,带波浪纹的M、带波浪纹的Mercury 和SmartCraft 均为Brunswick 公司的注册商标。
【精品】救助艇艇机的操作说明
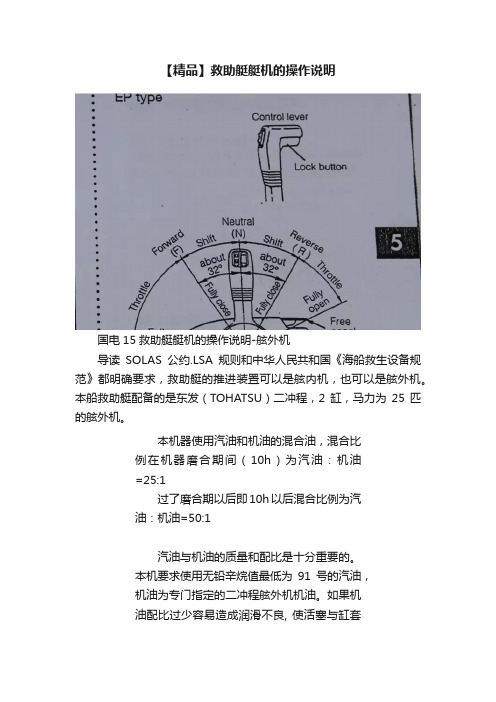
【精品】救助艇艇机的操作说明国电15救助艇艇机的操作说明-舷外机导读SOLAS公约.LSA规则和中华人民共和国《海船救生设备规范》都明确要求,救助艇的推进装置可以是舷内机,也可以是舷外机。
本船救助艇配备的是东发(TOHATSU)二冲程,2缸,马力为25匹的舷外机。
本机器使用汽油和机油的混合油,混合比例在机器磨合期间(10h)为汽油:机油=25:1过了磨合期以后即10h以后混合比例为汽油:机油=50:1汽油与机油的质量和配比是十分重要的。
本机要求使用无铅辛烷值最低为91号的汽油,机油为专门指定的二冲程舷外机机油。
如果机油配比过少容易造成润滑不良, 使活塞与缸套加快磨损, 甚至出现活塞过热膨胀, 产生拉缸,严重时会造成活塞与缸套卡死, 使机器不能正常运转。
如果配比过高燃烧不尽的机油还会凝结成碳, 附着在活塞和缸套顶部, 长期工作会造成积碳, 并粘住活塞环, 造成活塞环密封性能下降,燃烧不良, 形成恶性循环, 使发动机噪音加大, 功率下降。
1启动前的准备工作注意:如果是在船上进行艇机的日常启动检查,而不是将艇放至水面。
启动前应将艇机螺旋桨浸没在一装有淡水的桶里,水位应至少淹没艇机进水孔。
如无冷却水禁止启动机器。
A.将燃油软管与油箱连接好,并通过油量表检查油箱中燃油量注意:油箱中的油量至少应满足公约中规定的当艇满载乘员和属具时,以6Kn的航速航行至少4小时的油量。
加注燃油最多则保证油箱留有10%的空间,给燃油以膨胀的空间B.将燃油软管的另一端与舷外机供油系统连接C.逆时针旋松油箱盖上的放气螺钉2-3圈,使油箱通气D.利用燃油软管中的软气囊将燃油泵入化油器,直到感觉到软气囊内部充满燃油为止E.将启动档位处于空挡位置,将空挡节流杆开启,将应急制动开关的锁定扳与制动开关牢固连接好。
2电动启动A.断开电池充电线路,否者易对电池造成损害B.将电池选择开关钥匙插入,选择启动机器所需的电池,一般只需要一个电池启动(配备有两组电池),钥匙柄所指的位置即是电池所处的状态。
四冲20匹水星船外机气门标准间隙

四冲20匹水星船外机气门标准间隙一、概述气门是发动机中十分重要的部件,它的开合程度直接影响着发动机的性能和燃烧效率。
在船外机的维护保养中,气门的调整是一项非常重要的工作,也是保证发动机正常运转的关键步骤之一。
本文将以四冲20匹水星船外机为例,阐述其气门标准间隙的调整方法,以供相关维修人员参考。
二、四冲20匹水星船外机气门标准间隙的意义气门在发动机中起着控制气缸进气和排气的作用。
当气门的间隙不合适时,会影响气缸的正常工作,导致发动机性能下降,甚至出现故障。
而正确的气门间隙可以保证发动机的顺畅运转和高效工作,延长发动机寿命,降低能耗,减少排放。
调整气门的间隙是非常重要的。
三、四冲20匹水星船外机气门标准间隙的调整步骤1.准备工作在进行气门间隙调整之前,首先需要确保发动机处于冷却状态,以免因为高温而烫伤自己。
提前准备好必要的工具和备件,以便于操作和更换。
2.找准上止点开动发动机,让其运转至正常工作温度。
然后关闭发动机,取下火花塞,让曲轴转至上止点,这时可以利用摇杆或其他工具感受气缸的工作状态,以找到上止点。
3.调整气门间隙找准上止点后,可以开始调整气门间隙了。
取下气门盖,并利用适当的工具依次松开和拧紧调整螺母,直到达到标准的气门间隙。
在调整过程中要注意力均匀,避免造成磨损或损坏。
4.检查和测量调整完成后,需要再次检查和测量气门间隙是否符合标准要求。
可以将曲轴旋转一定角度,再次确认气门间隙是否正常。
5.安装和测试当确认气门间隙正常后,可以将气门盖和火花塞安装回原来的位置,开动发动机进行测试。
观察发动机的工作状态以确保调整的准确性和可靠性。
四、四冲20匹水星船外机气门标准间隙的注意事项1.操作人员必须熟悉发动机的结构和工作原理,具备相应的维修知识和技能,以免因操作不当导致损坏。
2.调整气门间隙时,需要注意力的均匀和谨慎,避免造成额外的损坏或不良影响。
3.在操作过程中,需要时刻注意自身安全,避免因高温或其他原因导致的伤害。
zanussi zwfm25w804a 洗衣機 使用手冊说明书

Washing Machine ZWFM25W804AUser Manual 2EN 洗衣機使用手冊40HK2 CONTENTS1.1 Conditions Of Use 1.2 Child Safety 1.3 General Safety 1.4 Installation 1.5 Use 1. SAFETY INFORMATION........................................................................................................ 4.................................................................................................................. 5............................................................................................................. 6.................................................................................................................... 6.............................................................................................................................. 72.1 Parts 2.2 Accessories 2. PRODUCT DESCRIPTION............................................................................................................................ 8................................................................................................................. 93.1 Control Panel Description 3.2 Program Chart 3.3 Program Options Compatibility 3.4 Options 3.5 Settings 3.6 Start/Pause ( ) and Add Clothes ( ) Touchpad 3. CONTROL PANEL........................................................................................... 10............................................................................................................. 11..................................................................................... 12........................................................................................................................ 13........................................................................................................................ 15. (16)Adherence to the directions for use in this manual is extremely important for health and safety. Failure to strictly adhere to the requirements in this manual may result in personal injury, property damage and affect your ability to make a claim under the Zanussimanufacturer’s warranty provided with your product. Products must be used, installed and operated in accordance with this manual. You may not be able to claim on the Zanussi manufacturer’s warranty in the event that your product fault is due to failure to adhere to this manual.IMPORTANT INFORMATION THAT MAY IMPACT YOUR MANUFACTURER’S WARRANTYWe recommend the use of original spare parts.When contacting Service, ensure that you have the following data available. The information can be found on the rating plate. Model, PNC, Serial Number.Subject to change without notice.Warning / Caution-Safety information.General information and tips.Environmental information.CUSTOMER CARE AND SERVICEThank you for purchasing an Electrolux appliance. You’ve chosen a product that brings with it decades of professional experience and innovation. Ingenious and stylish, it has been designed with you in mind. So whenever you use it, you can be safe in the knowledge that you’ll get great results every time. Welcome to Zanussi.Get usage advice, brochures, trouble shooting, service information, buy accessories & spare parts, online product registration : WE’RE THINKING OF YOUVisit our website to:ENGLISH 33ENGLISH5.1 Loading The Laundry 5.2 Using Detergent And Additives 5.3 Options Setting 5.4 Starting A Cycle ( )5.5 Interruption Of A Program 5.6 Changing A Program 5.7 Changing The Options 5.8 Opening The Door 5.9 At The End Of The Program 5.10 When The Washing Program Is Completed, But There Is Water In The Drum 5.11 AUTO Off Mode 5. DAILY USE.................................................................................................... 17.................................................................................... 17............................................................................................................ 18................................................................................................... 19............................................................................................ 19................................................................................................... 19................................................................................................ 19........................................................................................................ 19........................................................................................ 19......... 20......................................................................................................... 206.1 Sorting The Laundry 6.2 Temperatures 6.3 Before Loading The Laundry 6.4 Maximum Loads 6.5 Removing Stains 6.6 Detergents Type And Quantity Of Detergent 6. WASHING HINTS.................................................................................................... 21............................................................................................................... 21........................................................................................ 21........................................................................................................... 21.......................................................................................................... 21............................................................... 228.1 External Cleaning 8.2 Descaling 8.3 After Each Wash 8.4 Maintenance Wash With “Tub Clean” Program 8.5 Cleaning The Dispenser Drawer 8.6 Cleaning The Drawer Recess 8.7 Cleaning The Pump 8.8 Cleaning The Water Inlet Filter 8.9 Frost Precautions 8. CARE AND CLEANING........................................................................................................ 24..................................................................................................................... 24.......................................................................................................... 24........................................................... 24.................................................................................. 24...................................................................................... 25...................................................................................................... 25.................................................................................... 27......................................................................................................... 289.1 Possible Failures 9.2 Emergency Door Opening 9. TROUBLESHOOTING........................................................................................................ 29........................................................................................... 324. BEFORE FIRST USE ....................................................................................................... 167. INTERNATIONAL WASH CODE SYMBOLS ................................................................ 2310. TECHNICAL DATA .......................................................................................................... 3311.1 Unpacking 11.2 Positioning 11.3 Water Inlet 11.4 Water Drainage 11.5 Electrical Connection ................................................................................................................... 33.................................................................................................................. 35.................................................................................................................. 36......................................................................................................... 36................................................................................................. 3811. INSTALLATION12.1 Packaging Materials 12.2 Old Machine 12.3 Ecological Hints .................................................................................................. 39............................................................................................................... 39 (39)12. ENVIRONMENT CONCERNS4 4 www.electrolux.co.th SAFETY INFORMATION In the interest of your safety and to ensure the correct use, before installing and first using the appliance, read this user manual carefully, including its hints and warnings.This appliance is intended to be used in household andsimilar applications such as:farm houses;by clients in hotels, motels, and other residential type environments;1.1 Conditions Of UseTo avoid unnecessary mistakes and accidents, it is important to ensure that all people using the appliance are thoroughly familiar with its operation and safety features.Save these instructions and make sure that they remain with the appliance if it is moved or sold, so that everyone using it through its life will be properly informed on appliance use and safety.1.●bed and breakfast type environtments;●areas for communal use in blocks of flats or in launderettes.●staff kitchen areas in shops, offices and other working environtment;●●WARNING! The appliance must not be supplied through an external switching device, such as timer, or connected to a circuit that is regularly switched on and off by utility.ENGLISH 55ENGLISH ●●●●This washing machine is not intended for use byyoung children or infirm persons without supervision. Young children should be supervised to ensure that they do not play with the appliance.The packaging components (e.g. plastic film,polystyrene) can be dangerous to children - danger of suffocation! Keep them out of children’s reach.Keep all detergents in a safe place out of children’s reach.1.2 Child SafetyMake sure that children or pets do not climb into the drum.This machine is provided with child safety lock option ( ) to prevent children playing with the control panel. (see page 15)●●6 6 www.electrolux.co.th 1.3 General SafetyIt is dangerous to alter the specifica-tions or attempt to modify this productin any way.During high temperature washprogram the door glass may get hot. Do not touch it!Make sure that small pets do not climb into the drum. To avoid this, please check inside the drum before using the appliance.Any objects such as coins, safetypins, nails, screws, stones or any other hard, sharp material can cause extensive damage and must not be placed into the machine.Only use manufacturer’srecommended quantities of fabric softener and detergent. Damage to the fabric or appliance can occur if you exceed the recommended amount.Wash small items such as socks,laces, washable belts etc in awashing bag or pillow case as it is possible for such items to slip down between the tub and the inner drum.Do not use your washing machine towash articles with whalebones, material without hems or torn material.●●●●●●●This appliance is not intended for useby persons (including children) with reduced physical, sensory or mental capabilities, or lack of experience and knowledge, unless they have been given supervision or instructionconcerning use of the appliance by a person responsible for their safety. This appliance is heavy. Care shouldbe taken when moving it.When unpacking the appliance, checkthat it is not damaged. If in doubt, do not use it and contact the Service Centre.All packing and transit bolts must beremoved before use. Serious damage can occur to the product and toproperty if this is not adhered to. See relevant section in the user manual.Under no circumstances should youattempt to repair the machine yourself. Repairs carried out by inexperienced persons may cause injury or serious malfunctioning. Contact your local Service Centre. Always insist on genuine spare parts.1.4 InstallationAfter having installed the appliance,check that it is not standing on the inlet and drain hose and the worktop is not pressing the electrical supply cable.If the appliance is installed on acarpeted floor, please adjust the feet in order to allow air to circulate freely.Always be sure, that there is no water leakage from hoses and their connections after the installation.Any plumbing work required to installthis appliance should be carried out by a qualified plumber.Any electrical work required to installthis appliance should be carried out by a qualified electrician.Always unplug the appliance and turnoff the water supply after use, clean and maintenance.●●●●●●●●●●●May cause electric shock! if the machine is not connected to an earthed/ground system. DO NOT touch the wet clothes and metal parts.For safety reasons do not use double adaptors, extension cords and multi-plug adapters.ENGLISH 77ENGLISH Never use the washing machine if the power supply cable, the control panel, the working surface or the base are damaged so that the inside of the washing machine is accessi-ble.Only wash fabrics which aredesigned to be machine washed. Follow the instructions on each garment label.Do not overload the appliance. See the relevant section in the user manual.Before washing, ensure that all pockets are empty and buttons and zips are fastened. Avoid washing frayed or torn articles and treat stains such as paint, ink, rust, and grass before washing.Garments which have been in contact with volatile petroleum products should not be machinewashed. If volatile cleaning fluids are used, care should be taken to ensure that the fluid is removed from the garment before placing in the machine.Never pull the power supply cable to remove the plug from the socket; always take hold of the plug itself.1.5 Use●●●●●●8 8 www.electrolux.co.th PRODUCT DESCRIPTION2.2.1 PartsENGLISH 99 ENGLISH10 A Program knob H DisplayB Temp touchpad I Delay End touchpadC On/Off button J Flexi Time touchpadD Spin touchpad K Start/Pause touchpadE Plus Steam touchpad(Pause to add Clothes option)F Prewash touchpad L Favourite program save optionG Extra Rinse touchpad M Child safety lock optionDisplayA Delay End IconB Door Lock IconC Program Duration / Delay End Time/ Alarm CodeD Time Manager levelE Program Phase Indication Icon:Wash Phase, Rinse Phase,Spin PhaseF Add Clothes IconG Anticrease Phase Icon (this programphase is only active in the WasherDryer model)H Vapour phase IconI Ultramix phase Icon3. CONTROL PANEL3.1 Control Panel DescriptionENGLISH 11 3.2 Program Chart12 1)Maximum capacity depended on the model of the Washing Machine (see defined onthe control panel)2)Eco Cotton Program with 40degC option selected is recommended for a full load ofnormally soiled cotton and is the Energy and Water rating label program.1) “Plus Steam” option can be combined with temperature 40 to 90 °C only.ENGLISH13The door stays locked with the water in the drum. To continue the cycle, you must press (Start/Pause).Temperature TouchpadPress this touchpad repeatedly to increase or decrease the washtemperature if you want your laundry to be washed at a temperature differentfrom the one proposed by the washing machine. (Symbol “ ” corresponds to cold wash)Spin Selection Touchpad●●Press this touchpad repeatedly toincrease or decrease the spin speed or select Rinse Hold, if you want your laundry to be spun at a speed different from the one proposed by the washing machine.No spin option eliminates all the spin phases and increase the number of rinses.No Spin ( )By selecting this option the water of the last rinse is not emptied out and the drum turns regularly to prevent the laundry creases.The door is still locked to indicate that the water must be emptied out.Rinse Hold ( )3.4 OptionsDelay End ( ) TouchpadFlexi TimeThis option allows you to adjust the wash time. Press this touchpad repeatedly to decrease or increase the wash time according to the soil level of your wash. Use the table below as a guide.Before you start the program, this option makes it possible to define the end of the washing program from minimum of 1 hour to maximum of 20 hours.If program duration is longer than 3 hours, minimum Delay End option starts from 4 hours.After selecting Delay End time, press Start/Pause touchpad to start theprogram. Machine will then countdown and update time on the display every hours until it reaches the starting point of the wash cycle.Press the Delay End touchpad to choose the end time as you wish. The display shows the number of hours and the indicator beside the touchpad is on.For example, if the program duration of your selected program is 3.20 hours and you define the “Delay End” time to 6 hours. This means your wash program will finish in 6 hours. (See diagram)Start/PauseCycleProgramThis option must be selected after choosing the wash program, and before pressing the “Start/Pause” touchpad.If you wish to modify or cancel Delay End option after starting the program, follow the steps below:set the washing machine to PAUSE by pressing “Start/Pause” touchpad;-deselect this option by pressing “Delay End” touchpad repeatedly till the display shows delay time “ ”;-press the “Start/Pause” to start the program.-14 Plus Steam ( ) TouchpadPrewash ( ) TouchpadSelect this option if you wish your laundry to be pre-washed before the main wash. Use this option for heavy soil. The indicator of this option will be on.Select this option to add approximately 30 minutes of tumbling in vapour after the rinse cycle. The indicator of this option will be on.Vapour may not necessarily be visible inside the drum during a vapour cycle. Vapour is created below the drum and allowed to naturally rise into the clothes.At the end of the Vapour cycle, the clothes will be warmer, softer and detached from the drum.If Vapour option is selected, rinse temperatures will be elevated.During a vapour cycle, you may notice vapour exiting from the drain hose of the washing machine, this is normal and there is no cause for alarm.Vapour may not be present during the entire vapour cycle.Vapour function is more effective with half load.NOTEWhen you set this function, put the detergent into the “ ” compartment. This function increases the program duration.●●●●Easy Iron TouchpadWhen selecting this option the laundry is gently washed and spun to avoidcreasing. In this way ironing is easier. The indicator of this option comes on.ENGLISH 15Save Favourite ( ) Program3.5 SettingsProgram settings that are frequently used can be saved (e.g. Cotton, 60°C, 1200 rpm, with Prewash and Hygienic Care). To recall the favourite wash program, turn selector knob to “Favourite ”program. You will get acknowledgement on the display when the Favourite program is loaded.To program/re-program Favourite with your own selections and save them, proceed as follows:1.Put machine in Stand-By mode.2.Select your desired wash settings.3.2 seconds and you will hear “Bip, Bip” sound and “ ” is flashing on the display.This setting permits you to either enable or disable the buzzer at the end of the program. As an example, you might wish to disable this buzzer when you start a wash when going to bed, so that when the wash finished approximately 1 hour later, it will not disturb you through the night.Error warning beeps such as critical faults are not disabled.Enabling/Disabling End-Of-Wash BuzzerTo disable the buzzer sound, press “Spin and Plus Steam ( )” touch-pads at the same time about3 seconds, the icon “ ” will show on display along with buzzer sound.To return to default configuration press these 2 touchpads at the same time about 3 seconds, the icon “ ” will show on display along with buzzer sound.●●Child Safety Lock ( ) OptionYour appliance is provided with CHILD SAFETY LOCK which permits you to leave the appliance unsupervised with the door closed without having to worry that children might be injured by or cause damage to the appliance.Set this option after pressing the Start/Pause touchpad.To activate the function, press and hold “Prewash” touchpad about2 seconds until the display shows the icon “ ”.To set “Child Lock” option:To deactivate the function, press and hold “Prewash” touchpad about2 seconds until the display shows the icon “ ”.This function remains enabled even after the appliance is switched off.The touchpads are locked (except for the On/Off button).●●If you press any touchpad while Child Lock is activated, the icon “ ” will flash on display3 times along with buzzer sound.16 BEFORE FIRST USE4.3.Select a Cottons cycle at 90 °C,without any laundry in the machine, to remove any manufacturing residue NOTE3.6 Start/Pause ( ) and Add Clothes ( ) TouchpadThis touchpad has 2 functions:Start/Pause ( )1.To interrupt a program which isrunning, press this touchpad to pause the machine, the Start/Pause pilot light flashes.After you have selected the desired program and options, press this touchpad to start the machine. The Start/Pause pilot light will stop flashing and remain lit until the water level is above the bottom edge of the door then pilot light goes OFF. If you have selected a “Delay End” option, the countdown will begin and will be shown on the display.To restart the program from the point at which it was interrupted, press this touchpad again, the Start/Pause pilot light will stop flashing.Add Clothes ( )2.To add clothes:Pressing the “Start/Pause”touchpad to pause the program.You can only add clothes when the icon “ ” shown on the display.1.Wait for the machine to come to a complete stop before opening the door (wait for door lock “ ” icon to turn off).2.Resume the program by pressing “Start/Pause” touchpad again.4.Add clothing and close the door.3.ENGLISH1717ENGLISH●DAILY USE5.Press the On/Off button to turn on the washing machine. Turn the knob to set a program. The washing machine will propose a temperature and automatically select the spin value provided for the program you have chosen.1.2.5.1 Loading The LaundryConnect the main plug to the mainsocket.Turn the water tap on.3.much as possible. (Refer to page 21 “WASHING HINTS”) 1. Please read “Detergents Type and Quantity of Detergent”on page 22 before use.5.2 Using Detergent And AdditivesCompartment “SOFTENER”This compartment is used for fabric conditioner and starching agent.This compartment is used for detergent on all programs.Detergent flapPosition down : for liquid detergent.Position up : for powder detergent.The selector knob can be turned either clockwise or counter-clockwise.18 18 www.electrolux.co.thDo not use gelatinous or thick liquid detergents.Do not put more liquid than the maximum level.Do not set the “Delay End”.Do not set the “Prewash” phase.NOTE: When you use theliquid detergentPull out the dispenser drawer until ------Measure out the detergent and thefabric softener;2. -Close the drawer gently.--Residues of detergent, softener and water may remain in the dispenser. It is recommended to clean the dispenser regularly to remove any residue.The softener amount used must not exceed the “MAX” mark in the drawer.If you use thick softeners it isrecommended to dilute with water.If you want your laundry to be spun or use temperature different from the one proposed by the washing machine, pess “Spin” and “Temp” touchpads repeatedly to change the spin speed and temperature.Press the option touchpads, if youwant your laundry to be washed with special functions.Different functions can becombined which is dependent on the program selected.If an option is not compatible with the wash program selected, the symbol “ ” will flash on display along with buzzer sound.If you want to adjust washing time, press the “Time Manager” touchpad repeatedly to increase or decrease washing time. (See Time Manager guide on page 13)If you want to define the end of the washing program, press the “Delay End” touchpad repeatedly to choose your washing machine working time.5.3 Options Setting--1.2.NOTENOTENOTEENGLISH 1919ENGLISHThe appliance will automatically adjust the selected program durationaccording to the type and size of the load.-The display will show adjusted program duration.-To start a program, press the Start/Pausetouchpad. The corresponding pilot light will stop flashing and a default program duration will be displayed on the screen.5.4 Starting A Cycle ( )After approx. 15 minutes from the start of a program:If you press any touchpad while aprogram is operating, the symbol “ ” will flash on display along with buzzer sound. (except Start/Pause touchpad and On/Off button)To pause, press Start/ Pause. The indicator will start flashing.-Press the Start/Pause again. The program will continue.-Changing a running program is possible only by switching off the appliance.Press the “On/Off” button to cancel the program and to turn off the appliance.-5.5 Interruption Of A Program5.6 Changing A ProgramIt may be possible to change some of the options after a wash program has started.Press the “On/Off” button again to start the appliance. - 5.7 Changing The OptionsPress the touchpad Start/Pause. The indicator will start flashing.1.If available change the options that you wish.2.Press Start/Pause again. The program will continue.3.While a program or the Delay End is operating, the appliance door is locked and the display shows the indicator “ ”. First, set the machine to PAUSE bypressing the “Start/Pause” touchpad. Wait until the door lock indicator goes off, then the door can be opened.If the door lock indicator “ ” does not disappear, this means that the machine is already heating and the water level is above the bottom edge of the door or the drum is turning. In this case the door CAN NOT be opened. If you need to open it, you must drain the water to open the door.In case of emergency please refer to “Emergency door opening” on page 32.5.8 Opening The DoorNOTENOTENow you can set a new wash program and change any available options. Press Start/Pause to start the new program.The appliance will not drain the water (except programs; Vapour Refresh, Spin, Rinse + Spin, Tub Clean).The appliance stops automatically.The acoustic signal will operate.The display will show “ ”.The indicator of the touchpad Start/Pause goes off.--------The door lock indicator “ ” goes off.Remove the laundry from theappliance. Make sure that the drum is empty.Keep the door partly open, to prevent the mildew and odours.Turn off the water tap.5.9 At The End Of The Program20 20 www.electrolux.co.thWhen the program is completed and the door lock indicator “ ” goes off, you can open the door.5.10 When The Washing Program Is Completed, But There Is Water In The DrumThe drum turns regularly to prevent the creases in the laundry.(Option “Rinse Hold ” is used)You must drain the water to open the door.The indicator “Start/Pause” flashes to remind you to drain the water.---At the end of the program, the timeremaining can suddenly decrease from 7 minutes or less to 0 due to theoverestimated total program time during the load sensing phase. In some cases (with perfectly balanced load) the program time can be shorter than the time estimated after the load sensing phase is completed. This is a normal behavior of the machine and not a cause for concern as it does not compromise its performance.5.11 AUTO Off ModeThe AUTO Off mode automatically deactivates the appliance to decrease the energy consumption when:You do not press any buttons for 5minutes before you press “Start/Pause”. Press the “On/Off” button to activate the appliance again.After 5 minutes from the end of the washing program.Press the “On/Off” button toreactivate the appliance. Display will show the end of the last wash.--Press any touchpad again to show the last wash program.-NOTEThe door lock indicator “ ” is on. The door stays locked.1.To drain the water:Press the “Start/Pause ” touchpad. The appliance drains the water and spins with the maximum spin speed for selected program.Alternatively , before pressing the “Start/Pause” touchpad, you can press the “Spin ” touchpad to change the spin speed. You can select “No Spin ( )”, if you want the machine to only drain the water.2.Press the “On/Off” button to deactivate the appliance.3.After approximately 18 hours, if you do not press Start/Pause touchpad, theappliance will drain and spin automatically (except for “Wool” program) .NOTE。
- 1、下载文档前请自行甄别文档内容的完整性,平台不提供额外的编辑、内容补充、找答案等附加服务。
- 2、"仅部分预览"的文档,不可在线预览部分如存在完整性等问题,可反馈申请退款(可完整预览的文档不适用该条件!)。
- 3、如文档侵犯您的权益,请联系客服反馈,我们会尽快为您处理(人工客服工作时间:9:00-18:30)。
承蒙阁下选购水星公司生产的舷外机,这是世界上最好的舷外机之一。
从此,您可尽情享受游艇乐趣,您的投资必定物超所值。
自 1939 年以来,水星公司就已在造艇技术和舷外机生产方面占据世界领先地位。
依靠数十年的经验,我们一直致力于生产上乘产品。
这也是本公司以严格的质量控制、优异的产品质量、经久耐用的性能以及优良的售后服务著称于世的原因所在。
在您启用舷外机之前,请仔细阅读本手册。
编写这本手册的目的,就是在操作、安全使用和维护保养方面,为您提供帮助。
能为您制造舷外机,我们水星公司的全体同仁均感到十分荣幸。
祝您驾艇游乐,永远愉快、安全。
再次感谢阁下对水星公司的厚爱。
美国环保局排放控制规范美国水星公司生产的舷外机,均由美国环保局(EPA )认定,符合新舷外机空气污染控制规范的要求。
此项认定是经过一定的调节使之符合工厂标准而达到的。
因此,必须严格遵循产品的工厂维修程序,并尽可能使之恢复到设计的初衷。
排放控制设备和系统的维护、更换或修理,可由任何艇用发动机修理部门或个人进行。
发动机上贴有“排放控制信息”标签,以作为美国环保局认证的永久性证明。
©2005 M e r c u r y M a r i n e 4/5/6 四冲程舷外机 90-10211060 205您所购买的产品享有水星公司提供的有限保修,保修条款载于本手册的“保修说明”部分。
保修声明包对保修范围、不保修项目、保修期、享受保修的最佳条件、重要免责声明和损害赔偿限制,以及其它相关信息做出了说明。
请认真阅读这一重要部分。
本手册中包含的说明和技术规格,均为手册付印时的有效资料。
不断改进提高,是水星公司方针之一。
因此,本公司有权随时废止某些型号,修改技术规格、设计、方法或工艺程序,恕不另行通知,也不为此承担任何义务。
美国威斯康星州方迪拉克市,水星公司美国威斯康星州方迪拉克市© 2005,Mercury MarineMercury,Mercury Marine,MerCruiser,Mercury MerCruiser,Mercury Racing,Mercury Precision Parts,Mercury Propellers,Mariner,Quicksilver,#1 On The Water,Alpha,Bravo,Pro Max,OptiMax,Sport‑Jet,K‑Planes,MerCathode,RideGuide,SmartCraft,Zero Effort,带波浪纹的M、带波浪纹的Mercury 和SmartCraft 均为Brunswick 公司的注册商标。
Mercury Product Protection 为Brunswick 公司的注册服务标志。
水星首席服务商水星公司将评估它的代理商的服务性能,并指派给它的最高等级的“水星首席服务商”以超常规维修服务的委托证明。
赢得一个水星首席服务商等级,代理商须满足以下条件:●获得12个月保修服务的顾客满意度(CSI)高分记录。
●拥有所有必须的维修工具、测试仪器、手册和零件薄。
●雇员至少有一个是持有证书的技师或资深技师。
●能够为所有的水星公司客户提供及时服务。
●尽可能提供24小时服务或移动电话服务。
●应使用水星公司的原装精密部件,并备好足够库存。
●提供一间干净整洁的店铺,配备成套工具和服务资料。
目录保修说明保修期的转让 (1)水星产品保护方案(延长保修期)的转让 (1)保修登记:美国和加拿大地区 (2)四冲程舷外机有限保修条款 (2)腐蚀损坏三年有限保修 (4)保修范围和不保修的项目.............................................................................................. 错误!未定义书签。
加利福尼亚州对排放控制系统零部件的有限保修 .......................................................... 错误!未定义书签。
排放等级标帖.. (9)综述驾驶员的责任 (10)起动舷外机前的准备工作.............................................................................................. 错误!未定义书签。
艇的额定功率 (11)拉绳熄火停机开关 (11)保护水中人员 (12)废气排放 (13)选配舷外机附件 (14)安全驾艇的建议 ............................................................................................................ 错误!未定义书签。
记录序列号 (16)4/5/6 技术规格 (17)安装安装舷外机 (18)运输从游艇上拆下您的舷外机时的携带、存放和运输 (19)拖曳船艇 (20)燃油与机油建议使用的燃油 (21)向燃油箱加油 (22)建议使用的发动机机油 (22)检查发动机机油 (23)控制装置和器件控制装置和器件 (24)舷外机翘起 (26)在浅水水域中航行 (27)设置舷外机的操舵角度 (28)发动机超速保护系统 (28)操作起动前应检查的项目 (29)气温在冰点以下航行时 (29)在咸水或污水中航行时 (29)发动机的磨合程序 (30)起动发动机 (30)换档 (34)停止发动机 (34)应急起动....................................................................................................................... 错误!未定义书签。
维护保养舷外机维护 (38)美国环保局排放控制规范 (38)检查和维护保养项目 (39)冲洗冷却系统 (40)顶部机罩的拆卸和安装 (41)防蚀阳极 (42)外表面的维护保养 (42)燃油系统 (42)螺旋桨的更换 (43)火花塞检查和更换 (45)润滑点 (46)更换发动机机油 (48)齿轮箱润滑 (49)舷外机落水后的处理 (51)存放存放前的准备工作 (52)保护外部发动机部件 (52)保护内部发动机部件 (53)齿轮箱 (53)存放时舷外机的放置状态 (53)服务支持本地维修服务 (55)外地维修服务 (55)零件和附件查询 (55)服务支持 (55)水星公司的维修服务办事处 (56)维护保养记录维护保养记录 (58)保修期的转让有限保修期是可以转让给下一个买家的,但仅限于该有限保修期剩余的尚未使用的部分。
这一点并不适用于商业用途的各种产品。
将保修期转让给下一个买主时,应将销售帐单或购买协议书,新买主的姓名和地址,以及发动机序列号寄送或传真给水星(Mercury Marine)公司保修登记部。
在美国和加拿大地区,邮寄地址为:Mercury MarineW6250 W. Pioneer RoadP.O. Box 1939Fond du Lac, WI 54936-1939920-929-5054Fax 920-929-5893水星(Mercury Marine)公司在处理保修期转让时,将通过邮件给产品的新买主寄送一份登记证书。
此项服务无须支付费用。
对于在美国和加拿大以外的地区购买的产品,请与所在国家的批发商或与您距离最近的Marine Power Service Center(水星船舶动力维修服务中心)联系咨询。
水星产品保护方案(延长保修期)的转让“产品保护方案”的剩余期限,从销售之日起的三十(30)天内,可转让给下一位买家。
在转售三十(30)天内未转让的合同将不再有效,产品也将不再受到合同条款的保护。
为了将产品保护方案转让给下位买家,请与水星产品保护机构或特约代理商联系,以获得“转让申请表”。
应向水星产品保护机构提交购买收据/买卖合同、填写完整的转让申请表及一份支票,收款人为水星公司,金额为50美元(每台发动机),作为转让手续费。
保护方案的适用范围不能从一个产品转让至另一产品,或转让至不适合的应用环境。
经认证的二手发动机保护方案是不可转移的。
若需帮助,请在每周一至周五,美国中部时间上午7:30 至下午4:30,拨打电话1-888-427-5373 或通过电子邮件*****************************.与水星产品保护部联系。
保修登记:美国和加拿大美国和加拿大以外地区的客户,请与您所在地区的分销商核查。
1. 您可在任何时刻(提出申请保修时),更改您的地址。
方式是用电话通知水星公司,或寄信或用传真将您的姓名、旧地址、新地址以及发动机的序列号告知水星公司的保修登记部。
向您出售产品的代理商也可处理这一信息变更工作。
水星公司Pioneer 西路W6250 号1939 号信箱威斯康星州方迪拉克市,邮编:54936-1939920-929-5054传真:920-929-5893注:按照《联邦船艇安全法规》的要求,在美国出售船舶产品的水星公司和代理商,均应保存好登记表,以供在必要时回收。
2. 产品必须在水星公司登记,才有资格享受保修服务。
在出售时,代理商应填写保修登记表的全部项目,并立即将其通过MercNET、E-mail 或邮寄至水星公司。
收到保修登记表后,水星公司会将其登记在案。
3. 在处理保修登记表后,水星公司将通过邮寄方式给产品购买者发送登记证书。
若在30 天内还未收到这份登记证书,所购买的产品只有在水星公司登记之后,保修范围才生效。
四冲程舷外机有限保修条款美国和加拿大地区的客户美国和加拿大以外地区的客户——请与向您出售产品的当地分销商进行核对。
凡向加利福尼亚州代理商购买2001型号年度舷外机的加利福尼亚居民,除下述保修条款外,与排放有关零部件还享有补充待遇。
具体请查阅产品供应商提供的“加利福尼亚州对排放系统零部件的有限保修条款”。
保修内容:水星公司保证其新产品在下述规定期限内,不会由于材质及工艺缺陷而产生故障。
保修期:娱乐性使用的产品,从第一次售出之日或第一次使用之日起,提供三年保修期(以先到期为准)。
商业性使用的产品,则从第一次售出之日或第一次使用之日起,提供一年保修期(以先到期为准)。
商业性使用,系指用产品进行营运或出租,或使用产品获取收益。
在保修期内的任何时间,即使是偶尔做这类使用,也属于商业性使用。
对零部件进行修理或更换,或按照保修规定进行维修,都不会使原定的保修期延长。
对产品重新办理登记手续后,剩余的保修期可从一个娱乐用户转让给另一个娱乐用户,但商业用户不得转让或接受剩余保修期。