en3d6用户手册
操作流程

操 作 流 程(一)、运行EN3D(二)、打开雕刻文件(三)、选择加工路径。
(四)、小线段光顺。
(五)、进入“选择加工”,或者“全部加工”界面。
(进入全部加工的路径不用选择)(六)、检查主轴冷却是否正常(七)、检查切削液是否正常(八)、装卡材料:遵循“装正装平装实”的原则。
(九)、装卡刀具: (1)、将螺母和卡头旋下,用93#酒精清理干净。
(2)、将卡头装到螺母内放正,轻松旋入主轴电机轴上。
(3)、将刀具插入卡头,刀柄插入卡头内的长度必须大于18毫米,露出卡头部分要尽量短,只要刃长够用就可以。
(4)、用扳手慢慢锁紧螺母,松半扣再慢慢锁紧,注意不要太用力,以免损坏弹簧夹头和锁紧螺母。
(十)、如果路径带有操作设置,要在加工界面中,将“扩展功能”的所有“路径属性开关”全部选中。
(十一)、定义XY起刀点,将数值填入“F9 XY起刀点” 中。
(注意:与输出原点相对应)(十二)、定义Z轴起刀点,将数值填入“F8 Z轴起刀点 ”中。
工件的第一把加工刀具,是通过手动对刀获得Z轴起刀点数值,然后通过对刀仪定义对刀基准。
(1)、三维输出的路径,刀具对到材料表面上。
(2)、观察刀尖距离材料表面的距离,调节Z轴步长,保证步长小于这个距离,向下移动刀具。
当刀尖接近材料表面2MM左右时,把主轴转速打起来,继续一边调节Z轴步长,一边向下移动,注意Z轴步长最好是小到0.013毫米的时候将刀尖对到材料表面上,此时对刀误差最小。
这时侯Z轴的数值就是Z轴起刀点的数值。
(3)、将Z轴的数值填入“F8 Z轴起刀点” 中(4)、定义对刀位当对刀仪的位置改变了时,要通过“扩展功能”中的“位置参数”,重新定义对刀仪的位置。
注意:换成了比较长的刀具时,要适当改小Z轴位置参数。
以免刀具直接撞在对刀仪上折断。
(5)、将主轴电机停转,停稳。
(6)、通过“特例运动”中的“对刀”功能,去对刀仪上对刀,定义对刀基准。
(十三)、将对刀仪防护起来,以防进油进水。
六自由度机器人说明书
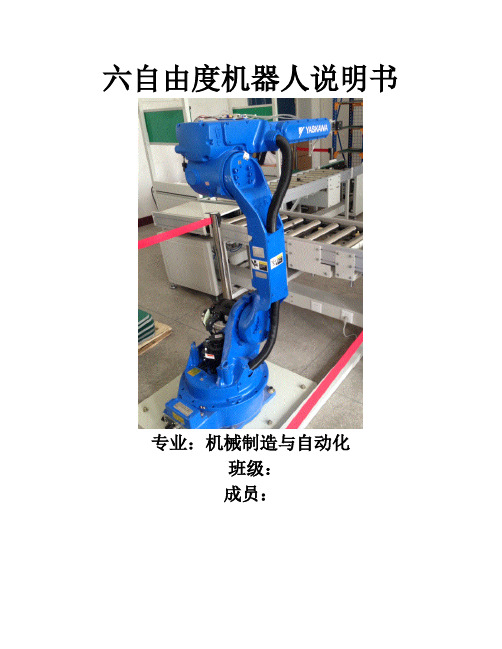
六自由度机器人说明书专业:机械制造与自动化班级:成员:目录一、打开气源二、机器人的快速操作入门1、坐标系的选择2、手动速度调整3、伺服电源接通4、接通主电源5、接通伺服电源三、伺服电源切断1、切断伺服电源2、切断主电源四、轴操作一、打开气源请确认系统进气气源已进行供气,未供气或气压不足将会导致系统无法正常工作,系统运行中如断开气源,可能导致设备损坏,甚至造成人员伤害。
打开下图气泵,将开关拨到“I”,再打开气阀拨到“开”,即“Ⅰ”往上拨,打开气阀二、机器人的快速操作入门1、坐标系的选择在示教模式下,选择机器人运动坐标系:按手持操作示教器上的【坐标系】键,每按一次此键,坐标系按以下顺序变化,通过状态区的显示来确认。
2、手动速度调整示教模式下,选择机器人运动速度:按手持操作示教器上【高速】键或【低速】键,每按一次,手动速度按以下顺序变化,通过状态区的速度显示来确认。
•按手动速度【高速】键,每按一次,手动速度按以下顺序变化:微动1%→微动2%→低5%→低10%→中25%→中50%→高75%→高100%。
•按手动速度【低速】键,每按一次,手动速度按以下顺序变化:高100%→高75%→中50%→中25%→低10%→低5%→微动2%→微动1%。
3、伺服电源接通打开上电控柜上的主电源开关时,应确认在机器人动作范围内无任何人员。
忽视此提示可能会发生与机器人的意外接触而造成人身伤害。
如有任何问题发生,应立即按动急停键,急停键位于电控柜前门的右上方。
4、接通主电源●把电控柜侧板上的主电源开关扳转到接通(ON) 的位置,此时主电源接通。
●按下电控柜面板上的绿色伺服启动按钮。
5、接通伺服电源示教模式和回放模式、远程模式的伺服电源接通步骤是不一样的。
示教模式下:按下手持操作示教器上的【伺服准备】键,轻握手持操作示教器背面的【三段开关】,这时手持操作示教器上的【伺服准备指示灯】亮起,表示伺服电源接通。
回放和远程模式下:按下手持操作示教器上的【伺服准备】键,这时手持操作示教器上的【伺服准备指示灯】亮起,表示伺服电源接通。
HP E363xA系列可编程DC电源说明书

H Affordable programmablepower supplies to meet yourneedsThe HP E363xA-series ofprogrammable DC power suppliesgive you the performance of systempower supplies without the highprice. All models give you cleanpower, dependable regulation and fast transient response with built-in GPIB and RS-232 interface.HP E363xA-series are designed to meet the most demanding applications in R&D design verifications, production testing, and QA verifications with traditional HP quality and reliability you can count on.Excellent Performanceyou can trust0.01% load and line regulation keep the output steady when power line and load change occur. The power supplies specify both normal mode voltage noise and common mode current noise. The low normal mode noise specification assures clean power for precision circuitry applications and the low common mode current provides isolation from power line current injection. Remote InterfaceIf you have an IEEE-488 card or RS-232 in a PC, these power supplies will work for you. Every model comes equipped with both GPIB and RS-232 as standard.All programming is done in easy to use SCPI (Standard Commands for Programmable Instruments).The manual describes the process for first time programmers.Front Panel OperationA knob and self-guiding keypads allow you to set the output at the resolution you need for the most exacting adjustments quickly and easily. Up to three complete power supply setups can be stored and recalled from the internal non-volatile memory. The output on/off button sets the output to zero. HP E3631A triple-output power supplyThis famous 80-watt triple output supply offers three independent0to +6V/5A and 0 to +/-25V/1A outputs. The 6V output is electrically isolated from the +/-25V supply to minimize any interference between circuits under tests.The+/-25V outputs can be set to track each other.HP E3632A/33A/34Asingle-output dual rangepower suppliesThese single output power supplies give you the flexibility to select from dual output ranges. Output load is protected against overvoltage and overcurrent, which are easily monitored and adjusted from the front panel and remote interface. Remote sense is available to eliminate the errors due to voltage drops on the load leads. E3633A/34A offers front and rear output terminals.HP E363xA - Series Programmable Power SuppliesTechnical Data October 1998• Single and triple outputs• 80W to 200W output power• Low noise and excellent regulation • High accuracy and resolution• Front and rear output terminals (E3633/34A only)• GPIB and RS-232 standardHP E3631A/32A/33A/34A Programmable DC Power Supply SpecificationsModel Number E3631A E3632A E3633A E3634A123DC Output0 to +6V, 0 to +25V,0 to -25V,0 to +15V/7A or0 to +8V/20A or0 to +25V/7A o Rating0 to 5A0 to 1A0 to 1A0 to +30V/4A0 to +20V/10A0 to +50V/4A (0°C to 40°C)Load Regulation 1< 0.01% + 2mV+(% of output + offset)< 0.01% + 250uALine Regulation< 0.01% + 2mV+(% of output + offset)< 0.01% + 250uARipple and Noise(20Hz to 20MHz)Normal Mode Voltage< 350uVrms / 2mVpp<350uVrms/ 3mVpp<500uVrms/ 3mVpp Normal Mode Current<2mArms<500uArms< 2mArmsCommon Mode Current< 1.5uArmsAccuracy 12Mos(25 °C + 5 °C), ±(% output + offset)ProgrammingVoltage0.1% + 5mV0.05% + 20mV0.05% + 10mVCurrent0.2% + 10mA0.15% + 4mA0.2% + 10mAReadbackVoltage 0.1% + 5mV0.05% + 10mV0.05% + 5mVCurrent0.2% + 10mV0.15% + 4mA0.15% + 5mAResolutionProgram0.5mV / 0.5mA 1.5mV / 0.1mA1mV/ 0.5mA1mV/1mA3mV/0.5mA Readback0.5mV / 0.5mA 1.5mV / 0.1mA0.5mV / 0.1mA0.5mV / 1mA 1.5mV / 0.5mA Meter1mV/1mA10mV / 1mA1mV / 1mA1mV / 1mA (<10A), 10mA (≥10A) Transient Response Less than 50usec for output to recover to within 15mV following a change in output current from full load to half load or vice versa. Command Processing< 100msecTime2OVP/OCP N / AAccuracy,0.5% + 0.5V / 0.5% + 0.5A±(% output + offset)Activation time<1.5msec, OVP>3V / <10msec, OVP< 3V and OCP Temperature Coefficient per °C±(% output + offset)Voltage0.01% + 2mV0.01% + 3mVCurrent0.02% + 3mA0.02% + 0.5mA0.02% + 3mAStability, constant output & temperature ±(% of output + offset), 8 hrsVoltage 0.03%+1mV0.02%+2mV0.02%+1mACurrent0.1%+3mA0.05%+1mA0.1% + 1mARemote Sense Max voltage in each load lead1V0.7VVoltage Programming Speed, to within 1% of total excursionUp Full Load11msec50msec50msec95msec80msec No Load10msec45msec20msec45msec100msec Down Full Load13msec20msec45msec30msec30msec No Load200msec400msec400msec450msec450msecAC Input100Vac ±10% (Opt 0E9) / 115Vac + 10% (Std) / 230Vac ±10% (Opt 0E3)(47Hz - 63Hz)Dimension/Net Weight213mmW x 133mmH x 348mmD213mmW x 133mmH x 348mmD(8.4 x 5.2 x 13.7 in) / 8.2kg (18 lbs)(8.4 x 5.2 x 13.7 in) / 9.5kg (21 lbs)Warranty 3 yearsProduct Regulation Designed to comply with UL 1244, IEC1010-1; Certified with CSA 22.2 no. 1010.1, meets requirements for CE regulationNote: 1. With sense terminal connected for E3632A/33A/34A.2. Maximum time for output to change after receipt of commands.H Ordering InformationHP E3630-Series Power SuppliesHP E3631A80-Watt Triple Power SupplyHP E3632A120-Watt Single Power SupplyPower OptionsOpt. 0E3230 Vac +/- 10%Opt. 0E9100 Vac +/- 10%Other OptionsOpt. W50Additional 2-year warranty (5-year total)Opt. 910Extra manual setsRack Mount KitsHP E3631A/32A/33A/34ATo rack mount a single instrument (HP P/N 5063-9243)To rack mount two instruments side by sideLock-link Kit (HP P/N 5061-9694)Flange Kit (HP P/N 5063-9214)To rack mount one or two instruments in a sliding support shelfShelf (HP P/N 5063-9256)Slide Kit (HP P/N 1494-0015)Within Budget.Without Compromise.Data subject to change.© Hewlett-Packard Company 1998Printed in the U.S.A. 2/995968-2617EN。
3ds max 6 标准教程01

1.1 用户界面当启动3ds max 6后,显示的主界面见图1.1。
图1.1初看起来,大量的菜单和图标着实令人不知从何处着手。
但随着我们对界面各个部分的深入讨论,将可以通过实际操作逐步熟悉各个命令。
1.1.1 界面的布局用户界面的每个部分都有固定的名称,在所有标准的3ds max 6教材和参考资料中,这些名称都是统一的。
视口(Viewports)3ds max用户界面的最大区域被分割成四个相等的矩形区域,称之为视口(Viewports)或者视图(Views)。
视口是主要工作区域,每个视口的左上角都有一个标签,启动3ds max 后默认的四个视口的标签是Top(顶视口)、Front(前视口)、Left(左视口)和Perspective (透视视口)。
每个视口都包含垂直和水平线,这些线组成了3ds max的主栅格。
主栅格包含黑色垂直线和黑色水平线,这两条线在三维空间的中心相交,交点的坐标是X=0、Y=0和Z=0。
其余栅格都为灰色显示。
Top视口、Front视口和Left视口显示的场景没有透视效果,这就意味着在这些视口中同一方向的栅格线总是平行的,不能相交,参见图1.1。
Perspective视口类似于人的眼睛和摄像机观察时看到的效果,视口中的栅格线是可以相交的。
菜单栏(Menu Bar)用户界面的最上面是菜单栏(参见图1.1)。
菜单栏包含许多常见的菜单(例如File/Open和File/ Save等)和3ds max独有的一些菜单(例如Rendering / Ram Player和Customize/ Preferences等)。
主工具栏(Main Toolbar)菜单栏下面是主工具栏(参见图1.1)。
主工具栏中包含一些使用频率较高的工具,例如变换对象的工具、选择对象的工具和渲染工具等。
命令面板(Command Panels)用户界面的右边是命令面板(见图1.2左图),它包含创建对象、处理几何体和创建动画需要的所有命令。
久保田发动机欧三系列操作手册

CONTENTSSAFE OPERATION (1)SERVICING OF THE ENGINE (1)NAMES OF PARTS (2)PRE-OPERATION CHECK (3)BREAK-IN (3)DAILY CHECK (3)OPERATING THE ENGINE (4)STARTING THE ENGINE(NORMAL) (4)COLD WEATHER STARTING (5)STOPPING THE ENGINE (6)CHECKS DURING OPERATION (6)Radiator Cooling water(Coolant) (6)Oil pressure lamp (6)Fuel (7)Color of exhaust (7)Immediately stop the engine if; (7)REVERSED ENGINE REVOLUTION AND REMEDIES (7)How to tell when the engine starts running backwards (7)Remedies (7)MAINTENANCE (8)SERVICE INTERVALS (9)PERIODIC SERVICE (12)FUEL (12)Fuel level check and refueling (12)Air bleeding the fuel system (13)Checking the fuel pipes (14)Cleaning the fuel filter pot (14)Fuel filter cartridge replacement (15)ENGINE OIL (15)Checking oil level and adding engine oil (15)Changing engine oil (16)Replacing the oil filter cartridge (17)RADIATOR (17)Checking coolant level, adding coolant (18)Changing coolant (19)Remedies for quick decrease of coolant (19)Checking radiator hoses and clamp bands (19)Precaution at overheating (19)Cleaning radiator core(outside) (19)Anti-freeze (20)Radiator cement (20)AIR CLEANER (21)Evacuator valve (21)For the air cleaner with a dust cup (optional) (21)Dust indicator (optional) (22)BATTERY (22)Battery charging (22)CONTENTSDirection for long term storage (23)ELECTRIC WIRING (23)FAN BELT (24)Adjusting Fan Belt Tension (24)CARRIAGE AND STORAGE (25)CARRIAGE (25)STORAGE (25)TROUBLESHOOTING (26)SPECIFICATIONS (28)WIRING DIAGRAMS (31)1SAFE OPERATIONE N G L I SSAFE OPERATIONCareful operation is your best assurance against an accident. Read and understand this section carefully before operating the engine. All operators, no matter how much experience they may have, should read this and other related manuals before operating the engine or any equipment attached to it. It is the owner's obligation to provide all operators with this information and instruct them on safe operation.Be sure to observe the following for safe operation.1.OBSERVE SAFETY INSTRUCTIONSA Read and understand carefully this "OPERATOR'S MANUAL" and "LABELS ON THE ENGINE" before attempting to start and operate the engine.A Learn how to operate and work safely. Know your equipment and its limitations. Always keep the engine in good condition.A Before allowing other people to use your engine, explainhow to operate and have them read this manual beforeoperation.A DO NOT modify the engine. UNAUTHORIZEDMODIFICATIONS to the engine may impair the functionand/or safety and affect engine life. If the engine does notperform properly, consult your local Kubota EngineDistributor first.2.WEAR SAFE CLOTHING AND PERSONAL PROTECTIVE EQUIPMENT (PPE)A DO NOT wear loose, torn or bulky clothing around themachine that may catch on working controls andprojections or into fans, pulleys and other moving partscausing personal injury.A Use additional safety items-PPE, e.g. hard hat, safetyprotection, safety goggles, gloves, etc., as appropriate orrequired.A DO NOT operate the machine or any equipment attachedto it while under the influence of alcohol, medication, orother drugs, or while fatigued.A DO NOT wear radio or music headphones whileoperating the engine.SAFE OPERATION23.CHECK BEFORE STARTING & OPERATING THE ENGINEA Be sure to inspect the engine before operation. Do notoperate the engine if there is something wrong with it.Repair it immediately.A Ensure all guards and shields are in place beforeoperating the engine. Replace any that are damaged ormissing.A Check to see that you and others are a safe distancefrom the engine before starting.A Always keep the engine at least 3 feet (1 meter) awayfrom buildings and other facilities.A DO NOT allow children or livestock to approach themachine while the engine is running.A DO NOT start the engine by shorting across starterterminals. The machine may start in gear and move. Donot bypass or defeat any safety devices.4.KEEP THE ENGINE AND SURROUNDINGS CLEANA Be sure to stop the engine before cleaning.A Keep the engine clean and free of accumulated dirt,grease and trash to avoid a fire. Store flammable fluids inproper containers and cabinets away from sparks andheat.A Check for and repair leaks immediately.A DO NOT stop the engine without idling; Allow the engineto cool down, first. Keep the engine idling for about 5minutes before stopping unless there is a safety problemthat requires immediate shut down.5.SAFE HANDLING OF FUEL AND LUBRICANTS -KEEP AWAY FROM FIREA Always stop the engine before refueling and/orlubricating.A DO NOT smoke or allow flames or sparks in your workarea. Fuel is extremely flammable and explosive undercertain conditions.A Refuel at a well ventilated and open place. When fueland/or lubricants are spilled, refuel after letting theengine cool down.A DO NOT mix gasoline or alcohol with diesel fuel. Themixture can cause a fire or severe engine damage.A Do not use unapproved containers e.g. buckets, bottles,jars. Use approved fuel storage containers anddispensers.3SAFE OPERATION6.EXHAUST GASES & FIRE PREVENTIONA Engine exhaust fumes can be very harmful if allowed toaccumulate. Be sure to run the engine in a well ventilatedlocation and where there are no people or livestock nearthe engine.A The exhaust gas from the muffler is very hot. To preventa fire, do not expose dry grass, mowed grass, oil or anyother combustible materials to exhaust gas. Keep theengine and muffler clean at all times.A To avoid a fire, be alert for leaks of flammablesubstances from hoses and lines. Be sure to check forleaks from hoses or pipes, such as fuel and hydraulicfluid by following the maintenance check list.A To avoid a fire, do not short across power cables andwires. Check to see that all power cables and wirings arein good condition. Keep all electrical connections clean.Bare wire or frayed insulation can cause a dangerouselectrical shock and personal injury.7.ESCAPING FLUIDA Relieve all pressure in the air, the oil and the coolingsystems before disconnecting any lines, fittings orrelated items.A Be cautious of possible pressure relief whendisconnecting any device from a pressurized system thatutilizes pressure. DO NOT check for pressure leaks withyour hand. High pressure oil or fuel can cause personalinjury.A Escaping fluid under pressure has sufficient force topenetrate skin causing serious personal injury.A Fluid escaping from pinholes may be invisible. Use apiece of cardboard or wood to search for suspectedleaks: do not use hands and body. Use safety goggles orother eye protection when checking for leaks.A If injured by escaping fluid, see a medical doctorimmediately. This fluid can produce gangrene or severeallergic reaction.4SAFE OPERATION8.CAUTIONS AGAINST BURNS & BATTERY EXPLOSIONA To avoid burns, be cautious of hot components, e.g.muffler, muffler cover, radiator, hoses, engine body,coolants, engine oil, etc. during operation and after theengine has been shut off.A DO NOT remove the radiator cap while the engine isrunning or immediately after stopping. Otherwise hotwater will spout out from the radiator. Wait until theradiator is completely cool to the touch before removingthe cap. Wear safety goggles.A Be sure to close the coolant drain valve, secure thepressure cap, and fasten the pipe band before operating.If these parts are taken off, or loosened, it will result inserious personal injury.A The battery presents an explosive hazard. When thebattery is being charged, hydrogen and oxygen gasesare extremely explosive.A DO NOT use or charge the battery if its fluid level is belowthe LOWER mark.Otherwise, the component parts may deteriorate earlierthan expected, which may shorten the service life orcause an explosion. Immediately, add distilled water untilthe fluid level is between the UPPER and LOWER marks.A Keep sparks and open flames away from the battery,especially during charging. DO NOT strike a match nearthe battery.A DO NOT check the battery charge by placing a metalobject across the terminals. Use a voltmeter orhydrometer.A DO NOT charge a frozen battery. There is a risk ofexplosion. When frozen, warm the battery up to at least16C (61F).9.KEEP HANDS AND BODY AWAY FROM ROTATING PARTSA Be sure to stop the engine before checking or adjustingthe belt tension and cooling fan.A Keep your hands and body away from rotating parts,such as the cooling fan, V-belt, fan drive V-belt, pulley orflywheel. Contact with rotating parts can cause severepersonal injury.A DO NOT run the engine without safety guards. Installsafety guards securely before operation.5SAFE OPERATION10.ANTI-FREEZE & DISPOSAL OF FLUIDSA Anti-freeze contains poison. Wear rubber gloves to avoidpersonal injury. In case of contact with skin, wash it offimmediately.A DO NOT mix different types of Anti-freeze. The mixturecan produce a chemical reaction causing harmfulsubstances. Use approved or genuine KUBOTA Anti-freeze.A Be mindful of the environment and the ecology. Beforedraining any fluids, determine the correct way to disposeof them. Observe the relevant environmental protectionregulations when disposing of oil, fuel, coolant, brakefluid, filters and batteries.A When draining fluids from the engine, place a suitablecontainer underneath the engine body.A DO NOT pour waste onto the ground, down a drain, orinto any water source. Dispose of waste fluids accordingto environmental regulations.SAFE OPERATION611.CONDUCTING SAFETY CHECKS & MAINTENANCEA When inspecting the engine or servicing, place theengine on a large flat surface. DO NOT work on anythingthat is supported ONLY by lift jacks or a hoist. Always useblocks or the correct stands to support the engine beforeservicing.A Disconnect the battery from the engine beforeconducting service. Put a "DO NOT OPERATE!" tag onthe key switch to avoid accidental starting.A To avoid sparks from an accidental short circuit alwaysdisconnect the battery's ground cable (-) first andreconnect it last.A Be sure to stop the engine and remove the key whenconducting daily and periodic maintenance, service andcleaning.A Check or conduct maintenance after the engine, coolant,muffler, or muffler cover have cooled off completely.A Always use the appropriate tools and fixtures. Verify thatthey are in good condition before performing any servicework. Make sure you understand how to use them beforeservice.A Use ONLY correct engine barring techniques formanually rotating the engine. DO NOT attempt to rotatethe engine by pulling or prying on the cooling fan and V-belt. This practice can cause serious personal injury orpremature damage to the cooling fan and belt.A Replace fuel pipes and lubricant pipes with their hoseclamps every 2 years or earlier whether they aredamaged or not. They are made of rubber and agegradually.A When servicing is performed together by two or morepersons, take care to perform all work safely.A Keep a first aid kit and fire extinguisher handy at all times.7SAFE OPERATION 1.Keep warning and caution labels clean and free from obstructing material.2.Clean warning and caution labels with soap and water, dry with a soft cloth.3.Replace damaged or missing warning and caution labels with new labels from your local KUBOTA dealer.4.If a component with warning and caution label(s) affixed is replaced with a new part, make sure the new label(s) is (are) attached in the same location(s) as the replaced component.5.Mount new warning and caution labels by applying to a clean dry surface and pressing any bubbles to the outside edge.12.WARNING AND CAUTION LABELSPart No.19077-8724-1 or 16667-8724-1(55mm in diameter) (37mm in diameter)Part No.TA040-4957-1Do not get your hands closeto engine fan and fan belt.13.CARE OF WARNING AND CAUTION LABELS8SAFE OPERATIONSERVICING OF THE ENGINE1 SERVICING OF THE ENGINEYour dealer is interested in your new engine and has the Array desire to help you get the most value from it. After readingthis manual thoroughly, you will find that you can do someof the regular maintenance yourself.However, when in need of parts or major service, be sureto see your KUBOTA dealer.For service, contact the KUBOTA Dealership from whichyou purchased your engine or your local KUBOTA dealer.When in need of parts, be prepared to give your dealerthe engine serial number.Locate the serial number now and record them in thespace provided.Type Serial No.(1) Engine serial numberEngineDate of PurchaseName of Dealer(To be filled in by purchaser)2NAMES OF PARTS NAMES OF PARTS(1) Intake manifold(2) Speed control lever(3) Engine stop lever(4) Injection pump(5) Fuel feed pump(6) Cooling fan(7) Fan drive pulley(8) Oil filter cartridge(9) Water drain cock (10) Oil filler plug(11) Exhaust manifold(12) Alternator(13) Starter(14) Oil level gauge(15) Oil pressure switch(16) Flywheel(17) Oil drain plug(18) Oil pan(19) Engine hook3PRE-OPERATION CHECK PRE-OPERATION CHECKBREAK-INDuring the engine break-in period, observe the following by all means:1.Change engine oil and oil filter cartridge after the first 50 hours of operation. (See "ENGINE OIL" in "PERIODICSERVICE" section.)2.When ambient temperature is low, operate the machine after the engine has been completely warmed up. DAILY CHECKTo prevent trouble from occurring, it is important to know the conditions of the engine well. Check it before starting.To avoid personal injury:A Be sure to install shields and safeguards attached to the engine when operating.A Stop the engine at a flat and wide space when checking.A Keep dust or fuel away from the battery, wiring, muffler and engine to prevent a fire.Check and clear them before operating everyday. Pay attention to the heat of the exhaust pipe or exhaust gas so that it can not ignite trash.Item Ref. page1. Parts which had trouble in previous operation-2. By walking around the machine(1) Oil or water leaks15 to 20(2) Engine oil level and contamination15,16(3) Amount of fuel12(4) Amount of coolant18 to 20(5) Dust in air cleaner dust cup21(6) Damaged parts and loosened bolts and nuts-3. By inserting the key into the starter switch (1) Proper functions of meters and pilot lamps; no stains onthese parts-(2) Proper function of glow lamp timer-4. By starting the engine(1) Color of exhaust fumes7(2) Unusual engine noise7(3) Engine start-up condition5(4) Slow-down and acceleration behavior74OPERATING THE ENGINE OPERATING THE ENGINESTARTING THE ENGINE(NORMAL) To avoid personal injury:A Do not allow children to approach themachine while the engine is running.A Be sure to install the machine onwhich the engine is installed, on a flatplace.A Do not run the engine on gradients.A Do not run the engine in an enclosedarea. Exhaust gas can cause airpollution and exhaust gas poisoning.A Keep your hands away from rotatingparts (such as fan, pulley, belt,flywheel etc.) during operation.A Do not operate the machine whileunder the influence of alcohol ordrugs.A Do not wear loose, torn or bulkyclothing around the machine. It maycatch on moving parts or controls,leading to the risk of accident. Useadditional safety items, e.g. hard hat,safety boots or shoes, eye andhearing protection, gloves, etc., asappropriate or required.A Do not wear radio or musicheadphones while operating engine.A Check to see if it is safe around theengine before starting.A Reinstall safeguards and shieldssecurely and clear all maintenancetools when starting the engine aftermaintenance.A Do not use ether or any starting fluid for starting theengine, or a severe damage will occur.A When starting the engine after a long storage (of morethan 3 months), first set the stop lever to the "STOP"position and then activate the starter for about 10 seconds to allow oil to reach every engine part.1.Set the fuel lever to the "ON" position.(1) Fuel lever(A) "ON"(B) "OFF"2.Place the engine stop lever to the"START" position.3.Place the speed control lever at morethan half "OPERATION".(1) Engine stop lever(2) Speed Control lever(A) "STOP"(B) "START"(C) "IDLING"(D) "OPERATION"5OPERATING THE ENGINE (with lamp timer in use)A The glow lamp goes out in about 5 seconds when thelamp timer is up. Refer to this for pre-heating.Even with the glow lamp off, the glow plug can be pre-heated by turning the starter switch to the "PREHEATING" position.A If the oil pressure lamp should be still on, immediatelystop the engine and check; - if there is enough engine oil. - if the engine oil has dirt in it.- if the wiring is faulty.A If the glow lamp should redden too quickly or tooslowly, immediately ask your KUBOTA dealer to check and repair it.A If the engine does not catch or start at 10 secondsafter the starter switch is set at "STARTING" position,wait for another 30 seconds and then begin the engine starting sequence again. Do not allow the starter motor to run continuously for more than 20 seconds.COLD WEATHER STARTINGIf the ambient temperature is below -5C(23F)* and the engine is very cold, start it in the following manner:Take steps (1) through (4) above.A Shown below are the standard preheating times forvarious temperatures. This operation, however, is not required, when the engine is warmed up.A Do not allow the starter motor to run continuously formore than 20 seconds.A Be sure to warm up the engine, not only in winter, butalso in warmer seasons. An insufficiently warmed-up engine can shorten its service life.A When there is fear of temperature dropping below-15C (5F) detach the battery from the machine, and keep it indoors in a safe area, to be reinstalled just before the next operation.4.Insert the key into the key switch andturn it to the "OPERATION" position.(A) "OFF" SWITCHED OFF (B) "ON" OPERATION (C) "GL" PREHEATING (D) "ST" STARTING(A) "GL" PREHEATING (B) "OFF" SWITCHED OFF (C) "ON" OPERATION (D) "ST" STARTING5.Turn the starter switch to the"PREHEATING" position to allow the glow lamp to redden.6.Turn the key to the "STARTING"position and the engine should start. Release the key immediately when the engine starts.7.Check to see that the oil pressure lampand charge lamp are off. If the lamps are still on, immediately stop the engine, and determine the cause.(See "CHECKS DURING OPERATION" in "OPERATING THE ENGINE" section.)8.Warm up the engine at medium speedwithout load.5.Turn the key to the "PREHEATING"position and keep it there for a certain period mentioned below.Ambient temperature Preheating time Above 10C (50F)NO NEED10C (50F) to -5C (23F)Approx. 5 seconds *Below -5C (23F)Approx. 10 secondsLimit of continuous use20 seconds6.Turn the key to the "STARTING"position and the engine should start.(If the engine fails to start after 10 seconds, turn off the key for 5 to 30 seconds. Then repeat steps (5) and (6).)OPERATING THE ENGINE6STOPPING THE ENGINEA If equipped with a turbo-charger, allow the engine toidle for 5 minutes before shutting it off after a full load operation.Failure to do so may lead to turbo-charger trouble.CHECKS DURING OPERATIONWhile running, make the following checks to see that all parts are working correctly.B Radiator Cooling water(Coolant)To avoid personal injury:A Do not remove radiator cap until coolant temperature is well below its boiling point. Then loosen cap slightly to the stop position, to relieve any pressure, before removing cap completely.When the engine overheats and hot coolant overflows through the radiator and hoses, stop the engine immediately and make the following checks to determine the cause of trouble:Check item1.Check to see if there is any coolant leak;2.Check to see if there is any obstacle around thecooling air inlet or outlet;3.Check to see if there is any dirt or dust betweenradiator fins and tube;4.Check to see if the fan belt is too loose;5.Check to see if radiator water pipe is clogged; and6.Check to see if anti-freeze is mixed to a 50/50% mix ofwater and anti-freeze.B Oil pressure lampThe lamp lights up to warn the operator that the engine oil pressure has dropped below the prescribed level. If this should happen during operation or should not go off even after the engine is accelerated more than 1000rpm,immediately stop the engine and check the following:1.Engine oil level (See "ENGINE OIL" in "PERIODICSERVICE" section.)2.Lubricant system (See "ENGINE OIL" in "PERIODICSERVICE" section.)1.Return the speed control lever to lowidle, and run the engine under idling conditions.2.Set the engine stop lever to the "STOP"position.3.With the starter switch placed to the"SWITCHED OFF" position, remove the key. (Be sure to return the engine stop lever to the "START" position to be ready for the next start.)(1) Engine stop lever(2) Speed control lever(A) "STOP" (B) "START" (C) "IDLING"(D) "OPERATION"7 OPERATING THE ENGINEB FuelTo avoid personal injury:A Fluid escaping from pinholes may beinvisible. Do not use hands to searchfor suspected leaks; Use a piece ofcardboard or wood, instead. Ifinjured by escaping fluid, see amedical doctor at once. This fluid canproduce gangrene or a severeallergic reaction.A Check any leaks from fuel pipes orfuel injection pipes. Use eyeprotection when checking for leaks. Be careful not to empty the fuel tank. Otherwise air may enter the fuel system, requiring fuel system bleeding. (See "FUEL" in "PERIODIC SERVICE" section.)B Color of exhaustWhile the engine is run within the rated output range:A The color of exhaust remains colorless.A If the output slightly exceeds the rated level, exhaustmay become a little colored with the output level kept constant.A If the engine is run continuously with dark exhaustemission, it may lead to trouble with the engine.B Immediately stop the engine if;A The engine suddenly slows down or accelerates.A Unusual noises are suddenly heard.A Exhaust fumes suddenly become very dark.A The oil pressure lamp or the water temperature alarmlamp lights up.REVERSED ENGINE REVOLUTION AND REMEDIESTo avoid personal injury:A Reversed engine operation can makethe machine reverse and run itbackwards. It may lead to serioustrouble.A Reversed engine operation maymake exhaust gas gush out into theintake side and ignite the air cleaner;It could catch fire.Reversed engine revolution must be stopped immediately since engine oil circulation is cut quickly, leading to serious trouble.B How to tell when the engine starts running backwards1.Lubricating oil pressure drops sharply. Oil pressurewarning light, if used, will light.2.Since the intake and exhaust sides are reversed, thesound of the engine changes, and exhaust gas will come out of the air cleaner.3. A louder knocking sound will be heard when theengine starts running backwards.B Remedies1.Immediately set the engine stop lever to the "STOP"position to stop the engine.2.After stopping the engine, check the air cleaner, intakerubber tube and other parts, and then replace parts as needed.8MAINTENANCE MAINTENANCETo avoid personal injury:A Be sure to conduct daily checks,periodic maintenance, refueling orcleaning on a level surface with theengine shut off and remove the key.A Before allowing other people to useyour engine, explain how to operate,and have them read this manualbefore operation.A When cleaning any parts, do not usegasoline but use regular cleanser.A Always use proper tools, that are ingood condition. Make sure youunderstand how to use them, beforeperforming any service work.A When installing, be sure to tighten allbolts lest they should be loose.Tighten the bolts by the specifiedtorque.A Do not put any tools on the battery,or battery terminals may short out.Severe burns or fire could result.Detach the battery from the enginebefore maintenance.A Do not touch muffler or exhaustpipes while they are hot; Severeburns could result.9MAINTENANCE SERVICE INTERVALSObserve the following for service and maintenance.The lubricating oil change intervals listed in the table below are for Class CF lubricating oil of API classification with a low-sulfur fuel in use. If the CF-4, CG-4, CH-4 or CI-4 lubricating oil is used with a high-sulfur fuel, change the lubricating oil at shorter intervals than recommended in the table below depending on the operating condition. (approximately half)IntervalItemRef. page Every 50 hours Check of fuel pipes and clamp bands14@See NOTEChange of engine oil (depending on the oil pan)15 to 17 Every 100 hours Cleaning of air cleaner element 21*1@Cleaning of fuel filter14Check of battery electrolyte level 22,23Check of fan belt tightness 24Draining water separator-Every 200 hoursCheck of radiator hoses and clamp bands19Replacement of oil filter cartridge (depending on the oil pan)17Check of intake air line-@Every 400 hoursReplacement of fuel filter cartridge 15@Cleaning of water separator -Every 500 hours Removal of sediment in fuel tank -Cleaning of water jacket (radiator interior)18 to 20Replacement of fan belt24Every one or two months Recharging of battery22,23Every year Replacement of air cleaner element 21*2@Every 800 hours Check of valve clearance26Every 1500 hours Check of fuel injection nozzle injection pressure -*3@Every 3000 hoursCheck of turbo charger -*3@Check of injection pump-*3@Every two years Change of radiator coolant (L.L.C.)18 to 20Replacement of battery22,23Replacement of radiator hoses and clamp bands 19Replacement of fuel pipes and clamp bands 14*3@Replacement of intake air line-*4@10MAINTENANCEAThe jobs indicated by must be done after the first 50 hours of operation.*1 Air cleaner should be cleaned more often in dusty conditions than in normal conditions. *2 After 6 times of cleaning.*3 Consult your local KUBOTA Dealer for this service. *4 Replace only if necessary.A When the battery is used for less than 100 hours in a year, check its electrolyte yearly. (for refillable battery's only)AThe items listed above (@ marked) are registered as emission related critical parts by KUBOTA in the U.S. EPAnonroad emission regulation. As the engine owner, you are responsible for the performance of the required maintenance on the engine according to the above instruction.Please see the Warranty Statement in detail.AChanging interval of engine oil* 90 mm (3.54 in.) oil pan depth is optional.**Standard replacement intervalAAmerican Petroleum Institute (API) classification: above CF AAmbient temperature: below 35C (95F)Lubricating oilWith strict emission control regulations now in effect, the CF-4 and CG-4 engine oils have been developed for use with low sulfur fuels, for On-Highway vehicle engines. When a Non-Road engine runs on high sulfur fuel, it is advisable to use a "CF or better" classification engine oil with a high Total Base Number (a minimum TBN of 10 is recommended).A Lubricating oil recommended when a low-sulfur or high-sulfur fuel is employed. : Recommendable X : Not recommendable* TBN: Total Base Number **FuelA Diesel Fuel Specification Type and Sulfur Content % (ppm) used, must be compliant with all applicable emissionregulations for the area in which the engine is operated.A Use of diesel fuel with sulfur content less than 0.10 % (1000 ppm) is strongly recommended.A If high-sulfur fuel (sulfur content 0.50 % (5000 ppm) to 1.0 % (10000 ppm)) is used as a diesel fuel, change the engineoil and oil filter at shorter intervals. (approximately half).A DO NOT USE Fuels that have sulfur content greater than 1.0 % (10000 ppm).A Since KUBOTA diesel engines of less than 56 kW (75 hp) utilize EPA Tier 4 and Interim Tier 4 standards, the use oflow sulfur fuel or ultra low sulfur fuel is mandatory for these engines, when operated in US EPA regulated areas.Therefore, please use No.2-D S500 or S15 diesel fuel as an alternative to No.2-D, and use No.1-D S500 or S15 diesel fuel as an alternative to No.1-D for ambient temperatures below -10 (14 ).1) No.1-D or No.2-D, S500 : Low Sulfur Diesel (LSD) less than 500 ppm or 0.05 wt.% No.1-D or No.2-D, S15 : Ultra Low Sulfur Diesel (ULSD) 15 ppm or 0.0015 wt.%A CJ-4 classification oil is intended for use in engines equipped with DPF (Diesel Particulate Filter) and is NotRecommended for use in Kubota E3 specification engines.Models*Oil pan depth124 mm (4.88 in.)*90 mm (3.54 in.)D1503-M-E3 D1703-M-E3 D1803-M-E3 V2003-M-E3 V2203-M-E3 V2403-M-E3 V2403-M-T-E3200 Hrs 150 HrsInitial 50 HrsLubricating oil classification**FuelRemarks Low-sulfur High-sulfurCF *TBN10CF-4X CG-4X CH-4X CI-4X。
A3 EVO 6-axis 陀螺仪说明书

User ManualV1.0 Oct, 2021 RevisionThank you for purchasing our products. A3 EVO is a high-performance and functional 6-axis gyro system designed for R/C airplanes. In order for you to make the best use of your gyro and to fly safely, please read this instruction manual carefully and set up the device as described below.IMPORTANT NOTES•Radio controlled (R/C) models are not toys! The propellers rotate at high speed and pose potential risk. They may cause severe injury due to improper usage. It is necessary to observe common safety rules for R/C models and the local law. Read the following instructions thoroughly before the first use of your gyros and setup the gyro carefully according to this manual. We also recommend that you seek the assistance of an experienced pilot before attempting to fly with our gyros for the first time.•After power on, A3 EVO needs to perform an accurate gyroscope calibration, keep the airplane stationary after power on and wait while the LED flashes Blue. The LED will stay solid Blue if a slight movement is detected and the calibration will not start until you stop moving the airplane, however, making the airplane level is NOT required during the initialization.• A stick centering is also required following the gyroscope calibration. Always put all the sticks center (the throttle stick in the lowest position) before power on the airplane, and do not move the sticks until the initialization is done.•Make sure to check the gyro direction of Aileron, Elevator and Rudder channels after installation and always perform a test of them before each flight. An opposite reaction of the gyro could lead to losing control or even crash!•It is recommended to use the supplied 3300uF/16V capacitor to get a more stable and secure working voltage for the gyro. The capacitor can be plugged onto any one of the free connectors of the gyro or receiver.Use one of the supplied double-sided tape to attach the gyro to your airplane firmly. For best performance, the gyro should be mounted as close to the C.G. as possible, and the housing edges must be aligned exactly parallel to all three rotation axes of the plane. The gyro can be attached flat or upright, and even upside down, however, you have to ensure that the shorter side with the setting button always points toward the heading direction of the airplane, otherwise the gyro will not work normally in LEVEL and HOVER modes.①Flat, face up ②Flat, face down③Upright, button up ④Upright Inverted, button downNOTES•Never use the hot-melt glue or nylon ties to fix the gyro onto the airplane!•You need only one piece of the tapes each time, a soft or thick mounting may probably impact the performance of the gyro.•The gyro is a sensing device, please make enough space around it and keep as far away from other electronic devices or wires as possible.NOTES•[MODE] is used for flight mode switching of the gyro, connect it to a 3-way switch channel of the receiver to switch the flight mode in flight.•[SBUS/PPM/G] is used for remote master gain adjusting, connect it to a proportional channel of a volume or slide lever of the transmitter to tune the master gain in flight.•The ESC or throttle servo is connected to the throttle channel of the receiver directly without passing through the gyro.•Pay attention to the polarity of the plugs. The orange signal line must always be on the top and the brown on the bottom.St andard PWM Receiver ConnectionSingle-line Receiver ConnectionA3 EVO supports PPM and Futaba S.Bus serial receivers which allows you to connect the gyro to the receiver with one single wire. When using a specific type of these receivers the appropriate type of receiver channel allocation will be preset in the A3 EVO. Please refer to the table below and check if yourradio transmits the channels in the correct order. If you use a standard PWM receiver with standard wiring layout the channel mapping does not apply. When A3 EVO is operating in single line receiver mode, the [THR Out/AIL] can be used as the throttle output channel for the ESC or the throttle servo if a mini receiver is being used which has no additional output connectors.Please note that the Remote Master Gain is disabled in single line mode as default. Choosea channel number for gain channel in item 11 of the Setup Menu to activate this feature if needed.Table 1: Default Channel Mapping for Single Line ReceiversAIL ELE THRPPM Receiver CH1CH2CH3CH4CH5-Futaba S.Bus (FrSky SBUS or WFLY WBUS)CH1CH2CH3CH4CH5-A3 EVO provides 4 flight modes which can be switched by a 3-position switch of the transmitter during flight. We have provided you with 4 different mode allocation corresponding to the 3 positions of the switch in Item 7 of the Setting Menu, the default setting is MODE 1: NORMAL – LEVEL - HOVER. The color of the LED shows the current flight mode of the gyro while in use.Table 2: Colors of the LED for Flight ModesTable 3: Flight Mode Allocations1. GYRO OFF ModeWhen operating in GYRO OFF mode the gyro will be deactivated completely, and the airplane will be completely under the control of your transmitter as it was before installing the gyro. This mode is usually used for testing purpose only.2. NORMAL ModeThe NORMAL mode, also known as the ‘Rate mode’, is the most basic function of the gyro. It works based on the rotation rate control of each axis of the airplane. When operating in this mode, the gyro will only correct currently occurring rotational movements, a momentary reaction will be applied to the servos when the airplane rotating on corresponding axis, after rotation the servos will move back to their neutral position as soon as the airplane standing still immediately. The NORMAL mode can be used with nearly any size and type of airplanes. It can effectively improve the stability and precision of the airplane and reduce the stall point specially.3. LEVEL ModeThe LEVEL mode is also known as the ‘Auto-Level mode’, ‘Auto-Balance mode’ or ‘Horizon mode’. When operating in this mode, the airplane will be brought to horizontal position automatically when releasing the sticks. Different from the ANGLE mode, there is no maximum angle limitation in this mode and the airplane will be stabilized only when there is no specific control input from aileron and elevator sticks. This mode can be used if the pilot becomes disoriented and would like to save the airplane from crashing.4. HOVER ModeThe HOVER mode, also known as the ‘Auto-Hover mode’, provides the same functionality as the LEVELmode. The only difference is that when you release the sticks, the airplane will be brought to vertical position (nose up) and keeps hovering. This mode is designed to help you to learn hovering maneuver and reduce the probability of crashing.Basic GainThere are 3 trimming potentiometers on the front of the A3 EVO. They are used to adjust the basic gain of the gyro for Aileron, Elevator and Rudder separately. Clockwise for increase, anticlockwise for decrease. Basic gain determines the momentary reaction strength of the gyro. In general, the higher the gain the harder the airplane will stop after rotation and the more stable and precise the airplane will fly. But if the gain is too high the airplane will tend to oscillate at high frequency on the corresponding axis. If too small, the operation and stability will not be so good and the airplane does not stop precisely and overshoots. The gyro will be deactivated completely if you turn the basic gain to 0%.For the first flight test it is recommended to start with a lower basic gain setting (e.g. 30%) and switch the gyro to NORMAL mode. In case the airplane starts to oscillate in flight then reduce the gain of the corresponding axis. If the control feels weak and imprecise and does not hold position when stopping then increase the gain, according to this approach, fine tune the basic gain until you get the best performance.Remote Master GainThe [SBUS/PPM/G] is used to control the remote master gain for parallel PWM receiver. You can make a linear adjustment by using a volume or slide lever on your transmitter or make a 3-level gain selection using a 3-position switch. This function is optional, the master gain will always default to 100% if you do not connect it. Master gain will not affect the basic gain setting on the gyro.Setup MenuTo get into the Setup Menu, press and hold the button for about 2 seconds until the LED starts flashing Blue and Red quickly. The Setup Menu contains 11 setting functions which normally only need to be setup once after installation.Function SelectionIn the Setup Menu, the LED will flash Blue and Red several times every 3 seconds in a loop and the number of times LED flashes shows at which function item you are currently. For example, one Blue and Red flashing means the first setting “Aileron Gyro Direction”, after waiting about 3 seconds, a twice Blue and Red flashing means the second setting “Elevator Gyro Direction”, and so on.Option SwitchingWhen you reach the function that you wish to operate in, short press the button to get into it. After entering in, the current selected option is indicated by the color of the LED. Each short press of the button advances the option to the next value. After you finish making your selection, just wait for 5 seconds until the LED starts blink quickly which indicates that the modified is saved and then you will be brought back to the Setup Menu level automatically. If you do not want to change anything, just wait for timeout without any operation.Exit of MenuTo exit the menu just keep the button pressed for 2 seconds again until the LED starts flashing Blue and Red quickly.Blue&Red Flash ing 1-3. Gyro DirectionThe top 3 items of the Setting Menu is used to reverse the gyrodirection for Aileron , Elevator and Rudder . The color of LEDshows you the gyro direction currently selected, the default setting is Normal (Solid Blue). Each short press of the buttonwill switch between Normal and Reversed . After you finishmaking your selection, just wait for 5 seconds until LED starts blink quickly which indicates that the modified is saved and then you will be brought back to the Setup Menu level automatically.VERY IMPORTANT!It is extremely important to make sure that the gyro reacts in the correct direction for each channel before flight. An opposite reaction of the gyro could lead to losing control or even crash!Check the gyro direction for Aileron Quickly move the right wing downward around the roll axis, the right aileron surface should flap down and the left flap up as shown below.Check the gyro direction for Elevator Quickly move the nose of the airplane downward around the pitch axis, the elevator surface should flap up as shown below.Check the gyro direction for Rudder Quickly move the nose of the airplane to the left around the yaw axis, the rudder surface should flap right as shown below.4. Wing TypeThe 4th item of the Setup Menu is used to setup the wingtype. A3 EVO supports standard fixed-wing, flying-wing(delta-wing) and V-tail. The color of LED shows you the wing type currently selected. The default setting is Standard(Solid Blue), each short press of the button will switch to thenext type. After you finish making your selection, just wait for 5 seconds until LED starts blink quickly which indicatesthat the modified is saved and then you will be brought back to the Setup Menu level automatically.NOTES• Make sure that there are no mixing functions active on your transmitter. Have a look at the radio’s servo monitor and verify that each stick controls only one output channel. • If two aileron servos are being used, please connect a Y-extended lead to [OUT1]. •Most flying-wings have no rudder, in this case, [RUD] is unnecessary to connect.Servo Connection Illustration5. Receiver TypeThe 5th item of the Setup Menu is used to choose the receiver type. The color of LED shows you the receiver type currently selected. The default setting is PWM Receiver (Solid Blue), each short press of the button will switch to the next value. After you finish making your selection, just wait for 5 seconds until the LED starts blink quickly whichindicates that the modified is saved and then you will be brought back to the Setup Menu level automatically.Restart the gyro to make the new receiver type setting take effect!6. Mount Orient ationThe 6th item of the Setup Menu is used to setup themounting orientation of the gyro. The color of LED showsyou the orientation currently selected. The default setting isFlat, face up (Solid Blue), each short press of the button willswitch to the next value. After you finish making yourselection, just wait for 5 seconds until LED starts blinkquickly which indicates that the modified is saved and thenyou will be brought back to the Setup Menu levelautomatically.The setting here should be the same as the mounting orientation of your unit installed in the airplane, otherwise the gyro will not work normally.7. Flight Mode AllocationThe 7th item of the Setup Menu is used to select the flightmode allocation definition for the 3-position switch. Thecolor of LED shows you the orientation currently selected.The default setting is Mode-1 (Solid Blue), each short pressof the button will switch to the next value. After you finishmaking your selection, just wait for 5 seconds until LEDstarts blink quickly which indicates that the modified issaved and then you will be brought back to the Setup Menulevel automatically.See “Table 3: Flight Mode Allocations” on page 5 for description of each mode.8. Servo FrequencyThe 8th Item of the Setup Menu is used to select the working frequency of the servos. The color of LED shows you the frequency currently selected. The default setting is 50Hz (Solid Blue), each short press of the button will switch to the next value. After you finish making your selection, just wait for 5 seconds until LED starts blink quickly which indicates that the modified is saved and then you will be brought back to the Setup Menu level automatically.Please note that the analog servos can only work with 50Hz. If you do not know what the maximum update rate that is tolerated by your servos never use more that 50Hz. The higher the frequency the better it is for the flight performance of the gyro but you must check the servo specifications before increasing the setting. Otherwise, the servos may get damaged!9. Level CalibrationWhen flying in LEVEL mode, A3 EVO needs to know the angle of the airplane in both roll and pitch directions, this is achieved by calculating the attitude of its own. A small angle deviation caused by installation can lead to an unexpected behavior when flying in LEVEL mode. For this reason, a level calibration is recommended to offset the error caused by installation and to establish a proper level reference of your airplane after installing the gyro.Before calibrating, the airplane should be placed on the horizontal ground and make the wing parallel to the ground. Make the airplane slightly nose-up because a certain elevation angle is usually required to maintain level flight for most airplanes. Short press the button when you reach the 9th item of the Setup Menu, then LED will start blink Blue rapidly for several seconds, do not move the airplane and keep its attitude until the calibration is done.10. Hover CalibrationAs a same reason, a hover calibration is recommended to perform after installation if you want to fly with HOVER mode. The procedure is quite similar to that of level calibration. The only difference is that before calibrating, you need to lift the airplane and make it vertical to the ground instead of putting it on the ground.Short press the button when you reach the 10th item of the Setup Menu, then LED will start blink Blue rapidly for several seconds, do not move the airplane and keep its attitude until the calibration is done.11. Remote Master Gainthe remote master gain function for SBUS or PPM receivermode. The master gain is disabled as default when leavingthe factory, you need to choose either channel 6 or channel7 as the gain channel to activate this feature if needed.* F actory ResetTo restore the gyro to factory default settings, press and hold the button while turn on the power of the gyro, release it when LED starts flash Blue and Red. (FYA: the button needs to be hold for more than 4 seconds), after successfully entering the program the LED will remain flashing Blue, press and hold thebutton again for about 2 seconds until the LED starts flash Blue quickly, release the button to confirm thereset. After a successful reset the gyro will start the initialization automatically.* Accelerometer CalibrationBefore leaving the factory, every unit has been carefully tested and calibrated. Usually, you do not need to perform a calibration of the accelerometer during use. However, in some specific cases, we would suggest you re-calibrate the accelerometer to obtain better performance, these include temperature changes those will probably cause the mechanical characteristics changes of the sensor, or replacement of new sensor, etc. The calibration should be done on a horizontal desktop and the gyro needs to be removed from the airplane.Entering the Calibration ProgramTo access the accelerometer calibration program, press and hold the button while turn on the power of the gyro, release it when LED turns Blue and Red.Calibration StepsA3 EVO uses a quick approach for accelerometer calibration, there are only 2steps corresponding to both sides of Z axis of the unit required to becalibrated. Each step will take about 2 seconds. While calibrating, the LED willflash Blue several seconds and then light up solid in Blue. Do not move thegyro until the calibration is done.①Put the gyro flat and face up on the table and make it parallel to thedesktop. short press the button, do not move the gyro while the LED isflashing Blue quickly.②Put the gyro flat and face down on the table and make it parallel to thedesktop, short press the button, do not move the gyro while the LED isflashing Blue quickly.③After you have finished the 2 steps above, the LED will flash Blue andRed once which indicates that the calibration is complete, after a successfulcalibration the gyro will start the initialization automatically.Blue, Flashing Power-on initialization and self-test Solid Blue NORMAL ModeSolid Red LEVEL ModeSolid Blue&Red HOVER ModeLED Off GYRO OFF ModeRed, Slow Flashing No receiver signal detected Blue, Fast Flashing Calibrating or testingRed, Fast Flashing Gyroscope sensor error。
eagle6 图形编辑器 中文手册 用户指南

CadSoft Computer 公司版权所有© 2012
保留所有权利
CadSoft Computer 是 Newark 公司的贸易子公司。
如果您有任何疑问请通过以下方式与我们联系:
美国和其他美洲国家: 电话: 传真: 网站: 电子邮件: 德国和其他欧洲国家: 电话: 热线: 传真: 网站: 电子邮件:
请记住我们的客户可以使用免费的热线电话!
CadSoft Computer 公司版权所有 2012。在全球范围内保留所有权利。
在没有经过 CadSoft Computer 公司预先同意的情况下,该文档中的任何部分均不允许 在公共文件服务器中复制或保存,或数字化以及其他方式进行转移。 针对个人应用而言允许打印该手册。
Windows 是 Microsoft 公司的注册商标。 Linux 是 Linus Torvalds 公司的注册商标。 Mac 是 Apple Computer 有限公司的注册商标。
目录
1 用户指南介绍..............................................................................................7 2 EAGLE 的特性.............................................................................................7 系统要求..............................................................................................7 专业版..................................................................................................8 概述...............................................................................................8 PCB 编辑器....................................................................................9 Schematic Editor 原理图编辑器.....................................................9 Autorouter 自动布线模块............................................................10 标准版................................................................................................10 免费试用版.........................................................................................10 简化版................................................................................................10 3 安装...........................................................................................................11 Windows 系统....................................................................................11 Linux 系统..........................................................................................12 Mac OS X...........................................................................................12 4 语言设置...................................................................................................13 Windows 系统下设置语言..................................................................13 Linux 和 Mac OS-X 系统下设置语言...................................................14 5 EAGLE 个人设置........................................................................................14 脚本文件 eagle.scr..............................................................................14 用户界面............................................................................................14 功能键................................................................................................14 层颜色................................................................................................15 6 EAGLE 用户界面介绍.................................................................................15 选择菜单项.........................................................................................15 鼠标单击............................................................................................16 多种输入选择.....................................................................................16 组合键的使用.....................................................................................16 弹出菜单............................................................................................17 通过命令框输入命令和参数...............................................................17 7 Control Panel............................................................................................19 EAGLE 文件........................................................................................20 备份文件............................................................................................21 创建 EAGLE 项目................................................................................21 8 加载文件和选择放大功能..........................................................................22 9 选择需要显示的.........................................................................................23 10 设置栅格和单位.......................................................................................24 11 连线、圆形、弧形、长方形和文本..........................................................24
维宏系统雕刻机电子版使用教程
聊工机械雕刻机操作方法欢迎使用聊工数控雕刻机,首先我们先了解机器的结构1 机器有三个轴分别是X 轴(左右移动)Y 轴(前后移动)Z 轴(上下移动)。
了解其控制原理雕刻机主要是由电气控制柜----经过传输数据线连接到电脑,在电脑的主机箱子里面装有一个维宏控制卡------电脑里面装有一个维宏控制软件来控制。
操作方法:(一)定点方法1 平面板左下角定点方法在木板上的左下角或板上雕刻区域的左下角-----通过维宏控制软件用鼠标移动各个轴到左下角的位置-----然后各个轴在维宏控制软件里面的坐标轴清零。
2 平面板中心点定点方法在木板上的中心点或板上雕刻区域的中心点-----通过维宏控制软件用鼠标移动各个轴到中心点的位置-----然后各个轴在维宏控制软件里面的坐标轴清零三.断点续刻和高级开始功能断点续刻点击维宏控制软件里面的---操作——回工件原点----操作-----断点续刻—系统就可以继续从原来停下来的地方开始工作了。
高级开始功能点击维宏控制软件里面的---操作——回工件原点----操作-----高级开始—点具体位置-输入你要跳到的那一段程序的序号---系统就跳到你指定的位置开始工作了。
四.换刀和断刀时定点的的处理方法先记下当前段号再把刀抬到安全高度----点击维宏控制软件里面的---操作——回工件原点—换刀----然后把刀移到板上面-----然后在维宏控制软件里面的Z轴清零而X坐标轴和Y 坐标轴则不用清零。
-----点击维宏控制软件里面的---操作-----高级开始—点具体位置-输入你要跳到的那一段程序的序号(或者是刚才记下的短号)---系统就跳到你指定的位置开始工作了。
一、雕刻机安装前注意事项1.切勿在闪电或打雷时安装此设备,切勿在潮湿的地方安装电源插座,请勿触摸未绝缘的电源线。
2.上机操作人员必须经过严格的培训操作过程中必须注意人身安全和机器的安全,并严格按操作规程来操作电脑雕刻机。
3.电源电压要求210V-230V,若电源电压不稳或周围有大功率的用电设备,请一定要在专业技术人员指导下选择稳压电源。
- 1、下载文档前请自行甄别文档内容的完整性,平台不提供额外的编辑、内容补充、找答案等附加服务。
- 2、"仅部分预览"的文档,不可在线预览部分如存在完整性等问题,可反馈申请退款(可完整预览的文档不适用该条件!)。
- 3、如文档侵犯您的权益,请联系客服反馈,我们会尽快为您处理(人工客服工作时间:9:00-18:30)。
En3d6 用户手册概述介绍欢迎使用En3d6,En3d6是运行在Windows操作系统下的控制管理软件,En3d6进行加工数据管理与加工参数设置,负责载入与管理加工模块。
特征En3d6利用Microsoft Windows 32位操作系统,比以前版本提高了许多功能●使用32位内存管理,没有DOS下的基本内存限制,不需要配置config.sys和Autoexec.bat。
●使用3维显示环境,数据管理更加方便。
●新加路径数据编辑功能,提高加工效率。
●采用插件管理机制,可以灵活的定制加工模块和增加新功能,升级方便。
●内部集成加工参数设置模块,方便更改加工参数。
硬件与软件要求En3d6对计算机的要求比以前版本高很多,所有用户在选用计算机时必须严格选配。
计算机的最低硬件配置如下:1)CPU: 使用Intel PⅢ 300以上。
2)内存: 大于32M, 质量稳定。
3)主板: 有PCI插槽,必须是正规主板厂商(如华硕,技嘉等)的产品,请勿使用显卡集成主板。
4)硬盘: 5G以上,至少要保证有200M的工作空间5)显卡: 必须使用支持OpenGL的3D显卡,否则可能显示不正常。
6)电源: 应达到230 W以上稳定供电。
计算机的必须装有Win98操作系统。
目录1.安装En3d62.En3d6菜单与工具条2.1 用户界面2.2 文件菜单2.3 编辑菜单2.4 选取菜单2.5 视图菜单2.6 查看菜单2.7 加工菜单2.8 帮助菜单2.9 工具条3.En3d6基本概念3.1 系统工作状态3.2 路径的选取3.3 路径的移动和旋转3.4 路径的反向3.5 路径单元特性3.6 路径偏移4.En3d6的系统参数4.1 设备配置参数设置4.1.1 设备型号4.1.2 各轴机械参数4.1.3 位置参数4.1.4 速度档参数设置4.1.5 主轴参数设置4.1.6 手工步长参数设置4.1.7 其它4.1.8 各轴运动特性4.2 系统颜色设置4.3 加工模块定制1.安装En3d6En3d6在安装光盘的En3d6.0目录下,运行En3d6.0\Disk1\setup.exe进行安装。
在安装过程中会提示插入”精雕设备驱动盘”(如下图),此时必须插入”精雕设备驱动盘”在软区,或者指定含有设备驱动信息的路径。
如果取消则En3d6将没有安装加工模块。
安装完后,启动En3d6,如果是第一次安装且成功安装了加工模块时,系统会出现如下对话框:这表示En3d6发现未注册的加工模块pci40.plg,询问是否启此模块,一般我们都必须选择确定,这样以后每次启动En3d6系统都会自动装载pci40.plg加工模块。
这样在En3d6的加工菜单中会出现pci40模块的命令“全部加工”与“选择加工”。
如下图:如果选择取消时,在En3d6的加工菜单中不会出现pci40模块的命令。
详细介绍请看加工模块定制一章。
2.En3d6菜单与工具条2.1用户界面En3d61) 标题栏显示当前打开的文件名称,括号中的是当前使用的参数的设备类型。
2) 标尺栏显示当前工作区域的尺寸,单位为毫米。
3) 工作框左下角为当前路径的加工原点。
4) 坐标栏当前光标坐标,注意不在俯视图下的坐标没有意义。
5) 编辑工具栏文件和路径编辑功能。
6) 对齐工具栏用于在路径移动中的对齐功能。
7) 三视图工具栏调整显示区域的功能。
工作框状态栏坐标栏标尺栏8)微调工具栏路径移动和旋转的参数设置。
2.2文件菜单文件菜单主要用来打开和保存Eng类型的加工数据文件,以及设置系统参数。
文件菜单如下图所示:新建–清除当前显示的文件。
打开–打开指定的Eng文件,并清除当前显示的文件。
合并–打开指定的Eng文件,合并当前显示的文件。
保存–暂时未使用另存为–把当前文件另外保存。
系统参数设置–设置各种系统参数。
最近文件列表–显示最近打开的文件。
退出–退出En3d6。
2.3编辑菜单编辑菜单如下图所示:撤消–暂时未使用。
剪切–剪切当前选取的路径到剪贴板中。
复制–复制当前选取的路径到剪贴板中。
粘贴–从剪贴板中拷贝路径到当前视图。
偏移–偏移选取的二维路径。
移动旋转路径–切换到移动旋转路径的工作状态。
编辑路径方向–切换到编辑路径方向的工作状态。
编辑路径单元–切换到编辑路径单元特性的工作状态。
路径属性–显示和编辑当前被选取的路径属性。
2.4选取菜单选取菜单如下图所示:全部选择–选择所有路径。
反向选择–所有被选择的路径取消选择状态,所有未选择的路径变成选择状态。
删除选择路径–删除被选择的路径。
按刀具选择–按使用的刀具选择路径。
按刀具不选择–按使用的刀具不选择路径。
按序号选择–按路径的序号选择路径。
按序号选择–按路径的序号不选择路径。
视图菜单如下图所示:放大显示–以当前视图中心为中心放大1倍视图。
缩小显示–以当前视图中心为中心缩小1倍视图。
窗口放大–最大显示鼠标框选的窗口。
最大显示–最大显示当前所有路径在当前视图中。
俯视图–显示当前视图的俯视图。
前视图–显示当前视图的前视图。
左视图–显示当前视图的左视图。
右视图–显示当前视图的右视图。
等轴测视图–显示当前视图的等轴测视图。
2.6查看菜单查看菜单如下图所示:状态栏–显示或隐藏状态栏。
编辑工具栏–显示或隐藏编辑工具栏。
标尺工具栏–显示或隐藏标尺工具栏。
三视图工具栏–显示或隐藏三视图工具栏。
对齐工具栏–显示或隐藏对齐工具栏。
微调工具栏–显示或隐藏微调工具栏。
加工菜单如下图所示:工件直径–设置旋转轴的直径。
注意:在有加工模块时系统会在此菜单下增加加工模块的命令。
2.8帮助菜单帮助菜单如下图所示:帮助主题–显示帮助信息。
关于En3d –显示En3d的版本信息。
2.9工具条系统有如下一些工具条:3.En3d6基本概念3.1系统工作状态系统的工作状态有●选取状态------------------ 系统开始时就在此状态下,在此状态下只能进行路径的选取与不选择。
●移动旋转路径状态-------- 在此状态下可以进行路径的选取,还可以移动和旋转路径。
●编辑路径方向状态-------- 在此状态下可以进行路径的选取,还可以编辑路径方向。
●编辑路径单元特性状态--- 在此状态下可以进行路径的选取,还可以编辑路径方向。
●路径偏移状态------------- 在此状态下可以对二维路径进行偏移生成新的路径。
3.2路径的选取路径的选择有许多方法,具体有如下一些方法:a.直接用鼠标选取在选择状态下直接用按鼠标左键点选或者按住左键框选。
注意:当进行框选时鼠标从左到右选择,表示所有在选框中的路径被选取;鼠标从右到左选择,表示所有经过选框的路径被选取。
b.按刀具选择按刀具选择时系统会列出所有当前路径使用的刀具,用户可以选择需要使用的刀具路径。
如下图:当选择好刀具时,所有使用此刀具的路径会被选择,没有使用此刀具的路径被取消选择。
c.按刀具不选择按刀具不选择时从当前被选择的路径中去除需要使用此刀具的路径。
d.按序号选择由于每一个路径都有一个加工序号来指示加工的秩序,所以可以按序号选择路径加工,当按序号选择时系统会提示输入起始与终止序号。
如下图:当输入好序号时,所有在起始与终止序号中间的路径会被选择,其它的路径不被选择。
e.按路径序号不选择按路径序号不选择时用户可以去除选择不需要的加工路径。
f.反向选择反向选择使所有被选择的路径变成未选择状态,所有未选择的路径被选择。
3.3路径的移动和旋转在路径移动旋转状态下可以移动和旋转路径,路径的移动和旋转有两种方法:1)直接用鼠标移动旋转移动鼠标到当前被选择的路径的焦点框上,当出现时按住鼠标左键,此时移动鼠标可以移动当前被选择的路径。
当出现时按住鼠标左键,此时移动鼠标可以旋转当前被选择的路径。
2)用键盘移动旋转在路径移动旋转状态下按键盘上、下、左、右箭头键可以移动被选择的路径。
每按一次箭头键移动的距离为微调工具栏中设置的微调距离。
在路径移动旋转状态下按键盘shift+左箭头键可以逆时针旋转被选择的路径。
每按一次旋转的角度为为微调工具栏中设置的微调角度。
在路径移动旋转状态下按键盘shift+右箭头键可以顺时针旋转被选择的路径。
每按一次旋转的角度为为微调工具栏中设置的微调角度。
注意:由于没有撤消功能,所以在每次进行移动旋转时都必须小心,否则可能导致无法恢复开始的状态,此时只能重新打开当前文件进行编辑。
3)路径移动的对齐功能在路径移动时有时对齐功能可以方便的使路径排列整齐。
路径对齐工具栏如下图:左对齐--- 被选择的路径左边与指定路径的左边对齐。
右对齐--- 被选择的路径右边与指定路径的右边对齐。
上对齐--- 被选择的路径上边与指定路径的上边对齐。
下对齐--- 被选择的路径下边与指定路径的下边对齐。
左向右对齐--- 被选择的路径左边与指定路径的右边对齐。
右向左对齐--- 被选择的路径右边与指定路径的左边对齐。
下向上对齐--- 被选择的路径下边与指定路径的上边对齐。
上向下对齐--- 被选择的路径上边与指定路径的下边对齐。
水平中心对齐--- 被选择的路径水平中心与指定路径的水平中心对齐。
垂直中心对齐--- 被选择的路径垂直中心与指定路径的垂直中心对齐。
中心对齐--- 被选择的路径中心与指定路径的中心对齐。
3.4路径反向路径是有方向性的,所以编辑路径方向状态下会显示被选择的路径的方向,如下图的箭头方向即为路径的方向。
在此状态下双击被选择的路径可以改变路径的方向。
3.5路径单元特性路径是由一段段直线与圆弧单元组成的,所以在两个单元之间可以加入一些运动特性,在编辑路径单元特性状态下会显示出路径单元特性。
如果两个单元之间没有加入运动特性时,单元之间的点是灰色的,如下图的单元点。
双击单元点会弹出单元属性设置对话框,可以更改单元属性。
单元属性设置对话框如下图所示:主轴转速–在运动到此单元时使用当前设置的主轴转速,如果设置的主轴转速小于等于0将被忽略。
进给速度–在运动到此单元时使用当前设置的进给速度,如果设置的进给速度小于等于0将被忽略。
延迟时间–在运动到此单元时延迟时间设置的时间。
暂停–在运动到此单元时暂停。
注意:设置的主轴转速和进给速度会一直影响后面的所有单元,直到下一个有效的单元属性。
当添加了路径单元属性后,相应的单元点会变成黑色,表示此单元有有效属性。
如下图:3.6路径偏移路径偏移在加工是非常有用的功能,进行轮廓加工时,由于刀具总是有一定的半径,而实际加工时使用的刀具与理论上刀具大小有一定的偏差,所以在加工时可能必须加工几次才能达到要求,所以在加工时把路径偏移一定距离可以容易的保证加工精度,这就是所谓的刀具半径补偿。
注意:只有二维路径才能进行偏移。
当进行路径偏移时系统会问需要偏移的距离,如下图:设置好偏移的距离后,下一步要选取需要偏移的二维路径,然后选择偏移方向,下图虚线路径维向外偏移后的路径。