基于Android计算器功能的实现
基于Android的雷达遮蔽角计算器设计
件 界 面和 遮 蔽角计 算 功 能的 实现 方 法。 实验 结 果表 明,软 件 安装 简单 , 易于使 用 ,大 大提 高 了遮 蔽角计 算 效 率,缩 短 了雷达 部 队 战斗 准备 时 间,对 提 升部 队打 赢 能力具有 现实意义。
2 . 1 软 件 界 面设 计
良好 的人机 交 互界 面 能够 提升 用户 的操 作体验 ,便于软件普及和 推广。为突 出软件 实 用性和 易用性 ,人机 界面 力求简洁 明了。通 过 前面 分析,计算遮蔽 角的参数主要有 3个 ,可
件 , 以提 高遮 蔽 角 计 算 效 率 。
2 . 2按钮点击 事件
软 件 的 主 要 功 能 是 实 现 公 式 的 求 解 计 算 , 通 过 点 击 Bu t o n控 件 开 始 执 行 主 程 序 , 即 响 应 按 钮 点 击 事 件 。在 r e s / l a y o u t / a c t i v i t y
其实 就是 一个形 如 x x x ( Vi e w s o u r c e 1的方法 的 方法名 ,这 样直接就在界面布 局文件 中为指定 控件绑 定了事件处理方法 。同时在该界面布局
对 应 的 Ma i n Ac t i v i t y . j a v a文 件 中 定 义 一 个 v o i d c l i c k Ha n l e r ( Vi e w s o u r c e ) 方 法 , 该 方 法 将 会 处 理 该 按 钮 上 的 点 击 事 件 。关 键 代 码 如 下 :
遮 蔽角 作 为雷 达阵 地地 形 条件 技术 指标
重 要 内容 之 一 , 是 测 算 雷 达 探 测 盲 区 的 基 础 。
局 把 全 部 控 件 按 照 行 、 列 方 式 排 列 , 以 完 成 整 体布局 。
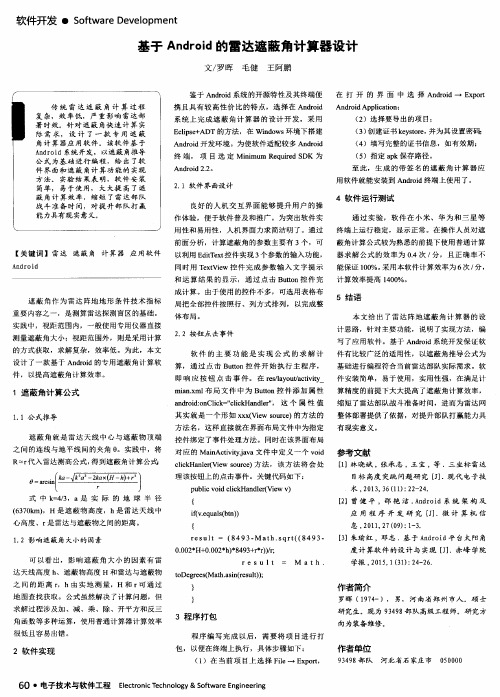
Android框架上的简单计算器界面设计
为了深入理解和应用Android框架系统的控件以及更加熟练的掌握eclips的开发技巧,所以就决定做一个简单的计算器来了解和介绍一下Android界面设计的基本技巧。
界面的样子如下:这个界面由一个编辑框和很多按钮组成。
他的功能跟Windows下的计算其功能差不多,就是实现+-*/等功能。
这个还实现了一个菜单的功能。
按一下Exit就可以离开这个应用程序了。
Android框架定义了很多布局(Layout)架构。
布局就像容器,里面可以装下很多控件。
布局里面还可以套用其他的布局。
这样就可以实现界面的多样化以及设计的灵活性。
在这个界面中,我们应用了一个LinearLayout的布局,它是垂直向下扩展的。
在这个LinearLayout中,我们可以应用一个EditText和一个TableLayout 作为他的子控件。
在TableLayout布局可以实现以表格的形式来布局空间。
而TableRow是用来定义每一行。
在TableLayout中,列的宽度是取其中这一列中宽度最大的控件的宽度。
这个应用程序正好用到5x5的一个表格,TableLayout将是最好的选择了。
Android界面编程的一个优势是他的布局全部可以用xml文件来描述,实现了即改即现的方式。
ADT又在Eclips里面做了一个Outline的插件。
当你打开布局xml文件的时候,Outline就会显示布局的所有控件以及他们的结构。
双击其中的控件就会打开空间的属性。
你就可以直接编辑属性来轻松实现界面的布局。
所改的属性也将立刻在xml文件中显示出来。
以下是描述这个简单计算器的界面xml文件给大家做个参考:android:background="#ff808080"><EditText android:id="@+id/input"android:layout_width="fill_parent"android:layout_height="wrap_content"android:cursorVisible="false"android:gravity="right"android:editable ="false"/><TableLayout xmlns:android="/apk/res/android" android:layout_width="fill_parent"android:layout_height="fill_parent"><TableRowandroid:layout_width="fill_parent"android:layout_height="wrap_content"><Button android:id="@+id/seven"android:text="7"android:layout_height="wrap_content"android:layout_width="63sp"/><Button android:id="@+id/eight"android:text="8"android:layout_width="63sp"android:layout_height="wrap_content" /><Button android:id="@+id/nine"android:text="9"android:layout_width="63sp"android:layout_height="wrap_content" /><Button android:id="@+id/divide"android:text="/"android:layout_width="63sp"android:layout_height="wrap_content" /><Button android:id="@+id/sqrt"android:text="sqrt"android:layout_width="63sp"android:layout_height="wrap_content" /></TableRow><TableRowandroid:layout_width="fill_parent"android:layout_height="wrap_content"><Button android:id="@+id/four"android:text="4"android:layout_width="63sp"android:layout_height="wrap_content" /><Button android:id="@+id/five"android:text="5"<Button android:id="@+id/multiply"android:text="*"android:layout_width="63sp"android:layout_height="wrap_content" /> <Button android:id="@+id/remainder"android:text="%"android:layout_width="63sp"android:layout_height="wrap_content" /></TableRow><TableRowandroid:layout_width="fill_parent"android:layout_height="wrap_content"><Button android:id="@+id/one"android:text="1"android:layout_width="63sp"android:layout_height="wrap_content" /> <Button android:id="@+id/two"android:text="2"android:layout_width="63sp"android:layout_height="wrap_content" /> <Button android:id="@+id/three"android:text="3"android:layout_width="63sp"android:layout_height="wrap_content" /> <Button android:id="@+id/minus"android:text="-"android:layout_width="63sp"android:layout_height="wrap_content" /> <Button android:id="@+id/convert"android:text="1/x"android:layout_width="63sp"android:layout_height="wrap_content" /> </TableRow><TableRowandroid:layout_width="fill_parent"android:layout_height="wrap_content"><Button android:id="@+id/zero"android:text="0"android:layout_width="63sp"android:layout_height="wrap_content" /> <Button android:id="@+id/digit"android:text="."。
在Android Studio中开发一个简单的计算器应用

在Android Studio中开发一个简单的计算器应用随着智能手机的普及,计算器应用成为了人们生活中不可或缺的工具之一。
为了满足用户的需求,我们决定在Android Studio中开发一个简单的计算器应用。
这个应用将提供基本的四则运算功能,并且界面简洁易用。
首先,在Android Studio中创建一个新的项目。
选择合适的应用名称和包名。
接下来,我们需要设计应用的用户界面。
我们希望用户界面简洁明了,方便用户使用。
可以考虑使用一个TextView显示计算结果,以及多个Button用于输入数字和操作符。
在开发计算器的过程中,我们需要处理用户的输入并进行相应的计算。
为此,我们可以使用一个EditText控件来接收用户的输入,并通过按钮的点击事件来获取用户点击的数字和操作符。
然后,我们可以使用Java中的数学库来进行四则运算,并将结果显示在TextView中。
通过Android Studio提供的布局编辑器,我们可以轻松地将TextView和Button布局在界面上。
可以使用LinearLayout或RelativeLayout进行布局,根据需要设置各个控件之间的位置和大小。
此外,还可以设置按钮的点击事件,使其能够响应用户的输入。
在处理用户输入时,需要考虑一些特殊情况。
例如,当用户输入非法字符或进行除法时需要进行错误处理。
可以通过在代码中添加条件判断语句来实现这些功能。
另外,还可以添加一些额外的功能,如清除输入、撤销操作等,以提升用户体验。
在开发过程中,可以使用Android Studio提供的调试工具来检查代码是否正常运行。
可以设置断点,逐步执行代码,并查看变量的值。
这些工具能够帮助我们快速定位和修复错误。
为了使应用具有良好的用户体验,我们还可以添加一些动画效果和过渡效果。
例如,当用户点击按钮时,可以添加按钮缩放、淡入淡出等动画效果,使界面更加生动有趣。
除了基本功能以外,我们还可以考虑添加更多的功能来完善应用。
Android入门程序开发—BMI计算器

Android入门程序开发—BMI计算器作者:董明华李宏伟来源:《电脑知识与技术》2017年第35期摘要:AndroidStudio已经代替了Eclipse,成为Android官方集成开发工具。
文章基于AndroidStudio设计了一款身高体重计算器,通过介绍常见布局控件的用法,使初学者能够快速入门Android APP开发,了解APP界面设计,用户输入值的获取等知识。
关键词:AndroidStudio;BMI;APP中图分类号:TP311 文献标识码:A 文章编号:1009-3044(2017)35-0136-031 背景BMI指数,即身体质量指数,是用体重公斤数除以身高米数平方得出的数字,是目前国际上常用的衡量人体胖瘦程度以及是否健康的一个标准。
体质指数(BMI)=体重(kg)÷身高^2(m)。
文章根据BMI指数开发一款简易身高体重计算器,通过分析用户的身高体重值,判断其身材是否标准。
2 APP展示最终APP效果如图1所示,用户输入身高体重值后,通过单击计算按钮,可得出身体胖瘦程度的一个提示。
3 知识点分析项目涉及知识点较为简单,界面布局为LinearLayout,控件为EditText和Button,java源代码部分主要是控件的初始化,取得文本输入框的输入值,并转换为数值类型,然后计算出BMI指数值,并通过Toast给出提示。
4 界面设计界面从上向下依次为身高输入框、体重输入框和按钮,输入框对应Android中的EditText 控件,按钮对应Button控件,垂直排列的布局适合用线性布局LinearLayout。
布局主要作用是设置控件在屏幕上的位置,线性布局LinearLayout可以让其中的控件水平排列或者垂直排列。
首先,在res/layout文件夹中找到自动生成的布局文件activity_main.xml。
在此文件中声明父布局LinearLayout的排版方向为垂直排列,通过设置android:orientation的属性值为vertical 实现。
基于Android计算器功能的实现

基于Android计算器功能的实现摘要随着移动通信技术和网络技术的迅速发展,手机系统发生了巨大的变化,从进行简单通话功能的非智能手机到现在集上网、聊天、收发邮件、视屏电话会议等各种服务于娱乐为一身的智能手机系统。
由Google公司牵头众多实力雄厚的软硬件厂商加盟成立了OMS联盟,并推出的Android平台手机系统。
作为时代的新生儿,Android手机操作平台有着得天独厚的优势广阔的发展前景。
本文正是基于Android平台开发的计算器。
论文主要阐述以面向对象的程序开发语言eclipse为开发工具, 设计并实现基于Android的计算器。
论文首先介绍了Android开发平台和环境以及Android 工程的重要部分,其次对计算器系统和程序进行了分析和设计,再次对计算器进行了系统的实现,并对系统进行了严格的验证,最后本文对所做工作进行了总结。
关键词:手机,Android,用户界面,计算器THE CALCULATOR FUNCTION REALIZATION BASEDON ANDROIDABSTRACTWith the development of mobile communication technology and network technology, great changes have taken place on the mobile phone system. The original mobile phone only has the functions of communication and Smartphone has the functions of internet, chat, video conferencing and other services and entertainment. Android mobile phone platform which was developed by Google Company and many equipment manufacturers of hardware and software vendors, as the era of neonatal has a unique advantage and prospects for development. This article is based on the Android platform calculator. The thesis describes object-oriented programming language eclipse development tools, design and implement a calculator based on the Android. The paper first introduces the Android development platform and environment as well as an important part of the Android project, followed by the calculator systems and procedures analysis and design, the realization of the system once again the calculator, and strict verification, Finally, a summary of the work done.Key words: mobile phone, Android, UI, calculator目录1 引言 (1)1.1 课题背景及意义 (1)1.1.1 课题背景 (1)1.1.2 课题意义 (1)1.2 智能手机平台系统 (2)1.3 课题来源 (3)2 基于Android平台计算器相关技术概述 (4)2.1 Android手机平台 (5)2.1.1 Android起源及优势 (5)2.1.2 Android体系结构 (5)2.1.3 Android平台功能特征 (7)2.2 Android SDK介绍 (9)2.3 XML技术 (10)2.4 JNI技术 (11)3 基于Android平台计算器设计 (12)3.1 系统的总体设计 (12)3.2 程序流程和系统功能设计 (13)3.2.1 程序流程设计 (13)3.2.2 系统功能设计 (14)3.3基于Android平台系统具体设计 (15)3.3.1 总体模块详细设计 (15)3.3.2 输入模块详细设计 (16)3.3.3 显示模块详细设计 (16)3.3.4 计算模块详细设计 (17)4 计算器系统实现 (18)4.1 Android应用程序构成 (18)4.2 Android应用系统文件结构 (19)4.3 构建Android应用程序用户界面 (21)4.3.1 Android应用程序界面组件 (21)4.3.2 Android应用系统界面组件 (22)4.3.3 Android用户界面的实现 (24)4.4 计算模块的实现 (28)4.5 计算器演示 (30)5 结论 (32)谢辞 (33)参考文献 (34)附录1: (36)附录2: (38)1 引言1.1 课题背景及意义1.1.1 课题背景随着社会的发展,经济水平的提高,手机越来越普及。
制作一个简易计算器——基于AndroidStudio实现
制作⼀个简易计算器——基于AndroidStudio实现⼀个计算器Android程序的源码部分分为主⼲和细节两部分。
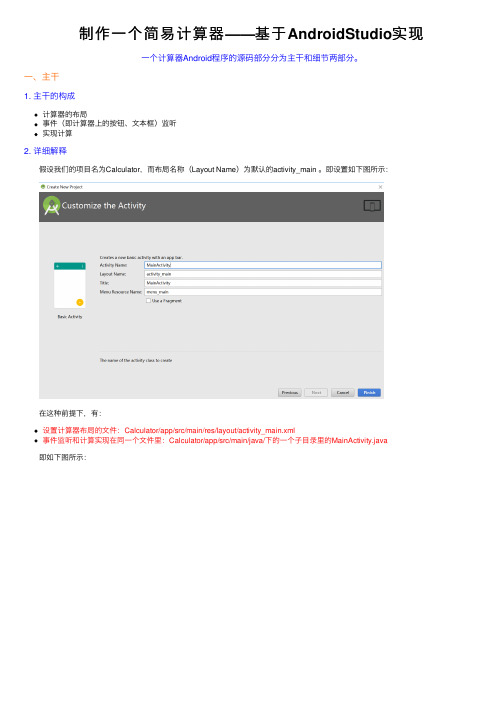
⼀、主⼲1. 主⼲的构成计算器的布局事件(即计算器上的按钮、⽂本框)监听实现计算2. 详细解释 假设我们的项⽬名为Calculator,⽽布局名称(Layout Name)为默认的activity_main 。
即设置如下图所⽰: 在这种前提下,有:设置计算器布局的⽂件:Calculator/app/src/main/res/layout/activity_main.xml事件监听和计算实现在同⼀个⽂件⾥:Calculator/app/src/main/java/下的⼀个⼦⽬录⾥的MainActivity.java 即如下图所⽰:计算器布局代码(写在activity_main.xml⽂件⾥):1<?xml version="1.0" encoding="utf-8"?>2<ScrollView xmlns:android="/apk/res/android"3 android:layout_width="fill_parent"4 android:layout_height="wrap_content"5>6<LinearLayout7android:layout_width="fill_parent"8 android:layout_height="fill_parent"9 android:orientation="vertical">10<EditText11android:id="@+id/input"12 android:layout_width="fill_parent"13 android:layout_height="wrap_content"14 android:layout_gravity="center"15 android:editable="false"16 android:hint="@string/shuru"/>1718<EditText19android:id="@+id/output"20 android:layout_width="fill_parent"21 android:layout_height="wrap_content"22 android:layout_gravity="center"23 android:editable="true"24 android:gravity="right"25 android:hint="@string/shuchu"/>2627<RelativeLayout28android:layout_width="fill_parent"29 android:layout_height="wrap_content">3031<Button32android:id="@+id/seven"33 android:layout_width="80dp"34 android:layout_height="70dp"35 android:layout_alignParentLeft="true"36 android:text="@string/seven"37 android:textSize="40sp"/>3839<Button44 android:text="@string/eight"45 android:textSize="40sp"/>4647<Button48android:id="@+id/nine"49 android:layout_width="80dp"50 android:layout_height="70dp"51 android:layout_toRightOf="@id/eight"52 android:text="@string/nine"53 android:textSize="40sp"/>5455<Button56android:id="@+id/add"57 android:layout_width="80dp"58 android:layout_height="70dp"59 android:layout_alignParentRight="true"60 android:layout_toRightOf="@id/nine"61 android:text="@string/add"62 android:textSize="40sp"/>6364<Button65android:id="@+id/four"66 android:layout_width="80dp"67 android:layout_height="70dp"68 android:layout_alignParentLeft="true"69 android:layout_below="@id/seven"70 android:text="@string/four"71 android:textSize="40sp"/>7273<Button74android:id="@+id/five"75 android:layout_width="80dp"76 android:layout_height="70dp"77 android:layout_below="@id/eight"78 android:layout_toRightOf="@id/four"79 android:text="@string/five"80 android:textSize="40sp"/>8182<Button83android:id="@+id/six"84 android:layout_width="80dp"85 android:layout_height="70dp"86 android:layout_below="@id/nine"87 android:layout_toRightOf="@id/five"88 android:text="@string/six"89 android:textSize="40sp"/>9091<Button92android:id="@+id/subtract"93 android:layout_width="80dp"94 android:layout_height="70dp"95 android:layout_alignParentRight="true"96 android:layout_below="@id/add"97 android:layout_toRightOf="@id/six"98 android:text="@string/subtract"99 android:textSize="40sp"/>100101<Button102android:id="@+id/one"103 android:layout_width="80dp"104 android:layout_height="70dp"105 android:layout_alignParentLeft="true" 106 android:layout_below="@id/four"107 android:text="@string/one"108 android:textSize="40sp"/>109110<Button111android:id="@+id/two"112 android:layout_width="80dp"113 android:layout_height="70dp"114 android:layout_below="@id/five"115 android:layout_toRightOf="@id/one" 116 android:text="@string/two"117 android:textSize="40sp"/>118119<Button120android:id="@+id/three"121 android:layout_width="80dp"122 android:layout_height="70dp"123 android:layout_below="@id/six"128<Button129android:id="@+id/multiply"130 android:layout_width="80dp"131 android:layout_height="70dp"132 android:layout_alignParentRight="true" 133 android:layout_below="@id/subtract" 134 android:layout_toRightOf="@id/three" 135 android:text="@string/multiply"136 android:textSize="40sp"/>137138<Button139android:id="@+id/zero"140 android:layout_width="80dp"141 android:layout_height="70dp"142 android:layout_alignParentLeft="true" 143 android:layout_below="@id/one"144 android:text="@string/zero"145 android:textSize="40sp"/>146147<Button148android:id="@+id/clear"149 android:layout_width="80dp"150 android:layout_height="70dp"151 android:layout_below="@id/two"152 android:layout_toRightOf="@id/zero" 153 android:text="@string/clear"154 android:textSize="40sp"/>155156<Button157android:id="@+id/result"158 android:layout_width="80dp"159 android:layout_height="70dp"160 android:layout_below="@id/three"161 android:layout_toRightOf="@id/clear" 162 android:text="@string/result"163 android:textSize="40sp"/>164165<Button166android:id="@+id/divide"167 android:layout_width="80dp"168 android:layout_height="70dp"169 android:layout_alignParentRight="true" 170 android:layout_below="@id/multiply" 171 android:layout_toRightOf="@id/result" 172 android:text="@string/divide"173 android:textSize="40sp"/>174175<Button176android:id="@+id/dot"177 android:layout_width="80dp"178 android:layout_height="70dp"179 android:layout_alignParentLeft="true" 180 android:layout_below="@id/zero"181 android:text="@string/dot"182 android:textSize="40sp"/>183<Button184android:id="@+id/writeButton"185 android:layout_width="wrap_content" 186 android:layout_height="wrap_content" 187 android:layout_alignParentLeft="true" 188 android:layout_below="@id/dot"189 android:text="@string/write"190 android:textSize="40sp"/>191<Button192android:id="@+id/readButton"193 android:layout_width="wrap_content" 194 android:layout_height="wrap_content" 195 android:layout_alignParentRight="true" 196 android:layout_below="@id/dot"197 android:text="@string/read"198 android:textSize="40sp"/>199200<CheckBox201android:id="@+id/appendBox"202 android:text="@string/appendBox"203 android:layout_width="wrap_content" 204 android:layout_height="wrap_content" 205 android:layout_alignParentBottom="true" 206 android:layout_toLeftOf="@+id/divide" 207 android:layout_toStartOf="@+id/divide"212213<EditText214215android:layout_width="match_parent"216 android:layout_height="wrap_content"217 android:id="@+id/textView"/>218219<EditText220221android:layout_width="match_parent"222 android:layout_height="wrap_content"223 android:id="@+id/displayView"/>224225<EditText226android:id="@+id/errorzero"227 android:layout_width="fill_parent"228 android:layout_height="wrap_content"229 android:layout_gravity="center"230 android:editable="false"231 android:gravity="center"232/>233<EditText234android:id="@+id/resultText"235 android:layout_width="fill_parent"236 android:layout_height="wrap_content"237 android:layout_gravity="center"238 android:editable="false"239 android:gravity="left"240 android:text="@string/resultText"241/>242</LinearLayout>243</ScrollView>View Code事件监听和实现计算代码(写在MainActivity.java⽂件⾥)1package com.example.lenovo.calculator;2345import android.app.Activity;6import android.content.Context;7import android.os.Bundle;8import android.view.View;9import android.view.View.OnClickListener;10import android.widget.Button;11import android.widget.CheckBox;12import android.widget.EditText;1314import java.io.FileInputStream;15import java.io.FileNotFoundException;16import java.io.FileOutputStream;17import java.io.IOException;1819public class MainActivity extends Activity {20/**21 * Called when the activity is first created.22*/23private EditText output = null;24private EditText input = null;25private Button btn0 = null;26private Button btn1 = null;27private Button btn2 = null;28private Button btn3 = null;29private Button btn4 = null;30private Button btn5 = null;31private Button btn6 = null;32private Button btn7 = null;33private Button btn8 = null;34private Button btn9 = null;35private Button btnadd = null;36private Button btnsubtract = null;37private Button btnmultiply = null;38private Button btndivide = null;39private Button btnclear = null;40private Button btnresult = null;41private Button btndot = null;46private Button writeButton = null;47private Button readButton = null;48private CheckBox appendBox = null;49private EditText textView = null;50private EditText displayView = null;51public String FILE_NAME = "fileDemo.txt";525354private String str = "";//保存数字55private String strold = "";//原数字56private char act = ' ';//记录“加减乘除等于”符号57private int count = 0;//判断要计算的次数,如果超过⼀个符号,先算出来⼀部分58private Float result = null;//计算的输出结果59private Boolean errBoolean = false;//有错误的时候为true,⽆错为false60private Boolean flagBoolean = false;//⼀个标志,如果为true,可以响应运算消息,如果为false,不响应运算消息,只有前⾯是数字才可以响应运算消息 61private Boolean flagDot = false; //⼩数点标志位62636465 @Override66public void onCreate(Bundle savedInstanceState) {67super.onCreate(savedInstanceState);68 setContentView(yout.activity_main);6970 output = (EditText) findViewById(R.id.output);71 input = (EditText) findViewById(R.id.input);7273 errorzero = (EditText) findViewById(R.id.errorzero);74 resultText = (EditText) findViewById(R.id.resultText);75 writeButton = (Button) findViewById(R.id.writeButton);76 readButton = (Button) findViewById(R.id.readButton);77 textView = (EditText) findViewById(R.id.textView);78 displayView = (EditText) findViewById(R.id.displayView);79 appendBox = (CheckBox) findViewById(R.id.appendBox);8081 btn0 = (Button) findViewById(R.id.zero);82 btn1 = (Button) findViewById(R.id.one);83 btn2 = (Button) findViewById(R.id.two);84 btn3 = (Button) findViewById(R.id.three);85 btn4 = (Button) findViewById(R.id.four);86 btn5 = (Button) findViewById(R.id.five);87 btn6 = (Button) findViewById(R.id.six);88 btn7 = (Button) findViewById(R.id.seven);89 btn8 = (Button) findViewById(R.id.eight);90 btn9 = (Button) findViewById(R.id.nine);91 btnadd = (Button) findViewById(R.id.add);92 btnsubtract = (Button) findViewById(R.id.subtract);93 btnmultiply = (Button) findViewById(R.id.multiply);94 btndivide = (Button) findViewById(R.id.divide);95 btnclear = (Button) findViewById(R.id.clear);96 btnresult = (Button) findViewById(R.id.result);97 btndot = (Button) findViewById(R.id.dot);98//设置按钮侦听事件99 btn0.setOnClickListener(listener);100 btn1.setOnClickListener(listener);101 btn2.setOnClickListener(listener);102 btn3.setOnClickListener(listener);103 btn4.setOnClickListener(listener);104 btn5.setOnClickListener(listener);105 btn6.setOnClickListener(listener);106 btn7.setOnClickListener(listener);107 btn8.setOnClickListener(listener);108 btn9.setOnClickListener(listener);109//执⾏运算110 btnadd.setOnClickListener(listener);111 btnsubtract.setOnClickListener(listener);112 btnmultiply.setOnClickListener(listener);113 btndivide.setOnClickListener(listener);114 btnclear.setOnClickListener(listener);115 btnresult.setOnClickListener(listener);116117 btndot.setOnClickListener(listener);118119 writeButton.setOnClickListener(writelistener);120 readButton.setOnClickListener(readlistener);121122123// ATTENTION: This was auto-generated to implement the App Indexing API.124// See https://g.co/AppIndexing/AndroidStudio for more information.125 }130public void onClick(View v) {131// TODO Auto-generated method stub132switch (v.getId()) {133//输⼊数字134case R.id.zero:135 num(0);136break;137case R.id.one:138 num(1);139break;140case R.id.two:141 num(2);142break;143case R.id.three:144 num(3);145break;146case R.id.four:147 num(4);148break;149case R.id.five:150 num(5);151break;152case R.id.six:153 num(6);154break;155case R.id.seven:156 num(7);157break;158case R.id.eight:159 num(8);160break;161case R.id.nine:162 num(9);163break;164165case R.id.dot:166 dot();167break;168//执⾏运算169case R.id.add:170 add();171break;172case R.id.subtract:173 sub();174break;175case R.id.multiply:176 multiply();177break;178case R.id.divide:179 divide();180break;181case R.id.clear:182 clear();183break;184//计算结果185case R.id.result:186 result();187if (!errBoolean && flagBoolean) {188 output.setText(String.valueOf(result));189 }190 resultText.setText(strold + act + str + "=" + result+" "); 191break;192193default:194break;195196 }197 input.setText(strold + act + str);198 output.setText(String.valueOf(result));199200201 }202 };203204private OnClickListener writelistener = new OnClickListener() {205 @Override206public void onClick(View view) {207//textView.setText("");208209 FileOutputStream fos = null;214 fos = openFileOutput(FILE_NAME, Context.MODE_PRIVATE); 215 }216 String text = resultText.getText().toString();217 fos.write(text.getBytes());218 textView.setText("⽂件写⼊成功,写⼊长度:" + text.length()); 219//resultText.setText("");220221 } catch (FileNotFoundException e) {222 e.printStackTrace();223 } catch (IOException e) {224 e.printStackTrace();225 }226finally {227if (fos != null)228try {229 fos.flush();230 fos.close();231 } catch (IOException e) {232 e.printStackTrace();233 }234 }235 }236 };237private OnClickListener readlistener = new OnClickListener() {238 @Override239public void onClick(View view) {240241 displayView.setText("");242 FileInputStream fis = null;243try {244 fis = openFileInput(FILE_NAME);245if (fis.available() == 0) {246return;247 }248byte[] readBytes = new byte[fis.available()];249while (fis.read(readBytes) != -1) {250251 }252 String text = new String(readBytes);253 displayView.setText(text);254 textView.setText("⽂件读取成功,写⼊长度:" + text.length()); 255256 } catch (FileNotFoundException e) {257 e.printStackTrace();258 } catch (IOException e) {259 e.printStackTrace();260 }261262 }263 };264265private void dot() {266// TODO Auto-generated method stub267268if (!flagDot) {269 str = str + ".";270 flagBoolean = false;271 flagDot = true;272 }273 }274275private void clear() {276// TODO Auto-generated method stub277 str = strold = "";278 count = 0;279 act = ' ';280 result = null;281 flagBoolean = false;282 flagDot = false;283 input.setText(strold + act + str);284 output.setText("");285 errorzero.setText("");286 displayView.setText("");287 textView.setText("");288 resultText.setText("");289 }290291private void divide() {292// TODO Auto-generated method stub293if (flagBoolean) {299300private void multiply() {301// TODO Auto-generated method stub 302if (flagBoolean) {303 check();304 act = '*';305 flagBoolean = false;306 }307 }308309private void sub() {310// TODO Auto-generated method stub 311if (flagBoolean) {312 check();313 act = '-';314 flagBoolean = false;315 }316 }317318private void add() {319// TODO Auto-generated method stub 320if (flagBoolean) {321 check();322 act = '+';323 flagBoolean = false;324 }325 }326327private void check() {328// TODO Auto-generated method stub 329if (count >= 1) {330 result();331 str = String.valueOf(result);332 }333 strold = str;334 str = "";335 count++;336 flagDot = false;337 errorzero.setText("");338 }339340//计算输出结果341private void result() {342// TODO Auto-generated method stub 343if (flagBoolean) {344 Float a, b;345346 a = Float.parseFloat(strold);347 b = Float.parseFloat(str);348349if (b == 0 && act == '/') {350 clear();351 errorzero.setText("除数不能为零!"); 352//output.setText("除数不能为零!"); 353354355//errBoolean=true;356 }357358359if (!errBoolean) {360switch (act) {361case '+':362 result = a + b;363break;364case '-':365 result = a - b;366break;367case '*':368 result = a * b;369break;370case '/':371 result = a / b;372break;373374default:375break;376 }377 }383private void num(int i) {384// TODO Auto-generated method stub385 str = str + String.valueOf(i);386 flagBoolean = true;387 errorzero.setText("");388 }389390 }View Code⼆、细节 仅仅将主⼲部分代码copy下来并不能运⾏程序,因为主⼲代码调⽤了⼀些⽂件的代码,这些⽂件就是我们所说的细节。
Android:实现一个计算器--(四则运算)

Android :实现⼀个计算器--(四则运算)计算器的功能介绍:Dot 的效果展⽰:侃侃 Dot:改进的地⽅:不⾜的地⽅:补充知识:android 中的事件处理步骤如何将信息显⽰到 View(EditText)上:异常的类型:Name: Dot (从某点开始,到某点结束)功能: + 、- 、* 、/ 、%(清零,退格操作)版本:1.0Dot 与其他的计算器相⽐没有太⼤的竞争⼒,甚⾄在处理⼀些极端的问题时还存在很⼤的不⾜,例如:⼤数的四则运算,对于这个问题处理的还不够到位,⽬前只能实现⼀些简单的四则运算(只能说⾃⼰的⽔平太菜,还没有掌握⼀些实质性的内容,这个是⾃⼰需要检讨的)另外:⾮常感谢 Android ⽼师教给我们的知识,使我们可以设计出第⼀款属于⾃⼰的 app.相对于最原始的设计,更新了哪些东西呢?1、改变按钮的形状,由原始的长⽅形 -- 椭圆状,使得按钮更加形象化。
2、增加背景图⽚,使⽤户的体验效果更好。
3、增加退格操作,使得⽤户在输错信息时不⽤全盘清零,可以删除刚刚写的某个字符。
1、未实现⼀些⼤数的运算。
2、当退格退完后,再按退格时会⾃动退出(不影响总体效果,但还是有那么⼀点 bug )3、⽬前两个数操作就需要 '=' ⼀下,但是可以实现多项式的运算,只是每次都需要 '='(后续会进⾏修改,逐渐完善)a 、找到事件⽬标对象(Button),通过 findViewById(),遍历⼦对象。
b 、实现view.onClickLisenter 接⼝,重写 onClick ⽅法。
c 、在事件⽬标对象上注册,btn.setOnClickListener (实现类的对象)a 、为 EditText 定义 id -- etResultb 、通过 findViewById 获取 etResult 对象c 、通过 etResult.setText() 将信息显⽰到计算器界⾯上a 、RuntimeExceptiona、RuntimeException运⾏时异常,不要求处理(但最好处理⼀下),与业务相关,⽐较主观(每个应⽤都可以采⽤⾃⼰的⽅式进⾏处理),⼀般不严重, 对效果不会产⽣太⼤的影响。
AndroidStudio实现简易计算器(表格布局TableLayout)

AndroidStudio实现简易计算器(表格布局TableLayout)这是⼀个运⽤⽹格布局来做的简易计算器,可能没有那么美观,⼤家可以继续完善⾸先先看看成果吧⾸先先建⼀个新的Project Calculator然后先编写颜⾊背景⽂件创建⼀个gray.xml,哪⾥创建呢?如图在drawable下右击,选择new–Drawable resource file第⼀个是⽂件名字,第⼆个属性可以⾃⼰选择,我们这⾥前两个⽂件选择shape,第三个⽂件选selector,附上颜⾊背景代码gray.xml<?xml version="1.0" encoding="utf-8"?><shape xmlns:android="/apk/res/android"><corners android:radius="5dp"/><solid android:color="#f9f9f9"/><strokeandroid:width="2dp"android:color="#ffa600"/></shape>orange.xml<?xml version="1.0" encoding="utf-8"?><shape xmlns:android="/apk/res/android"><corners android:radius="5dp"/> // 圆⾓<solid android:color="#F7B684"/> //颜⾊</shape>white.xml<?xml version="1.0" encoding="utf-8"?><shape xmlns:android="/apk/res/android"><corners android:radius="5dp"/><solid android:color="#ffffff"/><strokeandroid:width="1dp"android:color="#ffa600"/></shape>change.xml<?xml version="1.0" encoding="utf-8"?><selector xmlns:android="/apk/res/android"><item android:drawable="@drawable/gray"/> //默认颜⾊<item android:drawable="@drawable/orange" android:state_pressed="true"/> //按下的改变的颜⾊</selector>这个是当你按下按键的时候按键会改变颜⾊接下来就是布局⽂件了activity_main.xml我⽤的是表格布局,⼤家也可以⽤表格布局来写,效果会好⼀些<?xml version="1.0" encoding="utf-8"?><TableLayout xmlns:android="/apk/res/android"android:layout_width="match_parent"android:layout_height="match_parent"android:background="#D8ECF3"><TextViewandroid:gravity="bottom|right"android:textSize="70dp"android:singleLine="true"android:layout_margin="15dp"android:layout_width="match_parent"android:layout_height="120dp"android:background="@drawable/white"android:id="@+id/textView"/><TableRowandroid:layout_width="match_parent"android:layout_height="match_parent"android:layout_marginTop="10dp"><Buttonandroid:id="@+id/btn_clean"android:layout_marginLeft="10dp"android:background="@drawable/orange"android:gravity="center"android:text="C"android:textSize="25sp" /><Buttonandroid:id="@+id/btn_del"android:layout_marginLeft="10dp"android:layout_span="2"android:background="@drawable/gray"android:gravity="center"android:text="Del"android:textSize="25sp" /><Buttonandroid:id="@+id/btn_divide"android:layout_marginLeft="10dp"android:layout_marginRight="10dp"android:background="@drawable/gray"android:gravity="center"android:layout_span="1"android:text="/"android:textSize="25sp" /></TableRow><TableRowandroid:layout_width="match_parent"android:layout_height="match_parent"android:layout_marginTop="10dp"><Buttonandroid:id="@+id/btn_7"android:layout_marginLeft="10dp"android:background="@drawable/white"android:gravity="center"android:text="7"android:textSize="25sp" /><Buttonandroid:id="@+id/btn_8"android:layout_marginLeft="10dp"android:background="@drawable/white" android:gravity="center"android:text="8"android:textSize="25sp" /><Buttonandroid:id="@+id/btn_9"android:layout_marginLeft="10dp"android:background="@drawable/white" android:gravity="center"android:text="9"android:textSize="25sp" /><Buttonandroid:id="@+id/btn_multiply"android:layout_marginLeft="10dp"android:layout_marginRight="10dp"android:background="@drawable/gray" android:gravity="center"android:text="*"android:textSize="25sp" /></TableRow><TableRowandroid:layout_width="match_parent" android:layout_height="match_parent" android:layout_marginTop="10dp"><Buttonandroid:id="@+id/btn_4"android:layout_marginLeft="10dp"android:background="@drawable/white" android:gravity="center"android:text="4"android:textSize="25sp" /><Buttonandroid:id="@+id/btn_5"android:layout_marginLeft="10dp"android:background="@drawable/white" android:gravity="center"android:text="5"android:textSize="25sp" /><Buttonandroid:id="@+id/btn_6"android:layout_marginLeft="10dp"android:background="@drawable/white" android:gravity="center"android:text="6"android:textSize="25sp" /><Buttonandroid:id="@+id/btn_add"android:layout_marginLeft="10dp"android:layout_marginRight="10dp"android:background="@drawable/gray" android:gravity="center"android:text="+"android:textSize="25sp" /></TableRow><TableRowandroid:layout_width="match_parent" android:layout_height="match_parent" android:layout_marginTop="10dp"><Buttonandroid:id="@+id/btn_1"android:layout_marginLeft="10dp"android:background="@drawable/white" android:gravity="center"android:text="1"android:textSize="25sp" /><Buttonandroid:id="@+id/btn_2"android:layout_marginLeft="10dp"android:background="@drawable/white"android:gravity="center"android:text="2"android:textSize="25sp" /><Buttonandroid:id="@+id/btn_3"android:layout_marginLeft="10dp"android:background="@drawable/white"android:gravity="center"android:text="3"android:textSize="25sp" /><Buttonandroid:id="@+id/btn_minus"android:layout_marginLeft="10dp"android:layout_marginRight="10dp"android:background="@drawable/gray"android:gravity="center"android:text="-"android:textSize="25sp" /></TableRow><TableRowandroid:layout_width="wrap_content"android:layout_height="match_parent"android:layout_marginTop="10dp"><Buttonandroid:id="@+id/btn_0"android:layout_marginLeft="10dp"android:layout_span="2"android:background="@drawable/white"android:gravity="center"android:text="0"android:textSize="25sp" /><Buttonandroid:id="@+id/btn_point"android:layout_marginLeft="10dp"android:layout_span="1"android:background="@drawable/white"android:gravity="center"android:text="."android:textSize="25sp" /><Buttonandroid:id="@+id/btn_equal"android:layout_marginLeft="10dp"android:layout_marginRight="10dp"android:layout_span="1"android:background="@drawable/gray"android:gravity="center"android:text="="android:textSize="25sp" /></TableRow></TableLayout>接下来就是MainActivity.javapackage com.example.calculator;import android.support.v7.app.AppCompatActivity; import android.os.Bundle;import android.view.View;import android.widget.Button;import android.widget.TextView;public class MainActivity extends AppCompatActivity implements View.OnClickListener {Button btn_clean,btn_del,btn_divide,btn_0,btn_1,btn_2,btn_3,btn_4,btn_5,btn_6,btn_7,btn_8,btn_9, btn_multiply,btn_add,btn_minus,btn_point,btn_equal;TextView textView;boolean clear_flag; //清空标识@Overrideprotected void onCreate(Bundle savedInstanceState) {super.onCreate (savedInstanceState);setContentView (yout.activity_main);btn_0 = findViewById(R.id.btn_0); //初始化btn_1 = findViewById(R.id.btn_1);btn_2 = findViewById(R.id.btn_2);btn_3 = findViewById(R.id.btn_3);btn_4 = findViewById(R.id.btn_4);btn_5 = findViewById(R.id.btn_5);btn_6 = findViewById(R.id.btn_6);btn_7 = findViewById(R.id.btn_7);btn_8 = findViewById(R.id.btn_8);btn_9 = findViewById(R.id.btn_9);btn_multiply = findViewById(R.id.btn_multiply);btn_divide = findViewById(R.id.btn_divide);btn_add = findViewById(R.id.btn_add);btn_minus = findViewById(R.id.btn_minus);btn_point = findViewById(R.id.btn_point);btn_del =findViewById(R.id.btn_del);btn_equal = findViewById(R.id.btn_equal);btn_clean = findViewById(R.id.btn_clean);textView = findViewById(R.id.textView);btn_0.setOnClickListener(this); //设置按钮的点击事件btn_1.setOnClickListener(this);btn_2.setOnClickListener(this);btn_3.setOnClickListener(this);btn_4.setOnClickListener(this);btn_5.setOnClickListener(this);btn_6.setOnClickListener(this);btn_7.setOnClickListener(this);btn_8.setOnClickListener(this);btn_9.setOnClickListener(this);btn_minus.setOnClickListener(this);btn_multiply.setOnClickListener(this);btn_del.setOnClickListener(this);btn_divide.setOnClickListener(this);btn_point.setOnClickListener(this);btn_add.setOnClickListener(this);btn_equal.setOnClickListener(this);btn_clean.setOnClickListener(this);}public void onClick(View v) {String str = textView.getText().toString();switch(v.getId ()){case R.id.btn_0:case R.id.btn_1:case R.id.btn_2:case R.id.btn_3:case R.id.btn_4:case R.id.btn_5:case R.id.btn_6:case R.id.btn_7:case R.id.btn_8:case R.id.btn_9:case R.id.btn_point:if(clear_flag){clear_flag=false;str="";textView.setText ("");}textView.setText(str+((Button)v).getText ());break;case R.id.btn_add:case R.id.btn_minus:case R.id.btn_multiply:case R.id.btn_divide:if(clear_flag){clear_flag=false;textView.setText("");}textView.setText(str+" "+((Button)v).getText()+" ");break;case R.id.btn_del:if(clear_flag){clear_flag=false;textView.setText ("");}else if (str != null && !str.equals ("")){textView.setText(str.substring(0,str.length()-1)); //删除⼀个字符}break;case R.id.btn_clean:clear_flag=false;str = "";textView.setText(""); //清空⽂本内容break;case R.id.btn_equal:getResult(); //获取结果break;}}private void getResult() { //算法String s = textView.getText().toString();if(s == null || s.equals ("")){return;}if (!s.contains ("")){return;}if (clear_flag){clear_flag=false;return;}clear_flag=true;String str1 = s.substring(0,s.indexOf(" ")); // 获取到运算符前⾯的字符String str_y = s.substring(s.indexOf(" ")+1,s.indexOf(" ")+2); //获取到运算符 String str2 = s.substring(s.indexOf(" ")+ 3); //获取到运算符后⾯的字符double result = 0;if (!str1.equals ("") && !str2.equals ("")){double num1 = Double.parseDouble(str1); //将str1、str2强制转化为double类型 double num2 = Double.parseDouble(str2);if (str_y.equals ("+")){result = num1 + num2;}else if (str_y.equals ("-")){result = num1 - num2;}else if (str_y.equals ("÷")){if (num2 == 0){result = 0;}else {result = num1/num2;}}else if (str_y.equals ("*")){result = num1*num2;}if (!str1.contains (".") && !str2.contains (".") && !s.equals ("÷")){int k = (int) result; //强制转换textView.setText (k);}else{textView.setText (result+"");}}else if (!str1.equals ("") && str2.equals ("")){textView.setText (s);}else if (str1.equals ("") && !str2.equals ("")){double num2 = Double.parseDouble(str2);if (s.equals ("+")){result = 0 + num2;}else if (s.equals("-")){result = 0 - num2;}else if (s.equals("×")){result = 0;}else if (s.equals("÷")){result = 0;}if (!str2.contains (".")) {int r = (int) result;textView.setText (r + "");} else {textView.setText (result + "");}} else {textView.setText ("");}}}这⾥的算法可能写的没有那么好,⼤家可以⽹上找找其他案例参照⼀下,继续完善算法更多计算器功能实现,请点击专题:进⾏学习关于Android计算器功能的实现,查看专题:进⾏学习。
- 1、下载文档前请自行甄别文档内容的完整性,平台不提供额外的编辑、内容补充、找答案等附加服务。
- 2、"仅部分预览"的文档,不可在线预览部分如存在完整性等问题,可反馈申请退款(可完整预览的文档不适用该条件!)。
- 3、如文档侵犯您的权益,请联系客服反馈,我们会尽快为您处理(人工客服工作时间:9:00-18:30)。
Android课程设计基于Android计算器功能的实现所在系(院):学生姓名:指导教师:研究起止日期:目录1、软件产品介绍 (1)2、软件开发环境 (2)3、软件功能说明 (2)4、程序流程图 (2)5、软件介面及程序主要代码 (4)6、设计总结.................................... .. (10)基于Android计算器相关技术概述1、软件产品介绍随着移动通信技术和网络技术的迅速发展,手机系统发生了巨大的变化,从进行简单通话功能的非智能手机到现在集上网、聊天、收发邮件、视屏电话会议等各种服务于娱乐为一身的智能手机系统。
由Google公司牵头众多实力雄厚的软硬件厂商加盟成立了OMS联盟,并推出的Android平台手机系统。
作为时代的新生儿,Android手机操作平台有着得天独厚的优势广阔的发展前景。
本文正是基于Android平台开发的计算器。
计算器作为现在人们日常生活中常用的一种工具已经可以说是人们日常生活中必不可少的工具了。
整个程序基于android技术开发,出总体模块外主要分为输入模块、显示模块以及计算模块(包括一些其他功能)这三大部分。
在整个系统中总体模块控制系统的生命周期,输入模块部分负责读取用户输入的数据,显示模块部分负责显示用户之前输入的数据以及显示最终的计算结果,计算模块部分负责进行数据的运算以及一些其他的功能。
下面较为详细的做了说明。
具体的说,总体模块的作用主要是生成应用程序的主类,控制应用程序的生命周期。
输入模块主要描述了计算器键盘以及键盘的监听即主要负责读取用户的键盘输入以及响应触屏的按键,需要监听手机按键动作以及用指针事件处理方法处理触屏的单击动作(以松开按键为准)。
同时提供了较为直观的键盘图形用户界面。
显示模块描述了计算器的显示区,即该区域用于显示用户输入的数据以及最终的计算结果,同时还负责显示一些其他的信息。
计算模块则主要描述了计算器的整体,实现了计算器的界面,负责计算用户输入数据,包括加、减、乘、除、等各种计算功能以及清零的功能。
用系统框图来表示即如图2-0。
图2-0 系统框图2、 软件开发环境论文主要阐述以面向对象的程序开发语言eclipse 为开发工具, 设计并实现基于 Android 的计算器。
步骤1安装JDK 步骤2安装Tomcat 步骤3安装 Android SDK 步骤4安装Eclipse 步骤5安装Eclipse 的ADT 插件 步骤6 Eclipse 的SDK 配置 步骤7建立AVD 虚拟机3、 软件功能说明系统包括普通计算功能,基本的加减乘除,小数运算以及清零功能。
如图2-1。
如图2-1 功能图4、 程序流程图 知道了系统的功能以后,我们通过main.xml 来建立显示界面,完成后系统开始监听用户的按键输入,每次输入系统都会判断一次用户输入的类型,是数字还是运算符号或者是清除,判断完后分成不同类型如数字,符号,基本运算等等进行进一步的处理,根据用户的要求继续进行下一步的操作,最后计算出最终结果并显示在显示区。
系统流程图如图2-2所示:除法(/)手机计算器 加法(+) 减法(-) 乘法(*) 清零 C 对任意两个数据进行相加的操作 对任意两个数据进行相减的操作 对任意两个数相乘的操作 任意两个数相除的操作,但要符合运算逻辑 清除已经被记忆的数据5、软件介面及程序主要代码1:(1)XML文件生成Main.xml的代码:根据MVC原则,UI应该与程序逻辑相分离,因此,在XML中定义UI结构是强烈推荐的。
常用的方式是用图形化的方式来编写布局Layout,这些布局保存在XML文件中,然后编译成资源,在程序中Activity通过setContentView()方法来加载,然后通过findVi ewByld()方式来获得每一个界面组件的引用。
实现过程及步骤。
在layout文件夹下定义自己的XML页面。
如计算器属性界面的实现如下所示部分代码<?xml version="1.0"encoding="utf-8"?><LinearLayoutxmlns:android="/apk/res/android"android:orientation="vertical"android:layout_width="fill_parent"android:layout_height="fill_parent"><EditText android:id="@+id/txt_input"android:layout_width="240dp"android:layout_height="wrap_content"android:gravity="right"android:text="@stri ng/zero"/>..........</LinearLayout>LinearLayout是线性布局控件,它包含的子控件将以横向或竖向的方式排列,按照相对位置来排列所有的widgets或者其他的containers,超过边界时,某些控件将缺失或消失。
android:id="@+id/txt_input" // 定义了布局的变量名称为txt_input,会自动写进R.java; 在R.Java文件中会生成内部类id,可在主程序里面调用R.id.txt_input来获取这个布局变量实体。
android:orientation="vertical" //这个布局是垂直布局;(水平horizontal)android:layout_width="fill_parent"//设置一个顶部布局或控件强制性让它布满整个屏幕;("wrap_content"设置一个顶部布局或控件强制性让它布满整个屏幕)android:gravity="right" //限定里面的内容向右对齐;(android:layout_gravity="right" 表示在界面上的位置向右对齐)用XML实现用户界面具有以下优点:a)XML文件结构清晰,易于扩展,系统可扩展性好。
b) 用户界面与业务逻辑完全分离,降低了系统界面与业务逻辑的耦合性。
c)XML文件简单易懂,可维护性好。
2:计算器控制逻辑设计与实现代码:CountMain.java用户在输入过程中,肯定会存在一定的错误,程序设计过程中需要对应用程序进行容错处理。
容错设计比如:在输入过程中小数的话只能有一个小数点,操作符不能连续输入,整数数据的开头不能出现0等等。
所以设计了如下代码:// 数字监听public void xianshi(final Button but, final EditText t1) {but.setOnClickListener(new OnClickListener() {public void onClick(View v) {//判断开始是否可以按操作符if (but.getText().toString().equals(".")) {if (strBuff.indexOf("+") != -1|| strBuff.indexOf("-") != -1|| strBuff.indexOf("*") != -1|| strBuff.indexOf("/") != -1) {strBuff.append(but.getText().toString());t1.setText(strBuff);//判断一个操作数中是否可以按多个点} else {if (strBuff.indexOf(".") == -1 && strBuff.length() != 0) {strBuff.append(but.getText().toString());t1.setText(strBuff);}}//判断在什么情况下可以按多个零} else if (but.getText().toString().equals("0")) {if (strBuff.indexOf("0") == 0 && strBuff.indexOf(".") == 1) {strBuff.append(but.getText().toString());t1.setText(strBuff);} else if (strBuff.length() == 0) {strBuff.append(but.getText().toString());t1.setText(strBuff);}//判断第一个按零,接着再按整数的情况时,屏幕的显示} else if (strBuff.indexOf("0") == 0&& strBuff.indexOf(".") == -1) {strBuff.delete(0, strBuff.length());strBuff.append(but.getText().toString());t1.setText(strBuff);} else {strBuff.append(but.getText().toString());t1.setText(strBuff);}}});}运算部分代码:// 符号监听public void jisuan(final Button but1, final EditText t1) {but1.setOnClickListener(new OnClickListener() {public void onClick(View v) {//存放输入的字符String newchar1 = but1.getText().toString();//判断开始是否为等号,输入一个数字后在输入等号没有反映String newchar = "";if (!(newchar1.equals("="))) {newchar = newchar1;}float per1 = 0;//用来存放截取字符串的第一个操作数float per2 = 0;//用来存放截取字符串的第二个操作数//判断按的字符是否为清除键if (newchar.equalsIgnoreCase("c")) {strBuff.delete(0, strBuff.length());t1.setText("0");return;}//判断按的操作符是什么计算字符//判断是否为加法if (strBuff.indexOf("+") != -1&& strBuff.indexOf("+") < strBuff.length() - 1&& strBuff.indexOf("+") != 0) {int i = strBuff.indexOf("+");per1 = Float.parseFloat(strBuff.substring(0, i));per2 = Float.parseFloat(strBuff.substring(i + 1, strBuff.length()));float sum = per1 + per2;strBuff.delete(0, strBuff.length());strBuff.append(sum);strBuff.append(newchar);t1.setText(strBuff);//判断是否为减法} else if (strBuff.indexOf("-") != -1&& strBuff.indexOf("-") < strBuff.length() - 1&& strBuff.indexOf("-") != 0) {int i = strBuff.indexOf("-");per1 = Float.parseFloat(strBuff.substring(0, i));per2 = Float.parseFloat(strBuff.substring(i + 1, strBuff.length()));float sum = per1 - per2;strBuff.delete(0, strBuff.length());strBuff.append(sum);strBuff.append(newchar);t1.setText(strBuff);//判断是否为乘法} else if (strBuff.indexOf("*") != -1&& strBuff.indexOf("*") < strBuff.length() - 1&& strBuff.indexOf("*") != 0) {int i = strBuff.indexOf("*");per1 = Float.parseFloat(strBuff.substring(0, i));per2 = Float.parseFloat(strBuff.substring(i + 1, strBuff.length()));float sum = per1 * per2;strBuff.delete(0, strBuff.length());strBuff.append(sum);strBuff.append(newchar);t1.setText(strBuff);//判断是否为除法} else if (strBuff.indexOf("/") != -1&& strBuff.indexOf("/") < strBuff.length() - 1&& strBuff.indexOf("/") != 0) {int i = strBuff.indexOf("/");per1 = Float.parseFloat(strBuff.substring(0, i));per2 = Float.parseFloat(strBuff.substring(i + 1, strBuff.length()));//判断第二个操作数是否为零,为零则把显示框清零if (per2 != 0) {float sum = per1 / per2;strBuff.delete(0, strBuff.length());strBuff.append(sum);strBuff.append(newchar);t1.setText(strBuff);} else {strBuff.delete(0, strBuff.length());strBuff.append("0");t1.setText(strBuff);}} else {//判断操作符是否能接连不断的点击if (strBuff.length() > 0&& ('0' <= strBuff.charAt(strBuff.length() - 1))&& ('9' >= strBuff.charAt(strBuff.length() - 1))) {strBuff.append(newchar);t1.setText(strBuff);}}}});}@Overridepublic void onCreate(Bundle savedInstanceState) { //这是Activity建立的时候一定会调用的onCreate()方法,第一行是声明super.onCreate(savedInstanceState); //然后是继承原来的onCreate()方法setContentView(yout.main); //然后是载入main这个视图,一般来说是在XML 里定义的// 下面为变量赋值final EditText t1 = (EditText) findViewById(R.id.txt_input);final Button but1 = (Button) findViewById(R.id.but1);xianshi(but1, t1);final Button but2 = (Button) findViewById(R.id.but2);......// 符号final Button but4 = (Button) findViewById(R.id.but4);jisuan(but4, t1);......}}6、设计总结到现在为止,系统的设计和开发已基本完成。