爱康跑步机各型号参数表
滚珠丝杠(选型手册)

酒店健身房配置标准-HyperFit

一. 器材配置标准1.1 净面积约60平米,器械配置约9万元的健身房l小飞鸟机约24000元(台湾产,inotec、matrix、sportart等品牌)l风阻划船机约8000元(美国产,concept2品牌)l风阻单车或滑雪机约8000元(美国产,concept2等品牌)l商用跑步机约22000元(国产正星或台湾产各品牌)l商用椭圆机约16000元(国产品牌)l5-25公斤范围可调节哑铃4只共约3000元(国产)l六角杠铃杆、1.2米短弯杠铃杆、1.6米铝制杠铃杆各一根,共约1200元(国产)l 1.25-15公斤各规格多孔杠铃片共140公斤约3200元(国产)l可调倾斜角度训练凳约3000元(台湾产)l竞技壶铃4、8、12、16kg四种规格各一对,20、24kg各一只(国产metcon等品牌),共约2600元l小道具类,共约1200元① 悬挂训练带(又称TRX)*2(迪卡侬等品牌)② 泡沫轴*2(MDBUDDY、JOINFIT等国内品牌)③ 双孔可悬挂瑜伽垫*4(MDBUDDY、JOINFIT等国内品牌)④ 橡胶炮筒训练器(又称VIPR)4kg*1,6kg*1(MDBUDDY、JOINFIT等国内品牌)1.2 净面积约30平米,器械总配置约6.5万元的健身房l风阻划船机约8000元(美国产,concept2品牌)l商用跑步机约22000元(国产,正星等品牌)l小飞鸟机约24000元(台湾产,inotec、matrix、sportart等品牌)l5-25公斤范围可调节哑铃4只共约3000元(国产)l六角杠铃杆、短弯杠铃杆共约1000元(国产)l 1.25-15公斤各规格多孔杠铃片共140公斤共约3200元(国产)l竞技壶铃4、8、12、16、20kg五种规格各一只(国产metcon等品牌),共约1300元l小道具类,共约1200元:① 悬挂训练带(又称TRX)*2(迪卡侬等品牌)② 泡沫轴*2(MDBUDDY、JOINFIT等国内品牌)③ 双孔可悬挂瑜伽垫*4(MDBUDDY、JOINFIT等国内品牌)④ 橡胶炮筒训练器(又称VIPR)4kg*1,6kg*1(MDBUDDY、JOINFIT等国内品牌)二. 装修标准2.1 净面积60平米左右健身房的健身相关装修项(约2.7万元左右)l15mm木纹PVC运动地垫9000元(每平米单价140元)l设备悬吊及训练功能钢制挂架3000元l更衣室及物件收纳6000元l镜子5000元(每平米单价500元)l电视机4000元2.2 净面积30平米左右健身房的健身相关装修项(约1.7万元左右)l15mm木纹PVC运动地垫4500元(每平米单价140元)l设备悬吊及训练功能钢制挂架2000元l更衣室及物件收纳4000元l镜子3000元(每平米单价500元)l电视机4000元三. 平面示意图3.1 60平米健身房3.2 净面积36平米健身房四. 施工图及设计图样列参见附件。
爱康跑步机避震技术详解
爱康跑步机避震技术详解前言购买跑步机的用户对跑步机减震效果的关注不言而喻!减震不好,身体锻炼了,关节伤了,腿废了,绝对的伤不起!!正确的跑步机踏板避震有助于减轻关节之间的冲击力,在您得到锻炼身体的同时更能保护好您的关节,使得训练时感觉更加舒适。
目前国内常用减震气囊、减震气柱、减震气垫、减震胶来用于跑步机的减震。
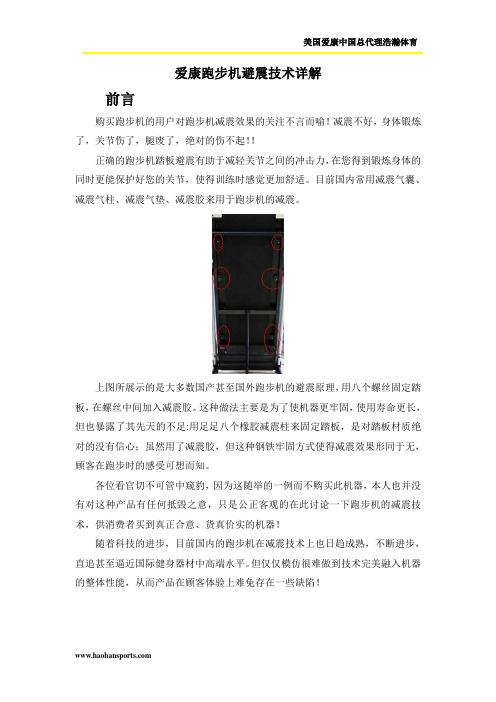
上图所展示的是大多数国产甚至国外跑步机的避震原理,用八个螺丝固定踏板,在螺丝中间加入减震胶。
这种做法主要是为了使机器更牢固,使用寿命更长,但也暴露了其先天的不足:用足足八个橡胶减震柱来固定踏板,是对踏板材质绝对的没有信心;虽然用了减震胶,但这种钢铁牢固方式使得减震效果形同于无,顾客在跑步时的感受可想而知。
各位看官切不可管中窥豹,因为这随举的一例而不购买此机器,本人也并没有对这种产品有任何抵毁之意,只是公正客观的在此讨论一下跑步机的减震技术,供消费者买到真正合意、货真价实的机器!随着科技的进步,目前国内的跑步机在减震技术上也日趋成熟,不断进步,直追甚至逼近国际健身器材中高端水平。
但仅仅模仿很难做到技术完美融入机器的整体性能,从而产品在顾客体验上难免存在一些缺陷!经过多年对器材和市场的研究,使我对跑步机颇有一些心得。
机器虽小,动辄上千上万,所以大家买得也会非常小心谨慎。
一篇文章就能把跑步机的购买须知写得细致入微也是天方夜谭。
在此重点叙述一下跑步机有关减震的技术。
为大家推荐一下爱康跑步机,只要在各大商场淘过健身器材的人都会略知一下爱康,它是美国健身器材的知名品牌,被国际社会公认为世界健身器材行业的领头羊,健身器材界的超级航母。
根据SMRG年度报告,早在2006年美国健身器材市场份额中,按年销售台数和年销售金额排,爱康均位居第一。
现在市场上跑步机卖得比较好的品牌多不胜数,他们确实在各自领域内各有千秋,但就减震来说,爱康的老大地位绝对是不可撼动的,下面详细介绍一下!一、“悬空”设计。
这是爱康在减震技术上最大的亮点!无论是国内还是国外品牌,只此一家,别无分店!至于什么是悬空,不必长篇大论的文字解释一番,有图有真相,大家一看便知!悬空示例一悬空示例二跑步机的踏板与支架完全分离!看似简单的技术需要设计师们付出的心血是不可想像的!能做到这点需要十分精良且优越的踏板材质,否则只能像其他品牌的跑步机一样,用八个橡胶减震柱来顶住踏板和支架,以求得跑步机的生命持续,这也是爱康对自己产品的绝对信心!这种悬空设计带给顾客的最大好处就是“健康”的健身。
十大不建议买的跑步机排行榜

十大不建议买的跑步机排行榜虽然质量好的跑步机有很多,但还是有很多朋友后悔买了家用跑步机,因为有些太垃圾了,根本无法满足正常的使用需求,下面我们就来说说十大不建议买的跑步机,希望能帮到大家,避开跑步机的坑。
一、千元机预算1000元的跑步机是真心不建议大家买,多数买这种跑步机的都是交智商税了,用料真的是省到极致,除去运营费用和利润还有多少成本在里面,大家应该也是能想的到的。
买跑步机要考虑比较多的因素在里面,比如马达、跑带宽度、减震效果、静音效果等等,基本上能谈到减震静音的已经在3000价位了。
如果你的体重超过150斤,市面上也没什么1000元的跑步机能适合你,买回去也基本跑不了,跑几分钟马达发热、故障……关键是一点体验都没有!还不如去户外跑跑。
不知道买哪款跑步机好?建议参看《十款性价比高的跑步机推荐》。
二、杂牌机跑步机品牌是非常多的,国际品牌,国内品牌,互联网品牌,甚至山寨杂牌等一应俱全,对于没有知名度的品牌还是要谨慎一些,以免买来后成了晾衣杆……杂牌跑步机典型的减震偷工减料或者直接就没有,有很多黑心健身房使用劣质杂牌跑步机,没有减震措施,给使用者造成膝盖损伤,还拒不负责。
选购的时候我们一定要做好充分的市场调研和品牌分析。
哪些是杂牌机?具体的我就不太方便透露了,毕竟这会引来一些不必要的纷争。
像前两年的某强、启某斯都倒闭了,伊某康也销声匿迹了,这类型品牌我建议大家都要慎重对待。
国际上比较大牌的有爱康、乔山、锐步、司特拉、岱宇等,国内也有很多品质不错的牌子,像舒华、英派斯、汇祥等,无论从材质、性能上都比那些杂牌子要好很多,而淘系品牌或者一些不知名的杂牌子,质量和售后就一言难尽了。
如果你不知道跑步机什么牌子好请参看:《全球跑步机十大品牌排名_口碑最好的家用跑步机排名》品牌的知名度代表了:专业度,研发能力,品质品控,服务能力等,千万擦亮眼睛。
怎么判断专业品牌:看品牌历史,30年以上的品牌,看经销商分布,全国至少要百家以上经销商,看实体店,全国至少要有50家实体店,看产品线,一定要有全线健身器材生产能力,也就是说健身房里面的所有都覆盖,这类品牌都不会差到哪里去。
PBK9-series高精度称体产品说明书

I n s t a ll ati o n I nf o rm ati o nCongratulations on choosing the quality and precision of METTLER TOLEDO. Properuse of your new equipment according to this User manual and regular calibration andmaintenance by our factory-trained service team ensures dependable and accurateoperation, protecting your investment. Contact us about a service agreement tailored toyour needs and budget. Further information is available at/service.There are several important ways to ensure you maximize the performance of yourinvestment:1. Register your product: We invite you to register your product at/productregistrationso we can contact you about enhancements, updates and important notificationsconcerning your product.2. Contact METTLER TOLEDO for service: The value of a measurement is proportionalto its accuracy – an out of specification scale can diminish quality, reduce profits andincrease liability. Timely service from METTLER TOLEDO will ensure accuracy andoptimize uptime and equipment life.–Installation, Configuration, Integration and Training:Our service representatives are factory-trained, weighing equipment experts. Wemake certain that your weighing equipment is ready for production in a costeffective and timely fashion and that personnel are trained for success.–Initial Calibration Documentation:The installation environment and application requirements are unique for everyindustrial scale so performance must be tested and certified. Our calibrationservices and certificates document accuracy to ensure production quality andprovide a quality system record of performance.–Periodic Calibration Maintenance:A Calibration Service Agreement provides on-going confidence in your weighingprocess and documentation of compliance with requirements. We offer a varietyof service plans that are scheduled to meet your needs and designed to fit yourbudget.2 PBK9-series 30233012AContents1 Safety information for operation in the Ex area (4)2 Installation (6)2.1 Preparatory work (6)2.2 Setting up (7)2.3 Levelling (8)2.4 Lengthening and installing connection cable (9)2.5 Equipotential bonding in hazardous areas (9)2.6 Connecting PBK98_APW weighing platforms (10)2.7 Commissioning (13)3 Configuration possibilities (14)3.1 General information (14)3.2 Configuration data in the factory setting (15)4 Planning assemblies (16)4.1 Notes on planning (16)4.2 Preload range (16)4.3 Mounting possibilities (17)5 Dimensions (21)3 30233012A PBK9-series1 Safety information for operation in the Ex area ▲The PBK9-series high precision weighing platforms except PBK989-XS0.6 are approved for operation in Zone2 (gases), Zone 22 (dusts) and DIV 2 hazardous areas. There is an increased risk in injury and damage when using the explosion-protected weighing platforms in a potentially explosive atmosphere. Special care must be taken when working in such hazardous areas. ▲Any protective foils present in the hazardous area, e.g. on the load plate, must always be removed. ▲In hazardous areas, the weighing platforms may only be installed, maintained and repaired by authorized METTLER TOLEDO service personnel. ▲No modifications may be made to the weighing platform and no repair work may be performed on the system modules. Any weighing platform or system modules that are used must comply with the specifications contained in the installation instructions. Non-compliant equipment jeopardizes the intrinsic safety of the system, cancels the "Ex" approval and renders any warranty or product liability claims null and void. ▲The safety of the weighing system is only guaranteed when the weighing system is operated, installed and maintained in accordance with the respective instructions. ▲Also comply with the following: –the instructions for the system modules, –the regulations and standards in the respective country, –the statutory requirement for electrical equipment installed in hazardous areas in the respective country, –all instructions related to safety issued by the owner. ▲The explosion-protected weighing system must be checked to ensure compliance with the requirements for safety before being put into service for the first time, following any service work and every3 years, at least. ▲Prevent the build-up of static electricity. Always wear suitable working clothes when operating or performing service work in a hazardous area. Avoid strong mechanical rubbing of the powder-coated surfaces against any material when operating in Zone 22. ▲Do not use protective coverings for the devices. ▲Avoid damage to the system components. ▲If system damage occurs, the system must be put out of operation immediately. ▲Damaged system components must be replaced petenceEx approval Operation4Safety information for operation in the Ex area PBK9-series 30233012A▲Only install or perform maintenance work on the weighing system in hazardous areas if the following conditions are fulfilled: –the intrinsically safe characteristic values and zone approval of the individual components are in accord with one another, –the owner has issued a permit ("spark permit" or "fire permit"), –the area has been rendered safe and the owner's safety coordinator has confirmed that there is no danger, –the necessary tools and any required protective clothing are provided (danger of the build-up of static electricity). ▲The certification papers (certificates, manufacturer’s declarations) must be present. ▲Lay cabling fixed and securely, bending radius > 5 x cable diameter. ▲Do not cut through cables. ▲The explosion protected PBK9-series high precision weighing platforms may onlybe operated in hazardous areas of Zone 2 (gases), Zone 22 (dusts) and DIV 2 in conjunction with weighing terminals that have the appropriate approval and interface specification.▲The connection cable may not be separated from the weighing terminal while it isenergized.▲Tighten the knurled nut of the M12 connection cable with a tightening torque of 10 Nm. ▲Before setting up the system secure the connection between weighing terminal andweighing platform.InstallationAdditional requirements for Zones 2/22 or DIV 25 Safety information for operation in the Ex area 30233012A PBK9-series2 Installation2.1 Preparatory work2.1.1 Selecting installation location▲The foundation at the installation location must be capable to safely support theweight of the weighing platform at its support points when it carries the maximumload. At the same time, it should so stable that no vibrations occur during weighingoperations. These requirements also apply when the weighing platform is integratedin conveying systems and the like.▲Ensure that the ground at the installation location is even.▲Ensure that there are no vibrations from machines near the installation site.▲Ensure that there are no drafts at the installation site.EXPLOSION HAZARDPBK989-XS0.6 is not approved for hazardous areas.▲Do not use PBK989-XS0.6 in any kind of hazardous areas.2.1.2 Ambient conditions• Use powder-coated/enamelled weighing platforms only in a dry environment.• In a damp environment, in wet operation or when working with chemicals: Usestainless-steel weighing platforms.2.1.3 Accessories➜Completely unpack the accessories provided with the weighing platform.– 1 bottle of oil, suitable for foodstuffs– 1 set of measuring data signs for selectable configurations–Optional: ACC409xx-SICSpro-IDNet converter (incl. identcard kit)6Installation PBK9-series 30233012A2.2 Setting up2.2.1 PBK989-XS0.61. Unpack weighing platform (1), windshield (2), load plate support (3) and load plate (4).2. Mount the load support (3) on the weighing platform.3. Put the windshield (2) on.4. Put the load plate (4) on the load support.2.2.2 PBK989-A3 / PBK989-A61. Remove the weighing platform from the packing.2. Lift off the load plate.3. Remove the transport locks (3 cardboard strips).4. Put the load plate on.2.2.3 PBK989-A15 / PBK989-A30 / PBK-A60➜Remove the weighing platform from the packing.2.2.4 PBK98_-B60 / PBK98_-B1201. Remove the weighing platform from the packing.2. Lift off the load plate.3. Remove the transport locks from the corners (4 cardboard angles).4. Put the load plate on.7 Installation30233012A PBK9-series2.2.5 PBK98_-CC150 / PBK98_-CC3001. Remove the weighing platform from the packing.2. Remove the load plate by pivoting the two side handles (1) outward.3. Remove the transport locks (2 x 2 cardboard strips between lever and base frame + 4 cardboard angles in the corners).4. Replace the load plate (2) so that the symbol is located above the level indicator.5. Make sure that the load supports (3) in the corners of the weighing platform are vertical.2.3Levelling Notes • Only weighing platforms that have been levelled precisely horizontally provide accurate weighing results. • Redo levelling when the weighing platform has been moved.1. Level the weighing platform with the 4 foot bolts (1) using the level indicator (2): The air bubble of the level indicator must come to rest within the ring marking.2. Ensure even contact of the foot bolts. Every foot must stand safely and must have full contact with its entire surface. Check the stability of the weighing platform by pressing down on or rocking it at the corners.3. Lock the foot bolts with the nuts.18Installation PBK9-series 30233012A2.4 Lengthening and installing connection cableThe connection cable may be lengthened.Standard version up to 100 mEx version up to 50 m➜Route the connection cable directly out of the weighing platform to the weighingterminal or the ConBloc (PBK98_APW weighing platforms only).CAUTIONIf the cable is laid in a pipe, ensure that the pipe is of a sufficient diameter.2.5 Equipotential bonding in hazardous areasThe equipotential bonding must be installed by a professional electrician when using theweighing platform in hazardous areas. METTLER TOLEDO Service only has a monitoringand consulting function here.➜Connect equipotential bonding (PA) of all devices (weighing platform and serviceterminal) in accordance with the country-specific regulations and standards. In theprocess, make sure that all device housings are connected to the same potential via1 Serrated lock washer A 4.3 DIN 67982 Hexagonal lock nut M4 DIN 9343 Base frame4 Washer 4.3 DIN 1255 Equipotential bonding clampMounting materials are enclosed with the weighing terminal for hazardous areas, e.g.IND690xx.9 30233012A PBK9-seriesInstallation2.6 Connecting PBK98_APW weighing platforms2.6.1 Typical configurationsTo connect the PBK98-APW weighing platform to its environment, the ConBlock /ConBlock IP66 is recommended.Direct connection to the PLCA210Installation PBK9-series 30233012AConnection to the PLC via Fieldbus module2METTLER TOLEDO components1 PBK98_APW weighing platform2 ConModule connection module / ConBlock IP66 connection module with IP66housing3 Fieldbus module (Profibus, Profinet, DeviceNet, Ethernet/IP, CC-Link)Customer componentsA Connection cable to PLC, RS232 or RS422/RS485B PLCC PC or laptop (for configuration and service purpose)D Standard RS232 cable (DB9 male/female)E Cable, 1 m, D-Sub 9 male <–> open endsF Fieldbus cable2.6.2Installation with weighing platforms used in hazardous areasEXPLOSION HAZARDConBlock / ConBlock IP66 is not approved for hazardous areas.▲Only install the ConBlock / ConBlock IP66 in the safe area.▲Always use a suitable safety barrier to separate equipment located in the hazardousarea from the safe area.11Installation30233012A PBK9-series2.6.3 ConBlock / ConBlock IP66 connection1 System connection side: 10 terminals2 Weighing platform connection side: 2 x 10 terminals3 RS232 interface (D-Sub 9), for configuration and servicingConBlock connections – weighing platform sideThe PBK98_APW weighing platform is delivered with a 12 wire open end cable. The corresponding terminals of the ConBlock are identified by the wire color and the respectivepin designation.ConBlock connections – system sideThe connection terminal strip is grouped according to the following functions: RS232 andRS422/RS485 interface, input voltages and digital inputs and outputs.RS422 / RS485 configurationThe RS422 interface is directly avalable via the connection terminals. For the RS485 configuration, the following signals must be connected:A–: Tx– and Rx–B+: Tx+ and Rx+31212Installation PBK9-series 30233012ALoad cell connector2.7 Commissioning➜Switch on the weighing system at the final location only.When switching on the weighing system for the first time, it will perform an automaticgeo code adjustment using the calibration weight which is integrated in the load cell.13 30233012A PBK9-seriesInstallation3 Configuration possibilities3.1 General information3.1.1 MultiIntervalMultiInterval precision means automatic switchover of the numerical increment (readability) in dependence on the applied load.3.1.2 Single Range and High ResolutionSingle Range and High Resolution mean that the numerical increments (readability) remain the same across the entire weighing range.3.1.3 Additional setting options• All other adjustment variables (adjustment to the weighing process and vibrations, aswell as adjustment of stability monitoring and the zero point correction) are adjusted to the usual user conditions, however, they can be changed in the Scale menu of the weighing terminal if necessary.• When ordering the IDNet option, the ACC409xx-SICSpro-IDNet converter including theidentcard kit and a set of measuring data signs for the selectable configurations is delivered.• If the standard configuration does not meet your needs, it is possible to reconfigure theweighing platform with the terminal. To do this, see the terminal operating instructions.• Apply the selected configuration corresponding to the factory-mounted measuringdata sign to the Identcard, and the Max-Min sign near the IDNet terminal display.• When the configuration is changed, it is also possible to change the preload range inaddition to the weighing range and the readability.NumericalNumerical 14Configuration possibilities PBK9-series 30233012A3.2 Configuration data in the factory setting15 30233012A PBK9-seriesConfiguration possibilities4 Planning assemblies4.1 Notes on planningDue to their design characteristics, the weighing platforms are suitable for installation inconveying systems. The following specifications and dimensional drawings form the basisfor the design of the required assemblies.• The weighing platform may only be supported by the support feet, and never by theframe or lever parts.• The weighing platform may only be permanently installed on the support feet.• Moving or rotating parts on the weighing platform must be designed so that they donot affect the weighing result. Balance rotating parts.• The load plate must be free on all sides so that there is no connection between theload plate and permanently mounted parts, even by falling parts or dirt deposits.• Lay cables or hoses between the weighing platform and other machine parts so thatthey do not exert any force on the weighing platform.CAUTIONWhen mounting assemblies, make sure that no metal chips get into the weighing platform.➜Remove the load plate rfrom the weighing platform before working on the load plate.4.2 Preload rangeThe weight of the structural parts permanently mounted on the weighing platform is referredto as "preload". The preload is electrically compensated in the weighing platform so thatthe full weighing range is available. The maximum preload (or the zero-setting range) thatcan be compensated dispends on the configured weighing range.For the preload range of the individual weighing platform refer to section "3.2 Configurationdata in the factory setting" on page 15.CAUTIONThe assemblies must already be mounted when connecting the weighing platform.16Planning assemblies PBK9-series 30233012A4.3 Mounting possibilitiesMounting possibilities PBK989-A3 / PBK989-A6L Level bubble Dimensions in mm• Bridge assemblies can be mounted in the shaded areas.Recommended mounting type: Bolting on, welding on.• Remove the load plate and drill through for this purpose.• Mounting parts (e.g. bolts and nuts) may extend to a maximum of 7 mm beyond theunderside of the load plate.Technical version: 11/201417Planning assemblies30233012A PBK9-seriesMounting possibilities PBK989-AB15 / PBK989-AB30L Level bubble Dimensions in mm• Bridge assemblies can be mounted in the shaded areas.Recommended mounting type: Bolting on, welding on.• Remove the load plate and drill through for this purpose.• Mounting parts (e.g. bolts and nuts) may extend to a maximum of 7 mm beyond theunderside of the load plate.Technical version: 11/201418Planning assemblies PBK9-series 30233012AMounting possibilities PBK98_-B60 / PBK98_-B120L Level bubble Dimensions in mm• Bridge assemblies can be mounted in the shaded areas.Recommended mounting type: Bolting on, welding on.• Remove the load plate and drill through for this purpose.• Mounting parts (e.g. bolts and nuts) may extend to a maximum of 10 mm beyondthe underside of the load plate.Technical version: 11/201419Planning assemblies30233012A PBK9-seriesMounting possibilities PBK98_-CC150 / PBK98_-CC300L Level bubble Dimensions in mm• Bridge assemblies can be mounted in the shaded areas.Recommended mounting type: Bolting on, welding on.• Remove the load plate and drill through for this purpose.• Mounting parts (e.g. bolts and nuts) may extend to a maximum of 10 mm beyondthe underside of the load plate.Technical version: 11/201420Planning assemblies PBK9-series 30233012A5 DimensionsDimensions PBK989-XS0.6Dimensions in mmH Adjustable with 4 foot boltsMin. H = 115 mmMax. H = 127 mmFS Foot boltRequired area D = 40 mm dia.Spanner size = 17 mmThread = M10C Cable connectionL Level bubbleTechnical version: 11/201421 30233012A PBK9-seriesDimensionsDimensions PBK989-A3 / PBK989-A6Dimensions in mmH Adjustable with 4 foot boltsMin. H = 135 mmMax. H = 147 mmFS Foot boltRequired area D = 40 mm dia.Spanner size = 17 mmThread = M10C Cable connectionL Level bubbleTechnical version: 11/201422Dimensions PBK9-series 30233012ADimensions PBK989-AB15 / PBK989-AB30Dimensions in mmH Adjustable with 4 foot boltsMin. H = 132 mmMax. H = 144 mmFS Foot boltRequired area D = 40 mm dia.Spanner size = 17 mmThread = M10C Cable connectionL Level bubbleTechnical version: 11/201423 30233012A PBK9-seriesDimensionsDimensions PBK98_-B60 / PBK98_-B120Dimensions in mmH Adjustable with 4 foot boltsMin. H = 127 mmMax. H = 152 mmFS Foot boltRequired area D = 35 mm dia.Spanner size = 17 mmThread = M10C Cable connectionL Level bubbleTechnical version: 11/201424Dimensions PBK9-series 30233012ADimensions PBK98_-B60 / PBK98_-B120 with roller conveyerDimensions in mmH Adjustable with 4 foot boltsMin. H = 127 mmMax. H = 152 mmTechnical version: 11/201425 30233012A PBK9-seriesDimensionsDimensions PBK98_-CC150 / PBK98_-CC300Dimensions in mmH Adjustable with 4 foot boltsMin. H = 115 mmMax. H = 140 mmFS Foot boltRequired area D = 35 mm dia.Spanner size = 17 mmThread = M10C Cable connectionL Level bubbleTechnical version: 11/201426Dimensions PBK9-series 30233012ADimensions PBK98_-CC150 / PBK98_-CC300 with roller conveyorDimensions in mmH Adjustable with 4 foot boltsMin. H = 115 mmMax. H = 140 mmTechnical version: 11/201427 30233012A PBK9-seriesDimensionsFor more information/supportMettler-Toledo (Albstadt) GmbHD-72458 AlbstadtTel. + 49 7431-14 0Fax + 49 7431-14 232Subject to technical changes© Mettler-Toledo (Albstadt) GmbH 01/2015 30233012A *30233012A* *30233012A*。
进口品牌跑步机的优势与劣势分析

进口品牌跑步机的优势与劣势分析进口品牌的跑步机比国产跑步机好,似乎成了一种常识。
那么,是不是所有的进口品牌跑步机都是“精兵强将”呢?也不尽然。
常见的跑步机进口品牌有爱康、乔山、射肯 SOLE、岱宇、BH等,那么这几个牌子的跑步机谁更胜一筹呢?实际上,一个跑步机品牌,能够打入国际市场,都有自己的优势。
一位专业的健身教练,总结了自己健身方面10余年的经验,对如今市场上热销的进口品牌跑步机做出了如下点评。
爱康ICON:推荐指数10爱康是美国品牌,是当今世界销量第一的健身器材公司,旗下健身产品非常丰富,占据欧美家用健身器材市场80%以上的市场份额。
爱康旗下拥有众多知名品牌,包括NordicTrack、PRO-FORM、HEALTHRIDER、WESLO、WEIDER、IMAGE、FREEMOTION、GOLDS、GYM EPIC、REEBOK等。
爱康旗下诺迪克品牌为高端健身用品的代表,其主色调为深蓝色,以身心合一为主题,在全球范围内拥有着数百万的消费者,目前已经是成功人士和都市白领健身品牌的首选。
关注健身器材的朋友,可能熟知爱康这个品牌,因为爱康在全球与众多知名零售商合作,著名的如沃尔玛、金吉姆、JJB SPORTS、DICKS 、迪卡侬等,用户可以很方便地在身边的商场买到爱康的产品。
目前,现在国内家用跑步机里面只有爱康是有美国原装进口的机器,因此属于高端产品,之前价格一直较高,但是近年推出的几款经济型产品与其他国际品牌相比性价比极其突出,使其国内市场的份额日益增大。
射肯CIRCLE:推荐指数9射肯跑步机是注册在德国的品牌,工厂设立在台湾,2009年进入中国大陆市场。
先期进入的为射肯(CIRCLE)品牌商用系列,主要面对高端健身俱乐部以及企事业单位健身房。
射肯旗下Smooth史慕斯品牌定位于欧美市场,进军中国市场重新包装了家用系列邦仕(BOUNCE)品牌,该在保留了史慕斯经典高端的基础上,加入了适合于中国高端消费者审美的元素,以满足中国消费者的审美需求。
EZON宜准智能跑步运动表说明书

蓝牙心率带需另行购买目 录1. 产品简介 (1)2. 功能特征 (1)3. 显示符号与按键功能 (2)3.1. 显示符号 (2)3.2. 按键功能 (2)4. 休眠状态 (4)5. 手表电池充电 (5)6. 下载手机APP (5)7. 查看时间日期 (6)8. 查看计步器数据 (6)9. 运动测量前准备 (7)9.1. 戴上心率带 (7)9.2. 配对心率带 (8)9.3.接收GPS信号 (9)10. 运动测量 (10)10.1. GPS运动模式 (10)10.2. 实时查询运动数据 (10)10.3. 运动签到 (12)10.4. 暂停GPS 测量 (12)10.5. 结束GPS 测量 (13)10.6. 查询运动数据 (13)11. 跑表 (14)11.1. 跑表模式 (14)11.2. 单段计时 (15)11.3. 圈计时 (15)11.4. 查询跑表数据 (16)12. 提醒功能 (16)13. 在手表进行设置 (17)13.1. 设置显示 (17)13.2. 设置时间 (18)13.3. 设置日期 (18)13.4. 设置目标步数 (19)13.5. 设置个人信息 (20)14. 防水性 (20)15. 注意事项 (21)16. 产品规格 (21)17.有害物质的名称及含量表 (22)1. 产品简介感谢您购买EZON宜准智能跑步运动表,本表内置GPS接收器、心率计、计步器,可测量运动距离、运动配速、运动速度、运动时蓝牙心率带(含发射器和弹性带)需另行购买!如果未购买心9.1和9.2章节以及与心率带相关的内容。
于耗尽状态,会导致电池性能下降。
2. 功能特征锻炼记录卡 路 里背 景 光心 率 计计 步 器计时码表锻炼距离锻炼配速闹钟提醒来电提醒久坐提醒运动提醒心率提醒蓝牙连接GPS授时中文显示3.2. 按键功能在时间模式:1) 按住[A ]键,(GPS 未开启时);接收GPS 信号2)按[B ]键,切换显日期、秒、剩余电量;3)按住 [B ]键,进入设置菜单(GPS 未开启时);4)按[C ]键,进入记录模式;5)按[D ]键,进入跑表模式;6) 按[E ]键,进入计步器模式(GPS 未开启时)或者进入GPS 模式(GPS 已开启)。
多功能电动跑步机

多功能跑步机FP-92352一、电子表功能说明:1、PO(MANUAL)为用户设定训练程序,P1-P8为内置自动训练程序,BODY FAT为体脂测试功能;2、6吋LCD蓝底白字显示屏,18个操作键,左右手柄快捷键功能;3、双声道MP3播放功能;4、运行速度范围:1.0~16.0KM/H;5、扬升坡度范围:0~15%;6、心率检测范围:50~199BPM;7、超载、过流保护,防爆冲,防飞车,抗电磁干扰等安全保护功能;8、系统自检,异常信息提示功能;二、LCD显示说明:1、“DISTANCE”视窗:上电时显示系统版本号,在停止状态下,显示训练程序的序号,在运行状态下显示距离的数值,在测脂程序中,显示设置项目的序号2、“CALORIES”视窗:显示热量的数值,在测脂程序中,显示设置参数和BMI值;3、“TIME”视窗:主要显示时间的数值;跑步机启动时显示5秒倒计时;暂停中显示“PAUS”;停止过程中显示“STOP”;自动程序中运行结束时显示“END”;异常状态下显示“ERR”提示序号;在测脂过程中不显示;4、“INCLINE/PULSE”视窗:测试心率时“PULSE”字符亮,显示心率的数值;否则“INCLINE”字符亮,显示坡度的数值;5、“SPEED”视窗:显示速度之;在测脂程序中不显示;6、“SPEED”表盘:指示速度值,在测脂程序中不显示;7、安全离位后,全屏显示“———”;三、键盘操作说明:1、“程序/Program”:程序选择键,停止状态下,循环选择程序PO(MANUAL)—P1—P2—P3—P4—P5—P6—P7—P8—BODYFAT—PO———;2、“PO(MANULA)”为用户程序,“BODYFA T”为体脂测试功能;3、“选择/Select”:模式选择键,停止状态下,在PO(MANULA)中循环选择计时—倒计里程—倒计卡路里—正计时共四种运行模式;在P1-P8为倒计时间默认值(30分钟)复位键;在BODY FA T中依次选择体脂测试中的项目序号:F1、F2、F3、F4、F5、;4、“开始/Start”:启动/暂停键,在停止状态下,启动跑步机;在运行状态下,暂停跑步机;5、“停止Stop”:停止键,有三种功能:1、在运行状态下,停止跑步机;2、显示“ERR”提示信息时,清除一次显示信息;3、坡度功能异常时,长按2秒,关闭坡度控制功能;6、“+”:速度递加键,在停止或测脂状态下,为设定参数递加键,在运行状态下,为速度递加键;7、“—”:速度递减键,在停止或测脂状态下,为设定参数递减键,在运行状态下,为速度点递减键;8、“速度快捷/Quick Speed”:速度快捷键,在跑步机运行状态下,直接设定速度为键位指定值;9、“VOLUME+”:音量递加键;10、“VOLUME—”:音量递减键;11、“▲”:在跑步机运行状态下,为坡度递加键;12、“▼”:在跑步机运行状态下,为坡度递减键;13、“坡度快捷/Quick Incline”:坡度快捷键,在跑步机运行状态下,直接坡度为键位指定值;14、左手柄“INCLINE/坡度+”:手柄坡度递加键;功能与键盘的坡度递加键相同;15、左手柄“INCLINE/坡度-”:手柄坡度递减键;功能与键盘的坡度递减键相同;16、右手柄“SPEED/速度+”:手柄速度递加键;功能与键盘的速度递加键相同;17、右手柄“SPEED/速度-”:手柄速度递减键;功能与键盘的速度递减键相同;18、“STOP”+ “VOLUME+”语音开/关组合键:在跑步机停止状态下,先按住“STOP”键不放,再按“VOLUME+”键,用于启动或关闭语音功能;(此组合功能只为带有语音提示功能的机型使用。