Blueair_E_Series_INT
2015 SeamFil 色彩匹配指南 - 皮亚迪色彩匹配说明书

2015SEAMFIL COLORMATCHING GUIDEPIONITE COLORSINSTRUCTIONS FOR USING THIS CHARTThe following is a list of PIONITE colors and the SeamFil colors needed to match them. Find the desired color in the left-hand column. SeamFil color numbers appear to the right under their approximate mixing proportions. It may be necessary to increase or decrease proportions to improve the color match. The number 1 in the chart means that essentially 100% of the given color is used. “SlightSW812 TAWNY WHITE901904SW813 ICE WHITE901914 SW826 ANGEL WHITE901914 SW836 WINTER WHITE901902SY913 FORSYTHIA936937 SY914 PRIMARY YELLOW901936PATTERNSAB051 INDIGO ORGANIX 914903AB081 AZZURRA946903AB141 BALTIC FRESCO946914901+937 AB221 CRADLE OF LIBERTY946903901 AB291 BRIDE OF THE SEA901903946937AE011 CHARCOAL CHROMAT.901914AE021 GRAPHITE SPEKTRUM903914AG011 ESTELLA903AG021 SABLE914903AG031 FIRST N MAIN914903AG041 SHOOTING STAR913914AG071 MACADAMIA NUT902934AG081 SUGAR PIE90290 AG130 COOKIES & CREAM901903AG180 METEORIC METALLO903AG281 STORM CIRRUS903914 AG291 GRAY SANTOS902901903AG331 STONEDUST CREPE902901903913AG361 GRAPHITE TALC934914AG371 CARDAMON FIBER901913903AG381 MINERAL TALC901904913936 AG431 GRAY LINEN934902903AG471 CINDER GRAY CONCRETE934902903AG500 CAKE BATTER902934903AG561 CUBICLE PAPEL902940 AG601 PEARL OF THE ORIENT902903AG611 GRAVEYARD OF THE ATLANTIC902903AT101 OATMEAL FIBER901936913+918 AT106 GRANDIOSE GRID913903933AT121 MOROCCAN FRESCO918940941936 AT161 ROCKY MTN. HIGH941904 AT181 AGATHA933934903 AT191 VIOLA904933934AT231 MANILA LINEN904933AT241 CINNAMON FIBER933936AT251 BEIGE CREPE904933AT291 CHAMOMILE FIBER933936AT301 BEIGE LINEN934942902AT341-H HERE COMES THE SUN941931937 AT351 OASIS IN THE DESERT903933941940 AT361 STAR OF THE WEST933941940AT371 CRESSIDA913939AT391 PHOENIX913940AT440 CONNECTED CUBES902934AT610 WOVEN WEAVE935AT650 CAVALCADE SOUTH902941AT660 CRISSCROSS904941AT680 TRAVELIN LIGHT904903AT700 GROUNDWELL913903904AT710 GOLD PANNIN903933AT931 TERRE COTTA ORGANIX933918937913AT951 NEUTRAL SANTOS901902935913AT965 MELLOW MARRON903913933 AT970-C MUD PIE913933AT991 WHEAT FIBER901904931 AV100 GATEWAY TO THE FUTURE941904945AV110 TROPICAL GETAWAY902939903 AV250 PASSIN THROUGH903904AV674 OLIVE ORGANIX903933939AV711 EMERALD SANTOS945914904+936 AV721 THYME FIBER939904914945 AV751 CELERY FIBER904941AV771 AGEAN FRESCO945914+941946 AV781 SAGE CORAL903902904AV791 SLATE ELEMENT903914AV801 OLIVE SERENITY904913939945AV861 KALE FIBER903946945 AV971 MOONLIGHTING PAPEL903902940 AV981 IL PALIO PAPEL902904903945 AW141 ROCK OF AGES901902AW785 WHITE SPEKTRUM902901914AW841 IVORY CIRRUS902901AW871 VANILLA FIBER901941AY120 GINGER SNAP933934LG110 IVORY KID LEATHER901902904 ME011 PYRENEES MARBLE914901ME031 BLACK GRANITE903914 ME051 ARCTIC FLASH903914MG071 BERNARD902903904MG120 HAROLD903904MG130 ABRAHAM913914933MG160 UPLAND STONE903914MG170 HEDGEROW903902913 MR120 LOUISE*902903935937933 MR125 THEODORE913940MR130 ROSE GRANITE902903MR170 CANDELA903933934946 MT260 SANTIAGO934935MT280 ROCKY ROAD902913935MT290 WILHELMINA931934MT300 NATURAL LIMESTONE901913+941919 MT310 FREDERICK934931MT330 CITY OF LIGHTS941935 MT340 ROCK AROUND THE CLOCK941902 MT390 HAZEL933918 MT411 ROCK ON935933 + 939MT440 CORNWALL934902903 MW550 WHITE FIESTA901902MW570 POLAR CAP901903 PFA39 SINGING THE CHICAGO BLUES903946937PFA42 TEA PARTY IN BOSTON901913 + 935PFA45 ALIVE IN MEMPHIS904913940946 PFA48 SIPPING SEATTLE JAVA918940941PFA51 GRIDLOCK IN L.A.904913 +940901 PFA54 STREETS OF SAN FRANCISCO902904934PFA60 NEGOTIATING IN GENEVA902901 + 903WF131 VANA941901 WF181 ICE FISHIN901914 WOODGRAINSHP272 WANDERER931933940HP336 SUNSET913940941 HP359 THUNDERSTORM913HP360 AFTERNOON SHOWERS933940913 WA001 CLEAR ASH931901WA011 SUMMIT ASH933913937 WB071 SELECT B-BLOCK901931918WC115 AIMTOO SAVATRE934933937 WC210 CHOCOLATE MALT935934903WC230 BUTTER TOFFEE934903913 WC331 VICTORIAN CHERRY918940WC411 YORKSHIRE CHERRY918933940WC421 OILED CHERRY931940918 WC431 MILLWORK CHERRY933936 WC521 SHAKER CHERRY918933940WE261 WHITE ELM901935933WG101 ACADIA BEECH931933940WM115 SUGAR MAPLE II 941942WM221AMBER CURLY MAPLE931941933 WM791 HARD ROCK MAPLE901904931WM951 HONEY MAPLE931933940 WO095 ORNATE OAK903904934913 WO581 WISCONSIN OAK933914WO680-OZ CRACKLE CRUNCH941903934 WO862 HEARTH OAK933913940 WO891 SHERWOOD OAK931918WO951 FINE OAK931918WP110 LOOKS LIKATRE902913*these colors should be ordered according to the pattern the customer requestsFORM#WP.PIONITESF5/2015。
蓝芬R2低功耗RF生态系统入门指南说明书
BlueNRG-2 Getting StartedMohit ARORALow-power RF ecosystem 2Graphical UI RF chipsetMOTION SW VOICE SW libraries librariesBLUENRG-MESH TRIPLE SDKBLE SDKAndroid SDK iOS SDKBlueNRG/Spirit RF Power SimulatorSW development PROTOCOLS / SW IP iOS/Android SDK RF modulesEvaluation Kit and Development ToolsCovered in this Presentation#Hardware Requirements #Install SDK and tools##Install Keil and License #Test Debugger connection #Compilation and debug testwith Keil#Install Mobile apps#Test BlueNRG-GUIconnectivityRun BLE Chat ExampleHardware RequirementsBlueNRG-2 Target board withUART/VCOM ST-Link V2 or STNucleo BoardSmart Phone with BLE4.2 or higher withrequired apps installedYour windows 7/10 PCSetup with all requiredsoftware and setupsInstall ST SoftwareBlueNRG-2 SDK•Standard SDK for BlueNRG-1 and BlueNRG-2 devices from ST•Contains basic tools like Navigator, Radio Init Wizard•Download and Install BlueNRG-2 SDK from link below(STSW-BLUENRG1-DK) https:///content/st_com/en/products/embedded-software/evaluation-tool-software/stsw-bluenrg1-dk.html•Installation of the package creates three directories •Installation Directory•C:\Program Files (x86)\STMicroelectronics\BlueNRG-1_2 DK 3.X.X•Contains compiled binary files, doxygen documentation, drivers and installed applications•Example Projects Path•C:\Users\XXXXX\ST\BlueNRG-1_2 DK 3.X.X•Contains the example projects for BLE, prop radio and peripheral examples•Utility launch directory•C:\ProgramData\Microsoft\Windows\Start Menu\Programs\ST BlueNRG-1_2 DK 3.X.X •Shortcuts to Release folder, Navigator and Radio Init WizardSTSW-BLUENRG1-DK post InstallB L E E x a m p l e sP e r i p h e r a l E x a m p l e sSTSW-BLUENRG1-DK ExamplesInstall ST Tools•Install BlueNRG-GUI (STSW-BNRGUI)https:///content/st_com/en/products/embedded-software/wireless-connectivity-software/stsw-bnrg1stlink.html•Install BlueNRG ST-Link Utility (STSW-BNRG1STLINK)https:///content/st_com/en/products/embedded-software/wireless-connectivity-software/stsw-bnrg1stlink.html•Install BlueNRG-X Flasher (STSW-BNRGFLASHER)https:///content/st_com/en/products/embedded-software/wireless-connectivity-software/stsw-bnrgflasher.html•Install BlueNRG current consumption estimation tool(STSW-BNRG001) https:///en/embedded-software/stsw-bnrg001.htmlUpdate ST-LINK firmware STSW-LINK007and USB driver as required STSW-LINK009Supported HardwareSTEVAL-IDB007VxBlueNRG-1 (32QFN)STEVAL-IDB008Vx BlueNRG-2 (32QFN)STEVAL-IDB009Vx BlueNRG-2 (48QFN)STEVAL-IDB008V1M BlueNRG-M2 ModuleSTEVAL-FKI001V1BlueNRG-1 + S2LPQuickly Run the BLE_Chat Example•We will use BlueNRG-2 Navigator to quickly run the example•This software is installed as part of STSW-BLUENRG1-DK•You would need a STEVAL-IDB008x board to use it•Supports direct flash write of example codes on STEVAL with UART Bootloader BlueNRG-2 NavigatorBlueNRG-2 Navigator: Hardware SetupMicro USB CableSTEVAL-IDB008VxPC running BlueNRG-2 Navigator•Open BlueNRG-2 Navigator •Navigate to BLE_Chat•BLE demo and test apps•BLE_Chat•Server•If drivers installed and board connected The Eval board pic will appear•Click on Flash and Run button Run BLE_Chat using NavigatorSTSW-BlueNRG1-DK (4/7)•The board will be flashed with the BLE_Chat Server configuration compiled code •After flashing, serial terminal would automatically appear.•Push the reset button and messages from board should display•Install a generic BLE service discovery tool like B-BLE or BLE Scanner on you phone•Enable Bluetooth and location on your phone and startthe application•Click on “Scan” button•The devices available should appear•Click on CONNECT button against “Chat_1_2”Scan and•After you connect, the servicediscovery will start•You would see three services•Generic Attribute (GATT 0x1800)•Generic Access(GAP 0x1801)•Custom Service (ST Chat Service)•Click on custom service•Then enable notifications by clickingon “N” Button. It would turn greenEnableNotification•Click on “W” button•A window will appear•Type in text (ASCII) any data tobe send to the UART•The click on “OK”Note:If size exceeds 20 bytes, BLE scannerautomatically breaks data in 20 bytes and sendacross multiple packetsThis limit can be increased to 240 bytes perpacket but depends on support of phone for “DataLength Extension (DLE)” featureExchange data from phone to UART•Type data on the Serial terminal•Hit enter key or send “\n” new linecharacter•The data will be sent to phone andwill be visible if “N” notification buttonis greenNote:if size exceeds 20 bytes, BlueNRG-2 willautomatically break the data in packets in 20bytes and send to phoneOn the phone, only last packet will display asprevious packets were received and overwrittenIf phone supports DLE, the code can request toincrease packet sizeExchange data from UART to PhoneSetup Keil IDEInstall Keil•Kindly refer below link for all details on ST version of Keil•https:///stmicroelectronics-stm32/mdk•Download Keil MDK-ARM v5 from https:///demo/eval/arm.htm•Run the downloaded MDK5xx.exe installer.•Install to any path you like. If you have existing MDK-ARM installations that you want to keep, select a new folder for MDK v5.1.Open Keil window, Click on the Pack Installer button and open it2.Select device and Click Install to download and install the Device Function packs for BlueNRG-1 and BlueNRG-2Install Keil Device Function Packs12Get Keil ST License•Follow instructions on the page link below to install the license after you install Keil •https:///stmicroelectronics-stm32/mdk•Login with an account that has administration rights.•Right-click the µVision icon and select Run as Administrator... from the context menu.•Open the dialog File —License Management... and select the Single-User License tab.•Click the button Get LIC via Internet..., then click the button OK to register the product. This action opens the License Management page on the Keil web site.•Enter the Product Serial Number 4RMW3-A8FIW-TUBLG along with your contact information and click the button Submit.•An e-mail is sent back with the License ID Code (LIC) within a few minutes.•To activate the Software Product•enter the LIC in the field New License ID Code (LIC) of the dialog License Management (2)•click Add LIC (3)•Verify the license as visible in screenshotwith expiry dateActivate Keil ST License•After DFP and License are installed, open BLE Chat example project in Keil \\STSW-BLUETILE-DK 1.3.0\Project\BLE_Examples\BLE_Chat\MDK-ARM\BlueNRG-2•Select ST-Link as debuggerSelect ST-Link as debugger (1)•Settings for ST-Link•Click on settings (2)•Check both the download options (3)•Verify download functions (4) and programming algorithm (5)Settings in Keil12345Important DocumentsImportant Documents for Reference•BlueNRG-2 Datasheet PDF•PM0257 BLE stack v2.x programming guidelines PDF•UM2406 The BlueNRG-X Flasher SW package PDF•DT0120How to program and debug BlueNRG-1 and BlueNRG-2 devices PDF •UM2058 BlueNRG GUI SW package PDF•UM2109 BlueNRG-1 ST-LINK Utility software description PDF•AN5187 BlueNRG-1, BlueNRG-2 improving robustness PDFTest Debugger Connection•Pull DIO7 High on BlueNRG-2 Target (Automatic in STEVAL)•Connect the target to PC using VCOM/UART•Open BlueNRG-X Flasher•Select the relevant com port (ST DK)•Press Ctrl + E and execute mass erase•Click on “Read” button to verify the blank memory filled with FF •Remove the micro USB cable now.Erase the BlueNRG-2•If using Nucleo board, remove ST-LINK (CN2) jumpers •Connect the Target board with ST-Link V2•Refer the picture for connector alignment•Now, power up the target and then connect ST-Link V2•If red led is blinking: your STEVAL is in DFU mode, remove ST-LINK and then connect power. Afterwards connect ST-LINKSetup Hardware for DebugSWCLK SWDIO•Open BlueNRG-1 ST-Link Utility and Click on settings icon•Check if the ST-Link Serial number is visible•If you don’t see the ST -Link serial number, then•Try clicking on the Refresh button •Then, try re-plugging setup again with ST-Link only •If persists, update the driver of ST-LINK and firmware of ST-LINK V2•Please check you are using BlueNRG-1 ST-Link utility and Not STM32 ST-LINK utilityVerify SWD Connection•If your setup is fine, you should see similar in Target Information•If BlueNRG-2 is not visible, then you should match thesettings as per snapshot•Once you see the Target voltage and Target, you shouldclick on “OK” button•The device will now be read by debugger•If device is not detected, try to reduce the frequency andchange the modeVerify SWD TargetTest Compile and debug run of BLE_Chat project on Keil•Open BLE_Chat project in KeilPath: C:\Users\{USER NAME}\ST\BlueNRG-1_2 DK 3.2.1\Project\BLE_Examples\BLE_Chat\MDK-ARM\BlueNRG-2The project file name is “BLE_Chat” with extension “.uvprojx ”•Select the “Server” from drop down•Go to “Project” menu dropdown and click “Build Target”•The Build Output window should show as belowCompile BLE_ChatProjectEstablish Debug Session•After build, go further only if you have tested the debugger connection•Ensure that the BlueNRG-1 ST-Link utility is not connected to target•Press F8 to program the device•Press Ctrl+F5 to start the debug session•Now Open any serial monitor (tera term etc) and open the serial port•Select setting as 115200 8 N 1•Enable “\n” new line character for Enter key•Now press F5Verify Successful Debug Session Start•You will see a screen like one here if all works well•Now click on F5to run the code•You can connect via phone following procedure explained with Navigator UsageIf you face issues with Building the Project then•Goto “File” →“License Management”•The installed license should be visible as•If you don’t see above license, then refer License Installation section•If License is installed and you still face issue, check below•Keil has write permission in the drive where project is located•Try running Keil as administrator•Verify if the DFP has been installed.Help: In case of Build Error•There are different hardware available for BlueNRG-2 with combinations of•SMPS On/SMPS Off•External LF crystal/Internal RO•After opening project in Keil Go to Project →Options for Target→C/C++ (tab)•For STEVAL and BlueNRG-M2SA •LS_SOURCE=LS_SOURCE_EXTERNAL_32KHZ•SMPS_INDUCTOR=SMPS_INDUCTOR_10uH•For BlueNRG-M2SP or low-cost modules•LS_SOURCE=LS_SOURCE_INTERNAL_RO •SMPS_INDUCTOR=SMPS_INDUCTOR_NONEHelp: Verify Preprocessor SettingsHelp: Unable to establish debugPlease check below•The DFP is installed•You have configured debugger settings in Keil as per instructions•Try reading the device vis BlueNRG-1 ST-LINK utility. If you see all FF starting at address 0x10040000 then you have either•You have not flashed the right code or used an OTA configuration•your flash erase setting is set for Erase chip, change to Erase sectorsInstall Mobile Apps•Install ST BLE sensor mobile app (available for android and iOS)•Install BLE Scanner app (available for android and iOS)Install Mobile appsTest Board Connection with BlueNRG-GUI•Mount the Bluetile on the base board•Connect the Bluetile base board to PC via Micro USB cable•Check switches SW2 and SW3 on bluetile host board are on USB connector side •Open BlueNRG-X Flasher•Select the relevant com port (ST DK)•Press Ctrl + E and execute mass erase•You should see the green light on the BlueTile LED•Click on “Read” button to verify the blank memory filled with FFErase the BlueTile BoardFlash DTM Code•Click on “Select Image file” button and navigate to\\STSW-BLUETILE-DK 1.3.0\Firmware\BLE_Examples\DTM•Select file DTM_UART.hex and click on “Open”•Switch to “Image File” tab•Verify that the file starts from address 0x10040000•Now click on the “Flash” button upper section of Flasher•Once successful, you should see a popup like one below. Else, try to erase chip and change USB port and cableConnect GUI and Verify Versions•Close Flasher and Start BlueNRG-GUI•Go to “Settings”→“Set Baud Rate” and select “115200”. Then click “OK”•Select the relevant com port and click on open port button and see if the device and firmware versions are visible•If you see a message like on below, you can click “OK” and continue.Reference MaterialApplication Notes and User ManualsDoc Title HWAN4378Using the BlueNRG family transceivers under FCC title 47 part 15 in the 2400 –2483.5 MHz band BlueNRG-MS, BlueNRG-1, BlueNRG-2 AN4387Using the BlueNRG family transceivers under ETSI EN 300 328 in 2400 –2483.5 MHz band BlueNRG-MS, BlueNRG-1, BlueNRG-2 AN4392Using the BlueNRG family transceivers under ARIB STD-T66 in the 2400 –2483.5 MHz band BlueNRG-MS, BlueNRG-1, BlueNRG-2 AN4486BlueNRG, BlueNRG-MS over-the-air bootloader BlueNRG-MSAN4491BlueNRG, BlueNRG-MS updater BlueNRG-MSAN4494Bringing up the BlueNRG and BlueNRG-MS devices BlueNRG-MSAN4630PCB design guidelines for the BlueNRG and BlueNRG-MS devices BlueNRG-MSAN4818Bringing up the BlueNRG-1, BlueNRG-2 devices BlueNRG-1, BlueNRG-2AN4819PCB design guidelines for the BlueNRG-1 device BlueNRG-1AN4820BlueNRG-1 and BlueNRG-2 low power modes BlueNRG-1, BlueNRG-2AN4869BlueNRG-1, BlueNRG-2 BLE OTA (over-the-air) firmware upgrade BlueNRG-1, BlueNRG-2AN4872BlueNRG-1 and BlueNRG-2 UART bootloader protocol BlueNRG-1, BlueNRG-2AN5187The BlueNRG-1, BlueNRG-2 improving robustness BlueNRG-1, BlueNRG-2UM1770BlueNRG, BlueNRG-MS profiles application interface BlueNRG-MSUM1865BlueNRG-MS Bluetooth® LE stack application command interface (ACI)BlueNRG-MSUM1868BlueNRG and BlueNRG-MS information register (IFR)BlueNRG-MSUM2058BlueNRG GUI SW package BlueNRG-MS, BlueNRG-1UM2109BlueNRG-1 ST-LINK Utility software description BlueNRG-1UM2211BLE-Sub1GHz development kit S2-LP, BlueNRG-1, BlueNRG-2Design TipsDoc Title HWDT0049IFR configuration of BlueNRG/BlueNRG-MS using STM32ODE BlueNRG-MSDT0051Quick guide on BLE RF technology: products, evaluation kits and software packages BlueNRG-MSDT0052Quick guide on Sub-1GHz RF technology: products, evaluation kits and software packages Spirit1, SPSGRFDT0063Bluetooth Low-Energy network: time-stamping and sample-rate-conversion BlueNRG-MS, BlueNRG-1DT0068How to replace a low-speed wired connection using a BLE link BlueNRG-MS, BlueNRG-1DT0069Enabling the Bluetooth Low Energy Direct Test Mode (DTM) with BlueNRG-MS BlueNRG-MSDT0070How to set the Bluetooth device address on BlueNRG-MS BlueNRG-MSDT0074BlueNRG-MS radio stack images versions BlueNRG-MSDT0093How to mount the new balun BALF-NRG-02D3 without the top side marking BlueNRG-1, BlueNRG-2DT0107Slot allocation and multiple connection timing strategy for BlueNRG, BlueNRG-MS, BlueNRG-1 and BlueNRG-2BlueNRG-MS, BlueNRG-1, BlueNRG-2 DT0108How to program and debug BlueNRG-1 and BlueNRG-2 devices BlueNRG-1, BlueNRG-2DT0109How to configure the BlueNRG-1 and BlueNRG-2 devices in network coprocessor mode BlueNRG-1, BlueNRG-2DT0120How to program and debug BlueNRG-1 and BlueNRG-2 devices BlueNRG-1, BlueNRG-2DT0129BLE Module integration design guidelines SPBTLE-RF0, SPBTLE-RF, SPBTLE-1SNEWSoftware and Programming ManualsDoc Title HWES0280BlueNRG/BlueNRG-MS device limitations BlueNRG-MSPM0237BlueNRG, BlueNRG-MS stacks programming guidelines BlueNRG-MSPM0257BlueNRG-1, BlueNRG-2 BLE stack programming guidelines BlueNRG-1, BlueNRG-2STSW-BLEPROFILES BlueNRG-1 BLE Profiles SW package BlueNRG-1, BlueNRG-2STSW-BLUENRG-DK Setup for BlueNRG Kits BlueNRG-MSSTSW-BLUENRG1-DK BlueNRG-1, BlueNRG-2 DK SW package BlueNRG-1, BlueNRG-2STSW-BNRG001BlueNRG current consumption estimation tool BlueNRG-MS, BlueNRG-1, BlueNRG-2 STSW-BNRG1STLINK BlueNRG-1 ST-LINK utility for BlueNRG-1, BlueNRG-2 MCU BlueNRG-1, BlueNRG-2STSW-BNRGUI BLUENRG family GUI BlueNRG-MS, BlueNRG-1, BlueNRG-2 STSW-BNRG_V1-DK BlueNRG-1 DK SW package for BLE stack family v1.x BlueNRG-1STSW-BNRG-Mesh Mesh over Bluetooth Low Energy BlueNRG-MS, BlueNRG-1, BlueNRG-2 STSW-BNRG-S2LP STSW-BNRG-S2LP evaluation software package based on BlueNRG-1 and S2-LP S2-LP, BlueNRG-1, BlueNRG-2 STSW-BNRG-V71A BLE Stack Image Package Release v7.1a BlueNRG-MSSTSW-BNRG-V71C BLE Stack Image Package Release v7.1c BlueNRG-MSSTSW-BNRG-V71E BLE Stack Image Package Release v7.1e BlueNRG-MSSTSW-BNRG-V72C BlueNRG-MS BLE Stack Image Package Release v7.2c BlueNRG-MSSTSW-BNRG-V73BlueNRG-MS BLE Stack Image Package Release v7.3BlueNRG-MS•BlueNRG-1,2 Flasher utility•Supports programming via SWD and UART interface•Supports flash to be read, mass erased, written and programmed•Can connect to multiple hardware simultaneously•Autobaud and forced baud rate supported •Supports .bin and .hex formats STSW-BNRGFLASHER。
IBE白屏接口清单

目录一.搜索服务 (1)二.航班信息查询 (2)IBE白屏接口一.搜索服务1、AirFightShop_D国内shopping 查询服务:提供国内所有航空公司、全舱位、全类型基于舱位的低价和全价搜索。
范围:基础查询--单office基础查询--单office--带大客户编码基础查询--单office--带av-不分航空公司基础查询--单office--指定舱位等级下限基础查询--海量office 用户全office 查询基础查询--海量office 用户单office 查询基础查询--海量office 用户部分office 查询特殊查询--一舱多价特殊查询--往返程特殊查询--多航段特殊查询--团队票特殊查询--联程特殊查询--普通儿童特殊查询--普通婴儿2、AirFareSearchOne_I国际接口3、AirFareFlightShop国际Shopping(AirFareFlightShop)服务是一款运价搜索服务,在机票预订环节给用户提供航班和票价信息。
Shopping 服务提供的票价信息是给旅客的一个参考报价,不作为旅客实际支付的价格,实际支付的价格由国际运价计算(AirFarePrice)服务进行提供。
国际Shopping 服务提供两种方式的运价搜索服务:FlightShop 航班搜索(包含全舱位搜索)和CalendarShop 日历搜索。
FlightShop 航班搜索根据旅客的行程信息返回指定日期当天每个航班组合指定的若干个服务等级的最低价格,全舱位搜索能够搜索指定日期指定航班的全部舱位的可用价格。
CalendarShop 日历搜索根据旅客的行程信息返回指定日期范围内每天的最低可用价格。
二.航班信息查询1、航班经停查询:AirBief航班经停信息查询服务可用于查询航班的经停城市、起降时间和机型,为代理人实现航班经停信息的实时查询提供了快捷、简便、高效的途径。
2、航班详细信息查询:AirDetails国内航班详细信息查询接口对应主机指令DSG,可以查看除座位可利用情况外的其他数据,如航班的起飞降落城市,起飞降落时间,航班的空中飞行时间,航班的空中飞行距离,经停点数,航班机型,餐食等。
蓝外设备MAA-S500的安装指南说明书

Malware Analysis Appliance: MAA-S500 Series
1 3 Unpack the Appliance
Unpack the shipment package and verify the contents of the box.
The Blue Coat MAA-S500 series appliance ships with the following components:
2. Assemble the slide-rails (Figure 6): a. Loosely attach Rail_C to Rail_A. The precise attachment location depends on how far Rail_C must be extended (or retracted) to fit your specific equipment rack model. It might be necessary to remove Rail_C from Rail_A to determine the proper installation length for your network rack. Temporarily mount Rail_C to Rail_A by doing the following: 1. Approximate the slide-rail installation length by lining up the front and rear mounting faces against the equipment rail. Be sure that the slide-rail mounting faces are on the outside of the equipment rack vertical rails. 2. Temporarily install (3) M3 screws through the slotted hole located on Rail_C after the installation length has been determined. Be sure to install the screws equidistantly to distribute the loads placed on the rail. b. Repeat step 2a for the opposite slide-rail.
BLUEAIR E系列使用说明

显示面板机器电源开关: 每次开启后,机器会自动以最大风速运行5分钟,然后转换成自动风速模式.SPEED风速: 需要的话,可以按SPEED 手动调节风速SPEED 1: 夜间运行风速SPEED 2: 白天运行风速SPEED3: 初始风速或适用于大房间AUTO: 自动风速,由电子感应器根据颗粒和气味环境控制自动控制风速PRESET:(遥控器上的)把机器停止后,可以用遥控器上的PRESET键设置 ON TIME(运行时间), OFF TIME(停止时间) 和 SPEED(风速)ON TIME(运行时间):按一下PRESET,进入到运行时间设置。
+ 号和–号表示增加和减少 30分钟。
比如显示面板上显示1,就表示运行1小时后机器会自动关闭。
OFF TIME(停止时间):再按一下PRESET,进入到停止时间设置。
+ 号和–号表示增加和减少 30分钟。
比如ON TIME设置成1,OFF TIME设置成4,就表示机器在1小时后自动开启,工作4小时后自动关闭。
SPEED(风速):按PRESET第三下,进入到SPEED 风速设置。
可以在1 2 3 和AUTO之间选择。
TIMER (计时器)TIMER (计时器)有两个功能, 1是用来设置OFF TIME(停止时间),让机器一定时间后自动关机;2是用来计算滤网剩下的使用天数(以便更新滤网)OFF TIME(停止时间):当机器开启后,用显示面板上的TIMER键(机器关闭后可以用遥控器上的PRESET键)来设置OFF TIME(停止时间),比如1,2,4,8小时后停止,按+ 号和–号来增加和减少 30分钟。
如果要取消OFF TIME(停止时间),只需要按TIMER几次直到出现滤网剩下的使用天数。
当显示面板上TIMER显示的是滤网使用天数时,OFF TIME(停止时间)的设置就被取消了,机器每天都24小时运行。
OFF TIME(停止时间)的设置没被取消时,显示面板上TIMER显示的是运行一段时间后机器会自动关机。
JBL Control 65P T 全范围两路挂吊型扬声器说明说明书

Key Features:᭤JBL’s exclusive conical Radiation Boundary Integrator ®(RBI) technology provides consistent and wide 120°coverage of the listening area.᭤Coaxial design featuring 130 mm (5¼ in)woofer and 20 mm (¾in) soft-dome tweeter.᭤Hanging hardware with 4.5 m (15 foot)galvanized steel cable and easy to adjust clamp.᭤Stylish design, available in black or white (-WH).᭤UL listed (speaker and hanging cable system).᭤8 ohm and 70V/100V operation.Applications:The Control 65P/T is a compact full-range,two-way pendant-type loudspeaker that provides superb sound reproduction and very consistent,wide coverage for rooms with open architecture ceilings and other locations where a pendant form factor is desired.JBL’s patent-pending Radiation Boundary Integrator ®(RBI) technology, adapted from the groundbreaking V ER T EC ™ Series of line array loudspeakers, delivers consistent coverage of the listening area. Combining a large 200 mm (8 in)diameter waveguide with low-frequencyprojection apertures, the two coaxially-mounted drivers provide a seamless integration ofcoverage, resulting in extremely even pattern control and coverage where all listeners hear a consistent, high-fidelity sound quality. The wide 120°coverage pattern allows for the use of fewer speakers, reducing the cost of theinstalled system without sacrificing performance.Excellent sound quality coupled with stylish design and easy installation makes the Control 65P/T ideal for a wide variety of applications including retail, restaurants, hotels, casinos,fitness centers, convention centers, exhibit spaces, conference rooms, atriums, museums,transit centers and other open-ceiling applications.The Control 65P/T includes a single-pointmounting system for easy and secure suspension in open-ceiling applications. Two complete hanging cable systems are included, providing both main and safety suspension cables. Include are extra-long 4.5 m (15 foot) high tensile galvanized steel wire rope having spring clips for the loudspeaker end of the cable and UL listed cable fasteners for infinitely adjustable suspension height.The system’s 130 mm (5¼in) low-frequency driver features a polypropylene-coated cone and 25 mm (1 in) copper voice coil with vented fiberglass resin coil-former for high powerhandling and improved long-term reliability. The coaxially-mounted 20 mm (¾in) textile soft-dome high frequency driver features internal damping for smooth extended response, along with an aluminum voice coil former andneodymium magnet assembly with ferro-fluid cooling, for high-fidelity sound quality with enhanced long-term sound level capability.The Control 65P/T contains a high-quality 60Watt multi-tap transformer for use on 70V/100V distributed loudspeaker lines, and is switchable for 8-ohm voice-coil direct operation.Euro-style clip-in connectors allow for easySpecifications:System:Frequency Response (-10 dB)1:55 Hz – 20 kHzFrequency Range (±3 dB)1:78 Hz – 18 kHzPower Capacity 2:75 Watts Continuous Pink Noise Power (with 300 Watts peaks)150 Watts Continuous Program PowerNominal Sensitivity:86 dBNominal Coverage Angle3:120°(+20°/-10°)Directivity (Q)3: 5.3Directivity Index (DI)3:7.2 dBRated Maximum SPL @ 1m:105 dB continuous pink noise, 111 dB peakRated Impedance:8 ohmsTransformer Taps:70V: 60W, 30W, 15W & 7.5W100V: 60W, 30W, 15WTransformer Insertion Loss:**********,0.5dB@15W,0.6dB@30W,0.7dB@60WTransducer:LF Driver:130 mm (5¼in) polypropylene-coated paper with pure butyl rubbersurround, 25 mm (1 in) copper voice coil, vented fiberglass resin voice coil-formerHF Driver:20 mm (¾in) textile soft-dome, neodymium magnet assembly,ferro-fluid cooling, aluminum voice coil formerEnclosure:Enclosure Material:High impact polystyreneGrille:Zinc-plated steel grille with powder-coat finish, foam backing(removable for painting)Environmental:Exceeds Mil Spec 810 for humidity, salt spray, temperature & UV.IP44 capability per IEC 529 – splashproof rating.Termination:Two removable locking euro-block 2-pin connectors with screw-down terminals for bare wire. Connectors paralleled for input and loop-thru. Max. wire 12 AWG (2.5 mm2). Rubber terminal covers included.Suspension:Two identical suspension systems (one as main suspension cableand the other as safety cable), each consisting of 4.5 m (15 ft) long 2 mm (0.077 in) high-tensile galvanized-steel wire rope suspension cable with spring-clips for clipping onto the loudspeaker bracket and Gripple™ brand adjustable-height cable fasteners for infinitely adjustable height. Cables have SWL rating of 45 kg (99 lb).Safety Agency Ratings:Speaker listed per UL1480, transformer registered per UL1876. Inaccordance with IEC60849/EN60849. Suspension system andGripple ®-brand cable fastener listed per UL1598 and UL2239, TUV,and CSA Class 3426-01 & Class 3426-81.Dimensions:234 mm (9.3 in) diameter x 259 mm (10.2 in) height to top ofcabinet. 279 mm (11.0 in) to top of suspension bracket.Net Weight (ea): 3.7 kg (8 lbs)Shipping Weight (pair):8.7 kg (19 lbs)IIncluded Accessories:Two suspension cable systems (see “Suspension”, above), two 2-pinremovable locking euro-block connectors, two rubber covers for euro-block connectors.Optional Accessories:MTC-PC60 top panel / terminal coverColors:Available in black or white (-WH). Paintable.Full-space (suspended)Continuous Pink Noise rating is IEC-shaped pink noise with a 6 dB peak-to-average crest factor for 100 hoursCompact Full-Range Pendant Loudspeaker with RBIProfessional SeriesControl ®65P/TShown with included grille removedSS C65᭤Control 65P/T Compact Full-Range Pendant Loudspeaker with RBI Beamwidth:-6 dB coverage by frequencyFrequency Response:Full-space, 8 ohm, 10°off-axis (typical for coverage area)Off-Axis Frequency Response:JBL Professional8500 Balboa Boulevard, P.O. Box 2200Northridge, California 91329 U.S.A.©Copyright 2010 JBL Professional。
埃森普项目器搭载兼容性信息表说明书
Epson America, Inc. 3131 Katella Ave., Los Alamitos, CA 90720
Epson Canada Limited 185 Renfrew Drive, Markham, Ontario L3R 6G3
www.epson.ca
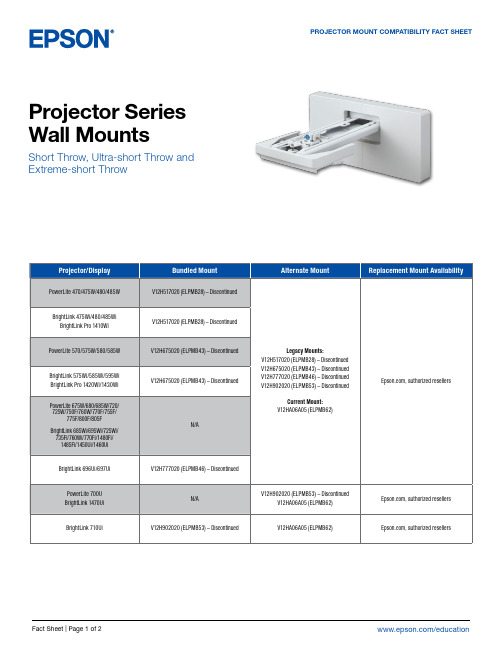
BrightLink 475Wi/480/485Wi BrightLink Pro 1410Wi
PowerLite 570/575W/580/585W
BrightLink 575Wi/585Wi/595Wi BrightLink Pro 1420Wi/1430Wi
PowerLite 675W/680/685W/720/ 725W/750F/760W/770F/755F/
BrightLink 475Wi/480/485Wi/575Wi/585Wi/ 595Wi/685Wi/695Wi/696Ui/697Ui/710Ui/
725Wi/735Fi/760Wi/770Fi
BrightLink Pro 1410Wi/1420Wi/ 1430Wi/1450Ui/1460Ui/1470Ui
N/A
Legacy Mounts: V12H517020 (ELPMB28) – Discontinued V12H675020 (ELPMB43) – Discontinued V12H777020 (ELPMB46) – Discontinued V12H902020 (ELPMB53) – Discontinued
V12H706020 (ELPMB45) – Discontinued V12H706020 (ELPMB45) – Discontinued
PowerLite L200SX/L200SW/ L210SW/L210SF
Blueair Health Protect User Manual 3210 - 3410说明书

BLUEAIR HEALTHPROTECT USER MANUAL3210 - 3410Clemas & Co. Unit 5 Ashchurch Business Centre, Alexandra Way, Tewkesbury,Gloucestershire, GL20 8NB.Tel: 01684 850777 Fax: 01684 850707Email: **************.uk Web: 3Blue 3210/3410 4Safety instructions 6Get started 8Filters 11Care and maintenance 15 Disposal and recycling 17Help and support 17Warranty information 17Specifications18ContentPlease read this user manual carefully and keep it for future reference.The latest version of this user manual can be found on Note: There may be local variations of these models.Product name:Model number: 3210323110100034103431101000Blue 3210/3410Blueair purifiers are available in two models. All models have a pre-filter and a HEPASilent TM main filter to purify air. All Blue models have control functions and a built in sensor.The air purifier is mainly composed of a motor, a fan and filters. The air purifier removes contaminants from the air in a room to improve indoor air quality.You can change the air purifier settings at any time, using the control panel on the air purifier.Recommendations for best performance• Use the air purifier in a room that does not exceed the room size recommendation.• Place the air purifier in a location where air can circulate freely in, out and around the air purifier.• Do not place the air purifier closer than 10 cm to another object.• During operation, keep doors and windows in the room with the air purifier closed.• Only use original Blueair filters.• Change the main filter when the filter replacement indicator appears on the control panel.• Follow the maintenance instructions in this user manual.45A Touch buttonF Main filter (Particle + Carbon filter)B Air outletG Pre-filter C Air quality indicatorH Air quality sensor D Fan and motorI Power cable (not in picture)E Filter shelf ring J User Manual (not in picture)Safety instructionsBlue 3210/3410 air purifiers are electrical appliances for indoor use only, take the necessary precautions to reduce the risk of fire, electric shock or injury.• This appliance can be used by children aged from 8 years and above and persons with reduced physical, sensory or mentalcapabilities or lack of experience and knowledge if they have been given supervision or instruction concerning use of the appliance ina safe way and understand the hazards involved.• Children shall not play with the appliance.• Cleaning and user maintenance shall not be made by children without supervision.• Always disconnect the appliance from the power supply before maintenance.• Do not attempt to open or service the appliance yourself. Service must be done by the manufacturer, service agent or similarlyqualified personnel using only original Blueair spare parts.• Ensure that the power cable and the power plug are not at risk of getting damaged. To avoid hazard, a damaged power cable must always be replaced by the manufacturer, service agent or similarly qualified person.• If the appliance is damaged or malfunctions, turn it off, disconnect it from the power supply and contact Blueair.• The power plug must be firmly inserted in the power socket.• When disconnecting the unit from the power supply, do not pull on6the power cord, pull on the power plug.• Use the power cable provided with your Blueair air purifier to plug directly and firmly into an appropriate, electrical outlet.• Do not use an extension cord or a power strip. Refer to the rating label on your appliance.• Do not alter the power plug in any way. If the plug does not fit into the outlet, contact qualified personnel to install the proper outlet.• Do not use the included power cord for anything else but the appliance.• Do not allow objects to enter or block the air inlets and air outlets as this can cause electric shock or damage the appliance.• Do not place any objects on top of or directly against the appliance.• Do not sit on, stand, climb onto or hang from the appliance.• Keep the appliance, including the power cable, at a safe distance from heated surfaces and open fire.• Keep the appliance and power plug away from water and other liquids.• Keep the appliance and power plug away from chemicals such as pesticides and deodorants.• Place the appliance on the floor. The appliance must be placed ona stable surface.• Do not use the appliance outdoors or in wet environments such as bathrooms, laundry rooms or pool areas.78Get startedStep 1Plug the power cable into a wall outlet.Step 2Press the button to turn the air purifier on and adjust the fan speed mode.The autostart feature automatically restarts the air purifier at the last set speed if it has been unplugged, used with a power switch timer, or if a power failure occurs.In auto mode the air purifier automatically controls the airflow based on air quality information from the sensor.AutostartAuto modeAvailable settings are: Auto, Night, Everyday, Boost and Off.The indicator lights on the touch button indicate the selected fan speed. The lights automatically dim down completely 5 seconds after pressing the touch button, indicating a deactivated fan speed control mode. Press the touch button once to reactivate on/off and fan speed control. The indicator lights light up and you can adjust the fan speed mode again.On/Off and fan speed controls9Press once to turn the unit On and to set it to Auto mode.Press twice to set to Night mode (low fan speed)Press three times to set to Everyday mode (medium fan speed).Press four times to set to Boost mode (high fan speed).Press five times to turn the unit Off.10Air quality informationThe air quality levels for particulate matter (PM) are indicated using a color scale on the air quality indicator. The air quality indicator is completely dimmed in Night mode.Air quality level (PM 2.5)PM2.5, Particulate matter, particles with diameter of size 2.5 micrometers or less.PollutedModerateGood11Button control functionsFiltersThe air purifier is delivered with a fabric pre-filter and a main filter. The filters purify the air from both particles and gases. For best performance, clean the pre-filters regularly and change the main filter when the air purifier indicates filter change. To find the right main filter for your air purifier, use the Blueair app or visit . The model number of your air purifier can be found on the rating label on the air purifier. Change filter When the indicator light turns red (after 6 months of operation) you should change the main filter.Filter replacement indicator Press the button down for 7 seconds to reset the filter replacement indicator.Blueair filter subscription program Use the Blueair app or visit to sign up for the Blueair filter subscription program. (Not available in all markets)Important! Always turn off and disconnect the appliance from the power supply beforechanging filters, cleaning or carrying out maintenance procedures.Clean and change the pre-filtersFor best performance, clean the pre-filter regularly. Vacuum the exterior of the fabric pre-filter with a soft brush attachment to remove dust. If the pre-filter requires a deeper clean, wash it on a gentle, low-temperature cycle in the washing machine.Important! Press the Velcro strips together on the pre-filter before machine wash.Step 5Wash the pre-filter in the washing machine, according to instructions on the pre-filter´s label .Step 1Turn the unit off and unplug it.Step 3Remove the top cylinder from the unit.Step 2Carefully push the topcylinder down while rotating counterclockwise to unlock.Step 6Place the pre-filter back onto the unit.Adjust the pre-filter and the panel to hide the power cord in the back.Step 7Carefully push the top cylinder down, at the same time rotating itclockwise to secure it back into the lock.Step 8Plug in the unit.Step 4Open the pre-filter panel andremove the pre-filter.Change the main filterWhen changing the filter, vacuum any dust that may have accumulated inside the unit.Important! Use only original Blueair filters suitable for the model to ensure proper function and performance of the air purifier, and to qualify for full warranty coverage.Step 5Open the pre-filter panel and remove the pre-filter.Step 7Grip the filter handles and pull upwards to remove the main filter from the inner structure.Step 1When the indicator lightthe main filter.Step 3Carefully push the topcylinder down while rotating counterclockwise to unlock.Step 2Turn the unit off and unplug it.Step 6Carefully remove the filter shelf ring.Step 8Position the new main filter onto the inner structure. The filter handles should face upwards.Step 4Remove the top cylinder from the unit.Step 13Press the touch button for a duration of 7 seconds to reset the filter replacement timer.This lets the air purifier know that you have changed the filter.The indicator light flashes for 4 seconds, and then changes from red to white.Step 9Press the filter shelf ringfirmly into position above theprotects the top edge of the main filter from damage.Step 11Carefully push the topcylinder down while rotating clockwise to secure the lock.Step 10Place the pre-filter back onto the unit.Adjust the pre-filter and the panel to hide the power cord in the back.Step 12Plug in the unit.Care and maintenanceGeneral• Disconnect the air purifier from the power supply before maintenance.• Do not allow foreign objects to enter the air inlets or air outlets. This may cause electric shock or damage the air purifier.• Never clean with gasoline, chemical solvents or corrosive materials as these agents may damage the air purifier.• Make sure the air purifier is completely dry before connecting it to power.• Do not wash the main filter. The main filter is not washable or reusable.Cleaning• Wash the pre-filter according to the instructions on the pre-filter´s label or vacuum the pre-filter with a soft brush attachment.• Wipe the exterior of the air purifier with a soft, clean, damp cloth.• Clean and check the power cable and power plug for wear or damages.• Clean the sensor when changing the main filter.Clean the air quality sensorThe inlet for the air quality sensor is located at the back of the air purifier.Important! Do not use fingers or any unrecommended objects to clean inside the sensor inlet.Step 3Remove the top cylinder from the unit.Step 4Press the button on the inside of the unit to open the lid covering the sensor and remove the lid.Step 5Gently clean the sensor with a cotton swab, and attach the sensor lidStep 2Carefully push the topcylinder down while rotating counterclockwise to unlock.Step 6Carefully push the top cylinder down while rotating clockwise to secure the lock.Step 7Plug in the unit.Step 1Turn the unit off and unplugit.Warranty informationThe Blueair Limited Warranty applies only if the air purifier is installed, used and maintained according to the instructions in this manual .For warranty conditions, please visit /warranty Warranty and returnsIf you purchased the air purifier at one of our authorized retailers, please contact the same store to request assistance.Help and supportIf you have questions about your product, please visit or contact your local Blueair retailer.To contact Blueair for personalized support, please visit /customer-supportThe crossed-out waste bin symbol on the appliance or on its packaging means that at the end of its useful lifespan, the product must be disposed of separately from ordinary household wastes.This air purifier should be recycled as electronic waste and the filter recycled as plasticaccording to local regulations. If you have questions regarding the disposal of this air purifier, please contact your local authorities or Blueair dealer and ask for the correct method of recycling.Disposal and recyclingSpecificationsBlue 3210Blue 3410Input Power, Frequency100-240VAC 50/60Hz100-240VAC 50/60Hz Power consumption/2-10W 3-35WRated input powerSound level (min/max)1 18-48 dB23-53 dB Recommended room size217 m2 36 m2CADR Smoke2210 m3/h425 m3/hCADR Dust2181 m3/h425 m3/hCADR Pollen2163 m3/h415 m3/h1 Sound pressure according to GB/T18801 and GB4214.12According to ANSI/AHAM AC-1-2019。
- 1、下载文档前请自行甄别文档内容的完整性,平台不提供额外的编辑、内容补充、找答案等附加服务。
- 2、"仅部分预览"的文档,不可在线预览部分如存在完整性等问题,可反馈申请退款(可完整预览的文档不适用该条件!)。
- 3、如文档侵犯您的权益,请联系客服反馈,我们会尽快为您处理(人工客服工作时间:9:00-18:30)。
Our philosophyBlueair believes in cleaner indoor air for ev-eryone. Removing air impurities down to the tiniest particle requires a deep commit-ment to continuous innovation and a greener global environment. Our fresh air solutions are not only inventive, but extremely eff ec-tive and ecofriendly. At Blueair we believe that clean air is a human right.Blueair ABDanderydsgatan 11, SE-114 26 Stockholm, Sweden Tel: +46-8-679 45 00, Fax: +46-8-679 45 45info@blueair.seCertifi cationsThis product earned the ENERGYSTAR by meeting the strict energy effi ciency guidelines set by the U.S. EPA. The U.S. EPA does not endorse any manufacturer claims of healt-hier indoor air from the use of thisproduct.Blueair Inc.17 N. State, Suite 1830, Chicago, IL 60602Tel: (888) 258-3247, Fax: (312) 727-1153info@Blueair E SeriesElectronic control of your indoorair qualityPut on a happy face with the Blueair E SeriesNot happy with your indoor air quality? Let the new BlueairE Series continuously monitor and purify your air using integrated electronic sensors and automatic fan control.Introducing the Blueair Electronic SeriesFeel what cleaner indoor air can do for you. The Blueair E Series air purifiers effectively remove indoor air pollutants from the air you breathe. Thanks to patented HEPASilent™ technology, the units capture 99.97% of 0.1 micron particles, including allergy-provoking pollen grains, dust mites, mold spores and pet dander.These four air purification systems – the Blueair 270E, 450E, 550E and 650E give you the power to manage your indoor air quality with a handy remote control and digital display from a distance of up to 20 feet. Moving from high speed to low speed is easier than you think. Instead of climbing out of your comfortable armchair to switch operating speeds, you simply push a button on the remote. Or better yet, set your Blueair unit on auto mode and let it regulate the speed according to the actual amount of particles and gaseous contaminants present in the air. The faces on the digital display indicate the status of your indoor air quality.The Blueair E Series is an excellent choice for people with allergy, asthma or other respiratory conditions or for health-conscious individuals who simply want to breathe cleaner air and have convenient control ofindoor air quality.234Instant gratificationwith a wireless remote and electronic sensorsHow it works. Pure air is now yours in an instant. Simply plug inyour Blueair unit and turn it on. Depending on your needs, you can let the unit operate in automatic mode or choose between the high,m edium and low settings. With sleek silent steel housing, Blueair air purifiers work so quietly that you may wonder if they’re on.A fan draws air into the unit. Air passes through an ion chamber where airborne particles are electrically charged with negative ions. Charged particles are drawn to the HEPASilent filter surface. Purified air, which is virtually contaminant-free, is re-circulated into the room.Ionizer. The ionizer charges airborne particles with negative ions tomake them cling more easily to the filter. This helps increase overall cleaning efficiency. No ozone is emitted. In fact, our Blueair unitsa ctually reduce indoor ozone levels.High-efficiency filters. Patented HEPASilent filter technology gener-ally provides higher filtration performance than other air purifiers, trapping up to six times more dirt. Fine polypropylene fibers effectively capture 99.97% of all allergens and other airborne particles yet enable air to flow freely through the bacteria-resistant filters.Filter timer. Count down the days over a six-month period until it’s time for filter replacement according to manufacturer recommenda-tions. When the light-emitting diode turns red, spend less than aminute changing the filters. The Blueair 550E and 650E come with SurroundAir™technology, which gently diffuses air through an areasix times greater than the average air purifier.5A little device with a lot of fi nesse. The Blueair E Series wireless remote control puts air-purifying convenience at your fingertips.Electronic gas sensor. Detect cooking odors and gaseouscontaminants, such as smoke, exhaust fumes, formaldehyde and other volatile organic compounds, thanks to advanced electronic nose technology built into all Blueair E Series units. A happy face on the digital display means that the Blueair unit is maintaining good indoor air quality by reducing gaseous contaminants to low levels. If thed isplay shows a sad face, you should turn up the operating speed to restore your indoor air quality or set the unit on auto mode and let the unit do the job for you.Electronic particle sensor. Determine whether the amount ofairborne particles are above or below the acceptable limit usinga dvanced electronic nose technology that detects dust, smoke, pet dander and more. Like the electronic gas sensor, the digital display displays a happy face when particle levels are kept in check and a sad face when you need to increase the operating speed.Auto mode. Let the gas and particle sensors automatically adjustthe operating speed according to the actual level of airborne particlesand gaseous compounds. When levels are low, the Blueair E Series runs on low speed. If one or both levels are high, the unit chooses the proper operating speed.On/off timer. Don’t want to run your unit 24/7? Then press the timerbutton to set the start or end time for operation. Simply click on the + and – keys to adjust the time by half-hour intervals.67Energy efficient. Blueair’s low power usage means you can runyour Blueair unit 24/7 without a significant jump in electricityc onsumption. As Energy Star qualified room air cleaners, all Blueair products meet the strict energy efficiency guidelines set by the U.S. Environmental Protection Agency and the Department of Energy.Environmentally aware. Blueair products offer exceptional per-formance without polluting the environment. Recyclable nontoxicp olypropylene filters are made of one of the least harmful plastics and do not contain any chemical additives or release any toxins into land-fills or the air. Plus the sturdy galvanized steel housing uses a special powder-coated finish that produces no chemical outgassing.Award-winning design. The union of visually pleasing form andeffective function is a hallmark of Swedish design, and Blueair is no exception. Its sleek contemporary look has earned Blueair one of the most prestigious design awards in Scandinavia, the Excellent Swedish Design award. In fact, a Blueair unit resides in a permanent exhibit at The National Museum in Stockholm.Extended warranty. Buy the Blueair air purifiers with complete confi-dence. The units come with a one-year limited warranty against hard-ware defects from the purchase date. By completing and returning your Blueair product registration card, you may receive extended warranty service protection. Check with the authorized Blueair dealer in yourcountry for details.Designed for life。