518 part4
TRI-518测试原理

內Lead Frame與Sensor Plate之間會產生一微小 的電容效應,此時若在IC測試腳上輸入一300mV、 10KHz信號,則時信號透過此電容效應由Lead Frame Coupling 到Sensor Plate上,Sensor Plate 接收此信號經濾波及放大後送給系統作處理;若 此測試腳焊接不良(Solder Open),信號將無法傳 到Lead Frame,系統接收到的信號將趨近於零。
可通過測其DIODE來判定插反,空焊,漏件,開/短 路以及IC保護DIODE不良等情形, 但對IC內部 的電性不良則必須仰賴功能測試
TestJet測試原理(Lead Frame的電容效應)
• 如图(3.21)所示,IC之內部主要結構為晶片本
身(Die)、細小的金線(Bond Wire)、較粗的連接線 (Lead Frame)、以及外接焊腳的接點(Solder Joint)。
0V-10V可程式電壓源(Programmable Voltage)直 接加在二極體兩端,並輸入該二極體正向導通所 需電壓來測試
左图为二極體測試原理
齊納二極體(Zener Diode)測試原理
• 齊納二極體的測試原理是量測其崩潰電壓,
與二極體的差異性是在測試電壓源不同, 其電壓源為0V- -10V及0V- -48V可程式電壓 源兩種
齊納二極體測試原理
電晶體(Transistor)測試原理
• 對於電晶體測試需要三步驟(Step)測試,其中(1)B-E腳
(2)B-C腳測試是使用二極體測試方式(3)E-C腳使用Vcc的飽 和電壓值及截止電壓值的不同,來測試電晶體是否反插。 電晶體反插測試方法為:在電晶體的B-E腳及E-C腳兩端各 提供一個可程式電壓源,並測量出電晶體E-C腳正向的飽 和電壓值為Vce=0.2V左右,若該電晶體反插時,則Vce電 壓將會變成截止電壓,並大於0.2V,如此即可測出電晶體 反插的錯誤
ASCO 3 2 阀门指南说明书
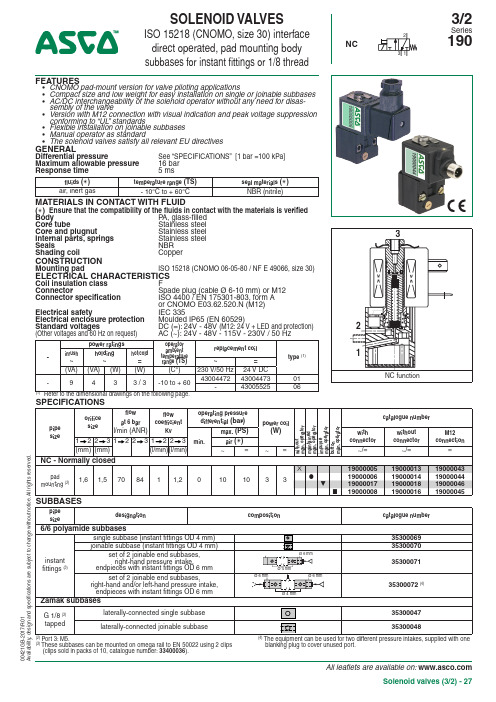
All leaflets are available on: Solenoid valves (3/2) - 27FEATURES• CNOMO pad-mount version for valve piloting applications• Compact size and low weight for easy installation on single or joinable subbases • AC/DC interchangeability of the solenoid operator without any need for disas-sembly of the valve• Version with M12 connection with visual indication and peak voltage suppression conforming to “UL ” standards• Flexible installation on joinable subbases • Manual operator as standard• The solenoid valves satisfy all relevant EU directivesGENERALDifferential pressureSee “SPECIFICATIONS” [1 bar =100 kPa]Maximum allowable pressure 16 bar Response time5 msfluids ( )temperature range (TS)seal materials ( )air, inert gas- 10°C to + 60°CNBR (nitrile)MATERIALS IN CONTACT WITH FLUID( ) Ensure that the compatibility of the fluids in contact with the materials is verified Body P A, glass-filled Core tube Stainless steel Core and plugnut Stainless steel Internal parts, springs Stainless steel Seals NBR Shading coil CopperCONSTRUCTIONMounting padISO 15218 (CNOMO 06-05-80 / NF E 49066, size 30)ELECTRICAL CHARACTERISTICSCoil insulation class F Connector Spade plug (cable Ø 6-10 mm) or M12 Connector specification ISO 4400 / EN 175301-803, form A or CNOMO E03.62.520.N (M12)Electrical safety IEC 335Electrical enclosure protection Moulded IP65 (EN 60529)Standard voltages DC (=): 24V - 48V (M12: 24 V + LED and protection) (Other voltages and 60 Hz on request) AC (~): 24V - 48V - 115V - 230V / 50 Hz-power ratings operator ambient temperature range (TS)replacement coil type (1)inrush~holding ~hot/cold =~=(VA)(VA)(W)(W)(C°)230 V/50 Hz 24 V DC -9433 / 3-10 to + 60430044724300447301-4300552506(1)Refer to the dimensional drawings on the following page.(3)T hese subbases can be mounted on omega rail to EN 50022 using 2 clips (clips sold in packs of 10, catalogue number: 33400036).blanking plug to cover unused port.SOLENOID VALVESISO 15218 (CNOMO, size 30) interface direct operated, pad mounting body subbases for instant fittings or 1/8 threadNC3/2Series 19000421G B -2017/R 01A v a i l a b i l i t y , d e s i g n a n d s p e c i fi c a t i o n s a r e s u b j e c t t o c h a n g e w i t h o u t n o t i c e . A l l r i g h t s r e s e r v e d .All leaflets are available on: 28 - Solenoid valves (3/2)OPTIONS• Explosionproof enclosures for use in zones 1/21-2/22, categories 2-3 to ATEX Directive 2014/34/EU (see “Explosionproof solenoids” section): Ex mb (PV ), PV19000005/6/17/8 / Potentially explosive atmospheres (SG ), zone 22• Straight M12 connector (IP67 protection with connector correctly installed): with 5 m cable: catalogue number 88130212• Right-angle M12 connector (IP67 protection with connector correctly installed), with 5 m cable: catalogue number 88130213• Catalogue number (without connector) + connector catalogue number (with integrated LED indicator and electrical protection ): 24 V (~/=), 88122603 - 48 V (~/=), 88122604 - 115 V (~), 88122605 - 230 V (~), 88122608• M5 flow control regulator to fit port 3, catalogue number: 34600380• Plug with visual indication and peak voltage suppression or with cable length of 2 m (see Solenoids, Coils & Accessories section)INSTALLATION• The solenoid valves can be mounted in any position without affecting operation • Mounting on single or joinable subbases• ATEX 2014/34/EU versions (options “SG” and “PV”) can be installed on single (all versions) or joinable zink diecast subbases • Pipe connections 1/8 have standard thread according to ISO 228/1•Installation/maintenance instructions are included with each valveORDERING EXAMPLES:19000006230V /50 Hz 1900004424V /DCvoltage basic numberoptionsSOLENOID VALVES SERIES 190DIMENSIONS (mm), WEIGHT(kg)TYPE 01- 06Spade plug /M12IEC 335 /EN 175301-803 (11 mm)E03.62.520.N, IP6519000005 to19000045TYPE 02Single instant fitting subbase PolyamideTYPE 04Single subbase Zamak35300047TYPE 03Joinable instant fitting subbase Polyamide 3530007035300071 (set of 2)TYPE 05Joinable subbase Zamak 35300048Right-hand pressure intake option or 2 different pres-sure intakes by procuring the set of two end subbases with endpieces (catalogue number: 35300072).When mounted on DIN rail, it is recommended to use a securing clip on the end subbases as well as on the central subbase.instant-fitting endpieces (catalogue number: 35300071 )2 locking U-piecesO-ringJoinable subbase (catalogue number: 35300070)PolarizerInstant-fitting endpiece(except M12 connection type 06)00421G B -2017/R 01A v a i l a b i l i t y , d e s i g n a n d s p e c i fi c a t i o n s a r e s u b j e c t t o c h a n g e w i t h o u t n o t i c e . A l l r i g h t s r e s e r v e d .1 Manual operator location2 Port 3: M5, depth 5,5 mm3 Mounting: two CM4 x 33,5 screws4 Instant-fitting connection for OD 4 mm tube5 Mounting: two dia. 3,5 mm securing holes, dia. 6,5 mm counter-bores, depth 3,5 mm6 Instant-fitting connection for OD 6 mm tube7 Mounting: two dia. 4,5 mm securing holes8 Adaptable clips9Subbase mounting hole, adapter。
环保空调系列产品说明书

421 51 6250 02 1/13/16Specifications subject to change without notice.EFFICIENT 14 SEER/11.7−12.2 EER AIR CONDITIONERENVIRONMENT ALLY SOUND R −410A REFRIGERANT1−1/2 THRU 5 TONS SPLIT SYSTEM 208/230 V olt, 1−phase, 60 Hz208/230, 460 & 575 V olt, 3−phase, 60 HzREFRIGERATION CIRCUITS Scroll compressors on all modelsS Filter −Drier supplied with every unit for field installation S Copper tube /aluminum fin coil EASY TO INSTALL AND SERVICES Easy Access service valves on all models S External high and low refrigerant service ports S Only two screws to access control panel S Factory charged with R −410A refrigerant BUILT TO LASTS Baked −on powder coat finish over galvanized steel S Post −painted (black) coil finsS C oated, weather −resistant cabinet screwsS Coated inlet grille with 3/8” (10mm) grille spacing for extra protection (hail guard)LIMITED WARRANTY*S 10 year parts limited warranty (including compressor and coil) with timely registrationS 5 year parts limited warranty if not registered within 90days of original installation*For owner occupied, residential applications only. See warranty certificate for complete details andrestrictions, including warranty coverage for other applications.Use of the AHRI Certified TM Mark indicates a manufacturer’s participation in the program. For verification of certification for individual products,go to .Model Number Size (tons)Nominal BTU/hr Min.Circuit Amps Max. Fuse or BreakerOperating Dimensions depth x width x height in. (mm)Ship / Operating Weight lbs.(kg)N4A518GKC 1−1/218,00011.72025−3/4 x 25−3/4 x 25(654 x 654 x 635)145/122 (66/55)N4A524GKC 224,00014.12025−3/4 x 25−3/4 x 32−5/16(654 x 654 x 821)148/123 (67/56)N4A530GKC 2−1/230,00016.82531−3/16 x 31−3/16 x 31−13/16(792 x 792 x 808)186/151 (84/69)N4A536GKC 336,00018.13031−3/16 x 31−3/16 x 35−3/16(792 x 792 x 894)171/151(78/69)N4A542GKC 3−1/242,00022.33531−3/16 x 31−3/16 x 28−7/16(792 x 792 x 722)226/191 (103/87)N4A548GKC 448,00020.93531−3/16 x 31−3/16 x 28−7/16(792 x 792 x 722)200/182 (91/83)N4A560GKC560,00027.54031−3/16 x 31−3/16 x 31−13/16(792 x 792 x 808)218/197 (99/89)PRODUCT SPECIFICATIONS Split System Air Conditioner: N4A52421 51 6250 02Specifications subject to change without notice.OUTDOOR UNIT MODEL NUMBER IDENTIFICATION GUIDEDigit Position:12345, 6789101112Example Part Number:N 4A 518G K C 100H = Airquest Mainline N = Airquest Entry BRANDING4 = R −410AREFRIGERANTA = Air Conditioner H = Heat Pump TYPE5 = 15 SEERNOMINAL EFFICIENCY18 = 18,000 BTUH = 1−1/2 tons 24 = 24,000 BTUH = 2 tons 30 = 30,000 BTUH = 2−1/2 tons 36 = 36,000 BTUH = 3 tons 42 = 42,000 BTUH = 3−1/2 tons 48 = 48,000 BTUH = 4 tons 60 = 60,000 BTUH = 5 tons NOMINAL CAPACITYA = Standard Grille G = Coil Guard Grille C = Coastal FEATURESK = 208/230−1−60H = 208/230−3−60L = 460−3−60S = 575−3−60VOLTAGESales CodeEngineering Revision Extra Digit Extra DigitACCESSORIES PART NUMBER IDENTIFICATION GUIDEDigit Position:123456, 78, 910, 11Example Part Number:N A S A 00 101 C HN = Non −Branded BRANDING A = AccessoryPRODUCT GROUPS = Split System (AC & HP)KIT USAGEA = OriginalB = 2nd GenerationMAJOR SERIES0 = Generic or Not Applicable 2 = R −224 = R −410AREFRIGERANTProduct Identifier Number Package QuantityType of Kit (Example: CH = Crankcase Heater)PRODUCT SPECIFICATIONSSplit System Air Conditioner: N4A53Specifications subject to change without notice.1.A l l o w 30” c l e a r a n c e t o s e r v i c e s i d e o f u n i t , 48” a b o v e u n i t , 6“ o n o n e s i d e , 12” o n r e m a i n i n g s i d e s a n d 24” b e t w e e n u n i t s f o r p r o p e r a i r f l o w .2.M i n i m u m o u t d o o r o p e r a t i n g a m b i e n t i n c o o l i n g m o d e i s 55ºF , m a x 125ºF .3.C e n t e r o f G r a v i t yM o d e l D i m e n s i o n s I n c h e s (E n g l i s h )AB C D E F G KLMNPM i n i m u m G r o u n d M o u n t i n g P a d S i z e X M i n i m u m R o o f t o p M o u n t i n g P a d S i z e YS h i p p i n g D i m e n s i o n s L x W x HN 4A 518G K C 25−3/4253−3/43/44−7/1621−1/49−1/82−13/161/21315−1/49−3/425−3/4 x 25−3/420−7/16 x 20−7/1627−7/8 x 27−7/8 x 32−9/16N 4A 524G K C 25−3/432−5/163−3/43/44−7/1621−1/49−1/82−13/161/213−5/813−1/415−1/1625−3/4 x 25−3/420−7/16 x 20−7/1627−7/8 x 27−7/8 x 36−5/8N 4A 530G K C 31−3/1631−13/163−3/43/46−9/1624−11/169−1/82−13/161/216−1/815−1/1612−5/831−3/16 x 31−3/1623 x 2333−3/8 x 33−3/8 x 34N 4A 536G K C 31−3/1635−3/163−7/87/86−9/1624−11/169−1/82−15/165/816−1/816−3/814−7/1631−3/16 x 31−3/1623 x 2333−3/8 x 33−3/8 x 37−7/16N 4A 542G K C 31−3/1628−7/163−7/87/86−9/1624−11/169−1/82−15/165/815−7/81711−7/831−3/16 x 31−3/1623 x 2333−3/8 x 33−3/8 x 30−5/8N 4A 548G K C 31−3/1628−7/163−7/87/86−9/1624−11/169−1/82−15/165/816−3/1616−1/410−1/431−3/16 x 31−3/1623 x 2333−3/8 x 33−3/8 x 30−5/8N 4A 560G K C31−3/1631−13/163−7/87/86−9/1624−11/169−1/82−15/165/815−1/21610−7/831−3/16 x 31−3/1623 x 2333−3/8 x 33−3/8 x 34PRODUCT SPECIFICATIONSSplit System Air Conditioner: N4A5421 51 6250 02subject to change without notice.1.A l l o w 762 m m c l e a r a n c e t o s e r v i c e s i d e o f u n i t , 1219 m m a b o v e u n i t , 152 m m o n o n e s i d e , 305 m m o n r e m a i n i n g s i d e s , a n d 610m m b e t w e e n u n i t s f o r p r o p e r a i r f l o w .2.M i n i m u m o u t d o o r o p e r a t i n g a m b i e n t i n c o o l i n g m o d e i s 13ºC , m a x 52ºC .3.C e n t e r o f G r a v i t yM o d e l D i m e n s i o n s m m (S I M e t r i c )AB C D E F G K LMNPM i n i m u m G r o u n d M o u n t i n g P a d S i z e XM i n i m u m R o o f t o p M o u n t i n g P a d S i z e YS h i p p i n g D i m e n s i o n s L x W x HN 4A 518G K C 65463595191135402327113330387248654 X 654518 x 518708 x 708 x 827N 4A 524G K C 65482195191135402327113340337383654 x 654518 x 518708 x 708 x 827N 4A 530G K C 79280895191676272327113410383321792 x 792583 x 583847 x 847 x 864N 4A 536G K C 79289498221676272327516410416367792 x 792583 x 583847 x 847 x 951N 4A 542G K C 79272298221676272327516403432302792 x 792583 x 583847 x 847 x 778N 4A 548G K C 79272298221676272327516411413260792 x 792583 x 583847 x 847 x 778N 4A 560G K C79280898221676272327516394406276792 x 792583 x 583847 x 847 x 864PRODUCT SPECIFICATIONSSplit System Air Conditioner: N4A5421 51 6250 025Specifications subject to change without notice.PHYSICAL DATA{ Time −Delay fuse.FLA − Full Load Amps LRA − Locked Rotor Amps MCA − Minimum Circuit Amps RLA − Rated Load Amps NOTE :Control circuit is 24V on all units and requires external power source. Copper wire must be used from service disconnect to unit.All motors/compressors contain internal overload protection.Complies with 2010 requirements of ASHRAE Standards 90.1A–WEIGHTED SOUND POWER (dBA)A–WEIGHTED SOUND POWER (dBA) WITH SOUND SHIELDPRODUCT SPECIFICATIONS Split System Air Conditioner: N4A56421 51 6250 02Specifications subject to change without notice.METERING DEVICEREFRIGERANT CHARGE ADJUSTMENTSUnits are factory charged for 15 ft (4.6 m) of 3/8” liquid line. The factory charge for 3/8” lineset 9 oz. When using other length or diameter liquid lines, charge adjustments are required per the chart above.Charging Formula:[(Lineset oz/ft x total length) – (factory charge for lineset)] = charge adjustmentExample 1: System has 15 ft of line set using existing 1/4“ liquid line. What charge adjustment is required?Formula:(.27 oz/ft x 15ft) – (9 oz) = (-4.95) oz.Net result is to remove 4.95 oz of refrigerant from the systemExample 2: System has 45 ft of existing 5/16” liquid line. What is the charge adjustment?Formula:(.40 oz/ft. x 45ft) – (9 oz.) = 9 oz.Net result is to add 9 oz of refrigerant to the systemLONG LINE APPLICATIONSAn application is considered Long Line, when the refrigerant level in the system requires the use of accessories to maintain acceptable refrigerant management for systems reliability. See Accessory Usage Guideline table for required accessories. Defining a system as long line depends on the liquid line diameter, actual length of the tubing, and vertical separation between the indoor and outdoor units.For Air Conditioner systems, the charts below shows when an application requires a TXV and long line accessories due to lineset length.AC with R −410A Refrigerant Long Line Description ft (m) Beyond these lengths, a TXV is requiredAC with R −410A Refrigerant Long Line Description ft (m) (Beyond these lengths, long line accessories are required)Note: See Long Line Guideline for detailsPRODUCT SPECIFICATIONS Split System Air Conditioner: N4A5421 51 6250 027Specifications subject to change without notice.VAPOR LINE SIZING AND COOLING CAPACITY LOSSAcceptable vapor line diameters provide adequate oil return to the compressor while avoiding excessive capacity loss. The suction line diameters shown in the chart below are acceptable for AC systems with R −410A refrigerant:Consult the Long Line Application Guideline document before purchasing/installing line sets.Applications in shaded area may have height restrictions that limit allowable total equivalent length when outdoor unit is below indoor unit.TESTED AHRI COMBINATION RATINGSNOTE: For complete ratings information, use the AHRI website directory search: www.AHRIdirectory .org.EER — Energy Efficiency Ratio − 80_F (26.6_C) indoor db/67_F (19.4_C) indoor wb & 95_F (35_C) outdoor wb.SEER — Seasonal Energy Efficiency RatioTDR—Time −Delay Relay. In most cases, only one method should be used to achieve TDR function. Using more than one method in a system may cause degradation in performance. Use either the accessory Time −Delay Relay or a furnace equipped with TDR. Most ICP furnaces are equipped with TDR.NOTES:1. Ratings are net values reflecting the effects of circulating fan motor heat. Supplemental electric heat is not included.2. Tested outdoor/indoor combinations have been tested in accordance with DOE test procedures for central air conditioners. Ratings for other combinations are determined under DOE computersimulation procedures.3. Determine actual CFM values obtainable for your system by referring to fan performance data in fan coil or furnace coil literature.4. Do not apply with capillary tube coils as performance and reliability are significantly affected.TESTED AHRI COMBINATION RATINGS*Or scan this QR code:NOTE: Ratings contained in this document are subject to change at any time.For AHRI ratings certificates, please refer to the AHRI directory. www.ahridirectory .org Additional ratings and system combinations can be accessed via the Airquest database:/AHRIratings/ratings.aspx?Brand=AirquestPRODUCT SPECIFICATIONSSplit System Air Conditioner: N4A58421 51 6250 02Specifications subject to change without notice.S e e n o t e s o n p a g e 7PRODUCT SPECIFICATIONSSplit System Air Conditioner: N4A5421 51 6250 029Specifications subject to change without notice.S e e n o t e s o n p a g e 7PRODUCT SPECIFICATIONSSplit System Air Conditioner: N4A510421 51 6250 02Specifications subject to change without notice.S e e n o t e s o n p a g e 7PRODUCT SPECIFICATIONSSplit System Air Conditioner: N4A5421 51 6250 0211Specifications subject to change without notice.{ T o t a l a n d s e n s i b l e c a p a c i t i e s a r e n e t c a p a c i t i e s . B l o w e r m o t o r h e a t h a s b e e n s u b t r a c t e d .} S e n s i b l e c a p a c i t i e s s h o w n a r e b a s e d o n 80_F (27_C ) e n t e r i n g a i r a t t h e i n d o o r c o i l. F o r s e n s i b l e c a p a c i t i e s a t o t h e r t h a n 80_F (27_C ), d e d u c t 835 B t u h (245 k W ) p e r 1000 C F M (480 L /S ) o f i n d o o r c o i l a i r f o r e a c h d e g r e e b e l o w 80_F (27_C ), o r a d d 835 B t u h (245 k W ) p e r 1000 C F M (480 L /S ) o f i n d o o r c o i l a i r p e r d e g r e e a b o v e 80_F (27_C ).# D e t a i l e d c o o l i n g c a p a c i t i e s a r e b a s e d o n i n d o o r a n d o u t d o o r u n i t a t t h e s a m e e l e v a t i o n p e r A H R I s t a n d a r d 210/240-2008. I f a d d i t i o n a l t u b i n g l e n g t h a n d /o r i n d o o r u n i t i s l o c a t e d a b o v e o u t d o o r u n i t , a s l i g h t v a r i a t i o n i n c a p a c i t y m a y o c c u r .** S y s t e m k w i s t o t a l o f i n d o o r a n d o u t d o o r u n i t k i l o w a t t s .{{ A t T V A r a t i n g i n d o o r c o n d i t i o n (75_F e d b /63_F e w b ). A l l o t h e r i n d o o r a i r t e m p e r a t u r e s a r e a t 80_F e d b .N O T E : W h e n t h e r e q u i r e d d a t a f a l l s b e t w e e n t h e p u b l i s h e d d a t a , i n t e r p o l a t i o n m a y b e p e r f o r m e d . E x t r a p o l a t i o n i s n o t a n a c c e p t a b l e p r a c t i c e .E W B — E n t e r i n g W e t B u l bPRODUCT SPECIFICATIONS Split System Air Conditioner: N4A5421 51 6250 0212Specifications subject to change without notice.ACCESSORY USAGE GUIDELINEAccessoryREQUIRED FOR LOW −AMBIENT APPLICATIONS {Below 55°F (13°C)}REQUIRED FOR LONG −LINE APPLICATIONS*Crankcase HeaterYes Yes Evaporator Freeze ThermostatYes No Winter Start ControlYes**No TXVYes Yes ǂHard Start Kit (Capacitor & Relay)Yes Yes Low Ambient Kit (Pressure Switch)YesNo Support Feet, 4” (102mm) tallRecommendedNo* Refer to the Long Line Application Guideline document.**Can only be installed in conjunction with the Low Pressure SwitchǂTXV required beyond 20 ft (6.1m) vertical separation or 50 ft (15.2) total length.ACCESSORIESPart Number DescriptionUsed On Model Size NASA001CH Crankcase Heater for Scroll Compressor (208/230 V)42 − 60NASA003CH Crankcase Heater for Scroll Compressor (208/230 V)18 − 36NASA001SC Start Component − PTC Device 24 − 60NASA00201FS Evaporator Freeze Thermostat ALL NASA403PS Low Pressure Switch, AC, R −410A ALL NASA401LS Liquid Line Solenoid Valve, R −410A ALL NASA001TD Time Delay Relay, Indoor BlowerALL NASA00201WS Winter Start ControlALL NASA001AC Anti −Cycle Timer (5 minute delay)ALL NASA404PS High Pressure Switch, AC or HP, R −410AALL NASA005SC Hard Start Kit (Capacitor & Relay)ALL NASA401LA Low Ambient Kit (Pressure Switch), R −410A ALL NASA00201SF Support Feet, 4” (102mm) tall (5 blocks)18 − 36NASA001SF Support Feet, 4” (102mm) tall (4 blocks)42 − 60NASA001SJ Sound Jacket, Compressor 18 − 48NASA003SJ Sound Jacket, Compressor60EBAC05TXVX TXV Kit, R −410A − 2005−2009 R −22 TXV Fancoils (air handlers)18 − 30EBAC06TXVX TXV Kit, R −410A − 2005−2009 R −22 TXV Fancoils (air handlers)36 − 42EBAC07TXVX TXV Kit, R −410A − 2005−2009 R −22 TXV Fancoils (air handlers)48 − 60NAEA40501TX TXV Kit, R −410A for use with copper or tin fan coils 18 − 30NAEA40601TX TXV Kit, R −410A for use with copper or tin fan coils 36 − 42NAEA40701TX TXV Kit, R −410A for use with copper or tin fan coils 60NAEA40501TX TXV Kit, R −410A for use with aluminum fan coils 18 − 30NAEA40601TX TXV Kit, R −410A for use with aluminum fan coils 36 − 42NAEA40701TXTXV Kit, R −410A for use with aluminum fan coils60Copyright 2016 International Comfort ProductsLewisburg, Tennessee 37091 USA。
How to Write an Essay Introduction

How to Write an Essay IntroductionFive Parts:Sample Essay Hooks;Hooking Your Reader;Creating Your Context;Presenting Your Thesis;Bringing It All Together;Community Q&AThe introduction of your essay serves two important purposes. First, it gets your reader interested in the topic and encourages them to read what you have to say about it. Second, it gives your reader a roadmap of what you're going to say and the overarching point you're going to make –your thesis statement. A powerful introduction grabs your reader's attention and keeps them reading.[1]Quick SummaryTo write an essay introduction, start with a relevant anecdote, fun fact, or quote that will entice people to keep reading. Follow your opening with 2-3 sentences containing background information or facts that give your essay context, such as important dates, locations, or historical moments. Finally, present your thesis statement. Write a specific and provable statement that answers a question about your essay topic.Did this summary help you? Yes NoPart I: Sample Essay插入图片sample essay插入图片1.11.Identify your audience. The first sentence or two of your introduction should pull the reader in.You want anyone reading your essay to be fascinated, intrigued, or even outraged. You can't do this if you don't know who your likely readers are.[2]If you're writing a paper for a class, don't automatically assume your instructor is your audience. If you write directly to your instructor, you'll end up glossing over some information that is necessary to show that you properly understand the subject of your essay.It can be helpful to reverse-engineer your audience based on the subject matter of your essay. For example, if you're writing an essay about a women's health issue for a women's studies class, you might identify your audience as young women within the age range most affected by the issue.e the element of surprise. A startling or shocking statistic can grab your audience's attentionby immediately teaching them something they didn't know. Having learned something new in the first sentence, people will be interested to see where you go next.[3]For this hook to be effective, your fact needs to be sufficiently surprising. If you're not sure, test it on a few friends. If they react by expressing shock or surprise, you know you've got something good.Use a fact or statistic that sets up your essay, not something you'll be using as evidence to prove your thesis statement. Facts or statistics that demonstrate why your topic is important (or should be important) to your audience typically make good hooks.3.Tug at your reader's heart-strings. Particularly with personal or political essays, use your hookto get your reader emotionally involved in the subject matter of your story. You can do this by describing a related hardship or tragedy.[4]For example, if you were writing an essay proposing a change to drunk driving laws, you might open with a story of how the life of a victim was changed forever after they were hit by a drunk driver.4.Offer a relevant example or anecdote. In your reading and research for your essay, you mayhave come across an entertaining or interesting anecdote that, while related, didn't really fit into the body of your essay. Such an anecdote can work great as a hook.[5]For example, if you're writing an essay about a public figure, you might include an anecdote about an odd personal habit that cleverly relates back to your thesis statement.Particularly with less formal papers or personal essays, humorous anecdotes can be particularly effective hooks.5.Ask a thought-provoking question. If you're writing a persuasive essay, consider using arelevant question to draw your reader in and get them actively thinking about the subject of your essay.[6]For example: "What would you do if you could play God for a day? That's exactly what the leaders of the tiny island nation of Guam tried to answer."If your essay prompt was a question, don't just repeat it in your paper. Make sure to come up with your own intriguing question.6.Avoid clichés and generalizations. Generalizations and clichés, even if presented to contrastwith your point, won't help your essay. In most cases, they'll actually hurt by making you look like an unoriginal or lazy writer.[7]Broad, sweeping generalizations may ring false with some readers and alienate them from the start. For example, "everyone wants someone to love" would alienate someone who identified as aromantic or asexual.Part 2: Creating Your Context1.Relate your hook to a larger topic. The next part of your introduction explains to your readerhow that hook connects to the rest of your essay. Start with a broader, more general scope to explain your hook's relevance.[8]Use an appropriate transitional word or phrase, such as "however" or "similarly," to move from your specific anecdote back out to a broader scope.For example, if you related a story about one individual, but your essay isn't about them, you can relate the hook back to the larger topic with a sentence like "Tommy wasn't alone, however. There were more than 200,000 dockworkers affected by that union strike."2.Provide necessary background information. While you're still keeping things relativelygeneral, let your readers know anything that will be necessary for them to understand your main argument and the points you're making in your essay.[9]For example, if your thesis relates to how blackface was used as a means of enforcing racial segregation, your introduction would describe what blackface performances were, and where and when they occurred.If you are writing an argumentative paper, make sure to explain both sides of the argument in a neutral or objective manner.3.Define key terms for the purposes of your essay. Your topic may include broad concepts orterms of art that you will need to define for your reader. Your introduction isn't the place to reiterate basic dictionary definitions. However, if there is a key term that may be interpreted differently depending on the context, let your readers know how you're using that term.[10] Definitions would be particularly important if your essay is discussing a scientific topic, where some scientific terminology might not be understood by the average layperson.Definitions also come in handy in legal or political essays, where a term may have different meanings depending on the context in which they are used.4.Move from the general to the specific. It can be helpful to think of your introduction as anupside-down pyramid. With your hook sitting on top, your introduction welcomes your readers to the broader world in which your thesis resides.[11]If you're using 2 or 3 sentences to describe the context for your thesis, try to make each sentence a bit more specific than the one before it. Draw your reader in gradually.For example, if you're writing an essay about drunk driving fatalities, you might start with an anecdote about a particular victim. Then you could provide national statistics, then narrow it down further to statistics for a particular gender or age group.Part 3 Presenting Your Thesis插入图片3.11.Make your point. After you've set up the context within which you're making your argument, tell your readers the point of your essay. Use your thesis statement to directly communicate the unique point you will attempt to make through your essay.[12]For example, a thesis for an essay on blackface performance might be "Because of its humiliating and demoralizing effect on African American slaves, blackface was used less as a comedy routine and more as a way of enforcing racial segregation."Be assertive and confident in your writing. Avoid including fluff such as "In this essay, I will attempt to show...." Instead, dive right in and make your claim, bold and proud.Your outline should be specific, unique, and provable. Through your essay, you'll make points that will show that your thesis statement is true – or at least persuade your readers that it's most likely true.插入图片3.22.Describe how you're going to prove your point. Round out your introduction by providing your readers with a basic roadmap of what you will say in your essay to support your thesis statement. In most cases, this doesn't need to be more than a sentence.[13]3.If you've created an outline for your essay, this sentence is essentially the main subjects of each paragraph of the body of your essay.For example, if you're writing an essay about the unification of Italy, you might list 3 obstacles to unification. In the body of your essay, you would discuss details about how each of those obstacles was addressed or overcome.Instead of just listing all of your supporting points, sum them up by stating "how" or "why" your thesis is true. For example, instead of saying, "Phones should be banned from classrooms because they distract students, promote cheating, and make too much noise," you might say "Phones should be banned from classrooms because they act as an obstacle to learning."3.Transition smoothly into the body of your essay. In many cases, you'll find that you can move straight from your introduction to the first paragraph of the body. Some introductions, however, may require a short transitional sentence at the end to flow naturally into the rest of your essay.[14]To figure out if you need a transition sentence, read the introduction and the first paragraph out loud. If you find yourself pausing or stumbling between the paragraphs, work in a transition to make the move smoother.You can also have friends or family members read your easy. If they feel it's choppy or jumps from the introduction into the essay, see what you can do to smooth it out.Part 4 Bringing It All Together1.Read essays by other writers in your discipline. What constitutes a good introduction will varywidely depending on your subject matter. A suitable introduction in one academic discipline may not work as well in another.[15]If you're writing your essay for a class assignment, ask your instructor for examples of well-written essays that you can look at. Take note of conventions that are commonly used by writers in that discipline.Make a brief outline of the essay based on the information presented in the introduction. Then look at that outline as you read the essay to see how the essay follows it to prove the writer's thesis statement.2.Keep your introduction short and simple. Generally, your introduction should be between 5and 10 percent of the overall length of your essay. If you're writing a 10-page paper, your introduction should be approximately 1 page.[16]For shorter essays under 1,000 words, keep your introduction to 1 paragraph, between 100 and 200 words.Always follow your instructor's guidelines for length. These rules can vary at times based on genre or form of writing.3.Write your introduction after you write your essay. Some writers prefer to write the body ofthe essay first, then go back and write the introduction. It's easier to present a summary of your essay when you've already written it.[17]As you write your essay, you may want to jot down things you want to include in your introduction. For example, you may realize that you're using a particular term that you need to define in your introduction.4.Revise your introduction to fit your essay. If you wrote your introduction first, go back andmake sure your introduction provides an accurate roadmap of your completed paper. Even if you wrote an outline, you may have deviated from your original plans.[18]Delete any filler or unnecessary language. Given the shortness of the introduction, every sentence should be essential to your reader's understanding of your essay.5.Structure your introduction effectively. An essay introduction is fairly formulaic, and willhave the same basic elements regardless of your subject matter or academic discipline. While it's short, it conveys a lot of information.[19]The first sentence or two should be your hook, designed to grab your reader's attention and get them interested in reading your essay.The next couple of sentences create a bridge between your hook and the overall topic of the rest of your essay.End your introduction with your thesis statement and a list of the points you will make in your essay to support or prove your thesis statement.Community Q&A New! Make a stranger's day. Answer a question.Q: How do I start a paper about extreme sports that kids play?A: I would first narrow your subject down to one sport so you can be more focused. Note that this will likely be an informative essay. After you do this, an interesting hook statement may be an anecdote describing an intense moment in that chosen sport to get your audience interested. This can be made up or from your own experience with the sport.Q: How can I start an essay about HIV and lifestyle?A: An effective hook statement to start your essay about this topic may be a statistic about HIV, or perhaps an anecdote about someone facing this diagnosis and trying to make positive lifestyle changes for their health.Q: How do you begin an introduction?A: With something interesting! This is easier said than done of course, but a good intro starts with a quote, fact, or brief story that interests the reader. If it interested you while reading or researching, it's a great thing to start with. Just keep it short and it will be great.Q: What should I do if I'm stuck on the thesis?A: Skip it, write down your main points, and build the body of your essay. Once you know all the areas you want to cover, think about what links them all together, and what the main thing you're trying to convey is.Q: How should I start a body paragraph?A: Start off with a mini thesis which states what the body paragraph is talking about.Q: Where do you get started with a topic and introduction?A: Start with the basics -- what do you think about the topic? What argument can you make about it? Once you have an argument, start jotting down the evidence for the argument. This evidence will make up your paragraphs later on. If it's easiest, just skip the introduction now and come back once you're done -- you'll have all the ideas already drawn out.Q: My assignment is to summarize an already-written essay: could I begin by using the same introduction?A: To summarize, you really need to condense what's there and put everything into your own words -- this will include the introduction. It's fine to use the content of the introduction, but make sure not to copy the writing word-for-word.Q: How can I write a short introduction about heart disease?A: Start with something like "Heart disease is a serious condition that takes the lives of (number) Americans every year." Then go on to to talk about the causes of heart disease and the symptoms and warning signs, and treatment options. Maybe something about how we can encourage more people to go to the doctor to get a diagnosis before it becomes more serious.Q: What are some good statements to start with?A: Generally, one starts an essay with an interesting quote, fact, or story to make the reader want to continue reading. Ex. Did you know that every year...? Then you can begin to talk about background information and a thesis. A thesis usually lays out a brief summary of the points you want to make and includes your position on the topic. Ex. Dogs are ideal pets because of their loyalty to humans and their great trainability.Q: How can I write the introduction for an essay on the effects of peer pressure among teenagers? A: Talk about the problem first, this way the reader can understand why you are talking about effects and so the reader gets a good background on the subject.。
AI-518 518P 型人工智能温度控制器 说明书 v7.1

(一)显示状态....................................................................................................................17 (二)基本使用操作.............................................................................................................19 (三)AI 人工智能调节及自整定(AT)操作 ............................................................................20 (四)程序操作(仅适用 AI-518P 型)................................................................................22
《win8培训》新圆梦h5新品推介-v3.0PPT课件

Win8 User Accounts and Security
Protect your data and privacy with robust user accounts and advanced security features. Learn how to set up user profiles, manage permissions, and safeguard your valuable information.
Introduction to Windows 8
Learn about the revolutionary operating system that transformed the way we interact with computers. Discover the sleek design, intuitive interface, and powerful features of Windows 8.
Features of Win8 Operating System
Experience the advanced features of the Win8 operating system, including enhanced security, seamless synchronization across devices, improved performance, and a wide range of productivity tools.
Win8 Start Screen and Apps
Discover how to navigate the dynamic Start Screen and explore the vast collection of apps available in the Windows Store. Customize your Start Screen to suit your preferences and boost your productivity.
TR-518系列ICT训练PowerPoint(A级)

不良记录: 不良记录 ******Open Fail****** ******Open (48)(45 48)表示48点与短路组(45 48) 断开,可能是探针未接触到PCB焊盘,或板 上有断路。 ******Short ******Short Fail****** (20)(23)表示20点与23点短路(R<5Ω), 可能是板上有锡渣造成Short,装错零件造 成Short,零件脚过长造成Short等。
C
R//L(mode3,4,5): R/籍 相位法輔助. |Y’|Cosθ=YRx=1/Rx,並 Ix |Y’|=I’x/Vs 故:Rx=1/|Y’|Cosθ
量测C/L C/L: 2. 量测C/L: 单个C/L 单个C/L(Mode0,1,2,3):信号源取恒定 C/L 交流压源Vs Vs Vs/Ix=Zc=1/2лfCx ,求 Cx Ix 得:Cx=Ix/2лfVs
R:在E[编辑]下,ALT-X查串联元件,ALT-P查 并联元件。据此选好“信号”(Mode)和串联 最少元件的Hi-P/Lo-P,并ALT-F7选择 Guarding Pin。 R//C:Mode2及Dly加大(参考:T=5RC) R//D(or IC、Q):Mode1 R//R:Std-V取并联阻值 R//L:Mode3、4、5,根据Zl=2πfL,故L一 定时,若f越高,则Zl越大,则对R影响 越小
Vs
Lx
Ix
Vs/Ix=Zl=2лfLx , 求得:Lx=Vs/2лfIx
C//R或L//R: C//R或L//R:
籍相位法辅助 |Y’|Sinθ=|Ycx|, 即
Vs
ωCx’Sinθ=ωCx Cx
Ix
R
Vs
Lx R
Ix
求得:Cx=Cx’Sinθ (Cx’=Ix’/2лfVs) |Y’|Sinθ=|Ycx|,即Sinθ/ωCx’ =1/ωCx 求得:Lx=Lx’/Sinθ (Lx’=Vs/2лfIx’)
TR-518FE使用手册-part4

TR-518FE
4-5
TR-518FE TR518FE : COPY A:\8030BF\*.* C:\TR-518FE A 518FE TR-518FE.EXE 2.3. 8030BF 8030BF A C ICT.BAT TR-
: COPY C:\TR-518FE\8030BF\*.* A:\8030BF C 8030BF 8030BF 8030BF A A
TR-518FE
4-1
1.
Level 0 (TEST) Level 1
(Command Tree)
Level 2 (Testing) Level 3 (Test-Sequence) (Test-Abortion) (Test-Pin) (Retry) (Printer) / (Map/Stamp)
TR-518FE
1. 2.
(COMMAND TREE) .............................................................................. 4-1
..................................................... 4-2 2.1. ......................................................................................... 4-2 2.2. ............................................................. 4-4 2.3. ............................................................. 4-5 3. ......................................................................................... 4-6 ..................................................................................... 4-6 3.1. 3.2. ..................................................................................... 4-7 4. ......................................................................................................... 4-8 4.1. (RESISTOR) DEBUGGING ................................................................................... 4-8 (CAPACITOR) DEBUGGING ................................................................................ 4-9 4.2. 4.3. (D) DEBUGGING.......................................................................................... 4-11 4.4. DEBUGGING ............................................................................................... 4-12 4.5. (FET) DEBUGGING ............................................................................. 4-13 4.6. (SCR TRIAC) DEBUGGING .................................................................... 4-14 4.7. DEBUGGING ....................................................................... 4-15 DEBUGGING ................................................................................................... 4-16 4.8. 4.9. (PHOTO COUPLER) DEBUGGING .......................................................... 4-16 4.10. DEBUGGING ................................................................................. 4-17 4.11. (OPEN TESTER) DEBUGGING ............................................................ 4-18 4.12. (PRINTER) DEBUGGING ............................................................................. 4-19 4.13. OPEN/SHORT FAIL DEBUGGING ........................................................................... 4-20 4.14. DEBUGGING ................................................................................................. 4-20
- 1、下载文档前请自行甄别文档内容的完整性,平台不提供额外的编辑、内容补充、找答案等附加服务。
- 2、"仅部分预览"的文档,不可在线预览部分如存在完整性等问题,可反馈申请退款(可完整预览的文档不适用该条件!)。
- 3、如文档侵犯您的权益,请联系客服反馈,我们会尽快为您处理(人工客服工作时间:9:00-18:30)。
TR-518EP 使用手冊第四章1. 指令樹狀結構圖(COMMAND TREE)..............................................................................4-12. 測試軟體在硬碟機上的儲存架構與測試資料的拷貝.....................................................4-22.1. 測試系統所需要的資料檔.........................................................................................4-23. 測試資料檔之編寫與偵錯程序.......................................................................................4-203.1. 新電路板測試資料檔的準備...................................................................................4-203.2. 測試資料檔偵錯的注意事項...................................................................................4-214. 測試資料檔偵錯要點.......................................................................................................4-234.1. 電阻(R ESISTOR)之D EBUGGING.................................................................................4-234.2. 電容(C APACITOR)之D EBUGGING..............................................................................4-244.3. 二極體(D)之D EBUGGING.........................................................................................4-254.4. 電晶體之D EBUGGING...............................................................................................4-274.5. 跳線,保險絲,開關之D EBUGGING.......................................................................4-284.6. 電感之D EBUGGING...................................................................................................4-294.7. 光耦合元件(P HOTO C OUPLER)之D EBUGGING.........................................................4-294.8. 電容極性判斷之D EBUGGING...................................................................................4-304.9. 開路測試(OPEN TESTER)之D EBUGGING..............................................................4-314.10. 印表機(P RINTER)之D EBUGGING............................................................................4-324.11. O PEN/S HORT F AIL之D EBUGGING...........................................................................4-324.12. 壓床之D EBUGGING.................................................................................................4-331.指令樹狀結構圖(C o m m a n d T r e e)Level 0 Level 1 Level 2 Level 3測試開始測試(Testing) 順序(Test-Sequence) (TEST) 中斷(Test-Abortion)測試針(Test-Pin)測試參數(Test-Par) 修改參數(Update) 短/開路設定(Short/Open Base)重測(Retry)設定新參數(SetUp) 列印機(Printer)拷貝參數(Copy) 位置圖/自動列印(Map/Stamp)刪除參數(Delete)選擇板號(Board-Sel) 壓床型式(Test-Fixture)網路設定(Network)延遲時間(Delay-Time)系統參數(System-Par) 列印機(Printer)統計基底(Report-Base)編輯(EDIT) 短路學習(Learning)編輯(Edit)短路點資料(Short/Open) 列印(Print)短路測試(Short-T)開路測試(Open-T)IC腳(IC-Pins)IC保護二極體(Clamping-D) 學習(Learning)學習顯示(Display)(LEARN) 列印(Print)刪除(Delete)IC腳(IC-Pins)學習(Learning)並聯測試(Diode Check) 顯示(Display)列印(Print)刪除(Delete)測試點資料(Pin-Information) 測試點資料(Test-Pins)列印(Print)日報表顯示(Day-Display)報表(Total) 日報表列印(Day-Print)分佈表(Histo) 月報表顯示(Month-Display)分佈圖(Statis) 月報表列印(Month-Print)報告排行榜(Worst) 螢幕顯示不良零件排行(Disp_Comp)(REPORT) 存檔(Store) 螢幕顯示不良測試針排行(Disp_Pin)讀入(Load) 列印不良零件排行(Print_Comp)清除(Clear) 列印不良測試針排行(Print_Pin)系統自我檢測(System-Check)硬體診斷(Self-Check) 切換電路板診斷(Switch-Board)單體測試(Test-Exers) 使用維修盒診斷(Debug-Box)診斷切換電路板(Switch- Brd)(DEBUG) 測試針(Pin-Search)壓床(Fixture)REMOTE功能編輯(Function -Edit)功能穩定性測試(Stability -Check)(FUNC)腳位編輯(IC-Pins)空焊自動學習(OT-Learn)IC空焊測試空焊資料編輯(OT-Edit)(IC-OPEN) 分佈表(Histo)刪除(Delete)自我診斷(Debug) TestJet配置(TestJet-Config)穩定度測試(Stability-Check)VIEW2.測試軟體在硬碟機上的儲存架構與測試資料的拷貝在硬碟機或軟碟機的根目錄上設定TR-518EP子目錄,所有的測試軟體均儲存於該子目錄下。
當軟體正確安裝時,所有需要的子目錄與檔案均已安裝至硬碟上。
有關軟體的安裝,請參閱本手冊第一部份。
2.1.測試系統所需要的資料檔在TR-518EP子目錄上必須有如下的檔案或子目錄,測試系統才能正常的動作:ICT.BAT 批次檔TR-518EP.EXE 測試系統執行檔ICTBAT子目錄子目錄DEBUGBOX子目錄維修盒自我測試用的子目錄每種電路板皆有一相對應的子目錄2.1.1. 電路板的測試資料檔與測試參數檔每種電路板皆有一個子目錄,該片電路板的測試資料檔與測試參數檔均存在該子目錄上。
使用新設定參數為一片新的電路板鍵入測試資料時,系統程式同時會在TR-518EP子目錄下為這片電路板建立一個新的子目錄。
子目錄的名子與該片電路板的測試資料檔名稱是一樣的。
例如一片名叫8030BF的電路板,其測試資料檔名稱是8030BF.DAT,則在8030BF子目錄下會有如下的資料檔存在硬碟機上:8030B F.B A T8030B F.D A T8030B F.S C P8030B F.S P G8030B F.I C N8030B F.I C P8030B F.S R S8030B F.H S T8030B F.S T A8030B F.R P T8030B F.B A K8030B F.T P I8030B F.T V8030B F.B A R8030B F.B I F8030B F.C A P8030B F.C O F8030B F.C P K8030B F.F S D8030B F.H S R8030B F.O P I8030B F.O T P8030B F.S G R8030B F.S K P8030B F.S P A8030B F.S P G C A P8030B F.S P I8030B F.S P R8030B F.T A B8030B F.T C R8030B F.T C T8030B F.D C F8030B F.H C F8030B F.M B C8030B F.V E R8030B F.V S T每一種電路板的測試資料檔與測試參數檔其名稱均是一樣的,僅有屬性不一樣。
每個電路板會有上述測試資料檔與測試參數檔存在硬碟機上。
各種檔案的功能如下:.BAT:.BAT檔是執行該片電路板測試的批次檔。
例如8030BF.BAT的內容是:TR-518EP.EXE 8030BF.DAT 8030BF第一個參數是測試資料檔名稱,第二個參數是電路板名稱。