酷乐视X2微型投影仪用户手册(中英文)
投影仪快速设置指南说明书
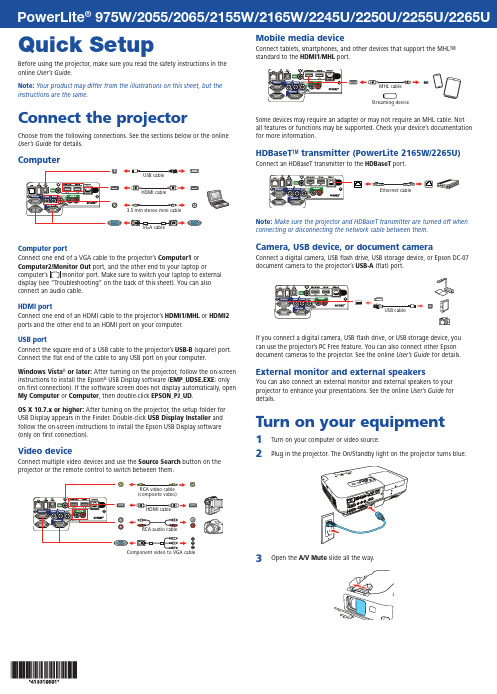
Quick SetupBefore using the projector, make sure you read the safety instructions in the online User’s Guide .Note: Your product may differ from the illustrations on this sheet, but the instructions are the same.Connect the projectorChoose from the following connections. See the sections below or the online User’s Guide for details.Computer3.5 mm stereo mini cableComputer portConnect one end of a VGA cable to the projector’s Computer1 orport, and the other end to your laptop or connect an audio cable.HDMI portConnect one end of an HDMI cable to the projector’s HDMI1/MHL or HDMI2 ports and the other end to an HDMI port on your computer.USB portConnect the square end of a USB cable to the projector’s USB-B (square) port. Connect the flat end of the cable to any USB port on your computer.Windows Vista ® or later: After turning on the projector, follow the on-screen instructions to install the Epson ® USB Display software (EMP_UDSE.EXE ; only on first connection). If the software screen does not display automatically, open My Computer or Computer , then double-click EPSON_PJ_UD .OS X 10.7.x or higher: After turning on the projector, the setup folder for USB Display appears in the Finder. Double-click USB Display Installer and follow the on-screen instructions to install the Epson USB Display software (only on first connection).Video deviceConnect multiple video devices and use the Source Search button on theprojector or the remote control to switch between them.Mobile media deviceConnect tablets, smartphones, and other devices that support the MHL™ standard to the HDMI1/MHLport.Some devices may require an adapter or may not require an MHL cable. Not all features or functions may be supported. Check your device’s documentation for more information.HDBaseT ™ transmitter (PowerLite 2165W/2265U)Connect an HDBaseT transmitter to the HDBaseTport.Ethernet cableNote: Make sure the projector and HDBaseT transmitter are turned off when connecting or disconnecting the network cable between them.Camera, USB device, or document cameraConnect a digital camera, USB flash drive, USB storage device, or Epson DC-07 document camera to the projector’s USB-A(flat) port.If you connect a digital camera, USB flash drive, or USB storage device, you can use the projector’s PC Free feature. You can also connect other Epson document cameras to the projector. See the online User’s Guide for details.External monitor and external speakersYou can also connect an external monitor and external speakers to your projector to enhance your presentations. See the online User’s Guide for details.Turn on your equipment1 Turn on your computer or video source.2Plug in the projector. The On/Standby light on the projector turns blue.3O pen the4 P ress the power button on the projector or remote control. Theprojector beeps, the Status light flashes blue, and then stays on.Note: To shut down the projector, press the power button twice.5 U se the arrow buttons on the remote control to highlight any of theoptions on the Home screen that appears, then press to select it.You can display a QR code, switch between projection sources, andquickly access various adjustment options from this screen.6 T he default language of the menu system is English. To select anotherlanguage, press the Menu button on the projector or remote control.Select Extended and press . Select Language and press . Selectyour language and press . Press the Menu button to exit the menusystem.Adjust the image1 I f you don’t see an image, press the Source Search button on theprojector or the remote control to select the image source.Note: If you still see a blank screen or have other display problems, seethe troubleshooting tips on the back of this sheet.2 TNote: You can also press the button on the projector tofine-tune your adjustments. See the online User’s Guide for details.5 Y our projector automatically adjusts images that are unevenly rectangular), but if necessary you can correctUser’s Guide for details.Using the remote controlInstall the batteries as shown (two AA batteries).Choose which sourceto displayTurn projectoron and offAccess projectormenusTurn off projectordisplayAccess the HomescreenNavigate projectormenusFor more information on using the remote control, see the online User’s Guide.Project wirelesslyFollow the steps here to install the included wireless LAN module and connectthe projector over a wireless network. With the PowerLite 2250U, you willneed the optional wireless LAN module (part number V12H731P02).If you’re projecting from a computer, it must have a wireless card or built-inwireless interface.1 Turn off the projector and unplug the power cord.2 Slide the air filter cover latch and open the air filter cover.3 R emove the screw securing the wireless LAN module stopper andremove the stopper.45Replace the wireless LAN module stopper and secure it using the screwyou removed.6 7 Plug in the power cord and turn on the projector.8 P ress the Menu button on the remote control, select the Networkmenu, and press.9 Choose Network Configuration and press .10Select the Wireless LAN menu and press .11 C hoose Connection Mode , press, select Quick (for a directconnection to a computer, tablet, or smartphone) or Advanced (for a connection to a router or access point), then press again. When you’re finished, press Esc to return to the Wireless LAN menu.12I f you chose the Advanced connection mode, select Search Access Point and press . Use the arrow buttons to highlight your networkname (SSID) in the list of available connections.13 I f your network has security enabled, enter your network password onthe screen that appears. Make sure to enter any uppercase or lowercase letters in the correct case.• To select a number or character, use the arrow buttons on the remote control to highlight it, then press . • To switch between uppercase and lowercase letters, select CAPS and press .• To change the displayed symbols, select SYM1 or SYM2 and press .When you’re finished entering the network password, select Finish and press .14 I f you chose the Advanced connection mode, select IP Settings andpress.If your network assigns addresses automatically, make sure DHCP is turned on. If not, turn off DHCP and enter the projector’s IP Address , Subnet Mask , and Gateway Address , as needed.15 T o prevent the SSID and IP address from appearing on the network standby screen, set the SSID Display and IP Address Display settings to Off .16 W hen you’re finished selecting settings in the Wireless LAN menu,press Esc .17 S elect Complete and press, then select Yes and press again tosave your settings.Install network softwareLinks to download the network software and to the manuals are availablefrom the projector CD. Downloads require an Internet connection. You can also download the software and manuals from the Epson website, as described in “Where to get help.”To monitor and control your projector over the network, install the EasyMP ® Monitor software (Windows ® only). To project from multiple PCs over the network, install the EasyMP Multi PC Projection software. To update your projector’s firmware over a wired LAN, install the EasyMP Network Updater software.Click the icons on your desktop to view the software manuals. See the manuals for instructions on installing and using the software.Project wirelessly from a mobile deviceYou can connect your mobile device and projector using Epson iProjection™ and a QR code. Make sure the latest version of Epson iProjection is installed on your device.Install the Epson iProjection appTo project from an iOS or Android™ device, download and install the Epson iProjection app. Visit /projectorapp (U.S.) orwww.epson.ca/projectorapp (Canada) for more information.Direct wireless connectionMake sure your device and Epson projector are not connected to a network and your Epson projector’s Connection Mode is set to Quick .1 P ress the Home button on the projector or remote control to bring up the Home screen.2 Select Display the QR Code and press.3TapiProjection on your device’s Home screen.4Tap Read QR code .5 Point your device’s camera at the QR code your projector displays; the QR code is read automatically.6If you are using an iOS device, follow the on-screen prompts to register your projector’s Wi-Fi profile.Your device and Epson projector are now connected.Wireless network connectionMake sure your projector and mobile device are connected to the same wireless network.1 Press the Home button on the projector or remote control to bring up the Home screen.2 S elect Display the QR Code and press .3TapiProjectionon your device’s Home screen.4 Tap Read QR code .5Point your device’s camera at the QR code your projector displays; the QR code is read automatically.Your device and Epson projector are now connected.TroubleshootingIf you see a blank screen or the No signal message after turning on your computer or video device, check the following:• M ake sure the Status light on the projector is blue and not flashing, andthe A/V Mute slide is open.• P ress the Source Search button on the projector or the remote controlto switch to the correct image source, if necessary.•Press the Home button on the projector or remote control to verify the source input and settings.• O n Windows 7 or later, hold down the Windows key and press P at thesame time, then click Duplicate .• If you’re using a Windows laptop, press the function key on your keyboard that lets you display on an external monitor. It may be labeled CRT/LCD or have an icon such as . You may have to hold down the Fn key while pressing it (such as Fn + F7). Wait a moment for the display to appear.• I f you’re using a Mac laptop, open System Preferences and selectDisplays . Click the Arrangement tab and select the Mirror Displays checkbox.Where to get helpManualsFor more information about using the projector, click the icons on yourdesktop to access the online manuals (requires an Internet connection). If you don’t see icons to the manuals, you can install them from the projector CD or go to the Epson website, as described below.Telephone support servicesTo use the Epson PrivateLine ® Support service, call (800) 637-7661. This service is available for the duration of your warranty period. You may also speak with a support specialist by calling (562) 276-4394 (U.S.) or (905) 709-3839 (Canada). Support hours are 6 AM to 8 PM , Pacific Time, Monday through Friday, and 7 AM to 4 PM , Pacific Time, Saturday. Days and hours of support are subject to change without notice. Toll or long distance charges may apply.Internet supportVisit /support (U.S.) or www.epson.ca/support(Canada) for solutions to common problems. You can download utilities and documentation, get FAQs and troubleshooting advice, or e-mail Epson.RegistrationRegister today to get product updates and exclusive offers. You can use the CD included with your projector or register online at /webreg.EPSON, EasyMP , and PowerLite are registered trademarks, Epson iProjection is a trademark, and EPSON Exceed Your Vision is a registered logomark of Seiko Epson Corporation. PrivateLine is a registered trademark of Epson America, Inc.Mac and OS X are trademarks of Apple Inc., registered in the U.S. and other countries.Android is a trademark of Google Inc.HDBaseT and the HDBaseT Alliance logo are trademarks of the HDBaseT Alliance.General Notice: Other product names used herein are for identification purposes only and may be trademarks of their respective owners. Epson disclaims any and all rights in those marks.This information is subject to change without notice.© 2016 Epson America, Inc., 10/16CPD-52404R1Optional accessoriesFor a list of optional accessories, see the online User’s Guide .You can purchase screens or other accessories from an Epson authorizedreseller. To find the nearest reseller, call 800-GO-EPSON (800-463-7766). Or you can purchase online at (U.S. sales) or www.epson.ca (Canadian sales).。
投影仪操作手册说明书

投影仪用户手册

版权
©2013 Vivitek Corporation. 是 Vivitek Corporation 的商标。其他商标是其 各自所有者的资产。值、重量和尺寸等均为近似值。规格如有变更,恕不另行通知。
免责声明
本文档中的信息如有变更,恕不另行通知。制造商对于本文档中的内容不提供任何表述或担 保,特别放弃对于适销性或特定用途适用性的任何隐含担保。制造商保留修订本出版物和不 定期更改本文档内容且无须向任何人通知此类修订或更改的权利。
第 1 章 概览 .................................................................................. 1
概览 ........................................................................................................................ 1 附件 ........................................................................................................................ 3 遥控器 .................................................................................................................... 4 Qumi 和遥控器按钮 ................................................................................................ 4 媒体播放器画面 ...................................................................................................... 5
微型投影“神机”对决:丽讯Q2 PK 酷乐视X2

微型投影“神机”对决:丽讯Q2 PK 酷乐视X2微型投影机从2008年进入市场以来,最为市场所诟病的,是亮度不足。
从最开始的几流明,在白天完全无法使用,到后来的100流明级的产品,虽有明显的改善,但仍然显得亮度不够。
随着德州仪器(TI)高清微投DMD芯片的面世,从2011年夏季开始,丽讯、NEC、宏基、优派、明基、华硕等众多知名品牌开始推出了300---500流明的高亮高清微型投影机。
令LED微投的实用性,开始大为改观。
这其中最富盛名的,当数丽讯Q2,该机标称300流明,物理分辨率达到了1280*800,厚度仅31mm,是上市机型中最轻薄小巧的。
进入2012年,国内微型投影领域的标志性品牌酷乐视,也终于推出了自己的第一款高亮、高清微型投影机,就是本文PK的对手:酷乐视X2。
其实早在今年1月,美国拉斯维加斯CES展上,来自中国深圳的酷乐视科技首次展示了这款亮度高达400流明的手持高清微型投影机,令市场为之一震。
随后在1月中旬中国消费电子展新品宣传发布会上再次惊艳亮相,立即引起国内媒体的追捧,誉为“微投神机”。
其实酷乐视X2不是“神”在高清、不是“神”在400流明高亮,因为上述性能的产品,在半年前就已经有了。
酷乐视X2“神”在,如此强大性能配置下,还内置了续航电池,可以手持、移动使用,令高性能与便携移动性完美结合,而类似可手持移动使用的微投产品,在酷乐视X2之前,最高亮度不过100流明而已。
第一回合:先来看看双方外观工艺、体积与便携性丽讯Q2的厚度31mm,体积约560毫升;酷乐视X2的厚度更加极致,仅仅28mm,显得更加纤薄,体积大约是550毫升。
两机体积基本一样,但酷乐视更薄,更加容易携带。
在工艺方面,酷乐视上盖采用镜面工艺,调焦轮位于上盖;丽讯Q2则采用了优质烤漆工艺,调焦轮位于侧面。
虽然两台机的工艺都相当不错,但丽讯还是略胜一筹。
综合下来,第一回合,双方打了一个平手。
第二回合:包装、附件从上图可以看到,酷乐视X2好像稍大一点,其实是因为其更薄,所以长宽就稍大一点。
投影仪操作作业指导书
投影仪操作作业指导书第一篇:一、前言投影仪作为一种常见的现代化教学辅助工具,在教育、商务等领域发挥着重要作用。
为了能够正确高效地操作使用投影仪,本篇文章将为大家提供详细的操作指导。
请仔细阅读以下内容,以便更好地使用投影仪。
二、投影仪的连接与设置1. 连接电源:首先,将投影仪的电源线插入电源插座,并确保电源插座通电。
2. 连接电脑:使用VGA线或HDMI线将投影仪与电脑连接,确保连接稳固。
3. 设置输入模式:投影仪通常自动切换到正确的输入模式,如果没有自动切换,请查看投影仪说明书,并手动切换到正确的输入模式。
三、投影仪的开机与调试1. 打开投影仪:按下投影仪的电源按钮,等待投影仪启动。
2. 调整投影仪位置:根据需要,调整投影仪的位置、高度和投影角度,确保投影画面清晰、居中。
3. 调试画面尺寸:移动投影仪或使用投影仪镜头上的焦距调节环,调试画面尺寸,使其适应屏幕或墙面。
四、投影仪的操作1. 切换输入信号:使用投影仪遥控器或面板上的按钮,切换输入信号,选择正确的源设备。
2. 调整图像亮度和对比度:使用投影仪遥控器上的亮度和对比度调节按钮,根据需要调整图像的亮度和对比度。
3. 调整投影画面的尺寸和位置:通过投影仪遥控器上的方向键,调整投影画面的尺寸和位置,使其适应屏幕或墙面。
4. 静音和调节音量:使用投影仪遥控器上的音量加减按钮,静音和调节音量。
5. 其他操作:根据投影仪的具体型号和功能,了解并学习其他常见操作,如横竖屏切换、菜单导航等。
五、投影仪的关机与存放1. 关机操作:按下投影仪遥控器上的关机按钮,或者在投影仪面板上按下关机按钮,等待投影仪完全关闭。
2. 断开连接:先断开电脑与投影仪之间的连接线,然后断开投影仪的电源线。
3. 清洁和存放:定期清洁投影仪镜头和机身,使用专用清洁布擦拭。
将投影仪放置在干燥、通风的地方,避免直接阳光照射。
六、注意事项1. 使用环境:投影仪应放置在干燥、通风的环境中,避免长时间处于高温、潮湿等特殊环境。
投影仪使用说明
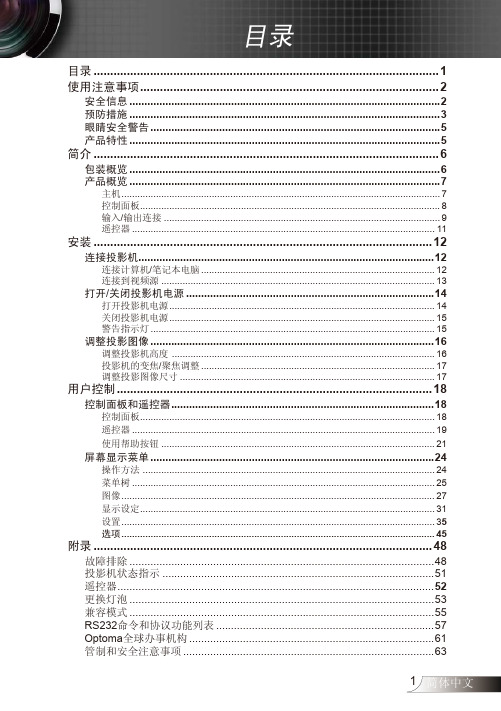
安装 ...................................................................................................... 12
连接投影机...................................................................................................12 打开/关闭投影机电源 ...................................................................................14
连接计算机/笔记本电脑 ........................................................................................ 12 连接到视频源 ....................................................................................................... 13
操作方法 .............................................................................................................. 24 菜单树 .................................................................................................................. 25 图像 ...................................................................................................................... 27 显示设定............................................................................................................... 31 设置 ...................................................................................................................... 35 选项 ...................................................................................................................... 45
投影机快速参考手册说明书
Multimedia ProjectorQuick Reference GuideMODEL103-011100-01Use this book as a reference guid e when setting up the projector.For detailed information about installation, setup, and operation of the projector, refer to the owner’s manual on the CD-ROM.READ THE SAFETY INSTRUCTIONS IN THE OWNER’S MANUAL (CD-ROM) BEFORE USING THE PROJECTOR.E n g l i s hD e u t s c hF r a n ça i s I t a l i a n o E s p a ñol✽Projection lens is optional.E n g l i s hThis projector uses nominal input voltages of 100-120 V or 200-240V AC. This projector automatically selects correct input voltage. It is designed to work with single-phase power systems having a grounded neutral conductor. To reduce risk of electrical shock, do not plug into any other type of power system.Consult your authorized dealer or service station if you are not sure of type of power supply being in use.Connect a projector with a peripheral equipment before turning a projector on.CONNECTING AC POWER CORDAC outlet must be near this equipment and must be easily accessible.LENS SHIFT ADJUSTMENTProjection lens can be moved up and down with motor-driven lens shift function. This function makes it easy to provide projected image where you want.NOTEScreen size and lens shift ratio on the above charts are standard values and they may change by positioning conditions.POSITIONING PROJECTORThis projector is designed to project on a flat projection surface.Before setting up a projector, install Projection Lens on Projector.1.Before installation, check where a projector is used and prepare a suitable lens. For specifications of a Projection Lens, contact sales dealer where you purchased a projector.2.For installation, refer to installation manual in the optional lens.LENS INSTALLATIONWhen installing the lens, remove the cover cap in the projector.NOTE;E n g l i s hADJUSTABLE FEETPicture tilt and projection angle can be adjusted by rotating ADJ USTABLE FEET. Projection angle can be adjusted to 10.5 degrees.Lift front of a projector and pull FEET LOCK LATCHES on both sides of a projector.1Release FEET LOCK LATCHES to lock ADJ USTABLE FEET and rotate ADJ USTABLE FEET to fine tune position and tilt.2To shorten ADJ USTABLE FEET, lift front of a projector and pull and undo FEET LOCK LATCHES.Position and keystone distortion of image can be adjusted using Menu Operation.3INSTALLING PROJECTOR IN PROPER POSITIONInstall the projector properly. Improper installation may reduce the lamp lifetime and cause a fire hazard.Do not tilt the projector more than 10 degrees above and below.Do not point the projector up to project an image.Do not point the projector down to project an image.Do not put the projector on either side to project an image.LATCHESMOVING PROJECTORWhen moving a projector, replace lens cap and retractfeet to prevent damage to lens and cabinet.When this projector is not in use for an extended period,put it into case (not supplied with this projector).E n g l i s hThis projector has input and output terminals on its back for connecting computers and video equipment. Refer to figures on pages 12 to 14 and connect properly.E n g l i s hEn g l i s h●Avoid contact with water or liquid.●Do not expose Remote Control Unit to moisture, or heat.●Do not drop Remote Control Unit.●If a battery has leaked on Remote Control Unit, carefully wipe case clean and install new batteries.●Danger of explosion if battery is incorrectly replaced.●Dispose of used batteries according to batteries manufacturers instructions and local rules.REMOTE CONTROL BATTERIES INSTALLATIONThis projector has CONTROL BUTTONS (TOP CONTROLS) and INDICATORS on its top.En g l i s h HOW TO OPERATE ON-SCREEN MENUFLOW OF ON-SCREEN MENU OPERATIONDisplay ON-SCREEN MENU Press MENU button to display ON-SCREEN MENU (MENU BAR). A red frame is POINTER.Move POINTER (red frame) to MENU ICON that you want to select by pressing POINT RIGHT / LEFT buttons.Adjust ITEM DATA by pressing POINT RIGHT/LEFT buttons.Refer to following pages for details of respective adjustments.Press POINT UP/DOWN buttons and move POINTER (redframe or red arrow)to ITEM that you want to adjust, and then press SELECT button to show ITEM DATA.Select Menu to be adjusted Control or adjust item through ON-SCREEN MENU 1243POINTER (red frame)Press POINT UP/DOWN buttons to move POINTER.POINTER (red frame)ITEMITEM DATAPress POINT LEFT/RIGHTbuttons to adjust value orset function.ContrastAutoTURNING ON THE PROJECTOR Connect the projector's AC power cord into an AC outlet.The LAMP Indicator lights RED, and READY Indicator lights GREEN.Press the POWER ON-OFF button on the top control or onthe remote control to ON. The LAMP Indicator dims, and the cooling fans start to operate. The preparation display appears on the screen and the count down starts. 231The preparation display disappears after 20 ~30 seconds.4After the count-down, the input source that was selected lastand the Lamp control status icon appear on the screen.If the projector is locked with a PIN code, PIN code Input Dialog Box will appear. Enter the PIN code as instructed below.Complete peripheral connections (with a computer, VCR,etc.) before turning on the projector.What is PIN code?PIN code is a security code using Personal Identification Number that allows the person who knows it to operate the projector. Setting PIN code prevents others except the specific users from operating the projector.A PIN code consists of a four-digit number. Refer to PIN Code Lock function in Setting menu in the user’s manual for locking operation of the projector with your PIN code.Pointer PIN code Input Dialog Box Enter a PIN codeSelect a number by pressing the POINT LEFT/RIGHT button and fix the number with the SELECT button. The number will change to "✳". If you fixed a wrong number, move the pointer to "Set" or "Clear" once by pressing the POINT DOWN button, then return to "PIN code". Enter the correct number again.Repeat this step to complete entering a four-digit number.When the four-digit number is fixed, the pointer will automatically move to "Set". Press the SELECT button so that you can start to operate the projector.If you entered a wrong PIN code, "PIN code" and the number (✳✳✳✳) will turn red and disappear. Enter a correct PIN code all over again.After the OK ico n disappears, yo u can operate the projector.En g l i s h Press the POWER ON-OFF button on the top control or onthe remote control, and a message "Power off?" appears on the screen.Press the POWER ON-OFF button again to turn off theprojector. The LAMP Indicator lights bright and READY Indicator turns off. After projector is turned off, Cooling Fans operate (for 90 seconds). During this "Cooling Down" period,this appliance cannot be turned on. 12TO MAINTAIN THE LIFE OF LAMP, ONCE YOU TURN PROJ ECTOR ON, WAIT AT LEAST 5 MINUTES BEFORE TURNING IT OFF.DO NOT DISCONNECT AC POWER CORD WHILE COOLING FANS ARE RUNNING OR BEFORE READY INDICATOR LIGHTS GREEN AGAIN. OTHERWISE IT WILL RESULT IN SHORTENING LAMP LIFE.3When the projector has cooled down, READY Indicator lightsGREEN again and you can turn projector on. After cooling down completely, disconnect AC Power Cord.The message disappears after 4 seconds.• The projector cannot be turned on during the cooling period with the READY indicator turned off. You can turn it on again after the READY indicator GREEN again.• When the On start function is on, this projector is turned on automatically by connecting the AC power cord to an AC outlet.• Do not operate the projector continuously without rest. Continuous use may result in shortening the lamp life. Turn off the projector and give it a rest about an hour in every 24 hours.• This projector monitors internal temperature and automatically controls the running speed of the cooling fans.• If the WARNING TEMP indicator flashes red, see “WARNING TEMP INDICATOR ” in the user’s manual.TURNING OFF THE PROJECTORNOTE;。
酷乐视说明书
手把手教你玩转酷乐视q6无线互动投影1. 简介酷乐视q6是深圳市酷乐视科技有限公司推出的一款具备无线互动功能的发烧智能手机投影伴侣,它能很好的完成与安卓、苹果手机/平板之间的无线影音数据传输,从而达到多屏互动的效果。
无线互动投影在酷乐视q6当中有一个专用名称为wifi-display,进入该功能有miracast和dlna两个子功能,可以通过下滑电源开关来切换它们。
miracas为无线镜像功能,目前市面上较新款的安卓系统智能手机大都支持此功能;dlna为无线推送功能,酷乐视q6的dlna功能同时兼容安卓系统(android)和苹果手机系统(ios)。
2. 玩法下面使用图解分别介绍酷乐视q6在miracast和dlna模式时的无线互动投影玩法。
2.1 安卓手机使用miracast与酷乐视q6同屏镜像向后快速推动电源开关切换酷乐视q6的无线模式为miracast。
使用小米3通过miracast将屏幕镜像传输到酷乐视q6的操作过程:在小米3上操作:①.在设置项中打开全部设置;②.更多无线连接;③.无线显示;④.选择连接q6的预设名,等待服务建立成功后即可正常使用。
小米3使用miracast连接酷乐视q6的操作方法其它手机的设置方法请参考简介中的“市面上主要手机的miracast功能设置目录表”。
2.2 安卓手机使用dlna推送方法2.2.1 安卓手机使用dlna推送本地媒体文件向后快速推动酷乐视q6电源开关切换无线模式为dlna。
以下是使用某款安卓手机通过dlna推送本地图片到酷乐视q6的操作过程:①.打开wifi设置;②.连接到酷乐视q6的预设名;③.进入手机的图片功能打开一张图片;④.选择功能菜单键;⑤选择“选择媒体服务器项”;⑥.选择名称为酷乐视q6预设名的服务器;⑦选择推送logo,等待若干秒后推送成功。
安卓手机使用dlna推送图片到酷乐视q6的操作方法以上安卓手机的界面及操作可能稍有不同,请根据实际使用进行适当的调整。
ASKProximaM22投影机说明书
Regulatory models W1100 and W1102符合性声明制造商:InFocus Corporation, 27500 SW Parkway Ave. Wilsonville, Oregon 97070 USA欧洲办事处:Louis Armstrongweg 110, 1311 RL Almere, The Netherlands我们基于独立承担责任的原则,特此声明,本投影机符合下列指令和规范:EMC指令2004/108/ECEMC:EN 55022EN 55024EN 61000-3-2EN 61000-3-3低电压指令2006/95/EC安全:IEC 60950-1:1版商标DisplayLink是DisplayLink Corporation的商标。
Apple、Macintosh和PowerBook是苹果电脑公司的商标或注册商标。
IBM是国际商用机器公司的商标或注册商标。
Microsoft、PowerPoint和Windows是微软公司的商标或注册商标。
Adobe和Acrobat是Adobe Systems Incorporated公司的商标或注册商标。
DLP®和DLP标志是Texas Instruments公司的注册商标,BrilliantColor™是Texas Instruments公司的商标。
InFocus、In Focus和INFOCUS (美术化)是InFocus Corporation公司在美国和其他国家(地区)的注册商标或商标。
FCC警告注意:本设备已经通过测试并符合FCC规则之第15部分的B级数字设备要求限制。
该限制专为在住宅环境中安装时避免有害干扰提供合理有效的保护。
本设备会产生、使用、和辐射无线电频率能量,如果不按照指示进行安装和使用,可能会对无线电通信产生有害干扰。
但是,本公司不担保在特定安装情况下不产生干扰。
如果本设备对无线电或电视接收造成有害干扰(关闭后再打开设备电源可以确定),建议用户尝试采取以下一项或多项措施来排除此干扰:--调整天线方向或重新放置接收天线。
BLUETREK X2 用户指南说明书
1. Place the BLUETREK® X2 and your mobile phone within 0.3 meter (1 foot) from each other.
2. Switch on your phone and select its Bluetooth® discover mode (refer to the Bluetooth® mobile phone user manual).
To replace with the ear hook: Simply unsnap the ear loop from the headset by pulling gently at the base of the ear clamp ring.
The ear hook is made of a soft material which can be shaped to fit your ear. Please refer to the above diagram of how it can be adjusted.
Bluetooth® is a trademark owned by Bluetooth SIG, Inc. and is used by the manufacturer under license.
PAGE 1 / 7
BEFORE USING YOUR HEADSET FOR THE FIRST TIME
• Do not let the battery charger remain plugged in the headset for more than 24h.
• The use of any other charger will automatically suspend the warranty.