无线使用说明书
无线路由器说明书

Wireless Router
User Manual
商标、版权声明
本产品的所有组成部分,包括配件和软件在内,受版权保护,未经许可,不得任意仿制、 拷贝、誊抄或转译。本手册所提到的产品规格和资讯仅供参考,如有内容更新,恕不另行 通知。.
本文档提及的所有品牌和产品名称由其各自所有者的拥有。
Wireless Router
User Manual
1 概述
首先感谢您购买本公司产品。 KW5590 无线路由器集路由、802.11n 无线、4 口交换机 于一体,为用户带来 SOHO 级的上网体验。
1.1 主要特点
1.1.1 无线特征 Fully IEEE 802.11b & IEEE 802.11g&IEEE 802.11n compatible. 无线数据传输速率最高可达 150 Mbps 无线工作频段使用公共免费的2.4GHz ISM频段 支持 64/128 bits WEP, WPA, WPA2, 1.1.2 网络协议和特征 以太网宽带自学透明桥接 控制报文协议(ICMP) 静态IP路由 路由信息协议(RIP, RIPv2) 网络地址转换(NAT) 虚拟服务, 端口转发 动态主机配置协议(DHCP) 动态域名服务( DDNS) 简单网络时间协议(SNTP) VPN 通道 (IPSec/PPTP/L2TP) 1.1.3 防火墙 Built-in NAT MAC 地址过滤 包 过滤 状态包检查(SPI) 拒绝服务预防 DMZ
1.1.6
工作环境
工作温度:0℃~40℃ 存储温度:-40℃~70℃ 工作湿度:10%-90% 不凝结 储存湿度:5%-95%不凝结
TP-LINK TL-WA850RE 无线中继器使用说明书
NOTICEMARQUE: TP-LINKREFERENCE: RE200CODIC: 4333640User GuideAC750 Wi-Fi Range ExtenderRE200REV2.0.0 1910012003ContentsAbout This Guide (1)Chapter 1. Get to Know About Y our Extender. . . . . . . . . . . . . . . . . . . . . . . . .2 1. 1. Product Overview. . . . . . . . . . . . . . . . . . . . . . . . . . . . . . . . . . . . . . . . . . . . . . . . . . . . . . . . . . . . 3 1. 2. Appearance . . . . . . . . . . . . . . . . . . . . . . . . . . . . . . . . . . . . . . . . . . . . . . . . . . . . . . . . . . . . . . . . . 31. 2. 1. L ED Explanation. . . . . . . . . . . . . . . . . . . . . . . . . . . . . . . . . . . . . . . . . . . . . . . . . . . . . . . 41. 2. 2. P ort and Button Description. . . . . . . . . . . . . . . . . . . . . . . . . . . . . . . . . . . . . . . . . . . 4 Chapter 2. Set Up Internet Connection . . . . . . . . . . . . . . . . . . . . . . . . . . . . . . .5 2. 1. Quick Setup . . . . . . . . . . . . . . . . . . . . . . . . . . . . . . . . . . . . . . . . . . . . . . . . . . . . . . . . . . . . . . . . . 62. 1. 1. M ethod One: Via the WPS Button. . . . . . . . . . . . . . . . . . . . . . . . . . . . . . . . . . . . . . 62. 1. 2. M ethod Two: Via a Web Browser. . . . . . . . . . . . . . . . . . . . . . . . . . . . . . . . . . . . . . . 72. 1.3. M ethod Three: Via the TP-Link T ether App . . . . . . . . . . . . . . . . . . . . . . . . . . . .10 2. 2. Position Y our Extender. . . . . . . . . . . . . . . . . . . . . . . . . . . . . . . . . . . . . . . . . . . . . . . . . . . . . .11 Chapter 3. Customize Y our Network. . . . . . . . . . . . . . . . . . . . . . . . . . . . . . . . 13 3. 1. Check Internet Status. . . . . . . . . . . . . . . . . . . . . . . . . . . . . . . . . . . . . . . . . . . . . . . . . . . . . . .14 3. 2. Configure Wireless Network . . . . . . . . . . . . . . . . . . . . . . . . . . . . . . . . . . . . . . . . . . . . . . . .14 3. 3. Change LAN Settings. . . . . . . . . . . . . . . . . . . . . . . . . . . . . . . . . . . . . . . . . . . . . . . . . . . . . . .16 3.4. Specify DHCP Server Settings. . . . . . . . . . . . . . . . . . . . . . . . . . . . . . . . . . . . . . . . . . . . . .17 3.5. Adjust Wi-Fi Coverage . . . . . . . . . . . . . . . . . . . . . . . . . . . . . . . . . . . . . . . . . . . . . . . . . . . . . .18 3.6. Set Access Control . . . . . . . . . . . . . . . . . . . . . . . . . . . . . . . . . . . . . . . . . . . . . . . . . . . . . . . . .18 Chapter 4. More Features of Y our Extender. . . . . . . . . . . . . . . . . . . . . . . . . 21 4. 1. Use Y our Extender as a Wireless Adapter. . . . . . . . . . . . . . . . . . . . . . . . . . . . . . . . . . . .22 4. 2. Transform Y our Existing Wired Network to a Wireless One . . . . . . . . . . . . . . . . . . .224. 2. 1. T o Set Up the Extender as an Access Point . . . . . . . . . . . . . . . . . . . . . . . . . . .224. 2. 2. T o Connect Y our Wireless Devices to the Extender via WPS. . . . . . . . . . .24 Chapter 5. Manage Y our Extender . . . . . . . . . . . . . . . . . . . . . . . . . . . . . . . . . 26 5. 1. Set Up System Time . . . . . . . . . . . . . . . . . . . . . . . . . . . . . . . . . . . . . . . . . . . . . . . . . . . . . . . .27 5. 2. Control LEDs . . . . . . . . . . . . . . . . . . . . . . . . . . . . . . . . . . . . . . . . . . . . . . . . . . . . . . . . . . . . . . .27 5. 3. Power Schedule . . . . . . . . . . . . . . . . . . . . . . . . . . . . . . . . . . . . . . . . . . . . . . . . . . . . . . . . . . . .28 5. 4. Upgrade the Firmware . . . . . . . . . . . . . . . . . . . . . . . . . . . . . . . . . . . . . . . . . . . . . . . . . . . . . .29 5. 5. Backup and Restore Configuration Settings. . . . . . . . . . . . . . . . . . . . . . . . . . . . . . . . .30 5. 6. Change Login Password . . . . . . . . . . . . . . . . . . . . . . . . . . . . . . . . . . . . . . . . . . . . . . . . . . . .31 5. 7. System Log. . . . . . . . . . . . . . . . . . . . . . . . . . . . . . . . . . . . . . . . . . . . . . . . . . . . . . . . . . . . . . . . .31 FAQ (33)About This GuideThis guide is a complement to Quick Installation Guide. The Quick Installation Guide provides instructions for quick internet setup, while this guide contains details of each function and demonstrates how to configure them.When using this guide, please notice that features of the extender may vary slightly depending on the model and software version you have, and on your location, language, and internet service provider. All screenshots, images, parameters and descriptions documented in this guide are used for demonstration only. ConventionsMore InfoThe latest software, management app and utility are available from the Download Center at /support.The Quick Installation Guide can be found where you find this guide or inside the package of the range extender.Specifications can be found on the product page at .A T echnical Support Forum is provided for you to discuss our products at .Our T echnical Support contact information can be found at Contact T echnical Support page at /support.1Chapter 1Get to Know About Y our ExtenderThis chapter introduces what the extender can do and its appearance. It contains the following sections:• Product Overview• Appearance1. 1. Product OverviewBring Dead Zones Back to LifeTired of Wi-Fi “dead zones”? The TP-Link extender is connected to your router wirelessly, strengthening its signal and expanding its coverage into areas that could not otherwise be reached. The device also reduces signal interference to ensure reliable Wi-Fi coverage throughout your home or office.Easy Installation & Quick PositionThe extender works with any standard wireless router. Instantly connect the extender to a router by pressing the router’s WPS button (if available) followed by the extender’s RE/WPS button. Alternatively, follow the Quick Setup instructions on the extender’s web management page.Once the extender is connected to a router, you can relocate it to your preferred location with no further configuration required. The intelligent signal light can help to find the best location.Easy Management with the TP-Link T ether AppT ether provides a simple, intuitive way to access and manage your extender with your smart devices.1. 2.Appearance31. 2. 1. LED Explanation4Chapter 2Set Up Internet ConnectionThis chapter informs you how to boost your host wireless coverage. Please follow the step-by-step instructions to set up the internet connection.It contains the following sections:• Quick Setup• Position Y our Extender62. 1. Quick SetupPower on Plug the extender into an electrical outlet next to your host router , and then wait until the LED is solid on.Connect to the host network There are three ways to connect to the host network: via the WPS button, via a web browser or via the TP-Link T ether app. Using the WPS button is the easiest way toextend your host network. We recommend you to use this way if your router has a WPS button. The button might look like one of these: | | .2. 1. 1. Method One: Via the WPS Button 1. Press the WPS button on your host router, and then press the button on the extender within 2 minutes.Tips:• Some ISP gateways disable the WPS function by default. If the WPS connection fails, please refer to Method Two: Via a Web Browser .• For more information about using WPS button on your host router, please refer to the router manufacturer’s user guide.2. Wait until the LED changes to solid on, which indicates that the WPS connection is successful. If it doesn’t, please refer to Method Two: Via a Web Browser . 3. If you are connecting the extender to a dual-band router but only the 2.4G or 5G LED is on, repeat Step 1 and 2 to connect to the other band.4. Enjoy! Connect to the extended network and enjoy the internet. Both extended networks share the same SSIDs (network names) and passwords as those of your host networks.Tips: Since the performance of the extended networks will be affected by the distance between the extender and the host router, we recommend that you relocate your extender by referring to Position Y our Extender .WPS72. 1. 2. Method Two: Via a Web Browser 1. Connect your computer to the extender's wireless network.Tips: Before connecting, please find the SSID (network name) on the label of the extender.• For Windows Users 1 ) Unplug the Ethernet cable from your computer (if any).2 ) Click the Wi-Fi icon on the taskbar and connect to the extender’s wireless network: TP-Link_Extender_2.4GHz or TP-Link_Extender_5GHz .• For Mac OS X Users 1 ) Unplug the Ethernet cable from your computer (if any).2 ) Click the Wi-Fi icon in the top right corner of the screen, and connect to the extender’s network: TP-Link_Extender_2.4GHz or TP-Link_Extender_5GHz .2. Follow the instructions of the Quick Setup wizard to connect the extender to your host router.1 ) Launch a web browser, enter or http://192.168.0.254 in the address field, and then create a password for future login attempts, and click Start .Tips: If the login window does not appear, please refer to FAQ.2 ) Select your host router’s 2.4GHz SSID (network name), enter its password (NOT the password you just created for management), and click Next.3 ) Select your host router’s 5GHz SSID (network name), enter its password (NOT the password you just created for management), and click Next.Tips: If your host router does not support 5GHz wireless network, please click Skip to continue.4 ) Either keep the default SSIDs (network names) or customize them for the extended networks, and then click Next.5 ) Verify your wireless settings and click Save. The corresponding LED(s)(2.4G or 5G) should turn on.6 ) Enjoy! Connect to the extended network and enjoy the internet. Both extended networks share the same wireless passwords as those of your host networks, but may have different network names if you have customized the SSIDs duringthe configuration.Tips: Since the performance of the extended network will be affected by the distance between the extender and the host router, we highly recommend you to relocate your extender referring to Position Y our Extender .2. 1.3. Method Three: Via the TP-Link T ether App1. Launch the Apple App Store or Google Play Store and search TP-Link T ether or simplyscan the QR code to download and install the app.OR2. Go to Wi-Fi Settings and connect your device to the extender’s wireless network: TP-Link_Extender_2.4GHz or TP-Link_Extender_5GHz .3. Launch T ether and select your extender from the Local Device list.4. Create a password for future logins and click Create.5. Follow the on-screen instructions to complete the configuration.Tips: Y ou can manage your extender via T ether, such as controlling LEDs, sharing passwords of your networks and blocking devices.2. 2. Position Y our ExtenderPlease follow the instructions below to achieve optimal performance of the extender.1. Plug the extender into an electrical outlet between your host router and the Wi-Fi “dead“ zone. The location you choose must be within the range of your existing host network.2. Wait until the 2.4G/5G LED is lit and solid green. If not, relocate it closer to the host router to achieve better signal quality.Router ClientsIdeal Extender PlacementTips: T o minimize signal interference, please choose a location which is far away from Bluetooth devices and other household electronic devices, such as cordless phones, microwave ovens and baby monitors.Chapter3Customize Y our NetworkThis chapter guides you on how to configure network settings that are available for this extender.It contains the following sections:• Check Internet Status• Configure Wireless Network• Change LAN Settings• Specify DHCP Server Settings• Adjust Wi-Fi Coverage• Set Access Control3. 1. Check Internet StatusY ou can view the internet status of your extender to check whether you have successfully set up the extended network(s).1. Visit , and log in with the password you set for the extender.2. Go to Settings > Status to view the internet status of your extender.• The extender is functioning normally.• The extender is not connected to the host networks. Please go to Settings > Wireless > Connect to Network to check the passwords of the host networks. If the problem still exists, please refer to the FAQ section.• The extender is connected to the host network, but is not transmitting data. Please check your router’s internet connection.• The extender is connected to the router abnormally. Please go to Settings > Network and try setting your extender to obtain an IP address automatically.Click the Internet/Router/Range Extender/Clients icon to view corresponding information.3. 2. Configure Wireless NetworkIf you want to extend another host network after Quick Setup, you can refer to thisVisit , and log in with the password you set for the extender. Note: Here we take the configuration of the 2.4GHz network as an example. If the 5GHz network is available on your extender, please refer to the instructions to set your 5GHz network.¾T o extend another host network:1. Go to Settings > Wireless > Connect to Network.2. Enable Connect to 2.4GHz Network and click Wireless Scanner to find all available networks.3. Select the 2.4GHz host network you want to extend.Note:If the network you want to extend is on but not listed, please try the following steps.• Move the extender closer to your router, and click Rescan in the top-right corner of the list.• Y ou can manually enter the SSID (network name) and password of the network you want to extend, and click Save.4. Once a host network is selected, the SSID and security type will be automatically filled in. If the selected network is encrypted, enter the password in the Password field.5. Click Save.¾T o enable or disable the extended network:1. Go to Settings > Wireless > Extended Network.2. Extended networks are enabled by default. If you want to disable the wireless function of a certain band, just clear the Enable checkbox. In this case, all the wireless settings of this band will be invalid.3. Click Save.¾T o change the wireless network name (SSID):1. Go to Settings > Wireless > Extended Network.2. Create a new SSID in Extended 2.4GHz SSID or click Copy Host SSID. The value is case-sensitive.3. Click Save.Note: If you have changed the wireless settings via a wireless device, you will be disconnected after the settings are applied. Please write down the new SSID for future use.¾T o hide the SSID of the extended network:1. Go to Settings > Wireless > Extended Network.2. Select Hide SSID broadcast, and the corresponding SSID will not be displayed when wireless devices scan for local wireless networks. Devices must join the network manually in order to connect.3. Click Save.3. 3. Change LAN SettingsThe extender is preset with a default LAN IP 192.168.0.254, with which you can log in to the web management page. The LAN IP address, together with the Subnet Mask, also defines the subnet that the connected devices are on. If the IP address conflicts with another device on your local network or your network requires a specific IP subnet, you can change it.1. Visit , and log in with the password you set for the extender.2. Go to Settings > Network.3. Select Use the following IP address.4. Enter a new IP address as needed and leave the Subnet Mask as the default settings and enter the gateway that is in the same subnet as the IP address. The gateway is usually the LAN IP address of your extender.5. Click Save.3. 4. Specify DHCP Server SettingsBy default, the DHCP (Dynamic Host Configuration Protocol) Server is enabled and the extender acts as a DHCP server; it dynamically assigns TCP/IP parameters to client devices from the IP Address Pool. Y ou can change the settings of the DHCP Server if necessary.1. Visit , and log in with the password you set for the extender.2. Go to Settings > Network.¾T o specify the IP address that the extender assigns:1. Select Auto (recommended) or On to enable the DHCP Server.2. Enter the starting and ending IP addresses in the IP Address Pool.3. Enter other parameters if the ISP requires them. The Default Gateway is automatically filled in and is the same as the LAN IP address of the extender.4. Click Save.¾T o view the DHCP Client List:Y ou can view the information of the DHCP clients connected to the extender in the DHCP Client List.3. 5. Adjust Wi-Fi CoverageY ou can set the extender’s Wi-Fi coverage depending on how large you want your Wi-Fi area to be.1. Visit and log in with the password you set for the extender.2. Go to Settings > Advanced Settings > Wi-Fi Coverage.3. Select Min, Mid or Max to adjust your Wi-Fi coverage of the extender.4. Click Save.3. 6. Set Access ControlAccess Control allows you to permit or block specific devices from accessing the internet for a specific period.1. Visit and log in with the password you set for the extender.3. Enable Access Control.¾T o block specific device(s):Note: Devices connected to the extender via an Ethernet cable cannot be blocked.1. Select Blacklist and click Save.2. Select the device to be blocked in the Online Devices table by ticking the corresponding checkbox.3. Click Block and the selected device(s) will be added to the Devices in Blacklist table.4. Click in the Devices in Blacklist table to set the Effective Time for a certain entry as needed.5. Click OK.¾T o permit specific device(s):1. Select Whitelist and click Save.2. Click Add in the Devices in Whitelist table. Enter the Device Name and MAC Address. And you can set the Effective Time for a certain entry as needed.3. Click OK.Chapter 4More Features of Y our ExtenderThis chapter explains how to use the extender as a wireless adapter and as an access point.It contains the following sections:• Use Y our Extender as a Wireless Adapter• Transform Y our Existing Wired Network to a Wireless One4. 1. Use Y our Extender as a Wireless AdapterThe extender can be used as a wireless adapter to connect any wired-only device, such as a Blu-ray player, game console, DVR, or smart TV, to your wireless network. After configuration, you can connect an Ethernet-enabled device to the extender via an Ethernet cable.Note: Extenders that have no Ethernet port do not support this feature.By default, the Ethernet port of the extender is connected to the 5GHz wireless netwok. ¾T o change the connected wireless frequency:1. Visit , and log in with the password you set for the extender.2. Go to Settings > Network.3. Select 2.4GHz or 5GHz and click Save.4. 2. Transform Y our Existing Wired Network to aWireless OneThe extender can work as an access point, transforming your existing wired network to a wireless one.4. 2. 1. T o Set Up the Extender as an Access Point1. Visit , and log in with the password you set for the extender.2. Click Mode in the top right corner of the page. Select Access Point and click Save. The extender will reboot and switch to Access Point mode.3. After rebooting, connect the extender to your modem or wired router via an Ethernet cable.4. Visit , and log in with the password you set for the extender.5. Go to Quick Setup to configure your extender.1 ) Configure your wireless settings and click Next.2 ) Confirm the information and click Finish. Now, you can enjoy Wi-Fi.4. 2. 2. T o Connect Y our Wireless Devices to the Extender via WPS Wi-Fi Protected Setup (WPS) provides an easier way to set up a secure Wi-Fi connection. Wireless devices that support WPS, including Android phones, tablets and most USB network cards, can be connected to your extender through this method (not supported by iOS devices).1. Visit , and log in with the password you set for the extender.2. Go to Settings > Wireless > WPS.3. Enable WPS.4. Connect via WPS:• AP’s PIN: Enable AP’s PIN and enter the PIN on your device. Y ou can click Generate to get a new PIN or click Default to restore the PIN to its factory one.• Push Button (Recommended): Click Connect and push the WPS button on the client device.• PIN code: Enter the client’s PIN, and click Connect.Chapter 5 Manage Y our Extender This chapter presents how to manage and maintain your extender.It contains the following sections:• Set Up System Time• Control LEDs• Power Schedule• Upgrade the Firmware• Backup and Restore Configuration Settings• Change Login Password• System LogChapter 5Manage Y our Extender 5. 1. Set Up System TimeThe System Time of the extender will be used for time-based functions such as the Power Schedule function. If you have enabled the Daylight Saving Time feature, the system time will be sychronized with the daylight saving time you configure.1. Visit , and log in with the password you set for the extender.2. Go to Settings > System T ools > Time Settings.¾T o get system time:1. Select your local Time Zone from the drop-down list.2. Click Save.¾T o set up Daylight Saving Time:1. Select Enable Daylight Saving Time.2. Select the Start and End date and time of the daylight saving time at your local time zone.3. Click Save.5. 2. Control LEDsThe LEDs of the extender indicate its activities and status. Y ou can enable the Night Mode feature to specify a time period during which the LEDs are off.1. Visit , and log in with the password you set for the extender.2. Go to Settings > System T ools > LED Control.¾T o specify a time period when LEDs are off:1. Select Night Mode.2. Specify a time period in the LED Off Time field, and the LEDs will be off during this period.3. Click Save.5. 3. Power ScheduleThe Power Schdule feature allows you to specify a time period during which the extender is off.1. Visit , and log in with the password you set for the extender.2. Go to Settings > Advanced Settings > Power Schedule.¾T o specify a time period when the extender is off:1. Select Enable Power Schedule.2. Specify a time period in the Power-Off Time field and days in the Day(s) field, and the extender will be off during this period.3. Click Save.5. 4. Upgrade the FirmwareTP-Link is committed to improving product features, giving you a better network experience. Y ou can upgrade the firmware online or download the latest firmware file from the Support page at our website and upgrade the extender to the latest firmware version.Note:• Make sure the latest firmware file is matched with the hardware version (as shown in the download section of the Support page).• Make sure that you have a stable connection between the extender and your computer. It is NOT recommended to upgrade the firmware wirelessly.• Backup your extender configuration.• Do NOT power off the extender during the firmware upgrade.¾T o upgrade the firmware online:1. Visit , and log in with the password you set for the extender.2. Go to Settings > System T ools > Firmware Upgrade, and click Check for upgrade to see whether a new firmware is released.3. Focus on the Online Upgrade section, and click Upgrade.4. Wait a few minutes for the firmware upgrade to complete and the extender to reboot.¾T o upgrade the firmware locally:1. Download the latest firmware file for the extender from our website .2. Visit , and log in with the password you set for the extender.3. Go to Settings > System T ools > Firmware Upgrade.5. Wait a few minutes for the firmware upgrade to complete and the extender to reboot.5. 5. Backup and Restore Configuration SettingsThe configuration settings are stored as a configuration file in the extender. Y ou can backup the configuration file and restore the extender to the previous settings from the backup file when needed. Moreover, if necessary, you can erase the current settings and reset the extender to the default factory settings.1. Visit , and log in with the password you set for the extender.2. Go to Settings > System T ools > Backup & Restore.¾T o backup configuration settings:Click Backup to save a copy of the current settings to your local computer. A ‘.bin’ file of the current settings will be stored on your computer.¾T o restore configuration settings:1. Click Browse to locate the backup configuration file stored on your computer, and click Restore.2. Wait a few minutes for the restore and reboot.Note: During the restore process, do not power off or reset the extender.¾T o reset the extender to factory default settings:1. Click Factory Restore to reset the extender.2. Wait a few minutes for the reset and reboot.Note:• During the reset process, do not power off or reset the extender.• We strongly recommend you backup the current configuration settings before resetting the extender.5. 6. Change Login PasswordThe account management feature allows you to change your login password of the management webpage.1. Visit , and log in with the password you set for the extender.2. Go to Settings > System T ools > Admin Account.3. Enter the old password, then the new password twice (both case-sensitive) and click Save.4. Use the new password for future logins.5. 7. System LogIf the extender is not working normally, you can save the system log and send it to our technical support team.1. Visit , and log in with the password you set for the extender.2. Go to Settings > System T ools > System Log.¾T o save the system log locally:2. Click Save Log to save the system logs to a local disk.FAQQ1. How do I reset the extender to its factory default settings?• With the extender powered on, use a pin to press the Reset button until all the LEDs turn on momentarily and then release the button.• Log in to the extender’s web management page. Go to System T ools > Restore & Backup and click Factory Restore.Q2. What should I do if I forget my login password?Refer to FAQ > Q1 to reset the extender, and create a password to log in.Note: The extender must be reconfigured after a reset to access the internet. Please note down your login password for future use.Q3. What should I do if I forget my wireless password?The factory default wireless password is printed on the label of the extender.If the password has been altered, please connect your computer to the extender using an Ethernet cable and follow the steps below:1. Visit , and log in with the password you set for the extender.2. Go to Settings > Wireless> Wireless Settings to retrieve or reset your wireless password.Q4. What should I do if I cannot access the web management page? This can happen for a variety of reasons. Please try the following to log in again.• If your computer is wirelessly connected, make sure that you have connected to the extender’s SSID.• If your computer is connected via an Ethernet cable, please make sure that the connection is stable.• Make sure your computer is set to obtain an IP address and DNS server address automatically.• Verify that or http://192.168.0.254 is correctly entered in the web browser and press Enter.• Use the IP address to access the extender. The default IP is 192.168.0.254. If the extender is connected to the router, you should go to your router’s DHCP client list to obtain the extender’s current IP address.• Reset the extender and try again.Q5. I have enabled wireless MAC filter, wireless access control, or access control list (ACL) on my router. What should I do before configuring。
无线路由器使用说明书

无线路由器使用说明书一、产品概述本产品是一款无线路由器,主要用于将有线网络信号转换为无线信号,提供便捷的无线上网体验。
本使用说明书将详细介绍产品的安装与配置方法,用户可根据说明书进行正确操作,以确保无线路由器的功能正常运行。
二、准备工作在开始使用无线路由器之前,请确保已具备以下条件:1. 一台有线网络连接设备(如ADSL调制解调器);2. 一台支持WIFI功能的终端设备(如笔记本电脑、智能手机等);3. 一条网线。
三、硬件连接1. 将无线路由器的电源线插入电源插座,确保电源供应正常;2. 使用网线将有线网络连接设备与无线路由器的WAN口(通常标注为"Internet")相连;3. 将另一端的网线插入有线网络连接设备的网络接口。
四、设置无线网络1. 打开您的终端设备的WIFI功能;2. 在终端设备的WIFI设置页面中,搜索无线路由器的名称(通常以厂商名称开头),并选择进行连接;3. 若需要设置无线网络密码,输入密码后点击确认。
五、登录管理界面1. 打开您的终端设备的浏览器,输入无线路由器的默认管理IP地址(通常为192.168.1.1);2. 在弹出的登录页面中,输入默认的管理员用户名和密码(通常为"admin");3. 成功登录后,即可进入无线路由器的管理界面。
六、设置无线路由器1. 在管理界面中,可以进行如下设置:a. 修改管理员用户名和密码,提升安全性;b. 设置无线网络名称(SSID)和密码,确保网络安全;c. 查看设备连接数和流量使用情况,以便及时管理网络;d. 开启和配置访客网络,方便客人上网使用;e. 设置MAC地址过滤和IP地址过滤,限制特定设备的接入;f. 配置端口映射和虚拟服务器,实现特定应用的远程访问。
七、其他功能除了上述基本设置外,本无线路由器还具备以下功能:1. 支持远程管理,用户可以通过互联网随时随地管理和配置无线路由器;2. 支持QoS流量控制,可以根据需要调整网络带宽分配,确保视频、游戏等应用的优先传输;3. 支持WPS一键连接功能,简化无线网络连接过程;4. 支持升级固件,提供更稳定和完善的功能和性能。
无线模块使用说明书
无线模块使用说明书
一、产品概述
无线模块是一种便捷、高效的电子设备,采用无线通信技术,
使设备在无需布线的情况下进行数据传输和通信。
本文档旨在为用
户提供详细的无线模块使用说明,帮助用户快速了解和使用该产品。
二、产品特点
1. 高效便捷:无线模块采用无线通信技术,可以实现设备之间
的快速数据传输和通信,避免了繁琐的布线。
2. 稳定可靠:采用先进的无线通信技术,使数据传输更加稳定
可靠,减少了传输过程中的数据丢失率。
3. 灵活易用:无线模块与设备连接简单方便,只需要进行简单
的设置即可实现设备间的快速通信。
三、产品安装与连接
1. 确保所有设备都处于关机状态。
2. 将无线模块插入需要进行无线通信的设备的对应插槽中,并
确保插紧。
3. 打开设备电源,并确保无线模块的电源指示灯正常亮起。
4. 对无线模块进行必要的设置,如设置连接方式、配置网络参
数等。
四、使用方法
1. 网络连接
根据设备的需求,选择合适的连接方式,如Wi-Fi、蓝牙等。
2. 配置网络参数
根据实际情况,配置无线模块的网络参数,包括网络名称、密
码等,确保连接的网络能够正常工作。
3. 设备通信
配置完成后,设备之间即可通过无线模块进行数据传输和通信。
用户可根据实际需求,自行编写代码或使用相应的软件进行通信。
五、常见问题解决。
中国电信 TP-LINK 千兆双频Wi-Fi 6路由器 WTA301使用手册说明书
手机、平板电脑和笔记本使用无线无法上网怎么办?请确认您的设备无线功能处于正常状态,如无线开关已经打开、可以搜索到无线信号。
请确认无线路由器设置正确,无线名称请不要使用中文或者特殊字符。
请确认进行无线连接时,选择的无线名称和填写的无线密码正确(注意区分大小写)。
1.雷雨天气请将路由器电源及所有连线拆除,以免遭雷击破坏。
2.远离热源,保持通风。
3.在储存、运输和运行环境中,请注意防水。
4.使用路由器附带的电源适配器。
5.将设备放置在平稳的表面。
警告未经普联技术有限公司明确书面许可,任何单位或个人不得擅自仿制、复制、誊抄或转译本手册部分或全部内容,且不得以营利为目的进行任何方式(电子、影印、录制等)的传播。
声明Copyright © 2021 普联技术有限公司版权所有,保留所有权利。
为普联技术有限公司注册商标。
本手册提及的所有商标,由各自所有人拥有。
本手册所提到的产品规格和资讯仅供参考,如有内容更新,恕不另行通知。
除非有特殊约定,本手册仅作为使用指导,所作陈述均不构成任何形式的担保。
地址:深圳市南山区深南路科技园工业厂房24栋南段1层、3-5层、28栋北段1-4层公 司 网 址:技术支持热线:400-8863-400产品保修卡一、下列情况不属于免费维修范围,普联技术有限公司可提供有偿服务,敬请注意:已经超出保换、保修期限;未按使用说明书要求安装、使用、维护、保管导致的产品故障或损坏;擅自涂改、撕毁产品条形码;未经普联技术有限公司许可,擅自改动本身固有的设置文件或擅自拆机修理;意外因素或人为行为导致产品损坏,如输入不合适电压、高温、进水、机械破坏、摔坏、产品严重氧化或生锈等;客户发回返修途中由于运输、装卸所导致的损坏;因不可抗拒力如地震、火灾、水灾、雷击等导致的产品故障或损坏;其他非产品本身设计、技术、制造、质量等问题而导致的故障或损坏。
特别说明:在您送修产品之前,请致电我公司技术支持热线:400-8863-400,以确认产品故障。
F3X14-DK系列 无线通信路由器 使用说明书
F3X14-DK系列使用说明书此说明书适用于下列型号产品:型号产品类别F3814-DK4G全网通F3Z14-DK电力1.8G专网F3914-DK5GF3814-DKS4G+国网加密F3Z14-DKS专网+国网加密F3914-DKS5G+国网加密F3814-DKG4G全网通+GPSF3Z14-DKG电力1.8G专网+GPSF3914-DKG5G+GPSF3814-DKGS4G+国网加密+GPSF3Z14-DKGS专网+国网加密+GPSF3914-DKGS5G+国网加密+GPS1/64文档修订记录日期版本说明作者2022.01.17V1.0.0初始版本WWWWWW2022.03.21V1.1.0新增加密、GPS版本相关说明;增加配置串口、通信串口区分说明2022.05.10V1.1.1修改产品尺寸图WWW2/643/64著作权声明本文档所载的所有材料或内容受版权法的保护,所有版权由厦门四信智慧电力科技有限公司拥有,但注明引用其他方的内容除外。
未经智芯公司书面许可,任何人不得将本文档上的任何内容以任何方式进行复制、经销、翻印、连接、传送等任何商业目的的使用,但对于非商业目的的、个人使用的下载或打印(条件是不得修改,且须保留该材料中的版权说明或其他所有权的说明)除外。
商标声明Four-Faith 、四信、、、均系厦门四信智慧电力科技有限公司注册商标,未经事先书面许可,任何人不得以任何方式使用四信名称及四信的商标、标记。
产品外形图注:不同型号配件和接口可能存在差异,具体以实物为准。
目录第一章产品简介 (5)1.1产品概述 (5)1.2产品特点 (5)1.3工作原理框图 (7)1.4产品规格 (7)第二章安装 (10)2.1概述 (10)2.2装箱清单 (10)2.3安装与电缆连接 (10)2.4电源说明 (12)2.5指示灯说明 (12)2.6复位按钮说明 (12)第三章参数配置 (13)3.1配置连接图 (13)3.2登录到配置页面 (13)3.2.1PC机IP地址设置(两种方式) (13)3.2.2登入到配置页面 (14)3.3管理和配置 (16)3.3.1设置 (16)3.3.2服务 (26)3.3.3VPN (29)3.3.4安全 (35)3.3.5访问限制 (37)3.3.6NAT (41)3.3.7QoS设置 (43)3.3.8应用 (44)3.3.9管理 (48)3.3.10状态 (52)附录 (62)4/645/64第一章产品简介1.1产品概述F3X14-DK 系列ROUTER 是一种电力物联网无线通信路由器,利用公用2.5G/3G/4G/5G 或者专用1.8GHz 蜂窝网络为用户提供无线长距离数据传输功能。
莫莎无线配置使用说明书
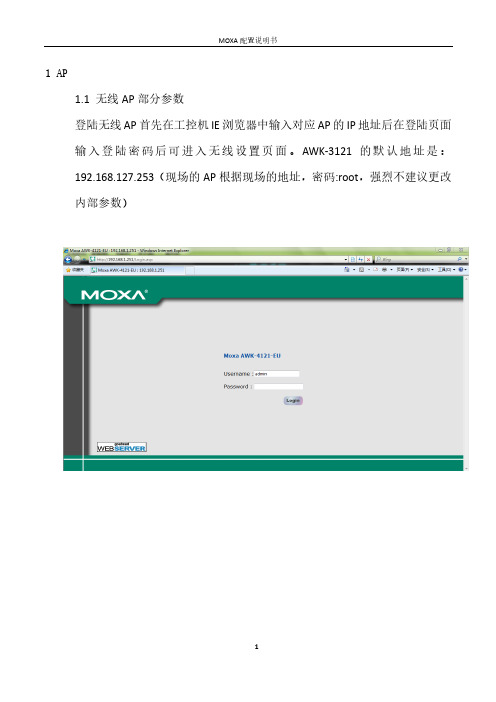
1 AP1.1 无线AP部分参数登陆无线AP首先在工控机IE浏览器中输入对应AP的IP地址后在登陆页面输入登陆密码后可进入无线设置页面。
AWK-3121的默认地址是:192.168.127.253(现场的AP根据现场的地址,密码:root,强烈不建议更改内部参数)图1.3图1.3为登陆该AP后,该AP的信息画面。
可选择“Status”下的“associatedClient List”选项查看连接到该AP的客户端信息如图1.4图1.41.2无线AP设置1.2.1 IP地址设置如上图所示,无线AP的IP地址在“Basic Settings ”下的“Network Settings”中设置。
所要设置的IP地址对应上文中的AP分布所提供的IP地址。
1.2.2 参数设置(1) SSID以及信道和模式设置:钮显示下图:按照上图所示设置SSID就是AP和AGV上无线模块要设置的一样,Channel 就是信道,在不需要漫游的情况下AP的信道为几对AGV上的无线模块没有影响。
在漫游的情况下,AGV上的无线模块的Channel 要设置的跟AP一样,如果有多个AP,那么AGV上的无线模块就对应要设这几个AP的Channel(AGV上的Channel可以多选)。
图所示的界面:按照图中参数设置密码(当前使用密码为:123456789 如果需要更改密码,同时需要更改AGV上无线模块的密码,不然会出现掉线的情况,上面的Encryptionmethod 一般设为AES)。
在“WLAN”选项下的“Advanced Wireless Settings”设置参数。
如上图所示(这个地方一般不需要更改)。
1.2.3 快速配置。
配置方法如下:(1)登录用网线插入AP的以太网端口,把电脑的IP地址设置为192.168.127.100,打开IE浏览器,输入192.168.127.253会出现以下的登录界面在password后面输入“root”即可登录。
学习型无线接收器使用说明书
学习型分体无线接收器使用说明书
学习型分体无线接收器学码程序(注意:学码前要先全部清码在学码)
一、 全部清码 要全部清码需先按下学码键,待学码灯亮再长按遥控器的任一键不放,待学码灯闪烁六次后,再连续快速闪烁都次后放手,此时所有键的功能都被清除,需使用得重新学码。
二、 学码 按下接收器外壳的学码键(约2秒)此时学码灯亮(红色)即松开学码键。
紧接着按下遥控器的任一按键不放待学码灯熄灭后,再闪烁一次,即松开该按键,此键以学码成功,即该键可开、可关。
(如学不进再重复一次)
三、 单键清码 按下接收器学码键,在电灯亮着的状态下,按着遥控器上你想清码键,待学码灯闪烁四次(学码灯第一次熄灭不算在闪烁次数内)即松开此键,此时表明该键单键清码,要使用得重新学码。
四、 如接收器装在隐蔽的地方造成学码不便。
此情况可在未装灯具之前按需要先把接收器学码成功后,再装灯具
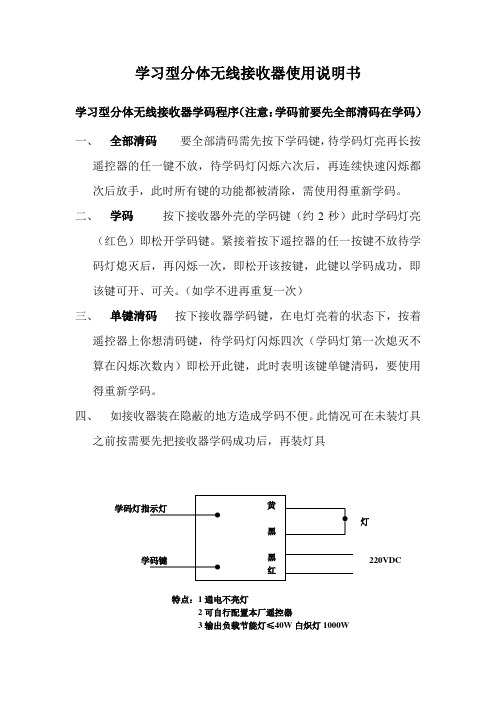
学码灯指示灯
灯
学码键 220VDC
特点:1通电不亮灯
2可自行配置本厂遥控器
3输出负载节能灯≤40W 白炽灯1000W 黄 黑 黑 红。
- 1、下载文档前请自行甄别文档内容的完整性,平台不提供额外的编辑、内容补充、找答案等附加服务。
- 2、"仅部分预览"的文档,不可在线预览部分如存在完整性等问题,可反馈申请退款(可完整预览的文档不适用该条件!)。
- 3、如文档侵犯您的权益,请联系客服反馈,我们会尽快为您处理(人工客服工作时间:9:00-18:30)。
使用说明书沈阳沈衡电子衡器有限公司1目录一、概述 (3)二、特点 (3)三、主要技术指标和功能 (3)四、按键功能介绍 (4)五、称重显示器使用方法 (5)1.开机 (5)2.称重操作 (6)3.设置 (8)4.其它操作 (10)5.自动关机 (10)六、使用维护 (10)七、常见故障及排除方法 (11)注意:请在试用本产品前仔细阅读本手册2一. 概述••• 本厂的无线数传电子吊秤, 采用高精度吊秤称重传感器和采用当前最先进Σ-Δ型•A/D转换器的称重仪表,具有很高的可靠性,良好的精度。
二. 特点◆全钢结构外壳,耐撞击,抗电磁干扰,可在强电磁场环境(如电磁吸盘、中频电炉)下使用。
◆背光显示,白天晚上清晰可见。
◆显示器体积小巧,非常适合便携使用。
◆可在计量单上打印用户单位名称和物料名称,使每台秤和计量单都为用户“定制”。
适用各场合计量称重。
◆内置EPSON微型打印机,可打印全中文国标一、二级汉字、英文、数字及各种符号等。
◆可按日期及类别分类打印报表。
◆具有分类存储功能,可以存储10个货号,每种货号999磅次,一共10×999次。
◆具有累加,累减(负值和零位不能存储),可删除任意货号的任意磅次的错误累加值。
◆无线发射,接收频率均可以通过键盘调整,以确保仪表与各种秤体互换通用。
◆实时监控秤体重量,仪表欠压和无信号自动关机。
◆精确的内部时钟和日历。
3◆单价输入,可自动计算货物总价,方便货物买卖。
◆配有标准RS-232C通讯接口,可以连接大屏幕和电脑。
◆人机界面,全中文显示,方便操作。
三. 主要技术指标和功能• (1) 准确度等级符合OIML秤标准(2)电源:电池供电,秤体电池均6V/4.5AH,显示器6V2.5AH。
(3)无线电频率 430MHZ或450MHZ,共64个频点。
• (4) 显示更新速度 6次/秒• (5) 称重传感器激励电源 DC 5V±5%• (6) 工作温度显示器-10℃—40℃秤体补偿温度范围-10℃—50℃,允许工作温度-40℃—70℃• (7) 秤体电池充电一次连续工作时间 40小时• (8) 称重显示器电池充电一次待机工作时间 60小时(9) 无线传送距离无阻挡时≥200米四. 各按键功能:【开机/复位】 :接通电源开机;开机后操作,系统重新启动(不影响原先各选项的设定)。
【关机/取消】:主屏幕状态下起关机作用,其他屏幕下可取消当前操作。
【背光/确认】:主屏幕状态下,按下开背光,再按关背光;其它状态下,确认当前操作功能。
4【检查/删除】:汉字输入期间起删除已输入的字符或汉字的作用。
【设置】:主屏下设置可进入设置菜单,在汉字输入期间可起到输入法切换的作用。
【置零】 :使当前显示重量为0。
【去皮】:可把当前重量当成皮重去除,去皮范围在0到满量程(负值不能去皮),如去皮误操作,再去皮可取消去皮。
【累加】:在不需打印时可累加,把当前重量信息累加到当前货物类别中去(零和负值不累加,两次打印操作之间应间隔5秒),并存贮当前重量值。
【累显】:显示当前货物的累重信息和各磅次信息【货号】:设置当前货物类别号0~~9【编号】:编号可一次设置10行汉字数字等各种符号,并可直接打印。
【无线遥控】:主屏幕下,按下进入无线遥控菜单。
0:秤体开机1:秤体关机2:频道搜索【皮重】:设置皮重。
5【负秤】:首次按下进入负秤状态,卸掉货物显示卸掉的货物重量(适用于冶金浇铸行业),再次按下恢复称重状态。
【走纸】:按此键,走纸。
【打印】:称重状态下打印,打印出当前重量值。
【←↑→↓】:在汉字输入的时候的光标左右上下的移动。
五. 称重显示器使用方法1.开机(1)用螺丝刀打开秤体电池门, 将电源线接通。
(2)打开显示器电源, 显示系统启动中。
若没有无线电信号将一直显示日期时间。
(3)若无线电信号稳定则显示器进入称重状态,显示屏显示0。
2. 称重操作◆只需读取称重数据,不需打印则除可能需要按【置零】外无须任何操作。
◆简单打印称重记录:称重数据稳定后按【打印】打印称重计量单并记录。
◆若需利用本仪表的分类统计功能,应在称重时输入【货号】作为分类依据。
注意:任何参数不变化时无需重复设置。
(1)置零••若空秤时显示不为0或需去皮时,可按【置零】使显示为0。
•(2)设皮重••••在已知皮重时,可用此功能。
按【皮重】,显示屏显示“设皮重00000kg”,这时可输入皮重,输毕再按【背光/确认】。
在6未知皮重时,按【去皮】把当前重量当成皮重去除,去皮范围在0到满量程(负值不能去皮),如去皮误操作,再去皮可取消去皮。
(3)设货号按【货号】显示原货号, 若无须改动可直接按【背光/确认】, 否则输入新类别号(0-9)然后按【背光/确认】确认。
•(4)称重••••将重物挂于吊钩上, 显示屏即显示相应重量, 若需获得净重, 可先对包装物去皮。
将包装物置于吊钩上按【置零】即可。
(5)打印重量稳定后,按【打印】,即可打印称重计量单。
打印格式如下:锐力称重计量单2009-10-18 14:30序号时间重量kg0114:30 20000214:50 2500(6)累加••••吊起重物, 稳定后按【累加】即将本次称重值存入机内, 序号加1, 屏幕显示如下:•••• 货号:0 重量: 2000kg磅次:10 累重: 20000kg可多次累加。
(7)累显7按累显,显示当前重量信息和各磅次信息,屏幕显示如下:•••• 货号:0 磅次: 10累重: 20000kg(8) 打清单称重告一段落可打印称重汇总表,按【设置】两次,按数字7打印,打印结果如下:沈衡称重计量单2009-10-18 15:30序号时间重量kg货号:0--------------------序号时间重量kg001 14:30 2000002 14:50 2500..010 15:26 2500-------------------累重: 35000kg(9)负秤按下进入负秤状态(10)走纸按下走纸。
3.设置按【设置】,进入一级菜单,再按【设置】后,进入二级菜单。
3.1一级设置菜单操作(0)、设声音:进入设声音,按任意键切换按【背光/确认】确认。
(1)、设时间:进入设时间,输入时间后按【背光/确认】确8认。
(2)、设日期:进入设日期,输入日期后按【背光/确认】确认。
(3)、设限重:进入设限重,输入重量后按【背光/确认】确认。
(4)、累减:进入设累减,输入重量后按【背光/确认】确认。
(5)、累清:按累清后,累清当前类别累加重量。
(6)、总累清:按总累清后,累清所以类别累中重量。
(7)、设单价:进入设单价,输入单价后按【背光/确认】确认(8)、设打印:进入设打印,按任意键切换模式1或模式2,按【背光/确认】确认。
(9)、打题头:打印设置好的题头。
3.2 二级设置菜单操作(0)、标定:以下以标定5吨秤为例注:标定要求专业的检定人员及标准砝码a、输入密码后进入标定。
b、确认空秤,空秤稳定后,按【背光/确认】确认。
c、设定砝码(kg):11000 输入1000kg后,等数值稳定后确认。
d、设定砝码(kg):23000 输入3000kg后,等数值稳定后确认。
e、设定砝码(kg):35000 输入5000kg后,等数值稳定后确认。
9f、满量程:输入05t, 确认。
标定成功(1)、重力修正,默认为放大倍数10000(2)、累计模式:按任意键切换模式,选定后,确认。
共3种累计模式:0、自动存储不打印。
1、自动存储并打印2、取消自动功能(3)、参数设置:可设置零位跟踪,仪表频道,秤体频道,时间限制。
(4)、帮助:仪表功能使用说明。
(5)、设题头,可设置每行8个汉字,共10行的题头。
(6)、分度值(kg):可选择1:0.1 2:0.2 3:0.5 4:1.0 5:2.06:5.0 7:10 8:20 9:50 10:10011:200 12:500选定后,按【背光/确认】确认。
(7)、打清单:打印当前货号的磅次清单。
(8)、打印时间,设置自动打印的打印时间,可设置1-9秒;选定后,按【背光/确认】确认。
4.其它操作(1)、打印纸更换第一步:打开打印机盖第二步:把纸头插入进纸口,按【走纸】,打印机自动进纸。
第三步:合上打印机盖。
(2)、充电秤体与仪表均由电池供电,当需要充电时,应及时充电。
10秤体充电时应取下充约8小时;仪表电池约充5小时。
5.自动关机仪表收不到信号时,5分钟后自动关机。
六.使用维护电子吊秤是精密计量器具, 良好的维护对提高工作可靠性, 延长设备使用寿命具有十分重要的意义。
••1.吊秤秤体有较好的抗震和防水性能,但使用中仍要十分注意避免剧烈碰撞和长时间雨淋,特别注意防止秤体从挂钩上掉下造成秤体损坏甚至人身事故。
2.非高温吊秤不能长时间在高温环境下工作,使用现场有高温源时应注意尽量缩短停留时间,总的原则是若秤体外壳底面摸上去不烫手(低于70℃)则不会对吊秤产生不良影响。
3.严禁自行在秤体上进行电焊操作以免损坏仪表和传感器。
4.使用中严格防止超载。
••5.为延长电池使用时间,白天使用时请关闭显示器背光。
6.吊秤、显示器均使用铅酸蓄电池供电,应避免过度放电以延长电池寿命。
••7.显示器禁止雨淋。
七、常见故障及排除方法:一、仪表充不上电充电器是否有电压输出,电池是否电压低于5V。
二、仪表开机后无称重信号11请检查秤体电池电压,插上发射机天线,接通发射机电源,如还无信号,请检查仪表频道是否与发射机相对应。
三、打印字符不清楚或打不出字符请检查色带是否脱落或色带无印色,更换色带。
四、打印机走纸困难积尘太多,应清洗打印机头,可加微量的润滑油。
五、数字乱跳附近有同频率的电子秤干扰。
本产品保修期为18个月(消耗材料不在保修范围内)。
我公司保留对产品的解释权及在不作任何预先通知的情况下对技术规格作修改的权利。
12。