E100无线上网卡中文用户手册
WIFI上网卡操作手册
WIFI上网卡操作手册一、登录网站目前有三种方式可以进入天翼宽带WiFi时长卡产品购买网站:(1)用户通过天翼宽带WiFi Portal页面上的购买链接进入。
(2)用户直接在浏览器地址栏输入网址“/main/wifibuy/index.html”进入。
(3)访问福建省网上营业厅()的“移动业务”—“天翼应用”—“数据业务”栏目中的“天翼宽带WiFi业务”栏目中的“WiFi时长卡购买链接”进入。
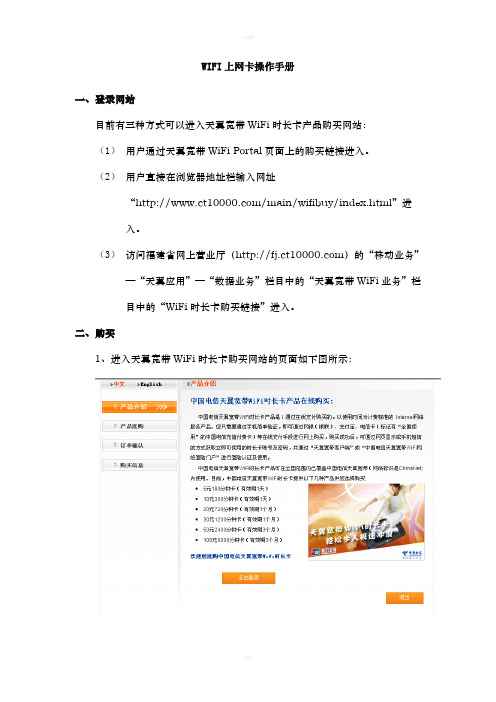
二、购买1、进入天翼宽带WiFi时长卡购买网站的页面如下图所示:2、进入手机验证页面点击购买页面首页上的“点击继续”按钮后,进入手机验证页面,如下图:根据页面提示,输入手机号,验证码及发到手机上的随机短信密码后,点击“进入购买流程”按钮。
3、产品选购点击“进入购买流程”按钮后,只要用户输入的手机号、验证码、手机随机短信密码正确,就可以顺利进入如下产品选购页面:选择要购买的“天翼宽带WiFi时长卡类型”及“支付类型”(支付类型中的“电信充值卡”支付方式目前仅对上海地区发行的电信充值卡提供服务。
)4、订单确认三、支付1、进入付款页面以招商银行的网上银行付款为例:2、购买成功三、查看购买记录1、进入购买网站目前有三种方式可以进入天翼宽带WiFi时长卡产品购买网站:(1)用户通过天翼宽带WiFi Portal页面上的购买链接进入。
(2)用户直接在浏览器地址栏输入网址“/main/wifibuy/index.html”进入。
(3)访问福建省网上营业厅()的“移动业务”—“天翼应用”—“数据业务”栏目中的“天翼宽带WiFi业务”栏目中的“WiFi时长卡购买链接”进入。
进入天翼宽带WiFi时长卡购买网站的页面如下图所示:2、进入手机验证页面。
点击购买页面首页上的“点击继续”按钮后,进入手机验证页面,如下图:根据页面提示,输入手机号,验证码及发到手机上的随机短信密码后,点击“购买记录查看”按钮。
四、查看购买记录点击“购买记录查看”按钮后,只要用户输入的手机号、验证码、手机随机短信密码正确,就可以顺利进入该手机所购买WiFi时长卡的购买记录查看页面:点击对应购买记录上的“短信获取”按钮,则会将您购买的WiFi时长卡账号密码发到您捆绑的手机上,点击“页面显示”按钮,则会直接在新打开的页面上显示您购买的WiFi时长卡账号和密码。
埃迪茅斯无线网卡安装和使用说明说明书
本機器屬於 Class B 產品,適用於家用環境中,由於本產品可能會產生無線電干擾,因此用戶需採取適當防範措施。
NCC 低功率電波輻射性電機管理辦法
第十二條 經型式認證合格之低功率射頻電機,非經許可,公司、商號或使用者均不得擅自變更頻率、加大功率或變更原設計 之特性及功能。
第十四條 低功率射頻電機之使用不得影響飛航安全及干擾合法通信;經發現有干擾現象時,應立即停用,並改善至無干擾時 方得繼續使用。
前項合法通信,指依電信法規定作業之無線電通信。 低功率射頻電機須忍受合法通信或工業、科學及醫療用電波輻射性電機設備之干擾。
安全性
本設備之設計已針對安裝和使用上的安全性施以最大重視。然而, 仍需對電擊和靜電的危險給予特別留意。
歐洲地區 EU Countries Intended for Use
本機器的 ETSI 版本可以使用於下列國家的一般家庭及辦公室內: 澳洲、比利時、丹麥、芬蘭、法國、德國、希臘、 愛爾蘭、義大利、盧森堡、保加利亞、塞浦路斯、捷克、愛沙尼亞、匈牙利、拉脫維亞、立陶宛、馬爾他、波蘭、 羅馬尼亞、斯洛伐克、斯洛伐尼亞、荷蘭、西班牙、葡萄牙、瑞典及英國。並且此 ETSI 版本也已被下列國家授權 准予使用: 冰島、列之敦斯敦、挪威、瑞士。請檢查您所使用的通道,歐洲標準限定最大幅射功率為 100mW EIRP, 範圍為 2.4GHz ~ 2ห้องสมุดไป่ตู้4835GHz。
FCC 警告聲明:
本設備已通過測試並符合 FCC 規則第 15 部分有關數位裝置的規定。這些限制的主要目的是在保護商業區中運作 此種設備時,提供合理程度的保護,避免有害干擾。本設備會產生、使用並放射射頻能源,若不按指示手冊安裝和 使用,會對無線通訊造成有害干擾。在住宅區中運作本設備亦可能造成有害干擾,在這種情況下,使用者會被要求 採用以下一種或多種方法來改善干擾的情形: 1. 調整接收天線的方向或移動其位置。 2. 將設備與接收天線的距離增加。 3. 諮詢經銷商或有經驗的無線電/電視技術員的協助。
河北联通WLAN无线网卡使用说明

河北联通WLAN无线网卡使用说明
一、安装:
1、将WLAN网卡插入笔记本电脑的PCMCIA插槽中,如操作系统未能自行识别此网卡(如Windows98),此时电脑会弹出一个菜单选择“从列表或指定位置安装(高级)”,点击“下一步”;
2、将WLAN网卡驱动光盘放入光驱,点击“浏览”按钮,指定驱动程序的位置,然后点击“确定”;
3、点击“下一步”,由操作系统自动运行完成驱动程序的安装。
二、系统软件配置:
1、单击桌面上或开始菜单中的“网上邻居”,点击右键弹出菜单后单击“属性”;
2、找到“无线网络连接”图标,点击右键弹出菜单后单击“属性”,并在“常规”页面中点击“Internet 协议(TCP/IP)”,然后点击下面的“属性”按钮。
确认此选项中下述功能进行设置:“自动获得IP地址”、“自动获得DNS服务器地址”。
三、使用方法:
1、在电脑或手机/PDA中开启WiFi功能,或插入WiFi网卡;
2、在操作系统中打开网络连接,双击“无线网络连接”,搜索无线网络连接后,在无线网络连接列表中选择“ChinaUnicom”,并点击连接;
3、打开WEB浏览器(如IE),随机输入想要访问网址;
4、在浏览器推送的认证页面中输入手机号、登录密码等信息后提交;
5、如果认证成功,返回登录成功页面,并打开输入网址的页面,即可以正常上网;如果认证失败,则返回失败信息;
6、如要下线,则通过登录成功页面上的下线按钮进行下线。
Yeacomm YF-P11 4G无线路由器用户手册说明书

YEACOMM P11User ManualThank you for choosing Yeacomm YF-P114G wireless router,please read and keep the user manual carefully.1.Main Technology Parameters●Working temps :-30℃--+60℃●Relative humidity:5%--95%●Working frequency :LTE:B1/2/3/5/7/8/20/38/40LTE:B1/2/3/5/7/8/28/38/39/40/41(Optional)●Power supply :input AC :100V~240V ,50Hz~60HzOutput DC:15V,500mA●Size:252mm*112mm*58mm ●Weight:560g●Rate of uplink and downlink:LTE(Cat 4)150Mbps/DL ;50Mbps/UL2.Product Interface and Indicator2.1Productinterface2.2Indicator Type StatusDescriptionRFAll offno signal (the signal status can bechecked in the terminal configuration page)One on Signal ispoor Two on Signal is moderate Three on Signal is good All on Signal is very goodSYSOff Power abnormal,the router power off On Power normal,the router power on SIM Off No SIM or can not detect SIM card On Device read the SIM normally ETH Off Device doesn't connect to PC On Device connects to PC RUN Off Device is not running OnDevice is running3.Installation3.1Insert the sim card as below.When you hear a clicking sound,it means that the USIM card has been installed successfully.3.2Connect the power adapter’s POE port to outdoor cpe router’sPOE port by Cate5e cable.3.3Place the unit outside in open space,the front panel face to thebase station.Make sure the unit is fixed well.3.4Power on the device,the system will automatically runs in 1~2minutes.Attention:1)Do not insert the SIM card or remove it if power is connected to the device.2)Please use the power adapter that came with the device.4.Quick Config GuideConnect your PC to the router via Ethernet port.The router supports Windows XP,Windows 7/8/10,MAC OS,Linux,Android and so on.First Step :(1)Make sure the computer obtain IP address automatically.Once the computer get IP,input CPE IP address into the browser,press “enter ”to access CPE home page.Pls see the username and password as follows:Web:192.168.0.1Username:admin Password:admin(2)Click“Login”to enter the setting page.(3)Second step:✧If the router auto recognize the APN and already connect tointernet,then you do not need to add APN info.✧If the router does not recognize the APN,then you need to addAPN manually.Pls select Device Settings--WAN Settings--APN, fill in the APN info.Pls make sure the APN setting is correct.Incorrect APN will cause internet connection failed.5.Router SettingIf the device works fine,you’d better not change the parameter.Ifyou have poor experience or can’t access Internet after changing theparameter,then please press and hold the reset button for more than7seconds to restore the factory settings.Menu1Menu2DescriptionSystemstatusHomegatewayinformationstatusRouter running status info,such asrunning hours,LTE network,SIM,WAN,LAN,WLAN infoOnlineterminalstatusCurrent terminal connections,MAC,IPTrafficStatisticsTraffic statisticsVersioninfoCheck the router's software andhardware version number.LTE infoCheck LTE details info,includingfrequency,cell,RSRP,SINR,RSRQetc.DeviceSettingWANSettingNetwork selection:Auto,4G Prefer,4G Only,3G Prefer,3G Only,etc.APN SettingIPV4/IPV6:Set router IP stacksupport model.The default setting isIPV4/IPV6dual stack.PIN,MTU,DNS SettingsDHCPDHCP:Set the router’s DHCP info andIP info.Once turn off the DHCP,theuser has to set IP manually,and it cannot obtain the IP automatically.Keep addressIPV6setIPV6address allocation,PNATfunction.SMSfunctionNewmessageCreating a new messageInbox InboxDraft DraftSent SentFirewallFilteringRulesPorts filtering,IP address filtering,URL Filtering,.MAC binding,Speed limit IP speed limitSystemmanagementSystemsettingChange password,username,devicereboot settings and runtime.System log Check system work logReboot Support reset routerSystemupdateUpdate the firmwareModuleupdateLTE module software updateConfigupdateUpdate router system settingRestartdeviceUser can restart router。
电信天翼wifi上网使用方法
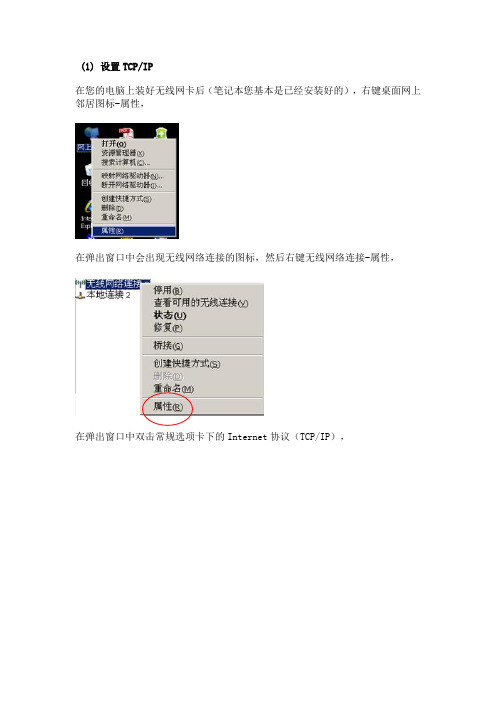
(1) 设置TCP/IP在您的电脑上装好无线网卡后(笔记本您基本是已经安装好的),右键桌面网上邻居图标-属性,在弹出窗口中会出现无线网络连接的图标,然后右键无线网络连接-属性,在弹出窗口中双击常规选项卡下的Internet协议(TCP/IP),在新的弹出窗口中选择自动获取IP地址和自动获得DNS服务器地址,确定即可选择自动获取IP地址(2) 查看可用的无线连接:l 步骤一:鼠标右键点击“网上邻居”图标,选择“属性”。
l 步骤二:进入“网络连接”对话框,鼠标右键点击无线网卡,选择“查看可用的无线连接”。
l 步骤三:进入“无线网络连接”对话框,选择“刷新网络列表”,查看本区域内可用的无线网络列表。
(3)连接到电信WLAN网络找到所在热点的无线网络,选择中国电信WIFI网络(ChinaNet),点击连接;等待自动获取到IP地址后成功连接;无线网络已连接请注意此时电脑右下角应该出现无线连接成功的信号如果出现有惊叹号或者显示“部分连接”或“连接受限”字样,说明并没有成功连接中国电信WIFI网络(ChinaNet),原因可能是网络繁忙,请多试几次。
(4)登陆l 步骤一:打开任意网页,IE会显示:“if you are not redirected,click here”字样,此时页面正在进行重定向,您可以点击也可以不点击,页面会自动跳转到登录页面,如果页面不能正常登陆,请尝试通过其他互联网接入方式连接https:///,查看热点覆盖范围是否覆盖所在地;l 步骤二:若您的机器从未安装过安全控件,系统会自动弹出安装ActiveX的提示框;l 步骤三:点击中提示框的“确定”按纽,弹出安装控件的界面,点击”安装”;注:若您访问IE时,出现如下提示“此站点可能需要下列ActiveX控件……”,请点击右键,选择“安装ActiveX控件”即可;l 步骤四:成功安装完控件后,就可以进行登陆了,请按照下列步骤操作:输入手机号码—输入密码—登录;如果不记得密码,可以点击“短信获取无线宽带密码按键”,从手机短信获取你的账号密码。
D-Link DUB-E100 USB 2.0 Fast Ethernet Adapter 说明书
D-Link™ DUB-E100 USB 2.0 Fast Ethernet AdapterManualFirst Edition (June 2007)Printed in TaiwanTable of ContentsINTRODUCTION (3)System Requirements (3)Features (3)INSTALLATION (4)Unpack and Inspect (4)Installing the Adapter (4)connecting the network cable (3)software installation (4)TROUBLESHOOTING (19)SPECIFICATIONS (23)1IntroductionThank you for choosing the D-Link DUB-E100. The D-Link DUB-E100 is a Hi-Speed USB 2.0 10/100Mbps Fast Ethernet Adapter specifically designed to plug into an available Universal Serial Bus (USB) port on a desktop or laptop PC running Microsoft Windows Vista, XP, Server 2003, 2000,ME 98SE ,Mac OS X, and Linux. Based on USB 2.0, the DUB-E100 extends the transfer speed of earlier USB Fast Ethernet adapters to true 10/100Mbps connectivity. Power for the DUB-E100 is provided directly by the USB bus, eliminating the need for an external power adapter. It also supports USB's energy saving suspend and resume functions to minimize power consumption, which is especially useful for laptop/notebook users.System RequirementsBefore installing the DUB-E100, check your system for the following minimum configuration requirements.200MHz or above based computer with a minimum of 32MB RAMOne available USB portWindows Vista x64/86, XP x32/x64 Edition, Server 2003 x32/x64 Edition, 2000, Me, 98SE, Linux or Mac OS XFeaturesDesigned for versatility and performance, the DUB-E100 USB 2.0 Fast Ethernet Adapter provides the following:•Compliant with USB 2.0 and USB 1.1 specifications•Universal Bus support 3.3V•Compliance with IEEE 802.3u Fast Ethernet standards and IEEE 802.3 Ethernet standards.• Plug-and-Play installation•Supports half and full duplex at 10Mbps, half and full-duplex at 100Mbps.•One built-in RJ-45 connector•Auto-negotiation to the highest available speed•Two LED indicators: Link/ TX/RX•Driver support:√ Microsoft Windows Vista (x86 ,x64) √ Linux (kernel 2.6.9~13)√ Microsoft Windows XP (x32/x64 Edition) √ Linux (kernel 2.6.14 & above)√ Microsoft Windows Server 2003 (x32/x64 Edition) √Macintosh OSX (10.x) √ Windows 98SE/ME√ Microsoft Windows 20002InstallationUnpack and InspectOpen the shipping carton and carefully remove all items. Ensure that the following items are included: •One DUB-E100 USB 2.0 Fast Ethernet Adapter•DUB-E100 Drivers and Manual on CD-ROM•Quick Installation GuideIf any of these items are missing or damaged, please contact your local reseller for replacement.Installing the AdapterPlug the DUB-E100’s USB cable into an available USB port on your computer.Windows will detect new hardware and prompt you for the drivers. The installation process varies slightly for each operating system. Insert the DUB-E100 CD into your CD-ROM drive. Then proceed to the appropriate installation section on the following pages for your operating system.Connecting the Network CableA. Attach an Ethernet cable to the Ethernet port on the DUB-E100.B. Attach the other end of the Ethernet cable to your network switch, hub, or router.Software InstallationInsert the DUB-E100 CD into your CD-ROM drive. Then proceed to the appropriate installation sectionon the following pages for your operating system.Windows Vista x64/86Windows Vista driver installation is complete. Now you may connect the DUB-E100 to a network using an Ethernet cable.Windows XPFor Windows XP 64 EditionFor Windows XP 32 EditionWindows XP driver installation is complete. Now you may connect the DUB-E100 to a network using an Ethernet cable.Windows 2000Windows 2000 driver installation is complete. Now you may connect the DUB-E100 to a network using an Ethernet cable.Windows 2003For Windows Server 2003 x64 EditionFor Windows Server 2003 x32 EditionWindows Server 2003 driver installation is complete. Now you may connect the DUB-E100 to a network using an Ethernet cable.Windows MEWindows ME driver installation is complete. Now you may connect the DUB-E100 to a network using an Ethernet cable.Windows 98SEWindows begins copying the necessary files ontoyour computer. You may be prompted to providethe original Windows 98SE CD-ROM. If so, insert the CD-ROM and click OK. If necessary, providethe path to the CD-ROM, such as D:\WIN98(where D: is your CD-ROM drive letter).If prompted, restart your computer to complete the installation. Windows 98SE driver installation is complete. Now you may connect the DUB-E100 to a network using an Ethernet cable.Mac OS X UsersThe following screen shots were taken from Mac OS 10.3 but the steps are similar in other versions of OS X. Your operating system must be version 10.1 or above.After the restart, plug the DUB-E100’s USB cable into an available USB port on your computer. Then attach one end of an Ethernet cable to the Ethernet port on the DUB-E100 and the other end to your network switch, hub or router.Mac system will detect the new hardware and show the name of the adapter, e.g. Ethernet Adapter (en1) in the example below.To configure the network settings of DUB-E100, click the Apple icon and select System Preferences. Then double-click the Network icon.Linux 2.6.14This driver is designed for Kernel 2.6.14.x or above. To compile the provided Linux driver, you need the Linux 2.6 Kernel source. Also, please make sure the kernel is built with “Support for Host-side, EHCI, OHCI, and UHCI” option.1.Insert the driver CD-ROM into the CD-ROM drive of your computer and go to the Drivers\Linux\ directory.2.Copy the LINUX2.6.14_REV101 folder to your temporary directory.3.Go to the LINUX2.6.14_REV101 folder and execute the following command to compile the driver.[**********************.14_rev101]#make4.If compiling without errors, asix.ko will be created under the current directory.5.If you want to use modprobe command to mount the driver, execute the following command to install the driver on your Linux.[**********************.14_rev101]#makeinstallTo mount the driver, go to the LINUX2.6.14_REV101 directory and executing the following command:[**********************.14_rev101]#insmodusbnet[**********************.14_rev101]#insmodasix.koor[root@localhost anywhere]# modprobe asixTo unmount the driver, just typing the following command:[root@localhost anywhere]# rmmod asix[root@localhost anywhere]# rmmod usbnetSoftware Installation (continued)Linux 2.6.9This driver is designed for Kernel 2.6.x to 2.6.13. To compile the provided Linux driver, you need the Linux 2.6 Kernel source. Also, please make sure the kernel is built with “Support for Host-side, EHCI, OHCI, and UHCI” option.Insert the driver CD-ROM into the CD-ROM drive of your computer and go to the Drivers\Linux\ directory. Copy the LINUX2.6.9_REV111 folder to your temporary directory.Go to the LINUX2.6.9_REV111 folder and execute the following command to compile the driver.[**********************.9_rev111]#makeIf compiling without errors, usbnet.ko will be created under the current directory.If you want to use modprobe command to mount the driver, execute the following command to install the driver on your Linux.[**********************.9_rev111]#makeinstallTo mount the driver, go to the LINUX2.6.9_REV111 directory and executing the following command:[**********************.9_rev111]#insmodusbnetor[root@localhost anywhere]# modprobe usbnetTo unmount the driver, just typing the following command:[root@localhost anywhere]# rmmod usbnetInstallation is Complete!Installation of the DUB-E100 is complete. The LINK LED should be solid green, indicating a good physical connection between the DUB-E100 and the network. The TX/RX LED indicates when data is being transmitted or received. If both LEDs are unlit, there may be a problem with the physical connection. Check the cables between your DUB-E100, the computer, and the network. Verify that your network switch, hub, or router is powered on.3Troubleshooting1. Can I use my DUB-E100 on a USB 1.1 port?The DUB-E100 will work on a USB 1.1 port but the transfer speeds will be limited to the limitations of USB 1.1. If your computer does not have USB 2.0 ports, you can purchase an add-in USB 2.0 adapter to add USB 2.0 functionality to your computer.D-Link offers the following USB 2.0 adapters:•DU-520 (5 Port USB 2.0 PCI Adapter) for desktop computers.•DUB-A2 (2-Port USB 2.0 PCI Adapter) for desktop computers.•DUB-C2 (2-Port USB 2.0 Cardbus Adapter) for laptops computers.2. Do I need to use a crossover cable or straight-through cable?With most of D-Link’s switches/routers, the Ethernet ports are Auto MDI-II/MDI-X. This means the port will auto-sense the cable type. Auto MDI-II/MDI-X ports may react differently if the Ethernet cable is not properly pinned. If you make your own cables, it is very important that they follow the industry standard pin-out (568A and 568B).Computer connections to a hub, switch, or router typically use a straight-through cable. When connectinga computer to another computer or to an uplink port then a cross-over cable is typically required. Rule ofThumb: ”If there is a link light, the cable is right.”3. How do I verify that my DUB-E100 is properly installed?WindowsYou can verify that the adapter has been properly installed in Device Manager:• Right click on the My Computer icon and select Properties.• For Windows 98SE and ME: Go to the Device Manager tab.• For Windows XP, 2000, and Server 2003: Go to the Hardware tab and click on the Device Manager button• For Windows Vista: Click on the Device Manager item under the Tasks group.• Expand the Network Adapters heading by clicking on the plus (+) sign next to Network Adapters.• Right click on the My Computer icon and select Properties.• The D-Link USB DUB-E100 should appear with a green and gold network adapter symbol.If the D-Link USB DUB-E100 in device manager appears with a bright yellow exclamation mark or a red x, please contact D-Link Technical Support.Mac1. Click the Apple icon on the task bar, select System Preferences and then click the Network icon.2. You will find that a new Ethernet network interface is available. It’s usually named Ethernet Adapter(en1) or Ethernet Adapter (en2).Linux 2.6.xTo verify if the DUB-E100 driver is properly installed:1. Load the DUB-E100 module by the following command:[**********************.14_rev101]#modprobeasix2. List the loaded modules with the specified pattern “asix”:[**********************.14_rev101]#lsmod|grepasixThen you should get the reply similar to the following lines:asix 26880 0usbnet 20616 1 asixmii 9600 2 asix,e100usbcore 114896 5 asix,usbnet,usb_storage,echi_hcd,uhci_hcdIf you still have problem on installing the D-Link USB DUB-E100 driver, please contact D-Link Technical Support.4SpecificationsEMC And Safety Certifications:•FCC Class B•CE Class BNetwork Interface: Female RJ45 jackData Bus: USB 2.0 (1.1 compliant)Network Standards: IEEE 802.3: 10Base-TIEEE 802.3u: 100Base-TData Transfer Rates: Ethernet: 10Mbps/20Mbps (Half/Full Duplex)Fast Ethernet: 100Mbps/200Mbps (Half/Full Duplex)Physical Dimensions: 3.15 inches(L) x 2.05 inches (W) x 0.98 inches (H) [80mm(L) x 5.2mm(W)x 25mm(H)]Environment:•Storage: −20° to 70°C (-4° to 158° F)•Operating: 0° to 55° C (32° to 131° F)•Humidity: 5% to 95% non-condensing•Power Consumption: 850mWTechnical SupportYou can find software updates and user documentation on the D-Link websites.If you require product support, we encourage you to browse our FAQ section on the Web Site before contacting the Support line. We have many FAQ’s which we hope will provide you a speedy resolution for your problem.For Customers within The United Kingdom & Ireland:D-Link UK & Ireland Technical Support over the Internet:ftp://D-Link UK & Ireland Technical Support over the Telephone:***********(UnitedKingdom)+1890 886 899 (Ireland)Lines Open8.00am-10.00pm Mon-Fri10.00am-7.00pm Sat & Sun。
User Guide_Chinese
版权声明是深圳市吉祥腾达科技有限公司注册商标。
文中提及的其它商标或商品名称均是深圳市吉祥腾达科技有限公司的商标或注册商标。
本产品的所有组件,包括硬件和软件,其版权属深圳市吉祥腾达科技有限公司所有,在未经过深圳市吉祥腾达科技有限公司许可的情况下,不得任意拷贝、抄袭、仿制或翻译成其它语言。
本手册中的所有图片和产品参数仅供参考,随着软件或硬件的升级会略有差异,如有变更,恕不另行通知,如需了解更多产品信息,请登录我们公司网站:。
目 录第一章产品简介 (1)1.1物品清单(以实际产品为准) (1)1.2指示灯描述 (1)1.3产品特性 (1)1.4产品应用 (2)1.5安装前准备工作 (2)1.6停用其它厂商的无线网卡 (2)1.7产品保养 (4)第二章安装指南 (5)第三章使用系统自带的无线配置程序 (9)3.1Windows XP无线网络连接 (9)3.2 VISTA无线网络连接 (12)3.3 Windows 7无线网络连接 (15)第四章客户端应用程序使用 (18)4.1客户端(Station)模式 (18)4.1.1无线网络 (19)4.1.2 连线信息 (20)4.1.3 连线设置 (22)4.1.4 高级设置 (30)4.1.5 信息 (31)4.1.6 帮助 (32)4.2AP模式 (32)4.2.1一般设置 (34)4.2.2高级 (36)4.2.3连线过滤设置 (37)4.2.4目前连线列表 (38)4.2.5 Windows 7下AP模式 (38)附录一相关技术名词解释 (40)附录二如何设置WPS功能 (42)附录三常见问题解答 (49)附录四产品有毒有害物质清单 (53)第一章产品简介Tenda无线网卡支持最新的IEEE无线标准,能迅速处理文件传输、视频、多媒体、以及其它对带宽要求较高的应用。
无线网卡另集成了无线配置程序,可以轻松快捷的设置无线客户端。
并支持Soft AP功能,方便您快速组建无线局域网。
河北联通USB接口无线上网卡使用说明
河北联通USB接口无线上网卡使用说明一、客户端安装步骤:将无线上网卡插入电脑的USB接口,无线上网卡安装向导将引导您安装好上网卡驱动程序和上网卡客户端软件;安装完毕后,电脑显示无线上网卡客户端软件界面。
(如下图)二、使用方法:1、上网:点击无线上网卡客户端软件主界面的“连接/断开”图标后即开始上网;同样,如要断开网络连接,再次点击“连接/断开”图标即可。
断开网络连接后,点击“退出”图标,可退出无线上网卡客户端软件。
2、发送短信可以同时给多个号码发送短信,编辑短信后可进行保存,系统默认自动保存到您的草稿箱。
在给好朋友发送短信过程,可使用“接收方列表提供添加框”添加接收方手机号码,或者从电话本导入电话号码。
3、短信管理(1)收件箱:保存接收到的短信。
当收到新短信时,或客户端启动时从SIM/USIM卡中读到未读短信时,有短信提示。
(2)发件箱:保存已发送成功或发送失败的短信。
(3)草稿箱:保存编辑好但未发送的短信。
(4)垃圾箱:从收件箱、发件箱、草稿箱、收藏夹中删除的短信,实际上并未真正删除,而是移到了垃圾箱中,当从垃圾箱中删除短信时,才是永久地删除了。
(5)报告箱:您可以设置是否要求短信接收方发送短信报告。
报告箱保存收到的短信接收报告,报告箱中的发送成功标识表示该短信是否已经被对方成功接收。
温馨提示:从报告箱中删除的短信报告,不会被转移到垃圾箱,而是直接删除。
(6)收藏夹:可以保存您从其他箱中转移过来的希望长期保存的重要短信。
4、短信日志(1)存储文件夹短信列表展示:您选定一个具体的短信存储文件夹时,如收件箱,显示该文件夹内保存的短信列表,接收、发送或保存时间。
(2)存储文件夹短信内容展示:您在短信列表中选定一条短信时,显示该条短信的内容。
河北联通微型无线上网卡使用说明
河北联通微型无线上网卡使用说明
一、微型USIM卡安装:
1、打开包装,取出iPad;
2、iPad左侧下方有一个长约1cm的微型USIM卡槽,其下端为一个细小的针孔。
使用包装盒中附带的取卡针或其他类似针形物,插入该细针孔即可弹出微型USIM卡槽,沿内切线将联通微型USIM卡体取下,放入卡槽。
二、iPad激活:
1、在电脑上安装iTunes 9;
2、长按iPad顶部右侧的黑色按钮打开iPad电源,屏幕会显示一根数据线的标志;
3、将包装下面的数据线连接电脑和iPad,打开iTunes,此时iPad 自动激活;
4、若您的iPad已经激活,则直接安装微型USIM卡后即可使用。
三、网络设置:在屏幕上选择“设置”,在打开的窗口左侧选择“蜂窝数据”后,对右侧参数进行如下设置:将“蜂窝数据”设为打开状态,点击“APN设置”,在“APN”处输入“3gnet”,用户名和密码为空。
四、使用iPad:您可以通过数据线将iPad和电脑连接,运行iTunes,将电脑上的音乐、视频、电子书、App store应用程序等同步到iPad,享受联通3G高速上网。
方正科技 无线上网卡 说明书
方正科技无线上网卡使用说明书注意事项:1、在编写本说明书过程中已经力求内容正确与完整,但并不保证本说明书没有任何错误或漏失。
2、方正科技集团股份有限公司只对机器本身存在问题负有保修和维修责任,对于因软件误操作、产品维修或者其他意外情况等所引起个人数据资料删改或丢失,不负任何责任,也不对因此造成其他间接损失负责。
3、本产品软件及硬件或者说明书有任何修改,如不另行通知,方正科技集团股份有限公司拥有最终解释权。
目录一、产品信息 (1)二、无线上网卡自动安装指南 (4)三、无线上网卡使用说明 (10)(一)主界面 (10)(二)功能使用 (12)四、无线上网卡卸载 (24)五、主要指标和规格 (27)六、基本功能 (29)七、故障排除指南 (30)八、常见拨号故障指南 (36)九、维护保养指南 (38)一、产品信息彰显自我随e生活移动办公:您可随时随地收发E-mail,或者召开电话会议,与公司和合作伙伴保持联系;也可以浏览网站,获得最新资料。
随身理财:您可以随时得到最新的证券交易信息,还可连接网上银行和证券公司,进行在线交易。
在线生活:您可随时与网友聊天;收看实时新闻或娱乐节目;也可以在线预定机票、宾馆,或者到网上商城购物。
精心设计性能卓越多信道: CDMA 的最高传输速度可达153.6k,实际上网速度相当于GPRS的3-4倍。
多频段: CDMA使用800MHz,可以提供更好的空间覆盖和深度覆盖,资源使用更优。
操作简便功能丰富快速安装:对于各类计算机,附带的应用软件组件可以帮助您快速安装、配置和管理无线上网卡。
多系统支持:其设计和应用软件可轻易支持Windows2000/ XP/ VISTA(中、英、繁)等常见的操作系统,满足不同用户的要求。
支持热插拔:您可随时安装或取下无线上网卡,而无需重新启动操作系统。
二、无线上网卡1. 放入光盘,单击“安装软件”。
12. 按照提示插入上网卡。
23. 驱动安装完成后,自动弹出安装应用界面,单击“下一步”。
- 1、下载文档前请自行甄别文档内容的完整性,平台不提供额外的编辑、内容补充、找答案等附加服务。
- 2、"仅部分预览"的文档,不可在线预览部分如存在完整性等问题,可反馈申请退款(可完整预览的文档不适用该条件!)。
- 3、如文档侵犯您的权益,请联系客服反馈,我们会尽快为您处理(人工客服工作时间:9:00-18:30)。
E100 PCMCIA无线上网卡设备介绍目录1. E100 PCMCIA 无线上网卡介绍 (2)1.1 功能特性 (2)1.2 组件 (2)1.3 简介 (3)1.4 系统要求 (3)2. PC98 管理软件介绍 (3)3.1 插入 E100 无线上网卡 (3)3.2 取出E100 无线上网卡 (4)4. 安装PC98管理软件 (4)5. 卸载 PC98 管理软件 (5)6. 使用 PC98 管理软件 (5)6.1 语音呼叫 (6)6.2 多方呼叫 (6)6.3 短信息 (6)6.4 电话簿 (7)6.5 通话记录 (7)6.6 设置 (7)6.7 网络连接向导 (8)6.8 建立网络连接 (9)6.9 传真 (9)6.10 在线帮助 (9)6.11 快捷菜单 (10)7. 快速入门指南 (10)8. 常见问题解答 (10)9. 术语 (11)1. E100PCMCIA无线上网卡介绍功能特性1.1单面高集成度精巧结构设计: 92.8mm ×54.0mm×5.2mmType II PC Card 插槽外部可移除天线EDGE MS Class 12 多时隙功能(最多4个时隙发送和4 个时隙接收, 收发时隙总共不超过5 个时隙)固件可升级EDGE、GPRS、和 GSM 电路交换数据传输多个APN支持多路复用应用短信息业务语音和传真兼容GSM 99版标准EDGE/GPRS(GSM 850M/900MHz/DCS 1800 MHz/ PCS 1900 MHz)四频支持低功耗工作温度: -20 to +60º C储藏温度: -30 to +85º C振动极限: 峰值15g, 频率范围10 Hz to 2 kHz湿度: <95%1.2组件图 11. 天线插孔;2. 复位开关插孔;3. SIM 卡插槽;4.服务指示灯;5.耳机插孔;6.仰视图;7.SIM 卡;8.正视图;9.俯视图; 10. 侧视图; 11.背视图1.3简介E100支持四频EDGE/GSM/GPRS网络。
全球用户都能在EDGE/GSM/GPRS网络上享受自由地访问关键信息。
用户可以通过E100无线上网卡同时进行快速地传输大量数据、图片和发送/接收短信息,并保持永远在线服务。
E100无线上网卡在EDGE网络上平均传输速率可达100-130Kbps,最大可达216Kbps。
独特的结构使它具有固件升级能力,无需拆卸,而且低功耗性能延长了计算机电池使用时间。
系统要求1.4操作系统:Windows 2000 or Windows XPPC98 管理软件卡插槽: 1 Type II PCMCIA Card Slot内存: 32 MB硬盘空间: 10 MB驱动器: CD ROM 光驱WEB浏览器2. PC98管理软件介绍PC98管理软件将E100无线上网卡作为一个调制解调器以建立计算机与移动网络和因特网的连接。
您可通过它拨打/接听电话、发送/接收电子邮件和短信息、传输数据、浏览网页、聊天等。
它友好的用户界面设计使您方便地使用E100无线网络卡强大的功能。
3.E100 无线网络卡的插入和取出3.1 插入E100无线上网卡步骤1:按照图1所示插入SIM 卡到E100 无线上网卡的SIM卡插槽。
注:请留意图1中SIM卡缺口方向。
步骤2:按照图1所示插入天线和耳机到E100 无线上网卡的相应插孔。
步骤3:按照图2所示插入E100无线上网卡到笔记本上的PCMCIA卡插槽。
注:请留意图2中E100无线上网卡表面的箭头方向。
图23.2 取出E100 无线上网卡步骤1:在移除E100无线上网卡前,用鼠标双击托盘区的“”图标以弹出卸载硬件设备对话窗口,在硬件设备列表中选择“Serial Multiplexer Driver”,单击“停止”按钮卸载E100无线上网卡。
步骤2:按下PC上PCMCIA卡插槽的弹簧按钮使E100无线上网卡与PCMCIA卡插槽脱离连接。
步骤3:从PC上PCMCIA卡插槽取出E100无线上网卡。
4. 安装PC98管理软件在安装PC98管理软件前,请插入E100无线上网卡到计算机的PCMCIA卡插槽。
开启您的计算机;插入存有PC98管理软件的CD到光驱;选择开始>运行,输入D:\(PC98 Manager)Setup.EXE (请用光驱驱动器盘符代替“D”, 单击“确定” 按钮启动PC98管理软件安装程序;注:用户也可以用其他方式启动PC98管理软件安装程序;阅读许可协议并单击“下一步”按钮接受它;单击“下一步”按钮接受默认安装路径或单击“浏览”按钮改变安装路径;单击“下一步”按钮接受默认程序管理组指定的程序名或在编辑框中编辑它;单击“下一步”按钮开始安装;单击“完成”按钮结束安装;根据系统提示重新启动您的计算机。
注意:1.安装PC98管理软件前请确认PC至少有一个COM端口可用。
2.安装PC98管理软件时E100无线上网卡驱动程序同时被安装。
如果您通过设备管理器看到“调制解调器“选项中“generic edge modem”、“多串口卡”选项中“Serial Multiplexer Driver”和“端口(COM和LPT)”选项中三个虚拟串口,说明PC98无线上网卡驱动程序已经被成功安装。
3.在安装PC98管理软件时,如果有警告对话框弹出,请按“继续”或“确定”按钮继续下一步.4.在安装PC98管理软件时,如果有找到新的硬件向导对话框弹出,要求用户手动选择E100无线上网卡驱动程序安装目录,请选择附带光盘的Driver目录完成E100无线上网卡驱动程序安装。
5. 卸载PC98 管理软件请使用“控制面板”中“添加或删除程序”卸载PC98管理软件,步骤如下:在卸载PC98管理软件前,用鼠标双击托盘区的“”图标以关闭“PC98 Monitor”。
依次选择“开始”>“控制面板”>“添加或删除程序”;从当前安装的程序列表中选择 PC98管理软件简体中文;单击“更改/删除”按钮;单击“卸载”按钮完成卸载。
6. 使用PC98 管理软件在PC98管理软件成功安装后,从桌面或程序管理组(开始>所有程序)中运行PC98管理软件,E100无线上网卡将自动搜索可用网络。
当与移动网络连接建立时,PC98管理软件主界面会显示网络运营商名、信号强度指示。
此时E100无线上网卡处于待机状态,您可接听或拨打语音电话包括多方呼叫、接收或发送语音短信息、建立与因特网连接、查看通话记录、使用电话簿等。
PC98管理软件主界面如下:注: 当您在漫游时, 在主界面的左上角会漫游图标“”显示。
语音呼叫6.1在键盘区按0-9数字键以及*、# 键输入电话号码;按“删除”按钮删除光标左面的字符。
按“拨号”按钮按钮拨打输入的电话号码或接听来电。
按“挂断”按钮按钮拒接来电或结束通话。
注:在通话期间,您可移动主界面的垂直滚动条以调节麦克音量。
6.2 多方呼叫单击“”条弹出多方呼叫对话框,您可激活、保持、结束多方呼叫中的一个通话。
6.3 短信息单击“写新短信”按钮弹出“发送短信”对话框以创建新信息,编辑短信息内容和接收方电话号码,单击“发送”按钮发送短信息。
单击“短信”按钮弹出“短消息”对话框. 您可查看收件箱和发件箱中短信息,同时对选择短信息可进行如下操作:删除、回复、转发、回电。
您也可在此创建新短信、设置短信中心号码、查看SIM卡短信容量和使用情况。
注:1.您可从电话簿中选择短信接收方的电话号码2.您编辑和发送最多达480个字符长短信。
3.如果收件箱中有未读短信,主界面的图标“”变为“”。
6.4电话簿单击“电话本”按钮弹出“电话本”对话窗口。
您可以查看存储在SIM卡和计算机上的电话簿记录。
此时您可以添加一条记录到电话簿、向选择的电话簿记录发送短信、删除/修改/呼叫当前的电话簿记录。
通话记录6.5单击“呼叫记录”按钮弹出“通话记录”对话窗口。
您可查看未接来电、已接来电、最近已拨电话,同时可对当前通话记录呼叫或发送短信。
注: 当有未接来电,主界面的图标“”将变为“”。
设置6.6按“设置”按钮弹出“选项”对话窗口。
您可进行如下个性化设置:“SMS”、“PIN”、“连接”、“拨号设置”、“铃音设置”、“网络运营商定制”、“网络设置”、“QOS”和“ATD”。
- “SMS”:设置短信中心号码、短信有效期限、短信状态报告、系统自动重启开关。
如果您复选了“自动重启”选项,下次计算机启动时PC98管理软件会自动启动。
- “PIN”:开启或关闭PIN码保护。
注意:如果您开启了PIN码保护,您启动PC98管理软件时必须输入正确的PIN 码以解锁。
PIN码如果连续三次输错,SIM卡将被锁死,这时,您需要PUK码来解锁SIM卡。
PIN码和PUK码可能和SIM卡一起提供给您,如果没有,请与您的网络供应商联系。
缺省的PIN码一般是1234,请尽快将其更改为自己设置的密码。
- “连接”:设置EDGE和CSD默认的拨号属性。
.- “拨号设置”:设置EDGE和CSD默认的连接设置。
- “铃音设置”: 设置来电和短信提示铃声。
.- “网络运营商定制”: 自定义您的网络运营商名称。
您可向“自定义网络运营商名”列表中增加个性化的网络名或删除它。
具体操作如下:在“网络名”编辑框输入您的网络运营商默认名。
在“定义为”编辑框输入自定义的网络运营商名。
按“添加”按钮完成添加。
从“自定义网络运营商名”列表中选择一个,按“删除”按钮删除它。
如果您要使列表中自定义的一个网络运营商名称有效,请删除列表中在它之前所有自定义网络名,使其在列表中的第一个位置。
如果要恢复您的网络运营商默认名,请删除列表中所有为您的网络运营商自定义网络名。
- “网络设置”:设置网络频率和网络搜索类型。
此设置依赖您使用的网络特征,为获得更多信息,请向您的网络供应商咨询。
- “QOS”:设置网络服务品质参数。
- “ATD”:设置附加服务功能. 为获得更多信息,请向您的网络供应商咨询。
网络连接向导6.7按“网络连接向导”按钮弹出“连接向导”对话窗口。
您可新建或删除网络连接配置文件。
按“新建”新建网络连接配置文件1. 输入连接配置文件唯一名称;2. 输入您的连线的 APN (存取点名称 ) 和电话号码。
您的网络服务供应商将会为您提供这些信息。
3. 如果您的网络服务供应商要求用户名和密码,请输入其提供的用户和密码。
4. 按照网络服务提供商的指示,选取连线 IP 地址的选项:自动获得IP地址:如果您的网络服务供应商会在您每次开启连线时动态指 -定IP 地址,请单击此选项。
使用下面的IP地址:如果您的网络服务供应商已经为您指定一个用于每次 -开启此连线的 IP 地址。
请单击此选项,将IP地址输入文本框。