Emgu CV Tutorial Skander(EmguCV教程)
EmguCV入门指南-中文翻译版 (1)

翻译:gola E-mail:njuidog@
1 封装 OPENCV ..........................................................................................................................2
XML 文档.......................................................................................................................................7 类函数文档 .................................................................................................................................. 7 VISUAL STUDIO 中的自动补全 .........................................................................................................7
这种结构类型对应于 Opencv 中的结构:
Emgu CV Structure
OpenCV struc ture
Emgu.CV.Structure.MIplI mage
IplImage
Emgu.CV.Structure.MCv Mat
CvMat
...
...
Emgu.CV.Structure.Mxxxx
EmguCV耦合视觉引导的图像目标定位与补偿技术研究
EmguCV耦合视觉引导的图像目标定位与补偿技术研究王帮元【摘要】在平板电脑组装过程中,需要对背光板进行整体定位,传送给机械机构进行位移和角度补偿,从而实现精准组装.但由于背光板顶点背景复杂,往往存在很多干扰点,使得当前图像角点定位算法定位不准,易产生误差.对此提出了一个基于EmguCV与视觉引导的目标定位与引导机制.首先打通Basler SDK与C#-Emgucv 平台的数据通道,实现图像采集;然后基于轮廓,查找到背光板区域,再通过最小矩形框定背光板,查找背光板顶点,实现定位;最后计算出水平、垂直方向偏移和旋转角度,联合PLC,实现基于视觉引导的机构补偿.测试定位补偿技术的性能结果表明:与当前图像角点定位算法相比,机制具有更好的定位与引导效果,准确定位出背光板顶点,计算出补偿值.【期刊名称】《湖北民族学院学报(自然科学版)》【年(卷),期】2015(033)001【总页数】5页(P43-47)【关键词】图像定位;背光板;视觉引导;EmguCV;最小矩形;机构补偿【作者】王帮元【作者单位】安徽经济管理学院信息工程系,安徽合肥230051【正文语种】中文【中图分类】TP391随着电子行业产业化的推进,机器视觉技术在该领域内得到广泛应用,并且已在很大程度上推动了行业生产力发展[1-3].机器视觉的作用主要有:视觉引导、缺陷检测等[4-6],其中的目标定位是视觉引导的关键,也是前提,尤其是角点定位.在平板电脑自动组装中,电脑零部件背光板的位置经常需要传递给机器人的机械手臂,实现精准抓取.因此,对背光板顶点的准确定位直接影响到产品的质量和效率.对此,已有部分学者设计了相应的角点目标定位算法,并且达到了一定的效果.如利用梯度均方差进行特征分析后提取角点的定位算法[7].还有利用局部图像区域直方图特性定位角点的定位算法.这些算法的实验结果表明其具有良好的视觉定位效果[8].尽管上述这些角点定位机制能够取得较好的效果;但是当目标存在干扰时,这些算法的定位精度较低,存在明显的定位偏差.对此,本文提出了一个基于Emgucv 与视觉引导的定位机制.首先打通相机SDK 与C#-Emgucv 平台的数据通道,实现图像采集;然后基于轮廓匹配得到背光板区域,再通过最小矩形框定背光板后查找背光板顶点,实现定位.最后计算出水平、垂直方向偏移和旋转角度,实现基于视觉引导的机构补偿.最后通过实验,验证了本文算法与传统定位算法的定位性能.1 本文整体定位与引导机制由于一块反光板上有三个顶点需要定位,因此本文机制采用2 个摄像头分2 次抓取三个顶点所在视野,然后分别定位.考虑到C#在界面、运行效率、通信方面比较有优势,故选用C#语言开发软件系统,且在C#平台上调用Emgucv 也很方便.首先研究相机C#版本的SDK 底层函数,然后用C#进行调取,并且转换为bitmap、Emgucv 图像格式,实现相机取像、实时动态显示功能.反光板上目标是三个顶点,如图1 所示.通过定位反光板上三个顶点来确定位置信息.取像完成后,首先对采集的目标区域进行轮廓查找,得到目标区域;再通过最小矩形框定得到目标的精确坐标;然后查找目标顶点;最后引入补偿计算模型,实现位移和角度补偿.以上过程采用C#平台与EmguCV 来实现.本文机制整体框架如图2 所示.图1 反光板Fig.1 Backlight board图2 本文定位与引导机制架构Fig.2 Positioning and visual guiding system architecture in this paper2 基于相机SDK 数据转换的图像采集首先基于相机C#版本SDK 进行二次开发,用C#语言编程调用SDK 底层相机采集函数,取出相机采集的图像裸数据,即二进制数据.然后,利用字节流转换的方法,将图像裸数据转换至C#支持的Bitmap 格式数据.最后利用索引调色板重构方式,转换到Emgucv 数据格式Image <>.由此得到PC-visual stadio 平台可以处理的数据格式,从而通过C#编程实现两个工业相机的数据采集,为图像处理打下数据基础.实时显示视频如图4 所示.通过C#调用SDK,将相机采集的图像裸数据,转换为C#可以识别的数据流,继而转换为Bitmap 格式.由于索引图像格式存在伪彩,本研究采用索引表重构[11],转换Emgucv 平台图像数据格式Image,如图3 所示,为后续图像处理、定位打好数据基础.图3 数据采集与转换流程Fig.3 Data acquisition and conversion process相机初始化部分代码:相机SDK—C#-Emgucv 平台数据转换部分代码:图4 本文双目视觉效果图Fig.4 Effect of double vision in this paper3 基于Emgucv 的顶点目标定位基于阈值分割和轮廓查找得到可能包含目标点区域,再利用Emgucv 的最小矩形框定函数cvMinAreaRect2,得到可能包含目标点的最小外接矩形区域,再通过查找顶点,得到顶点坐标;随后,与标准坐标相减后得到位置偏移和角度旋转.基于式(1)计算,得到X 轴、Y 轴补偿和角度补偿,即测量值与标准值得差值表示位移偏差和角度偏差.整体框架如图5 所示.采用轮廓查找,定位出目标.图5 定位算法Fig.5 The positioning algorithm式(1)中,x、y 为实际坐标,Standard_x、Standard_y 为标准坐标,Delt_X、Delt_Y 为X、Y 轴偏移.Juli 为两顶点距离,Jiaodu 为旋转角度;Real_distance为两点实际距离,Pixel_distance 为两点像素距离,Bili 为图像距离到实际距离的转换比例.以图6 为待定位图像,经本文定位机制处理后,结果见图7.从图7 中可知,本文定位机制精确识别出角点.可见定位标示绿点准确的打在顶点上,代表定位成功.进而计算出水平、垂直、角度补偿,如图8 所示.图8 为软件界面部分截图,是补偿计算显示.图6 原图Fig.6 The original image图7 处理效果图Fig.7 Processing result image图8 补偿计算显示Fig.8 Display of compensation calculation背光板顶点定位部分代码:4 基于视觉引导的机构补偿计算出位移和角度的补偿值后,本文利用PLC 实现位移、角度补偿.视觉软件完成对背光板X 轴、Y 轴位移偏移、旋转角度,即X 轴、Y 轴、角度补偿,软件通过串口通信将这些值传递给PLC 机构,PLC 转换为相应的动作.比如X 轴偏移-4 mm,PLC 步进电机X 轴方向多走4 mm,X 轴偏移4 mm,PLC 步进电机X 轴方向少走4 mm,Y 轴偏移-4 mm,PLC 步进电机Y 轴方向多走4 mm,Y 轴偏移4 mm,PLC 步进电机Y 轴方向少走4 mm,角度偏移-4°,PLC 旋转电机逆时针旋转4°,角度偏移4°,PLC 旋转电机顺时针旋转4°.PLC 即可编程逻辑控制器,它采用一类可编程的存储器,用于其内部存储程序,执行逻辑运算、顺序控制、定时、计数与算术操作等面向用户的指令,并通过数字或模拟式输入/输出控制各种类型的机械或生产过程.当可编程逻辑控制器投入运行后,其工作过程一般分为三个阶段,即输入采样、用户程序执行和输出刷新三个阶段.完成上述三个阶段称作一个扫描周期.在整个运行期间,可编程逻辑控制器的CPU 以一定的扫描速度重复执行上述三个阶段.部分PLC 关键代码:5 实验与讨论本文定位与引导机制,基于C#、EmguCV 编程完成对目标视野的取像,通过阈值分割、轮廓匹配、最小矩形框定、顶点查找得到目标的精确坐标.经过实验验证,在图像目标特征不明显,准确定位目标位置,如图9~10 所示.传统定位方式是基于静态大差异特征识别定位算法,在图像目标特征不明显,且背景复杂时,往往存在定位不准确,如图11~12 所示.图9 本文算法效果图Fig.9 Algorithm effect in this paper图10 本文算法效果图Fig.10 Algorithm effect in this paper图11 传统算法效果图Fig.11 Effect of the traditional algorithm随后,对十枚背光板进行检测,先用精密光学距离测量工具测算出实际物理偏移;然后分别用传统算法和本文算法测试,计算出偏移,然后综合取平均值后,结果见表1.从表中可知,本文算法的定位精度比传统技术要高,定位偏移非常小;而传统的角点定位技术产生了较大的偏移.图12 传统算法效果图Fig.12 Effect of the traditional algorithm表1 测试数据表Tab.1 Table of data testing名称实际物理偏移传统算法计算偏移本文算法计算偏移X 方向 3.0 2.0 3.00 Y 方向 5.0 1.0 4.90角度2.3 3.1 2.356 结论为了解决反光板顶点目标的定位问题,本文提出了一个基于EmguCV 与双目视觉的定位与引导机制.首先基于两个Basler 工业相机实现图像采集;然后基于轮廓查找与阈值分割处理得到目标的大致区域,再通过最小矩形框定和顶点查找得到目标的精确坐标.最后引入补偿计算机制,实现机构补偿.最后测试了本文机制性能,结果表明:与普通的图像目标定位算法相比,在图像目标特征背景复杂时,本文机制具有更好的定位与引导效果,准确定位出图像目标的坐标,并完成定位.参考文献:[1]王忠勇.一种并联机械手视觉引导算法[J].计算机测量与控制,2013,13(17):4983-4986.[2]李龙.结构光视觉引导的轨迹跟踪系统的标定技术[J].计算机工程与应用,2013,18(11):383-387.[3]赵丹阳.火灾视频图像定位中特征点提取和匹配[J].计算机工程与应用,2013,36(4):181-185.[4]聂华.基于计算机图像定位的伺服平台研究[J].电子设计工程,2013,21(7):1906-1913.[5]李翀伦.复杂背景下红外图像目标的快速定位[J].海军工程大学学报,2013,33(10):2886-2890.[6]秦绪佳,桑贤生,程时伟.改进的规范化卷积图像修复算法[J].计算机辅助设计与图形学学报,2011,23(2):371-376.[7] Noori H,Saryazdi S.A bilateral image inpainting[J].IJST Trans Electr Eng,2011,25(E2):95-108.[9]李虹.基于符号理据性的视觉引导系统设计研究[J].统计与管理,2014,18(15):482-4387.[10] hmann J E,Appas T P,Neuhoff D.Structure texture similarity metrics for image analysis and retrieval[J].IEEE Transactions,2013,22(7):2545-2258.[11]龙水军.基于彩色轨迹引导的AGV 视觉导航方案研究[J].工具技术,2014,18(15):42-47.[12]王秀平.基于激光视觉引导的焊接机器人系统设计[J].煤炭技术,2013,21(7):906-913.。
EmguCV类(CvInvoke_Class) 方法整理
规范化输入数组
Randn(IInputOutputArray, IInputArray, IInputArray)
用正态分布的随机数填充数组
Randn(IInputOutputArray, MCvScalar, MCvScalar)
用正态分布的随机数填充数组
RandShuffle
将原数组(矩阵)打乱
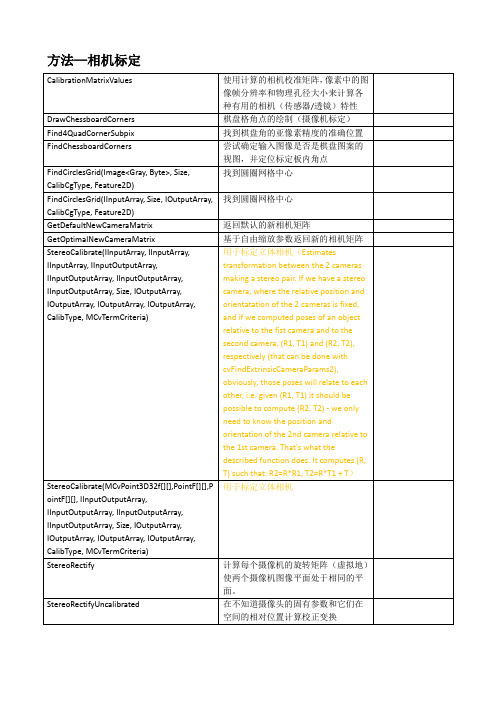
用于标定立体相机
StereoRectify
计算每个摄像机的旋转矩阵(虚拟地)使两个摄像机图像平面处于相同的平面。
StereoRectifyUncalibrated
在不知道摄像头的固有参数和它们在空间的相对位置计算校正变换
方法
CalibrateCamera(IInputArray, IInputArray, Size, IInputOutputArray, IInputOutputArray, IOutputArray, IOutputArray, CalibType, MCvTermCriteria)
cvGetRawData
以低级别信息填充输出变量。
cvGetRow
返回头文件信息,对应于输入数组的指定行。
cvGetRows
返回头文件信息,对应输入数组的指定行跨度。
cvGetSubRect
返回头文件,对应于输入数组的指定矩形。换句话说,它允许用户将输入阵列的一部分视为独立阵列。通过还可提取ROI的子阵列。
计算源数据的加权平均和,使得acc变为帧序列的运行平均值(Calculates weighted sum of input src and the accumulator acc so that acc becomes a running average of frame sequence: acc(x,y)=(1-alpha) * acc(x,y) + alpha * image(x,y) if mask(x,y)!=0 where alpha regulates update speed (how fastaccumulator forgets about previous frames).
EmguCV图像处理函数
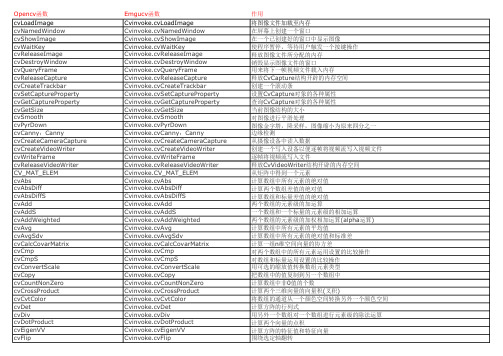
Opencv函数Emgucv函数作用cvLoadImage Cvinvoke.cvLoadImage将图像文件加载至内存cvNamedWindow Cvinvoke.cvNamedWindow在屏幕上创建一个窗口cvShowImage Cvinvoke.cvShowImage在一个已创建好的窗口中显示图像cvWaitKey Cvinvoke.cvWaitKey使程序暂停,等待用户触发一个按键操作cvReleaseImage Cvinvoke.cvReleaseImage释放图像文件所分配的内存cvDestroyWindow Cvinvoke.cvDestroyWindow销毁显示图像文件的窗口cvQueryFrame Cvinvoke.cvQueryFrame用来将下一帧视频文件载入内存cvReleaseCapture Cvinvoke.cvReleaseCapture释放CvCapture结构开辟的内存空间cvCreateTrackbar Cvinvoke.cvCreateTrackbar创建一个滚动条cvSetCaptureProperty Cvinvoke.cvSetCaptureProperty设置CvCapture对象的各种属性cvGetCaptureProperty Cvinvoke.cvGetCaptureProperty查询CvCapture对象的各种属性cvGetSize Cvinvoke.cvGetSize当前图像结构的大小cvSmooth Cvinvoke.cvSmooth对图像进行平滑处理cvPyrDown Cvinvoke.cvPyrDown图像金字塔,降采样,图像缩小为原来四分之一cvCanny:Canny Cvinvoke.cvCanny:Canny边缘检测cvCreateCameraCapture Cvinvoke.cvCreateCameraCapture从摄像设备中读入数据cvCreateVideoWriter Cvinvoke.cvCreateVideoWriter创建一个写入设备以便逐帧将视频流写入视频文件cvWriteFrame Cvinvoke.cvWriteFrame逐帧将视频流写入文件cvReleaseVideoWriter Cvinvoke.cvReleaseVideoWriter释放CvVideoWriter结构开辟的内存空间CV_MAT_ELEM Cvinvoke.CV_MAT_ELEM从矩阵中得到一个元素cvAbs Cvinvoke.cvAbs计算数组中所有元素的绝对值cvAbsDiff Cvinvoke.cvAbsDiff计算两个数组差值的绝对值cvAbsDiffS Cvinvoke.cvAbsDiffS计算数组和标量差值的绝对值cvAdd Cvinvoke.cvAdd两个数组的元素级的加运算cvAddS Cvinvoke.cvAddS一个数组和一个标量的元素级的相加运算cvAddWeighted Cvinvoke.cvAddWeighted两个数组的元素级的加权相加运算(alpha运算) cvAvg Cvinvoke.cvAvg计算数组中所有元素的平均值cvAvgSdv Cvinvoke.cvAvgSdv计算数组中所有元素的绝对值和标准差cvCalcCovarMatrix Cvinvoke.cvCalcCovarMatrix计算一组n维空间向量的协方差cvCmp Cvinvoke.cvCmp对两个数组中的所有元素运用设置的比较操作cvCmpS Cvinvoke.cvCmpS对数组和标量运用设置的比较操作cvConvertScale Cvinvoke.cvConvertScale用可选的缩放值转换数组元素类型cvCopy Cvinvoke.cvCopy把数组中的值复制到另一个数组中cvCountNonZero Cvinvoke.cvCountNonZero计算数组中非0值的个数cvCrossProduct Cvinvoke.cvCrossProduct计算两个三维向量的向量积(叉积) cvCvtColor Cvinvoke.cvCvtColor将数组的通道从一个颜色空间转换另外一个颜色空间cvDet Cvinvoke.cvDet计算方阵的行列式cvDiv Cvinvoke.cvDiv用另外一个数组对一个数组进行元素级的除法运算cvDotProduct Cvinvoke.cvDotProduct计算两个向量的点积cvEigenVV Cvinvoke.cvEigenVV计算方阵的特征值和特征向量cvFlip Cvinvoke.cvFlip围绕选定轴翻转cvGEMM Cvinvoke.cvGEMM矩阵乘法cvGetCol Cvinvoke.cvGetCol从一个数组的列中复制元素cvGetCols Cvinvoke.cvGetCols从数据的相邻的多列中复制元素cvGetDiag Cvinvoke.cvGetDiag复制数组中对角线上的所有元素cvGetDims Cvinvoke.cvGetDims返回数组的维数cvGetDimSize Cvinvoke.cvGetDimSize返回一个数组的所有维的大小cvGetRow Cvinvoke.cvGetRow从一个数组的行中复制元素值cvGetRows Cvinvoke.cvGetRows从一个数组的多个相邻的行中复制元素值cvGetSize Cvinvoke.cvGetSize得到二维的数组的尺寸,以CvSize返回cvGetSubRect Cvinvoke.cvGetSubRect从一个数组的子区域复制元素值cvInRange Cvinvoke.cvInRange检查一个数组的元素是否在另外两个数组中的值的范围内cvInRangeS Cvinvoke.cvInRangeS检查一个数组的元素的值是否在另外两个标量的范围内cvInvert Cvinvoke.cvInvert求矩阵的逆cvMahalonobis Cvinvoke.cvMahalonobis计算两个向量间的马氏距离cvMax Cvinvoke.cvMax在两个数组中进行元素级的取最大值操作cvMaxS Cvinvoke.cvMaxS在一个数组和一个标量中进行元素级的取最大值操作cvMerge Cvinvoke.cvMerge把几个单通道图像合并为一个多通道图像cvMin Cvinvoke.cvMin在两个数组中进行元素级的取最小值操作cvMinS Cvinvoke.cvMinS在一个数组和一个标量中进行元素级的取最小值操作cvMinMaxLoc Cvinvoke.cvMinMaxLoc寻找数组中的最大最小值cvMul Cvinvoke.cvMul计算两个数组的元素级的乘积(点乘)cvNot Cvinvoke.cvNot按位对数组中的每一个元素求反cvNormalize Cvinvoke.cvNormalize将数组中元素进行归一化cvOr Cvinvoke.cvOr对两个数组进行按位或操作cvOrs Cvinvoke.cvOrs在数组与标量之间进行按位或操作cvReduce Cvinvoke.cvReduce通过给定的操作符将二维数组简为向量cvRepeat Cvinvoke.cvRepeat以平铺的方式进行数组复制cvSet Cvinvoke.cvSet用给定值初始化数组cvSetZero Cvinvoke.cvSetZero将数组中所有元素初始化为0 cvSetIdentity Cvinvoke.cvSetIdentity将数组中对角线上的元素设为1,其他置0 cvSolve Cvinvoke.cvSolve求出线性方程组的解cvSplit Cvinvoke.cvSplit将多通道数组分割成多个单通道数组cvSub Cvinvoke.cvSub两个数组元素级的相减cvSubS Cvinvoke.cvSubS元素级的从数组中减去标量cvSubRS Cvinvoke.cvSubRS元素级的从标量中减去数组cvSum Cvinvoke.cvSum对数组中的所有元素求和cvSVD Cvinvoke.cvSVD二维矩阵的奇异值分解cvSVBkSb Cvinvoke.cvSVBkSb奇异值回代计算cvTrace Cvinvoke.cvTrace计算矩阵迹cvTranspose Cvinvoke.cvTranspose矩阵的转置运算cvXor Cvinvoke.cvXor对两个数组进行按位异或操作cvXorS Cvinvoke.cvXorS在数组和标量之间进行按位异或操作cvZero Cvinvoke.cvZero将所有数组中的元素置为0cvConvertScaleAbs Cvinvoke.cvConvertScaleAbs计算可选的缩放值的绝对值之后再转换数组元素的类型cvNorm Cvinvoke.cvNorm计算数组的绝对范数,绝对差分范数或者相对差分范数cvAnd Cvinvoke.cvAnd对两个数组进行按位与操作cvAndS Cvinvoke.cvAndS在数组和标量之间进行按位与操作cvScale是cvConvertScale的一个宏,可以用来重新调整数组的内容,并且可以将参数从一种数cvT cvT是函数cvTranspose的缩写cvLine Cvinvoke.cvLine画直线cvRectangle Cvinvoke.cvRectangle画矩形cvCircle Cvinvoke.cvCircle画圆cvEllipse Cvinvoke.cvEllipse画椭圆cvEllipseBox Cvinvoke.cvEllipseBox使用外接矩形描述椭圆cvFillPolycvFillConvexPolycvPolyLine cvFillPolycvFillConvexPolycvPolyLine画多边形cvPutText Cvinvoke.Cvinvoke.cvPutText在图像上输出一些文本cvInitFont Cvinvoke.Cvinvoke.cvInitFont采用一组参数配置一些用于屏幕输出的基本个特定字体cvSave Cvinvoke.Cvinvoke.cvSave矩阵保存cvLoad Cvinvoke.Cvinvoke.cvLoad矩阵读取cvOpenFileStorage Cvinvoke.Cvinvoke.cvOpenFileStorage为读/写打开存储文件cvReleaseFileStorage Cvinvoke.Cvinvoke.cvReleaseFileStorage释放存储的数据cvStartWriteStruct Cvinvoke.Cvinvoke.cvStartWriteStruct开始写入新的数据结构cvEndWriteStruct Cvinvoke.cvEndWriteStruct结束写入数据结构cvWriteInt Cvinvoke.cvWriteInt写入整数型cvWriteReal Cvinvoke.cvWriteReal写入浮点型cvWriteString Cvinvoke.cvWriteString写入字符型cvWriteComment Cvinvoke.cvWriteComment写一个XML或YAML的注释字串cvWrite Cvinvoke.cvWrite写一个对象cvWriteRawData Cvinvoke.cvWriteRawData写入多个数值cvWriteFileNode Cvinvoke.cvWriteFileNode将文件节点写入另一个文件存储器cvGetRootFileNode Cvinvoke.cvGetRootFileNode获取存储器最顶层的节点cvGetFileNodeByName Cvinvoke.cvGetFileNodeByName在映图或存储器中找到相应节点cvGetHashedKey Cvinvoke.cvGetHashedKey为名称返回一个惟一的指针cvGetFileNode Cvinvoke.cvGetFileNode在映图或文件存储器中找到节点cvGetFileNodeName Cvinvoke.cvGetFileNodeName返回文件的节点名cvReadInt Cvinvoke.cvReadInt读取一个无名称的整数型cvReadIntByName Cvinvoke.cvReadIntByName读取一个有名称的整数型cvReadReal Cvinvoke.cvReadReal读取一个无名称的浮点型cvReadRealByName Cvinvoke.cvReadRealByName读取一个有名称的浮点型cvReadString Cvinvoke.cvReadString从文件节点中寻找字符串cvReadStringByName Cvinvoke.cvReadStringByName找到一个有名称的文件节点并返回它cvRead Cvinvoke.cvRead将对象解码并返回它的指针cvReadByName Cvinvoke.cvReadByName找到对象并解码cvReadRawData Cvinvoke.cvReadRawData读取多个数值cvStartReadRawData Cvinvoke.cvStartReadRawData初始化文件节点序列的读取cvReadRawDataSlice Cvinvoke.cvReadRawDataSlice读取文件节点的内容cvGetModuleInfo Cvinvoke.cvGetModuleInfo检查IPP库是否已经正常安装并且检验运行是否正常cvResizeWindow Cvinvoke.cvResizeWindow用来调整窗口的大小cvSaveImage Cvinvoke.cvSaveImage保存图像cvMoveWindow Cvinvoke.cvMoveWindow将窗口移动到其左上角为x,y的位置cvDestroyAllWindow Cvinvoke.cvDestroyAllWindow用来关闭所有窗口并释放窗口相关的内存空间cvGetTrackbarPos Cvinvoke.cvGetTrackbarPos读取滑动条的值cvSetTrackbarPos Cvinvoke.cvSetTrackbarPos设置滑动条的值cvGrabFrame Cvinvoke.cvGrabFrame用于快速将视频帧读入内存cvRetrieveFrame Cvinvoke.cvRetrieveFrame对读入帧做所有必须的处理cvConvertImage Cvinvoke.cvConvertImage用于在常用的不同图像格式之间转换cvErode Cvinvoke.cvErode形态腐蚀cvDilate Cvinvoke.cvDilate形态学膨胀cvMorphologyEx Cvinvoke.cvMorphologyEx更通用的形态学函数cvFloodFill Cvinvoke.cvFloodFill漫水填充算法,用来进一步控制哪些区域将被填充颜色cvResize Cvinvoke.cvResize放大或缩小图像cvPyrUp Cvinvoke.cvPyrUp图像金字塔,将现有的图像在每个维度上都放大两倍cvPyrSegmentation Cvinvoke.cvPyrSegmentation利用金字塔实现图像分割cvThreshold Cvinvoke.cvThreshold图像阈值化cvAcc Cvinvoke.cvAcc可以将8位整数类型图像累加为浮点图像cvAdaptiveThreshold Cvinvoke.cvAdaptiveThreshold图像自适应阈值cvFilter2D Cvinvoke.cvFilter2D图像卷积cvCopyMakeBorder Cvinvoke.cvCopyMakeBorder将特定的图像轻微变大,然后以各种方式自动填充图像边界cvSobel Cvinvoke.cvSobel图像边缘检测,Sobel算子cvLaplace Cvinvoke.cvLaplace拉普拉斯变换图像边缘检测cvHoughLines2Cvinvoke.cvHoughLines2霍夫直线变换cvHoughCircles Cvinvoke.cvHoughCircles霍夫圆变换cvRemap Cvinvoke.cvRemap图像重映射,校正标定图像,图像插值cvWarpAffine Cvinvoke.cvWarpAffine稠密仿射变换cvGetQuadrangleSubPix Cvinvoke.cvGetQuadrangleSubPix仿射变换cvGetAffineTransform Cvinvoke.cvGetAffineTransform仿射映射矩阵的计算cvCloneImage Cvinvoke.cvCloneImage将整个IplImage结构复制到新的IplImage中cv2DRotationMatrix Cvinvoke.cv2DRotationMatrix仿射映射矩阵的计算cvTransform Cvinvoke.cvTransform稀疏仿射变换cvWarpPerspective Cvinvoke.cvWarpPerspective密集透视变换(单应性) cvGetPerspectiveTransform Cvinvoke.cvGetPerspectiveTransform计算透视映射矩阵cvPerspectiveTransform Cvinvoke.cvPerspectiveTransform稀疏透视变换cvCartToPolar Cvinvoke.cvCartToPolar将数值从笛卡尔空间到极坐标(极性空间)进行映射cvPolarToCart Cvinvoke.cvPolarToCart将数值从极性空间到笛卡尔空间进行映射cvLogPolar Cvinvoke.cvLogPolar对数极坐标变换cvDFT Cvinvoke.cvDFT离散傅里叶变换cvMulSpectrums Cvinvoke.cvMulSpectrums频谱乘法cvDCT Cvinvoke.cvDCT离散余弦变换cvIntegral Cvinvoke.cvIntegral计算积分图像cvDistTransform Cvinvoke.cvDistTransform图像的距离变换cvEqualizeHist Cvinvoke.cvEqualizeHist直方图均衡化cvCreateHist Cvinvoke.cvCreateHist创建一新直方图cvMakeHistHeaderForArray Cvinvoke.cvMakeHistHeaderForArray根据已给出的数据创建直方图cvNormalizeHist Cvinvoke.cvNormalizeHist归一化直方图cvThreshHist Cvinvoke.cvThreshHist直方图阈值函数cvCalcHist Cvinvoke.cvCalcHist从图像中自动计算直方图cvCompareHist Cvinvoke.cvCompareHist用于对比两个直方图的相似度cvCalcEMD2Cvinvoke.cvCalcEMD2陆地移动距离(EMD)算法cvCalcBackProject Cvinvoke.cvCalcBackProject反向投影cvCalcBackProjectPatch Cvinvoke.cvCalcBackProjectPatch图块的方向投影cvMatchTemplate Cvinvoke.cvMatchTemplate模板匹配cvCreateMemStorage Cvinvoke.cvCreateMemStorage用于创建一个内存存储器cvCreateSeq Cvinvoke.cvCreateSeq创建序列cvSeqInvert Cvinvoke.cvSeqInvert将序列进行逆序操作cvCvtSeqToArray Cvinvoke.cvCvtSeqToArray复制序列的全部或部分到一个连续内存数组中cvFindContours Cvinvoke.cvFindContours从二值图像中寻找轮廓cvDrawContours Cvinvoke.cvDrawContours绘制轮廓cvApproxPoly Cvinvoke.cvApproxPoly使用多边形逼近一个轮廓cvContourPerimeter Cvinvoke.cvContourPerimeter轮廓长度cvContoursMoments Cvinvoke.cvContoursMoments计算轮廓矩cvMoments Cvinvoke.cvMoments计算Hu不变矩cvMatchShapes Cvinvoke.cvMatchShapes使用矩进行匹配cvInitLineIterator Cvinvoke.cvInitLineIterator对任意直线上的像素进行采样cvSampleLine Cvinvoke.cvSampleLine对直线采样cvAbsDiff Cvinvoke.cvAbsDiff帧差cvWatershed Cvinvoke.cvWatershed分水岭算法cvInpaint Cvinvoke.cvInpaint修补图像cvGoodFeaturesToTrack Cvinvoke.cvGoodFeaturesToTrack寻找角点cvFindCornerSubPix Cvinvoke.cvFindCornerSubPix用于发现亚像素精度的角点位置cvCalcOpticalFlowLK Cvinvoke.cvCalcOpticalFlowLK实现非金字塔的Lucas-Kanade稠密光流算法cvMeanShift Cvinvoke.cvMeanShift mean-shift跟踪算法cvCamShift Cvinvoke.cvCamShift camshift跟踪算法cvCreateKalman Cvinvoke.cvCreateKalman创建Kalman滤波器cvCreateConDensation Cvinvoke.cvCreateConDensation创建condensation滤波器cvConvertPointsHomogenious Cvinvoke.cvConvertPointsHomogenious对齐次坐标进行转换cvFindChessboardCorners Cvinvoke.cvFindChessboardCorners定位棋盘角点cvFindHomography Cvinvoke.cvFindHomography计算单应性矩阵cvRodrigues2Cvinvoke.cvRodrigues2罗德里格斯变换cvFitLine Cvinvoke.cvFitLine直线拟合算法cvCalcCovarMatrix:Cvinvoke.cvCalcCovarMatrix:计算协方差矩阵cvInvert Cvinvoke.cvInvert计算协方差矩阵的逆矩阵cvMahalanobis Cvinvoke.cvMahalanobis计算Mahalanobis距离cvKMeans2Cvinvoke.cvKMeans2K均值cvCloneMat Cvinvoke.cvCloneMat根据一个已有的矩阵创建一个新矩阵cvPreCornerDetect Cvinvoke.cvPreCornerDetect计算用于角点检测的特征图cvGetImage Cvinvoke.cvGetImage CvMat图像数据格式转换成IplImage图像数据格式cvMatMul Cvinvoke.cvMatMul两矩阵相乘。
emgucv mat 相减 负值

emgucv mat 相减负值Emgu.CV是基于OpenCV的一个跨平台的计算机视觉库,使用C#语言进行开发。
在Emgu.CV中,Mat是一种多维矩阵对象,可以用来表示图像和其他多维数据。
在这里,我将向您介绍如何在Emgu.CV中进行Mat相减,并且解释当相减结果为负值时的情况。
Mat相减操作是指对两个Mat对象中对应元素进行减法运算,生成一个新的Mat对象。
在Emgu.CV中,Mat对象的元素类型可以是整数、浮点数或双精度浮点数。
当两个Mat对象的元素类型不同时,进行运算时会根据类型自动进行类型转换。
对于Mat相减操作,首先需要创建两个Mat对象,分别表示被减数和减数。
然后,使用Emgu.CV中的Subtract方法对这两个Mat对象进行相减操作。
最后,将结果保存在一个新的Mat对象中,即可得到相减的结果。
在进行Mat相减时,需要注意以下几点:1.尺寸相同:被减数和减数的Mat对象必须具有相同的尺寸,即行数和列数必须相等。
如果两个Mat对象的尺寸不相同,将无法进行相减操作。
2.元素类型相同:被减数和减数的Mat对象的元素类型必须相同。
如果两个Mat对象的元素类型不相同,将会进行类型转换,并根据转换规则进行相减操作。
接下来,让我们来考虑两个Mat相减结果为负值的情况。
在Emgu.CV中,Mat对象的元素类型可以是有符号整数、无符号整数或浮点数类型。
当Mat对象的元素类型为无符号整数类型时,当相减的结果为负值时,会发生什么呢?这是因为无符号整数类型的取值范围是从0到MaxValue,即不包含负值。
当两个无符号整数相减的结果为负值时,位于取值范围外,会发生数值溢出。
在Emgu.CV中,默认情况下,数值溢出会被截断到取值范围内的最大值。
因此,Mat相减的结果中的负值会被截断为0。
为了更好地理解这个现象,我们可以通过一个例子来进行说明。
假设我们有两个Mat对象A和B,它们的元素类型都是无符号整数。
如果我们将B的所有元素都设置为比A的对应元素大的值,那么A和B 相减的结果就会出现负值。
emgucv例子
emgucv例子
Emgu CV(也称为Emgu Computer Vision)是一个基于OpenCV
库的跨平台计算机视觉库,它提供了用于图像处理、对象检测、人
脸识别、视频分析等功能的丰富工具和类库。
下面我将从多个角度
来介绍Emgu CV的例子。
首先,Emgu CV提供了丰富的图像处理功能,包括图像滤波、
边缘检测、图像变换等。
例如,你可以使用Emgu CV来实现图像的
模糊处理、边缘检测以及图像的缩放和旋转等操作。
这些功能可以
帮助你处理图像数据,提取特征并进行后续的分析和识别。
其次,Emgu CV还支持对象检测和识别。
你可以利用Emgu CV
提供的算法和工具来实现目标检测、物体跟踪以及形状识别等功能。
例如,你可以使用Emgu CV来开发一个人脸识别系统,检测视频中
的人脸并进行识别和跟踪。
此外,Emgu CV还提供了丰富的视频处理功能。
你可以利用Emgu CV来实现视频的读取、处理和分析,包括视频流的捕获、帧
处理、运动检测等。
这些功能可以帮助你开发视频监控系统、视频
分析系统以及视频内容识别等应用。
总之,Emgu CV提供了丰富的计算机视觉功能和工具,可以帮助开发者快速实现图像处理、对象检测、人脸识别、视频分析等功能。
通过使用Emgu CV,开发者可以更加高效地开发和部署计算机视觉应用,实现图像和视频数据的分析和识别。
希望这些例子可以帮助你更好地了解Emgu CV的功能和应用。
emgu分水岭算法计数
emgu分水岭算法计数摘要:一、分水岭算法简介1.分水岭算法的概念2.分水岭算法的应用场景二、emgu分水岭算法实现1.emgu库简介2.emgu分水岭算法原理3.emgu分水岭算法步骤三、emgu分水岭算法计数1.计数原理2.计数方法3.计数结果分析四、案例演示1.图像处理实例2.结果分析正文:【一、分水岭算法简介】分水岭算法(Watershed algorithm)是一种图像处理领域中的边缘检测和分割技术。
它的基本思想是寻找图像中像素之间的极值点,将这些极值点作为分水岭,将图像划分为不同的区域。
这种算法具有较好的适应性和稳定性,可以有效处理复杂场景下的图像分割问题。
【二、emgu分水岭算法实现】emgu(Emgu CV)是一个基于OpenCV的.NET库,提供了丰富的图像处理功能。
emgu分水岭算法实现了分水岭原理,并对算法进行了优化。
以下是emgu分水岭算法的基本步骤:1.对输入图像进行预处理,如滤波、去噪等。
2.计算图像的梯度幅值和方向。
3.寻找梯度幅值的最大值点和最小值点。
4.将最大值点和最小值点连接成边缘。
5.对边缘进行填充,得到分割后的图像。
【三、emgu分水岭算法计数】emgu分水岭算法计数是对分割后的图像中边缘像素进行统计的过程。
计数原理是根据边缘像素的颜色、纹理等特征,将其分为不同的类别。
以下是一种简单的计数方法:1.预处理:对分割后的图像进行去噪、平滑等操作,以消除边缘附近的噪声。
2.特征提取:从处理后的图像中提取边缘像素的特征,如颜色、纹理等。
3.分类:根据特征将边缘像素分为不同的类别。
可以使用机器学习方法(如SVM、神经网络等)进行分类。
4.计数:统计各个类别边缘像素的数量,得到最终的结果。
【四、案例演示】以下是一个使用emgu分水岭算法进行图像处理的实例:1.输入图像:一幅包含建筑物、道路、树木等元素的复杂场景图像。
2.使用emgu分水岭算法进行分割。
3.观察分割结果:可以发现,建筑物、道路和树木等元素得到了较好的分割。
EmguCV常用函数总结

EmguCV常⽤函数总结1 Emgucv常⽤函数总结:2读取图⽚3 Mat SCr = new Mat(Form1.Path, Emgu.CV.CvEnum.LoadImageType.AnyColor);4//根据路径创建指定的灰度图⽚5 Mat scr = new Mat(Form1.Path, Emgu.CV.CvEnum.LoadImageType.Grayscale);6获取灰度//图像类型转换, bgr 转成 gray 类型。
MAT Bw = New MAT7 CvInvoke.CvtColor(SCr, bw, Emgu.CV.CvEnum.ColorConversion.Bgr2Gray);8//相当于⼆值化图 --⿊⽩根据⼤⼩10判断为0还是2559 CvInvoke.Threshold(bw,bw,10,255,Emgu.CV.CvEnum.ThresholdType.BinaryInv);10//获取指定区域图⽚ SCr为mat类型11 Rectangle rectangle = new Rectangle(10,10,10,10);12 SCr = SCr.ToImage<Bgr, byte>().GetSubRect(rectangle).Mat;13//将Mat类型转换为Image类型14 Image<Bgr, byte> Su = SCr.ToImage<Bgr, byte>();15 Image<Bgr, byte> Img = new Image<Bgr, byte>(new Bitmap(""));//路径声明16 Image<Bgr, byte> Sub = SCr.ToImage<Bgr, byte>().GetSubRect(rectangle);//指定范围17//指定参数获得结构元素18 Mat Struct_element = CvInvoke.GetStructuringElement(Emgu.CV.CvEnum.ElementShape.Cross, new Size(3, 3), new Point(-1, -1));19//膨胀20 CvInvoke.Dilate(bw, bw, Struct_element, new Point(1,1),3,Emgu.CV.CvEnum.BorderType.Default, new MCvScalar(0, 0, 0));21//腐蚀当Struct_element模型创建不合理或者膨胀腐蚀次数较⼤时可能图像会发⽣偏移22 CvInvoke.Erode(bw, bw, Struct_element, new Point(-1, -1), 3,Emgu.CV.CvEnum.BorderType.Default, new MCvScalar(0, 0, 0));23//轮廓提取24 VectorOfVectorOfPoint contours = new VectorOfVectorOfPoint();25//筛选后26 CvInvoke.FindContours(bw, contours, null, Emgu.CV.CvEnum.RetrType.List, Emgu.CV.CvEnum.ChainApproxMethod.ChainApproxSimple);27int ksize = contours.Size;//获取连通区域的个数。
- 1、下载文档前请自行甄别文档内容的完整性,平台不提供额外的编辑、内容补充、找答案等附加服务。
- 2、"仅部分预览"的文档,不可在线预览部分如存在完整性等问题,可反馈申请退款(可完整预览的文档不适用该条件!)。
- 3、如文档侵犯您的权益,请联系客服反馈,我们会尽快为您处理(人工客服工作时间:9:00-18:30)。
EMGU CV TutorialAgenda•Part I : Overview of Emgu CV•Part II: Setup the required tools•Part III: Run the Samples•Part IV: Show image from a camera stream or video•Part V: Optional Convert the previous Open CV tutorial to Emgu CV.Part IDescriptionEmgu CV is a cross platform .Net wrapper to the OpenCV image processing library. Allowing OpenCV functions to be called from .NET compatible languages such as C#, VB, VC++, IronPython etc. The wrapper can be compiled in Mono and run on Windows, Linux, Mac OS X, iPhone, iPad and Android devices.Overview of Emgu CV Versions:Advantage of Emgu CVCross PlatformEmgu CV is written entirely in C#. The benefit is that it can be compiled in Mono and therefore is able to run on any platform Mono supports, including Linux, Mac OS X, iOS and Android.Cross Language and comes with example codeEmgu CV can be used from several different languages, including C#, , C++ and IronPython.Other Advantages•Image class with Generic Color and Depth•Automatic garbage collection•XML Serializable Image•XML Documentation and intellisense support•The choice to either use the Image class or direct invoke functions from OpenCVAlthough it is possible to create image by calling CvInvoke.cvCreateImage, it is suggested to constructa Image<TColor, TDepth> object instead. There are several advantages using the managedImage<TColor, TDepth> classMemory is automatically released by the garbage collectorImage<TColor, TDepth> class can be examined by Debugger VisualizerImage<TColor, TDepth> class contains advanced method that is not available on OpenCV, for example, generic operation on image pixels, conversion to Bitmap etc.•Generic operations on image pixelsArchitecture OverviewEmgu CV has two layers of wrapper as shown below•The basic layer (layer 1) contains function, structure and enumeration mappings which directly reflect those in OpenCV.•The second layer (layer 2) contains classes that mix in advantanges from the .NET world.Wrapping OpenCVFunction Mapping - Emgu.CV.CvInvokeThe CvInvoke class provides a way to directly invoke OpenCV function within .NET languages. Each method in this class corresponds to a function in OpenCV of the same name. For example, a call toIntPtr image = CvInvoke.cvCreateImage(new System.Drawing.Size(400, 300),CvEnum.IPL_DEPTH.IPL_DEPTH_8U, 1);is equivalent to the following function call in CIplImage* image = cvCreateImage(cvSize(400, 300), IPL_DEPTH_8U, 1);Both of which create a 400x300 of 8-bit unsigned grayscale image.Structure Mapping - Emgu.CV.Structure.M xxxThis type of structure is a direct mapping to OpenCV structures.Emgu CV Structure OpenCV structureEmgu.CV.Structure.MIplImage IplImageEmgu.CV.Structure.MCvMat CvMat... ...Emgu.CV.Structure.M xxxx xxxxThe prefix M here stands for Managed structure.Emgu CV also borrows some existing structures in .Net to represent structures in OpenCV: .Net Structure OpenCV structureSystem.Drawing.Point CvPointSystem.Drawing.PointF CvPoint2D32fSystem.Drawing.Size CvSizeSystem.Drawing.Rectangle CvRectEnumeration Mapping - Emgu.CV.CvEnumThe CvEnum namespace provides direct mapping to OpenCV enumerations. For example,CvEnum.IPL_DEPTH.IPL_DEPTH_8U has the same value as IPL_DEPTH_8U in OpenCV; both of which equals 8. Depth and Color as Generic ParameterAn Image is defined by its generic parameters: color and depth. To create a 8bit unsigned Grayscale image, in Emgu CV it is done by callingImage<Gray, Byte> image = new Image<Gray, Byte>( width, height);Not only this syntax make you aware the color and the depth of the image, it also restrict the way you use functions and capture errors in compile time. For example, the SetValue(TColor color, Image<Gray, Byte> mask) function in Image<TColor, TDepth> class (version >= 1.2.2.0) will only accept colors of the same type, and mask has to be an 8-bit unsigned grayscale image. Any attempts to use a 16-bit floating point ornon-grayscale image as a mask will results a compile time error!Creating ImageAlthough it is possible to create image by calling CvInvoke.cvCreateImage, it is suggested to construct a Image<TColor, TDepth> object instead. There are several advantages using the managed Image<TColor, TDepth> class•Memory is automatically released by the garbage collector•Image<TColor, TDepth> class can be examined by Debugger Visualizer•Image<TColor, TDepth> class contains advanced method that is not available on OpenCV, for example, generic operation on image pixels, conversion to Bitmap etc.Image ColorThe first generic parameter of the Image class specific the color of the image type. For exampleImage<Gray, ...> img1;indicates that img1 is a single channel grayscale image.Color Types supported include:•Gray•Bgr (Blue Green Red)•Bgra (Blue Green Red Alpha)•Hsv (Hue Saturation Value)•Hls (Hue Lightness Saturation)•Lab (CIE L*a*b*)•Luv (CIE L*u*v*)•Xyz (CIE XYZ.Rec 709 with D65 white point)•Ycc (YCrCb JPEG)Image DepthImage Depth is specified using the second generic parameter Depth. The types of depth supported in Emgu CV 1.4.0.0 include•Byte•SByte•Single (float)•Double•UInt16•Int16•Int32 (int)Creating a new imageTo create an 480x320 image of Bgr color and 8-bit unsigned depth. The code in C# would beImage<Bgr, Byte> img1 = new Image<Bgr, Byte>(480, 320);If you wants to specify the background value of the image, let's say in Blue. The code in C# would beImage<Bgr, Byte> img1 = new Image<Bgr, Byte>(480, 320, new Bgr(255, 0, 0));Reading image from fileCreating image from file is also simple. If the image file is "MyImage.jpg", in C# it isImage<Bgr, Byte> img1 = new Image<Bgr, Byte>("MyImage.jpg");Creating image from BitmapIt is also possible to create an Image<TColor, TDepth> from a .Net Bitmap object. The code in C# would beImage<Bgr, Byte> img = new Image<Bgr, Byte>(bmp); //where bmp is a BitmapAutomatic Garbage CollectionThe Image<TColor, TDepth> class automatically take care of the memory management and garbage collection.Once the garbage collector decided that there is no more reference to the Image<TColor, TDepth> object, it will call the Disposed method, which release the unmanaged IplImage structure.The time of when garbage collector decides to dispose the image is not guaranteed. When working with large image, it is recommend to call the Dispose() method to explicitly release the object. Alternatively, use the using keyword in C# to limit the scope of the imageusing (Image<Gray, Single> image = new Image<Gray, Single>(1000, 800)){... //do something here in the image} //The image will be disposed here and memory freedGetting or Setting PixelsThe safe (slow) way•Suppose you are working on an Image<Bgr, Byte>. You can obtain the pixel on the y-th row and x-th column by callingBgr color = img[y, x];•Setting the pixel on the y-th row and x-th column is also simpleimg[y,x] = color;The fast way•The Image pixels values are stored in the Data property, a 3D array. Use this property if you need to iterate through the pixel values of the image.MethodsNaming Convention•Method XYZ in Image<TColor, TDepth> class corresponds to the OpenCV function cvXYZ. For example, Image<TColor, TDepth>.Not() function corresponds to cvNot function with the resulting image being returned.•Method _XYZ is usually the same as Method XYZ except that the operation is performed inplace rather than returning a value. For example, Image<TColor, TDepth>._Not() function performs the bit-wise inversion inplace.Operators OverloadThe operators + - * / has been overloaded (version > 1.2.2.0) such that it is perfectly legal to write codes like: Image<Gray, Byte> image3 = (image1 + image2 - 2.0) * 0.5;Generic OperationOne of the advantage of using Emgu CV is the ability to perform generic operations.It's best if I demonstrate this with an example. Suppose we have an grayscale image of bytesImage<Gray, Byte> img1 = new Image<Gray, Byte>(400, 300, new Gray(30));To invert all the pixels in this image we can call the Not functionImage<Gray, Byte> img2 = img1.Not();As an alternative, we can also use the generic method Convert available from the Image<TColor, TDepth> classImage<Gray, Byte> img3 = img1.Convert<Byte>( delegate(Byte b) { return (Byte) (255-b); } );The resulting image img2 and img3 contains the same value for each pixel.At first glance it wouldn't seems to be a big gain when using generic operations. In fact, since OpenCV already has an implementation of the Not function and performance-wise it is better than the generic version of the equivalent Convert function call. However, there comes to cases when generic functions provide the flexibility with only minor performance penalty.Let's say you have an Image<Gray, Byte> img1 with pixels set. You wants to create a single channel floating point image of the same size, where each pixel of the new image, correspond to the old image, described with the following delegatedelegate(Byte b) { return (Single) Math.cos( b * b / 255.0); }This operation can be completed as follows in Emgu CVImage<Gray, Single> img4 = img1.Convert<Single>( delegate(Byte b) { return (Single) Math.cos( b * b / 255.0); } );The syntax is simple and meaningful. On the other hand, this operation in OpenCV is hard to perform since equivalent function such as Math.cos is not available.Drawing Objects on ImageThe Draw( ) method in Image< Color, Depth> can be used to draw different types of objects, including fonts, lines, circles, rectangles, boxes, ellipses as well as contours. Use the documentation and intellisense as a guideline to discover the many functionality of the Draw function.Color and Depth ConversionConverting an Image<TColor, TDepth> between different colors and depths are simple. For example, if you have Image<Bgr, Byte> img1 and you wants to convert it to a grayscale image of Single, all you need to do is Image<Gray, Single> img2 = img1.Convert<Gray, Single>();Displaying ImageUsing ImageBoxEmgu CV recommends the use of ImageBox control for display purpose, for the following reasons •ImageBox is a high performance control for displaying image. Whenever possible, it displays a Bitmap that shares memory with the Image object, therefore no memory copy is needed (very fast).•The user will be able to examine the image pixel values, video frame rates, color types when the image is being displayed.•It is convenient to perform simple image operations with just a few mouse clicks.Converting to BitmapThe Image class has a ToBitmap() function that return a Bitmap object, which can easily be displayed on a PictureBox control using Windows Form.XML SerializationWhy do I care?One of the future of Emgu CV is that Image<TColor, TDepth> can be XML serializated. You might ask why we need to serialization an Image. The answer is simple, we wants to use it in a web service!Since the Image<TColor, TDepth> class implements ISerializable, when you work in WCF (Windows Communication Fundation), you are free to use Image<TColor, TDepth> type as parameters or return value of a web service.This will be ideal, for example, if you are building a cluster of computers to recognize different groups of object and have a central computer to coordinate the tasks. I will also be useful if your wants to implement remote monitoring software that constantly query image from a remote server, which use the Capture class in Emgu CV to capture images from camera.Conversion to XMLYou can use the following code to convert an Image<Bgr, Byte> image to XmlDocument:StringBuilder sb = new StringBuilder();(new XmlSerializer(typeof(Image<Bgr, Byte>))).Serialize(new StringWriter(sb), o); XmlDocument xDoc = new XmlDocument();xDoc.LoadXml(sb.ToString());Conversion from XMLYou can use the following code to convert a XmlDocument xDoc to Image<Bgr,Byte>Image<Bgr, Byte> image = (Image<Bgr, Byte>)(new XmlSerializer(typeof(Image<Bgr, Byte>))).Deserialize(new XmlNodeReader(xDoc));Part II1/You need Vstudio 2008 or later, the express edition can be downloaded from here: /visualstudio/eng/products/visual-studio-express-products2/You need the latest version of Emgu CV from this link for Win X86/32bit version/projects/emgucv/files/latest/downloadNOTE: otherwise select the appropriate version from here:/projects/emgucv/files/emgucv/2.4.2/The defaults are fine so you can use them for the complete installation.Part IIIGo to the VS2010 folder in Emgu, path is as follows:C:\Emgu\emgucv-windows-x86-gpu 2.4.2.1777\Solution\VS2010and open Emgu.CV.Example.slnFor that, Right-click the Solution 'Emgu.CV.Example' in the solution explorer and select Build solution. Then once it is built, click the debug button (green play button), now you should see a window with “hello world” pop up as shown below:Congratulations! You just successfully configured your first EmguCV project!After this is done, all the other EmguCV Examples are ready to be built and be debugged. You can experiment with them and use them as a model for similar tasks.Part IVSTEP-1: open visual Studio 2010 and select File-> New->Project as follows:STEP-2: in the Visual C# Project menu, Select "Windows Forms Application" and name the project "CameraCapture" as in figure below, and Click "OK"STEP-3: Lets first add Emgu References to our project.(though you can add them at any time later BUT you must add references before debugging.)For this, just follow right-click project's "References" in Solution explorer, and select "Add Reference". thebelow fig shows so:.dll files(Emgu.CV.dll, Emgu.CV.UI.dll and Emgu.Util.dll) click OK to continue.STEP-5: Rename Form1.cs to CameraCapture.cs and change its Text Field to "Camera Output"STEP-6:Add EmguCv Tools to your Visual Studio, because we will be using those tools, such as ImageBox, check Tip#4 at the end for the details or the link from the reference guide.STEP-7: The next step is pretty simple, once you've added EmguCv tools to the Toolbox, as in fig below, just re-size the form and follow the instruction in this fig to add an EmguCv ImageBox to the form we created.Note:You could use the already present PictureBox tool in Visual Studio instead of Emgu's ImageBox, but1. it will be used a bit differently in coding than how its shown in this tutorial.2. The purpose of using ImageBox here is to familiarize you with another aspect of EmguCv: i.e to use itsown tools. They have more capabilities somewhat.STEP-8: Add a button to the form and please do some more required "housekeeping" as below: ImageBox Properties:(Name) : CamImageBoxBorderStyle: FixedsingleButton properties:(Name) : btnStartText: Start!STEP-9: DEBUG & SAVE PROJECTOkie dokie, so for now our User Interface is ready, all that's left is coding but before we code, lets Debug our project, it will automatically Save the project as well. We need to do that now. So let’s see if our formis fit for run. The form should look something like belowSTEP-10: to begin coding, view code behind CameraCapture.cs as in fig shown belowSTEP-11: THE CODEif unaltered and debugged, the code will only work if you've made the application like I did and more importantly if you kept the Components' Design Names EXACTLY the same as I did. Otherwise please modify it according to your component names1.Welcome to your code view :) first things first, we had especially added the Emgu CVreferences, remember? Now in order to use them, add the following directives to the existingones:using Emgu.CV;using Emgu.CV.Structure;using Emgu.Util;2.Now inside the class, declare the following global variables just above the publicCameraCapture() initializer//declaring global variablesprivate Capture capture; //takes images from camera as image framesprivate bool captureInProgress; // checks if capture is executing3. Add a user defined function to your code and name it Process Frame() as shown below. In this function we'll create an EmguCv type image called ImageFrame. then capture a frame from camera and save it in "ImageFrame"(line 1). And then we'll load this into CamImageBox to show it to the user(line 2)private void ProcessFrame(object sender, EventArgs arg){Image<Bgr, Byte> ImageFrame = capture.QueryFrame();CamImageBox.Image = ImageFrame;}4. Now it’s time to add code behind the Start button. Go to Design View of CameraCapture.cs and double click the Start button you had added. it will take you back to the code view with an empty function of button click event as follows:private void btnStart_Click(object sender, EventArgs e){}What we want is that when the Start! button is pressed then camera should start working and the image stream should be visible in our ImageBox. if the stream is on, then the start button should display "Pause". and pressing it now should pause the stream and vice versa. right?for that, we should create a new capture event if one isn't already created, i.e at startup it will create a capture event from which we will get frames from camera.In case the capture was already created (i.e once the application had begun) then now it will do either of the following based on value of captureInProgress:when captureInProgress = truethen Pause the capture when btnStart is pressed. this is done by the code :Application.Idle -= ProcessFrame; //ProcessFrame() will be called here to hold its jobwhen captureInProgress = falsethen Start the capture when btnStart is pressed. this is done by the code :Application.Idle += ProcessFrame; //ProcessFrame() will be called here to resume its jobNOTE: this is why we had declared a bool type variable called captureInProgress, now do you get its use? Therefore,into the btnStart_Click() function, add the following code:#region if capture is not created, create it nowif (capture == null){try{capture = new Capture();}catch (NullReferenceException excpt){MessageBox.Show(excpt.Message);}}#endregionif (capture != null){if (captureInProgress){ //if camera is getting frames then stop the capture and set button Text// "Start" for resuming capturebtnStart.Text = "Start!"; //Application.Idle -= ProcessFrame;}else{//if camera is NOT getting frames then start the capture and set button// Text to "Stop" for pausing capturebtnStart.Text = "Stop";Application.Idle += ProcessFrame;}captureInProgress = !captureInProgress;}5. Last but not the least, add the following function to your code. which takes care of closing the application in a safe way.private void ReleaseData(){if (capture != null)capture.Dispose();}Now our Camera Capture Windows Form Application is all ready! what are waiting for? go on DEBUG it! :)STEP 12- HANDLE ERROR------------------------------------------------------------------------------------------------------------------------------------------Emgu.CV.CvIvoke threw an exception!!!??you tried to debug, but you got this BUGGING error? if you're making the application following our tutorial, please ignore this note below and continue reading this post...-----------------------------------------------------------------------------------------------------------------------------------------IMPORTANT NOTE: FOR THOSE WHO HAVE NOT READ THE TUTORIAL FROM START OR ARE NOT MAKING THIS APPLICATION,please read the Other post to solve your 'Emgu.CV.Invoke' error.------------------------------------------------------------------------------------------------------------------------------------------This error is telling you that your application just CAN'T connect to your Webcam!DO SOME CHECKS:-------------------------------------------------------------------------------------------------------------------------------------Don't worry, here are some checks for you to do:1.is the Emgu Cv's own example of Camera Capturing working perfectly?you can find it at following path (if you installed the Emgu CV as we did)C:\Emgu\emgucv-windows-x86 2.2.1.1150\Emgu.CV.Example\CameraCapturego there and open CameraCapture.csproj file. it will open the solution for you. debug this solution and see if the application works or not.if its showing you stream from your webcam then congratulations, at least your camera's working and rest assured that our application that we've just made is also perfectly as fit and fine because it is based on this EmguCV example itself.2.did you follow every instruction carefully & correctly?if yes, then there should be no errors in the project's Error List at the time you build and debug project. right?if there are errors then you just made a mistake somewhere most probably. resolve that issue.SOLUTION:------------------------------------------------------------------------------------------------------------------------------------------You might've tried various sites to find the solution to this problem. we did and trust me we couldn't find anything that worked!they just talked about adding managed and unmanged code and dlls and what not.well they weren't wrong! all they missed was the fact that WHICH dlls they were talking about and exactly where n how to put them!so here's what we present:Step 1: Add the Managed code to the folder where your .exe file is:Do you remember adding the Emgu References? those 3 Emgu.CV dll files? that's it! they're the managed code you MUST add to your project. that's why i made you do that in the very first place! See your Debug folder(or Release folder if you have one) the Emgu.Cv dlls will be present like in the Camera Capture's Debug(second image below).Step 2: Add the Unmanaged code to the folder where your .exe file is:THIS IS THE SOLUTION TO YOUR PROBLEM DEAR FRIENDS!there are some opencv_xxx220.dlls in the bin folder of EmguCV directory.other than managed dlls we talked about, these are also NECESSARY to be present with your .exe file so that application works perfectly!see the image below? that's where you can get them.which ones to add to you project? well for Camera application these 2 as marked above are required: opencv_core220.dll and opencv_highgui220.dll.Now paste it in your project's folder where your .exe file will execute, i.e the DEBUG folder, as shown below just paste the dlls you copiedReferences/wiki/index.php/Main_Page/wiki/index.php/Download_And_Installation#Getting_the_Dependency /tutorials/wiki/index.php/Add_ImageBox_ControlTips for possible issues1/When running the examples after the install of EMGU it complains about a missing nvcuda.dll this is a workaround the issue:Download nvcuda.zip from this link:/dllindex/dll-files.shtml?nvcudaExtract nvcuda.dll from nvcuda.zip. We recommend that you extract nvcuda.dll to the installation directory of the program that is requesting nvcuda.dll.If that doesn't work, you will have to extract nvcuda.dll to your system directory. By default, this is:•C:\Windows\System (Windows 95/98/Me)•C:\WINNT\System32 (Windows NT/2000)•C:\Windows\System32 (Windows XP, Vista, 7)If you use a 64-bit version of Windows, you should also place nvcuda.dll in C:\Windows\SysWOW64\Make sure overwrite any existing files (but make a backup copy of the original file).Reboot your computer.If the problem still occurs, try the following:1. Open Windows Start menu and select "Run...".2. Type CMD and press Enter (or if you use Windows ME, type COMMAND)).3. Type regsvr32 nvcuda.dll and press Enter.2/Emgu CV use WCF(Windows Communication Foundation) therefore requires .Net 3.0, although .net 4.0 worked better for me for some examples project, so I would recommend it, available from the Microsoft site:/en-us/download/details.aspx?displaylang=en&id=17851you can change the .net target platform by right clicking on the project in your solution explorer then select properties than on the Application tab select the appropriate target platform from the drop down list as shown below.3/ If you downloaded a 32bit Emgu CV install on a 64bit OS you can still run it but make sure you change the platform target to x86 by right clicking on the project in your solution explorer then select properties than on the Build tab select x86 as shown below:4/Add ImageBox ControlAdding ImageBox Control in Visual Studio (Windows Form)/wiki/index.php/Add_ImageBox_Control•Open your form in designer view. From Toolbox, right click in the empty space of 'General' column. This should pop up a selection menu, where 'Choose Items' selection is available, see below.•Click on 'Choose Items', you will see a 'Choose Toolbox Item' Dialog, from where click the 'Browse..' button on the lower right corner of the dialog.•Select 'Emgu.CV.UI.dll' file from 'Open' dialog, click the 'Open' button.•Now you should notice the ImageBox control has been added to the 'Choose Toolbox Items' dialog. Click 'Ok'.The ImageBox will be available from the 'General' column in the Toolbox area. Pull the control and drag it to the desired area on your form.。