UBERT 烤鸡炉
烤鸡炉的使用操作流程

烤鸡炉的使用操作流程准备工作•清洗烤鸡炉内外部分。
使用温和的清洁剂和湿布清洁外部,以及用刷子和烤炉清洁剂清洁内部。
•确保烤鸡炉处于平稳的地方,避免晃动或不稳定的情况。
•切断烤鸡炉的电源,并检查电源线是否损坏。
•准备燃料,如木炭、木柴或燃气罐等。
步骤步骤一:燃料储存1.检查燃料储存器具是否完整,没有破损或泄漏的情况。
2.将燃料加入燃料储存器具中,根据需要来决定加入的燃料量。
步骤二:点火准备1.打开炉门,检查炉内的风道和通风孔口是否畅通。
2.在炉底放置点火介质,如点火木柴、纸张或点火剂。
3.在点火介质上方放置燃料,确保有足够的通风空间。
4.关闭炉门。
步骤三:点火1.使用火柴、打火机或电子点火器等点燃点火媒介,点燃燃料中的点火媒介。
2.火苗点燃后,注意观察炉内的火苗情况,确保火苗均匀且稳定。
3.确保炉门关闭,以保持炉内温度。
步骤四:预热炉体1.打开通风孔口,以确保炉内有足够的氧气供应。
2.调整燃烧的控制器或旋钮来控制炉体的温度。
3.根据食材的要求和烹饪时间,将炉体预热至适当的温度。
步骤五:烹饪食材1.打开炉门,将食材放置在烤鸡炉的烹饪架上,确保食材均匀散开。
2.关闭炉门,观察烹饪时间和温度。
3.根据需要,翻转食材,以确保均匀烹饪。
步骤六:烹饪完成1.在烹饪结束前的一段时间,检查食材的熟度。
2.关闭燃料供应,以停止炉体的加热。
3.使用耐热手套或工具,取出食材或烤饼架。
清洁和维护•在每次使用后,等待烤鸡炉冷却后进行清洁。
•使用专用的烤炉清洁剂和刷子清洁炉体和炉架。
•定期检查烤鸡炉的燃烧控制器和其他配件是否正常工作,如有问题及时维修或更换。
•定期检查燃料储存器具是否完好,如有破损或泄漏即刻更换。
安全注意事项•在操作烤鸡炉前,确保自己了解烤鸡炉的使用说明书和安全警示。
•注意燃烧控制器的调节,避免炉内温度过高或过低。
•使用烤鸡炉时,请勿在炉体附近放置易燃物品。
确保周围环境安全。
•使用时请勿将手伸入炉内,以免烫伤。
燃气烤炉欧美标准差异
燃气烤炉欧美标准的主要差异前言自从加入世界贸易组织之后,中国与世界联系日益密切,中国有越来越多的燃气具出口到世界各地。
如何能够生产出合格的产品,获得欧洲的CE 认证及北美的CSA或UL认证,成为每个企业必须解决的问题。
如何解决这些问题,笔者认为,首先,必须对每种产品相关各国的标准有所了解,才能够按照标准的要求,生产出符合标准要求的产品,顺利的将自己的产品出口到国外。
在这些出口到国外的产品中,出口数量最大,应用最广泛的,当属燃气烤炉,即大家都熟悉的BBQ。
燃气烤炉在国外已经是非常普及的户外燃具,但是去往欧洲和北美的标准却存在较大的差异。
由于标准的差异,相同的产品,可以通过北美标准的要求,却未必能够通过欧洲标准的要求。
所以,对相应的标准的差异有足够的了解,至关重要,本文将就这些差异做出说明。
希望能够对相关厂商提供一些帮助。
另外,燃气烤炉在国内也逐渐被大家所认知,相关标准也在制定当中,希望能够对编者有所参考。
本文主要以欧洲标准EN498:1998《专用液化石油气的燃具-户外用烤炉》及北美标准ANSI Z21.58a:2008《户外用燃气烤炉》为依据,对标准主要差异以及标准对燃具的不同要求进行说明。
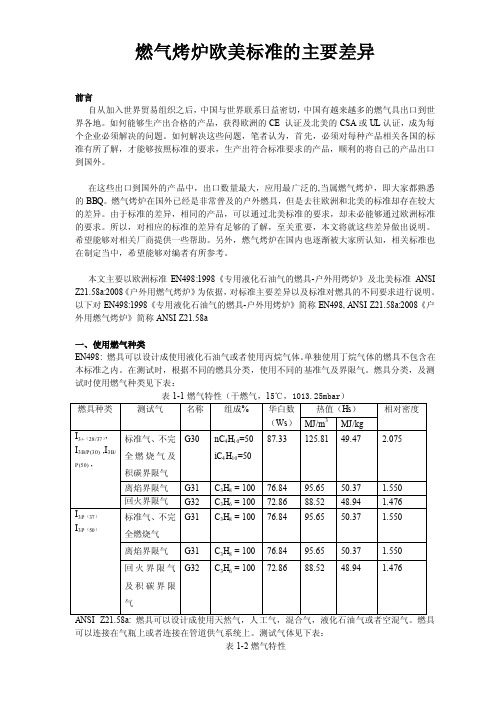
以下对EN498:1998《专用液化石油气的燃具-户外用烤炉》简称EN498, ANSI Z21.58a:2008《户外用燃气烤炉》简称ANSI Z21.58a一、使用燃气种类EN498: 燃具可以设计成使用液化石油气或者使用丙烷气体。
单独使用丁烷气体的燃具不包含在本标准之内。
在测试时,根据不同的燃具分类,使用不同的基准气及界限气。
燃具分类,及测试时使用燃气种类见下表:表1-1燃气特性(干燃气,15℃,1013.25mbar)可以连接在气瓶上或者连接在管道供气系统上。
测试气体见下表:表1-2燃气特性热值(Btu/ft3)(MJ/m3) 密度气体A(天然气)1075 40.1 0.65气体B(人工气)535 19.9 0.38气体C(混合气)800 29.8 0.50气体D(正丁烷)3200 119.2 2.00气体E(丙烷HD-5)2500 93.1 1.55气体F(丙烷混空气)700 26.1 1.16气体G(丁烷混空气)1400 52.2 1.42气体H(丙烷混客气)1400 52.2 1.30二、测试燃气压力EN498: 相对于不同的燃具使用压力,对应三种测试压力,见下表:表2-1测试压力对于钢瓶供气系统,调压器出口压力不超过11iwc(2.74Kpa)的燃具测试压力如下:表2-2测试压力(英寸水柱,千帕)表2-3测试压力三、气密性测试EN498: 在15Kpa 测试压力下,泄漏量不超过0.07L/h ,测量误差应不大于5ml/h 。
[烤鸡腿烧烤炉]烤鸡炉:烤鸡炉
![[烤鸡腿烧烤炉]烤鸡炉:烤鸡炉](https://img.taocdn.com/s3/m/679d4d2f366baf1ffc4ffe4733687e21af45ff38.png)
[烤鸡腿烧烤炉]烤鸡炉:烤鸡炉篇一: 烤鸡炉:烤鸡炉-烤鸡炉简介,烤鸡炉-性能与特点烤鸡炉上,再用二条液化石油气软管将三通二头出口分别连接到烤鸡炉左右进气口,并用接头夹件固定各软管接头,以防脱落。
3、把烤鸡炉内圆圈架按要求分别固定在转动圆管上。
4、接通电源,把左右开关设定到关位,扭开气瓶总阀门。
5、电子点火:用一只手按住二只手柄,用另一只手压进旋钮火开关左转90度,闻击发声响,电火花引燃点火管,确认燃烧器已燃烧,才可将手放开,否则无法点燃,火力大水在“开”、“关”旋转进行调节。
6、初次使用电子点火烤鸡炉,一次打火可能不能点燃,因接管内沿未充满燃气,可重复打火动作二至三次,便可点燃。
7、拨通电源开磁,拨通旋转开关,把鸡逐只挂入烤鸡炉内烘烤。
8、观察温度表读数,根据烘烤的需要调节供电量。
9、停止工作进,应闭点火开关和气源总阀,关关闭电源,确认炉火完全燃烧后,操作人员方可离开。
烤鸡炉_烤鸡炉-注意事项1、在使用碳烤鸡炉操作时勿将机器的链轮盒打开2、在使用碳烤鸡炉充电和操作时勿将电池正负极夹反,千万勿将电池的正负极短接,否则容易造成电池爆炸3、在生碳时要保持在通风顺畅的情况下,注意安全。
4、禁止未成年人操作5、请保持机器清洁卫生,勿将腐蚀性大的物品放入机器内部烤鸡炉_烤鸡炉-日常维护保养1、清洁烤炉时应切断电源,不能用水直接冲洗。
2、电源部分的保养必须由专业人员进行定期检查。
3、烤鸡炉内应保持清洁,每天用温湿布擦干净。
烤鸡炉_烤鸡炉-经营利润分析人们普遍选择吃鸡肉和鸭肉,而且鸡肉和鸭肉属于白肉,白肉鸡肉纤维细腻,脂肪含量较低,所以吃了也不会胖,同时白肉不饱和脂肪酸含量较高,它对人体预防脂肪异常和心脑血管病有重要的作用,所以吃鸡肉和鸭肉既能满足您吃肉的欲望,又是营养丰富,加上外观金黄透亮,口感又香又嫩,真正是大受欢迎。
在夜市,在菜场,在食堂,在酒店,都可以发现有烤鸡、烤鸭。
还没有看到就能闻到浓浓的香味。
吸引着你的口水直流,慢慢排队也要去购买。
室外烧烤产品 COS-330 垂直30英寸电烟熏炉组装和操作说明书

DaNGerFailure to follow these instructions could result in fire, explosion or burn hazard, which could cause property damage, per-Leave this Owner’s Manual with the consumer after delivery and/or installation.Leave this Owner’s Manual in a convenient place for future reference.table of contents1. Warnings and Safety Instructions 32. Exploded View 63. Assembly Instructions 74. Operating Your Smoker 105. Care And Maintenance 126. Storage 127. FAQ and Troubleshooting 128. Warranty and Replacement Parts 131. Warnings and Safety instructionsIf these instructions are ignored, there is a possibility of a hazardous fire or explosion which could result in physical injury or property damage! It is your responsibility to assemble, operate and maintain your gas smoker properly.READ ALL WARNINGS AND INSTRUCTIONS PRIOR TO ASSEMBLING AND OPERATING YOUR SMOKERWarNiNGS:m T his smoker is for outdoor use only. It should NOT be used in a building, garage or any other enclosed area.m T he use of alcohol, prescription or non-prescription drugs may impair an individual’s ability to properly assemble or safely operate this appliance.m D o not leave the smoker unattended.m K eep children and pets away from the smoker at all times.m D o not use the smoker in high wind.m D o not use charcoal or lighter fluid.m D o not use gasoline, kerosene or alcohol for lighting.m D o not move appliance when in use. Allow the smoker to cool to 115 F° (45 C°) before moving or storing. m D o not use the smoker unless it is COMPLETEL Y assembled and all parts are securely fastened and tightened. If there are any missing or damaged parts, contact customer service for a replacement. m D o not alter the smoker in any manner.m T his appliance is not intended to be installed in or on a boat or recreational vehicle.m L ocate the smoker away from any combustible or non-combustible materials or construction by at least 24 inches (61cm) from the back and sides.m T he appliance shall not be used under overhead unprotected combustible construction.m T his appliance is not intended for and should never be used as a heater.m T his appliance will be hot during and after use. Use insulated oven mitts or gloves for protection from hot surfaces or splatter from cooking liquids.m T his appliance is not intended for commercial use.m P ROPOSITION 65 WARNING: Handling the brass material on this product exposes you to lead,a chemical known to the state of California to cause cancer, birth defects or other reproductiveharm. (Wash hands after handling this product.)m T his smoker is to be used outdoors only. Do not operate this smoker indoors or in an enclosed area.m D o not use this smoker in the rain or on wet surfaces. Do not immerse cord, plug or electric element in water or other liquids. Keep this smoker and all electrical appliances away fromswimming pools, hot tubs, etc. Hazard of electrical shock if used on a wet surface, in the rain or if appliance has been exposed to moisture.m F or household use only. Do not use this product for other than its intended purpose.m T o prevent accidental electrical shock, this smoker should always be used on a GFCI (Ground Fault Circuit Interrupter) outlet or circuit, do not plug this appliance into an indoor circuit.m A lways use a 3-wire grounded outlet wired for 120 volts which is GFCI protected at 15 or 20 amps.If in doubt, contact a qualified electrician. Do not operate this smoker with any other appliance or electrical device on the same circuit.m A lways turn the unit “OFF” by unplugging cord from outlet on thermostat when adding water and wood or when finished cooking.m D o not use an extension cord unless absolutely necessary. If you must use one, the following care should be exercised:a. U se the shortest length possible. Use a 12/3 or 14/3 grounded-type extension cord with a ratingof at least 15 amps.b. T he cord should be marked with suffix letter “W-A” and with a tag stating “Suitable for Use withOutdoor Appliances”.c. K eep cord connection dry and off the ground. Appliance and/or extension cord should be placedin such a manner so it will not be tripped over, tugged on by children or pets. Do not allow cord to touch hot surfaces.m D o not operate this smoker if:a. The cord or plug is damaged.b. The electric element has been damaged in any manner.c. The smoker has malfunctioned.d. T he smoker has been exposed to moisture or if grease and drippings were not cleaned fromelement after each use. Refer to “Proper Care & Maintenance” section of this manual.e. There is any damage to the smoker.f. The GFCI circuit trips when the electric element is plugged into the electric outlet.m P roper clearance of 5 feet between the smoker and combustible construction should be maintained at all times when this product is in use.m I n windy weather, this product should be located in an outdoor area that is protected from the wind. m D o not leave smoker unattended when in use.m D o not place smoker on or near a gas or electric burner, or a heated oven.m D o not store or use smoker near gasoline or other flammable liquids, gases or where flammable vapors may be present.m U se smoker only on a hard, level, noncombustible, stable surface (concrete, ground, etc.). Never use smoker on wooden or other surfaces that could burn.m A drip pan/ash guard will not prevent fires from occurring on a wooden or other combustible surface. A drip pan/ash guard is designed for use with a smoker for easy clean up of drippings that can cause discoloration of surface and to catch falling ashes and embers.m S moker should be placed in an area where children and pets cannot come into contact with unit.Close supervision is necessary when this smoker is in use.m U se caution when reaching into or under smoker. Always wear oven mitts/gloves to protect your hands from burns. Avoid touching hot surfaces.m D o not wear loose clothing or allow hair to hang freely when operating smoker.m A lways wear shoes when operating smoker.m W hen in operation, smoker contains hot liquid in water pan. Extreme caution should be used at all times. Do not move smoker when water pan contains hot liquids. Tilting or other slight movement could cause hot liquid to spill from water pan causing serious bodily injury.m W hen opening door, keep hands, face and body safe from hot steam or possible flame flare-ups .Do not use water to extinguish flames.m U se extreme caution when adding liquid to water pan being careful not to spill any liquid onto electric element. Always unplug smoker before adding water. Follow instructions in Step 8 of “Smoking” section of this manual.m W ater pan should always be used when smoking. Do not allow liquid in water pan to completely evaporate. Check water pan every 2 hours and add water if level is low (a sizzling sound may indicate a need for water). Follow instructions in Step 8 of “Smoking” section of this manual.m U se caution when assembling or operating your smoker to avoid cuts or scrapes from sharp edges of metal parts.m N ever add charcoal, lighter fluid, fuel or material of any kind, other than flavoring wood to the wood chip pan.m U nplug the smoker from electric outlet when not in use. Allow smoker to cool completely before cleaning. Make sure embers are completely extinguished. Dispose of remaining embers and ashes in a noncombustible container. Do not allow ashes to build up in smoker.m D o not use the smoker if the electric element has been exposed to moisture. Do not clean electric element with a water spray or the like. Failure to adhere to this safety warning could result in the electric element shorting out and in some cases, exploding. Clean the electric element as instructed in the “Care and Maintenance” section of this manual.m S tore the smoker indoors in a dry location when not in use-out of the reach of children.m A ccessory attachments not manufactured for use with this smoker are not recommended and may lead to personal injury or property damage.m U se caution when lifting or moving smoker to prevent strains and back injuries.m W e advise that you have a fire extinguisher designed for use with electrical appliances on hand.Refer to your local authority to determine proper size and type of fire extinguisher.m D o not attempt to service smoker other than normal maintenance as explained in “Care & Maintenance” section of this manual.m P roperly dispose of all packaging material.1. Warnings and Safety instructions (cont.)3. assembly instructions (cont.)Step 3:Insert temperature gauge (9) stem through hole in smoker door (7) as shown. Secure with wing nut (Ill). Mount door handle (10) to smoker door (7) using screws (II).Step 6:Slide drip tray (16) onto grooves under smoker chamber body (1).Step 4:SOME PARTS NOT SHOWN FOR CLARITY.Slide cooking grates (11) onto Cooking gratesupports (4) inside smoker chamber body.Step 7:Insert thermostat control (15) intoside of smoker chamber body (1) asshown.Step 5:SOME PARTS NOT SHOWN FOR CLARITY.Place wood chip box (13) and water pan (12)into wood chip grate (14) as shown.Note: Wood chip bowl and water bowlMUST be in place when using smoker. Thisminimizes the chance of wood flare ups.4. operating Your Smokerm WARNINGPLACE THE SMOKER OUTDOORS ON A HARD, LEVEL, NON-COMBUSTIBLE SURFACE AWAY FROM ROOF OVERHANG OR ANY COMBUSTIBLE MATERIAL. NEVER USE ON WOODEN OR OTHER SURFACES THAT COULD BURN. PLACE THE SMOKER AWAY FROM OPEN WINDOWS OR DOORS TO PREVENT SMOKE FROM ENTERING YOUR HOUSE. IN WINDY WEATHER, PLACE THE SMOKER IN AN OUTDOOR AREA THAT IS PROTECTED FROM THE WIND.READ ALL SAFETY WARNINGS AND INSTRUCTIONS CAREFULLY BEFORE OPERATING YOUR SMOKER.CURINGBefore first use, cure your smoker to minimize damage to the exterior finish as well as rid the smoker of paint odor that can impart unnatural flavors to the first meal prepared.STEP 1Remove water pan from smoker and do not use flavoring wood while curing your smoker.STEP 2Coat all interior surfaces of the smoker cabinet, side rack and cooking grill with vegetable oil or vegetable oil spray.m WARNING: DO NOT coat the electric element and the controller.STEP 3Plug the smoker into electric outlet.STEP 4Cure smoker for two hours, then unplug smoker from electric outlet. Allow smoker to cool completely. It is important that the exterior of the smoker is not scraped or rubbed during the curing and cooling process.NOTE: Cure your smoker before first use. After cleaning, apply a light coat of vegetable oil or vegetable cooking spray to the interior surfaces, smoker body, cooking grids and water pan. This simple process will help reduce interior rusting. DO NOT apply oil to electric element or controller.SMOKINGSTEP 1Open door and remove wire rack that supports the wood chip pan and water pan.STEP 2To get the most smoke, soak wood chips in water for 30 minutes. Remove lid from the wood chip pan and add wood chips. We recommend the use of wood chips, not wood chunks. Replace the wood chip pan lid and slide rack into smoker.STEP 3Carefully fill water pan with warm water or your choice of marinade to 1 inch below the rim. Do not fill completely or water may overflow during use.m WARNING: DO NOT spill water, marinade or any liquid onto the electric element and controller.STEP 4Remove cooking grids and adjust the wire cooking grid support brackets to the desired height for the items you are smoking.STEP 5Place food on cooking grid(s) in a single layer and leave room between each piece to allow smoke and moisture to circulate evenly. Slide cooking grid into the wire cooking grid support brackets. Repeat steps for each cooking gridthat is used.STEP 6Close door and plug the smoker into electric outlet.m WARNING: Always use a 3-wire grounded outlet wired for 120-volts that is GFCI protected at 15 or 20 amps. If you are not sure the outlet is suitable, contact a qualified electrician. Do not operate this smoker on the same circuit with any other appliance or electrical device.m WARNING: When connecting controller to smoker, plug electric controller into smoker first, make sure controller is set to OFF, then plug into outlet. When unplugging, turn controller to OFF, disconnect from outlet, then remove controller from smoker.STEP 7Adjust the electric controller to the high position and allow the smoker to heat up. The desired temperature for smok-ing is between 220°F and 250°F. The heat indicator on the front of the unit will let you know when the smoker is near the desired temperature and you can adjust the controller accordingly.STEP 8Allow food to cook approximately 30-45 minutes per pound. Check the water level periodically and add water if needed. When adding water, wear an oven mitt and slide the wood chip pan/water pan rack slightly toward the door opening, add water and slide the rack back into place. You can add additional wood chips by following the same procedure.STEP 9Use a meat thermometer to check the temperature of your food. The heat indicator on the door will provide the approximate temperature inside the smoker but you should use a meat thermometer to ensure that your food is fully cooked.STEP 10After you are finished smoking, turn the controller knob to the off position and always unplug the smoker from the electric out let and allow the smoker to cool. Once the smoker has cooled, follow the instructions in the “Care and Maintenance” section of this manual.NOTE: Performance of the smoker is dependent on ambient temperature and wind conditions.Frequently Asked QuestionsShould I use wood chips or wood chunks?You can use wood chips or wood chunks. Wood chunks will take longer to produce smoke.Should I presoak the wood chips or use them dry?Both are acceptable options. The dry chips will burn faster with a more intense smoke. The pre-soaked chips will burn slower.Is it O.K. to use the smoker with no water in the water bowl?Yes. But, water will help control the temperature and the steam from the water will keep the food moist. Filling the water bowl with cold water will help lower the smoker temperature.Can I use the smoker in my garage?No. Do not use smoker in any enclosed or covered areas. Keep smoker 10+ feet from any building.5. care and maintenance8. Warranty and replacement Parts6. Storage7. FaQ and troubleshooting STEP 1Water pan, wood chip pan and cooking grids should be washed with hot, soapy water then rinsed and allowed to dry. Cooking grids can be lightly coated with vegetable oil or cooking spray to prevent food from sticking.STEP 2A light coating of vegetable or cooking spray may also be applied to the inside of the smoker to prevent rusting.STEP 3If rust appears on the exterior of the smoker, clean the affected area with steel wool and apply a high-temperature resis-tant paint.STEP 4Do not apply additional paint to the interior surface of the smoker. If rust develops, use steel wool to remove and then coat with vegetable oil or cooking spray.STEP 5After the electric element has completely cooled, clean with a damp cloth after each use.BEFORE STORING YOUR SMOKER:• Clean all surfaces.• When cool and not in use, store your smoker indoors in a dry location to protect against rusting.• If storing the grill outdoors, cover the grill with a grill cover for protection from the weather.This warranty covers defects in parts and workmanship for a period of 3 years from the original purchase date. Any damage claim regarding the enameling must be submitted within 30 days of purchase to be covered by the warranty.The following conditions are NOT covered by this warranty:• Unevenness and color variations in the coated surfaces.• Damage caused by improper assembly or disregard of the manual. • Use of spare parts not supplied by manufacturer.• Damage resulting from modifications or inappropriate use. • Abuse of the smoker•Damage caused by improper maintenance or repairs by an unauthorized person.Limitations and exclusions:1. This warranty applies only to the original purchaser and may not be transferred.2. If you cannot verify the purchase date of the smoker the warranty period will begin on the date the smoker was manufactured.3.Replacement or repair parts are warranted for the remaining period of the original part warranty.NoteS______________________________________________________________________________________________________________________________________ ______________________________________________________________________________________________________________________________________ ______________________________________________________________________________________________________________________________________ ______________________________________________________________________________________________________________________________________ ______________________________________________________________________________________________________________________________________ ______________________________________________________________________________________________________________________________________ ______________________________________________________________________________________________________________________________________ ______________________________________________________________________________________________________________________________________ ______________________________________________________________________________________________________________________________________ ______________________________________________________________________________________________________________________________________ ______________________________________________________________________________________________________________________________________ ______________________________________________________________________________________________________________________________________ ______________________________________________________________________________________________________________________________________ ______________________________________________________________________________________________________________________________________ ______________________________________________________________________________________________________________________________________ ______________________________________________________________________________________________________________________________________ ______________________________________________________________________________________________________________________________________ ______________________________________________________________________________________________________________________________________ ____________________________________________________________________________________________________________________________________________________________________________________________________________________________________________________________________________ ______________________________________________________________________________________________________________________________________ ______________________________________________________________________________________________________________________________________ ______________________________________________________________________________________________________________________________________ ______________________________________________________________________________________________________________________________________ ______________________________________________________________________________________________________________________________________ ______________________________________________________________________________________________________________________________________ ______________________________________________________________________________________________________________________________________ ______________________________________________________________________________________________________________________________________ ______________________________________________________________________________________________________________________________________ ______________________________________________________________________________________________________________________________________ ______________________________________________________________________________________________________________________________________ ______________________________________________________________________________________________________________________________________ ______________________________________________________________________________________________________________________________________ ______________________________________________________________________________________________________________________________________ ______________________________________________________________________________________________________________________________________ ______________________________________________________________________________________________________________________________________ ______________________________________________________________________________________________________________________________________ ______________________________________________________________________________________________________________________________________For troubleshooting, FAQs or customer service, visit us at ********************************************************************** Model# COS-330Cuisinart® is a registered trademark under license to The Fulham Group. Distributed by The Fulham Group, Newton, MA. 02466 U.S.A.。
烘炉、熔炉及电炉制造行业深度解析

烘炉、熔炉及电炉制造-行业深度解析烘炉、熔炉及电炉制造,指使用液体燃料、粉状固体燃料(焚化炉)或气体燃料,进行煅烧、熔化或其它热处理用的及非电力熔炉、窑炉和烘炉等燃烧器的制造,以及工业或实验室用电炉及零件的制造。
根据国家统计局制定的《国民经济行业分类与代码》,中国把烘炉、熔炉及电炉制造归入通用设备制造(国统局代码34)中的烘炉、熔炉及电炉制造(C346),其统计4级码为C3461。
同时,烘炉、熔炉及电炉设备属于热处理行业的热处理设备类和电器工业行业的工业加热装置。
目录1 烘炉、熔炉及电炉制造行业定义及分类1. 1.1 烘炉、熔炉及电炉制造行业定义2. 1.2 烘炉、熔炉及电炉制造产品分类2 烘炉、熔炉及电炉制造行业政策环境分析1. 2.1 烘炉、熔炉及电炉制造行业主管部门2. 2.2 烘炉、熔炉及电炉制造行业相关政策3. 2.3 烘炉、熔炉及电炉制造行业相关规划3 烘炉、熔炉及电炉制造行业发展状况分析4 烘炉、熔炉及电炉制造行业国际知名企业5 烘炉、熔炉及电炉制造行业国内领先企业烘炉、熔炉及电炉制造行业定义及分类烘炉、熔炉及电炉制造行业定义烘炉、熔炉及电炉制造,指使用液体燃料、粉状固体燃料(焚化炉)或气体燃料,进行煅烧、熔化或其它热处理用的及非电力熔炉、窑炉和烘炉等燃烧器的制造,以及工业或实验室用电炉及零件的制造。
根据国家统计局制定的《国民经济行业分类与代码》,中国把烘炉、熔炉及电炉制造归入通用设备制造(国统局代码34)中的烘炉、熔炉及电炉制造(C346),其统计4级码为C3461。
同时,烘炉、熔炉及电炉设备属于热处理行业的热处理设备类和电器工业行业的工业加热装置。
烘炉、熔炉及电炉制造产品分类烘炉、熔炉及电炉产品包括:图表1:烘炉、熔炉及电炉制造产品分类烘炉、熔炉及电炉制造行业政策环境分析烘炉、熔炉及电炉制造行业主管部门烘炉、熔炉及电炉制造行业的主管部门有工业和信息化部以及国家发展和改革委员会,该主管单位会向国家其它有关部门制定产业政策和产业发展规划,指导整个行业协同有序地发展。
电烤鸡炉的使用操作流程
电烤鸡炉的使用操作流程1. 准备工作在使用电烤鸡炉之前,我们需要进行一些准备工作,确保能够顺利地操作和烹饪食物。
•清洁电烤鸡炉:确保电烤鸡炉内外干净,没有食物残渣和污垢。
•检查电源:确保电烤鸡炉的电源线正常连接并插入电源插座,电源是否通电。
•准备食材:将准备好的食材放在操作台上,确保食材已经清洗干净并处理好。
2. 开启电烤鸡炉在进行第二步之前,请确保已经完成了准备工作。
1.打开电烤鸡炉的门:轻轻地拉开电烤鸡炉的门,确保门完全打开并保持稳定。
2.调整温度和时间:根据烹饪食物的需要,旋转温度和时间按钮,将温度和时间设定到目标数值。
3.开始预热:按下预热按钮,等待几分钟,让电烤鸡炉达到适合烹饪的温度。
3. 烹饪食物当电烤鸡炉处于预热状态后,可以开始烹饪食物了。
1.放入食材:将处理好的食材放入电烤鸡炉内,可以使用提供的烤盘或烤网。
2.关闭电烤鸡炉的门:轻轻地关闭电烤鸡炉的门,确保门紧闭且密封。
3.启动烹饪:按下开始按钮,电烤鸡炉开始烹饪食物。
4.监控烹饪过程:定期打开电烤鸡炉的门,检查食物的烹饪情况,可以根据需要旋转或翻转食材。
5.调整温度和时间:如果发现烹饪过程中需要调整温度和时间,可以根据需要旋转相应的按钮进行调整。
4. 完成烹饪当食材达到预期的熟度时,可以结束烹饪过程。
1.停止烹饪:按下停止按钮,电烤鸡炉停止烹饪。
2.关闭电烤鸡炉的门:轻轻地关闭电烤鸡炉的门。
3.取出食材:使用防热手套或其他工具,小心地从电烤鸡炉中取出烹饪好的食物。
4.关闭电源:拔出电烤鸡炉的电源插头,将电烤鸡炉断开电源。
5. 清洁和保养在使用完电烤鸡炉后,需要进行清洁和保养工作,以确保电烤鸡炉的正常使用寿命和卫生条件。
1.等待冷却:为了安全起见,等待电烤鸡炉完全冷却之后再进行清洁和保养。
2.清洁内部:使用湿布或海绵轻轻擦拭电烤鸡炉的内部,去除食物残渣和油污。
3.清洁外部:使用湿布擦拭电烤鸡炉的外部,保持外观干净。
4.保养维护:根据电烤鸡炉的使用说明书,定期进行保养和维护工作,如更换炉灯、清洁烤盘等。
烧鸡炉制作方法

烧鸡炉制作方法介绍烧鸡炉是一种用来烹饪鸡肉的设备,它能够将鸡肉烤至外酥里嫩的状态。
制作一个烧鸡炉可以让你在家中享受到美味的烤鸡。
本文将介绍如何制作一个简单的烧鸡炉。
材料以下是你需要准备的材料:•砖块 x 16•水泥•铁丝网•铁板 x 2•铁架 x 4•铁钳•铁锤•手套•防护眼镜制作步骤第一步:准备工作1.确保你有一个开阔的空间来进行制作工作。
2.穿戴好手套和防护眼镜,以确保安全。
3.准备好所有需要的材料。
第二步:制作炉体1.选取一个平坦的地面,堆放四块砖块以形成一个正方形。
2.在正方形内部的四个角落堆放砖块,与之前的四块砖块连接,形成一个砖柱。
3.叠加两层砖块在砖柱上,固定整体结构。
4.在砖块的顶部放置两块铁板,作为烧鸡的烤架。
5.在砖柱的侧面贴上铁丝网,以增加烧鸡炉的稳定性。
第三步:制作支架1.使用铁钳和铁锤将砖块打破,获得直径大约为 20 厘米的砖块碎片。
2.将铁架安装在砖柱的四个角上,将砖块碎片嵌入铁架中,以增加支架的稳定性。
第四步:涂抹水泥1.在砖柱的外部涂抹一层水泥,以增加烧鸡炉的外观美观度和耐用度。
2.等待水泥干燥,大约需要几个小时。
第五步:测试1.在烧鸡炉的铁板上放置鸡肉。
2.使用炭火或者燃气火炉点燃烧烤炉下方的木炭。
3.等待几分钟,观察鸡肉的烤制情况。
4.如有需要,根据鸡肉的烤制情况调整火候和时间。
注意事项•制作烧鸡炉时,请注意安全,避免造成意外伤害。
•在测试之前,确保烧鸡炉的结构牢固可靠。
•使用烧鸡炉时,请小心火焰和热量,避免烫伤。
结论通过简单的制作步骤,我们可以在家中制作一个烧鸡炉,享受美味的烤鸡。
制作烧鸡炉的过程需要一些基本的工具和材料,但在安全和注意事项的指导下,我们可以轻松完成制作过程。
快来动手制作一个属于自己的烧鸡炉,让全家人一同品尝美味的烤鸡吧!。
佰易巢嘉电炸炉说明书

佰易巢嘉电炸炉说明书第一章炸炉的概述1.1 产品介绍佰易巢嘉电炸炉是一款高效、安全、方便的厨房电器。
它采用先进的加热技术,能够快速加热食物,炸制出金黄酥脆的美味。
同时,它还具有智能控制系统和多项安全保护功能,确保用户的使用安全。
1.2 主要特点1.2.1 快速加热佰易巢嘉电炸炉拥有强大的加热功率,能够在短时间内将食物加热至适宜的温度,快速炸制出美味可口的食物。
1.2.2 多功能除了炸制食物外,佰易巢嘉电炸炉还可用于烤、烘、烤面包等多种烹饪方式,满足用户的多样化需求。
1.2.3 智能控制佰易巢嘉电炸炉配备了智能控制系统,用户只需简单设置温度和时间,即可轻松完成炸炉的操作。
同时,智能控制系统还能自动监测加热过程,确保食物的炸制效果。
1.2.4 安全保护佰易巢嘉电炸炉在设计上考虑了用户的安全需求,采用多项安全保护措施,如过热保护、漏电保护等,确保用户在使用过程中的安全。
第二章使用方法2.1 准备工作在使用佰易巢嘉电炸炉之前,需确保以下准备工作已完成:1. 清洗炸炉内外部分,确保无杂质;2. 检查电源线和插头是否损坏;3. 确保电源电压与产品标识一致。
2.2 操作步骤2.2.1 打开电源将佰易巢嘉电炸炉插入电源插座,打开电源开关。
2.2.2 设置温度和时间按照食谱或个人需求,设置合适的温度和时间。
可通过旋钮或触控面板进行设置。
2.2.3 炸制食物将待炸制的食物放入炸炉内,关上炸炉门。
2.2.4 完成炸制等待设定的时间结束后,佰易巢嘉电炸炉会自动停止加热,并发出提醒音。
第三章清洁与维护3.1 清洁方法在每次使用后,应及时清洁佰易巢嘉电炸炉,防止油渍和食物残渣对设备的损坏。
具体的清洁方法如下:1. 等待炸炉冷却后,用湿布擦拭炸炉内外部分;2. 使用中性清洁剂清洗炸炉内部,不可使用含酸、碱或腐蚀性成分的清洁剂;3. 清洗后用干布擦干炸炉。
3.2 维护注意事项为了延长佰易巢嘉电炸炉的使用寿命,以下是一些维护注意事项:1. 避免炸炉长时间空炸,以免损坏加热元件;2. 定期检查电源线和插头是否损坏;3. 不得将金属物品放入炸炉内,以免损坏炸炉;4. 不得将水直接倒入炸炉内清洗。