rfc4174.The IPv4 Dynamic Host Configuration Protocol (DHCP) Option for the Internet Storage Name Ser
基于中标麒麟操作系统的Apache服务器构建

Co ns t r uc t i o n o f Apa c he S e r ve r Ba s e d o n
Ne oKyl i n Op e r a t i ng S ys t e m
- 一 一 f
YAN( ; An 一1 l O l l g . J I AN( Zh o n g 一 \ V U ( : HEN L i a n g , ZHANG Xi a o — f e n g
器,借 鉴基于 Re d Ha t 及C ㈨t os等 典型 L x操作 系统 的 A p a c h e服 务器构 建方法 ,提 出在 国产中标麒麟操 作 系统 上构建 A m 1 。 服务 器的解决方案, 并给 出了详细的实现方法与步骤 , 对遇到的问题进行 了总结 通过客户端计算机上的浏 览器和某系统
基 于 中标 麒 麟 操 作 系统 的 Ap a c h e 服 务 器构 建
杨安 洪 , 姜忠 武 , 陈 良, 张晓峰
( 西 昌卫 星发射 中心 , 四) l 1 西昌 “ l 要】 为 了研 发 基于 自主 可控 技 术 的航 天发 射 信 息 化指 挥 系统 ,需要 构 建基 于 国产 操 作 系统 的全 球 多尺 度遥 感影 像服 务
f Xi c h a n g S a t e l l i t e L a u n c h Ce n t e ! , Xk ’ h a n g S i c h u a n n 1 j ( ) ( J I J , CI i f n a )
LINUX IPV6 IPV4 兼容编程 HTTP SERVER 源代码讲解

LINUX IPV6 IPV4 兼容编程 HTTP SERVER 源代码讲解代码是在linux上运行的,winsock的已经有人写了IPv4转换示例192.168.0.77c:::ffff:192.168.0.77。
打印后,删除::ffff:以获取IPv4地址有些函数比如debug_printf什么的我就不贴了,太多了看不过来,重点看红色标注部分intmain(){intlistenfd=-1,connectfd;pthread_utthread;//idofthreadstructarg*arg;//passthisvartothethreadcharbuf[bufsize];chartemp[bufsize];调试打印(\intport=80;调试打印(\memset(temp,0x0,bufsize);sprintf(temp,\//配置地址信息structaddrinfoaddrcriteria;memset(&addrcriteria,0,sizeof(addrcriteria));addrcriteria。
ai_uufamily=af_uuuunsec;addrcriteria。
ai_u标志=ai_u被动;addrcriteria.ai_socktype=sock_stream;addrcriteria.ai_protocol=ipproto_tcp;//获取地址信息。
此函数是必需的,因为接口同时具有IPv6和IPv4。
它通常位于Dr_uAnyStructAddRinfo*服务器uAddr;intretval=getaddrinfo(null,temp,&addrcriteria,&server_addr);if(retval!=0){调试打印(\}structaddrinfo*addr=server_addr;//获得的地址是一个链表。
事实上,它只是以下地址的IPv6地址:while(addr!=null){//建立套接字listenfd=socket(addr->ai_family,addr->ai_socktype,addr->ai_protocol);if(listenfd<0)continue;//绑定端口和侦听端口intopt=so_uureuseaddr;setsockopt(listenfd,sol_socket,so_reuseaddr,&opt,sizeof(opt));//可重用fcntl(listenfd,f_setfd,fd_cloexec);fcntl(列表、f_设置、o_非块);//非阻塞if((bind(listenfd,addr->ai_addr,addr->ai_addrlen)==0)&&listen(listenfd,128)==0){structsockaddr_uuStorageLocal_uuAddr;socklen_uutaddr_uusize=sizeof(本地地址);if(getsockname(listenfd,(structsockaddr*)&local_addr,&addr_size)<0){调试\uPrintf(\}debug_printf(\printsocketaddress((StructSocketAddr*)和local_uuAddr);//一般来说:break;}close(listenfd);addr=addr->ai_uuNext;}freeaddrinfo(server_addr);//事实上,以上都是胡说八道。
HP Color LaserJet Enterprise MFP M776用户指南说明书
Legal informationCopyright and License© Copyright 2019 HP Development Company, L.P.Reproduction, adaptation, or translation without prior written permission is prohibited, except as allowedunder the copyright laws.The information contained herein is subject to change without notice.The only warranties for HP products and services are set forth in the express warranty statementsaccompanying such products and services. Nothing herein should be construed as constituting anadditional warranty. HP shall not be liable for technical or editorial errors or omissions contained herein.Edition 1, 10/2019Trademark CreditsAdobe®, Adobe Photoshop®, Acrobat®, and PostScript® are trademarks of Adobe Systems Incorporated.Apple and the Apple logo are trademarks of Apple Inc., registered in the U.S. and other countries.macOS is a trademark of Apple Inc., registered in the U.S. and other countries.AirPrint is a trademark of Apple Inc., registered in the U.S. and other countries.Google™ is a trademark of Google Inc.Microsoft®, Windows®, Windows® XP, and Windows Vista® are U.S. registered trademarks of MicrosoftCorporation.UNIX® is a registered trademark of The Open Group.iiiT able of contents1 Printer overview (1)Warning icons (1)Potential shock hazard (2)Printer views (2)Printer front view (2)Printer back view (4)Interface ports (4)Control-panel view (5)How to use the touchscreen control panel (7)Printer specifications (8)T echnical specifications (8)Supported operating systems (11)Mobile printing solutions (12)Printer dimensions (13)Power consumption, electrical specifications, and acoustic emissions (15)Operating-environment range (15)Printer hardware setup and software installation (16)2 Paper trays (17)Introduction (17)Load paper to Tray 1 (multipurpose tray) (17)Load Tray 1 (multipurpose tray) (18)Tray 1 paper orientation (19)Use alternative letterhead mode (24)Enable Alternative Letterhead Mode by using the printer control-panel menus (24)Load paper to Tray 2 (24)Load Tray 2 (24)Tray 2 paper orientation (26)Use alternative letterhead mode (29)Enable Alternative Letterhead Mode by using the printer control-panel menus (29)Load paper to the 550-sheet paper tray (30)Load paper to the 550-sheet paper tray (30)550-sheet paper tray paper orientation (32)Use alternative letterhead mode (35)Enable Alternative Letterhead Mode by using the printer control-panel menus (35)ivLoad paper to the 2 x 550-sheet paper trays (36)Load paper to the 2 x 550-sheet paper trays (36)2 x 550-sheet paper tray paper orientation (38)Use alternative letterhead mode (41)Enable Alternative Letterhead Mode by using the printer control-panel menus (41)Load paper to the 2,700-sheet high-capacity input paper trays (41)Load paper to the 2,700-sheet high-capacity input paper trays (41)2,700-sheet HCI paper tray paper orientation (43)Use alternative letterhead mode (45)Enable Alternative Letterhead Mode by using the printer control-panel menus (45)Load and print envelopes (46)Print envelopes (46)Envelope orientation (46)Load and print labels (47)Manually feed labels (47)Label orientation (48)3 Supplies, accessories, and parts (49)Order supplies, accessories, and parts (49)Ordering (49)Supplies and accessories (50)Maintenance/long-life consumables (51)Customer self-repair parts (51)Dynamic security (52)Configure the HP toner-cartridge-protection supply settings (53)Introduction (53)Enable or disable the Cartridge Policy feature (53)Use the printer control panel to enable the Cartridge Policy feature (54)Use the printer control panel to disable the Cartridge Policy feature (54)Use the HP Embedded Web Server (EWS) to enable the Cartridge Policy feature (54)Use the HP Embedded Web Server (EWS) to disable the Cartridge Policy feature (55)Troubleshoot Cartridge Policy control panel error messages (55)Enable or disable the Cartridge Protection feature (55)Use the printer control panel to enable the Cartridge Protection feature (56)Use the printer control panel to disable the Cartridge Protection feature (56)Use the HP Embedded Web Server (EWS) to enable the Cartridge Protection feature (56)Use the HP Embedded Web Server (EWS) to disable the Cartridge Protection feature (57)Troubleshoot Cartridge Protection control panel error messages (57)Replace the toner cartridges (58)T oner-cartridge information (58)Remove and replace the cartridges (59)Replace the imaging drums (62)Imaging drum information (62)Remove and replace the imaging drums (63)Replace the toner-collection unit (66)T oner-collection unit information (66)vRemove and replace the toner-collection unit (67)Replace the staple cartridge (M776zs model only) (70)Staple cartridge information (70)Remove and replace the staple cartridge (71)4 Print (73)Print tasks (Windows) (73)How to print (Windows) (73)Automatically print on both sides (Windows) (74)Manually print on both sides (Windows) (74)Print multiple pages per sheet (Windows) (75)Select the paper type (Windows) (75)Additional print tasks (76)Print tasks (macOS) (77)How to print (macOS) (77)Automatically print on both sides (macOS) (77)Manually print on both sides (macOS) (77)Print multiple pages per sheet (macOS) (78)Select the paper type (macOS) (78)Additional print tasks (79)Store print jobs on the printer to print later or print privately (79)Introduction (79)Create a stored job (Windows) (79)Create a stored job (macOS) (80)Print a stored job (81)Delete a stored job (81)Delete a job that is stored on the printer (81)Change the job storage limit (82)Information sent to printer for Job Accounting purposes (82)Mobile printing (82)Introduction (82)Wi-Fi, Wi-Fi Direct Print, NFC, and BLE printing (82)Enable wireless printing (83)Change the Wi-Fi Direct name (83)HP ePrint via email (83)AirPrint (84)Android embedded printing (85)Print from a USB flash drive (85)Enable the USB port for printing (85)Method one: Enable the USB port from the printer control panel (85)Method two: Enable the USB port from the HP Embedded Web Server (network-connectedprinters only) (85)Print USB documents (86)Print using high-speed USB 2.0 port (wired) (86)Method one: Enable the high-speed USB 2.0 port from the printer control panel menus (86)Method two: Enable the high-speed USB 2.0 port from the HP Embedded Web Server (network-connected printers only) (87)vi5 Copy (88)Make a copy (88)Copy on both sides (duplex) (90)Additional copy tasks (92)6 Scan (93)Set up Scan to Email (93)Introduction (93)Before you begin (93)Step one: Access the HP Embedded Web Server (EWS) (94)Step two: Configure the Network Identification settings (95)Step three: Configure the Send to Email feature (96)Method one: Basic configuration using the Email Setup Wizard (96)Method two: Advanced configuration using the Email Setup (100)Step four: Configure the Quick Sets (optional) (104)Step five: Set up Send to Email to use Office 365 Outlook (optional) (105)Introduction (105)Configure the outgoing email server (SMTP) to send an email from an Office 365 Outlookaccount (105)Set up Scan to Network Folder (108)Introduction (108)Before you begin (108)Step one: Access the HP Embedded Web Server (EWS) (108)Step two: Set up Scan to Network Folder (109)Method one: Use the Scan to Network Folder Wizard (109)Method two: Use Scan to Network Folder Setup (110)Step one: Begin the configuration (110)Step two: Configure the Scan to Network Folder settings (111)Step three: Complete the configuration (118)Set up Scan to SharePoint (118)Introduction (118)Before you begin (118)Step one: Access the HP Embedded Web Server (EWS) (118)Step two: Enable Scan to SharePoint and create a Scan to SharePoint Quick Set (119)Scan a file directly to a SharePoint site (121)Quick Set scan settings and options for Scan to SharePoint (122)Set up Scan to USB Drive (123)Introduction (124)Step one: Access the HP Embedded Web Server (EWS) (124)Step two: Enable Scan to USB Drive (124)Step three: Configure the Quick Sets (optional) (125)Default scan settings for Scan to USB Drive setup (126)Default file settings for Save to USB setup (126)Scan to email (127)Introduction (127)Scan to email (127)Scan to job storage (129)viiIntroduction (129)Scan to job storage on the printer (130)Print from job storage on the printer (132)Scan to network folder (132)Introduction (132)Scan to network folder (132)Scan to SharePoint (134)Introduction (134)Scan to SharePoint (134)Scan to USB drive (136)Introduction (136)Scan to USB drive (136)Use HP JetAdvantage business solutions (138)Additional scan tasks (138)7 Fax (140)Set up fax (140)Introduction (140)Set up fax by using the printer control panel (140)Change fax configurations (141)Fax dialing settings (141)General fax send settings (142)Fax receive settings (143)Send a fax (144)Additional fax tasks (146)8 Manage the printer (147)Advanced configuration with the HP Embedded Web Server (EWS) (147)Introduction (147)How to access the HP Embedded Web Server (EWS) (148)HP Embedded Web Server features (149)Information tab (149)General tab (149)Copy/Print tab (150)Scan/Digital Send tab (151)Fax tab (152)Supplies tab (153)Troubleshooting tab (153)Security tab (153)HP Web Services tab (154)Networking tab (154)Other Links list (156)Configure IP network settings (157)Printer sharing disclaimer (157)View or change network settings (157)Rename the printer on a network (157)viiiManually configure IPv4 TCP/IP parameters from the control panel (158)Manually configure IPv6 TCP/IP parameters from the control panel (158)Link speed and duplex settings (159)Printer security features (160)Introduction (160)Security statements (160)Assign an administrator password (160)Use the HP Embedded Web Server (EWS) to set the password (160)Provide user access credentials at the printer control panel (161)IP Security (161)Encryption support: HP High Performance Secure Hard Disks (161)Lock the formatter (161)Energy-conservation settings (161)Set the sleep timer and configure the printer to use 1 watt or less of power (161)Set the sleep schedule (162)Set the idle settings (162)HP Web Jetadmin (163)Software and firmware updates (163)9 Solve problems (164)Customer support (164)Control panel help system (165)Reset factory settings (165)Introduction (165)Method one: Reset factory settings from the printer control panel (165)Method two: Reset factory settings from the HP Embedded Web Server (network-connectedprinters only) (166)A “Cartridge is low” or “Cartridge is very low” message displays on the printer control panel (166)Change the “Very Low” settings (166)Change the “Very Low” settings at the control panel (166)For printers with fax capability (167)Order supplies (167)Printer does not pick up paper or misfeeds (167)Introduction (167)The printer does not pick up paper (167)The printer picks up multiple sheets of paper (171)The document feeder jams, skews, or picks up multiple sheets of paper (174)Clear paper jams (174)Introduction (174)Paper jam locations (174)Auto-navigation for clearing paper jams (175)Experiencing frequent or recurring paper jams? (175)Clear paper jams in the document feeder - 31.13.yz (176)Clear paper jams in Tray 1 (13.A1) (177)Clear paper jams in Tray 2 (13.A2) (182)Clear paper jams in the fuser (13.B9, 13.B2, 13.FF) (188)ixClear paper jams in the duplex area (13.D3) (194)Clear paper jams in the 550-sheet trays (13.A3, 13.A4) (199)Clear paper jams in the 2 x 550 paper trays (13.A4, 13.A5) (206)Clear paper jams in the 2,700-sheet high-capacity input paper trays (13.A3, 13.A4, 13.A5, 13.A7) (213)Resolving color print quality problems (220)Introduction (220)Troubleshoot print quality (221)Update the printer firmware (221)Print from a different software program (221)Check the paper-type setting for the print job (221)Check the paper type setting on the printer (221)Check the paper type setting (Windows) (221)Check the paper type setting (macOS) (222)Check toner-cartridge status (222)Step one: Print the Supplies Status Page (222)Step two: Check supplies status (222)Print a cleaning page (222)Visually inspect the toner cartridge or cartridges (223)Check paper and the printing environment (223)Step one: Use paper that meets HP specifications (223)Step two: Check the environment (223)Step three: Set the individual tray alignment (224)Try a different print driver (224)Troubleshoot color quality (225)Calibrate the printer to align the colors (225)Troubleshoot image defects (225)Improve copy image quality (233)Check the scanner glass for dirt and smudges (233)Calibrate the scanner (234)Check the paper settings (235)Check the paper selection options (235)Check the image-adjustment settings (235)Optimize copy quality for text or pictures (236)Edge-to-edge copying (236)Improve scan image quality (236)Check the scanner glass for dirt and smudges (237)Check the resolution settings (238)Check the color settings (238)Check the image-adjustment settings (239)Optimize scan quality for text or pictures (239)Check the output-quality settings (240)Improve fax image quality (240)Check the scanner glass for dirt and smudges (240)Check the send-fax resolution settings (242)Check the image-adjustment settings (242)Optimize fax quality for text or pictures (242)Check the error-correction setting (243)xSend to a different fax machine (243)Check the sender's fax machine (243)Solve wired network problems (244)Introduction (244)Poor physical connection (244)The computer is unable to communicate with the printer (244)The printer is using incorrect link and duplex settings for the network (245)New software programs might be causing compatibility problems (245)The computer or workstation might be set up incorrectly (245)The printer is disabled, or other network settings are incorrect (245)Solve wireless network problems (245)Introduction (245)Wireless connectivity checklist (245)The printer does not print after the wireless configuration completes (246)The printer does not print, and the computer has a third-party firewall installed (246)The wireless connection does not work after moving the wireless router or printer (247)Cannot connect more computers to the wireless printer (247)The wireless printer loses communication when connected to a VPN (247)The network does not appear in the wireless networks list (247)The wireless network is not functioning (247)Reduce interference on a wireless network (248)Solve fax problems (248)Checklist for solving fax problems (248)What type of phone line are you using? (249)Are you using a surge-protection device? (249)Are you using a phone company voice-messaging service or an answering machine? (249)Does your phone line have a call-waiting feature? (249)Check fax accessory status (249)General fax problems (250)The fax failed to send (250)No fax address book button displays (250)Not able to locate the Fax settings in HP Web Jetadmin (250)The header is appended to the top of the page when the overlay option is enabled (251)A mix of names and numbers is in the recipients box (251)A one-page fax prints as two pages (251)A document stops in the document feeder in the middle of faxing (251)The volume for sounds coming from the fax accessory is too high or too low (251)Index (252)xiPrinter overview1Review the location of features on the printer, the physical and technical specifications of the printer,and where to locate setup information.For video assistance, see /videos/LaserJet.The following information is correct at the time of publication. For current information, see /support/colorljM776MFP.For more information:HP's all-inclusive help for the printer includes the following information:●Install and configure●Learn and use●Solve problems●Download software and firmware updates●Join support forums●Find warranty and regulatory informationWarning iconsUse caution if you see a warning icon on your HP printer, as indicated in the icon definitions.●Caution: Electric shock●Caution: Hot surface●Caution: Keep body parts away from moving partsPrinter overview1●Caution: Sharp edge in close proximity●WarningPotential shock hazardReview this important safety information.●Read and understand these safety statements to avoid an electrical shock hazard.●Always follow basic safety precautions when using this product to reduce risk of injury from fire orelectric shock.●Read and understand all instructions in the user guide.●Observe all warnings and instructions marked on the product.●Use only a grounded electrical outlet when connecting the product to a power source. If you do notknow whether the outlet is grounded, check with a qualified electrician.●Do not touch the contacts on any of the sockets on the product. Replace damaged cordsimmediately.●Unplug this product from wall outlets before cleaning.●Do not install or use this product near water or when you are wet.●Install the product securely on a stable surface.●Install the product in a protected location where no one can step on or trip over the power cord.Printer viewsIdentify certain parts of the printer and the control panel.Printer front viewLocate features on the front of the printer.2Chapter 1 Printer overviewPrinter front view3Printer back viewLocate features on the back of the printer.Interface portsLocate the interface ports on the printer formatter. 4Chapter 1 Printer overviewControl-panel viewThe control panel provides access to the printer features and indicates the current status of the printer.NOTE:Tilt the control panel for easier viewing.The Home screen provides access to the printer features and indicates the current status of the printer.screens.NOTE:The features that appear on the Home screen can vary, depending on the printerconfiguration.Control-panel view5Figure 1-1Control-panel view?i 12:42 PM6Chapter 1 Printer overviewHow to use the touchscreen control panelPerform the following actions to use the printer touchscreen control panel.T ouchT ouch an item on the screen to select that item or open that menu. Also, when scrolling T ouch the Settings icon to open the Settings app.How to use the touchscreen control panel 7SwipeT ouch the screen and then move your finger horizontally to scroll the screen sideways.Swipe until the Settings app displays.Printer specificationsDetermine the specifications for your printer model.IMPORTANT:The following specifications are correct at the time of publication, but they are subject to change. For current information, see /support/colorljM776MFP .T echnical specificationsReview the printer technical specifications.Product numbers for each model ●M776dn - #T3U55A ●Flow M776z - #3WT91A ●Flow M776zs - #T3U56APaper handling specificationsPaper handling features Tray 1 (100-sheet capacity)Included Included Included Tray 2 (550-sheet capacity)IncludedIncludedIncluded8Chapter 1 Printer overview550-sheet paper trayOptional Included Not included NOTE:The M776dn models accept one optional550-sheet tray.Optional Included Included2 x 550-sheet paper tray and standNOTE:The M776dn models accept one optional550-sheet tray that may be installed on top of thestand.Optional Not included Not included2,700-sheet high-capacity input (HCI) paper trayand standNOTE:The M776dn models accept one optional550-sheet tray that may be installed on top of theoptional printer stand.Printer standOptional Not included Not included NOTE:The M776dn models accept one optional550-sheet tray that may be installed on top of theoptional printer stand.Inner finisher accessory Not included Not included Included Automatic duplex printing Included IncludedIncludedIncluded Included Included10/100/1000 Ethernet LAN connection with IPv4and IPv6Hi-Speed USB 2.0Included Included IncludedIncluded Included IncludedEasy-access USB port for printing from a USBflash drive or upgrading the firmwareIncluded Included Included Hardware Integration Pocket for connectingaccessory and third-party devicesHP Internal USB Ports Optional Optional OptionalOptional Optional OptionalHP Jetdirect 2900nw Print Server accessory forWi-Fi connectivity and an additional Ethernet portOptional IncludedIncludedHP Jetdirect 3100w accessory for Wi-Fi, BLE, NFC,and proximity badge readingPrints 45 pages per minute (ppm) on Letter-sizepaper and 46 ppm on A4-size paperEasy-access USB printing for printing from a USBIncluded Included Includedflash driveT echnical specifications9Included Included Included Store jobs in the printer memory to print later orprint privatelyScans 100 pages per minute (ppm) on A4 andIncluded Included Included letter-size paper one-sidedIncluded Included Included 200-page document feeder with dual-headscanning for single-pass duplex copying andscanningNot included Included Included HP EveryPage T echnologies including ultrasonicmulti-feed detectionNot included Included Included Embedded optical character recognition (OCR)provides the ability to convert printed pages intotext that can be edited or searched using acomputerIncluded Included Included SMART Label feature provides paper-edgedetection for automatic page croppingIncluded Included Included Automatic page orientation for pages that haveat least 100 characters of textIncluded Automatic tone adjustment sets contrast,Included Includedbrightness, and background removal for eachpageIncluded Included Includedfolders on a networkIncludedSend documents to SharePoint®Included IncludedIncluded Included Included NOTE:Memory reported on the configurationpage will change from 2.5 GB to 3 GB with theoptional 1 GB SODIMM installed.Mass storage: 500 GB hard disk drive Included Included IncludedSecurity: HP Trusted Platform Module (TPM)Included Included IncludedT ouchscreen control panel Included Included IncludedRetractable keyboard Not included Included Included 10Chapter 1 Printer overviewFax Optional Included IncludedSupported operating systemsUse the following information to ensure printer compatibility with your computer operating system.Linux: For information and print drivers for Linux, go to /go/linuxprinting.UNIX: For information and print drivers for UNIX®, go to /go/unixmodelscripts.The following information applies to the printer-specific Windows HP PCL 6 print drivers, HP print driversfor macOS, and to the software installer.Windows: Download HP Easy Start from /LaserJet to install the HP print driver. Or, go tothe printer-support website for this printer: /support/colorljM776MFP to download the printdriver or the software installer to install the HP print driver.macOS: Mac computers are supported with this printer. Download HP Easy Start either from /LaserJet or from the Printer Support page, and then use HP Easy Start to install the HP print driver.1.Go to /LaserJet.2.Follow the steps provided to download the printer software.Windows 7, 32-bit and 64-bit The “HP PCL 6” printer-specific print driver is installed for this operating system aspart of the software installation.Windows 8.1, 32-bit and 64-bit The “HP PCL-6” V4 printer-specific print driver is installed for this operating systemas part of the software installation.Windows 10, 32-bit and 64-bit The “HP PCL-6” V4 printer-specific print driver is installed for this operating systemas part of the software installation.Windows Server 2008 R2, SP 1, 64-bit The PCL 6 printer-specific print driver is available for download from the printer-support website. Download the driver, and then use the Microsoft Add Printer tool toinstall it.Windows Server 2012, 64-bit The PCL 6 printer-specific print driver is available for download from the printer-support website. Download the driver, and then use the Microsoft Add Printer tool toinstall it.Windows Server 2012 R2, 64-bit The PCL 6 printer-specific print driver is available for download from the printer-support website. Download the driver, and then use the Microsoft Add Printer tool toinstall it.Windows Server 2016, 64-bit The PCL 6 printer-specific print driver is available for download from the printer-support website. Download the driver, and then use the Microsoft Add Printer tool toinstall it.Windows Server 2019, 64-bit The PCL 6 printer-specific print driver is available for download from the printer-support website. Download the driver, and then use the Microsoft Add Printer tool toinstall it.Supported operating systems11macOS 10.13 High Sierra, macOS 10.14 MojaveDownload HP Easy Start from /LaserJet , and then use it to install the print driver.NOTE:Supported operating systems can change.NOTE:For a current list of supported operating systems and HP’s all-inclusive help for the printer, go to /support/colorljM776MFP .NOTE:For details on client and server operating systems and for HP UPD driver support for this printer, go to /go/upd . Under Additional information , click Specifications .●Internet connection●Dedicated USB 1.1 or 2.0 connection or a network connection● 2 GB of available hard-disk space ●1 GB RAM (32-bit) or2 GB RAM (64-bit)●Internet connection●Dedicated USB 1.1 or 2.0 connection or a network connection●1.5 GB of available hard-disk spaceNOTE:The Windows software installer installs the HP Smart Device Agent Base service. The file size is less than 100 kb. Its only function is to check for printers connected via USB hourly. No data is collected. If a USB printer is found, it then tries to locate a JetAdvantage Management Connector (JAMc) instance on the network. If a JAMc is found, the HP Smart Device Agent Base is securelyupgraded to a full Smart Device Agent from JAMc, which will then allow printed pages to be accounted for in a Managed Print Services (MPS) account. The driver-only web packs downloaded from for the printer and installed through the Add Printer wizard do not install this service.T o uninstall the service, open the Control Panel , select Programs or Programs and Features , and then select Add/Remove Programs or Uninstall a Programto remove the service. The file name isHPSmartDeviceAgentBase.Mobile printing solutionsHP offers multiple mobile printing solutions to enable easy printing to an HP printer from a laptop, tablet, smartphone, or other mobile device.T o see the full list and to determine the best choice, go to /go/MobilePrinting .NOTE:Update the printer firmware to ensure all mobile printing capabilities are supported.●Wi-Fi Direct (wireless models only, with HP Jetdirect 3100w BLE/NFC/Wireless accessory installed)●HP ePrint via email (Requires HP Web Services to be enabled and the printer to be registered with HP Connected)●HP Smart app ●Google Cloud Print12Chapter 1 Printer overview。
identityserver4原理简述 -回复

identityserver4原理简述-回复什么是IdentityServer4?IdentityServer4是一个开源的身份验证和访问控制框架,用于构建安全的 Core应用程序。
它实现了OpenID Connect和OAuth 2.0等开放标准,使开发人员能够添加身份验证和授权功能到他们的应用程序中。
为什么需要IdentityServer4?在现代的应用程序中,身份验证和访问控制是很重要的功能之一。
用户登录和访问权限的管理,是构建安全可靠的系统的基础。
IdentityServer4提供了一个易于使用且高度可定制的解决方案,使开发人员能够轻松地添加和管理身份验证和授权过程。
IdentityServer4的工作原理是什么?IdentityServer4采用集中式的身份验证和授权模型。
它的工作原理可分为以下几个步骤:1. 注册和配置客户端应用程序:开发人员首先需要为他们的应用程序注册一个客户端,并配置它的身份验证和授权参数,例如允许使用的授权类型、重定向URI等。
2. 用户认证:当用户尝试访问客户端应用程序时,他们将被重定向到IdentityServer4以进行身份验证。
用户将提供他们的身份凭证,例如用户名和密码。
3. 验证用户凭证:IdentityServer4将验证用户提供的凭证,例如用户名和密码,以确保其有效性。
此验证可以使用内置的用户存储或外部的身份验证提供程序。
4. 发放访问令牌:一旦用户的身份得到验证,IdentityServer4将生成一个访问令牌并将其返回给客户端应用程序。
访问令牌是一个加密的字符串,用于标识用户和授权的权限。
5. 资源访问:当用户试图访问客户端应用程序需要授权的资源时,他们将使用访问令牌进行身份验证。
客户端应用程序将验证令牌的有效性,并根据令牌中的权限信息来决定是否允许访问请求的资源。
6. 刷新令牌:访问令牌具有一定的有效期限。
一旦令牌过期,用户将需要使用刷新令牌来获取一个新的访问令牌。
服务许可证错误原因中英文对照表
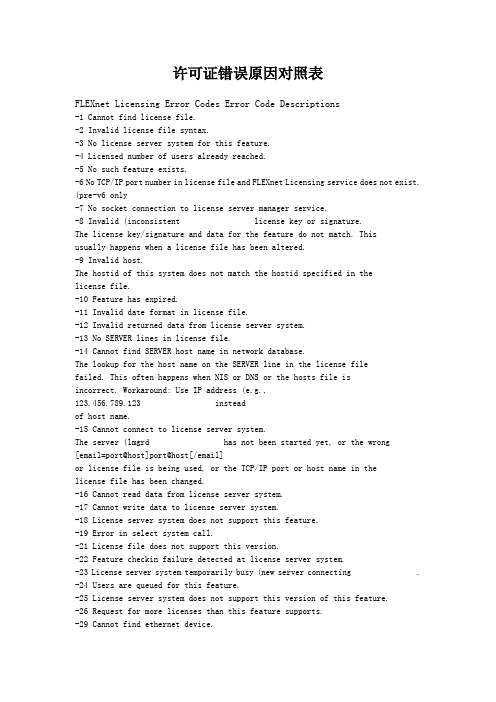
许可证错误原因对照表FLEXnet Licensing Error Codes Error Code Descriptions-1 Cannot find license file.-2 Invalid license file syntax.-3 No license server system for this feature.-4 Licensed number of users already reached.-5 No such feature exists.-6 No TCP/IP port number in license file and FLEXnet Licensing service does not exist. (pre-v6 only-7 No socket connection to license server manager service.-8 Invalid (inconsistent license key or signature.The license key/signature and data for the feature do not match. Thisusually happens when a license file has been altered.-9 Invalid host.The hostid of this system does not match the hostid specified in thelicense file.-10 Feature has expired.-11 Invalid date format in license file.-12 Invalid returned data from license server system.-13 No SERVER lines in license file.-14 Cannot find SERVER host name in network database.The lookup for the host name on the SERVER line in the license filefailed. This often happens when NIS or DNS or the hosts file isincorrect. Workaround: Use IP address (e.g., 123.456.789.123 insteadof host name.-15 Cannot connect to license server system.The server (lmgrd has not been started yet, or the wrong[email=port@host]port@host[/email]or license file is being used, or the TCP/IP port or host name in thelicense file has been changed.-16 Cannot read data from license server system.-17 Cannot write data to license server system.-18 License server system does not support this feature.-19 Error in select system call.-21 License file does not support this version.-22 Feature checkin failure detected at license server system.-23 License server system temporarily busy (new server connecting .-24 Users are queued for this feature.-25 License server system does not support this version of this feature.-26 Request for more licenses than this feature supports.-29 Cannot find ethernet device.-30 Cannot read license file.-31 Feature start date is in the future.-32 No such attribute.-33 Bad encryption handshake with vendor daemon.-34 Clock difference too large between client and license server system. -35 In the queue for this feature.-36 Feature database corrupted in vendor daemon.-37 Duplicate selection mismatch for this feature. Obsolete with v8.0+ vendor daemon.-38 User/host on EXCLUDE list for feature.-39 User/host not on INCLUDE list for feature.-40 Cannot allocate dynamic memory.-41 Feature was never checked out.-42 Invalid parameter.-47 Clock setting check not available in vendor daemon.-52 Vendor daemon did not respond within timeout interval.-53 Checkout request rejected by vendor-defined checkout filter.-54 No FEATURESET line in license file.-55 Incorrect FEATURESET line in license file.-56 Cannot compute FEATURESET data from license file.-571 socket( call failed.-59 Message checksum failure.-60 License server system message checksum failure.-61 Cannot read license file data from license server system.-62 Network software (TCP/IP not available.-63 You are not a license administrator.-64 lmremove request before the minimum lmremove interval.-67 No licenses available to borrow.-68 License BORROW support not enabled.-69 FLOAT_OK can’t run standalone on license server system.-71 Invalid TZ environment variable.-73 Local checkout filter rejected request.-74 Attempt to read beyond end of license file path.-751 SYS$SETIMR call failed (VMS .-76 Internal FLEXnet Licensing error—please report to Macrovision Corporation.-77 Bad version number must be floating-point number with no letters.-82 Invalid PACKAGE line in license file.-83 FLEXnet Licensing version of client newer than server.-84 USER_BASED license has no specified users - see license server system log.-85 License server system d oesn’t support this request.-87 Checkout exceeds MAX specified in options file.-88 System clock has been set back.-89 This platform not authorized by license.-90 Future license file format or misspelling in license file.The file was issued for a later version of FLEXnet Licensing than thisprogram understands.-91 Encryption seeds are non-unique.-92 Feature removed during lmreread, or wrong SERVER line hostid.-93 This feature is available in a different license pool.This is a warning condition. The server has pooled one or moreINCREMENT lines into a single pool, and the request was made on an INCREMENT line that has been pooled.-94 Attempt to generate license with incompatible attributes.-95 Network connect to THIS_HOST failed.Change this_host on the SERVER line in the license file to theactual host name.-96 License server machine is down or not responding.See the system administrator about starting the server, or make sure thatyou’re referring to the right host (see LM_LICENSE_FILE environmen tvariable .-97 The desired vendor daemon is down.1 Check the lmgrd log file, or2 Try lmreread.-98 This FEATURE line can’t be converted to decimal format.-99 The decimal format license is typed incorrectly.-100 Cannot remove a linger license.-101 All licenses are reserved for others.The system administrator has reserved all the licenses for others. Reservations are made in the options file. The server must be restartedfor options file changes to take effect.-102 A FLEXid borrow error occurred.-103 Terminal Server remote client not allowed.-104 Cannot borrow that long.-106 License server system out of network connections.The vendor daemon can't handle any more users. See the debug log forfurther information.-110 Cannot read dongle: check dongle or driver.Either the dongle is unattached, or the necessary software driver for this dongle type is not installed.-112 Missing dongle driver.In order to read the FLEXid hostid, the correct driver must be installed. These drivers are available from your software vendor.-114 SIGN= keyword required, but missing from license certificate. You need to obtain a SIGN= version of this license from your vendor.-115 Error in Public Key package.-116 TRL not supported for this platform.-117 BORROW failed.-118 BORROW period expired.-119 lmdown and lmreread must be run on license server machine.-120 Cannot lmdown the server when licenses are borrowed.-121 FLOAT_OK requires exactly one FLEXid hostid.-122 Unable to delete local borrow info.-123 Returning a borrowed license early is not supported. Contact the vendor for further details.-124 Error returning borrowed license.-125 A PACKAGE component must be specified.-126 Composite hostid not initialized.-127 A item needed for the composite hostid is missing or invalid.-128 Error, borrowed license doesn't match any known server license.-135 Error enabling the event log.-136 Event logging is disabled.-137 Error writing to the event log.-139 Communications timeout.-140 Bad message command.-141 Error writing to socket. Peer has closed socket.-142 Error, cannot generate version specific license tied to a single hostid, which is composite.-143 Version-specific signatures are not supported for uncounted licenses.-144 License template contains redundant signature specifiers.-145 Bad V71_LK signature.-146 Bad V71_SIGN signature.-147 Bad V80_LK signature.-148 Bad V80_SIGN signature.-149 Bad V81_LK signature.-150 Bad V81_SIGN signature.-151 Bad V81_SIGN2 signature.-152 Bad V84_LK signature.-153 Bad V84_SIGN signature.-154 Bad V84_SIGN2 signature.-155 License key required but missing from the license certificate. The application requires a license key in the license certificate. You need toobtain a license key version of this certificate from your vendor.-156 Invalid signature specified with the AUTH= keyword.-500 Invalid server port number.-501 Invalid value in license where an integer was expected.-502 Invalid value supplied for count.-503 Invalid hostid supplied in license.-504 Invalid hostid type supplied.-505 Bad feature line syntax.-506 Internal FLEXnet Licensing error.-507 Bad date format in license file.-508 Bad SERVER line.-509 Bad license string.-510 Server's feature doesn't authenticate on client side.-511 No license checked out.-512 License already checked out.-513 Error list returned.-514 No certicom module available.-515 Wrong or incomplete certicom module.-516 SIGN or SIGN2 required in license certificate.-517 Feature object has no license sources.-518 An Identical license is already checked out on this license source.-519 This license has an asynchronously-queued checkout pending.-521 Library for native hostid couldn't be loaded-522 Already connected to another vendor daemon.-523 No such user, host, or display.-524 Shutdown of license server system failed.-525 Shutdown failed — already connected to license server system.-526 Invalid license source string.-527 Log file switch error.------------------------------------------------------------------------------------------------------译成中文(简体)FLEXnet许可错误代码错误代码说明-1找不到许可证文件。
windows7 下安装IIS及遇到的问题解决办法
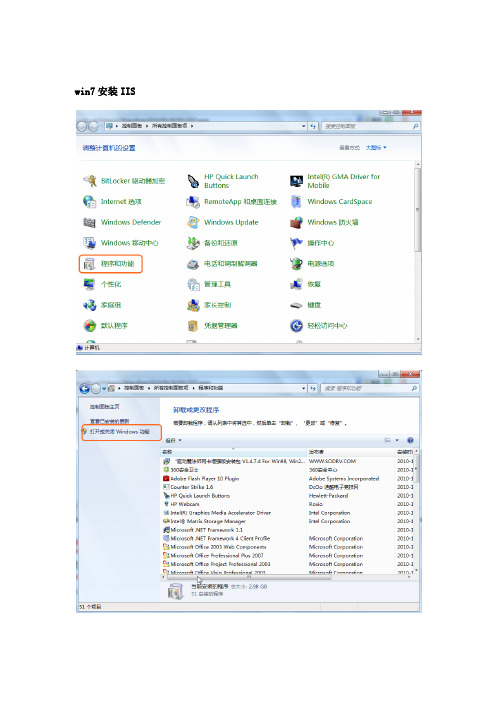
win7安装IIS遇到的问题:问题1:HTTP 错误 404.2 - Not Found,由于 Web 服务器上的“ISAPI 和 CGI 限制”列表设置,无法提供您请求的页面。
点击IIS服务器根节点,找到右边“ISAPI和CGI限制”,把禁止项设置为允许,刷新问题2:WCF问题:“HTTP 错误 404.17 - Not Found 请求的内容似乎是脚本,因而将无法由静态文件处理程序来处理”解决方法Net3.5的WCF服务在IIS7中发布后,在IE中访问.svc文件出现以下错误: HTTP 错误 404.17 - Not Found请求的内容似乎是脚本,因而将无法由静态文件处理程序来处理。
后来发现在II7的WCF服务网站中<处理程序映射>中*.svc文件已经被.Net Framework4.0的处理程序aspnet_isapi.dll接管,看来是由于装了.Net Framework4.0 beta和 2010 beta2导致的,把原先的3.5给废了.不影响开发,但影响布署重新指定成.Net2.0中的处理程序aspnet_isapi.dll处理也不行. 最后,干脆来个釜底抽薪吧,重新注册.Net 3.5的WCF结果,问题解决!<处理程序映射>中.svc也重新被.net 2.0接管最后:参考/en-us/library/ms751527.aspx安装MSsql2005:下载:Microsoft.SQL.Server.2005(ALL) 简体中文版(DVD)SQLServer2005SP3-KB955706-x86-CHS(SP3补丁,解决SQL2005在win7下运行不兼容的问题)微软这样解释:/sqlreleaseservices/archive/2009/05/14/sql-server-on-windows-7-rc-and-windows-server-2008-r2-rc.aspxsql server 2005 sp3下载地址/download/7/5/A/75A0B2DB-A41A-403C-83B6-DF26708C2836/S QLServer2005SP3-KB955706-x86-CHS.exe1、安装标准版SQL Server 2005按照提示安装即可2、安装SQL Server 2005 SP3。
【计算机应用】_代理技术_期刊发文热词逐年推荐_20140727

53 54 55 56 57 58 59 60 61 62 63 64 65 66 67 68 69 70 71 72 73 74 75 76 77 78 79 80 81 82 83 84 85 86 87 88 89 90 91 92 93 94 95 96 97 98 99 100 101 102 103 104 105 106
107 108 109 110 111 112 113 114 115 116 117 118 119 120 121 122 123 124 125 126 127 128 129 130 131 132 133 134 135 136 137 138 139 140 141 142 143 144 145 146 147 148 149 150 151 152 153 154 155 156 157 158 159 160
网格 网关 组成员管理 约束 移动组播 移动支付 移动性管理 移动商务 移动ip网络 移动ip扩展技术 移动agent 秘密共享方案 离散对数难题 短信息服务体系 知识库 盲代理签名 盲代理多重签名 监控系统 监控代理 电能质量 生物免疫 环签名 消息转换机制 消息中间件 测试部署 流媒体 检测元 框架 构件代理 构件cache 机车维护 本地缓存 服务质量 服务虚拟化 服务聚类 服务组合 服务发现 服务代理 最短路径 智能代理 智能 普适计算 时间解耦 数据采集 数据网格 数据流 数据挖掘 数字证书认证 搜索引擎 控制反转 授权代理 授权 报警控 5 6 7 8 9 10 11 12 13 14 15 16 17 18 19 20 21 22 23 24 25 26 27 28 29 30 31 32 33 34 35 36 37 38 39 40 41 42 43 44 45 46 47 48 49 50 51 52
伯南克ATP云恶意软件检测API设置指南说明书
Table of ContentsThreat Intelligence Open APIThreat Intelligence Open APIJuniper Advanced Threat Prevention Cloud (Juniper ATP Cloud) provides the following APIs that can help you keep your network free of sophisticated malware and cyberattacks by using superior cloud-based protection:Threat Intelligence API OverviewThe Threat Intelligence open API allows you to program the Juniper ATP Cloud Command and Control server (C&C) feeds to suit your requirements. You can perform the following operations using the threat intelligence API:•Inject an IP, URL, or domain into a C&C feed with a threat level from 1 through 10. You can create up to 30 different custom C&C feeds.•An IP can be an IP address, IP range, or IP subnet.•Both IPv4 and IPv6 addresses are supported.•Update the threat level of an IP, URL, or domain from 1 through 10.•Delete a specific server in the feed or delete the entire feed.•Retrieve the current status of an operation (processing) or errors (if any) from the feed processing engine.The Threat Intelligence API supports a Swagger API specification in JSON format to allow programmatic access to it. For more information on the Swagger API specification, see https://threat-/swagger.json.NOTE: Starting in Junos OS 19.2, SRX Series Firewalls support inspection of encrypted traffic(HTTPS) as well as HTTP traffic in threat intelligence feeds. Server name identification (SNI)checks are also supported. These changes do not introduce new CLI commands. Existingcommands make use of this functionality.The following table lists the rate limits (number of requests you can make per minute) for the Threat Intelligence APIs. If you exceed these rate limits, you will receive a 429 - Too many Requests error.Configuration and SetupT o access the API, you must create an application token in the Juniper ATP Cloud Web UI and use that token as the bearer token in the authorization header.T o generate an application token:1.Log in to the Juniper ATP Cloud Web UI using your credentials. Select Administration > ApplicationT okens and click the plus (+) sign. Fill in the name of the token and other required details in the pop-up box that appears and click OK to create a new token. See Figure 1 on page 3.Figure 1: Creating an Application T oken2.A confirmation pop-up message appears, indicating the creation of a new token, as shown in Figure 2on page 3. You can now use this token to access the Juniper ATP Cloud API.Figure 2: Confirming the Creation of an Application T okenNOTE: You can generate a maximum of 10 tokens per user, and each token is valid for oneyear.For more information on how to create application tokens, see Creating Application T okens.Usage ExamplesThe following cURL examples illustrate the use of the threat intelligence API:•curl -k -v -XPOST -H "Authorization: Bearer <TOKEN>" -F file=@/tmp/whitelist.txt <API HOST>/v1/cloudfeeds/ whitelist/file/ip/<FEEDNAME>•curl -k -v -XPOST -H "Authorization: Bearer <TOKEN>" -F file=@/tmp/whitelist.txt <API HOST>/v1/cloudfeeds/cc/ file/ip/<FEEDNAME>where:•API HOST is the name of the Open API hostname corresponding to the location of the customer portal.Please refer to Table 1 on page 5 for the correct hostname for your location.•TOKEN is the application token generated in the Juniper ATP Cloud Web UI.•FEED NAME is the name of the feed you want to create.Juniper ATP Cloud API OverviewYou can perform the following operations using the Juniper ATP Cloud API:•Retrieve the blocklist or allowlist for the specific server type.•Update an IP, URL, or FQDN in a blocklist or allowlist server list.•An IP can be an IP address, IP range, or IP subnet.•Both IPv4 and IPv6 addresses are supported.•Delete a specific server in the list or delete the entire list.The Juniper ATP Cloud API supports a Swagger API specification in JSON format to allow programmatic access to it. For more information on the Swagger API specification, see https:///swagger.json.The following table lists the rate limits (number of requests you can make per minute) for the Juniper ATP Cloud APIs. If you exceed these rate limits, you will receive a 429 - Too many Requests error.NOTE: Juniper ATP Cloud supports up to 3,000 entries in the allowlist and 3,000 entires in the blocklist.Configuration and SetupT o access the API, you must create an application token in the Juniper ATP Cloud Web UI and use that token as the bearer token in the authorization header. See section"Configuration and Setup" on page 2 for more information on the creation of the token.Juniper ATP Cloud URLsJuniper ATP Cloud hostnames varies by location. Please refer to the following table:Table 1: Juniper ATP Cloud URLs by LocationTable 1: Juniper ATP Cloud URLs by Location(Continued)Usage ExampleThe following cURL example illustrates the use of the Juniper ATP Cloud API:•curl -k -v -XPOST -H "Authorization: Bearer <TOKEN>” -F file=@/tmp/blacklist.txt <API HOSTNAME>/v1/skyatp/ blacklist/file/ip/<FEED NAME>where:•API HOST is the name of the Open API hostname corresponding to the location of the customer portal.Please refer to Table 1 on page 5 for the correct hostname for your location.•TOKEN is the application token generated in the Juniper ATP Cloud Web UI.•FEED NAME is the name of the feed you want to create.File/Hash API OverviewThe file/hash API lets you submit files for analysis. You can perform the following operations:•Look up sample malware scores by hash.•Submit samples for malware analysis.•Update an IP, URL, or FQDN from a file in a specific list.•An IP can be an IP address, IP range, or IP subnet.•Both IPv4 and IPv6 addresses are supported.The file/hash API supports a Swagger API specification in JSON format to allow programmatic access to it. For more information on the Swagger API specification, see https:/// swagger.json.Configuration and SetupT o access the API, you must create an application token in the Juniper ATP Cloud Web UI and use that token as the bearer token in the authorization header. See section"Configuration and Setup" on page 2 for more information on the creation of the token.Usage ExampleThe following cURL example illustrates the use of the file/hash API:•curl -H "Authorization: Bearer<TOKEN>” -k <API HOSTNAME>/v1/skyatp/lookup/hash/<SHA256>?full_report=true •curl -H "Authorization: Bearer<TOKEN>” -k -F file=@/srv/sample.exe <API HOSTNAME>/v1/skyatp/submit/sampleNOTE: API HOST is the name of the Open API hostname corresponding to the location of thecustomer portal. Please refer to Table 1 on page 5 for the correct hostname for your location.where:•TOKEN is the application token generated in the Juniper ATP Cloud Web UI.•SHA256 is the sample hash. Only SHA256 is supported at this time.Full reports will be completely supported in an upcoming release. The report you receive right now may slightly different in appearance and content.Infected Host API OverviewThe infected host feed is generated by Juniper ATP Cloud and is used to flag compromised hosts. The feed is dynamic. Hosts are automatically added when Juniper ATP Cloud suspects a host has been compromised (through a proprietary algorithm) and can be manually removed from the list through the user interface once you feel the host is no longer compromised. The feed lists the IP address or IP subnet of the host along with a threat level, for example, xxx.xxx.xxx.133 and threat level 5. This feed is unique to a realm and IP addresses within the real are assumed to be non-overlapping.Associated with the infected host feed are a allowlist and blocklist. These are different from the generic Juniper ATP Cloud allowlist and blocklist. The infected host feed uses these lists to remove hosts that are currently on an infected host feed (allowlist) and to always list a host in the infected host feed (blocklist.)With the infected host API, you can do the following:•Return a list of all IP addresses in the current infected host feed.•Return a list of all IP addresses in the infected host allowlist or blocklist.•Delete an IP address from the infected host allowlist or blocklist.•Add an IP address to the infected host allowlist or blocklist.The infected host API supports a Swagger API specification in JSON format to allow programmatic access to it. For more information on the Swagger API specification, see https:///swagger.json.Configuration and SetupT o access the API, you must create an application token in the Juniper ATP Cloud Web UI and use that token as the bearer token in the authorization header. See section"Configuration and Setup" on page 2 for more information on the creation of the token.IP Filter API OverviewA Dynamic Address Entry (DAE) provides dynamic IP address information to security policies. A DAE is a group of IP addresses, not just a single IP prefix, that can be imported. These IP addresses are for specific domains or for entities that have a common attribute such as a particular undesired location that poses a threat. The administrator can then configure security policies to use the DAE within a security policy. When the DAE is updated, the changes automatically become part of the security policy. There isno need to update the policy manually. Note that this is an IP address-only feed. It does not support URLs or fully qualified domain names (FQDNs).The IP filter APIs let you perform the following tasks:•Remove IP addresses (in a .csv file) from an IP filter feed•Add IP addresses (in a .csv file) to an IP filter feed.•Remove a specific IP address from the IP filter feed.•Add a specific IP address to the IP filter feed.•Remove a specific IP filter feed.•Get the processing status of a specific IP Filter feed.The IP filter API supports a Swagger API specification in JSON format to allow programmatic access to it. For more information on the Swagger API specification, see https:/// swagger.json.Configuration and SetupT o access the API, you must create an application token in the Juniper ATP Cloud Web UI and use that token as the bearer token in the authorization header. See section"Configuration and Setup" on page 2 for more information on the creation of the token.ExampleIn this example, targeted attacked are being performed against web servers in a DMZ while concealing their identities via T or. T or exit nodes move frequently and keeping an up-to-date list of all 1000+ exit nodes within a firewall policy is almost impossible. This can, however, be done easily using Juniper ATP Cloud APIs. For more information on this example, see Automating Cyber Threat Intelligence with Sky ATP.Shown below is an example script that performs the following actions:•Polls the official T orProject's exit-node list via cURL and extracts legitimate IP information via grep.•Utilizes Juniper ATP Cloud open API to install and propagate third-party threat intelligence to all SRX Series Firewalls in the network.•Runs on an hourly basis via cron to ensure that the active T or Relays are always being blocked. #!/bin/bash# Define Application Token (Paste in your value between the "")APPToken="Your_Application_Token_Here"# Define the name of the feed you wish to createFeedName="Tor_Exit_Nodes"#Define temporary file to store address listTorList=/var/tmp/torlist.txt# cURL fetches Tor Relay list from https:///exit-addresses# grep identifies and extracts valid IP addresses from the listcurl -k https:///exit-addresses | grep -E -o'(25[0-5]|2[0-4][0-9]|[01]?[0-9][0-9]?)\.(25[0-5]|2[0-4][0-9]|[01]?[0-9][0-9]?)\.(25[0-5]|2[0-4][0-9]|[01]?[0-9][0-9]?)\.(25[0-5]|2[0-4][0-9]|[01]?[0-9][0-9]?)' > $TorList#Remove old Feed information before uploading new listcurl -k -v -XDELETE -H "Authorization: Bearer $APPToken" -F server='*' https:///v1/cloudfeeds/blacklist/param/ip/${FeedName}# Wait for 5 seconds before uploading new listsleep 5#Upload List to SkyATP as Feed Tor_Exit_Nodescurl -k -v -XPOST -H "Authorization: Bearer $APPToken" -F file=@${TorList} https:///v1/cloudfeeds/blacklist/file/ip/${FeedName}# Cleanuprm $TorList# ExitOnce the script has been run successfully, we can see that the latest T or Nodes are being blocked during an ICMP request below (feed-name=Tor_Exit_Nodes)<14>12016-10-17T15:18:11.618ZSRX-1500RT_SECINTEL-SECINTEL_ACTION_LOG[*********.x.x.x.137 category="secintel" sub-category="Blacklist" action="BLOCK" action-detail="DROP" http-host="N/A" threat-severity="0" source-address="5.196.121.161" source-port="1" destination-address="x.x.0.10" destination-port="24039" protocol-id="1" application="N/A" nested-application="N/A" feed-name="Tor_Exit_Nodes" policy-name="cc_policy" profile-name="Blacklist" username="N/A" roles="N/A" session-id-32="572564" source-zone-name="Outside" destination-zone-name="DMZ"] category=secintel sub-category=Blacklist action=BLOCK action-detail=DROP http-host=N/A threat-severity=0 source-address=x.x.0.110 source-port=1 destination-address=x.x.x.161 destination-port=24039 protocol-id=1 application=N/A nested-application=N/A feed-name=Tor_Exit_Nodes policy-name=cc_policy profile-name=Blacklist username=N/A roles=N/A session-id-32=572564 source-zone-name=Outside destination-zone-name=DMZSRX Series Update Intervals for Cloud FeedsThe following table provides the update intervals for each feed type. Note that when the SRX Series Firewall makes requests for new and updated feed content, if there is no new content, no updates are downloaded at that time.Table 2: Feed Update IntervalsTable 2: Feed Update Intervals (Continued)Open API for DNS CategoryThe following table provides the feed manifest that is downloaded by the SRX Series Firewall. Table 3: Feed ManifestTable 3: Feed Manifest (Continued)RELATED DOCUMENTATIONThreat Intelligence Open API Reference GuideJuniper Sky ATP Open API Reference GuideJuniper Networks, the Juniper Networks logo, Juniper, and Junos are registered trademarks of JuniperNetworks, Inc. in the United States and other countries. All other trademarks, service marks, registeredmarks, or registered service marks are the property of their respective owners. Juniper Networks assumes no responsibility for any inaccuracies in this document. Juniper Networks reserves the right to change,modify, transfer, or otherwise revise this publication without notice. Copyright © 2023 Juniper Networks, Inc. All rights reserved.。
- 1、下载文档前请自行甄别文档内容的完整性,平台不提供额外的编辑、内容补充、找答案等附加服务。
- 2、"仅部分预览"的文档,不可在线预览部分如存在完整性等问题,可反馈申请退款(可完整预览的文档不适用该条件!)。
- 3、如文档侵犯您的权益,请联系客服反馈,我们会尽快为您处理(人工客服工作时间:9:00-18:30)。
Network Working Group C. Monia Request for Comments: 4174 Consultant Category: Standards Track J. Tseng Riverbed Technology K. Gibbons McDATA Corporation September 2005 The IPv4 Dynamic Host Configuration Protocol (DHCP) Optionfor the Internet Storage Name ServiceStatus of This MemoThis document specifies an Internet standards track protocol for the Internet community, and requests discussion and suggestions forimprovements. Please refer to the current edition of the "InternetOfficial Protocol Standards" (STD 1) for the standardization stateand status of this protocol. Distribution of this memo is unlimited. Copyright NoticeCopyright (C) The Internet Society (2005).AbstractThis document describes the Dynamic Host Configuration Protocol(DHCP) option to allow Internet Storage Name Service (iSNS) clientsto discover the location of the iSNS server automatically through the use of DHCP for IPv4. iSNS provides discovery and managementcapabilities for Internet SCSI (iSCSI) and Internet Fibre ChannelProtocol (iFCP) storage devices in an enterprise-scale IP storagenetwork. iSNS provides intelligent storage management servicescomparable to those found in Fibre Channel networks, allowing acommodity IP network to function in a similar capacity to that of astorage area network.Table of Contents1. Introduction (2)1.1. Conventions Used in This Document (2)2. iSNS Option for DHCP (3)2.1. iSNS Functions Field (5)2.2. Discovery Domain Access Field (6)2.3. Administrative Flags Field (7)2.4. iSNS Server Security Bitmap (8)3. Security Considerations (9)4. IANA Considerations (11)Monia, et al. Standards Track [Page 1]5. Normative References (11)6. Informative References (11)1. IntroductionThe Dynamic Host Configuration Protocol for IPv4 provides a framework for passing configuration information to hosts. Its usefulnessextends to hosts and devices using the iSCSI and iFCP protocols toconnect to block level storage assets over a TCP/IP network.The iSNS Protocol provides a framework for automated discovery,management, and configuration of iSCSI and iFCP devices on a TCP/IPnetwork. It provides functionality similar to that found on FibreChannel networks, except that iSNS works within the context of an IP network. iSNS thereby provides the requisite storage intelligence to IP networks that are standard on existing Fibre Channel networks.Existing DHCP options cannot be used to find iSNS servers for thefollowing reasons:a) iSNS functionality is distinctly different from other protocolsusing DHCP options. Specifically, iSNS provides a significantsuperset of capabilities compared to typical name resolutionprotocols such as DNS. It is designed to support client devicesthat allow themselves to be configured and managed from a central iSNS server.b) iSNS requires a DHCP option format that provides more than thelocation of the iSNS server. The DHCP option has to specify thesubset of iSNS services that may be actively used by the iSNSclient.The DHCP option number for iSNS is used by iSCSI and iFCP devices to discover the location and role of the iSNS server. The DHCP optionnumber assigned for iSNS by IANA is 83.1.1. Conventions Used in This DocumentiSNS refers to the Internet Storage Name Service framework, whichconsists of the storage network model and associated services.The key words "MUST", "MUST NOT", "REQUIRED", "SHALL", "SHALL NOT","SHOULD", "SHOULD NOT", "RECOMMENDED", "MAY", and "OPTIONAL" in this document are to be interpreted as described in [RFC2119].All frame formats are in big-endian network byte order. RESERVEDfields SHOULD be set to zero.Monia, et al. Standards Track [Page 2]This document uses the following terms:"iSNS Client" - iSNS clients are processes resident in iSCSI andiFCP devices that initiate transactions with the iSNS server using the iSNS Protocol."iSNS Server" - The iSNS server responds to iSNS protocol queryand registration messages and initiates asynchronous notification messages. The iSNS server stores information registered by iSNSclients."iSCSI (Internet SCSI)" - iSCSI is an encapsulation of SCSI for a new generation of storage devices interconnected with TCP/IP."iFCP (Internet Fibre Channel Protocol)" - iFCP is a gateway-to-gateway protocol designed to interconnect existing Fibre Channeldevices using TCP/IP. iFCP maps the Fibre Channel transport andfabric services to TCP/IP.2. iSNS Option for DHCPThis option specifies the location of the primary and backup iSNSservers and the iSNS services available to an iSNS client.0 1 2 30 1 2 3 4 5 6 7 8 9 0 1 2 3 4 5 6 7 8 9 0 1 2 3 4 5 6 7 8 9 0 1+-+-+-+-+-+-+-+-+-+-+-+-+-+-+-+-+-+-+-+-+-+-+-+-+-+-+-+-+-+-+-+-+| Code = 83 | Length | iSNS Functions |+-+-+-+-+-+-+-+-+-+-+-+-+-+-+-+-+-+-+-+-+-+-+-+-+-+-+-+-+-+-+-+-+| DD Access | Administrative FLAGS |+-+-+-+-+-+-+-+-+-+-+-+-+-+-+-+-+-+-+-+-+-+-+-+-+-+-+-+-+-+-+-+-+| iSNS Server Security Bitmap |+-+-+-+-+-+-+-+-+-+-+-+-+-+-+-+-+-+-+-+-+-+-+-+-+-+-+-+-+-+-+-+-+| a1 | a2 | a3 | a4 |+-+-+-+-+-+-+-+-+-+-+-+-+-+-+-+-+-+-+-+-+-+-+-+-+-+-+-+-+-+-+-+-+| b1 | b2 | b3 | b4 |+-+-+-+-+-+-+-+-+-+-+-+-+-+-+-+-+-+-+-+-+-+-+-+-+-+-+-+-+-+-+-+-+| . . . . || Additional Secondary iSNS Servers || . . . . |+-+-+-+-+-+-+-+-+-+-+-+-+-+-+-+-+-+-+-+-+-+-+-+-+-+-+-+-+-+-+-+-+Figure 1. iSNS Server OptionMonia, et al. Standards Track [Page 3]The iSNS Option specifies a list of IP addresses used by iSNSservers. The option contains the following parameters:Length: The number of bytes that follow the Length field.iSNS Functions: A bitmapped field defining the functions supported by the iSNS servers. The format of this field is described in section 2.1.Discovery Domain Access: A bit field indicating the types of iSNS clients that are allowed to modify Discovery Domains. Thefield contents are described in section 2.2.Administrative Flags field: Contains the administrative settingsfor the iSNS servers discovered through the DHCP query. The contents of this field are described in section 2.3.iSNS Server Security Bitmap: Contains the iSNS server securitysettings specified in section 2.4.a1...a4: Depending on the setting of the Heartbeat bit in theAdministrative Flags field (see section 2.3), this fieldcontains either the IP address from which the iSNS heartbeat originates (see [iSNS]) or the IP address of the primaryiSNS server.b1...b4: Depending on the setting of Heartbeat bit in theAdministrative Flags field (see section 2.3), this fieldcontains either the IP address of the primary iSNS server or that of a secondary iSNS server.Additional Secondary iSNS Servers: Each set of four octetsspecifies the IP address of a secondary iSNS server.The Code field through IP address field a1...a4 MUST be present inevery response to the iSNS query; therefore the Length field has aminimum value of 14.If the Heartbeat bit is set in the Administrative Flags field (seesection 2.3), then b1...b4 MUST also be present. In this case, theminimum value of the Length field is 18.The inclusion of Additional Secondary iSNS Servers in the responseMUST be indicated by increasing the Length field accordingly.Monia, et al. Standards Track [Page 4]2.1. iSNS Functions FieldThe iSNS Functions Field defines the iSNS server’s operational role(i.e., how the iSNS server is to be used). The iSNS server’s rolecan be as basic as providing simple discovery information, or assignificant as providing IKE/IPSec security policies and certificates for the use of iSCSI and iFCP devices. The format of the iSNSFunctions field is shown in Figure 2.0 1 10 1 2 3 4 5 6 7 8 9 0 1 2 3 4 5+-+-+-+-+-+-+-+-+-+-+-+-+-+-+-+-+| RESERVED |S|A|E|+-+-+-+-+-+-+-+-+-+-+-+-+-+-+-+-+Figure 2. iSNS Functions FieldBit Field Significance--------- ------------15 Function Fields Enabled14 DD-Based Authorization13 Security Policy DistributionThe following are iSNS Functions Field definitions:Function Fields Specifies the validity of the remainingEnabled: iSNS Function fields. If it is set to one, then the contents of all other iSNS Function fieldsare valid. If it is set to zero, then thecontents of all other iSNS Function fields MUSTbe ignored.DD-based Indicates whether devices in a commonAuthorization: Discovery Domain (DD) are implicitly authorizedto access one another. Although DiscoveryDomains control the scope of device discovery,they do not necessarily indicate whether a domain member is authorized to access discovereddevices. If this bit is set to one, then devices in a common Discovery Domain are automaticallyallowed access to each other (if successfullyauthenticated). If this bit is set to zero, then access authorization is not implied by domainmembership and must be explicitly performed byeach device. In either case, devices not in acommon discovery domain are not allowed to access each other.Monia, et al. Standards Track [Page 5]Security Policy Indicates whether the iSNS client is toDistribution: download and use the security policyconfiguration stored in the iSNS server. If itis set to one, then the policy is stored in theiSNS server and must be used by the iSNS clientfor its own security policy. If it is set tozero, then the iSNS client must obtain itssecurity policy configuration by other means.2.2. Discovery Domain Access FieldThe format of the DD Access bit field is shown in Figure 3.0 1 1 1 1 1 10 ... 9 0 1 2 3 4 5+---+---+---+---+---+---+---+---+---+| RESERVED | if| tf| is| ts| C | E |+---+---+---+---+---+---+---+---+---+Figure 3. Discovery Domain Access FieldBit Field Significance--------- ------------15 Enabled14 Control Node13 iSCSI Target12 iSCSI Initiator11 iFCP Target Port10 iFCP Initiator PortThe following are Discovery Domain Access Field definitions:Enabled: Specifies the validity of the remaining DDAccess bit field. If it is set to one, thenthe contents of the remainder of the DD Access field are valid. If it is set to zero, thenthe contents of the remainder of this fieldMUST be ignored.Control Node: Specifies whether the iSNS server allowsDiscovery Domains to be added, modified, ordeleted by means of Control Nodes. If it isset to one, then Control Nodes are allowed tomodify the Discovery Domain configuration. If it is set to zero, then Control Nodes are notallowed to modify Discovery Domainconfigurations.Monia, et al. Standards Track [Page 6]iSCSI Target, Determine whether the respectiveiSCSI Initiator, registered iSNS client (determinediFCP Target Port, by iSCSI Node Type or iFCP Port Role)iFCP Initiator is allowed to add, delete, or modifyPort: Discovery Domains. If they are set to one,then modification by the specified client type is allowed. If they are set to zero, thenmodification by the specified client type isnot allowed.(A node may implement multiple node types.)2.3. Administrative Flags FieldThe format of the Administrative Flags bit field is shown in Figure4.0 1 10 1 2 3 4 5 6 7 8 9 0 1 2 3 4 5+-+-+-+-+-+-+-+-+-+-+-+-+-+-+-+-+| RESERVED |D|M|H|E|+-+-+-+-+-+-+-+-+-+-+-+-+-+-+-+-+Figure 4. Administrative FlagsBit Field Significance--------- ------------15 Enabled14 Heartbeat13 Management SCNs12 Default Discovery DomainThe following are Administrative Flags Field definitions:Enabled: Specifies the validity of the remainder of the Administrative Flags field. If it is set toone, then the contents of the remainingAdministrative Flags are valid. If it is setto zero, then the remaining contents MUST beignored, indicating that iSNS administrativesettings are obtained through means other than DHCP.Heartbeat: Indicates whether the first IP address is themulticast address to which the iSNS heartbeatmessage is sent. If it is set to one, thena1-a4 contains the heartbeat multicast address and b1-b4 contains the IP address of theMonia, et al. Standards Track [Page 7]primary iSNS server, followed by the IPaddress(es) of any backup servers (see Figure1). If it is set to zero, then a1-a4 containthe IP address of the primary iSNS server,followed by the IP address(es) of any backupservers.Management SCNs: Indicates whether control nodes are authorized to register for receiving Management StateChange Notifications (SCNs). Management SCNsare a special class of State ChangeNotification whose scope is the entire iSNSdatabase. If this bit is set to one, thencontrol nodes are authorized to register forreceiving Management SCNs. If it is set tozero, then control nodes are not authorized to receive Management SCNs (although they mayreceive normal SCNs).Default Discovery Indicates whether a newly registeredDomain: device that is not explicitly placed into aDiscovery Domain (DD) and Discovery Domain Set (DDS) should be automatically placed into adefault DD and DDS. If it is set to one, then a default DD shall contain all devices in theiSNS database that have not been explicitlyplaced into a DD by an iSNS client. If it isset to zero, then devices not explicitly placed into a DD are not members of any DD.2.4. iSNS Server Security BitmapThe format of the iSNS server security Bitmap field is shown inFigure 5. If valid, this field communicates to the DHCP client thesecurity settings that are required to communicate with the indicated iSNS server.0 1 2 30 1 2 3 4 5 6 7 8 9 0 1 2 3 4 5 6 7 8 9 0 1 2 3 4 5 6 7 8 9 0 1+-+-+-+-+-+-+-+-+-+-+-+-+-+-+-+-+-+-+-+-+-+-+-+-+-+-+-+-+-+-+-+-+| RESERVED |T|X|P|A|M|S|E|+-+-+-+-+-+-+-+-+-+-+-+-+-+-+-+-+-+-+-+-+-+-+-+-+-+-+-+-+-+-+-+-+Figure 5. iSNS Server Security BitmapMonia, et al. Standards Track [Page 8]Bit Field Significance--------- ----------------31 Enabled30 IKE/IPSec29 Main Mode28 Aggressive Mode27 PFS26 Transport Mode25 Tunnel ModeThe following are iSNS Server Security Bitmap definitions:Enabled: Specifies the validity of the remainder of the iSNS server security bitmap. If it is set toone, then the contents of the remainder of the field are valid. If it is set to zero, thenthe contents of the rest of the field areundefined and MUST be ignored.IKE/IPSec: 1 = IKE/IPSec enabled; 0 = IKE/IPSec disabled. Main Mode: 1 = Main Mode enabled; 0 = Main Mode disabled. Aggressive Mode: 1 = Aggressive Mode enabled;0 = Aggressive Mode disabled.PFS: 1 = PFS enabled; 0 = PFS disabled.Transport Mode: 1 = Transport Mode preferred; 0 = Nopreference.Tunnel Mode: 1 = Tunnel Mode preferred; 0 = No preference.If IKE/IPSec is disabled, this indicates that the Internet KeyExchange (IKE) Protocol is not available to configure IPSec keys for iSNS sessions to this iSNS server. It does not necessarily preclude other key exchange methods (e.g., manual keying) from establishing an IPSec security association for the iSNS session.If IKE/IPsec is enabled, then for each of the bit pairs <Main Mode,Aggressive Mode> and <Transport Mode, Tunnel Mode>, one of the twobits MUST be set to 1, and the other MUST be set to 0.3. Security ConsiderationsFor protecting the iSNS option, the DHCP Authentication securityoption as specified in [RFC3118] may present a problem due to thelimited implementation and deployment of the DHCP authentication Monia, et al. Standards Track [Page 9]option. The IPsec security mechanisms for iSNS itself are specified in [iSNS] to provide confidentiality when sensitive information isdistributed via iSNS. See the Security Considerations section of[iSNS] for details and specific requirements for implementation ofIPsec.In addition, [iSNS] describes an authentication block that providesmessage integrity for multicast or broadcast iSNS messages (i.e., for heartbeat/discovery messages only). See [RFC3723] for furtherdiscussion of security for these protocols.If no sensitive information, as described in [iSNS], is beingdistributed via iSNS, and an Entity is discovered via iSNS,authentication and authorization are handled by the IP Storageprotocols whose endpoints are discovered via iSNS; specifically, iFCP [iFCP] and iSCSI [RFC3720]. It is the responsibility of theproviders of these services to ensure that an inappropriatelyadvertised or discovered service does not compromise their security. When no DHCP security is used, there is a risk of distribution offalse discovery information (e.g., via the iSNS DHCP optionidentifying a false iSNS server that distributes the false discovery information). The primary countermeasure for this risk isauthentication by the IP storage protocols discovered through iSNS.When this risk is a significant concern, IPsec SAs SHOULD be used (as specified in RFC 3723). For example, if an attacker uses DHCP andiSNS to distribute discovery information that falsely identifies aniSCSI endpoint, that endpoint will lack the credentials necessary to complete IKE authentication successfully, and therefore will beprevented from falsely sending or receiving iSCSI traffic. When this risk of false discovery information is a significant concern andIPsec is implemented for iSNS, IPsec SAs SHOULD also be used for iSNS traffic to prevent use of a false iSNS server; this is more robustthan relying only on the IP Storage protocols to detect falsediscovery information.When IPsec is implemented for iSNS, there is a risk of a denial-of-service attack based on repeated use of false discovery informationthat will cause initiation of IKE negotiation. The countermeasuresfor this are administrative configuration of each iSNS Entity tolimit the peers it is willing to communicate with (i.e., by IPaddress range and/or DNS domain), and maintenance of a negativeauthentication cache to avoid repeatedly contacting an iSNS Entitythat fails to authenticate. These three measures (i.e., IP addressrange limits, DNS domain limits, negative authentication cache) MUST be implemented for iSNS entities when this DHCP option is used. Ananalogous argument applies to the IP storage protocols that can bediscovered via iSNS as discussed in RFC 3723.Monia, et al. Standards Track [Page 10]In addition, use of the techniques described in [RFC2827] and[RFC3833] may also be relevant to reduce denial-of-service attacks. 4. IANA ConsiderationsIn accordance with the policy defined in [DHCP], IANA has assigned a value of 83 for this option.There are no other IANA-assigned values defined by thisspecification.5. Normative References[DHCP] Droms, R., "Dynamic Host Configuration Protocol", RFC 2131, March 1997.[iSNS] Tseng, J., Gibbons, K., Travostino, F., Du Laney, C., andJ. Souza, "Internet Storage Name Service (iSNS)", RFC 4171, September 2005.[RFC2119] Bradner, S., "Key words for use in RFCs to IndicateRequirement Levels", BCP 14, RFC 2119, March 1997.[RFC3118] Droms, R. and W. Arbaugh, "Authentication for DHCPMessages", RFC 3118, June 2001.[RFC3720] Satran, J., Meth, K., Sapuntzakis, C., Chadalapaka, M., and E. Zeidner, "Internet Small Computer Systems Interface(iSCSI)", RFC 3720, April 2004.[RFC3723] Aboba, B., Tseng, J., Walker, J., Rangan, V., and F.Travostino, "Securing Block Storage Protocols over IP", RFC 3723, April 2004.6. Informative References[iFCP] Monia, C., Mullendore, R., Travostino, F., Jeong, W., andM. Edwards, "iFCP - A Protocol for Internet Fibre ChannelStorage Networking", RFC 4172, September 2005.[RFC2827] Ferguson, P. and D. Senie, "Network Ingress Filtering:Defeating Denial of Service Attacks which employ IP Source Address Spoofing", BCP 38, RFC 2827, May 2000.[RFC3833] Atkins, D. and R. Austein, "Threat Analysis of the DomainName System (DNS)", RFC 3833, August 2004.Monia, et al. Standards Track [Page 11]Authors’ AddressesKevin GibbonsMcDATA Corporation4555 Great America ParkwaySanta Clara, CA 95054-1208Phone: (408) 567-5765EMail: kevin.gibbons@Charles Monia7553 Morevern CircleSan Jose, CA 95135EMail: charles_monia@Josh TsengRiverbed Technology501 2nd Street, Suite 410San Francisco, CA 94107Phone: (650)274-2109EMail: joshtseng@Monia, et al. Standards Track [Page 12]Full Copyright StatementCopyright (C) The Internet Society (2005).This document is subject to the rights, licenses and restrictionscontained in BCP 78, and except as set forth therein, the authorsretain all their rights.This document and the information contained herein are provided on an "AS IS" basis and THE CONTRIBUTOR, THE ORGANIZATION HE/SHE REPRESENTS OR IS SPONSORED BY (IF ANY), THE INTERNET SOCIETY AND THE INTERNETENGINEERING TASK FORCE DISCLAIM ALL WARRANTIES, EXPRESS OR IMPLIED,INCLUDING BUT NOT LIMITED TO ANY WARRANTY THAT THE USE OF THEINFORMATION HEREIN WILL NOT INFRINGE ANY RIGHTS OR ANY IMPLIEDWARRANTIES OF MERCHANTABILITY OR FITNESS FOR A PARTICULAR PURPOSE. Intellectual PropertyThe IETF takes no position regarding the validity or scope of anyIntellectual Property Rights or other rights that might be claimed to pertain to the implementation or use of the technology described inthis document or the extent to which any license under such rightsmight or might not be available; nor does it represent that it hasmade any independent effort to identify any such rights. Information on the procedures with respect to rights in RFC documents can befound in BCP 78 and BCP 79.Copies of IPR disclosures made to the IETF Secretariat and anyassurances of licenses to be made available, or the result of anattempt made to obtain a general license or permission for the use of such proprietary rights by implementers or users of thisspecification can be obtained from the IETF on-line IPR repository at /ipr.The IETF invites any interested party to bring to its attention anycopyrights, patents or patent applications, or other proprietaryrights that may cover technology that may be required to implementthis standard. Please address the information to the IETF at ietf-ipr@.AcknowledgementFunding for the RFC Editor function is currently provided by theInternet Society.Monia, et al. Standards Track [Page 13]。