高清SDI监视器EPM8001功能说明书
高清网络视频服务器说明书v2.0

尊敬的用户,因本机功能设置较为专业,使用前,请您仔细阅读本系统用户手册。
高清型网络视频服务器使用手册声明本手册可能在某些技术细节方面描述不够准确或存在印刷错误,假如您在使用过程中按照使用手册无法解决问题时,请致电我公司技术部垂询相关操作方法。
本手册的内容将做不定期的更新,恕不另行通知。
使用注意事项1、安装环境✋远离高温的热源和环境;避免阳光直接照射;✋注意防水, 有水接触到设备时, 立即断电.✋避免在过于潮湿的环境使用, 请在参考的适用湿度范围(-25℃~ +80 ℃)内使用。
✋避免在过热或过冷环境使用, 请在参考的适用温度范围(85%RH以下)内使用。
✋本机应水平安装或壁挂安装,避免安装在会剧烈震动的场所,勿将其它设备放于本机上。
✋除去安装硬盘,不得私自拆机. 安装硬盘需专业人员操作2、运输与搬运✋本机的包装经过抗震设计和实验,确保在运输过程中服务器不会受到意外损坏,所以在搬运本机时,最好使用原来的包装材料和纸箱;✋运输装有硬盘的服务器时,务必将硬盘固定安装在服务器内的硬盘卡位内,并用螺丝固定,否则可能会造成硬盘损伤而影响正常工作;✋避免在过冷、过热的场所间相互搬动服务器,以免机器内部产生结露,影响机器的使用寿命;✋严禁带电搬动本机,否则会损坏硬盘和主板;目录1产品简介 (4)1.1产品简介 (4)1.2功能简介 (4)1.3技术规格 (4)2外观与说明 (5)3设备与安装 (7)3.1 运行环境 (7)3.2 设备安装 (7)4IE 版客户端 (7)4.1 准备工作 (7)4.2 开始登陆 (8)4.3 功能简介 (9)4.3.1实时监视 (9)4.3.2录像回放 (11)4.3.3参数设置 (12)4.3.3.1基本信息设置 (12)4.3.3.2网络参数设置 (16)4.3.3.3通道参数设置 (19)4.3.3.4报警参数设置 (23)4.3.3.5前端存储设置 (27)5升级软件 (29)6恢复出厂设置 (29)7常见问题解答 (30)7.1无法通过浏览器访问网络视频服务器? (30)7.2程序升级以后,无法正常播放视频 (30)7.3在Windows98上无法正常浏览图像 (31)7.4在PC机上播放录像文件的时候只有声音没有图像 (31)7.5如何使服务器在公网(Internet)上进行音视频传输服务 (31)7.6为何正常数据不能通过交换机 (31)7.7为何升级后通过浏览器访问网络视频服务器会出错? (32)8附录 (32)附录A 关于网络视频服务器端口占用(映射)的问题说明 (32)附录B 关于动态域名服务器的使用方法说明 (32)附录C 出厂默认参数 (33)1产品简介1.1产品简介感谢您使用本公司产品,我们将向您提供最好的服务。
迈普斯 230T1SB 全高清 LCD 监视器说明书
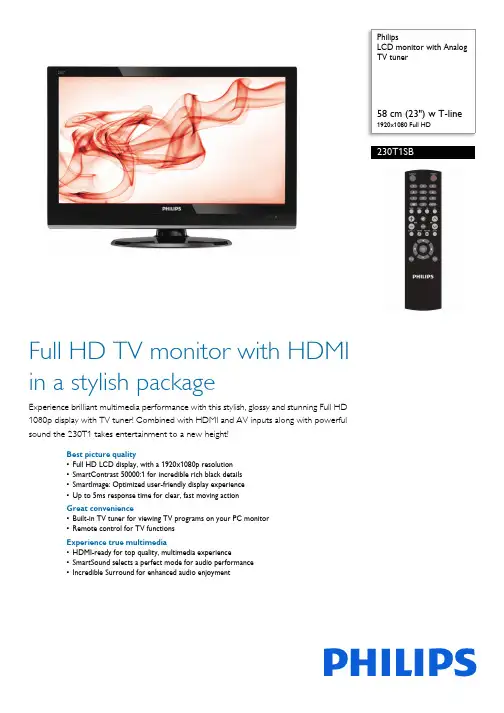
PhilipsLCD monitor with Analog TV tuner58 cm (23") w T-line1920x1080 Full HD230T1SBFull HD TV monitor with HDMI in a stylish packageExperience brilliant multimedia performance with this stylish, glossy and stunning Full HD 1080p display with TV tuner! Combined with HDMI and AV inputs along with powerful sound the 230T1 takes entertainment to a new height!Best picture quality•Full HD LCD display, with a 1920x1080p resolution •SmartContrast 50000:1 for incredible rich black details •SmartImage: Optimized user-friendly display experience •Up to 5ms response time for clear, fast moving action Great convenience•Built-in TV tuner for viewing TV programs on your PC monitor •Remote control for TV functionsExperience true multimedia•HDMI-ready for top quality, multimedia experience•SmartSound selects a perfect mode for audio performance •Incredible Surround for enhanced audio enjoymentHighlightsFull HD LCD display 1920x1080pThe Full HD screen has the widescreenresolution of 1920 x 1080p. This is the highest resolution of HD sources for the best possible picture quality. It is fully future proof as it supports 1080p signals from all sources, including the most recent like Blu-ray and advanced HD game consoles. The signalprocessing is extensively upgraded to support this much higher signal quality and resolution. It produces brilliant flicker-free progressive scan pictures with superb brightness and colors.HDMI ReadyAn HDMI-ready device has all the required hardware to accept High-DefinitionMultimedia Interface (HDMI) input. A HDMI cable enables high-quality digital video and audio all transmitted over a single cable from a PC or any number of AV sources (including set-top boxes, DVD players, A/V receivers and video cameras).SmartContrast ratio 50000:1You want the LCD flat display with the highest contrast and most vibrant images. Philips advanced video processing combined with unique extreme dimming and backlightboosting technology results in vibrant images. SmartContrast will increase the contrast with excellent blacklevel and accurate rendition of dark shades and colors. It gives a bright, lifelike picture with high contrast and vibrant colorsIncredible SurroundIncredible Surround is an audio technology from Philips that dramatically magnifies the sound field to immerse you in the audio. Using state-of-the-art electronic phase shifting, Incredible Surround mixes sounds from left and right in such a way that it expands the virtual distance between the two speakers. This wider spread greatly enhances the stereo effect and creates a more natural sounddimension. Incredible Surround allows you to experience total surround with greater depth and width of sound, without the use of additional speakers.5ms response timeResponse time measures signal reaction speed in milliseconds. Faster response time is better as it eliminates visible image artifacts that could dampen your experience when viewing fast moving images or objects. In this case, this LCD panel gives you 5ms response time so that you can watch your LCD TV with a clear,fast moving action.Issue date 2022-04-21Version: 1.0.212 NC: 8670 000 61584EAN: 87 12581 53478 3© 2022 Koninklijke Philips N.V.All Rights reserved.Specifications are subject to change without notice. Trademarks are the property of Koninklijke Philips N.V. or their respective owners.SpecificationsPicture/Display•Aspect ratio: Widescreen, 16:9•Brightness: 300 cd/m²•SmartContrast: 50000:1•Contrast ratio (typical): 1000:1•Diagonal screen size: 23 inch / 58.42 cm •Panel resolution: 1920 x 1080•Picture enhancement: Progressive scan, TrueVision•Response time (typical): 5 ms•Screen enhancement: Anti-Reflection coated screen•Viewing angle: 170º (H) / 160º (V)Supported Display Resolution•Computer formats Resolution Refresh rate 1920 x 1080 60Hz •Video formats Resolution Refresh rate 480i 60Hz 480p 60Hz 576i 50Hz 576p 50Hz 720p 50, 60Hz 1080i 50, 60Hz 1080p 50, 60HzSound•Output power (RMS): 2 x 3W•Sound Enhancement: Incredible Surround, Smart Sound•Sound System: Mono, StereoConvenience•Ease of Installation: Automatic Tuning System (ATS), Plug & Play•Ease of Use: On Screen Display, Program List, Side Control•Remote control: 230T1 Remote control•On-Screen Display languages: English, SimplifiedChinese•Other convenience: VESA mount (100x100mm)•Screen Format Adjustments: Widescreen, Normal, Zoom 1, Zoom 2•Smart mode: Movie, Standard, Personal, Vivid, Eco •SmartSound:Music, Speech, PersonalTuner/Reception/Transmission•Aerial Input: 75 ohm coaxial (IEC75)•TV system: PAL I, PAL B/G, PAL D/K •Video Playback: NTSC, PAL •Tuner Display:PLLConnectivity•Signal Input: VGA (Analog ), HDMI, PC Audio in•Ext 1: CVBS in, Audio L/R in •Ext 2: YPbPr in, Audio L/R in •Ext 3: CVBS out, Audio L/R out•Other connections: S-Video in, CVBS in, Audio L/R in, Headphone outPower•On mode: 49W (Typ.@monitor mode)•Off mode: 0.5W•Ambient temperature: 0 °C to 40 °C •Mains power: 100-240V, 50/60HzDimensions•Product with stand (mm): 399 x 560 x 176 mm •Product without stand (mm): 364 x 560 x 65 mm •Packaging in mm (WxHxD): 477 x 653 x 160 mmWeight•Product with stand (kg): 5.53 kg •Product without stand (kg): 5.35 kg •Product with packaging (kg): 7.59 kgAccessories•Included accessories: Table top stand, Power cord, Quick start guide, User Manual, Remote Control, Batteries for remote control。
监控使用说明书
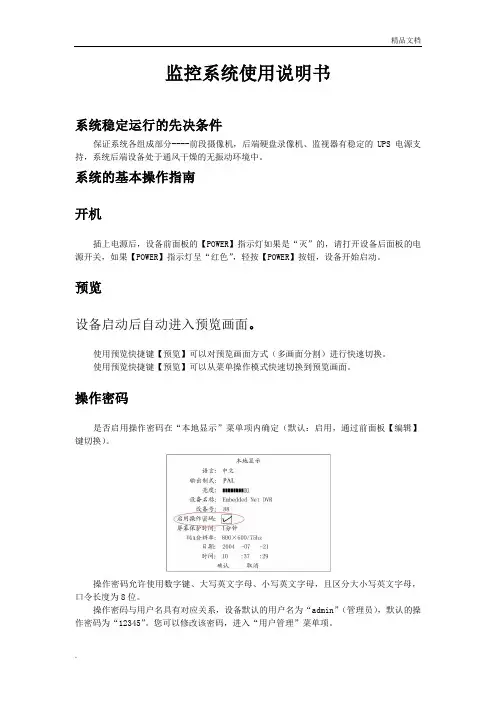
监控系统使用说明书系统稳定运行的先决条件保证系统各组成部分----前段摄像机,后端硬盘录像机、监视器有稳定的UPS电源支持,系统后端设备处于通风干燥的无振动环境中。
系统的基本操作指南开机插上电源后,设备前面板的【POWER】指示灯如果是“灭”的,请打开设备后面板的电源开关,如果【POWER】指示灯呈“红色”,轻按【POWER】按钮,设备开始启动。
预览设备启动后自动进入预览画面。
使用预览快捷键【预览】可以对预览画面方式(多画面分割)进行快速切换。
使用预览快捷键【预览】可以从菜单操作模式快速切换到预览画面。
操作密码是否启用操作密码在“本地显示”菜单项内确定(默认:启用,通过前面板【编辑】键切换)。
操作密码允许使用数字键、大写英文字母、小写英文字母,且区分大小写英文字母,口令长度为8位。
操作密码与用户名具有对应关系,设备默认的用户名为“admin”(管理员),默认的操作密码为“12345”。
您可以修改该密码,进入“用户管理”菜单项。
当启用口令后,使用【主菜单】快捷键从预览画面切换到菜单操作界面时,会出现输入用户名与密码的提示对话框。
当用户名或密码输入错误,硬盘录像机会产生告警提示音,连续3次输入错误,系统告警并返回预览界面。
【操作提示】输入用户名或密码时,注意输入法切换键【输入法】、【编辑】除了具有切换“✓”、“×”状态以外,在字符编辑状态下,还能删除光标前的字符。
手动录像通过前面板【录像】键直接进入手动录像操作界面。
通道状态绿色灯表示正在录像红色灯表示正在网传橙色灯表示既在录像又在网传。
启/停(通过【编辑】进行切换):✓:可以启动录像(这时对应的状态是“空闲”或“网传”)×:可以停止录像(这时对应的状态是“录像”或“录像&网传”)全部启动启动所有通道进行录像全部停止停止所有通道正在进行的录像回放通过前面板【放像】键直接进入回放操作界面。
以回放界面默认的条件(通道1、当天时间)来搜索文件,可直接按【确认】键,如果没有满足这些条件的录像资料,会显示如下提示:操操操操操操操操操操操操操您可以修改以下条件来检索历史录像资料:通道号:默认“通道1”;文件类型:全部、命令触发、开关量报警、移动侦测、定时默认,默认“全部”;时间段:起始时间(年月日时分秒)与终止时间,默认当天时间;回放方式时间检索,文件播放:输入起止时间,使时间检索有效(使之处于“✓”状态,默认),选择“搜索文件”,按【确认】键,列出文件列表(最多列出200个文件,通过“选择页号”进行翻页),选择要回放的文件,【确认】开始播放。
高分辨率显示屏产品说明书

User GuideIMPORTANT SAFETY INSTRUCTIONS:●Please read User Guide before using this product.●Please keep User Guide for future reference.●Please read the cautions to prevent possible danger and loss ofproperty.FEATURES:High resolution: 3840×2160;Wide voltage: DC 12-24V;High brightness: 400cd/㎡;High contrast: 1500:1;Visual menu icon;Quad view display.CAUTIONS:1. Please do not place the display screen towards the ground.2. Please avoid heavy impact or drop onto the ground.3. Please do NOT use chemical solutions to clean this product. Pleasewipe with a clean soft cloth to maintain the brightness of the surface.4.Please do not block any vent hole.5. Please follow the instructions and trouble-shootings to adjust theproduct. Other improper adjustment may result in damage. Any furtheradjustment must be performed or conducted by a qualified technician.6.Please unplug the power and remove the battery if long-term no-use,or thunder weather.Contents1. PRODUCT DESCRIPTION (3)2. BATTERY INSTALLATION (4)3. MENU SETTING (5)4. ACCESSORIES (7)5. PARAMETERS (8)6. TROUBLE SHOOTING (9)1. PRODUCT DESCRIPTION1.MENU Dial:Menu key:Press the dial to display menu on the screen whenscreen is lit.Options key:Left or right sliding the dial in the menu screen toselect the desired menu option.Confirm key:Press the dial to confirm the selected option.2.EXIT:To return or exit the menu function.3.F1、F2 User-definable buttons:Long press F1 or F2 key for 3-5 seconds to pop-up shortcut menu directly. As shown in Figure(default menu button in white font).F1:Display Mode F2:Display Rotate4. / INPUTPower:Long press for 3 or 5 seconds to power ON/OFF.Switch:Short press to switch among of DP,HDMI 1,HDMI 2,HDMI 3,HDMI 4 and 3G-SDI.5.Battery jar.6.Battery release button7.3G-SDI input/output interface.8.HDMI input interface.HDMI 1: HDMI2.0, support 4K 60HzHDMI 2~4: HDMI1.4, support 4K 30Hz9.DP input interface.10.Speaker.11.DC 12V power input.2. BATTERY INSTALLATION①Place battery to the slot, and then slide it down to finishmounting.②Press the battery release button, and then slide battery up totake it out.3. MENU SETTINGBefore setting the functions, please make sure the device is connected correctly.3-1. F1~F2 User-definable function buttons:Long press any F1-F2 key for 3-5 seconds to pop-up shortcut menu directly. As shown in Figure (default menu button in white font).Select option via sliding to the left or right.Press to confirm option as default, then press EXIT to exit.Functions of F1-F2 buttons can also be customized: Center Marker, Safety Marker, Aspect Marker, Aspect , Underscan, Check Filed, Freeze, Pixel to Pixel, Color Space, Peaking, False Color, Display Mode , Display Rotate and Display Mirror.F1-F2:2 user-definable function buttonsDefault function:F1:Display Mode F2:Display Rotate3-2. DialSliding the dial to activate the volume bar when not under the menu displaySlide the dial to adjust the value of option directly.Press “EXIT” to exit if accidentally enter the menu.After enter the Volume menu, press the dial to select among of Volume, Brightness, Contrast, Saturation, Hue, Sharpness, Backlight, Menu and Exit.3-3. MENU OperationWhen power on, press dial on the device, the menu of function setting will display on the screen.Sliding the dial to select the menu option;Then press the dial to confirm;Press“INPUT/EXIT”button to exit menu.4. ACCESSORIESStandard:1. 12V DC adapter 1 piece2. Folding sun shade cover 1 piece3. HDMI 2.0 A/C cable 1 piece4. VESA battery plate 1 piece5. Shoe mount 1 piece6. Manual 1 copy Optional:1. V-mount or Anton bauer mount 1 piece2. V-mount or Anton bauer mount power cable 1piece3. Li-ion Battery (F970) 1 piece5. PARAMETERS6. TROUBLE SHOOTING1. Only black-and-white display:Check whether the color saturation is properly setup or not.2. Power on but no pictures:Check whether the cables of DP, HDMI, and 3G-SDI are correctly connected or not. Please use the standard power adapter coming with the product package. Improper power input may cause damage.3. Wrong or abnormal colors:Check whether the cables are correctly and properly connected or not. Broken or loose pins of the cables may cause a bad connection.4. When on the picture shows size error:Press “MENU → FUNCTION → Underscan” to zoom in/out pictures automatically when receiving HDMI signals5. Other problems:Please press dial button and choos e “MENU→SYSTEM→ Reset →ON”6. According to the ISP, the machine can not function properly:ISP for program upgrades, non-professionals do not use. Please reboot your device if press accidentally!Note: due to constant effort to improve products and product features, specifications may change without notice.。
VX9e 8.9英寸HD-SDI视场监控器快速入门指南说明书
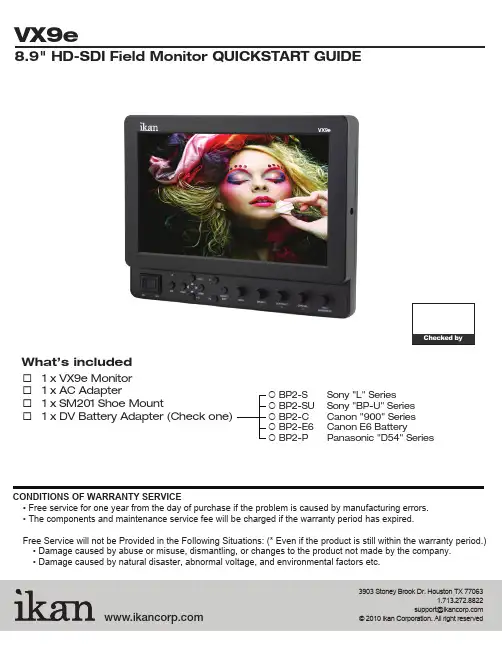
CONDITIONS OF WARRANTY SERVICE• Free service for one year from the day of purchase if the problem is caused by manufacturing errors. • The components and maintenance service fee will be charged if the warranty period has expired.Free Service will not be Provided in the Following Situations: (* Even if the product is still within the warranty period.) • Damage caused by abuse or misuse, dismantling, or changes to the product not made by the company. • Damage caused by natural disaster, abnormal voltage, and environmental factors etc.3903 Stoney Brook Dr. Houston TX 770631.713.272.8822********************What’s included☐ 1 x VX9e Monitor ☐ 1 x AC Adapter☐ 1 x SM201 Shoe Mount☐ 1 x DV Battery Adapter (Check one)BP2-S Sony "L" SeriesBP2-SU Sony "BP-U" Series BP2-C Canon "900" Series BP2-E6 Canon E6 BatteryBP2-PPanasonic "D54" Series1Power SwitchPower ON / OFFPower Indicator LightWhen the power is ON, the LED green lights up.SDI Selection SwitchSerial digital interface input (HD/SD compatible) VIDEO Selection SwitchVideo inputHDMI Selection SwitchHigh-De nition Multimedia Interface inputY/C Selection SwitchSVHS inputYPbPr Selection SwitchAnalog component or RGB input F1 and F2 ButtonsFunction key actions are selected in the menu. ASPECT/EXIT Selection ButtonAspect: 16:9, 4:3, FullIn MENU, it is to exit the menu.MENU KnobIt is to display menu, select settings, and adjustments. (Push the knob to select, turn the knob to adjust settings.) BRIGHT/R Knob1: Adjust brightness 0 - 60 (30)2: Adjust red channelCONTRAST/G Knob1: Adjust contrast 0 - 60 (30)2: Adjust green channelCHROMA/B Knob1: Adjust chroma 0 - 60 (30)2: Adjust blue channeTINT/SHARPNESS Knob1: Adjust tint 0 - 60 (30)2: Adjust sharpness 0 - 60 (30)2 3 4 5 6 7891312111014User programmable function buttons.For quick access, the user mayprogram the F1 and F2 buttons toenable frequently accessed monitorfeatures. Via the main monitorcon guration menu, either button maybe assigned to perform the followingfunctions: Window 1, Window 2, HVdelay, Blue Gun, and Pixel to Pixel, .POWERING THE MONITOR1. Plug the AC power adapter into the power input jack (See rear view diagram or above).2. Attach the DV battery plate on the slot, and connect DV battery to the plate.3. Connect a pro battery using the optional pro battery plate and then plugging that plate with the power tap cable into the DC-In connector. The pro battery plate kits (PBK17-S or PBK17-A) allow you to go into the eld using standard V-Mount or Gold-Mount batteries.DIGITAL TO ANALOG CONVERSION [SDI > YUV]The monitor can convert digital SDI signals to Analog YUV . A signal from the SDI will be displayed on the YPbPr analog outputs. This is a straight digital to analog conversion only. There is no up converting, down converting or standards conversion available in this feature. This feature works in one direction SDI to analog. It will not work in reverse.67++CAUTION: TURN OFF POWER DC 12V-20VDC 12V - 20V+1HDMI terminal HDMI input onlyVIDEO terminal (BNC)IN : Composite signal input terminal OUT: : Input signal through-out terminal Y/C terminal IN : SVHS signal input terminalOUT: : Input signal through-out terminal YPbPr terminal (BNC)IN : Component signal input terminal OUT: : Input signal through-out terminal SDI (HD/SD) terminal (BNC)IN : SDI input terminal - 1.5GOUT: : Input signal through-out terminal (Reclock)DC 12V-20V power terminal Standard DC ConnectionDC 12V-20V power terminalXLR DC Connection Vesa 100mm Mount HolesThreaded for M4x.07 screws. Use to attach pro battery plate adapter or for mounting third party vesa mounts.USB terminalFor factory service use only¼-20 Threaded insert (on four sides of monitor)Mounting Monitor DV Battery Plate SlotMounting ikan DV battery plate23456789111089SPECIFICATIONSScreen Size : Diagonal 8.9" TFT - LCDResolution : 1024 x 600LCD Brightness : 180cd/mContrast Ratio : 300:1Viewing angles : 45°/45°(R/L) 15°/35°(U/L)Operating Volts : DC 12-20VPower Consumption : 8.5 Watt max.Operating Temp. : 0 to +50°CDimension : 9.125” x 7.0” x 1.625”Weight : 1.6 lbsSUPPORT RESOLUTION - HDMI, HD-SDI, Component, Composite (Not all modes supported on all inputs)480/59.94i 480/59.94p 576/50i576/50p720/23.98p 720/24p720/25p720/30p 720/50p720/59.94p720/60p1080/23.98psf1080/24psf1080/23.98p1080/24p1080/25p1080/29.97p1080/30p1080/50i1080/50p1080/59.94i1080/59.94p1080/60i1080/60pCONFIGURATION OF SETTING MENUSContrast 0-60Brightness 0-60Tint0-60Chroma 0-60Sharpness 0-60Color Temp. User 1-55600K6500K9300KOSDLanguageEnglishOSD Duration 5-60 second Chinese Fuction 1 Window 1 FrenchWindow2 Spanish HVDelayBlueGunPixelFuction 2 Window 1Window2HVDelayBlueGunPixelSystem Reset This function recalls user de ned values for the Red, Green and Blue settings .The user setting will remain in memory inde nitely and can be erased by using the reset option in the main menu.This function turns off the red and green channels of the display or set the display into monochrome mode and is used to calibrate the display when using SMPTE or ARIB color bar patterns. The blue only setting will allow the user to adjust the hue and saturation of the display and the monochrome may be used to set the brightness and contrast.This function displays the blanking portion of the incoming signal.The LCD panel in this display has a native display of 1024 x 600 pixels. A signal of any other resolution is scaled to t this native resolution. There may be time when it is desired to view the incoming signal without scaling. Enabling Pixel to Pixel mode turns off the scaling and displays a 1024x600 pixel window of the original image. Each pixel of the panel displays one pixel of the original image. The user may use the arrow buttons (buttons 5-8) on the monitor face to move the window left, right, up and down to see the desired portion of the image.This function displays a side by side compari-son of the incoming video signal. Pushing the F1/2 button one time will enter the mode. Each time the F1/2 button is pushed it will freeze the current frame on the right hand side of the display while the left continues to display the live signal. Pressing the exit button will exit the window mode. Use Window 1 for 16:9 signals and Window 2 for 4:3 signals.。
PM800快速参考手册
三级菜单 菜单名称
显示内容 PEAK 峰值需用量 PF 峰值同步功率因数
INC1 第1个增量电能
INC2 第2个增量电能
INC3 第3个增量电能
1 A相真实功率因数 2 B相真实功率因数 3 C相真实功率因数 TOTAL 总真实功率因数 1 A相置换功率因数 2 B相置换功率因数 3 C相置换功率因数 TOTAL 总置换功率因数
D/T A A相峰值日期时间 A相峰值年月日、时间 D/T B B相峰值日期时间 B相峰值年月日、时间 D/T C C相峰值日期时间 C相峰值年月日、时间
1 A相有功功率 2 B相有功功率 3 C相有功功率 TOTAL 总有功功率 1 A相无功功率 2 B相无功功率 3 C相无功功率 TOTAL 总无功功率 1 A相视在功率 2 B相视在功率 3 C相视在功率 TOTAL 总视在功率 KWd 总需用有功功率 KWd 总需用有功功率 KWd 总需用有功功率 MIN 计算周期(分) LAST 上一周期需用量 PRED 预测需用量 PEAK 峰值需用量 PF 峰值同步功率因数 LAST 上一周期需用量 PRED 预测需用量 PEAK 峰值需用量 PF 峰值同步功率因数 LAST 上一周期需用量 PRED 预测需用量
THD I 电流谐波畸变率 U 线电压
V 相电压 I 电流
最小值、相位、日期时间 MIN 最小值
MAX 最大值
2次谐波分量
H2 2次谐波分量
H3 3次谐波分量
……
H13 13次谐波分量
2次谐波分量
H2 2次谐波分量
H3 3次谐波分量
……
H13 13次谐波分量
的切换通过最后一个按钮
实现,返回上级菜单通过第一个按钮
实现,进入下级菜单直接操作
E途X800行车记录仪说明书(修改定稿)
E途X800行车记录仪说明书欢迎使用一、我公司保留对此《使用手册》的最终解释权。
二、本产品有任何变动,恕不另行通知,不便之处,敬请谅解!三、请将重要资料进行备份,因资料遗失造成的损失,本公司不承担任何责任。
四、本手册已通过仔细核对,但不排除有少量文字错误的可能性,如发现,请联系本公司客户服务中心。
五、请先仔细阅读本《使用手册》的操作说明与指示,并只使用原厂提供的配件,以免造成无法预期的损坏,如果您未依照正确的程序使用本系统或连接不兼容的配件,此行为将违反本机的保修条款,将导致保修自动失效,甚至可能危害您及他人的安全。
对此,本公司不承担任何责任。
六、说明书中的图片以及参数内容可能会因升级/更等原因做变更,请以实物为准!一、结构示意图………………………………………………………二、产品技术参数………………………………………………………三、操作与使用说明………………………………………………………1、安装………………………………………………………2、充电………………………………………………………3、功能键………………………………………………………4、遥控器………………………………………………………四、系统菜单说明………………………………………………………1、图像参数………………………………………………………2、图像拍摄………………………………………………………3、回放………………………………………………………4、媒体工具………………………………………………………5、系统设置………………………………………………………五、影像摄录………………………………………………………六、文件下载………………………………………………………七、电源安装方法八、注意事项一、结构示意图主机(1)显示屏(2)蓝灯、绿灯(3)红外线接收端(4)开关键/模式键(5)录影键/菜单键(6)翻页键/送话器开关(7)摄像镜头(8)MICRO USB接口(9)AV OUT输出端口(10)TF卡卡槽(11)喇叭(12)送话器(13)复位键(14)安装底座遥控器录影键秒拍键移动侦测键确认键:左移键:右移键:上翻键:下翻键菜单键模式键送话器开关键锁定键二、产品技术参数1、显示屏:1.5寸320*240像素高清显示屏2、摄像镜头:500万像素,170度超广角镜头3、录像视频:全高清30fps 、高清30fps、高清60fps、VGA30fps4、视频格式:H.264、AVI/MOV解码格式5、照片格式:JPG6、相片分辩率:14M、12M、8M、5M、3M、2M、1.2M、VGA7、存储卡:TF卡(最大支持32G)8、送话器/喇叭:内置9、光源频率:50Hz/60Hz10、电视输出:NTSC/PAL11、USB接口:USB2.012、电源接口:5V 1A13、电池:内置3.7v 锂电池14、系统要求:Windows 2000/XP/Vista/Windows 7,MAC OSX 10.3.6以上三、操作与使用说明1、安装此DVR安装简便,将安装底座固定在汽车挡风玻璃的合适位置,撕去背胶离心纸后贴上(注意沿箭头向上方向粘贴好),再把机器安放在安装底座上即可。
H600 700 800 900系列高清终端用户手册
目录
1 系统基本信息 .....................................................................................................................................................1 1.1 1.2 1.2.1 1.2.2 1.2.3 1.3 1.4 1.5 1.6 1.7 1.7.1 1.7.2 1.7.3 1.7.4 1.8 2 遥控器 ............................................................................................................................................................... 1 设置遥控器模式 ................................................................................................................................................ 2 终端模式 ................................................................................................................................................... 2 摄像机模式 ............................................................................................................................................... 2 摄像机反向控制终端模式 ....................................................................................................................... 3 主菜单界面........................................................................................................................................................ 3 切换主菜单/视频界面 ...................................................................................................................................... 5 选择主菜单界面风格 ........................................................................................................................................ 5 屏幕提示图标.................................................................................................................................................... 6 字符输入方法.................................................................................................................................................... 7 特殊符号 ................................................................................................................................................... 7 数字 ........................................................................................................................................................... 7 英文字母 ................................................................................................................................................... 7 中文 ........................................................................................................................................................... 7 语言选择............................................................................................................................................................ 8
NT8001控制器使用说明书
-Ⅰ-
6.3.4 “网络设置”的说明 ............................................. - 32 6.3.5 “手控点号”的说明 ............................................. - 34 6.3.6 “广播分区”的说明 ............................................. - 35 6.3.7 “空码查询”的说明 ............................................. - 35 6.4 手动控制功能:“操作”菜单的说明 ................................... - 35 6.4.1 “器件曲线”的说明 ............................................. - 35 6.4.2 “自检操作”的说明 ............................................. - 36 6.4.3 “点确认灯”的说明 ............................................. - 37 6.4.4 “启停设备”的说明 ............................................. - 37 6.4.5 “屏蔽操作”的说明 ............................................. - 38 6.4.6 “时钟设置”的说明 ............................................. - 39 6.4.7 “重启音响”的说明 ............................................. - 39 6.4.8 “关闭音响”的说明 ............................................. - 40 6.5 历史记录查询与打印功能:“记录”菜单的说明.......................... - 40 6.6 突发事件介绍 ...................................................... - 42 6.6.1 “火警页面”的说明 ............................................. - 43 6.6.2 “监管页面”的说明 ............................................. - 44 6.6.3 “自检页面”的说明 ............................................. - 44 6.6.4 “故障页面”的说明 ............................................. - 45 6.6.5 “屏蔽页面”的说明 ............................................. - 45 6.7 直控点说明 ........................................................ - 45 6.7.1 功能概述 ....................................................... - 45 6.7.2 主要技术指标 ................................................... - 45 6.7.3 面板说明 ....................................................... - 46 6.7.4 内部结构说明 ................................................... - 46 6.7.5 安装与布线 ..................................................... - 46 6.8 在实际操作中还有一些需要注意的地方 ................................ - 46 七、安装接线图 .......................................................... - 47 7.1 外形尺寸图 ........................................................ - 47 7.2 内部接线图 ........................................................ - 49 7.3 接线端子说明 ...................................................... - 51 7.3.1 交流 220V ...................................................... - 51 7.3.2 通讯插箱: ..................................................... - 51 7.3.3 回路总线: ..................................................... - 51 7.3.4 直控点: ....................................................... - 51 7.3.5 通讯: ......................................................... - 52 八、注意事项 ............................................................ - 52 -
Tektronix WFM8300 WFM8200多格式高性能波形监测仪 说明书
多标准/多格式高性能波形监测仪WFM8300 WFM8200特点视/音频/数据监测仪和分析仪 — 众多功能共享同一平台- WFM8300和WFM8200是自动检测HD/SD-SDI 格式和多种双链路视频格式(包括RGB和XYZ彩色空间支持)的标准仪器- 众多的可选功能,包括3Gb/s SDI(A 级和B 级)格式支持(选件3G)、复合模拟视频支持(选件CPS)、模拟和数字音频(选件AD)以及杜比E 和杜比数字音频(选件DDE)解码和监测支持- WFM8300标准型提供两路输入同时监测功能、ANC 数据查验器以及模拟音频、数字音频(需含选件AD)或杜比音频格式(需含选件DDE)与视频之间的A/V 延迟测量的数字/图形显示高级物理层信号完整性分析仪- 高性能实时眼图显示、抖动测量以及享有专利的电缆长度测量(WFM8300选件PHY 或WFM8200选件EYE)- 最全面的眼图测量,包括眼图幅度、上升/下落时间、过冲/下冲测量以及泰克公司抖动波形显示(仅WFM8300,选件PHY)- 通过定购选件(WFM8300UP 选件3G 或WFM8200UP 选件3G)可以让用户在选购HD/SD-SDI基础上将来可以很方便地升级到对3Gb/s HD/SD-SDI 全面的支持黑帧图像和泰克专利的冻结帧图像检测泰克专利的定时和闪电显示图形,为重要设备提供方便而又准确的定时调整采用泰克最新发布的专利技术即矛头显示(Spearhead Display)图形和亮度合格矢量(Luma Qualified Vector,LQV TM )显示图形,为后期制作应用提供方便而又精确的彩色调整 最完善的音频监测- 多通道环绕声显示*1和灵活的李沙如显示图形(选件AD 或选件DDE)- 音频响度监测(选件AD 或选件DDE)- 完善的杜比元数据解码和显示,包括VANC 元数据(选件DDE)- 利用直观的杜比E防护带表(选件DDE)指示,用户可选择杜比E 防护带容限最全面的ANC 数据监测- CEA708/608隐藏字幕的同时监测;图文电视和OP47字幕监测- ANC 数据的检测和解码,包括AFD、WSS、视频索引、TSID、V-Chip、广播标志/CGMS-A、VITC、LTC 以及ANC TC 等- 支持ARIB STD-B35/B37/B39、TR-B22以及TR-B23 最深入的数据分析,有助于快速解决复杂的内容质量和可靠性问题(仅WFM8300) 无与伦比的多种显示功能- FlexVu TM ,先进的视频帧数据捕获功能,可简化故障查寻和设备设置- 标准的和用户可定义的安全区刻度,为视频编辑和格式转换提供了方便,降低了重新编辑的工作量- 提供有效格式描述符(AFD)的检测、解码和图像显示器的刻度自动调整功能,有利于更方便地识别并解决与宽高比相关的问题 无与伦比的适用性- 提供CaptureVu ®视频帧数据的高级捕获功能,为故障查寻和设备配置提供方便- 可提供32项用户预置,可迅速调用由工程师或操作人员定制的常用配置- 具有前面板USB 端口,为仪器常用配置项、已捕获的视频帧数据以及屏幕快照的传送提供方便- 设有前面板耳机插口,以便迅速查验输入信号是否为您选择的一组音频- 直观的菜单结构,快捷方便的上下文相关帮助信息- 提供各种告警信息,状态报告以及出错日志记录- 明亮、清晰的高分辨率LED 背光显示屏- 具有SNMP 和以太网遥控接口功能和GPI 接口控制,为中心的监测和控制提供方便产品技术资料可适应用户不断变化的多格式需求支持应用内容分配和传输系统的监测和符合性查验内容制作和后期制作的质量控制设备/系统的验收或质量鉴定,以及内容创建和分配系统中的安装、维护和故障查寻专业级视频设备的研究和开发 *1 音频环绕声显示已得到Werksutten GmbH和Co. KG (RTW)无线电技术公司 的授权。
- 1、下载文档前请自行甄别文档内容的完整性,平台不提供额外的编辑、内容补充、找答案等附加服务。
- 2、"仅部分预览"的文档,不可在线预览部分如存在完整性等问题,可反馈申请退款(可完整预览的文档不适用该条件!)。
- 3、如文档侵犯您的权益,请联系客服反馈,我们会尽快为您处理(人工客服工作时间:9:00-18:30)。
1
目录
一、 参数指标 ........................................................................................................................... 2
1. 输入格式及功能 ............................................................................................................... 2
2. 兼容的信号格式 ............................................................................................................... 2
3. 参数说明 ........................................................................................................................... 2
二、 按键说明 ........................................................................................................................... 3
三、 硬件接口及连线 ............................................................................................................... 3
四、 说明……………………………………………………………………………………….4
2
一、 参数指标
1. 输入格式及功能
型号 EPM80010215V01 备注
功能
视频输入 (IN) 复合视频 ○ BNC × 1
S-Video ○ 1
YPbPr ○ BNC × 3
DHMI ○ 1
HD/SD-SDI ○ BNC × 1
视频输出(OUT) HD/SD-SDI ○ BNC × 1
2. 兼容的信号格式
输入信号格式 AV S-Video HDMI YPbPr SDI
NTSC ○ ○
PAL ○ ○
480I@60Hz ○ ○ ○
480P@60Hz ○
576I@50Hz ○ ○ ○
576P@50Hz ○
720P@25Hz ○
720P@30Hz ○
720P@50Hz ○ ○ ○
720P@60Hz ○ ○ ○
1080I@50Hz ○ ○ ○
1080I@60Hz ○ ○ ○
1080P@24Hz ○ ○ ○
1080P@25Hz ○ ○ ○
1080P@30Hz ○ ○ ○
1080P@50Hz ○ ○ ○
1080P@60Hz ○ ○ ○
3. 参数说明
屏幕尺寸 21.53”
3
像素 1920(H)×1080(V)
显示比例 16:9/4:3/全屏
亮度 300cd/㎡
对比度 1000:1
二、 按键说明
新按键 功能
SOURCE 进入信源选择菜单并上下选择信源通道
UP(ASPECT) 进入OSD菜单时,选择上一项
MENU 进入/退出OSD菜单
DOWN(MONO) 进入OSD菜单时,选择下一项
V+( ENTER/VOL) 进入OSD菜单时,进入子菜单和调整选中选项的值
ENTER(V-/MUTE) 进入OSD菜单时,进入子菜单和调整选中选项的值
POWER 开关机
1. SOURCE:进入信源选择菜单并上下选择信源通道
a) 按MENU键确认。
b) 3秒后信源菜单消失自动切换到所选通道。
2. MENU:进入/退出OSD菜单
c) 信号通道确认键。
d) 退出OSD菜单子菜单
3. UP:进入OSD菜单时,选择上一项
e) 非OSD状态下:默认为ASPECT(屏显模式)
4. DOWN:进入OSD菜单时,选择下一项
f) 非OSD状态下:默认为MONO(黑白)
5. V+:进入OSD菜单时,进入子菜单和调整选中选项的值
g) 进入子菜单执行加操作
h) 非OSD状态下:弹出声音调整菜单
6. V-:进入OSD菜单时,进入子菜单和调整选中选项的值
i) 进入子菜单执行减操作
j) 非OSD状态下:静音功能键
7. POWER:开关机
三、 硬件接口及连线
4
硬件接口图
序号 接口名称 用途
1 SDI1 SDI信号输入
2 SDI2 SDI信号环出
3 HDMI HDMI信号输入
4 YPbPr YPbPr信号输入
5 S-Video S-Video信号输入
6 AV AV信号输入
7 Audio 模拟音频输入(立体声)
四、 说明
本产品最终解释权归深圳爱普视科技有限公司所有。详情请联系:
深圳市爱普视科技有限公司
Shen Zhen EPUS technology co.ltd
总 机:(0755)8660 7456
传 真:(0755)8621 9210
网 址: www.epus.cn
邮 箱: sales@epus.cn support@epus.cn
地 址:深圳市南山区南山软件园东座2楼