伟力911遥控器说明书
玩具遥控器操作说明书

玩具遥控器操作说明书一、产品介绍玩具遥控器是一款高科技产品,能够控制各种遥控玩具的运动和功能。
它采用先进的无线通信技术,操作简便,适合各个年龄段的用户使用。
二、操作前准备1. 请确保遥控器电池电量充足,如电池电量不足,请及时更换新电池。
2. 确保玩具遥控器与遥控玩具之间的通信连接正常。
三、基本操作1. 开机与关机按下遥控器上的电源按钮,遥控器将开机,并通过屏幕上的指示灯显示开机状态。
长按电源按钮可关机。
2. 功能选择遥控器上配备了多个功能按钮,通过点击相应的按钮,可以选择不同的功能模式。
请根据使用的遥控玩具功能需求,选择相应的功能按钮。
3. 方向控制遥控器上的摇杆或方向键可控制遥控玩具的前进、后退、左转和右转。
将摇杆或方向键向前推动,遥控玩具将向前运动;向后推动,则会向后运动;向左或向右推动,则会左转或右转。
4. 功能调整遥控器上的功能调整按钮可用于调整遥控玩具的速度、音量等参数。
根据具体的遥控玩具型号,功能调整按钮可能会有所不同,请参考遥控玩具的说明书进行操作。
5. 特殊功能部分遥控玩具配备了特殊功能,例如灯光、音乐等。
遥控器上的特殊功能按钮可用于控制这些特殊功能的开启和关闭。
请根据遥控玩具的说明书了解具体的特殊功能操作方法。
四、注意事项1. 使用时请避免将遥控器暴露在高温、潮湿或阳光直射的环境中,以免损坏遥控器。
2. 遥控器应远离水源,避免接触液体,以免发生短路或其他故障。
3. 遥控器不可随意拆卸或修理,如有故障,请联系售后服务中心进行维修。
4. 遥控器应妥善保管,避免摔落或受到撞击,以免影响正常使用。
5. 请勿将遥控器投掷或使用不当,以免造成人身伤害或财产损失。
五、售后服务如您在使用过程中遇到任何问题或需要进一步的帮助,请联系我们的售后服务中心。
我们将竭诚为您提供满意的解决方案。
六、总结玩具遥控器是一款功能强大、易于操作的产品,通过本操作说明书,您可以更好地使用和掌握遥控玩具的各项功能。
希望本说明书能够为您提供便利,并带来愉快的使用体验。
玩具电动飞机遥控说明
玩具电动飞机遥控说明一、产品简介玩具电动飞机遥控器是一款高性能的遥控设备,专为操控电动飞机而设计。
该遥控器采用先进的无线通信技术,能够稳定、迅速地传输指令信号,实现精确控制。
本说明书将详细介绍使用该遥控器的方法和注意事项。
二、遥控器结构1. 控制摇杆:遥控器上有两个摇杆,左右分别为横滚和俯仰控制,前后分别为升降和方向控制。
2. 功能按钮:遥控器上还设有多个功能按钮,用于实现特殊功能的切换,如一键起飞、一键降落等。
3. 屏幕显示:遥控器上配备有一块显示屏,用于显示飞机的状态信息、信号强度、电量等。
三、遥控器操作步骤1. 电源开关:在开始操作之前,请确保遥控器已经装入电池并正确连接,然后打开电源开关。
2. 飞机连接:将电动飞机的电池装入机身,并确保飞机与遥控器之间的信号连接正常。
3. 校准飞机:在第一次使用前,需要对飞机进行校准操作。
校准方法请参考飞机说明书中的指引。
4. 起飞与降落:用左手控制横滚和俯仰,右手控制升降和方向,将摇杆操作至中间位置进行起飞。
降落时,缓慢调整升降摇杆将飞机降低到地面。
5. 方向控制:使用右手的左右摇杆来改变飞机的左右方向,可实现转弯或调整飞行位置。
6. 高度控制:通过右手的前后摇杆来调整飞机的飞行高度。
向前推摇杆将飞机向上升高,向后拉摇杆将飞机向下降低。
7. 功能切换:遥控器上的功能按钮可以实现多种特殊功能的切换,例如一键起飞、一键降落、翻滚等。
请参考遥控器说明书中的详细介绍。
四、注意事项1. 安全操作:在操控过程中,请确保周围环境安全,避免造成人身或财产损伤。
2. 信号强度:在飞行过程中,请确保遥控器与飞机之间的信号强度良好,避免遥控失效。
3. 遥控距离:飞行时请注意遥控器的控制距离,避免超出可控范围造成信号中断。
4. 电池状态:遥控器电池电量过低时可能导致控制不稳定或失效,应及时更换或充电。
5. 飞行区域:选择平坦、开阔且无障碍物的区域进行飞行,避免危险或碰撞。
6. 学习阶段:对于初学者,建议先熟悉基本操作,逐渐掌握技巧后再进行高难度动作尝试。
遥控器的使用说明书

产品说明书遥控器使用说明书一、产品简介RM-01C 型号遥控器的手感良好,操作简单方便、舒适。
适用于—Y 系列的温控器。
二、面板说明1.“ON ”键:当温控器通电并处于关机(OFF )状态时,按下此键温控器进入正常工作界面。
2.“OFF ”键:当温控器处在正常工作界面时,按下此键温控器关机,显示OFF ,所有输出均关断。
3.“H ”键:表示选择风机高速的运行方式,适用手动和通风模式。
4.“M ”键:表示选择风机中速的运行方式,适用手动和通风模式。
5.“L ”键:表示选择风机低速的运行方式,适用手动和通风模式。
6.“-”键:设定温度和定时时间下调键。
7.“+”键:设定温度和定时时间上调键。
8.“AUTO ”键:表示选择自动(AUTO )方式来控制温控器的工作模式。
温控器会根据温差来判断输出状态。
此时可以通过“—”、“+”按键调节设定温度的值,6S 后自动确认保存。
9.“MAN ”键:表示选择手动方式来控制温控器的工作模式,选择之后默认的状态为阀门开启机和风机低速输出,此时通过“高风”“中风”“低风“按键来控制风机三速的改变。
10.“VENT ”键:表示选择“通风”方式来控制温控器的工作模式,默认状态仅为风机低速运行,然后通过高风、中风、低风按键,选择风机的运行速度。
11.“TIME ”键:表示选择定时关机的的模式,通过“—”“+”键调节时间,时间范围00~99,表示温控器运行0.1~9.9小时后自动关机。
三、电池安装打开电池仓,安装3V 锂电池一只,电池的“+”极与电池仓的标记的“+”方向一致,然后将电池仓放回遥控中,如图:四、技术参数1、遥控距离3m2、供电方式:锂电池3V Battery3V 电池Battery Cabin 电池仓。
无线遥控器说明书

ON/OFF buttonEach time you press this button, a mode isselected in a sequence that goes from AUTO COOL, DRY, FAN and HEAT*.MODE buttonAfter the unit is turned on, the default operating mode will be AUTO. In the AUTO mode, the indoor set point will not be displayed as the unit will automatically select the suitable operating mode and temperature set point to make the room temperature comfortable.Operation of wireless remote controlPress to start or stop operation. Pressthis button to turn on the unit. Press this button again to turn off the unit. Turning the unit off will cancel any sleep, quiet, or timer functions.-1-MS-SVU052A-EN 04/14-6-MS-SVU052A-EN 04/14Operation of wireless remote control-7-MS-SVU052A-EN 04/14Operation of remote control-8-MS-SVU052A-EN 04/14X-FAN buttonTURBO buttonX -FAN button in COOL or DRY he icon is displayed and the indoor fan will continue operation at low fan speed for 10 minutes after the unit is turned off. This function allows removal of moisture on the evaporator of the indoor unit after the unit has stopped. After power on, X-FAN OFF is defaulted.X-FAN is not available in AUTO,FAN or -2-MS-SVU052A-EN 04/14Operation of wireless remote controlPress this button to set swing angle, cycles through changes as below:This remote controller is universal command is sent out, the unit will carry out the available command as the guide louver swings through available option If guide louver is stopped when it isswinging up and down, it will remain in its present position.SWING UP AND DOWN BUTTON-3-MS-SVU052A-EN 04/14Operation of wireless remote controlSLEEP BUTTONSLEEP-4-MS-SVU052A-EN 04/14Operation of wireless remote controlSLEEP BUTTONSLEEP-5-MS-SVU052A-EN 04/14。
空调机器人遥控器用户手册说明书

IMPORTANT NOTE:Thank you for purchasing our air conditioner. Please read this manual carefullybefore operating your new air conditioning unit. Make sure to save this manualTable of ContentsRemote Controller Specifications (02)Handling the Remote Controller (03)Buttons and Functions (04)Remote Screen Indicators (08)How to Use Basic Functions (09)How to Use Advanced Functions (11)NOT SURE WHAT A FUNCTION DOES?Refer to the How to Use Basic Functions and How to Use Advanced Functions sections of this manual for a detailed description of how to use your air conditioner.Remote Controller SpecificationsQuick Start GuideNOTE: For models of RG10Y1 (D2)/BGEF,RG10Y2(D2S)/BGEF, If the unit is turned off under COOL, AUTO or DRY mode with the set temperature less than 24 C, the set temperature will be automatically set to 24 C when you turn on the unit again. If the unit is turned off under HEAT mode with the set temperature more than 24 C, the set temperature will be automatically set to 24 C when you turn on the unit again.NOTES FOR USING REMOTE CONTROL••Inserting and Replacing BatteriesYour air conditioning unit may come with twobatteries(some units). Put the batteries in theremote control before use.1. Slide the back cover from the remote controldownward, exposing the battery compartment.Insert the batteries, paying attention to matchup the (+) and (-) ends of the batteries withthe symbols inside the battery compartment.2.3.BATTERY DISPOSALDo not dispose of batteries as unsortedmunicipal waste. Refer to local laws for properdisposal of batteries.The device could comply with the local nationalregulations.In Canada, it should comply withCAN ICES-3(B)/NMB-3(B).In USA, this device complies with part 15 of theFCC Rules. Operation is subject to the followingtwo conditions:(1) This device may not cause harmful interference,and(2) this device must accept any interferencereceived, including interference that maycause undesired operation.This equipment has been tested and found tocomply with the limits for a Class B digital device,pursuant to part 15 of the FCC Rules. These limitsare designed to provide reasonable protectionagainst harmful interference in a residentialinstallation. This equipment generates, uses andcan radiate radio frequency energy and, if notinstalled and used in accordance with theinstructions, may cause harmful interference toradio communications. However, there is noguarantee that interference will not occur in aparticular installation. If this equipment does causeharmful interference to radio or television reception,which can be determined by turning the equipmentoff and on, the user is encouraged to try to correctthe interference by one or more of the followingmeasures:Reorient or relocate the receiving antenna.Increase the separation between the equipmentand receiver.Connect the equipment into an outlet on a circuitdifferent from that to which the receiver isconnected.Consult the dealer or an experienced radio/TVtechnician for help.Changes or modifications not approved by theparty responsible for compliance could voiduser’s authority to operate the equipment. Handling the Remote ControllerBefore you begin using your new air conditioner, make sure to familiarize yourself with its remote control. The following is a brief introduction to the remote control itself. For instructions on how to operate your air conditioner, refer to the How to Use Basic Functions section of this manual. Buttons and FunctionsMODEOKTIMERBREEZE AWAYCLEANLEDTurboECO/GEARScrolls through operation modesas follows: AUTO♑ COOL ♑ DRY ♑ HEAT ♑ FANModel:30°C (86°F).buttons at the same time TEMPRG10A2(D2S)/BGEFU1,RG10Y2(D2S)/BGEFRG10A10(D2S)/BGEF(20-28 C/68-82 F)RG10A(D2S)/BGEF & RG10A(D2S)/BGEFU1(Fresh feature is not available)RG10A2(D2S)/BGCEFU1 & RG10A2(D2S)/BGCEF(Cooling only models, AUTO mode and HEAT mode are not available)Used to confirm the selected functions O O in 1C(1O O OO 16C(60F).for 2 seconds to initiate vertical louver auto swing feature.NTOE: This feature is available under cool, Fan and Dry mode only NOTE: HEAT mode is not supported ECO GEAR(75%)GEAR(50%) mode ECO ......functions as follows:Fresh( ) Sleep( )Follow Me( ) AP mode( ) Fresh... ♑♑♑confirm.following order: A U ♑60% 40% ♑♑Press the TEMP or button Enables unit to reach preset temperature in shortest possible timePrevious settingUsed to start/stop the SelfClean or Active Clean function.(Model dependent, please refer to the USER’S OPERATION &INSTALLATION MANUAL).Turns indoor unit’s LED display and air conditioner buzzer on and off (model dependent), which create a comfortable and quiet environment.Model: RG10A1(D2S)/BGEFlouver movement. Hold down for 2 seconds to initiate vertical louver auto swing feature.MODEFRESHAUTO♑ COOL ♑ DRY ♑ HEAT ♑ FAN30°C (86°F).buttons at the same time TEMPO O in 1C(1Min. temperature is O O 16C(60F).Used to starts and stops the Fresh feature.ECO GEAR(75%)GEAR(50%) mode ECO ......functions as follows:Breeze Away( ) Sleep ( )Follow Me( ) Away ...♑♑♑ following order: A U ♑60% 40% ♑♑Press the TEMP or button Enables unit to reach pr temperature in shortest possible timePrevious settingNOTE: HEAT mode is notsupported by the cooling onlyappliance.Turns indoor unit’s LED display and air conditioner buzzer on and off (model dependent), which create a comfortable and quiet environment.MODEOKTIMERSHORTCUTCLEANLEDTurboSLEEPScrolls through operation modesas follows: AUTO♑ COOL ♑ DRY ♑ HEAT ♑ FANModel:30°C (86°F).buttons at the same time TEMPRG10B(D2)/BGEF(Fresh feature is not available)RG10B10(D2)/BGEF & RG10B10(D2)/BGCEF(20-28 C/68-82 F)RG10B2(D2)/BGCEF & RG10B10(D2)/BGCEF (Cooling only model, AUTO mode and HEAT mode are not available )RG10Y1(D2)/BGEFUsed to confirm the selected functionsO O in 1C(1Min. temperature is O OOO 16C(60F).Fresh( ) AP mode( ) Fresh .... ♑confirm.following order:♑Silence feature.Enables unit to reach preset temperature in shortest possible timeUsed to restore the current settings or resume previous settings.♑Starts and stops the horizontal louver movement. Hold down for 2 seconds to initiate verticallouver auto swing feature(some units).NOTE: HEAT mode is not supported by the cooling only appliance.Used to start/stop the SelfClean or Active Clean function.(Model dependent, please refer to the USER’S OPERATION &INSTALLATION MANUAL).Turns indoor unit’s LED display and air conditioner buzzer on and off (model dependent), which create a comfortable and quiet environment.MODETIMERFRESHCLEANLEDTURBOScrolls through operation modesas follows: AUTO ♑ COOL ♑ DRY ♑ HEAT♑ FAN 30°C (86°F).buttons at the same time Used to confirm the selected functionsO O in 1C(1O O 16C(60F).Used to start/stop the air fresh feature.functions as follows:Follow Me( ) AP mode ( ) ♑♑Enables unit to reach preset temperature in shortest possible timeModel: RG10B1(D2)/BGEFfollowing order:♑♑OKSLEEPStarts and stops the horizontal louver movement. Hold down for 2 seconds to initiate verticallouver auto swing feature(some units).NOTE: HEAT mode is not supported by the cooling only appliance.Used to start/stop the SelfClean or Active Clean function.(Model dependent, please refer to the USER’S OPERATION &INSTALLATION MANUAL).Remote Screen IndicatorsNote:All indicators shown in the figure are for the purpose of clear presentation. But during the actaul operation, only the relative function signs are shown on the display window.Note:Not all the models can display the fan speed values between AU-100%.[ ]*Information are displayed when the remote controller is power up.displaydisplaydisplayHorizontal louver swing display Vertical louver auto swing display TURBO mode display Not available for this unitSilence LOW MED HIGH AUTOunitDisplays selected fan speed:mode, This fan speed can not be adjusted in AUTO or DRY mode.o o o oC //60-86F Timer setting range: 0-24 hoursFan speed setting range: AU -100%This display is blank when operating in FAN mode.(20-28 C/68-82 F)(Model dependent)How to Use Basic FunctionsAUTO ModeCOOL or HEAT ModeDRY ModeSelect AUTO modeSet your desired temperatureNOTE:1. In AUTO mode, the unit will automatically select the COOL, FAN, or HEAT function based on the set temperature.2. In AUTO mode, fan speed can not be set.Turn on the air conditionerSelect DRY modeSet your desired temperatureTurn on the air conditionerFAN ModeSelect FAN modeTurn on the air conditionerSelect COOL/HEAT modeSet the temperatureTurn on the air conditionerSet the fan speedSet the fan speedNOTE: In DRY mode, fan speed can not be set since it has already been automatically controlled.NOTE: In FAN mode, you can’t set the temperature. As a result , no temperature displays in remote screen.Before operation, please ensure the unit is plugged in and power is available.ATTENTIONSetting the TIMERTIMER ON settingTIMER OFF settingTIMER ON & OFF setting(example)TIMER ON/OFF - Set the amount of time after which the unit will automatically turn on/off.Press TIMER button to initiate the ON time sequence.Press Temp. up or down button for for multiple times to set the desiredPress Temp. up or down button for for multiple times to set the desired NOTE:press, up to 10 hours. After 10 hours and up to 24, it will increase in 1 hour increments. (For example, press 5 times to get 2.5h, and press 10 times to get 5h,) The timer will revert to 0.0 after 24.2. Cancel either function by setting its timer to 0.0h.Point remote to unit and wait 1sec, the TIMER ON will be activated.Press TIMER button to initiate the OFF time sequence.Point remote to unit and wait 1sec, the TIMER OFF will be activated.time 1PM2:00PM 3:00PM2.5 hours later 5 hours laterExample: If current timer is 1:00PM,to set the timer as above steps, the unit will turn on 2.5h later (3:30PM)and turn off at 6:00PM.Keep in mind that the time periods you set for both functions refer to hours after the current time.How to Use Advanced FunctionsSwing functionAirflow directionLED DISPLAYThe horizontal louver will swing up and down automatically when pressing Swing button. Press again to make it stop.If continue to press the SWING button, five different airflow directions can be set. The louver can be move at a certain range each time you press the button. Press the button until the direction you prefer is reached.NOTE:When the unit is off, press and hold MODE andSWING buttons together for one second,the louver will open for a certain angle, which makes it very convenient for cleaning. Press and hold MODE and SWINGbuttons together for one second to reset the louver (Model dependent).Keep pressing this button more than 2 seconds, the vertical louver swing function is activated.(Model dependent)Keep pressing this button more than 5 seconds, the indoor unit will display the actual roomtemperature. Press more than 5 seconds again will revert back to display the setting temperature.Press this button to turn on and turn off the display on the indoor unit.Press LED buttonPress this button morethan 5 seconds(some units)ECO/GEAR functionUnder cooling mode, press this button, the remote controller will adjust the temperatureautomatically to 24 C/75 F, fan speed of Auto to save energy (only when the set temperatureis less than 24 C/75 F). If the set temperature is above 24 C/75 F, press the ECO button, the fan speed will change to Auto, the set temperature will remain unchanged.NOTE:Pressing the ECO/GEAR button, or modifying the mode or adjusting the set temperature to lessthan 24 C/75 F will stop ECO operation.Under ECO operation, the set tmeperature should be 24 C/75 F or above, it may result in insufficient cooling. If you feel uncomfortable, just press the ECO button again to stop it.OO O O O OO O O OPress this button to enter the energy efficient mode in a sequence of following:ECO GEAR(75%) GEAR(50%) Previous setting mode ECO......Note:This function is only available under COOL mode .ECO operation:GEAR operation:Press the ECO/GEAR button to enter the GEAR operation as following:75%(up to 75% electrial energy consumption)50%(up to 50% electrial energy consumption)Previous setting mode.Under GEAR operation, the display on the remote controller will alternage betweenelectical energy consumption and set temperature.SHORTCUT functionPush this button when remote controller is on, the system will automatically revert back to the previous settings including operating mode, setting temperature, fan speed level and sleep feature (if activated).If pushing more than 2 seconds, the system will automatically restore the current operation settings including operating mode, setting temperature,fan speed level and sleep feature (if activated ).FP function LOCK function Keep pressing Fan button for more than 2 seconds to activate/disable Silence function(some units).Due to low frequency operation of compressor, it may result in insufficient cooling and heating capacity. Press ON/OFF, Mode, Sleep, Turbo or Clean button while operating will cancel silence function.Silence functionThe unit will operate at high fan speed (whilecompressor on) with temperature automaticallyset to 8 C/46 F.Press together Clean button and Turbo button at thesame time more than 5 seconds to activate Lock function.All buttons will not response except pressing these twobuttons for two seconds again to disable locking. Press this button 2 times during one second under HEAT Mode and setting temperature of16 C/60 F or 20 C/68 F(for models of RG10A10(D2S)/BGEF, RG10B10(D2)/BGEF andRG10B10(D2)/BGCEF) to activate FP function.Press On/Off, Sleep, Mode, Fan and Temp. button while operating will cancel this function. Note: This function is for heat pump air conditioner only.FRESH function( ) (some units) :Sleep function( ) :SET functionorPress the SET button to enter the function setting, then press SET button or TEMP or TEMP button to select the desired function. The selected symbol will flash on the display area, press the OK button to confirm.To cancel the selected function, just perform the same procedures as above.The SLEEP function is used to decreaseenergy use while you sleep (and don t needthe same temperature settings to staycomfortable). This function can only beactivated via remote control.Note: The SLEEP function is not availablein FAN or DRY mode.,For the detail, see sleep operation inUSER S MANUAL.,,,,,,,,,When the FRESH function is initiated, theion generator is energized and will help topurify the air in the room.Follow me function( ):The FOLLOW ME function enables the remotecontrol to measure the temperature at itscurrent location and send this signal to theair conditioner every 3 minutes interval.When using AUTO, COOL or HEAT modes,measuring ambient temperature from theremote control(instead of from the indoorunit itself) will enable the air conditioner tooptimize the temperature around you andensure maximum comfort.If the memory feature is stopped, OFdisplays for 3 seconds on the screen.While the memory feature is activated,press the ON/OFF button, shift the modeor power failure will not cancel the Followme function.NOTE: Press and hold Turbo button forseven seconds to start/stop memoryfeature of Follow Me function.If the memory feature is activated, Ondisplays for 3 seconds on the screen.Choose AP mode to do wireless networkconfiguration. For some units, it doesn’twork by pressing the SET button. To enterthe AP mode, continuously press the LEDbutton seven times in 10 seconds.“ ”“ ”Press the SET button to scroll through operation functions as follows:Breeze Away ( ) Fresh ( ) Sleep( ) Follow Me( ) AP mode( )[ ]: If your remote controller has Breeze Away button, Fresh button or Sleep button, you can not use the SET button to select the Breeze Away, Fresh or Sleep feature.♑♑♑♑***This feature avoids direct air flow blowing on thebody and makes you feel indulging in silkycoolness.NTOE: This feature is available under cool,Fan and Dry mode only.Breeze Away function( ) (some units) :The design and specifications are subject to change without prior notice for product improvement. Consult with the sales agency or manufacturer for details.CR2756-RG10(D2S)。
遥控飞机说明书
遥控飞机说明书遥控飞机说明书1. 引言遥控飞机是一种受遥控器操控的飞行器,它以自由的姿态在空中飞行。
本说明书将为您提供有关遥控飞机的基本信息以及操作指南。
在使用遥控飞机前,请仔细阅读本说明书,并按照指南操作遥控飞机,以确保安全和正常的飞行体验。
2. 遥控飞机的组成遥控飞机的主要组成部分包括:- 机身:飞机的主体结构,承载各个零部件。
- 机翼:提供升力,使飞机能够在空中飞行。
- 机尾:稳定飞机的姿态,控制飞机的方向。
- 遥控器:用于操控遥控飞机的设备,包括摇杆、按钮等控制元件。
- 电池:提供遥控飞机所需的电力。
- 电机和螺旋桨:提供飞机的推力,使其能够飞行。
3. 操作指南3.1 充电电池在使用遥控飞机之前,需要确保电池已经充满电。
使用正确的充电器连接电池,并按照电池说明书的指引进行充电。
一般情况下,充电时间约为1至2个小时。
3.2 连接遥控器在飞行之前,需要将遥控器与飞机进行连接。
首先,打开遥控器电源开关,然后按照飞机说明书中的指引,将遥控器与飞机进行配对。
一般情况下,配对的操作包括按下特定的按钮或者在特定的时间段内进行操作。
在成功连接后,遥控器的指示灯将亮起。
3.3 起飞和降落在飞行前,请选择一个开阔的场地,远离人群和建筑物。
首先,将遥控器的油门控制杆拉至最低位置,然后对准风向,推动油门控制杆将飞机加速至适当的速度。
当飞机获得足够的升力时,拉动升降杆使飞机起飞。
要降落飞机,先减速并拉下油门控制杆,使飞机的高度逐渐减低。
同时,使用升降杆控制飞机的姿态,使其缓慢下降。
当飞机接近地面时,拉下升降杆,使飞机着陆。
3.4 飞行操作- 油门控制:使用油门控制杆调整飞机的速度。
将油门控制杆推向前方,飞机将加速;将其拉向后方,飞机将减速。
- 方向控制:使用方向控制杆控制飞机的左右移动。
将方向控制杆向左移动,飞机将向左转弯;将其向右移动,飞机将向右转弯。
- 姿态控制:使用升降杆和副翼控制飞机的姿态。
将升降杆推向前方,飞机将向上倾斜;将其拉向后方,飞机将向下倾斜。
无线遥控开关说明书
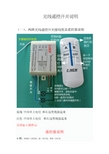
无线遥控开关说明(一)、两路无线遥控开关接线图及遥控器说明
蓝线中间串上电灯和右边黑线接起来
白色中间串上电灯和右边黑线接起来
具体如上图所示
遥控器说明
A 键:控制灯1的亮灭,按一次灯亮,再按一次灯灭
B键:控制灯2的亮灭,按一次灯亮,再按一次灯灭
ON/OFF键:控制灯1,灯2同时亮灭,按一下两灯同时亮,再按一下两灯同时灭SLEEP键:在灯亮的情况下,按一下这个键,延时25秒左右的时间,灯灭
(二)、三路无线遥控开关接线图
注意事项:以上,请亲严格按照接线图接线,不可按自己的想法接线,因接线错误造成的产品损坏,卖家一律不承担维修、换货、退款的责任。
如在接线的过程中有不明白的地方,请拨打售后客服电话:152********。
遥控器使用方法

遥控器使用方法遥控器是现代生活中不可或缺的电子设备,它可以控制电视、空调、音响等家电产品,为我们的生活带来了便利。
正确地使用遥控器不仅可以延长其使用寿命,还可以更好地享受家居娱乐。
下面,我将为大家介绍一些关于遥控器使用方法的技巧,希望能够帮助大家更好地使用遥控器。
首先,正确的使用遥控器需要注意保持清洁。
长时间使用后,遥控器上会积累灰尘和污垢,这不仅会影响遥控器的外观,还会影响按键的灵敏度。
因此,定期用干净的抹布擦拭遥控器表面,特别是按键部分,可以保持遥控器的清洁,并确保按键的正常使用。
其次,正确的使用遥控器需要注意避免遥控器受到撞击或摔落。
遥控器通常由塑料等材质制成,如果遭受撞击或摔落,可能会导致遥控器的内部电路受损,从而影响正常使用。
因此,在使用过程中,要注意轻拿轻放,避免遥控器受到外力影响。
另外,正确的使用遥控器需要注意避免长时间使用。
长时间使用遥控器可能会导致遥控器的电池过度耗损,从而影响遥控器的使用寿命。
因此,在不使用遥控器时,可以将电池取出,或者将遥控器放置在干燥通风的地方,以延长遥控器的使用寿命。
最后,正确的使用遥控器需要注意避免遥控器与水或其他液体接触。
遥控器内部的电路非常精密,一旦遥控器受到水或其他液体的侵害,可能会导致遥控器无法正常使用。
因此,在使用遥控器时,要注意避免将遥控器放在潮湿的地方,以及避免将水或其他液体洒在遥控器上。
总的来说,正确的使用遥控器需要注意保持清洁、避免受到撞击或摔落、避免长时间使用以及避免与水或其他液体接触。
只有正确地使用遥控器,才能够更好地享受家居娱乐,延长遥控器的使用寿命,为我们的生活带来更多的便利。
希望以上介绍的遥控器使用方法对大家有所帮助。
- 1、下载文档前请自行甄别文档内容的完整性,平台不提供额外的编辑、内容补充、找答案等附加服务。
- 2、"仅部分预览"的文档,不可在线预览部分如存在完整性等问题,可反馈申请退款(可完整预览的文档不适用该条件!)。
- 3、如文档侵犯您的权益,请联系客服反馈,我们会尽快为您处理(人工客服工作时间:9:00-18:30)。
伟力911遥控器说明书
1.商品名称:伟力911遥控器。
2.商品毛重:1.0kg。
3.伟力911飞行时长:40分钟以上。
4.伟力911最大飞行高度:10米以下。
5.伟力911遥控器操控方式:手动。
6.伟力911遥控器尺寸:100cm以上。
7.伟力911遥控器功能:无头模式可以锁定当前机头朝向作为前进
方向,无需继续控制机头朝向,使操控变得更为简单,易于掌握。
8.伟力911遥控器功能:选择重力感应控制模式,只需倾斜手机就
可以控制米兔遥控小飞机的飞行方向,单手遥控也能飞得随心所欲。
9.伟力911遥控器功能:炫酷的四向翻滚功能可以一键控制米兔遥
控小飞机进行前、后、左、右四个方向的360°空中翻滚,给你强烈的视觉震撼与飞行乐趣。