1.加气枪说明书
CNG加气机规格参数
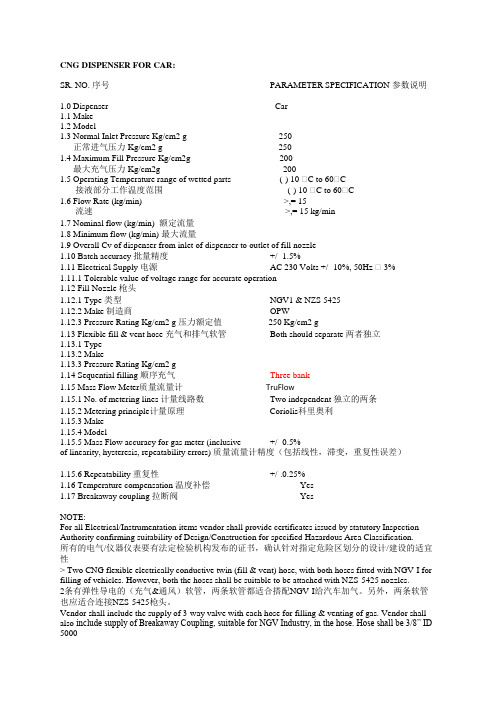
CNG DISPENSER FOR CAR:SR. NO. 序号PARAMETER SPECIFICATION 参数说明1.0 Dispenser Car1.1 Make1.2 Model1.3 Normal Inlet Pressure Kg/cm2 g 250正常进气压力 Kg/cm2 g 2501.4 Maximum Fill Pressure Kg/cm2g 200最大充气压力 Kg/cm2g2001.5 Operating Temperature range of wetted parts (-) 10 C to 60 C接液部分工作温度范围 (-) 10 C to 60 C1.6 Flow Rate (kg/min) >,= 15流速 >,= 15kg/min1.7 Nominal flow (kg/min) 额定流量1.8 Minimum flow (kg/min) 最大流量1.9 Overall Cv of dispenser from inlet of dispenserto outlet of fill nozzle1.10 Batch accuracy 批量精度+/- 1.5%1.11 Electrical Supply 电源AC 230 Volts +/- 10%, 50Hz 3%1.11.1 Tolerable value of voltage range for accurateoperation1.12 Fill Nozzle 枪头1.12.1 Type 类型NGV1 & NZS 54251.12.2 Make 制造商OPW1.12.3 Pressure Rating Kg/cm2 g 压力额定值250 Kg/cm2 g1.13 Flexible fill & vent hose 充气和排气软管Both should separate 两者独立1.13.1 Type1.13.2 Make1.13.3 Pressure Rating Kg/cm2 g1.14 Sequential filling 顺序充气Three bank1.15 Mass Flow Meter质量流量计TruFlow1.15.1 No. of metering lines 计量线路数Two independent 独立的两条1.15.2 Metering principle计量原理 Coriolis科里奥利1.15.3 Make1.15.4 Model1.15.5 Mass Flow accuracy for gas meter (inclusive +/- 0.5%of linearity, hysteresis, repeatability errors) 质量流量计精度(包括线性,滞变,重复性误差)1.15.6 Repeatability 重复性+/-.0.25%1.16 Temperature compensation 温度补偿Yes1.17 Breakaway coupling 拉断阀YesNOTE:For all Electrical/Instrumentation items vendor shall provide certificates issued by statutory InspectionAuthority confirming suitability of Design/Construction for specified Hazardous Area Classification.所有的电气/仪器仪表要有法定检验机构发布的证书,确认针对指定危险区划分的设计/建设的适宜性> Two CNG flexible electrically conductive twin (fill & vent) hose, with both hoses fitted with NGV-I for filling of vehicles. However, both the hoses shall be suitable to be attached with NZS-5425 nozzles.2条有弹性导电的(充气&通风)软管,两条软管都适合搭配NGV-I给汽车加气。
JQ系列加气机安装使用说明书

重要提示:请在安装和使用加气机前仔细阅读本说明书!制造计量器具许可证:渝制00000816号川仪耐德J Q 系列汽车用压缩天然气加气机 重庆四联油气设备制造有限公司 地址:中国.重庆市北部新区黄山大道中段杨柳路6号 电话:(86-23)67861935 67855641(Fax ) 目 录 1. 概述 (2)1.1 产品型号分类1.2 主要技术指标1.3 功能介绍2. 结构及原理 (6)2.1 总体结构2.2 工作原理 安装使用说明书2.3 加气操作规程3. 安装 (8)3.1 安装的基本要求3.2 管道连接3.3 电源接线4. 常见故障及排除方法 (11)5. 维护 (11)6. 随机备件及附件 (12)7. 服务 (12)附图1:JQ系列汽车用压缩天然气加气机拉断阀装拆图 (13)附图2:JQ系列汽车用压缩天然气加气机(西部之星)安装图 (14)附图3:JQ系列汽车用压缩天然气加气机过滤器装拆图 (15)附图4:JQ系列汽车用压缩天然气加气机(西部之星)结构图 (16)8. 电脑部分操作使用说明 (17)安全警示!1.请在安装和使用加气机前仔细阅读本说明书;2.务必请专业人员进行加气机的安装调试和维修;3.加气机电路部分的检修必须在断开电源后进行;4.加气机内压力管道的检修必须先排空管道内的气体、卸下压力之后进行;5.为了安全使用本设备,请定期进行气密性等安全检查。
1、概述JQ系列压缩天然气加气机是用于加气站贸易结算的加气设备,它的电脑控制部分采用了高性能的工控微处理芯片,在严酷的工作环境下仍能保持很高的稳定性。
选用高精度的质量流量计作为计量核心部件,它内置温度传感器以实现温度补偿,使加气机精确计量。
电气部分采用防爆结构以适应加气站的(爆炸性)环境,确保加气机安全可靠。
1.1 产品型号分类加气机的型号的编制规则及表示方法如下:JQ□□—□□□改型序列号: A-第一次改型;B-第二次改型;…以此类推额定流量:单位为立方米每分钟(m3/min)90-加气柱;80-卸气柱;40-大流量加气机;30-标准流量加气机枪数识别符:单枪省略;S-双枪;双枪以上使用对应的阿拉伯数字顺序控制方式:D-自带顺序控制;F-非自带顺序控制主称代号: JQ-加注气体1.2 主要技术指标1.2.1 产品型号:JQ□□-□□□1.2.2 制造计量器具许可证:渝制00000816号1.2.3 防爆合格证号:3200432541.2.4 防爆等级:本质安全兼隔爆型,防爆标志为ExibdmeⅡAT41.2.5 工作介质:压缩天然气1.2.6 流量范围:标准流量:2~30m3/min大流量:3~40m3/min1.2.7 计量准确度:±0.5%1.2.8 质量流量计准确度:±0.2%1.2.9 最大工作压力:25Mpa1.2.10 额定工作压力:20MPa1.2.11 输入电源:220V+10%,50Hz±1Hz,功率≤150W-151.2.12 环境温度:-30~+50℃环境湿度:≤95%环境大气压:86~110kPa1.2.13 计量单位:数量 m3(kg)金额元单价元/m3(元/kg)1.2.14 单次计数范围:0~9999.99 m3、kg、元1.2.15 累计计数范围:0~99999999.99 m3、kg、元1.2.16 预置定量范围: 1~9999.99 m3、kg、元1.2.17 单价设置范围:0.01~99.99元/m3(元/kg)1.2.18 密度设置范围:0.5000~0.9999kg/m31.2.19 净重:单枪180kg,双枪215kg;毛重:单枪230kg,双枪265kg;1.2.20 包装尺寸:(长)1220mm×(宽)750mm×(高)2230mm1.3 功能介绍1.3.1 计量准确可靠、显示清晰美观JQ系列汽车用压缩天然气加气机采用质量流量计作为核心计量部件,可准确测量出流过质量流量计的介质的质量,电脑部分经过自动计算就能得出加气量(体积/重量)或金额。
Nighthawk 气枪用户手册说明书
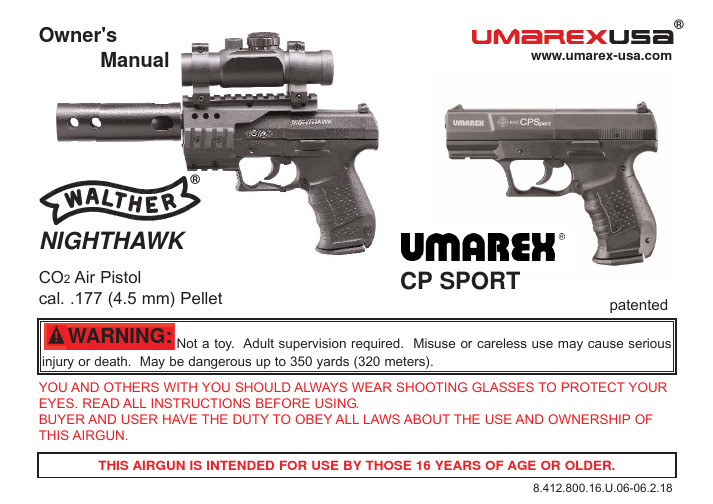
Owner'sManual injury or death. May be dangerous up to 350 yards (320 meters).CP SPORT WARNING:YOU AND OTHERS WITH YOU SHOULD ALWAYS WEAR SHOOTING GLASSES TO PROTECT YOUR EYES. READ ALL INSTRUCTIONS BEFORE USING.BUYER AND USER HAVE THE DUTY TO OBEY ALL LAWS ABOUT THE USE AND OWNERSHIP OF THIS AIRGUN.CO 2Air Pistolcal. .177 (4.5 mm) Pellet 8.412.800.16.U.06-06.2.18®NIGHTHAWK®Please read this owner's manual completely. This airpistol is not a toy. Treat it with the same respectyou would a firearm. Always carefully follow thesafety instructions found in this owner's manual andkeep this manual in a safe place for future use.If you have any questions regarding your new air pistol,please contact Umarex USA Customer Service atUmarex USA Inc.6007 South 29th StreetFort Smith, AR 72908 USAPhone: (479) 646 - 4210Fax: (479) 646 - 4206 Do not inhale dust or put pellets in mouth.Wash hands after handling. This product containslead, a chemical known to the State of Californiato cause cancer and birth defectsWARNING:Magazine shoe TriggerMagazine release leverGrip Frame 1. Get to know the components of your new air pistolFamiliarity with the components of your pistol will help you to understand this instruction manual. Read this manual in order to better enjoy the use of your new weapon.2. Handling the safety Fig. 2Fig. 1position until you are actually ready to shoot. Then push thesafety to the "OFF SAFE" position.WARNING:2.1 To Put The Air Pistol "ON SAFE:"Locate the safety on the right hand side of the receiver.Push the safety forward, toward the muzzle end of the airpistol (Fig. 1). The safety is not "On Safe" unless it is pushedforward all the way and the RED dot and the "F" on the gripframe are not showing.Like all mechanical devices, an air pistol safety can fail.Even when the safety is "On Safe", you should continue tohandle the air pistol safely. Do not ever point the air pistol atany person. Do not ever point the air pistol at anything you donot intend to shoot.2.2 To Take The Air Pistol "OFF SAFE":Locate the latch on the safety (Fig. 2)Push in the latch on the safety (1.) and slide the safetyrearward (2.) toward the rear sight.When you can see the RED dot and the "F" on the grip frame,the air pistol is "Off Safe" and can be fired. 1.2.“On Safe”“Off Safe”WARNING:Do not mutilate or incinerate them. Do not expose them to heat or store COabove 122°F (50°C)WARNING:come in contact with skin.3.1 Inserting the CO2cartridgeMake sure the air pistol is "On Safe" (See Step 2.1).Make sure the air pistol is unloaded (See Step 4.2).Point the air pistol in a SAFE DIRECTION.While supporting the bottom of the grip with your hand to catch the magazine, press the magazine release lever and remove the magazine from the bottom of the grip (Fig 3).Turn the magazine shoe clockwise towards "OPEN" (Fig. 4).If a CO2cartridge is already installed, See Step 3.2 - Removing the CO2cartridge.Insert the CO2cartridge with the small neck of the cartridge pointing upward toward the top of the magazine (Fig. 5).Tighten the cartridge into place by turning brass retaining screw clockwise (up) until secure and close the magazine shoe by turning counterclockwise towards "POWER" (Fig. 6) to pierce the CO2cartridge.Insert the magazine up into the bottom of the grip until it locks into place (Fig. 7).With the air pistol unloaded (See Step 4.2) and pointed in a SAFE DIRECTION, take "Off Safe" (See Step 2.2) and squeeze the trigger to fire. If your air pistol does not make a popping noise after pulling the trigger, the CO2is not being discharged.In that event you will have to put the air pistol "On Safe" (See Step 2.1), remove the CO2cartridge (See Step 3.2), and re-insert the CO2cartridge as described in Step 3.1, point in a SAFE DIRECTION, take "Off Safe" (See Step 2.2) and squeeze the trigger to fire.3.2 Removing the CO2cartridgeMake sure the air pistol is "On Safe" (See Step 2.1).Make sure the air pistol is unloaded (See Step 4.2).Point the air pistol in a SAFE DIRECTION.While supporting the bottom of the grip with your hand to catch the magazine, press the magazine release lever and remove the magazine from the bottom of the grip (See Fig. 3).Turn the magazine shoe clockwise towards "OPEN" (See Fig. 4).Slowly turn the brass cartridge retaining screw counter clockwise (down) until it stops; allowing any remaining CO2gas to escape (See Fig. 4).Remove the CO2cartridge.NOTE:High temperatures may cause damage to the air pistol. The maximum temperature for the storage or use of this air pistol should not exceed 122°F (50°C). This temperature can easily be reached when the air pistol is exposed to direct sunlight.FIRING THE AIR PISTOL WITH LOW GAS PRESSURE MAY CAUSE A PELLET TO GET STUCK IN THE BARREL.Never try to force any CO2cartridge into or out of place as it may result in injury to you or damage to your air pistol. Do not store your air pistol with a CO2cartridge in it. This is very important to remember, as it will prolong the longevity of your air pistol seals.Fig. 3Fig. 4Fig. 5Fig. 6Fig. 7Fig. 8Fig. 9Head Skirtwrong right Fig. 10wrong Use of any other ammunition can cause injury to you or damage to the air pistol.WARNING: 4.1 Loading the pistolMake sure the air pistol is "On Safe" (See Step 2.1).Point the air pistol in a SAFE DIRECTION.While keeping the air pistol in an upright position (to keep the pellet clip from falling out) as shown in Fig. 11, open the slide by pressing the slide release lever down (Fig. 8) until the slide opens and exposes the pellet clip.Place a cal. .177 (4.5 mm) pellet, nose first, in each pellet chamber of the pellet clip (Fig. 9).IMPORTANT: To avoid jams or deforming the pellets, make sure the pellet skirt is level or slightly below the rim of the pellet chamber.Place the pellet clip in the pistol (ratchet teeth facing the rear sight, Fig. 10).Close the air pistol by gripping the slide and pushing it back until it locks into place (Fig. 11).Note: Do not place your hand or fingers over the muzzle when opening or closing the slide.Do not place your hand orfingers over the muzzle.Always make sure your airpistol is pointing in a SAFEWARNING:Replace the empty pellet clip (ratchet teeth facing the rear sight)Fig. 11WARNING:ple or animals. Always handle the air pistol as if it was loaded and ready to fire.WARNING:choosing a safe target. Only choose targets with a safe backstop. Do not choose targets that will cause ricochets. Never shoot at water.5. Safe aiming and shootingYou and others with you should always wear shooting glasses to protect your eyes.Always aim your air pistol in a SAFE DIRECTION. When you are sure of your target and backstop,and the area around the target is clear, take the air pistol "Off Safe" (See Step 2.2) and squeeze the trigger to fire.Do not shoot at hard surfaces or at the surface of water. The pellet may bounce off or ricochet and hit someone or something you had not intended to hit.Always choose your target carefully. It is best to shoot at paper bullseye targets, which are attached to a safe backstop. Your backstop should be checked for wear before and after each use. Replace your backstop if the surface is worn or damaged, or if a ricochet occurs.Your air pistol is designed for target shooting and is suited for both indoor and outdoor use. Always remember to place your target carefully. THINK about what you will hit if you miss the target.The air pistol is correctly aimed when the front sight blade is positioned exactly in the notch of the rear sight. The top of the front sight blade should be even with the top of the notch in the rear sight. The bullseye should appear to rest on the top of the front sight (Fig. 12).Fig. 13too high too low Fig. 12correct6. Adjusting the sightThe rear sight can be adjusted for windage. This adjustment is made by using a screwdriver to turn the screw clockwise if the air pistol fires too far to the right and counterclockwise if it shoots too far to the left (Fig. 13).7. Use and handling of CO2cartridgesIt is possible that certain conditions may affect a CO2pistol, which can impact its proper performance. These conditions include the usage, maintenance, and storage at certain temperatures that are higher or lower than normal outdoors temperatures (from 59°F / 15°C to 69.8°F / 21°C). Another condition may be when the gun is shot at fast speeds.1. High temperatures can increase pressure in the CO2cartridge and also within the gun, leading to higher than standard operating pressure. This excess pressure could cause the gun to malfunction or be permanently damaged. Maximum storage or operation temperature should never exceed 122°F (50°C). This temperature can be reached if you leave the gun under direct sunlight on a bright day. Thus, to ensure proper gun operation, do not expose it to high temperatures or direct sunlight for long periods of time. Otherwise, the CO2cartridge could overheat and explode, which could damage the weapon and cause injuries or death to people around it.2. Fast consecutive shooting may produce a decrease of temperature in the gun, as well as the CO2cartridge.This could lead to a lower muzzle speed, uneven gas pressure.3. Keep in mind that during a rapid-fire sequence, the muzzle speed will diminish with each shot, which may negatively affect the power of the shot.4. Try not to shoot the weapon with a CO2cartridge that has already lost a considerable portion of its pressure. Here are some indicators of insufficient CO2cartridge pressure:A) The sound of the shot is not as loud as when the cartridge is full.B) The ammunition hits the target, but in a lower position than it would with a full CO2cartridge(that is, the shooting speed has dropped).WARNING:Bear in mind the indications for jams.WARNING:WARNING:8. Removing a jammed pelletIMPORTANT:The fact that the air pistol does not fire a projectile is never a reason to assume that the pellet clip does not contain any more pellets. Firing the air pistol with too little gas pressure left may cause a pellet to get stuck in the barrel.Make sure the air pistol is "ON SAFE" (See 2.1).Remove the CO2magazine (See 3.2).Open the slide and remove the pellet clip.Insert a ramrod of the proper size into the muzzle end of the barrel and carefully push the jammed pellet into the loading port (Fig. 10.). The barrel could be damaged if the proper sized ramrod is not used. Once you have pushed the pellet back into the loading port, shake the air pistol until the jammed pellet falls out.Do not try to reuse that pellet.If you are not able to unjam your air pistol by following this procedure, take no further action. Umarex USA Inc. or an Authorized Service Station will unjam your air pistol.(no cost during the warranty period)WARNING:Always store the air gun with the ammunition removed and the safety on. Carefully check that there is no ammunition in the barrel and remove the pellets from the pellet clip. Before storing it, we recommend to also remove the CO2cartridges. Keep the air gun out of the reach of children and users not familiarized with its use. Store the air gun separately from the pellets and the CO2cartridges.10. Care and MaintenanceIf you maintain and care for your air pistol properly, you will be able to enjoy it for many years.WARNING:(seeno pellets left in it.To clean the outside, use a soft cloth.Your air pistol will work best if you put just a drop of oil directly on the tip of the CO2cartridge before inserting.DO NOT use a petroleum distillate based oil or solvent and DO NOT over-oil as this can cause damage to your air pistol. Occasionally apply between 2 and 3 drops of oil for air guns to the following pieces:slide rails and magazine release leverTampering with the air pistol or attempts to modify the air pistol in any way may make it unsafe to use and will void the warranty. If you drop your air pistol, check to see that it works properly before you use it again.If your air pistol is damaged or does not perform properly, call Umarex USA Customer Service for assistance before using your air pistol again.11. Safety Review- Do not ever point the air pistol at any person. Do not ever point the air pistol at anythingyou do not intend to shoot.- Always treat the air pistol as if it was loaded and handle it with the same respect you would a firearm.- Always aim in a SAFE DIRECTION. Always keep the muzzle of the air pistol pointed in aSAFE DIRECTION.- Always keep the air pistol on "Safe" until you are ready to shoot in a SAFE DIRECTION.- Check behind and beyond your target to be certain you have a safe backstop and that no person or property could be endangered.- This air pistol may only be shot on the owner's property or at shooting ranges allowed by the police, and only if the ammunition does not travel further than the shooting area. Bear in mind the maximum range of the pellet (approximately 350 yards (320 m).- Always check to see if the air pistol is on "Safe" and unloaded when getting it from another person or from storage.- Always keep your finger away from the trigger and away from the trigger guard until ready to shoot. - You and others with you should always wear shooting glasses to protect your eyes.- Use only ammunition and an CO2cartridge designed for this air pistol.- Never reuse pellets.- Do not shoot at hard surfaces or at the surface of water. The pellet may bounce off or ricochet and hit someone or something you had not intended to hit.- Replace the backstop if it becomes worn. Place the backstop in a location that will be safe should the backstop fail.- Always store the air pistol with the safety on, unloaded, separated from the ammunition andCO2cartridge, and in a safe manner to prevent unauthorized people from accessing it.- Do not attempt to disassemble or tamper with your air pistol. Use an Authorized Service Stationor return it to Umarex USA for repair.- Do not put the air pistol away loaded. (See chap. 4.2).- Always store this air pistol in a secure location.- Never leave the air pistol loaded if it is out of your reach.- Unload the air pistol before giving it to someone else.12. Technical DataMechanism:RepeaterCaliber/Ammunition:cal. .177 (4.5 mm) pelletsPellet clip capacity:8 shotsWeight: 1.21 lbs (550 g)Overall Length:7 inch (180 mm)Sights:Front Fixed RampRear Adjustable for windageBarrel Length/Material: 3.35 inch (85 mm) / Rifled steelPower source12g CO2cartridgeSafety:Slide styleVelocity:Up to 360 f/s (109 m/s)PERFORMANCEMany factors affect velocity, including brand of projectile, type of projectile, amount of CO2in cartridges, lubrication, barrel condition and temperature.REPAIR SERVICEIf your air pistol needs repair, we recommend that you take or send it to an Authorized Service Station or Unarex USA. For an Authorized Service Station near you, visit our web site at or call Customer Service at (479) 646 - 4210.(International customers should contact their distributor.)DO NOT ATTEMPT TO DISASSEMBLE IT! Your air pistol requires special tools and fixtures to repair it. If you take it apart, you probably will notbe able to reassemble it correctly. Umarex USA assumes no warranty responsibility under such circumstances.Distributed byUmarex USA Inc.6007 South 29th Street Fort Smith, AR 72908 USA Phone: (479) 646 - 4210Fax: (479) 646 - e p I ®。
LNG加气设备的操作规范分解
LNG加气设备的操作规范1.目的任何电气设备的正确、规范化的操作,将会大大提高设备的性能和使用寿命,因此本公司制定了此设备操作规程,以帮助加气站领导及操作人员更好的撑握LNG整套设备的正常操作和使用方法.同时也能帮助大家及时发现站内设备、管线及工艺流程的异常情况,并及时处理以保证LNG加气站的安全运行。
2.实用范围本操作规程适用于即将建成并投入运行的LNG加气站以及已经投入运行的LNG加气站的运行及管理.3.加气站负责人的职责3.1.运营部经理和LNG加气站站长负责检查和监督本程序的执行.3。
2.LNG加气站站长负责本程序的执行和异常情况的处理与协调。
3.3。
站内运行操作人员负责本程序的操作执行、数据记录和异常情况处理。
3。
4.调度中心负责收集、整理运行数据,协助站内异常情况的处理。
4.操作步骤4.1。
空管气体置换4。
1.1.站内设备及连接管道投入运行前先使用液氮置换空气;当含氧量≤1%时,改用LNG 直接置换。
4.1.2。
LNG加气机出厂前已用液氮置换,投入运行前可直接使用LNG置换。
4。
1。
3. 用皮囊取适量置换放散气体,远离放散点进行点火试验(选择上风口),燃烧火焰以黄焰为合格。
4。
2.潜液泵预冷操作规程4。
2.1。
此工作应于卸车前2小时进行;4.2。
2。
管道流液:轻微开启一储罐的底部进液阀,将罐内部分LNG缓慢流经泵池,打开泵池溢流口处的阀门至储罐。
4.3.泵进口测温⑴观察控制柜上的显示温度,如温度低于-100℃,则认为已达预冷状态.⑵保持该状态,等液化天然气车到来后开始卸车。
4.4.LNG卸车操作规程4.4.1。
作业程序(一)液化天然气槽车进站后,引导监督其按指定卸车位停靠,接好接地线,垫好防溜木块;(二)检查槽车罐与储罐压力及液位,确定卸车方案:当储罐压力高于槽车压力时,宜采用顶部进液;否则反之。
如压力相近,可用上部或下部进,也可同时进;(三)查液化天然气液相、气相卸车软管完好状况;(四)检查储罐区内储罐内压力,液位;(五)按液化天然气充装流程检查卸车台至储罐的所有阀门开停位置是否正常;(六)以上各点准确无误后,站内操作员检查槽车压力、温度、液位并记录;(七)卸车区至罐区的操作由站内操作员进行,槽车至卸车台操作由槽车押运员进行.充装过程中,巡回检查所有工艺阀门、管线、仪表工况,作好记录工作,并注意避险;(八)具体卸车操作:(1)给槽车增压,将槽车压力增高至储罐压力加0。
Ironton 热气枪说明书

HEAT GUNOWNER’S MANUALWARNING:Read carefully and understand all ASSEMBLY AND OPERATIONINSTRUCTIONS before operating. Failure to follow the safety rules and other basic safety precautions may result in serious personal injury.Thank you very much for choosing an Ironton product! For future reference, please complete the owner’s record below:Model: _______________ Purchase Date: _______________Save the receipt, warranty and these instructions. It is important that you read the entire manual to become familiar with this product before you begin using it.This machine is designed for certain applications only. The distributor cannot be responsible for issues arising from modification. We strongly recommend this machine not be modified and/or used for any application other than that for which it was designed. If you have any questions relative to a particular application, DO NOT use the machine until you have first contacted the distributor to determine if it can or should be performed on the product.For technical questions please call 1-800-222-5381.INTENDED USEYour Ironton Heat Gun has been designed for stripping paint, shrinking PVC, bending plastics as well as general drying and thawing purposes.TECHNICAL SPECIFICATIONSVoltage: 120V~60HzRated Power: 1500WTemperature Rating: 572ºF/932ºF (299°C/499°C)GENERAL SAFETY RULESWARNING: Read and understand all instructions. Failure to follow all instructions listed below may result in serious injury.CAUTION:Do not allow persons to operate or assemble this Heat Gun until they have read this manual and have developed a thorough understanding of how the Heat Gun works.WARNING:The warnings, cautions, and instructions discussed in this instruction manual cannot cover all possible conditions or situations that could occur. It must be understood by the operator that common sense and caution are factors that cannot be built into this product, but must be supplied by the operator.SAVE THESE INSTRUCTIONSGENERAL P OWER T OOL S AFETY W ARNINGSWARNING! Read all safety warnings and all instructions. Failure to follow all warnings and instructions may result in electric shock, fire and/or serious injury. Save all warnings and instructions for future reference. The term “power tool” in all of the warnings refers to your corded power tool.1) Work area safetya) Keep work area clean and well lit. Cluttered or dark areas invite accidents.b) Do not operate power tools in explosive atmospheres, such as in the presence of flammableliquids, gases or dust. Power tools create sparks, which may ignite the dust or fumes.c) Keep children and bystanders away while operating a power tool. Distractions can cause youto lose control.d) Not for use around standing water. Avoid getting water in the heat gun. Water can causeelectric shock.2) Electrical safetya) Power tool plugs must match the outlet. Never modify the plug in any way. Do not use anyadapter plugs with grounded power tools. Unmodified plugs and matching outlets will reduce risk of electric shock.b) Avoid body contact with earthed or grounded surfaces, such as pipes, radiators, ranges andrefrigerators. There is an increased risk of electric shock if your body is earthed or grounded.c) Do not expose power tools to rain or wet conditions. Water entering a power tool willincrease the risk of electric shock.d) Do not abuse the cord. Never use the cord for carrying, pulling or unplugging the power tool.Keep cord away from heat, oil, sharp edges or moving parts. Damaged or entangled cords increase the risk of electric shock.e) When operating a power tool outdoors, use an extension cord suitable for outdoor use. Useof a cord suitable for outdoor use reduces the risk of electric shock.f) If operating a power tool in a damp location is unavoidable, use a residual current device(RCD) protected supply. Use of an RCD reduces the risk of electric shock.3) Personal safetya) Stay alert, watch what you are doing and use common sense when operating a power tool.Do not use a power tool while you are tired or under the influence of drugs, alcohol ormedication. A moment of inattention while operating power tools may result in serious personal injury.b) Use personal protective equipment. Always wear eye protection. Protective equipment suchas dust mask, non-skid safety shoes, hard hat, or hearing protection used for appropriateconditions will reduce personal injuries.c) Prevent unintentional starting. Ensure the switch is in the off-position before connecting topower source and/or battery pack, picking up or carrying the tool. Carrying power tools with your finger on the switch or energizing power tools that have the switch on invites accidents.e) Do not overreach. Keep proper footing and balance at all times. This enables better controlof the power tool in unexpected situations.f) Dress properly. Do not wear loose clothing or jewelry. Keep your hair, clothing and glovesaway from moving parts. Loose clothes, jewelry or long hair can be caught in moving parts.g) If devices are provided for the connection of dust extraction and collection facilities, ensurethese are connected and properly used. Use of dust collection can reduce dust-relatedhazards.h) Not for use by children or people with reduced mental capacity. Do not use under theinfluence of drugs or alcohol.4) Power tool use and carea) Do not force the power tool. Use the correct power tool for your application. The correctpower tool will do the job better and safer at the rate for which it was designed.b) Do not use the power tool if the switch does not turn it on and off. Any power tool that cannotbe controlled with the switch is dangerous and must be repaired.c) Disconnect the plug from the power source and/or the battery pack from the power toolbefore making any adjustments, changing accessories, or storing power tools. Such preventive safety measures reduce the risk of starting the power tool accidentally.d) Use the power tool, accessories and tool bits etc. in accordance with these instructions,taking into account the working conditions and the work to be performed. Use of the power tool for operations different from those intended could result in a hazardous situation.5) Servicea) Have your power tool serviced by a qualified repair person using only identical replacementparts. This will ensure that the safety of the power tool is maintained.HEAT GUN USE AND CARE•Do not modify the Heat Gun in any way. Unauthorized modification may impair the function and/or safety and could affect the life of the equipment. There are specific applications for which the Heat Gun was designed.•Always check of damaged or worn out parts before using the Heat Gun. Broken parts will affect the Heat Gun operation. Replace or repair damaged or worn parts immediately.•Store idle Heat Gun. When Heat Gun is not in use, store it in a secure place out of the reach of children. Inspect it for good working condition prior to storage and before re-use.WARNING: Fire Hazard.This t ool h as a b uilt-‐in s tand o n t he i ntake e nd. W henever p lugged i n or h ot, t he h eat g un m ust r est o n t his s tand. D o n ot l ay i t o n i ts s ide o r a llow t he h ot e nd o f t he g un t o t ouch any s urface.• Be careful when using the appliance in places where there are combustible materials.• Do not apply to the same place for a long time.• Do not use in presence of an explosive atmosphere.• Be aware that heat may be conducted to combustible materials that are out of sight.• Place the appliance on its stand after use and allow it to cool down before storage.• Do not leave the appliance unattended when it is switched on.• This appliance is not intended for use by persons (including children) with reduced physical, sensory or mental capabilities, or lack of experience and knowledge, unless they have beengiven supervision or instruction concerning use of the appliance by a person responsible for their safety.• Children should be supervised to ensure that they don’t play with the appliance. OPERATIONUSING YOUR HEAT GUNWARNING! Before use always read the safety instructions given on the rear of this manual. Failure to comply with the precautions stated could lead to a fire, serious injury or death. Retain these instructions in a safe place for future reference.WARNING! The use of any accessory or attachment or performance of any operation with this tool other than those recommended in this instruction manual may present a risk of personal injury.Before startup1. Make sure that the tool is connected only to a supply with the correct voltage.2. If you wish to have both hands free when working, adjust the metal hanging ring on the handle to allow the tool to stand in an upright position on its base. Fig A3. Make sure that the air intake slots on the side of the base are not blocked.Startup1. The machine must be switched in the off position “O” when you connect the tool to the power outlet.Selecting the heat setting1. Set the ON/OFF switch to Heat Setting 1 when you wish to avoid overheating the surroundings of the work piece or to avoid displacing the work piece if the airflow is too strong. Fig B2. Set the ON/OFF switch to Heat Setting 2 in order to heat up the work piece more quickly or when you wish to hold the heat gun at a greater distance from the work piece. Fig CWhen to remove the front collar1. You can remove the front collar when you want to insert the nozzle into a tighter space.WARNING! The nozzle becomes extremely hot during use. If the collar is removed, more of the nozzle will be exposed, and greater care should be taken to prevent bodily harm.WARNING! To reduce the risk of injury, turn off tool, disconnect from power source and allow to cool before conducting maintenance, installing and removing accessories, before making any adjustments or removing/installing attachments or accessories.3. To remove the front collar, face the nozzle away from you and then rotate the collar clockwise. The collar can now be pulled forward and removed. Reverse the process to re-assemble. Fig DWARNING! DANGER OF FIRE AND EXPLOSION!Flammable and poisonous gases may be produced when working with plastics, paints (especially older types of paint), varnishes and similar materials.Setting the temperature and working distance1. Determine the best operating conditions by starting at Heat Setting 1 and at a good distance from the work piece.2. If necessary, increase the temperature and decrease the operating distance to achieve optimum results.3. Generally, use low heat for:• Drying paint and varnish• Removing stickers• Waxing and de-waxing• Drying wet timber prior to filling• Shrinking PVC wrapping and insulation tubes• Thawing frozen pipesUse high heat for:• Welding plastics• Bending plastic pipes and sheets• Loosening rusted or tightly fastened nuts and bolts• Removing paint and lacquerUsing different types of nozzle (not supplied)Specific nozzles can be purchased and attached to the front of your heat gun.1. Removing paint and dissolving adhesivesSoften paint using hot air and remove evenly using a scraper. Do not heat the paint for too long since this will burn the paint, making it more difficult to remove.Avoid collecting paint on the scraper, as it may ignite. If necessary, carefully remove paint debris from the scraper using a knife. Many adhesives (e.g. stickers) become softer when heated, allowing adhesive bonds to be separated and superfluous adhesive to be removed.2. Removing paint from windows.Glass can break easily. Always use a glass protection nozzle. On profiled surfaces, paint can be removed using a scraper and brushed off using a soft wire brush. Do not strip metal window frames as the heat may crack the glass.3. Shaping plastic tubingFit a reflector nozzle. To avoid kinking the tubing, fill the tubing with sand and seal at both ends, Heat the tubing evenly by moving it from side to side.4. Staining woodFit a cone nozzle. Hot air staining gives natural wood a rustic effect. Do not hold the nozzle too close to the wood as this will color the wood unevenly. Carefully sand off any singed wood fibers afterwards using fine sand paper.5.Shrink fittingFit a cone nozzle. Select a heat-shrinkable sleeve with a diameter matching that of the work piece, such as a cable lug. Heat the heat-shrinkable sleeve evenly.6. Defrosting water pipesDo not attempt to defrost- PVC piping. Fit a reflector nozzle. Always heat the frozen area inwards from the edge to the center.Note: Water pipes are often difficult to distinguish from gas pipes.Copper pipes are joined using tin and should therefore not be heated above 390ºF.Operational tips1. This tool is designed for indoor use only. Using this tool for prolonged periods may cause it to overheat and malfunction. Use inside a confined area, such as a cabinet will increase the temperature of the tool. To ensure the tool does not overheat it is suggested frequent breaks are taken to allow the tool to cool down.2. Take extra care with the heat gun element. Once the element is hot it can become fragile and break if dropped or knocked.3. If the nozzle is hot or if you wish to have both hands free when working, adjust the metal hanging ring on the handle to allow the tool to stand in an upright position on the stand base.Cool down period1. The nozzle and accessories become very hot during use. Turn the heat gun off, disconnect it from the power source and let the tool cool down for at least 30 minutes before moving or storing it.Thermal protection deviceThe Ironton heat gun is fitted with a thermal fuse which is a one-time fusible link. The thermal fuse is a single-use device that cannot be reset when it fails or is triggered. Thermal fuses only react to excessive temperature and cut-off to prevent hazardous overheating conditions.MAINTENANCEMaintain your Heat Gun. It is recommended that the general condition of any Heat Gun be examined before it is used. Keep your Heat Gun in good repair by adopting a program of conscientious repair and maintenance. Have necessary repairs made by qualified service personnel.1. Before performing any maintenance, switch off, unplug the tool and allow it to cool.2. Regularly clean the ventilation slots in your Heat Gun using a soft brush or dry cloth.3. Regularly clean the motor housing using a damp cloth. Do not use any abrasive or solvent- based cleaner.4. If the supply cord is damaged, this tool should not be repaired. Dispose of the tool and get a replacement.DIAGRAM AND PARTS LISTFor technical questions please call 1-800-222-5381.NO. Part NameNO. Part Name1 Housing13 Motor stand 2 14 Motor 3 Ring cover 15 PCB 4 Nozzle 16 Switch5 Housing 17 Wiring Terminal6 Tool-hook 18 Cable Grip7 Heating element 19 Anti-Rink8 Heating wire20 Power Cord9 21 Plug 10 .Inter Wire 22 Cover 11 Hot Air Collector 23 Sheet Mica12Fan bladerWARNINGSome dust created by power sanding, sawing, grinding, drilling, and other construction activities contains chemicals known to the State of California to cause cancer, birth defects or other reproductive harm. Some examples of these chemicals are:• lead from lead-based paints,• crystalline silica from bricks and cement and other masonry products, and• arsenic and chromium from chemically-treated lumber.Your risk from these exposures varies, depending on how often you do this type of work. To reduce your exposure to these chemicals: work in a well ventilated area, and work with approved safety equipment, such as those dust masks that are specially designed to filter out microscopic particles.Distributed byNorthern Tool + Equipment Co., Inc.Burnsville, Minnesota 55306Made in China。
VIAIR 胎压充气枪操作指南说明书

T IRE I NFLATION G UN P/N 00041O PERATING I NSTRUCTIONSThe VIAIR Tire Inflation gun is used for airing up tires, and adding compressed air to any inflatable item with a valve stem. The Tire Inflation Gun has a normally closed lever style air chuck at the end of its rubber hose. After connection to an air source such as an air tank via the quick connect stud preinstalled in the unit, air may be discharged from the gun by simply squeezing the inflation trigger. To check air pressure, simply release the trigger and check the onboard air pressure gauge.1. Using the Tire Inflation Gun:Using a 1/4“ Quick Coupler, connect the Tire Inflation Gun to an air hose and connect to a tire valve stem or similar inflation collar by securing the folding lever on the Inflation Gun air chuck.2. Filling Tires and other Inflatable Items:Squeeze the Inflation Trigger on the Inflation Gun by pressing it towards the handle of the gun. This will allow stored air from the air tank to flow through the gun and through the chuck into your tire or other inflatable.3. Checking Tire Pressure:To check tire pressure, release Inflation Trigger on Inflation Gun and allow the needle of the 0-200 PSI gauge to settle. Tire pressure will be able to be read only when the inflation trigger is released.4. Storage:Always store using the included deluxe carry bag to protect the inflation gun & hose. WARNING:•Never operate the Inflation Gun at any pressure exceeding 200 PSI.•Use caution when attached or removing air chuck from valve stems.•Always ensure that tire valve stems are tight before inflating tires.•Never inflate any tire or other inflatable past its rated pressure to avoid explosion, or possible injury or death.WARNING: Not intended for use with regular portable compressors (units meant to be operated with an open ended air chuck). The Tire Inflation Gun is equipped with a close-ended chuck (will hold pressure back).WARRANTY: This product is warranted to be free from defects in workmanship or material for a period of one year from provided date of purchase.For more information: /warrantyVIAIR CORPORATION15 EDELMANIRVINE, CA 92618TEL: (949) 585-0011 FAX: (949) 585-0188TOLL FREE: (800) 618-1994。
加气站加气枪操作流程
加气站加气枪操作流程
朋友!今天来跟您唠唠加气站加气枪咋操作!
先说啊,我刚入行的时候,那叫一个懵,这加气枪咋摆弄都搞不明白,愁得我哟!不过后来慢慢也就上手啦。
咱先说准备工作哈,您得先把车停稳喽,可别歪七扭八的。
然后呢,要确保加气口周围干净,别啥脏东西都有。
这时候,拿起加气枪,我跟您说,这加气枪拿在手里还挺有分量的!然后把加气枪对准加气口,记住喽,一定要对准,不然可就麻烦啦!
我记得有一次,有个新手没对准,结果气喷得到处都是,那场面,哇,简直了!
插好加气枪后,就可以开始加气啦。
这时候您能听到“嘶嘶”的声音,别害怕,这是正常的。
不过我跟您说,加气的时候可不能分心。
我有一回,正加着气呢,突然想起晚上吃啥,结果差点出岔子,唉!
加完气后,先别急着拔枪,等气稳定了,再慢慢拔出来。
我这又扯远啦,反正操作流程大概就是这样。
您要是操作的时候有啥不明白的,尽管问我,千万别自己瞎琢磨!
对了,我还听说隔壁加气站有个师傅,加完气没关好阀门,结果闹了个大笑话。
您说这行业里,是不是啥事儿都有?哈哈!
这加气枪操作啊,其实多练练也就熟练了,您说是不?。
加气站加气枪操作流程
加气站加气枪操作流程下载温馨提示:该文档是我店铺精心编制而成,希望大家下载以后,能够帮助大家解决实际的问题。
文档下载后可定制随意修改,请根据实际需要进行相应的调整和使用,谢谢!并且,本店铺为大家提供各种各样类型的实用资料,如教育随笔、日记赏析、句子摘抄、古诗大全、经典美文、话题作文、工作总结、词语解析、文案摘录、其他资料等等,如想了解不同资料格式和写法,敬请关注!Download tips: This document is carefully compiled by theeditor. I hope that after you download them,they can help yousolve practical problems. The document can be customized andmodified after downloading,please adjust and use it according toactual needs, thank you!In addition, our shop provides you with various types ofpractical materials,such as educational essays, diaryappreciation,sentence excerpts,ancient poems,classic articles,topic composition,work summary,word parsing,copy excerpts,other materials and so on,want to know different data formats andwriting methods,please pay attention!加气站加气枪操作流程随着汽车行业的发展,加气站的数量也越来越多,加气站的服务也变得越来越便捷。
加气机操作规程国产
加气机操作规程国产
一、非定量加气
将加气枪插入汽车气瓶接口中,打开气瓶上的阀和枪阀,按加气机键盘上的加气键即可加气,当气瓶压力达到20Mpa时加气机自动停止加气。
二、定量加气
首先通过键盘设定需加的气量(Kg或m3)或金额,然后按加气键开始加气,当达到设定值时自动停止加气。
三、非常规加气
当加气站气库压力不足时,可通过键盘上换班键手动控制低、中、高三组电磁阀切换,加快充气速度,节约时间。
四、操作步骤
1、从加气机枪盒上取下加气枪,让枪阀手柄箭头指向“关”的方向,将加气枪插入汽车气瓶上的加气接口中,可靠连接;
2、打开汽车气瓶上的阀;
3、旋转枪阀的手柄,让其箭头指向“开”的方向,此时可从加气机上的压力表读出汽车车瓶的剩余压力;
4、按键盘上的加气键开始加气;
5、加气完成后电脑控制器的蜂鸣器会连续鸣叫三声自动停止加气,若果汽车不需要加足设定压力也可按停止键手动停止加气;
6、关汽车气瓶上的阀;
7、将枪阀的手柄旋转至箭头指向“排空”的方向,排除枪阀至汽车气瓶阀门之间管道中的高压气体;
8、从汽车上取下加气枪放回加气枪盒内,结束加气。
气枪安全简明指南说明书
AIR WEAPONS: A brief guide to safety•It is an offence for any person to use an air weapon for firing a pellet beyond the boundaries of any premises.• It is an offence for a supervisingadult to allow a person under the age of 18 to use an air weapon for firing a pellet beyond the boundaries of any premises.•It is an offence to have an air weapon in a public place without areasonable excuse. It is ultimately for the courts to decide what areasonable excuse is. However, it might include carrying a weapon to and from a shooting club, or taking a new weapon home from a dealer.•It is an offence to trespass with an air weapon.•It is an offence to have an air weapon if you are prohibited from possessing a firearm. Anyone sentenced to a term of imprisonment of between three months and three years(including suspended sentences) is prohibited from possessing an air weapon or other firearm orammunition for five years. Anyone who has been sentenced to three years or more is prohibited for life.•It is an offence to fire an air weapon without lawful authority or excuse within 50 feet (15 metres) of the centre of a public road in such a way as to cause a road user to be injured,interrupted or endangered.•It is an offence to have an air weapon with intent to damage or to destroy property, or to be reckless as towhether property would be damaged or destroyed.•It is an offence to have an air weapon with intent to endanger life.Types of air weaponThe advice in this leaflet concerns “lethal barrelled” air weapons – those with muzzle energy of more than one joule. Guns below this threshold, and qualifying “airsoft” guns, are notregarded as firearms. Air weapons with muzzle energy greater than 12 foot-pounds may only be held on a firearms certificate issued by local police forces. Air pistols with muzzle energies greater than six foot-pounds (and certain other air weapons) are prohibited and may not be possessed without the authority of the Home Secretary. In Scotland, any air weapon with muzzle energy above one joule may mean that you need an Air Weapon Certificate or permit – see www.airweapon.scot for more information. If you are in any doubt, seek advice from your local police force.What can I use my air weapon for? Air weapons can be used for a number of purposes including target shooting, vermin co ntrol and hunting small ground game. Howeve r, if you have never shot before, you should consider going to a shooting club with an air weapons section and learning from a qualified instructor how to handle your air weapon safely and responsibly and become an accurate shot. If you intend to shoot live quarry, you must be careful only to do so on privateproperty on which you have permission to shoot.Useful contactsThe following organisations canprovide you with further information on using your air weapon, including details of clubs in your area: The National Small-bore Rifle Association (NSRA) Lord Roberts Centre Bisley Camp Brookwood WokingSurrey GU24 0NP The British Association for Shooting and Conservation (BASC) Marford Mill Rossett WrexhamClwyd LL12 0HL The British Shooting Sports Council (BSSC) PO Box 79Halesworth IP19 1BBThe Gun Trade Association Bisley Camp BrookwoodSurrey GU24 0PB Published by the Home Office April 2023This leaflet is a guide to usingand storing your air weapon safely and responsibly.It outlines the law on air weapons and explains what you can do to be a responsible air weapon user. Before you use your air weapon, you shouldread this leaflet and familiarise yourself with its contents. In this leaflet, references to ‘air weapons’ are to “lethal barrelled” air weapons as defined in the legislation (see “Types of air weapon” on reverse).Safe handlingIn the wrong hands, an air weapon can cause serious injury or even kill. Follow the common sense rules below to reduce the risk of an accident:•Always treat an air weapon as though it were loaded.•Only point an air weapon in a safe direction, preferably at the ground, and never at another person. •Never load an air weapon until you are ready to fire it.•Never fire an air weapon unless you are certain that the shot will be safe. This means checking that there is nothing and no one nearby who might be endangered and ensuring that there is a suitable backstop or pellet catcher to prevent ricochets. •Never rely on a safety catch to make an air weapon safe: such devices can fail.•Never put a loaded air weapon down. Always safely discharge or unload and uncock it first. •Cover air weapons when youtransport them, e.g. in a gun slip.•Never store a loaded air weapon.•Air weapons should be stored out ofsight and separately from pellets.•Air weapons should be stored insidea house rather than in anoutbuilding, such as a garden shed.•Consider ways of rendering a storedair weapon incapable of being fired.Preventing children from accessing airweaponsIt is an offence for a person inpossession of an air weapon to fail totake reasonable precautions toprevent a person under the age of 18from gaining unauthorised access to it.‘Reasonable precautions’ means thatwhen a child is present an air weaponmust be:•stored securely•out of sight, and•separately from ammunitionThere have been several deaths as aresult of children getting hold of airweapons.These tragedies might havebeen prevented had the air weaponsbeen stored safely. Below are somesimple steps to reduce the risk:•In many cases, it will be sufficient tostore your air weapon in an existing,suitably robust, lockable cupboard -keeping the keys separate andsecure.•Alternatively, you could use a lock orlocking device to attach your airweapon to the fabric of a building, orto a fixed feature. Or you could use asecurity cord, lockable chain orsimilar device attached to a point ofanchorage within the building.Remember that the air weapon mustbe out of sight.•If you hold other firearms, you coulduse an existing gun cabinet for yourair weapon provided this does notcompromise security.•You might find it useful to considersome of the security measuressuggested for licensed firearms. Thisinformation can be found in theFirearms Security Handbook,available on the Home Officewebsite.When using an air weapon•Keep it under close supervision at alltimes and never leave it unattended.Where you have no option but to putyour air weapon down for shortperiods, unload it and gather up allthe ammunition. Steps should thenbe taken to prevent anyone underthe age of 18 from gainingunauthorised access to it. This couldinclude attaching it to a fixed object,out of sight, using a security cord orsimilar device, or locking it out ofsight in a car.Air weapons and the lawApart from the exceptions mentionedlater, you do not need a certificate tohave an air weapon in England andWales. In Scotland, you may need anAir Weapon Certificate or a visitorpermit to use, possess, purchase oracquire an air weapon – seewww.airweapon.scot for information.Lethal barrelled air weapons areclassed as firearms and regulated byfirearms legislation. You must makesure that you know the law and keepwithin it. In addition to the duty,mentioned above, to take reasonableprecautions to prevent unauthorisedaccess:•It is an offence to intentionally orrecklessly kill certain wild animalsand birds.•It is an offence to intentionally orrecklessly kill a pet animal orknowingly cause a pet animal tosuffer unnecessarily, which could becommitted by shooting at a petanimal.•It is an offence for a person underthe age of 18 to purchase or hire anair weapon or ammunition for an airweapon.•It is an offence to sell, let on hire ormake a gift of an air weapon orammunition for an air weapon to aperson under the age of 18.•It is an offence for anyone under theage of 18 to have with them an airweapon or ammunition for an airweapon unless:-they are under the supervision of aperson aged 21 or over; or-they are shooting as a member ofan approved target shooting club;or-they are shooting at a shootinggallery and the only firearms beingused are either air weapons orminiature rifles as defined in theFirearms Act 1968;or-the person is 14 years old or aboveand is on private premises with theconsent of the occupier.•It is an offence to part withpossession of an air weapon, orammunition for an air weapon, to aperson under the age of 18 exceptunder the special circumstancesmentioned immediately above.。