22硬件需求规格说明书
22inch 标准广告机规格书
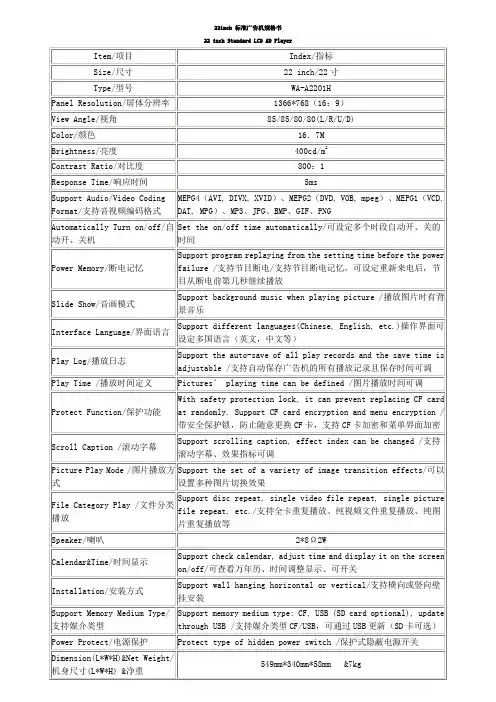
Set the on/off time automatically/可设定多个时段自动开、关的时间
Power Memory/断电记忆
Support program replaying from the setting time before the power failure /支持节目断电/支持节目断电记忆,可设定重新来电后,节目从断电前第几秒继续播放
Protect type of hidden power switch /保护式隐蔽电源开关
Dimension(L*W*H)&Net Weight/机身尺寸(L*W*H) &净重
549mm*340mm*58mm&7kg
Power In& Power Consumption /电源输入及功耗
AC 100-240V 50/60Hz 60W
Play Log/播放日志
Support the auto-save of all play records and the save time is adjustable /支持自动保存广告机的所有播放记录且保存时间可调
Play Time /播放时间定义
Pictures’playing time can be defined/图片播放时间可调
Protect Function/保护功能
With safety protection lock, it can prevent replacing CF card at randomly. Support CF card encryption and menu encryption /带安全保护锁,防止随意更换CF卡,支持CF卡加密和菜单界面加密
22 寸宽屏液晶显示器HW222 HW223 用戶手册
22寸宽屏液晶显示器HW222/HW223用戶手册用户说明书在操作显示器前请全部阅读此说明书,说明书应保留好,便于供将来参考用。
FCC B 类射频干扰声明经测试,本设备符合 FCC 规则第 15 部分对“B 类”数字设备的限制规定。
这些限制旨在提供合理的保护措施,以防该设备在住宅区安装时产生有害干扰。
本设备产生、使用并辐射射频能量,如果未遵照说明进行安装和使用,可能会对无线电通信产生干扰。
但也不能保证在特定的安装中不会产生干扰的问题。
如果本设备确实对无线电或电视接收造成干扰(可以通过开关设备来确定),建议用户采取以下一种或多种措施排除干扰:重新调整接收天线的方向或位置。
增大本设备与接收器的间距。
将设备电源连接到不同于接收器所连接到的电路的电源插座上。
咨询经销商或有经验的无线电/电视机技术人员以获取帮助。
本设备符合 FCC 规则第 15 部分的规定。
操作应符合以下两个条件:(1) 本设备不会造成有害干扰,并且(2) 本设备一定能够承受接收到的所有干扰,包括可能会造成意外操作的干扰。
加拿大本 B 类数字设备符合 Canadian Interference-Causing Equipment Regulations(加拿大设备引起干扰法规)的所有要求。
本设备符合电磁兼容性方面的 EMC 法令 89/336/EEC 的规定以及低压法令方面的73/23/EEC 和 93/68/EEC 规定。
电源插座应靠近设备并可以够到。
用户说明书Congratulations!The display you have just purchased carries the TCO’03Displays label. This means that your display is designed,manufactured and tested according to some of the strictestquality and environmental requirements in the world. This makesfor a high performance product, designed with the user in focusthat also minimizes the impact on our natural environment.Some of the features of the TCO’03 Display requirements:Ergonomics• Good visual ergonomics and image quality in order to improve the working environment for the user and to reduce sight and strain problems. Important parameters are luminance, contrast, resolution, reflectance, colour rendition and image stability.Energy• Energy-saving mode after a certain time – beneficial both for the user and the environment• Electrical safetyEmissions• Electromagnetic fields• Noise emissionsEcology• The product must be prepared for recycling and the manufacturer must have a certified environmental management system such as EMAS or ISO 14 001• Restrictions onchlorinated and brominated flame retardants and polymersheavy metals such as cadmium, mercury and lead.The requirements included in this label have been developed by TCO Development in cooperation with scientists, experts, users as well as manufacturers all over the world. Since the end of the 1980s TCO has been involved in influencing the development of IT equipment in a more user-friendly direction. Our labelling system started with displays in 1992 and is now requested by users and IT-manufacturers all over the world.For more information, please visit用户说明书回收信息我们,Hanns.G 极为重视环境保护战略,深信:通过在工业技术设备寿命结束时进行适当的处理和回收可以更好地保护我们的地球这些设备包含有可回收材料,可以将这些材料重新分解处理后用到新的产品中。
RE22R2AMR产品数据手册说明书

RE22R2AMR.T h e i n f o r m a t i o n p r o v i d e d i n t h i s d o c u m e n t a t i o n c o n t a i n s g e n e r a l d e s c r i p t i o n s a n d /o r t e c h n i c a l c h a r a c t e r i s t i c s o f t h e p e r f o r m a n c e o f t h e p r o d u c t s c o n t a i n e d h e r e i n .T h i s d o c u m e n t a t i o n i s n o t i n t e n d e d a s a s u b s t i t u t e f o r a n d i s n o t t o b e u s e d f o r d e t e r m i n i n g s u i t a b i l i t y o r r e l i a b i l i t y o f t h e s e p r o d u c t s f o r s p e c i f i c u s e r a p p l i c a t i o n s .I t i s t h e d u t y o f a n y s u c h u s e r o r i n t e g r a t o r t o p e r f o r m t h e a p p r o p r i a t e a n d c o m p l e t e r i s k a n a l y s i s , e v a l u a t i o n a n d t e s t i n g o f t h e p r o d u c t s w i t h r e s p e c t t o t h e r e l e v a n t s p e c i f i c a p p l i c a t i o n o r u s e t h e r e o f .N e i t h e r S c h n e i d e r E l e c t r i c I n d u s t r i e s S A S n o r a n y o f i t s a f f i l i a t e s o r s u b s i d i a r i e s s h a l l b e r e s p o n s i b l e o r l i a b l e f o r m i s u s e o f t h e i n f o r m a t i o n c o n t a i n e d h e r e i n .Product data sheetCharacteristicsRE22R2AMROn-delay Timing Relay - 0.05s…300h - 24…240V AC/DC - 2C/OMainRange of product Zelio TimeProduct or component typeModular timing relay Discrete output type Relay Device short name RE22Nominal output current8 AComplementaryContacts type and composition 1 C/O timed or instantaneous contact, cadmium free 1 C/O timed contact, cadmium free Time delay type A AwTime delay range0.3...3 s 1...10 s 0.05...1 s 3...30 s 10...100 s 30...300 s 3...30 min 30...300 min 3...30 h 30...300 hControl typeExternal potentiometer Diagnostic button Rotary knob[Us] rated supply voltage 24...240 V AC/DC at 50/60 Hz Release input voltage <= 2.4 V Voltage range 0.85...1.1 Us Supply frequency 50...60 Hz (+/- 5 %)Connections - terminalsScrew terminals : 2 x 0.2...2 x 1.5 mm², AWG 24...AWG 16 flexible cable with ca-ble endScrew terminals : 1 x 0.2...1 x 2.5 mm², AWG 24...AWG 14 flexible cable with ca-ble endScrew terminals : 2 x 0.5...2 x 2.5 mm², AWG 20...AWG 14 solid cable without cable endScrew terminals : 1 x 0.5...1 x 3.3 mm², AWG 20...AWG 12 solid cable without cable endTightening torque 0.6...1 N.m conforming to IEC 60947-1Housing material Self-extinguishingRepeat accuracy +/- 0.5 % conforming to IEC 61812-1Temperature drift +/- 0.05 %/°C Voltage drift+/- 0.2 %/VSetting accuracy of time delay +/- 10 % of full scale at 25 °C conforming to IEC 61812-1Control signal pulse width 30 ms100 ms (with load in parallel)Insulation resistance 100 MOhm at 500 V DC conforming to IEC 60664-1Recovery time120 ms (on de-energisation)Immunity to microbreaks <= 10 ms Power consumption in VA3 VA at 240 V ACPower consumption in W 1.5 W at 240 V DCSwitching capacity in VA2000 VAMinimum switching current10 mA 5 V DCMaximum switching current8 AMaximum switching voltage250 V ACElectrical durability100000 cycles for 2 A at 24 V DC-1100000 cycles for 8 A at 250 V AC-1Mechanical durability10000000 cyclesRated impulse withstand voltage 5 kV for 1.2...50 µs conforming to IEC 60664-1Power on delay< 100 msCreepage distance 4 kV/3 conforming to IEC 60664-1Overvoltage category III conforming to IEC 60664-1Mounting position Any positionMounting support35 mm DIN rail conforming to EN/IEC 60715Status LED Yellow LED (slow flashing) for timing in progress and output relay energisedYellow LED (fast flashing) for timing in progress and output relay de-energisedYellow LED (steady) for output relay energisedGreen LED backlight (steady) for dial pointer indicationProduct weight0.105 kgEnvironmentDielectric strength 2.5 kV for 1 mA/1 minute at 50 Hz between relay output and power supply withbasic insulation conforming to IEC 61812-1Standards IEC 61812-1UL 508Directives2004/108/EC - electromagnetic compatibility2006/95/EC - low voltage directiveProduct certifications CCCCECSAGLULRCMEACChina RoHSAmbient air temperature for operation-20...60 °CAmbient air temperature for storage-40...70 °CIP degree of protection IP50 (front panel) conforming to IEC 60529IP20 (terminals) conforming to IEC 60529IP40 (housing) conforming to IEC 60529Pollution degree 3 conforming to IEC 60664-1Vibration resistance20 m/s² (f = 10...150 Hz) conforming to IEC 60068-2-6Shock resistance 5 gn (in operation) (duration = 11 ms) conforming to IEC 60068-2-2715 gn (not operating) (duration = 11 ms) conforming to IEC 60068-2-27 Relative humidity95 % at 25...55 °CElectromagnetic compatibility Immunity to microbreaks and voltage drops (test level: 100 % - 20 ms) conform-ing to IEC 61000-4-11Immunity to microbreaks and voltage drops (test level: 30 % - 500 ms) conform-ing to IEC 61000-4-11Fast transient bursts (test level: 2 kV, level 3 - direct contact) conforming to IEC61000-4-4Conducted RF disturbances (test level: 10 V, level 3 - 0.15...80 MHz) conformingto IEC 61000-4-6Radiated radio-frequency electromagnetic field immunity test (test level: 10 V/m,level 3 - 80 MHz...1 GHz) conforming to IEC 61000-4-3Electrostatic discharge (test level: 8 kV, level 3 - air discharge) conforming to IEC61000-4-2Electrostatic discharge (test level: 6 kV, level 3 - contact discharge) conforming toIEC 61000-4-2Surge immunity test (test level: 2 kV, level 3 - common mode) conforming to IEC61000-4-5Surge immunity test (test level: 1 kV, level 3 - differential mode) conforming toIEC 61000-4-5Fast transients immunity test (test level: 1 kV, level 3 - capacitive connecting clip)conforming to IEC 61000-4-4Product data sheetRE22R2AMR Dimensions DrawingsDimensionsProduct data sheetRE22R2AMR Connections and SchemaWiring DiagramProduct data sheetRE22R2AMRTechnical DescriptionFunction A: Power On-DelayDescriptionOn energisation of power supply, the timing period T starts. After timing, the output(s) R close(s).The second output (R2) can be either timed (when set to "TIMED") or instantaneous (when set to "INST").Function: 1 OutputFunction: 2 OutputsFunction Aw : Power On-Delay With Retrigger / Restart ControlDescriptionOn energisation of power supply, the timing period T starts.At the end of the timing period T, the output(s) R close(s).Energization of Y1 makes the output(s) R open(s).Deenergization of Y1 restarts timing period T.At the end of timing period T, the output(s) R close(s).The second output (R2) can be either timed (when set to "TIMED") or instantaneous (when set to "INST")Function: 1 OutputFunction: 2 OutputsLegendRelay de-energisedRelay energisedOutput openOutput closedUSupply-TTiming period-R1/2 timed outputsR2-R2The second output is instantaneous if the right position is selected inst.-Retrigger / Restart controlY1-RE22R2AMR.。
《需求规格说明书》编写参考指南
《需求规格说明书》编写参考指南1.概述(Summary)本文档是进行项目策划、概要设计和详细设计的基础,也是软件企业测试部门进行内部验收测试的依据。
1.1 用户简介(User Synopsis)在本章节中要将用户的基本情况描述清楚,以便于分析人员划定系统范围,进行功能、进度、成本、性能等方面的平衡决策。
对于产品开发类项目,需要在此将该产品定义的用户群的特点描述清楚。
1.2 项目的目的与目标(Purpose and Aim of Project)项目的目的是对开发本系统的意图的总概括。
项目的目标是将目的细化后的具体描述。
项目目标应是明确的、可度量的、可以达到的, 项目的范围应能确保项目的目标可以达到。
对于项目的目标可以逐步细化,以便与系统的需求建立对应关系,检查系统的功能是否覆盖了系统的目标。
1.3 术语定义(Terms Glossary)将该需求规格说明书中的术语、缩写进行定义, 包括用户应用领域与计算机领域的术语与缩写等。
1.4 参考资料(References)说明该用户需求报告使用的参考资料,如:[1] 商务合同[2] 招标书[3] 用户领域的资料[4] 用户需求调查表[5] 用户需求报告[6] 参照的标准每一个文件、文献要有标题、或文件号,发布或发表日期以及出版单位。
1.5 相关文档(Related Documents)[1] 项目开发计划[2] 概要设计说明书[3] 详细设计说明书1.6 版本更新信息(V ersion Updated Record)版本更新记录格式,如表5-19所示。
表5-19 版本更新记录2.目标系统描述(System in Target)2.1 组织结构与职责(Organizing Framework and Function)将目标系统的组织结构逐层详细描述,建议采用树状的组织结构图进行表达,每个部门的职责也应进行简单的描述。
组织结构是用户企业业务流程与信息的载体,对分析人员理解企业的业务、确定系统范围很有帮助。
Hitachi 22 英寸 CRT 显示器说明书
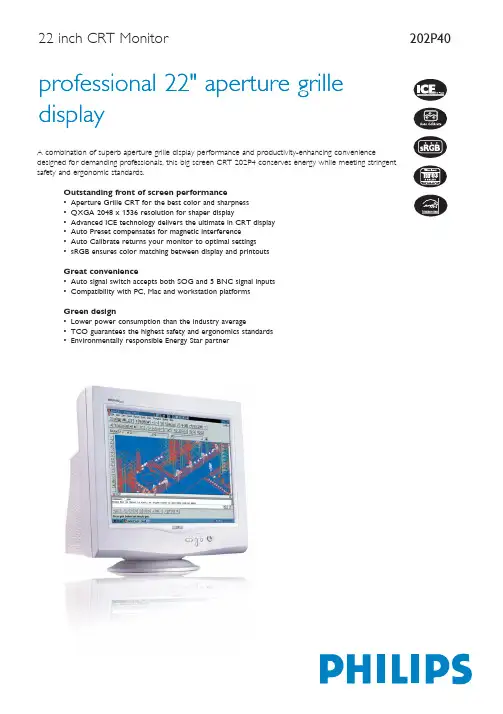
22 inch CRT MonitorCommercial Specifications Aperture Grille CRTA high-end technology used for illuminating phosphors in CRT tubes. It delivers a brighter, sharper overall picture.QXGA, 2048 x 1536 resolutionQuantum eXtended Graphics Array: A screen resolution of 2048 x 1536 pixels.ICE technologyAn exclusive Philips suite of technical enhancements that deliver outstanding CRT display.Auto presetDesigned to keep the purity and video position of your monitor at good under different magnetic field.Auto CalibrateA one-touch system for maintaining optimal CRT monitorperformance by automatically recalibrating color temperature to their original values.sRGB readyCalibrated RGB that is optimized for the vast majority of computer peripherals, monitors, operating systems and browsers, allowing accurate color mapping with very little data overhead.Auto signal switchThe function determines signal type and routes the signal to the proper channel.Platform compatibilityThe ability to work with a variety of platforms; Philips monitors are compatible to connect with PCs and workstation by employing a VGA connection and connect with Macintosh.Energy efficiencyReduction of the electrical power required to operate a device to achieve real savings.TCO '03 complianceA TCO (Swedish confederation of Professional Employees) standard even more stringent than MPR-II for safety andergonomics, especially concerning alternating electric fields (AEF).Energy Star partnerA manufacturer in compliance with power conservationrequirements set forth by the Environmental Protection Agency of the U.S. government.Product HighlightsTrademarks owned by Royal Philips Electronics 2004 © Royal Philips Electronics - All rights reserved As an Energy Star partner, Philips has determined that this product meets the Energy Star guidelines for energy efficiency.Microsoft and Windows are registered trademarks of Microsoft Corporation.All data subject to change without notice Release date: April 2005, Picture/Display• Display screen type Aperture Grille CRT • Panel size 22"/ 55 cm • Phosphor B22• Recommended display area 392 x 294 mm (15.4" x 11.6")• Dot pitch 0.24 mm• Horizontal dot pitch0.24 mm • White Chromaticity, 5500º K x = 0.332 / y = 0.347• White chromaticity, 6500º K x = 0.313 / y = 0.329• White chromaticity, 9300º K x = 0.283 / y = 0.297• Max. resolution 2048 x 1536 @ 80 Hz• Recommended resolution1600 x 1200 @ 85 Hz • Factory preset modes9 modes: 1024 x 768 @ 75 Hz, 1024 x 768 @ 85 Hz, 1280 x 1024 @ 75 Hz, 1280 x 1024 @ 85 Hz, 1600 x 1200 @ 75 Hz, 1600 x 1200 @ 85 Hz, 1792 x 1344 @ 75 Hz, 1920 x 1440 @ 75 Hz, 1920 x 1440 @ 85 Hz• Factory preload modes27 modes • Video dot rate 360 MHz • Horizontal scanning frequency 30 - 130 KHz • Vertical scanning frequency 50 - 160 Hz • Recommended refresh rate 85 Hz• Screen enhancementsAnti-glare Polarizer, Anti-Reflection, Anti-Static, High Contrast, High Brightness• Picture enhancementAuto Calibrate, ICE Technology • sRGB Yes • GTF YesConnectivity• Cables D-sub video cable,Power cord • Sync input impedance (ohm) 2.2 k • Video input impedance (ohm) 75• Video input signal levels 0.7 Vpp• Video sync input signal Composite sync, Separate sync ,Sync on Green• Video sync polarities Positive and Negative • Cable connectionAC Power in, 5BNC, D-subConvenience• Convenience enhancements Auto preset,Auto signal switch, Menu languages,On-screen display • Monitor controls Brightness control, Contrast control, Left/Right, Menu,Power On/Off, Up/Down • OSD languages English, French, German, Italian, Spanish, Portuguese,Simplified Chinese, Korean • Plug & Play compatibility DDC 2B, sRGB,Windows 98/ME/2000/XP • Regulatory approvals CE Mark, FCC-B, UL, CSA, SEMKO, TCO '03, TÜV/GS, TÜV Ergo, FDA, E2000,NUTEK, Energy Star• Swivel +/- 90°• Tilt-5° to 25°Accessories• Included accessories AC Power cord• User manualYesDimensions• Depth (with base) 466 mm • Height (with base) 501 mm • Width (with base)501 mm • Temperature range (operation) 0°C to 35°C • Temperature range (storage) -25°C to 65°C • Weight29.6 kgPower• Complies with E2000, Energy Star, NUTEK • Consumption 130 W (Typical)• Off mode1 W• Power LED indicator Off, amber;Operation, green • Power supplyBuilt-in。
19英寸和22英寸液晶显示器用户手册说明书
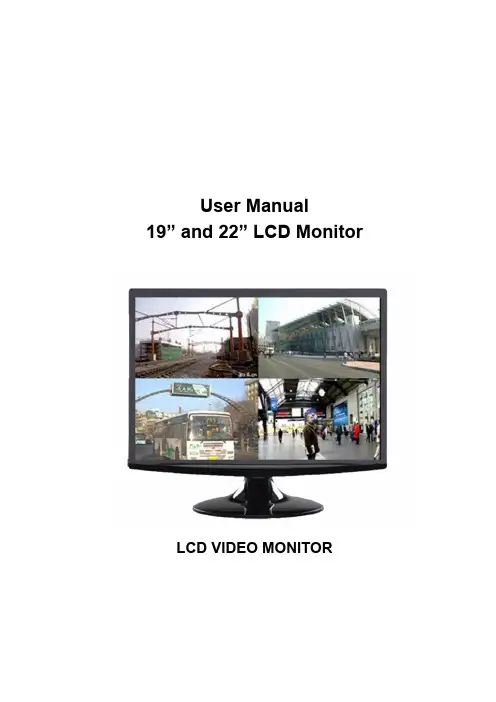
User Manual19” and 22” LCD MonitorLCD VIDEO MONITORSAFETY INSTRUCTIONS...............................................................................2-3 CAUTION . (4)FCC RF INTERFERENCE STATEMENT (5)CONNECTING WITH EXTERNAL EQUIPMENT (6)CONTROLS AND FUNCTIONS.........................................................................7-16 MOUNTING GUIDE .. (17)D-SUB CONNECTOR PIN ASSIGNMENTS (18)POWER MANAGEMENT (19)SPECIFICATIONS (20).1 …………………………………………………………………………… INSTRUCTION MANUAL1. Read all of these instructions.2. Save these instructions for later use.3. Follow all warnings and instructions in this manual and on the product.4. Unplug this product from the wall outlet before cleaning. Do not use liquid or aerosol cleaners. Usea damp cloth for cleaning.5. Do not use this product near water.6. Do not place this product on an unstable cart, stand, or table. The product may fall, causing seriousdamage to the product or nearby people.7. Please comply with the following conditions:A. Allow a minimum distance of 10cm around the apparatus for sufficient ventilation.B. The ventilation openings should not be impeded by items such as paper, table-cloths,curtains, etc..C. No naked flame sources, such as lighted candles, should be placed on the apparatus.D. Please dispose of all batteries according to local regulations.E. Use the monitor in moderate climates.8. This product should be operated from the type of power source indicated on the marking label. If you are not sure of the type of power available, consult your dealer or local power company.9. This product is equipped with a 3 wire grounding type plug having a third (grounding) pin. This is a safety feature. If you are unable to insert the plug into the outlet, contact your electrician to update the outlet. Do not defeat the purpose of the grounding-type plug.10. Do not allow anything to rest on the power cord or place this product where people will walk on thecord.11. If an extension cord is used with this product, make sure that the total ampere ratings on the products plugged into the extension cord does not exceed the extension cord ampere rating. Also, make sure that the all of the products plugged into the wall outlet do not exceed the rating of the outlet.12. Never push objects of any kind into this product through cabinet slots as they may touch dangerous voltage points or short out parts, which could result in the risk of fire or an electric shock. Never spill any kind of liquid on the product.13. Do not attempt to service this product yourself, as opening or removing covers may expose you to dangerous voltage points or other risks. Refer all servicing to trained personnel.INSTRUCTION MANUAL (2)14. Unplug this product from the wall outlet and refer servicing to qualified service personnel under the following conditions:A. When the power cord or plug is damaged or frayed.B. If liquid has been spilled into the product.C. If the product has been exposed to rain or water.D. If the product does not operate normally when the operating instructions are followed. Adjust onlythose controls that are covered by the operating instructions since improper adjustment of other controls may result in damage and will often require extensive work by a qualified technician to restore normal operation.E. If the product has been dropped or the cabinet has been damaged.F. If the product exhibits a distinct change in performance, indicating a need for service.CAUTION kThe power supply cord is used as the main disconnect device. Ensure that the socket-outlet is located/installed near the equipment and is easily accessible.3 …………………………………………………………………………… INSTRUCTION MANUAL▶ NEVER REMOVE THE BACK COVERRemoval of the back cover should be carried out only by qualified personnel.▶ DO NOT USE IN HOSTILE ENVIRONMENTSTo prevent electrical shock or a fire hazard, do not expose the unit to rain or moisture. This unit is designed to be used in the office or home. Do not subject the unit to vibrations, dust, or corrosive gases. ▶ KEEP IN A WELL VENTILATED PLACEVentilation holes are provided on the cabinet to prevent the temperature from rising. Do not cover or place anything on top of the unit.▶ AVOID HEATAvoid placing the unit in direct sunshine or near a heating appliance.▶ TO ELIMINATE EYE FATIGUEDo not use the unit against a bright back ground or where sunlight and other light sources will shine directly on the monitor.▶ BE CAREFUL OF HEAVY OBJECTSNeither the monitor itself nor any other heavy object should rest on the power cord. Damage to a power cord can cause fire or electrical shock.INSTRUCTION MANUAL (4)NOTEThis equipment has been tested and found to comply with the limits for a Class B digital device, pursuant to Part 15 of the FCC Rules. These limits are designed to provide reasonable protection against harmful interference in a residential installation.This equipment generates, uses, and can radiate radio frequency energy and, if not installed and used in accordance with the instructions, may cause harmful interference to radio communications. However, there is no guarantee that interference will not occur in a particular installation.If this equipment causes harmful interference to radio or television reception, which can be determined by turning the equipment off and on, the user is encouraged to try to correct the interference by one or more of the following measures.- Reorient or relocate the receiving antenna.- Increase the space between the equipment and receiver.- Connect the equipment into an outlet on a circuit different from that to which the receiver isconnected.- Consult the dealer, an experienced radio, or a TV technician for help.- Only a shielded interface cable should be used.Finally, any changes or modifications to the equipment by the user not expressly approved by the grantee or manufacturer could void the user's authority to operate such equipment.▶DOC COMPLIANCE NOTICEThis digital apparatus does not exceed the Class A limit for radio noise emissions from digital apparatus set out in the radio interference regulation of Canadian Department of Communications.This monitor complies with the basic protection requirements of the Electromagnetic Compatibility (EMC) Directive 2004/108/EC for electrical and electronic equipment imported into the European Union (EU): The electromagnetic disturbance generated by the apparatus does not exceed the level specified in the harmonized EMC Standards for this type of apparatus. It has a level of immunity to the electromagnetic disturbance to be expected in its intended use, and should operate without unacceptable degradation ofits specified performance.5 …………………………………………………………………………… INSTRUCTION MANUALBottom and Side Panel ControlBack View of MonitorA. Connector Panel1. Audio In2. Audio Out3. BNC Out4. BNC In5. VGAINSTRUCTION MANUAL (6)12 354B. CONTROL KEYS/BUTTONSButtons are located on the back of the monitor on the right side of the Bezel.1. Menu/Source:Opens the OSD and steps down on the OSD. Also, theMENU button selects either the VGA or BNC input after the EXIT button ispushed) and then press the MENU button to Select2. Up: Increases the volume or moves the selector/indicator right in the OSD3. Down: Decreases the volume or moves selector/indicator left in the OSD4. Exit: Press MENU button to select the input (first push EXIT and then MENUbutton) or to exit the OSD7 …………………………………………………………………………… INSTRUCTION MANUAL1. OSD setup under BNC input modeA. COLOR MENUPress the MENU button to bring the menu onscreen, and then Up/ Down buttons to moveleft and right across the menu selections tohighlight the COLOR menu. Press the Menu(Source) button to enter the (highlighted)COLOR sub menu.Each additional press of the Menu/Sourcebutton moves the yellow highlighted sub-menuselection downward, moving from the bottomselection back to the top of the sub-menu.Pressing the Up / Down buttons will adjust thevalue of the highlighted item. Press the MENUbutton to save the values.Press EXIT to exit the sub-menu, and go backto the main menu choices. Pressing the EXITbutton while at the top level will close themenu and return to normal operations.AdjustmentsContrast:Adjusts the contrast between light and dark areas of the picture. Brightness:Adjusts the overall picture shade and brightness. Saturation:Increase or decrease the saturation of the image. Sharpness:Increase or decrease the sharpness of the image.Hue:Increase or decrease the hue or tint of the image.INSTRUCTION MANUAL (8)1. OSD setup under BNC input mode (continued)B. AUDIO MENUPress the MENU button to bring the menu onscreen, and then Up / Down buttons to moveleft and right across the menu selections tohighlight the AUDIO menu. Press the Menu(Source) button to enter the (highlighted)AUDIO sub menu.Pressing the Up/ Down buttons will adjustthe value of the highlighted item. Press theMENU button to save the values. Press EXITto exit the sub-menu and go back to the mainmenu choices. Pressing the EXIT buttonwhile at the top level will close the menu andreturn to normal operations.AdjustmentsVolume:Increase or decrease the volume.9 …………………………………………………………………………… INSTRUCTION MANUAL1. OSD setup under BNC input mode (continued)C. OSD MENUPress the MENU button to bring the menu on screen, and then Up / Down buttons to move left and right across the menu selections to highlight the OSD menu. Press the Menu (Source) button to enter the (highlighted) OSD sub menu. Each additional press of the Menu/Source button moves the yellow highlighted sub-menu selection downward, moving from the bottom selection back to the top of the sub-menu. Pressing the Up / Down buttons will adjust the value of the highlighted item. Press the MENU button to save the values.Press EXIT to exit the sub-menu, and go back to the main menu choices. Pressing the EXIT button while at the top level will close the menu and return to normal operations.AdjustmentsLanguage: There are four languages that you can choose from:English, French, Korean, and Chinese. H. Position: Adjusts the OSD Menu’s Horizontal Position.V. Position: Adjusts the OSD Menu’s Vertical Position.OSD Timer: The OSD Menu closes automatically after a set sleep time(between 1 and 60 seconds)OSD Blending: Adjusts the brightness of the OSD Menu.Zoom: Adjusts how much the OSD Menu is zoomed in.4 :INSTRUCTION MANUAL (10)1. OSD setup under BNC input mode (continued)D. MISCPress the MENU button to bring the menu on screen, and then Up / Down buttons to move left and right across the menu selections to highlight the MISC menu. Press the Menu (Source) button to enter the (highlighted) MISC sub menu.Each additional press of the Menu/Source button moves the yellow highlighted sub-menu selection downward, moving from the bottom selection back to the top of the sub-menu. Pressing the Up / Down buttons will adjust the value of the highlighted item. Press the MENU button to save the values. Press EXIT to exit the sub-menu, and go back to the main menu choices.Pressing the EXIT button while at the top level will close the menu and return to normal operations.AdjustmentsFactory Reset: Reset all settings back to default factory settings. Signal Source: Choose between a BNC input or a VGA input source. Display Ratio: Adjusts the dimensions of the display.4 :11 …………………………………………………………………………… INSTRUCTION MANUAL2. OSD setup under VGA input modeA. COLOR MENUPress the MENU button to bring the menu onscreen, and then Up / Down buttons to moveleft and right across the menu selections tohighlight the COLOR menu. Press the Menu(Source) button to enter the (highlighted)COLOR sub menu.Each additional press of the Menu/Sourcebutton moves the yellow highlighted sub-menuselection downward, moving from the bottomselection back to the top of the sub-menu.Pressing the Up / Down buttons will adjust thevalue of the highlighted item. Press the MENUbutton to save the values. Press EXIT to exitthe sub-menu, and go back to the main menuchoices. Pressing the EXIT button while at the toplevel will close the menu and return to normaloperations.AdjustmentsAuto Color: Automatically adjusts the colors to the best color setting. Contrast: Adjusts the contrast between light and dark areas of the picture. Brightness: Adjusts the overall picture shading and brightness.Color Temp: Adjusts the amount of red, green, and blue present in the image.INSTRUCTION MANUAL (12)2. OSD setup under VGA input mode (continued)B: IMAGE MENUPress the MENU button to bring the menu onscreen, and then Up / Down buttons to moveleft and right across the menu selections tohighlight the IMAGE menu. Press the Menu(Source) button to enter the (highlighted)IMAGE sub menu.Each additional press of the Menu/Sourcebutton moves the yellow highlighted sub-menuselection downward, moving from the bottomselection back to the top of the sub-menu.Pressing the Up / Down buttons will adjust thevalue of the highlighted item. Press the MENUbutton to save the values. Press EXIT to exitthe sub-menu, and go back to the main menuchoices. Pressing the EXIT button while at thetop level will close the menu and return to normal operations.AdjustmentsAuto Adjust:Automatically configures the Phase, Clock, Vertical, and Horizontal PositionsettingsH. Position:Adjusts the OSD Menu’s Horizontal Position.V. Position:Adjusts the OSD Menu’s Vertical Position.Phase:Adjusts the signal phase to improve sharpness when the image is fuzzy.Clock: If the clock setting is not exactly the same as the DVR or computer, you may observeperiodic vertical bars of video noise on your image. These noise bars are usually adjusted out when an Auto Adjust is performed. If the noise bars are still present, this setting can be adjusted manually.13 …………………………………………………………………………… INSTRUCTION MANUAL2. OSD setup under VGA input mode (continued)C. AUDIO MENUPress the MENU button to bring the menu on screen, and then Up / Down buttons to move left and right across the menu selections to highlight the AUDIO menu. Press the Menu (Source) button to enter the (highlighted) AUDIO sub menu.Each additional press of the Menu/Sourcebutton moves the yellow highlighted sub-menu selection downward, moving from the bottom selection back to the top of the sub-menu.Pressing the Up / Down buttons will adjust the value of the highlighted item. Press the MENU button to save the values. Press EXIT to exit the sub-menu, and go back to the main menu choices. Pressing the EXIT button while at the top level will close the menu and return to normal operations.AdjustmentsVolume: Increase or decrease the volume.4 :INSTRUCTION MANUAL (14)2. OSD setup under VGA input mode (continued)D. OSD MENUPress the MENU button to bring the menu onscreen, and then Up / Down buttons to moveleft and right across the menu selections tohighlight the OSD menu. Press the Menu(Source) button to enter the (highlighted)OSD sub menu.Each additional press of the Menu/Sourcebutton moves the yellow highlighted sub-menu selection downward, moving from thebottom selection back to the top of the sub-menu.Pressing the Up / Down buttons will adjustthe value of the highlighted item. Press theMENU button to save the values. Press EXITto exit the sub-menu, and go back to the mainmenu choices. Pressing the EXIT button while at thetop level will close the menu and return to normaloperations.AdjustmentsLanguage: There are four languages that you can choose from: English, French, Korean, and Chinese.H. Position:Adjusts the OSD Menu’s Horizontal Position.V. Position:Adjusts the OSD Menu’s Vertical Position.OSD Timer: The OSD Menu closes automatically after a set sleep time (between 1 and 60 seconds) OSD Blending: Adjusts the brightness of the OSD Menu.Zoom: Adjusts how much the OSD Menu is zoomed in. 15…………………………………………………………………………… INSTRUCTION MANUAL2. OSD setup under VGA input mode (continued)E. MISCPress the MENU button to bring the menu onscreen, and then Up / Down buttons to move leftand right across the menu selections to highlightthe MISC menu. Press the Menu (Source)button to enter the (highlighted) MISC sub menu.Each additional press of the Menu/Source buttonmoves the yellow highlighted sub-menuselection downward, moving from the bottomselection back to the top of the sub-menu.Pressing the Up / Down buttons will adjust thevalue of the highlighted item. Press the MENUbutton to save the values. Press EXIT to exit thesub-menu, and go back to the main menuchoices. Pressing the EXIT button while at thetop level will close the menu and return to normaloperations.AdjustmentsFactory Reset: Reset all settings back to default factory settings.Signal Source: Choose between a BNC input or a VGA input source.INSTRUCTION MANUAL (16)Wall or Other Mounting with VESA StandardCAUTION:The wall mount must bear a minimum of five times the monitor’s net weight. To mount your MONITOR to the wall or another surface, you need to purchase a VESA wall mount. Use four M4 x 8mm screws (not included) to attach the mount. The monitor mount VESA hole pattern is 100mm x 100mm. Note: Metric (M4 x 8 mm) is the type screw that should be used (do not use longer screws or the monitor may be damaged).Screws1. Before mounting the monitor, remove the base riser (vertical portion of the base) by removing the two screws at the top with a screwdriver. Then the base and the riser can be removed. In order to prevent losing the two screws, we suggest replacing the screws in their original holes.2. Attach the VESA mount (100mm x 100mm) plate to the rear of the monitor and follow all of the instructions provided with the mount to complete the mounting process.17 …………………………………………………………………………… INSTRUCTION MANUAL▶PIN ASSIGNMENTS▶ACCESSORIESINSTRUCTION MANUAL (18)POWER CONSUMPTION :<20WLED INDICATORThe power management feature of the monitor is comprised of three stages: On (Green Light), No Signal (Flashing Green Light), and Off (No Light).MODE COLOR MONITOR OPERATIONON Green Normal OperationNO SIGNALFlashing GreenNo Signal OFFNonePower Off2. Power Cord1. Quick Installation Guide3. VGA Cable4. User's Manual (available through re-saler)19 …………………………………………………………………………… INSTRUCTION MANUALModel 19” LCD Monitor 22” LCD Monitor Aspect Ratio 16:9Resolution (H x V) 1360 x 768 1920 x 1080Colors 16.7MViewing Angle H: 170º V: 170ºViewing Lines 420 TV LinesContrast Ratio 10000:1 (DCR)Response Time 5ms 2ms2D Comb Filter with De-Yesinterlace2D Noise Reduction YesBrightness 300cd/m2Speakers 2 each (2 watts)Composite Inputs / Outputs BNC x 1 / BNC x 1VGA VGA x 1Audio Inputs Stereo PCAuto Adjustment YESWall Hanging VESA StandardVESA Size 100 x 100mm▶▶ NOTE : Technical specifications are subject to change without notice.INSTRUCTION MANUAL (20)Stand Plastic BezelPlasticOSD LanguageEnglish, French, Korean and Simplified ChinesePower Consumption <20W <30WPower Supply AC110~240V, 50/60 Hz AccessoriesPower cord, Audio cable,VGA Cable and User’s guidePackaging (L x D x W) 19.6” x 17.8” x 7.5” 498mm x 453mm x 191.6mm 22.3” x 18.9” x 7.5"567mm x 482mm x 191.6mmDimension (L x D x W) 17.5” x 13.8” x 5.43" 444.2mm x 350.7mm x 138mm20.2” x 15.4” x 5.35”513.2mm x 391.7mm x 136mm Gross Weight 9.9lb (4.5Kg) 12.1lb (5.5Kg) Net Weight 7.89lb (3.58Kg)9.7lb (4.4Kg)Operating Temp 32 °F - 122 °F (0 °C - 50 °C)Safety FCC, CE, CB, RoHS。
Philips 22英寸宽屏LCD显示器WSXGA 220BW8EB 用户手册说明书
PhilipsLCD widescreen monitor22" wideWSXGA220BW8EBBigger, wider screen: better business productivityWith a big, widescreen, performance-enhancing comfort, value-added convenience features and great cost benefit ratio, the 220BW8 is the smart choice for business productivity - and is ready for immediate or future upgrade to Windows Vista.Designed for maximum productivity•Tilt, swivel and height-adjust for an ideal viewing position •Big, widescreen ideal for viewing two A4 pages side-by-side Best total cost of ownership solution •Empowered for Windows Vista•Complies with RoHS standards to care for the environment •Power consumption below the industry averageOutstanding front of screen performance•WSXGA+, wide format 1680x1050 resolution for sharper display •5ms fast response time•DVI-D input and HDCP supportGreat convenience•Dual input accepts both analog VGA and digital DVI signals •Built-in speakers for audio without desktop clutter•Adjust display settings with hot key or on-screen controlsHighlightsWidescreenA big, widescreen display that improves productivity by displaying two A4 pages side-by-side.Windows Vista readyPhilips Vista-ready monitors are empowered for vibrant, exciting display of this new, visually sophisticated and demanding Windows operating system, designed to enhance your entertainment experience, make you more productive and help you control your computing experience at home and in the office, making viewing, finding and organizing information for work or play quick, efficient and easy.Compliant with RoHS standards Philips designs and produces display products in compliance with strict Restriction of Hazardous Substances (RoHS) standards that restrict lead and other toxic substances that can harm the environment.Lower power consumptionReduction of the electrical power required tooperate a device.WSXGA+, wide format 1680x1050Wide format, super extended graphics array isa display specification that is capable ofdisplaying 1680 x 1050 resolution orapproximately 1.7 million pixels.5ms on/off response timeOn-Off response time is the period requiredfor a liquid crystal cell to go from active (black)to inactive (white) and back to active (black)again. It is measured in milliseconds. Faster isbetter: Lower response time means fastertransitions and, therefore, results in fewervisible image artifacts in the display oftransition of texts and graphics. On-Offresponse time is a more important measure inthe display of business content like documents,graphs and photos.HDCP readyHigh-Bandwidth Digital Content Protection(HDCP) is a copyright protection system thatis incorporated into the DVI connector. Ithelps stop unauthorized duplication ofcopyrighted content. HDCP allows you to playprotected content media such as movies andconcerts. It checks the signal to prevent piracy,allowing only legal copies of content to display.Dual inputDual input provides connectors toaccommodate input of both analog VGA anddigital DVI signals.Built-in speakersAudio speakers built into a display device.User friendly hot key and OSDThe user friendly hot key and on-screen displaycontrols are dual systems for convenientlyfine-tuning display settings to meet a variety ofneeds. Press the hot key on your monitor'sframe for automatic picture, quick contrast andbrightness control or use the on-screen displayfeature to fine-tune your display settings.Issue date 2019-05-08 Version: 3.0.212 NC: 8670 000 35515 EAN: 87 12581 38130 1© 2019 Koninklijke Philips N.V.All Rights reserved.Specifications are subject to change without notice. Trademarks are the property of Koninklijke Philips N.V. or their respective owners.SpecificationsPicture/Display•LCD panel type: 1680 x 1050 pixels, Anti-glare polarizer, RGB vertical stripe•Panel Size: 22" / 55.9 cm•Effective viewing area: 474 x 296 mm•Pixel pitch: 0.282 x 0.282 mm •Brightness: 300 cd/m²•Contrast ratio (typical): 1000:1•Display colors: 16.7 M•Viewing angle: 160º (H) / 160º (V), @ C/R > 10•Response time (typical): 5 ms•White Chromaticity, 6500K: x = 0.313 / y = 0.329•White Chromaticity, 9300K: x = 0.283 / y = 0.297•Maximum Resolution: 1680 x 1050 @ 60Hz •Optimum Resolution: 1680 x 1050 @ 60Hz •Video Dot Rate: 205 MHz•Horizontal Scanning Frequency: 30 - 83 kHz •Vertical Scanning Frequency: 56 - 75 Hz •Aspect ratio: 16:10•sRGBConnectivity•Signal Input: VGA (Analog ), DVI-D•Video Sync Input Signal: Composite Sync, Separate Sync, Sync on Green•Video input impedance: 75 ohm•Sync input impedance: 2.2k ohm•Video input signal levels: 0.7 Vpp Convenience•User convenience: On-screen Display •Monitor Controls: Auto, Brightness (Left), Contrast (Right), Menu, Power On/Off•OSD Languages: English, French, German, Italian, Russian, Spanish•Other convenience: Kensington lock compatible •Plug & Play Compatibility: DDC/CI, sRGB, Windows 98/ME/2000/XP/Vista•Regulatory Approvals: CE Mark, Energy Star, FCC Class B, SEMKO, TCO '03, TÜV/GS, TÜV Ergo, UL/cUL •Tilt: -5° to 20°•Swivel:+/-45°•VESA Mount: 100 x 100 mm•Built-in Audio: 1 W x 2Accessories•Included Accessories: AC Power Cord, VGA cable, DVI-D cable, Audio Cable•User ManualDimensions•Box dimensions(W x H x D):565 x 420 x 295 mm•Box dimensions in inch (W x H x D):22.2 x 16.5 x 11.6 inch•Set dimensions(W x H x D):513.76 x 336.10 x 67.34 mm•Set dimensions in inch (W x H x D):20.2 x 13.2 x 2.7 inch•Set dimensions with stand (W x H x D):513.76 x 368.25 x 230.25 mm•Set dimensions with stand in inch (W x H x D): 20.2 x 14.5 x 9.1 inch•Height adjustment range: 130 mm•MTBF: 50,000 hrs•Relative humidity: 20% - 80%•Temperature range (operation): 5°C to 35°C •Temperature range (storage): -20°C to 60°C •Product weight (+stand): 7.7 kg•Product weight (+stand) (lb): 17.0 lb•Weight incl. Packaging: 9.6 kg•Weight incl. Packaging (lb): 21.2Power•Complies with: Energy Star•Consumption (On mode): < 49 W (Typical)•Consumption(Off Mode): < 1 W•Power LED indicator: Stand by/sleep - Amber, Operation - green•Power supply: Built-in, 100-240VAC, 50/60Hz。
高分辨率22英寸宽LCD监视器安装包说明书
High Resolution 22” Wide LCD Monitor provides Superior Image Quality in Live View and Playback Built-in Pentaplex Digital Video Recorder, 8 Camera-Capable, with Advanced Real Time Recording (240FPS)Internet Remote Monitoring* (Software included), Web Browser access and E-mail alerts High Resolution Weather Proof ** Cameras included with up to 50ft (15m) Night Vision range***Large Capacity Security Certified Hard Drive pre-installed expandable up to 1000GB**** USB ports for back up and convenient transferring of critical data Mouse Driven Navigation (mouse included) and Graphical User Interface Installer Friendly - Easy Quick Start Guide and installation video on the system with Toll Free Tech Support Multi function display - PC Monitor, Digital Picture Frame & Component Video with picture in picture function while DVR records in the background »»»»»»»»»FEATURESThis product redefines how people use a surveillance system by turning it into a multi-function unit that provides practical and intuitive utility for a wide range of business and homeapplications. It is the first system of its kind to offer a professional solution designed for surveillance that also works as a PC monitor, an entertainment video display and a Digital Picture Frame.Protect what matters to you most. This 8 channel recording solution with 4 or 8 high resolution cameras provides an expandable solution. Record your critical data on a pre-installed 500GB security certified hard drive that is designed to work 24/7. Indoor/Outdoor night vision cameras provide excellent image quality in all lighting conditions, utilizing the automatic IR filtering mechanism.Connect to your system over the internet regardless of your physical location. Control multiple systems remotely with the included software.Innovative, practical and intuitive. A reliable solution that will exceed your expectations.HOME & BUSINESS SECURITYALL-IN-ONE INTEGRATED, MULTI FUNCTION, USER FRIENDLY22” WIDE SCREEN LCD MONITOR WITH BUILT-IN 8 CHANNEL DIGITAL VIDEORECORDER & HIGH RESOLUTION DAY/NIGHTCOLOR CAMERASSecurityPC MonitorEntertainmentPicture FrameInstallation GuidePublic View MonitorInternet Remote MonitoringMonitor/Interface:22” Wide screen LCD with user selectable aspect ratio (Wide 16:9, Standard 4:3) Professional Grade High Resolution (1680 x 1050) Glossy LCD panel VGA Input - use your LCD Display as a PC monitorUSB picture frame feature - display digital pictures from a USB flash drive Entertainment Component Video input (YPbPr)PIP (Picture In Picture) functionally in VGA/Component and Picture Frame mode while still recording in the backgroundReverse PIP (Picture-In-Picture) of Component Video or PC while in DVR mode Spot Video Out supports a connection to another monitor to display video in a different location (e.g. Public View Monitor)Multiple control options; front panel buttons, remote control, mouse, remote softwareTri-lingual On Screen Display (English, Spanish, French)Screen saver for energy efficiency Wall mountable (VESA standard)Stand with cable management solutionEnvironmentally friendly, recyclable packaging materialDigital Video Recorder:8 Channels with Pentaplex operation - View, Record, Playback, Back Up & Remotely Control the system simultaneously MPEG4 Digital Video Compression - small file sizes without compromising video qualityRecording Frames Per Second (FPS): 240/200 (NTSC/PAL) @ 352X240 Recording Resolution: 704x480, 704x240, 352x240(NTSC), 704x576, 704x288, 352x288(PAL)Custom recording for each cameraCovert Camera - record without displaying camera imageContinuous Recording with Motion Event logging for easy event searching Selectable 4 channel audio recording Programmable motion detectionPre-Event Recording of a preset amount of time before motion triggers the recording to see activities leading up to an eventHard Drive with SATA interface, 100% duty cycle for optimal performance in the commercial video security market. Expandable up to 1000GB****S.M.A.R.T HDD Support (Self-Monitoring Analysis and Reporting Technology): Auto Detection / Recovery to ensure the HDD is functioning properly at all timesSupports external USB: Hard Drive, Optical Drive (DVDRW, CDRW) and Flash DriveScheduled back up to an external USB storage and Network Storage Using FTPWatermarking of video files to encrypt the data 8 Programmable Alarm Inputs, 1 Relay Alarm output Pan/Tilt/Zoom Camera Control: RS-485 interface Network Protocol: TCP/IP, DDNS and Web»»»»»»»»»»»»»»»»»»»»»»»»»»»»»»»»Cameras SG7540:High resolution image sensor produces sharp and clear video with 450 TV Lines 18 IR LEDs provide night vision range of 50ft (15m)*IR cut filter provides accurate color reproduction in all lighting conditions Advanced Day/Night mode: Picture automatically switches to B&W delivering better clarity in low light conditionsWeatherproof Design: Ideal for outdoor and indoor applications (IP66**)Built-in microphone provides one way audio from camera to the system 60 ft (18m) DIN weatherproof (IP66)** extension cable included per camera All-in-one camera cable (providing video, audio & power) plugs directly to the monitor and eliminates the need for a separate power adaptor, when connected to a DIN portCeiling or wall mountable cameras with versatile stand provides flexible mounting optionsCameras CVC6993R (optional):Advanced High Resolution Image Sensor -Produces Sharp and Clear Video with 450 TV Lines 30 IR LEDs Night Vision Range of 50ft (15m)*True Day/Night Operation using Built-in IR Filter Changeable Mechanism to Achieve Accurate Color Representation in Varying Lighting Conditions Advanced Day/Night mode: Picture Automatically Switches to B&W delivering Better Clarity in Low Light ConditionsWeatherproof Design: Ideal for Outdoor and Indoor applications (IP66**)Software:Remote monitoring software supporting multiple sites (up to 16 cameras) with full remote control over the Internet or Local Area Network (LAN)Internet Remote Functions: Live View, Live Recording, Search, Set-up, Back-upFirmware Upgrade over networkEmail alerts with a web browser link (DDNS signup required)Microsoft Windows XP™, Window Vista™ Compatible Software (included)Free DDNS Service»»»»»»»»»»»»»»»»»»»»* Requires a high speed internet connection and router - not included ** Not intended for submersion in water*** IR illumination range up to 50 ft (15M) under ideal conditions. Objects at or beyond this range may be partially orcompletely obscured, depending on the camera application.**** Recording capacity may vary based on recording resolution & quality, lighting conditions and movement in the sceneBACK PANEL:PTZAlarm BlockComponent Input (YPbPr)BNC Video inputs Audio inputsSpot OutAudio OutVGADIN Camera inputsSPECIFICATIONS:Includes:Supply, Ethernet cable, Software application CD, MouseL22WD804501 Package- LCD DVR- 4 x SG7540 Cameras CVC6993R Camera Pack: 4.1 KG / 9.1 LBSPackage Dimensions:System: 650mm x 550mm x 271mm / 25.6” x 21.7” x 10.7” (W x H x D)CVC6993R Camera Pack: 310mm/12.2”(W) x 310mm/12.2”(D) x 150mm/5.9”(H). Package Cube: 0.51CBF / 0.02CBM©2009 Lorex Technology Inc.Lorex Technology Inc.Monitor:LCD:22” Wide Screen LCD Resolution: 1680 x 1050Monitor display: Real time 240FPS (NTSC), 200 FPS (PAL) Image size: 3-5 Kbyte (352x240, 352x288) (NTSC, PAL) 5-10 Kbyte (704x240, 704x288) (NTSC, PAL)6-16 Kbyte (704x480, 704x576) (NTSC, PAL)Video inputs: 4 x DIN, 8 x BNCVideo outputs: Programmable Spot Out (BNC)Audio inputs: 4 x line-in, RCA sockets Audio output: 1 x line-out, RCA socket VGA input: Included Component input: YPbPrSupply Voltage: 100VAC-240VAC, 12VDC, 6.67A, 60/50Hz Power consumption: Approx. 65WTemperature range: 5° ~ 40° C / 41° ~ 104° F Weight: 8.7 kg / 19.3 lbsDimensions: 21” X 14.4” X 2.7” / 532mm X 365mm X 67mm (without stand)21” X 17” X 7.4” / 532mm X 433mm X 188mm (with stand)DVR:Hard disk capacity: SATA Interface (Max 1000 GB), 100% duty cycle,Backup: USB Default (USB memory stick, USB HDD), USB Optical Drive(CDRW, DVDRW)Back-up file formats: AVI, JPG, BMP Compression: MPEG4Recording speed: 240/200 (NTSC/PAL) @ 352x240 120/100 (NTSC/PAL) @ 704x24060/50 (NTSC/PAL) @ 704x480Record Scheduling: Hourly, Daily, Weekly adjustable per channelPre/Post alarm recording: 5 seconds (Pre); 3 minutes (Post), programmable per camera Event/Log search: Up to 100,000 for user login/out,configuration changes, remote access, connects/disconnects Playback: Single, Quad or 8CH Simultaneous Alarm inputs: 8 x TTL, programmable as NC/NOAlarm outputs: 1 x Relay with NO/NC contact; 30VDC/1A, 125VAC/0.5A resistive Activity detection: 16 x 16 grid, Sensitivity levels: 10PTZ Control: RS-485 interfaceRemote Functions: Live View, Live Recording, Search, Set-up, Back-up Network Speed Control: 8 levels (56Kb ~ 8MB)/work Protocol: TCP/IP, DDNS and Web Network Interface:10/100-Base-TX, RJ-45Camera: CVC6993R (optional)Image Sensor: High Resolution 1/4” Advanced Color Image Sensor Video Format: NTSC Effective Pixels: H: 656, V: 492Resolution: 450 TV Line Scan System: 2:1 Interlace Sync System: Internal S/N Ratio: More than 48dB Iris:AESAES Shutter Speed: 1/60~1/50,000 SecMini Illumination: 0.6 Lux without IR LED, 0 Lux with IR LED Video Output: Composite 1.0Vpp @ 75 ohm Lens/ Lens Mount: 5mm F 2.0/ Fixed FOV (Diagonal): 50 degrees Termination: BNC Type IR LED/ Night Vision Range: 30 pieces / 850 nm / 50ftPower Requirement: 12VdcPower Consumption: 220 mA or 3W max Operating Temp Range: -10° ~ 50° C (14° ~ 122° F)Environmental Rating:IP 66Monitor67mm/2.6”188mm/7.4”Camera: SG7540Image Sensor: High Resolution 1/4” Color Image Sensor Video Format: NTSCEffective Pixels: H: 656, V: 492Resolution: 450 TV Lines Scan System: 2:1 Interlace Sync System: InternalS/N Ratio: More than 48dB Iris:AESAES Shutter Speed: 1/60~1/50,000 SecMini Illumination: 3.0 Lux without IR LED, 0 Lux with IR LED Video Output: 1.0Vpp @ 75 ohm Lens/ Lens Mount: 3.6mm F 2.0/ Fixed FOV (Diagonal): 73 degrees Termination:6 pin DINIR LED/ Night Vision Range: 18 pieces / 850 nm / 50ft/15m Power Requirement: 12Vdc Power Consumption: 280 mAOperating Temp Range: -10° ~ 50° C (14° ~ 122°F)Environmental Rating: IP 66。
华为硬件需求说明书模板
华为硬件需求说明书模板[公司名称][项目名称][日期]硬件需求说明书1. 引言1.1 目的1.2 范围1.3 定义和缩略语2. 项目概述2.1 项目背景2.2 项目目标2.3 项目范围3. 硬件需求3.1 硬件规格3.1.1 服务器3.1.2 网络设备3.1.3 存储设备3.1.4 客户端设备3.1.5 其他硬件设备3.2 性能要求3.2.1 处理能力3.2.2 存储容量3.2.3 网络带宽3.3 可靠性要求3.3.1 冗余机制3.3.2 容错能力3.3.3 可恢复性3.4 安全要求3.4.1 数据加密3.4.2 访问控制3.4.3 防火墙3.5 兼容性要求3.5.1 操作系统兼容性 3.5.2 应用程序兼容性 3.6 扩展性要求3.6.1 可扩展性3.6.2 可升级性4. 硬件配置4.1 服务器配置4.2 网络设备配置4.3 存储设备配置4.4 客户端设备配置4.5 其他硬件设备配置5. 交付要求5.1 交付时间5.2 交付地点5.3 交付方式6. 维护和支持6.1 硬件维护6.2 技术支持7. 风险和限制7.1 风险分析7.2 限制和约束8. 附录8.1 术语表8.2 参考文献8.3 附加信息以上是一个简单的华为硬件需求说明书模板,您可以根据实际情况进行调整和修改。
在编写说明书时,建议尽量详细和准确地描述硬件需求,以便供应商或相关人员能够清晰理解您的需求,并提供合适的解决方案。
SUN 22 吋宽屏幕 LCD 平面显示器 WBZF 用户说明书
其它
z 请勿拆除外壳(或背板),屏幕内并无用户可自行修理的零件。 z 所有维修服务请找合格的服务人员进行。
z 若屏幕发出怪声、异味、或是无法正常运作时,请立刻拔除电源并与授权经 销商连络。
z 请勿将金属异物插入屏幕上任何的开口。
版权所有(C) 2008,Sun Microsystems, Inc.所有权利皆保留。
1. 将屏幕的电源线连接至屏幕后方的电源端口。将屏幕电源线插至最近的插头。
2. 将 HD-15 (模拟)接头插到显示卡上。 将信号线连接至位于屏幕后方的 15 接脚 HD-15 接头。
3. 将 DVI (数字)接头插到显示卡上。 将 DVI 连接线插入屏幕后方的 DVI 端口。
¡ 若已使用 DVI 接头正确连接屏幕,却未显示任何影像,请按 SOURCE (来源)按键来确认是否屏幕状态设 定为模拟。
直立操作
调整视角
转动屏幕
使用手册 - 5
设定
版权所有(C) 2008,Sun Microsystems, Inc.所有权利皆保留。
连接您的屏幕
使用手册 - 6
设定
屏幕后方
电源线 (未含)
计算机后方
DVI-D 连接线 HD-15 (VGA)连接线
每部计算机仅需一条视讯连接线。如果可 能,请尽量使用 DVI 连接线。
2. 引言..............................................................................1 拆装 ......................................................................... 1 前面 ......................................................................... 2 后方 ......................................................................... 3
- 1、下载文档前请自行甄别文档内容的完整性,平台不提供额外的编辑、内容补充、找答案等附加服务。
- 2、"仅部分预览"的文档,不可在线预览部分如存在完整性等问题,可反馈申请退款(可完整预览的文档不适用该条件!)。
- 3、如文档侵犯您的权益,请联系客服反馈,我们会尽快为您处理(人工客服工作时间:9:00-18:30)。
项目名称
硬件需求规格说明书
版本号:
拟制人:日期:
审核人:日期:
批准人:日期:
宇龙计算机通信科技有限公司
(限于公司员工内部使用)
修订记录
*A -增加 M -修改 D -删除
目录
1 引言 (4)
1.1 目的 (4)
1.2 内容 (4)
1.3 参考资料 (4)
2 概述 (4)
2.1 产品描述 (4)
2.2 硬件需求规格 (4)
2.2.1 音频需求规格 (4)
2.2.2 光电需求规格 (5)
2.2.3 电源管理需求规格 (6)
2.2.4 主芯片的需求 (6)
2.2.5 射频需求规格 (7)
2.3 硬件接口 (8)
2.3.1 内部接口 (8)
2.3.2 外部接口 (8)
1引言
1.1目的
编写该文档的目的
1.2内容
文档包含内容
1.3参考资料
所引用的企业标准与其它标准
2概述
2.1产品描述
对产品定义进行简要描述
2.2硬件需求规格
1补充,完善产品需求包里的硬件需求.
2.分析产品需求包里的硬件需求,按其电气特点进行分类.如: MP3,MP4,录音,立体声,免提,和旋,各种声效属于音频部分.LCD,CAMERA,触摸屏,背光,红外线,感应器属于光电.充电,放电,电池,充电器等属于电源部分.各个控制部分,USB, UART, JTAG, Memory, DSP,LCD Interface, Keypad Interface, Camera Interface等属于数字部分.蓝牙,收音机,GPS,GSM,CDMA,天线等属于射频率部分.
3.对于支持硬件需求,给出具体电性能指标参数,不能给出具体电性能指标参数请注明原因和什么阶段可以给出.
2.2.1音频需求规格
2.2.1.1 MP3/MP4/WMA/…
音频采样率及量化比特数
2.2.1.2 音效
立体声,环绕
2.2.1.3 录音
录音压缩格式,音频采样率,量化比特数,信噪比
2.2.1.4 免提
频响特性,失真度,最大响度
2.2.1.5 通话音频发送与接收
给出GSM,CDMA,Bluetooth等音频标准的要求,如发送灵敏度,接收灵敏度,接收响度,失真度,侧音等2.2.2光电需求规格
2.2.2.1 LCD
根据产品定义,给出类型,像素,透光模式,尺寸大小,接口方式
2.2.2.2 Touch panel
根据产品定义,给出类型,像素,透光模式,尺寸大小,驱动接口方式
2.2.2.3 LCD 背光
确定背光驱动方式,调节的档数
2.2.2.4 Camera
根据产品定义给出的类型,像素,调焦方式,数据传输速率,支持图片格式,接口方式
2.2.2.5 键盘
根据产品定义给出键盘类型,个数
2.2.2.6 键盘的背光
确定背光驱动方式,颜色,调节的档数
2.2.2.7 指示灯
确定背光驱动方式,颜色,调节的档数
2.2.2.8 红外线
2.2.3电源管理需求规格
2.2.
3.1 待机电流:
根据以往产品经验,行业标准,方案规格书给出电流大小
2.2.
3.2 通话电流:
根据以往产品经验,行业标准,方案规格书给出电流大小
2.2.
3.3 电池容量:
根据待机电流或通话电流,结合待机时间或通话时间估计出电池容量2.2.3.4 充电电流:
根据电池容量结合以往产品的充电时间给出最大充电电流
2.2.
3.5 充电器规格:
根据充电电流,其他产品规格确定充电器的规格
2.2.
3.6 CPU,控制和Memory需求规格
2.2.4主芯片的需求
罗列出主芯片的需求:如时钟需求,供电需求,调试接口需求
2.2.4.1 主芯片支持的功能和接口
罗列出支持的功能和接口:如制式,最大存储器的容量,存储器的接口,存储器的种类,LCD的接口的类型,Camera的接口类型,GPIO口的种类和数量,USB接口类型,Uart接口类型和数量,I2C接口,SPI,MP3,MP4,蓝牙,红外,GPS,
2.2.4.2 Nor Flash和SRAM
根据产品定义结合主芯片规格给出接口方式,类型,读写方式,读写速度,容量
2.2.4.3 Nand Flash
根据产品定义结合主芯片规格给出接口方式,读写速度,容量
2.2.4.4 外部存储卡
根据产品定义结合主芯片规格给出存储卡的类型,容量,放置方式
2.2.5射频需求规格
2.2.5.1 频段及制式
给出GSM,CDMA,Bluetooth,GPS,FM Radio等的频率要求,制式要求
2.2.5.2 接收灵敏度
给出GSM,CDMA,Bluetooth,GPS,FM Radio的灵敏度和最大接收功率要求
2.2.5.3 最大最小发射功率
给出GSM,CDMA,Bluetooth,GPS,FM Radio最大最小发射功率
2.2.5.4 接收抗干扰
从GSM,CDMA,Bluetooth,GPS,FM Radio的各自国标种抽出抗干扰指标
2.2.5.5 发射调制
从GSM,CDMA,Bluetooth,GPS,FM Radio的各自国标种抽出发射调制指标
2.2.5.6 EMC
从GSM,CDMA,Bluetooth,GPS,FM Radio的各自国标种抽出EMC指标
2.2.5.7 天线
1:根据ID,机构,射频率的要求给出天线的模式,所需要的体积
2:给出天线必须达到的指标.(效率,隔离度,VSWR等等)
2.3硬件接口
2.3.1内部接口
罗列出各个模块间的接口方式:如CPU与LCD与Memory,键盘,摄像头,触摸屏,SIM Card, RF, GPS, BlueTooth, GPS,FM Radio,GSM模块,外部解码器,外部DSP.
2.3.2外部接口
罗列出各个外部接口方式:如USB,UART,耳机,尾插,JTAG,红外线接口,蓝牙接口,其他无线接口,外部存储接口,
草图。