Readme for Sample
readme的模板和示例

readme的模板和示例
以下是一个示例的README模板,您可以根据自己的项目需求进行修改和定制:
```markdown
[项目名称]
简介
[项目名称]是一个[项目类型],它可以帮助用户[项目功能或目标]。
安装与配置
请按照以下步骤进行安装和配置:
1. 安装依赖:`npm install`
2. 配置数据库连接:编辑`config/`
3. 启动项目:`npm start`
功能特性
- [功能1]
- [功能2]
- [功能3]
使用示例
以下是使用[项目名称]的示例代码:
```javascript
// 示例代码
```
注意事项
- [注意事项1]
- [注意事项2]
- [注意事项3]
常见问题与解决方案
- [问题1]:解决方案1
- [问题2]:解决方案2
- [问题3]:解决方案3
联系我们
如果您有任何问题或建议,请联系我们:
邮箱:[]
```。
readme后缀

readme后缀
(原创版)
目录
1.文本概述
2.文本内容
3.文本格式
正文
一、文本概述
readme 后缀是一种常见的文本格式,通常用于说明软件、程序或项目的相关信息。
它可以为用户提供关于文件内容的简要概述,帮助用户了解其用途、功能以及使用方法。
readme 后缀的文本通常以.txt 格式保存,位于软件、程序或项目的根目录下。
二、文本内容
1.项目名称:文本开头应包含项目名称,以便用户快速了解文件所涉及的项目。
2.项目简介:简要介绍项目的背景、目的和功能,让用户对项目有一个大致的了解。
3.安装和使用说明:详细说明项目的安装过程、使用方法以及注意事项,方便用户正确地使用项目。
4.配置和选项:列举项目中所支持的配置选项和参数,让用户可以根据需要进行自定义设置。
5.示例和教程:提供项目的示例和教程,帮助用户更好地理解项目的使用方法和功能。
6.授权和许可证:说明项目的授权方式和许可证,告知用户合法使用
项目的相关信息。
7.贡献和反馈:提供项目的贡献方式和反馈渠道,鼓励用户为项目作出贡献或提出改进意见。
8.版权和致谢:列出项目的版权信息和致谢名单,表示对参与项目的人员和组织的感谢。
三、文本格式
readme 后缀的文本应采用清晰、简洁的格式,方便用户快速浏览和理解。
通常采用 markdown 语法进行编写,以实现列表、链接、代码块等排版效果。
总之,readme 后缀是一种重要的文本格式,它有助于用户了解软件、程序或项目的相关信息,从而更好地使用这些资源。
sample用法

sample用法主题:如何正确使用sampleSample是一个非常常见的英语单词,它的意思是“样本”或“样品”。
在日常生活中,我们经常会听到这个词,尤其是在科学研究、市场调查、产品测试等领域。
在这些领域,sample的作用非常重要,因为它可以代表整个群体的特征,从而为我们提供有用的信息。
那么,如何正确使用sample呢?下面是一些建议。
首先,我们需要明确sample的定义和作用。
Sample是从一个大群体中随机抽取的一小部分,它的目的是代表整个群体的特征。
因此,我们在使用sample时,需要确保它的代表性和可靠性。
这意味着我们需要采用一些科学的方法来确定sample的大小、抽样方式和抽样比例等,以确保sample能够代表整个群体的特征。
其次,我们需要注意sample的误差和置信度。
Sample的误差是指sample与整个群体之间的差异,而置信度是指我们对sample结果的信任程度。
在使用sample时,我们需要考虑到这些因素,并采用一些统计方法来计算误差和置信度。
这样可以帮助我们更准确地理解sample的结果,并做出更可靠的决策。
最后,我们需要注意sample的使用范围和限制。
Sample虽然可以代表整个群体的特征,但它并不能完全反映整个群体的情况。
因此,在使用sample时,我们需要明确它的使用范围和限制,并结合实际情况进行分析和判断。
同时,我们也需要注意避免过度解读sample的结果,以免产生误导或错误的结论。
综上所述,正确使用sample是非常重要的。
我们需要明确sample的定义和作用,注意sample的误差和置信度,以及注意sample的使用范围和限制。
只有这样,我们才能够充分利用sample的优势,为科学研究、市场调查、产品测试等领域提供有用的信息。
ReadMe
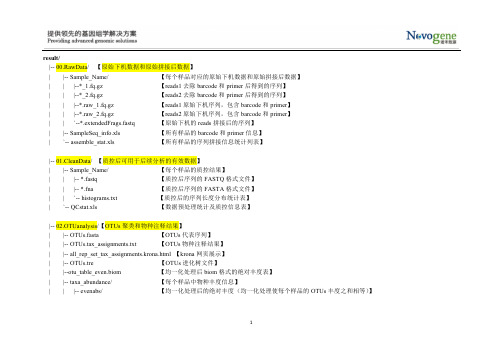
1result/|-- 00.RawData/ 【原始下机数据和原始拼接后数据】 | |-- Sample_Name/ 【每个样品对应的原始下机数据和原始拼接后数据】 | | |--*_1.fq.gz 【reads1去除barcode 和primer 后得到的序列】 | | |--*_2.fq.gz【reads2去除barcode 和primer 后得到的序列】| | |--*.raw_1.fq.gz 【reads1原始下机序列,包含barcode 和primer 】 | | |--*.raw_2.fq.gz 【reads2原始下机序列,包含barcode 和primer 】 | | `--*.extendedFrags.fastq 【原始下机的reads 拼接后的序列】| |-- SampleSeq_info.xls 【所有样品的barcode 和primer 信息】 | `-- assemble_stat.xls【所有样品的序列拼接信息统计列表】|-- 01.CleanData/ 【质控后可用于后续分析的有效数据】 | |-- Sample_Name/ 【每个样品的质控结果】| | |-- *.fastq 【质控后序列的FASTQ 格式文件】 | | |-- *.fna 【质控后序列的FASTA 格式文件】 | | `-- histograms.txt 【质控后的序列长度分布统计表】| `-- QCstat.xls【数据预处理统计及质控信息表】|-- 02.OTUanalysis/【OTUs 聚类和物种注释结果】 | |-- OTUs.fasta【OTUs 代表序列】| |-- OTUs.tax_assignments.txt 【OTUs 物种注释结果】 | |-- all_rep_set_tax_assignments.krona.html 【krona 网页展示】 | |-- OTUs.tre 【OTUs 进化树文件】| |--otu_table_even.biom 【均一化处理后biom 格式的绝对丰度表】 | |-- taxa_abundance/【每个样品中物种丰度信息】| | |-- evenabs/ 【均一化处理后的绝对丰度(均一化处理使每个样品的OTUs 丰度之和相等)】2| | | |-- otu_table.absolute.xls 【OTUs 绝对丰度】| | | `-- otu_table.*.absolute.xls 【界门纲目科属种(k,p,c,o,f,g,s )水平上的绝对丰度】 | | `-- relative/【均一化处理后的相对丰度(均一化处理使每个样品的OTUs 丰度之和相等)】| | |-- otu_table.relative.xls 【OTUs 相对丰度】| | `-- otu_table.*.relative.xls 【界门纲目科属种(k,p,c,o,f,g,s )水平上的相对丰度】| |-- taxa_stat/【OTUs 分析统计结果】| | |-- Classified_stat.{png,svg} 【注释到界门纲目科属种(k,p,c,o,f,g,s )水平上的Tags 数目分布图】 | | |-- classified_stat.xls 【注释到界门纲目科属种(k,p,c,o,f,g,s )水平上的Tags 数目统计表】 | | |-- Sample_Tags-OTUs_dis.{png,svg} 【各样品的Tags 及OTUs 数目统计分布图】 | | `-- Tags_stat.xls 【各样品的Tags 及OTUs 数目统计表】 | |-- taxa_charts_html/ 【注释结果网页版展示】 | | |-- area_charts.html 【注释结果面积图展示】 | | |-- bar_charts.html 【注释结果柱形图展示】 | | |-- pie_charts.html【注释结果饼状图展示】| | |-- charts/【网页展示用到的图片】| | |-- css/ 【网页配置文件】 | | `-- js/ 【网页配置文件】 | |-- top10/【门纲目科属(p,c,o,f,g )水平上的top10物种相对丰度柱形图】 | |-- taxa_heatmap/【物种注释聚类热图】 | | |-- cluster/ 【门纲目科属(p,c,o,f,g )水平上的物种聚类热图】 | | `-- OTU_heatmap/【OTUs 注释和丰度热图】 | |-- taxa_tree/【物种分类树】| |-- *.taxtree.{png,svg} 【单个样品的物种分类树】 | `-- all.taxtree.{png,svg}【所有样品的物种分类树】| |-- GraPhlan/ 【GraPhlan 结果展示】 | | |-- graphlan.{png,pdf} 【GraPhlan 图】3| |-- phylo_tree/ 【OTUs 进化树】| | |-- OTU.cluster.tree.{png,svg} 【OTUs 进化树图】 | | `-- OTUs.selected.tre 【OTUs 进化树文件,MEGA 软件可打开】|-- 03.AlphaDiversity/ 【alpha 多样性分析结果】 | |-- alpha_rarefaction_plots/ 【alpha 多样性分析结果网页版展示】 | |-- alpha_diversity_index.xls【alpha 多样性指数表格】 | |-- observed_species.{pdf,png} 【稀释曲线图(样本)】| |-- group_observed_species.{pdf,png}【稀释曲线图(分组)】| |-- plot_observed_species.txt【稀释曲线作图数据】 | |-- rank_abundance.{pdf,png} 【等级丰度曲线图(样本)】| |-- group_rank_abundance.{pdf,png}【等级丰度曲线图(分组)】| |-- venn_figure/ 【韦恩图】 | |-- Flower_figure/【花瓣图】| |-- Specaccum/ 【物种累积曲线】 | |-- specaccum.{png,pdf} 【物种累积曲线图】 | |-- Alpha_div/ 【组间Alpha 多样性比较箱型图】| |-- ACE / | |-- ACE.{png,pdf}【ACE 指数箱型图】| |-- ACE_Tukey.txt 【ACE 指数多组间方差分析】||--ACE_wilcox.txt 【ACE 指数多组间非参数wilcox 检验】| |-- chao1/| |-- chao1.{png,pdf}【chao1指数箱型图】| |-- chao1_Tukey.txt 【chao1指数多组间方差分析】| |-- chao1_wilcox.txt 【chao1指数多组间非参数wilcox 检验】 | |-- goods_coverage /4| |-- goods_coverage.{png,png} 【goods_coverage 指数箱型图】| |-- goods_coverage _Tukey.txt 【goods_coverage 指数多组间方差分析】| |-- goods_coverage _wilcox.txt 【goods_coverage 指数多组间非参数wilcox 检验】 | |-- observed_species /| |-- observed_species.{png,png} 【observed_specie 指数箱型图】| |-- observed_species _Tukey.txt 【observed_species 指数多组间方差分析】| |-- observed_species _wilcox.txt 【observed_species 指数多组间非参数wilcox 检验】 | |-- shannon /| |-- shannon.{png,png}【shannon 指数箱型图】| |-- shannon _Tukey.txt 【shannon 指数多组间方差分析】| |-- shannon _wilcox.txt 【shannon 指数多组间非参数wilcox 检验】 | |-- simpson /| |-- simpson.{png,png}【simpson 指数箱型图】| |-- simpson _Tukey.txt 【simpson 指数多组间方差分析】| |-- simpson _wilcox.txt 【simpson 指数多组间非参数wilcox 检验】|-- 04.BetaDiversity/ 【Beta 多样性分析结果】| |-- Beta_div/ 【组间Beta 多样性比较箱型图】| |-- weighted_unifrac.{png,pdf} 【基于加权的unifrac 距离的Beta 多样性箱型图】 | |-- weighted_unifrac_TukeyHSD.txt 【基于加权的unifrac 距离的多组间方差分析】| |-- weighted_unifrac_wilcox.txt 【基于加权的unifrac 距离的多组间非参数wilcox 检验】 | |-- unweighted_unifrac.{png,pdf} 【基于非加权unifrac 距离的Beta 多样性箱型图】 | |-- unweighted_unifrac_TukeyHSD.txt 【基于非加权的unifrac 距离的多组间方差分析】| |-- un weighted_unifrac_wilcox.txt 【基于非加权的unifrac 距离的多组间非参数wilcox 检验】 | |-- beta_div_heatmap/【unifrac 距离热图】| | |-- beta_diversity.heatmap.{png,svg} 【包含两种距离的热图】5| | |-- beta_diversity.heatmap.UnW.{png,svg} 【非加权unifrac 距离热图】 | | |-- beta_diversity.heatmap.W.{png,svg} 【加权unifrac 距离热图】 | | |-- unweighted_unifrac_sorted_otu_table.txt 【非加权unifrac 距离值】 | | `-- weighted_unifrac_sorted_otu_table.txt 【加权unifrac 距离值】 | |-- PCA 【PCA 分析结果】 | | |-- PCA12_2.{png,pdf}【标有样品名称的PCA 图】| | |-- PCA12.{png,pdf} 【未标样品名称的PCA 图】 | | |-- pca.csv 【各个主成分分析结果】 | | |-- PCA_stat_correlation1.txt 【第一主成分分析结果】 | | `-- PCA_stat_correlation2.txt 【第二主成分分析结果】 | |-- PCoA/【PCoA 分析】| | |-- unweighted_unifrac/【基于非加权unifrac 距离的PCoA 分析结果】| | | |-- {*.png ,*.pdf} 【前三个主成分两两作图结果】| | | |-- unweighted_unifrac_dm.txt 【用于PCoA 分析的unweighted unifrac 距离矩阵】 | | | `-- unweighted_unifrac_pc.txt 【PCoA 分析主成分信息】 | | `-- weighted_unifrac/【基于加权unifrac 距离的PCoA 分析结果】| | |-- {*.png ,*.pdf} 【前三个主成分两两作图结果】| | |-- weighted_unifrac_dm.txt 【用于PCoA 分析的weighted unifrac 距离矩阵】 | | `-- weighted_unifrac_pc.txt 【PCoA 分析主成分信息】 | | |--binary_jaccard__dm.txt 【binary_jaccard 距离矩阵】 | | |--binary_jaccard_pc.txt 【PCoA 分析主成分信息】 | | |--bray_curtis_dm.txt 【bray_curtis 距离矩阵】 | | |--bray_curtis_pc.txt 【PCoA 分析主成分信息】 | `-- Tree/【聚类树】| |-- unweighted_unifrac/【基于非加权unifrac 距离的聚类结果】| | |-- unweighted_unifrac.{png,pdf} 【基于非加权unifrac 距离的UPGMA 聚类树图】6| | |-- sorted_otu_table_upgma.tre 【基于非加权unifrac 距离的UPGMA 聚类树文件,MEGA 软件可以打开】 | | `-- UPGMA.UnW.tree.{png,svg} 【加入门水平物种组成的UPGMA 聚类树图】 | `-- weighted_unifrac/【基于加权unifrac 距离的聚类结果】| |-- sorted_otu_table_upgma.tre 【基于加权unifrac 距离的UPGMA 聚类树文件,MEGA 软件可以打开】 | |-- weighted_unifrac.{pdf,png} 【基于加权unifrac 距离的UPGMA 聚类树图】 | `-- UPGMA.W.tree.{png,svg} 【加入门水平物种组成的UPGMA 聚类树图】 | |-- NMDS/ 【NMDS 分析结果】| | |-- NMDS.{png,pdf} 【标有样品名称的NMDS 图】 | | |-- NMDS2.{png,pdf} 【未标样品名称的NMDS 图】| | |-- NMDS_scores.txt 【各样品在前两个主成分轴上的位置坐标】 | |-- LEfSe/ 【LEfSe 分析结果】 | | |-- */ LDA.*.{png,pdf}【LDA 值分布柱状图】| | |-- */ LDA.*.tree.{png,pdf} 【LEfSe 进化分支图】 | | |-- */LDA.*.res 【LEfSe 统计结果】| | |-- */biomarkers_raw_images/ 【各biomarker 在各组样品中的相对丰度比较图】 | |-- MetaStat/【MetaStat 分析结果】| | |-- */*.test.xls【门纲目科属(p,c,o,f,g )水平上MetaStat 分析结果】| | |-- */*.psig.xls 【从MetaStat 分析结果中,筛选出的 p value<=0.05的信息】 | | |-- */*.qsig.xls 【从MetaStat 分析结果中,筛选出的 q value<=0.05的信息】 | | |-- */cluster.*.diff.{pdf,png,txt} 【具有显著性差异物种的 heatmap 热图分析结果和输入文档】 | | |-- */boxplot / 【具有显著性差异物种的箱图结果】 | | |-- */PCA/ 【具有显著性差异物种的 PCA 分析结果】 | |-- Anosim/ 【Anosim 分析结果】 | | |-- stat_anosim.txt【Anosim 分析结果】| | |-- *.{pdf,png} 【Anosim 分析箱图结果】 | |-- MRPP/ 【MRPP 分析结果】7| | |-- stat_mrpp.txt 【MRPP 分析结果】 | |-- Adonis/ 【Adonis 分析结果】 | | |-- bray_adonis.txt 【Adonis 分析结果】 | |-- Amova/ 【Amova 分析结果】 | | |--(un)weighted_unifrac/*_amova.txt 【Amova 分析结果】| |-- t.test_bar_plot/ 【组间差异显著的物种分析】| |-- */*-VS-*. {png,svg} 【门纲目科属(p,c,o,f,g )水平上的组间差异显著的物种分析条形图】 | |-- */*-VS-*.xls 【门纲目科属(p,c,o,f,g )水平上组间差异显著的物种分析结果】 | |-- */*-VS-*.psig.xls 【从组间差异显著的物种分析结果中,筛选出的 p value<=0.05的信息】 | |-- ternaryplot/ 【ternaryplot 分析结果】| |-- */*/-- ternary.{png,pdf} 【未标有样品名称的ternaryplot 图】 | |-- */*/-- ternary_1.{png,pdf} 【标有物种名称的ternaryplot 图】 | |-- Environmen_factor/【环境因子分析】| | |-- mantel_test/ 【mantel_test 分析结果】| | |-- spearman/ 【spearman 分析结果】 | | |-- VPA/ 【VPA 分析结果】| | |-- multiCCA/【CCA 分析结果】`-- 05.WebShow/ 【网页版展示内容综合,可交互式操作,同时含使用说明】。
Dunning Notice ReadMe

The Dunning Notice SampleAdobe® LiveCycle Designer® 8.0Copyright 2006 Adobe Corporation. All rights reserved.About the sampleThe Dunning Notice sample demonstrates the behavior of a dynamic PDF form. For information about creating forms, see the LiveCycle Designer Help.Getting startedTo get started, you need the following files:Running the sampleYou can run the sample by following these steps.1.Open the form, Dunning Notice.xdp, in LiveCycle Designer.2.To specify the preview options, select File > Form Properties. Click the Defaults tab and do the following:●In Preview Type, select Print Form.●In Data File, browse to the Data folder and select one of the sample data files, for example Dunning Notice Level1.xml.●Click OK.3.To preview the form, click the Preview PDF tab.ResultsThe output sample PDF files in the Outputs folder show the rendered form merged with each of the three sets of data. Use these files to compare to the results of the previewed form.Form:Dunning Notice.xdp The LiveCycle Designer form file located in the Formsfolder.Data:Dunning Notice Level1.xml Dunning Notice Level2.xml Dunning Notice Level3.xml The XML data files located in the Data folder. The datafile for the Level 3 Dunning notice contains enoughinvoices to overflow onto a second page.Image:Dunning Notice.tif The image file located in the Images folder.Output:Dunning Notice Level1.pdf Dunning Notice Level2.pdf Dunning Notice Level3.pdfThe rendered forms with merged data located in theOutputs folder.About the formRequirementsThree dunning levels are available. The information appropriate for each level should be printed along with a list of the unpaid documents.FeaturesForm hierarchy structureThe Dunning Notice form is based on the data structure in order to take advantage of the implicit data binding process.Master pageTwo master pages are required. The first one should display the company logo, form title, and static text. This page is the first page to print and has a Max value of 1. The Max option is located in the Binding tab of the Object palette, The second master page is used for every subsequent page. The same static text is displayed as well as the page numbering.Page numberingThe page numbers are calculated values obtained by inserting run-time properties in a Text object.Flowed contentWhen data is merged with the form, the subforms are placed one below the other by setting the subforms’ parent (dunningNotice) Content option to Flowed. The Content option is located in the Subform tab of the Object palette. The Flow Direction, also located in the Subform tab of the Object palette, is set to Top to Bottom. The subform margins, specified in the Layout palette, add the extra spacing required between two subforms.The header, level1, level2, level3, and closing subforms have a flowed content as well. The fields margins add the extra spacing required between two objects.Subform occurrenceThe form includes a number of subforms that work together to properly accommodate the data. The subforms themselves are a mixture of repeating and non-repeating subforms. The Min Count values of all of the subforms (with the exception of the detailHeader and closing subforms) are set to 0 to specify that only the required subform will print. The Max value of the non-repeating subforms is set to 1. The repeating subforms do not have a maximum occurrence value because the number varies for each set of data. The Min Count value of the closing subform is set to 1 because no data is available to instantiate the subform.Detail headerThe detail header displays the column headings and should print before the first detail line. This detail header information should repeat at the top of the page when the detail lines can no longer fit on the current page and flow on to a new page. Setting the Min Count value of the detailHeader subform to 1 enables us to ensure the header is always printed at least once.Overflow leaderThe detailHeader subform is associated with the document subform as its overflow leader. This feature will force the overflow leader subform of the document subform to print every time the document subform flows onto a new page. Because there are no fields in the detailHeader subform, the Default Binding option, located in the Binding tab of the Object palette, is set to None.Global fieldsThe currency value is provided once in the data file. By setting the Default Binding of the currency field to Global and by using this field in multiple locations, the value is replicated in each occurrence of the field.Image fieldSince the company logo may vary, the logo file is embedded in the data file. An Image Field object is used to display the image.Maximum number of characters for each fieldThe Max Chars value for each field is specified as per data specifications. The Max Chars option is located in the Field tab of the Object palette.Expandable fields and anchor positionTo accommodate data values of varying length, the Expand to Fit option, located in the Layout palette, of some fields have been enabled. This is the case for the billToAddress, salutation, and closing fields. The anchor position of these fields is set to allow the proper expand direction. VariablesThe closing of every paragraph is the same. For easier maintenance, its value has been defined as a variable, and a script is used to reference this value and display it. Because the field’s value is calculated, the Default Binding is set to None.ScriptingThe address values should be displayed as a block. A JavaScript script is used to concatenate the data values. Because the billToAddress field’s value is calculated, the Default Binding is set to None.Multiple line fieldThe billToAddress field’s Allow Multiple Lines property, located in the Field tab of the Object palette, is enabled so that the calculated value can print on several lines.Floating fieldsThe level3 subform contains both text and fields. Using floating fields results in a natural flow of the information. A Display Pattern can be specified directly on the field and displayed in the paragraph. The Display Pattern option is located in the Field tab of the Object palette. The floating field is an hidden field inserted in the Text object. The reference to the floating field is represented by the field name between curly braces e.g. {fieldName}.Picture patternsSome values are easier to read by applying a Display Pattern. For example, the level3 subform’s deadline value is formatted with a medium-style date format. Additionally, a Data Pattern is required because the data value is not provided in a canonical format. Set the Data Pattern value in the Binding tab of the Object palette.Licenses and CopyrightsFor a complete list of the copyright notices for this product, see the copyright and trademarks page in the documentation.。
writing sample范文

writing sample范文英文回答:Language learning has been a passion of mine since I was a child. I have always been fascinated by different cultures and the way that language shapes our thoughts and experiences. As a native English speaker, I have had the privilege of learning several other languages throughout my life, including Spanish, French, Mandarin, and Japanese.Learning languages has opened up a whole new world for me. It has allowed me to connect with people from all over the globe, to learn about their cultures, and to gain a deeper understanding of my own. Through language, I have been able to experience the world from different perspectives and to see the beauty and diversity of human expression.One of the most rewarding aspects of learning languages is the ability to communicate with people from differentbackgrounds. When I travel to a new country, I love to immerse myself in the local language and culture. It is such a rewarding feeling to be able to connect with the people I meet and to learn about their lives.Learning languages has also had a profound impact on my professional life. As a journalist, I have been able to use my language skills to report on stories from around the world. I have interviewed people from all walks of life, and I have been able to share their stories with a global audience.In addition to the practical benefits of learning languages, I have also found that it has made me a more open-minded and tolerant person. By learning about other cultures and perspectives, I have come to appreciate the diversity of human experience. I believe that language learning is one of the most valuable and rewarding things that a person can do. It is a journey that will continuefor the rest of my life.中文回答:从小时候起,学习语言就是我的热情所在。
kmul常数乘法例程生成器说明书

kmul user manualTitle kmul(Constant multiplication routine generator)Author Nikolaos KavvadiasContact************************************************Website Release Date29November2014Version0.1.1Rev.historyv0.1.12014-11-29Added project logo in README.v0.1.02014-10-16Documentation updates andfixes.v0.0.72014-06-13Changed README to README.rst.v0.0.62014-06-12Updated contact information.Replaced COPYING.BSD byLICENSE.v0.0.52013-04-28Converted documentation to RestructuredText.v0.0.42012-03-17Split build-and-test scripts to"build"and"test".v0.0.32011-12-03Minor README updates regarding multiple releases,tuto-rial usage.v0.0.22011-11-20Minor README,Makefile updates.v0.0.12011-06-07Initial release.11.Introductionkmul is a generator of routines for optimized multiplication by an integer constant. In order to calculate a constant integer multiplication,it uses the public domain rou-tines presented in the work:Preston Briggs and Tim Harvey,"Multiplication by integer constants,"Technical report,Rice University,July1994.This technical report imple-ments Bernstein’s algorithm documented in:R.Bernstein,"Multiplication by integer constants,"Software-Practice and Experience,V ol.16,No.7,pp.641-652,July 1986.kmul can also be used for emitting a NAC(generic assembly language)or ANSIC implementation of the multiplication.2.File listingThe kmul distribution includes the followingfiles:/kmul Top-level directoryLICENSE Description of the Modified BSD license.Makefile Makefile for generating the kmul executable. README.html HTML version of README.rst.README.pdf PDF version of README.rst.README.rst Thisfile.build.sh Build script for kmul.kmul.c The source code for the application.kmul.png PNG image for the kmul project logo.rst2docs.sh Bash script for generating the HTML and PDF versions. test.c Sample testfile.test.opt.c Expected optimized version of test.c.test.sh Perform some sample runs.test2.sh Another test script to perform more sample runs.3.InstallationThere exists a quite portable Makefile(Makefile in the current directory).Running make from the command prompt should compile kmul.4.Prerequisites∙[mandatory for building]Standard UNIX-based tools∙gcc(tested with gcc-3.4.4on cygwin/x86)∙make∙bash25.kmul usageThe kmul program can be invoked with several options(see complete option listing below).The usual tasks that can be accomplished with kmul are:∙generate a NAC optimized software routine for the multiplication∙generate an ANSI C optimized software routine for the multiplication.ANSI C routines are emitted only for a width of32-bits(see option below).kmul can be invoked as:$./kmul[options]The complete kmul options listing:-h Print this help.-d Enable debug/diagnostic output.-mul<num>Set the value of the multiplier.Default:1.-width<num>Set the bitwidth of all operands:multiplier,multiplicand and product.Default:32.-signed Construct optimized routine for signed multiplication.-unsigned Construct optimized routine for unsigned multiplication(default).-nac Emit software routine in the NAC general assembly language(default).-ansic Emit software routine in ANSI C(only for width=32).Here follow some simple usage examples of kmul.1.Generate the ANSI C implementation of n*11optimized routine.$./kmul-mul11-width32-unsigned-ansic2.Generate the NAC implementation of n*(-7)optimized routine.$./kmul-mul-7-width32-signed-ansic3.Generate the ANSI C implementation of n*23optimized routine with de-bugging output.$./kmul-mul23-width32-unsigned-ansic-d6.Quick tutorialkmul can be used for arithmetic optimizations in user programs.Assume the following user program(test.c):3//test.c#include<stdio.h>#include<stdlib.h>int main(int argc,char*argv[]){int a,b;a=atoi(argv[1]);b=a*23;printf("b=%d\n",b);return b;}Thisfile is compiled and run as follows with one additional argument:$gcc-Wall-O2-o test.exe test.c$./test.exe155and the expected result is:$b=3565The user can apply kmul for generating a constant multiplication routine for a*23: $./kmul-mul23-width32-signed-ansicand the corresponding routine is produced(local variables t5to t15can be deleted by the user;the compiler will be optimize them away eventually).Then,the user should edit a newfile,let’s say test.opt.c and include the produced routine.The resulting optimized sourcefile should be as follows://test.opt.c#include<stdio.h>#include<stdlib.h>signed int kmul_s32_p_23(signed int x){signed int t0;signed int t1;signed int t2;signed int t3;signed int t4;signed int t5;signed int t6;signed int t7;signed int t8;signed int t9;signed int t10;signed int t11;signed int t12;signed int t13;signed int t14;signed int t15;4signed int y;t0=x;t1=t0<<1;t2=t1+x;t3=t2<<3;t4=t3-x;y=t4;return(y);}int main(int argc,char*argv[]){int a,b;a=atoi(argv[1]);b=kmul_s32_p_23(a);printf("b=%d\n",b);return b;}Thisfile is compiled and run as follows with one additional argument:$gcc-Wall-O2-o test.opt.exe test.opt.c$./test.opt.exe155The target platform compiler(e.g.gcc or llvm)is expected to inline the kmul_s32_p_23 function at its call site.7.Running testsIn order to build and run a series of sample tests do the following:$./build.sh$./test.shor for a more extensive set of tests:$./test2.sh8.ContactYou may contact me for further questions/suggestions/corrections at:Nikolaos Kavvadias<********************><****************************>Independent ConsultantLamia,Fthiotis,Greece5。
README——OpenScenegraph

below.
OSG_BUILD_APPLICATION_BUNDLES - Normally only executable binaries are
created for the examples and sample applications. Turn thisES - By default this is turned off. Turn this setting on
to compile many great example programs.
CMAKE_OSX_ARCHITECTURES - Xcode can create applications, executables,
or forum:
/
For the impatient, we've included quick build instructions below, these
are are broken down is three parts:
build system.
If you don't already have CMake installed on your system you can grab
it from , use version 2.4.6 or later. Details on the
1) General notes on building the OpenSceneGraph
2) OSX release notes
3) iOS release notes
- 1、下载文档前请自行甄别文档内容的完整性,平台不提供额外的编辑、内容补充、找答案等附加服务。
- 2、"仅部分预览"的文档,不可在线预览部分如存在完整性等问题,可反馈申请退款(可完整预览的文档不适用该条件!)。
- 3、如文档侵犯您的权益,请联系客服反馈,我们会尽快为您处理(人工客服工作时间:9:00-18:30)。
UAP开发样例指导用友研发中心U8平台技术部<本文档适用于U871版本>目录一、摘要 (3)二、样例开发前提 (3)三、建立UAP项目 (4)四、建立表单模型 (5)(一)新建实体 (6)(二)新建实体属性 (8)五、建立表单布局 (14)六、行为对象开发 (15)(一)表单开发 (17)(二)列表开发 (30)(三)生单二次开发 (36)(四)联查报表 (37)(五)联查UAP列表 (38)(六)UAP列表联查U8单据 (39)(七)用户自定义控件开发 (42)(八)U8单据引用UAP档案 (43)七、行为对象注册 (56)功能介绍: (56)使用说明: (56)应用技巧: (58)八、建立数据引擎 (59)功能介绍: (59)使用说明: (60)应用技巧: (82)九、设置过滤条件 (82)功能介绍: (82)使用说明: (82)应用技巧: (87)十、设置栏目 (88)功能介绍 (88)使用说明 (88)应用技巧 (89)十一、权限 (89)功能权限 (89)记录级权限 (90)字段级权限 (91)十二、部署 (92)附录:功能介绍 (93)1、行为对象升级说明 (93)2、LoginInfo 对象介绍 (95)一、摘要本文以U8-ERP中的销售订单为应用原型,介绍了如何通过UAP进行软件开发,文中给出了开发方法和丰富样例。
内容包括:UAP表单开发原理UAP项目的建立和导入、导出UAP表单的模型设计和布局设计UAP表单的行为对象开发UAP表单列表设计与开发UAP表单列表的行为对象开发如何对UAP表单的缺省按钮进行扩展性开发如何对UAP表单的缺省按钮进行取代性开发如何为UAP表单增加新的按钮及行为如何用程序代码调用UAP报表如何用程序代码调用UAP表单列表如何在UAP表单中增加权限控制:功能权限、字段权限、记录权限如何为UAP表单开发自定义控件如何开发树形档案如何维护UAP数据引擎如何维护栏目如何维护过滤条件如何调用U8APIU8单据自定义项如何引用UAP档案本文档中使用的示例文件为“销售订单二次开发”,可以通过UAP将该文件导入到帐套中。
项目名称为“SaleV oucher ”,导入后在项目中包括几个自定义单据:“销售订单”为二次开发的Demo示例;“零售日报”为自定义空间二次开发的Demo示例;“列表档案示例”、“树形编辑档案示例”、“树形导航档案示例”分别为各个对应的档案类型的示例。
项目源代码:二、样例开发前提首先,需要安装U8产品,并建立一个帐套。
其次,您需要向用友公司购买UAP表单设计许可;不过您可以使用UAP的演示版本,但是演示版本不能新建UAP项目,也不能注册行为对象。
三、建立UAP项目使用UAP登录您的帐套后,在系统界面上的新建项目选项卡,选中“供应链”后,在右边的列表中选择“销售管理”,在界面下方的几个文本框中输入项目名称,编号,描述等;顺序选择框使用“默认”即可。
点击“确定”如果输入信息与先前创建的项目信息不冲突,项目就可被成功创建。
您也可以导入我们为您提供的UAP样例项目,导入方法如下。
1、登录UAP;2、打开菜单“文件-导入和导出”;3、选中“导入项目数据到目前的服务器”,点“确定”按钮;4、点“导入”按钮,选取U8安装目录下的“uap\sdk”目录中的文件“Samplefile”;5、导入成功后;6、在UAP已存在的项目中产生了一个名称为“SaleV oucher”的项目;四、建立表单模型选中“自定义表单”节点,单击右键,使用“新建自定义表单”功能创建一个新的表单。
然后在弹出的选择界面中选择“表单类型”下的“单据”,在名称文本框中输入一个表单名字,不要与以前创建的表单名字重复。
在成功创建后,系统界面会如下图(图表1)所示:图表 1在上图所示的实体节点,默认有两个子节点,分别为“主表和第一子表”,根据当前表单的需要设计实体,包括增加实体和实体属性等。
(一)新建实体窗口为实体设置各项信息。
实体的相关属性:●名称:实体显示的名称,仅用于设计时。
●发布状态:实体是否已发布,只读。
●功能:为实体定义自定义功能,在运行时显示为表格对应的工具栏按钮。
●状态设置:设置实体属性、功能在表单运行时的状态,决定实体属性、功能在不同的环境下是否可用。
●物理表模式:设置实体物理表的创建模式,默认为由UAP在发布时自动创建。
在特殊的应用场景中可以使用“使用已存在的对象”或“无”。
后两种情况下UAP 不负责实体物理表的维护。
●物理表:设置该实体在数据库存储时使用的物理表,一般情况下一个实体对应一个物理表。
●数据引擎模式:设置实体运行时数据的访问方式。
默认为UAP系统在发布时自动创建,特殊的应用场景中可以使用“使用已存在的对象”或“无”,这两种情况下系统不负责实体数据的读取,只能通过用户定义的接口获取数据集。
●数据引擎:当数据引擎模式为“使用已存在的对象”时,设置要使用的数据引擎对象。
●主键:设置实体物理表的主键字段名。
●主键类型:设置实体物理表主键字段的类型,可选“整数”或“GUID”或“字符串”。
●行模式:多行或单行。
一般主表设置为单行。
(二)新建实体属性实体必须包含实体属性时才有效。
可以在UAP界面“表单”窗口中,右键点击实体对应的节点,选择“新建实体属性”菜单向实体添加实体属性:实体属性通用属性:●类型:该实体属性的类型。
●描述:对该实体属性的单体描述。
●属性名称:实体属性的名称。
●默认值:实体属性的默认值。
●使用默认值:用户未提供数据时,是否使用实体属性的默认值。
●发布:该实体属性是否已经发布。
●常用条件:该实体属性是否可以在过滤中作为常用条件使用。
●区间条件:该实体属性是否可以在过滤中作为区间条件使用。
●值更新事件:设置该实体属性值更新时需要处理的脚本列表。
基础资料类型字段共有三种类型的值更新事件:“携带当前字段相关参照属性到指定列”、“计算定义公式的值到指定列”、“表达式为真/假时改变指定栏目编辑状态”;其余类型字段比基础资料类型字段缺少第一种类型的值更新事件。
1.携带当前字段相关参照属性到指定列2.计算定义公式的值到指定列3.表达式为真/假时改变指定栏目编辑状态表单式为真\假时修改指定栏目的编辑状态表单式为真\假时修改指定栏目的显示状态表单式为真\假时修改指定功能状态表单功能实体功能●唯一约束:是否检查该实体属性的值在整个表单范围内唯一。
●文本对齐:实体属性文本的显示位置。
●显示文本:实体属性的不同语言环境中显示的文本。
●允许空值:实体属性的值是否可以为空。
●物理表:实体属性对应物理字段的表名,即该实体属性所属实体的物理表。
●字段:实体属性对应的物理字段名。
除了支持以上通用属性外,不同类型的实体属性还具有不同的特性:1.表单编号表单编号只能出现的主表实体中,并且只能有一个表单编号类型的实体属性。
2.表单名称表单名称类型的实体属性只能在档案类型的表单中使用,同表单编号一样,表单名称类型的实体属性只能出现主表实体中,并且只能出现一次。
3.整数和正整数●可否为0:数值型的值是否可为0。
●录入长度:限制用户可录入数值的最多位数。
●数据格式:数值类型的显示格式。
●最大值和最小值:数据的有效范围。
正整数的最小值必须等于或大于0。
4.小数和正小数●可否为0:数值型的值是否可为0。
●录入长度:限制用户可录入数值的最多位数。
●数据格式:数值类型的显示格式。
●最大值和最小值:数据的有效范围。
正小数的最小值必须等于或大于0。
●小数位数:数据保留的小数位数。
5.文本●多行输入:运行时是否支持录入多行文本。
●最大长度:最多可录入的文本长度。
6.日期和日期时间日期类型运行短日期格式,即只包含年月日。
日期时间类型包含年月日和时分秒。
7.枚举枚举类型的实体属性需要设置枚举值列表,枚举值的显示值为在界面显示的文本,保存值为实际保存到数据库的数据,如枚举类型的实体属性“销售类型”的枚举值可设置为如下图所示:U872中枚举字段支持选择“枚举模式”:使用已存在枚举、新创建枚举。
选择“使用已存在枚举”后,需要为“枚举类型”选择一个U8系统中现有的枚举中的一个。
8.基础资料基础资料类型的值来自指定参照档案的对照值。
●参照对象:设置基础资料类型实体属性的参照档案对象,可以从U8档案列表中选择,包含UAP中定义为档案类型的表单。
●参照显示值:该属性是设置当前就“基础资料”字段在运行时的文本框里显示参照的那个字段的值。
如上面的“参照对象”属性选择的存货档案,如果不设参照显示值,则运行时默认显示为存货编码,如果将“参照显示值”属性设置为存货档案的“存货”名称,运行是该字段就会显示为存货的名称。
●选择方式:设置在运行时的对照选择方式。
●自动校验:是否对录入的值进入检验以确定数据是否来自指定的参照对象。
选择“否”时允许用户录入参照对象中不存在的值。
9.基础资料属性基础资料属性类型的实体属性必须和基础资料类型的实体属性结合使用。
●参照属性:设置基础资料属性类型实体属性要绑定的基础资料类型实体属性,并指定关联的参照字段。
当基础资料类型的实体属性值变化时,基础资料属性类型的实体属性值随之改变。
10.数量、价格和金额数量、价格和金额类型的实体属性实质上为小数类型,设置等同于小数类型的实体属性。
11.复选框特殊类型的整数值,运行时显示为复选框,保存的数据为0(未选择)或1(选择)。
12.制单人当前单据的作者,一般设为登录用户。
13.制单日期和修改日期制单日期保存当前表单生成的日期,修改日期保存表单最后一次修改的日期。
这两种类型的实体属性实质上为日期时间类型,设置等同于日期时间类型的实体属性。
五、建立表单布局在完成实体的设计后,可以设计表单布局,UAP支持一个表单多个布局视图,用户可根据自己的使用习惯选择一种布局视图。
布局视图的设计与普通window界面的布局设计基本一致。
六、行为对象开发行为对象开发是指增加表单或列表的功能按钮,除了UAP系统自带的功能按钮外,还可以增加按钮,这些增加的功能按钮是UAP表单开发的基础。
UAP提供了多种增加功能的途径,首先通过设计界面的树形菜单中的“功能”节点下的表单功能和列表功能的“功能管理”(图表2)添加功能按钮,这些功能按钮最终在运行时会被加载到U8产品的门户上;其次可以为每个表单实体添加功能按钮(图表3),为实体添加完成这些功能按钮后,还需要在布局视图上为该表单实体的“功能”属性设置使用这些功能(图表4),这些功能按钮最终在运行时会被加载到该实体的工具栏按钮上。
图表 2 图表3 图表4图表5增加功能按钮时,很多工作都可以通过上图(图5)的设计界面完成,开发人员关心的仅仅是表单开发业务逻辑的实现。
这些按钮的作用主要是通过在运行时对模型对象中数据的修改以及最终将修改的数据持久化来完成的。