MagPix简易操作说明
美咖相机操作使用手册
美咖相机操作使用手册目录一、软件简介................................................................................................... 错误!未定义书签。
.................................................................................................. 错误!未定义书签。
三、下载安装:............................................................................................... 错误!未定义书签。
错误!未定义书签。
............................................................................................ 错误!未定义书签。
(二)、美丽自拍................................................................................... 错误!未定义书签。
(三)、魔法美颜................................................................................... 错误!未定义书签。
(四)、魅力彩妆................................................................................... 错误!未定义书签。
.................................................................................... 错误!未定义书签。
马格派克 B350 数码相机使用手册说明书
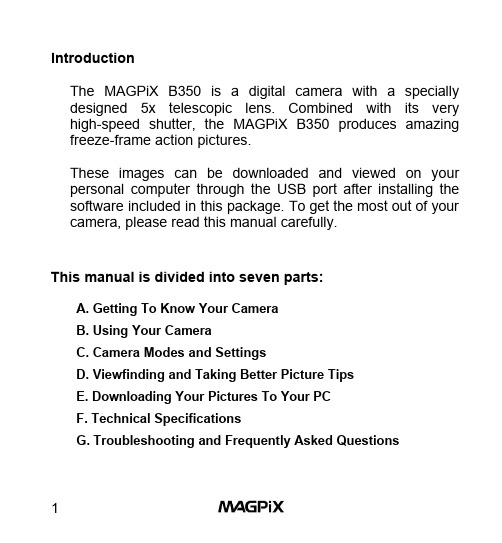
IntroductionThe MAGPiX B350 is a digital camera with a specially designed 5x telescopic lens. Combined with its very high-speed shutter, the MAGPiX B350 produces amazing freeze-frame action pictures.These images can be downloaded and viewed on your personal computer through the USB port after installing the software included in this package. To get the most out of your camera, please read this manual carefully.This manual is divided into seven parts:A. Getting To Know Your CameraB. Using Your CameraC. Camera Modes and SettingsD. Viewfinding and Taking Better Picture TipsE. Downloading Your Pictures To Your PCF. Technical SpecificationsG. Troubleshooting and Frequently Asked QuestionsA. Getting To Know Your CameraBelow are three views of the MAGPiX B350 to help familiarize you with your new camera. The parts and corresponding numbers will be referred to throughout this manual.1 Left Barrel2 Left Objective Lens3 Camera Lens4 Right Objective Lens5 Right Barrel6 Dioptric Knob7 Right Eyepiece8 Shutter/Select Button9 USB Port10 Power/Mode Button11 Left Eyepiece12 Focus Knob13 L CD DisplayFigure 1. Top View8 Shutter/Select Button9 USB Port10 Power/Mode ButtonFigure 2. Front View14 Camera Lens15 Eyepieces16 Battery Compartment17 Tripod MountFigure 3. Side ViewB. Using Your Camera1. Load The Batteries. Open the Battery Compartment (16)and insert two AAA batteries (included), paying attention to insert them in the correct direction. Close the compartment.Always download your picturesregularly (see Part E), if thebatteries run out, your pictures willbe lost. A flashing LCD indicatesthe batteries are low. You shoulddownload your pictures as soon aspossible. Figure 5. Loading The Batteries2. Turn On Your Digital Camera. Press Power/Mode Button(10) to turn on the camera. The preset mode of high resolution(HI) allows 52 VGA images and is indicated by a 3-star symbol on the LCD Display (13).Figure 6. High Resolution Figure 7. Pictures Remaining3. Use The Eyepieces (7 & 11) To Aim Your Camera. Thecamera works best at taking pictures of outdoor objects, 40ft away from you or more. Also, since the camera is point and shoot and independent from the binoculars, you do not need to focus the binoculars to get great in-focus pictures.4. Take Your Picture. Hold your MAGPiX B350 steady andaim at a scene or object 40ft. or greater away from you.Press the Shutter/Selection Button (8) to take the picture.You will hear a beep. The LCD Display (13) will show “- - -“, and when the number of available exposures has decreased by one on the LCD Display (13), you will hear another ‘beep’, and the camera is ready to take another picture. If you hear a quick ‘double beep’ and the counter does not go down, it means that there was not enough light for the camera to takea picture..Figure 8. Shooting Symbol Figure 9. LCD Display AfterFirst Exposure5. Turn off Your Camera. Press the Power/Mode Button (10)once and the LCD Display (13) will show “oFF”. - Then press the Shutter/Select Button (8) to turn off the camera.The camera will also automatically shut off after approximately 1minute of inactivity.Figure 10. Off ModeC. Camera Modes and SettingsDifferent camera modes and settings can be cycled through by pressing the Power/Mode Button (10) after the camera is turned on. *** It is important to wait 1 second before each press of the Power/Mode Button. ***1. Off Mode2. Self-timer3. Erase All Pictures4. Erase Last Picture5. Resolution Selection1. Off ModeWhen the camera is turned on, pressing the Power/Mode Button (10) once, will cause “oFF” to show on the LCD Display (13). Then press the Shutter/ Select Button (8) and the camera will turn off.Figure 11. Off Mode2. Self-Timer ModeWhen the camera is turned on, pressing the Power/Mode Button (10) two times, waiting one second between each press of the button - will put the camera in the Self-Timer Mode. When you see the timer icon, press the Shutter/Select Button (8) to activate the self-timer. The camera will beep for 10 seconds before taking the picture automatically. When LCD Display (13) no longer shows “- - -“, the camera is ready to take another picture.Figure 12. High Resolution + Self-timer Figure 13. Low Resolution + Self-timer3. Erase All PicturesWhen the camera is turned on, pressing the Power/Mode Button (10) three times, waiting one second between each press of the button - will put the camera in Erase All Pictures Mode. When you see the Erase All Pictures icon, press the Shutter/Select Button (8) and the LCD will begin to blink. While the LCD is blinking press the Shutter/Select Button (8) again, and the camera will erase all pictures that have been taken.Figure 14. Erase All Pictures4. Erase Last PictureWhen the camera is turned on, by pressing the Power/Mode Button (10) four times, waiting one second between each press of the button - will put the camera in Erase Last Pictures Mode. When you see the Erase Last Pictures icon, press the Shutter/Select Button (8) to erase the last picture. The number of available pictures on the LCD Display (13) will be increased by one.Figure 15. Erase Last Picture5. Resolution SelectionWhen the camera is turned on, pressing the Power/Mode Button (10) five times, waiting one second between each press of the button - will put the camera in Resolution Selection Mode. When you see the Resolution Icon, press the Shutter/Select Button (8) to change the preset high resolution(52 VGA images of 640 x 480 pixels) to low resolution (209QVGA images of 320 x 240 pixels).Figure 16. Changing Between High Resolution and Low ResolutionIf you change the resolution to low,the LCD Display (13) will show thefollowing when you turn on yourdigital camera again. To changethe resolution back to high - followthe steps above one more time.Figure 17. Low ResolutionD. Viewfinding and Taking Better Picture TipsHow to use the binoculars:1. Hold the MAGPiX B350 in a comfortable viewingposition, and adjust the left and right barrels (1 & 5) apart or together until one single circular field is seen with both of your eyes at the same time.2. To adjust the focus, look into the Left Eyepiece (11)with your left eye (with the right eye closed) to aim at any object 5 meters away, rotate the Focus Knob (12) clockwise or anti-clockwise to get the best focus. Then look into the Right Eyepiece (7) with your right eye (with the left eye closed), and rotate the Dioptric Knob (6) to the left or to the right to get the best focus.3. Now you can look with both eyes into the left and righteyepieces (2 & 4) and bring nearby or far away objects into focus by adjusting the Focus Knob (12).Viewfinding• The function of the binocular is as the viewfinder for the binoculars.• The area seen through the binocular is a circular area, approximately 8 times the magnification of originalimage.• The MAGPiX B350 lens produces a 5 times enlarged image with 4x3 standard shape.Figure 17. View area difference between binocular and camera• You do not need to focus the binoculars for a focused picture. The camera is auto-focus and is independentfrom the binoculars.Area Seen Through Binocular Area of Picture Taken• Depending upon the amount of available light, the shutter speed is fast enough that you can capture terrific action shots.• Try taking a picture of a helicopter in flight. You’ll notice that when you view your picture, you will have stopped the helicopter’s rotor blade in mid-flight.E. Downloading Your Pictures To Your PC1. Install the drivers and photo software. The CD includedin the box contains the MAGPiX B350 driver and bonus software (Photo Express 4.0). The driver must be installed before you connect the MAGPiX B350 to your computer.Ulead PhotoExpress is bonus software, and is not necessary to view your pictures.Insert the installation CD into the CD-ROM drive of your computer. A screen will appear as shown in Figure 18.Figure 18. B350 CD start-up screenClick once on “Install MAGPiX B350 Driver” to start the installation of the driver, and follow the instructions on the screen step by step. After the installation is completed, select “Restart your computer now”. (Go directly to step 2, ifyou do not want to install PhotoExpress on your computer). After your computer restarts, re-insert the MAGPiX B350 CDand click once on “Install Ulead Photo Express 4.0” to install Photo Express. Follow the instructions on the screen step by step. After the installation is completed, exit the installation screen and restart your computer.2. Connect your MAGPiX B350 to your computer. Plug inthe large end of the included USB cable to the USB port ofyour computer, and connect the smaller end of this cable tothe MAGPiX B350. Your computer will find new hardware and update its system. Follow the onscreen instructions, if any.3. Downloading your pictures from the MAGPiX B350.By using the MAGPiX Quick Download Utility:1. Make sure the MAGPiX B350 is connected with the USBcable to your computer.2. Launch the MAGPiX B350 by going to: StartàProgramsà MAGPiX B350à MAGPiX B350. (SeeFigure 19).Figure 19. MAGPiX Quick Download Utility3. Click on the Red/Pink camera icon to download imagesfrom the camera.4. The thumbnail images can be enlarged by clicking onthem with your right mouse button. Select the photosyou want to save and click on the save icon and click“Save”.5. After the pictures are downloaded, you may delete thepictures from your MAGPiX B350 by following thedirections on page 8 of this manual.6. You can now open your saved photos with your favoritephoto applications.By using Ulead PhotoExpress:1. Make sure the MAGPiX B350 is connected with the USBcable to your computer.2. Launch the PhotoExpress 4.0 application.3. Along the left hand side of the application, select thefolder that you like to download your pictures to.4. Click on “Get Photos” and select “Digital Camera” fromthe drop down menu, as shown in Figure 20.5. Make sure “MAGPIX B350 “ is selected along the lefthand side of the application under “Select Data Source”6. Click “Acquire” at the bottom left of the screen todownload your pictures in the camera. See Figure 21.7. After the pictures are acquired, you may delete thepictures from your MAGPiX B350 by following the directions on page 8 of this manual.8. Ulead PhotoExpress 4.0 offers many more functionalitiesas an image-editing program. To learn how to use PhotoExpress 4.0, please insert the CD that came with the B350 and select “Ulead PhotoExpress 4.0 User Manual”, or visit on the Internet.Figure 20. Click “Get Photos” and select “Digital Camera”Figure 21. Click ‘Acquire” at the bottom left of the screenF. Technical Specifications• Sensor Resolution: CMOS, 640x480 pixels• Built-in Memory: 8 MB, SDRAM• Image Storage: VGA (640x480) - 52 imagesQVGA (320x240) - 209 images • Status LCD: 3-digit B/W• White Balance: Auto• Exposure: Auto• Shutter Speed: Auto (1/8000 sec, Max.)• Focal Length: 33 mm (equals to 230 mm of 35 mmcamera)• Aperture: F=4• Self Timer: 10 seconds• Interface: USB• Delete Image: All / last one• Auto Power Off: 45 seconds• Battery: 2 x AAA Alkaline Battery• Dimensions: 115x90x55 mm• Weight: 225 grams (w/o battery)• Operating System: Windows 98SE/ME/2000/XP• Veiwfinder Full functioned 8x21 binocularSystem Requirements• Personal computer with an operating system of either Windows 98, 98SE, ME, 2000 or XP.• A CD-ROM to install the driver and application software. • Minimum Penthium II 200 MHz CPU.• 1 USB port available.• VGA Video card able to support a minimum of 640 x 480 24-bit true color resolution.1024 x 768 24-bit true color resolution is recommended.• At least 48 MB RAM for WIN98/ME, and 64 MB RAM for Windows 2000 and WIN XP.• At least 120 MB of free hard disk space.F. Troubleshooting and Frequently Asked QuestionsQ. The pictures I take seem to be blurred or out of focus.A. Try taking pictures of objects or activities 40ft. or further away. Remember, the B350’s lens is focused from 40ft to infinity.Q. I can’t get the B350 to delete my pictures or change to any other mode but ‘OFF’.A. When you press the mode button, you need to wait 1 second before pressing it again. So, when pressing the mode button 3 times to get to the trash icon, you need to wait one second between each press of the mode button. Then, when you see the trash icon, press the shutter button once and the number of pictures will start to blink. While the LCD is blinking, press the shutter button again and the number of pictures remaining will go back to ‘52’.Q. I downloaded my pictures to the computer, but the B350 LCD still shows the same number of pictures taken that I had before I downloaded them – why haven’t they been deleted?A. The B350 does not automatically delete your pictures off of the camera after you have downloaded them to your computer. To take new pictures, you must delete your old pictures by following the instruction on page 8.Q. How do I learn to use the other functions in Photo Express 4.0?A. You can insert the CD that is included with the B350 and select “Ulead Photo Express 4.0 User Manual” from the menu to read the manual for Photo Express 4.0. You can also visit Ulead’s website at .Q. The pictures I downloaded have some purple artifacts or seemto be distorted or have some black spots and lines on them.A. Try reconnecting the USB cable to the computer and to theB350. Make sure the USB cable to securely inserted into both your computer and the B350.Q. The pictures I took have a strong red tint when they are downloaded.A. The B350 is functioning normally. In very limited computer systems with Windows XP, pictures taken indoors under incandescent lighting may appear red. Pictures taken outdoors or under natural lighting are not affected. This phenomenon does not occur under Windows 98se, Me or 2000. Please visit our web site at for a special Windows XP driver. You do not need a different driver, unless you are experiencing a strong red tint.Q. My batteries are low, but I can’t get to my computer to download my pictures. I don’t want to loose my pictures.A. Turn off the B350 (The LCD should be blank). Then open battery compartment and replace your old batteries with new batteries. The B350 will keep your pictures for approximately 1 minute while you are changing the batteries.Q. None of the buttons seem to work. The LCD displays only “HI” and never shows the number of pictures remaining.A. A system error has occurred. Please take out the batteries for2 minutes and re-insert them. Unfortunately, all pictures taken with the B350 that have not been downloaded to your computer will be lost.Q. I inserted the CD, but no menu appears automatically.A. Go to “My Computer” and right click on your CD drive. Then select “AutoPlay” or “AutoRun”. The menu should now appear. If you do not have an option for “AutoPlay/AutoRun, select ‘open’. Then double click on the ‘Drivers’ folder. Inside the drivers folder, is the driver for the MAGPIX B350. Double click on that file and the driver will install automatically.Q. I changed the resolution from Hi to Lo. How do I change the resolution back from Lo to Hi.A. Follow the same steps you used to change the resolution from Hi to Lo and your camera will be back in Hi resolution mode. Q. Every time I try to take a picture, I hear a double beep and the counter does not go down. Why is my camera not taking a picture?A. If you hear a quick ‘double beep’ and the counter does not go down, it means that there was not enough light for the camera to take a picture. Please try to take a picture when there is more light available. The MAGPIX B350 works best outdoors during daylight.Q. When I try to install Ulead PhotoExpress, it keeps asking me for a serial number – Where do I find it?A. You do not need a serial number to install Ulead PhotoExpress. Just make sure that you fill in the ‘Name‘ box and the ‘Company’ box. Filling in ‘home’ or ‘none’ are good responses if the B350 is not being used for a business. After filling in these two lines you should be able to continue the installation.Q. I’ve taken pictures and installed the driver, but when I try to download my pictures, I get a ‘There is a Connection Error’message or a ‘No Photos in Camera’ message.A. Please make sure that you have pictures in the camera. The LCD should show a number less than ‘52’. If the LCD shows ‘52’, please take a picture and try to download the pictures again before proceeding with these instructions. Also, please make sure the USB cable is tightly connected. You may also get this message if the B350’s driver did not install properly. Please follow the directions below according to the operating system you have on your computer.***(If you are using Windows 98 it is important to distinguish between Windows 98 and Windows 98 Second Edition. Here’s how to tell: Go to your CONTROL PANEL and click on SYSTEM. In the window that opens, you will see either just ‘Windows 98’ or you will see ‘Windows 98 Second Edition’.) ***Windows 98 Second Edition / ME / 2000 / XP1. It is very important that you first restart your computer.2. Connect the B350 to the computer.3. - If you have Windows 98SE or ME, go to the ‘Control Panel’and then double click on ‘System’. Then click on the ‘Device Manager’ tab.- If you have Windows 2000, right-click on the ‘My Computer’ icon located on your desktop, and then select ‘Properties’ from the menu that will appear. Click on the ‘Hardware’ tab andthen click on the 'Device Manager' button.- If you have Windows XP, go to Start à Right-click on ‘My Computer’ and select ‘Properties’ from the dropdown menu.Then click on the 'Hardware' tab and click on the 'DeviceManager' button.4. If you see a yellow ‘?’ next to “Other Devices" and "?! USBDIGITAL STILL CAMERA". --> Right click on "?! USB DIGITAL STILL CAMERA" and select ‘remove’ or ‘uninstall’ from the menu. Confirm the removal. (Otherwise go to step 5).5. If the ‘Imaging Devices’ line is present, double click on it. If yousee ‘Dual mode DSC (2770)’ or ‘SQ (9120)’ right click on it and select ‘remove’ or ‘uninstall’. Confirm the removal orun-installation. (Otherwise go to step 6).6. Close the 'System Properties' Window. Do not restart thecomputer7. Go to your Control Panel and double click on Add/RemovePrograms8. Highlight 'MAGPIX B350' and click Add/Remove (orChange/Remove). Confirm the removal of the program. Do not restart the computer9. Highlight 'Ulead Photoexpress 4.0 My Custom Edition' andclick Add/Remove (or Change/Remove). Confirm the removal of the program. (If you cannot find this program, go to step 10).10. Unplug the camera from the computer. Restart the computer11. Insert the MAGPIX B350 installation CD (DO NOT CONNECTTHE B350 TO THE COMPUTER). Click once on ‘InstallMAGPIX B350 Driver’12. Restart the computer13. Connect the camera into the computer. Wait 45 seconds.Windows should find new hardware. (If Windows does not find new hardware after 45 seconds, try switching the USB cable to another USB port.)14. When Windows has finished installing the new hardware(Dual mode DSC (2770)), please wait 2 minutes and thenrestart the computer.15. Disconnect the B350 from your computer.16. Insert the MAGPIX B350 installation CD and click on ‘InstallUlead Photoexpress 4.0’ and complete the installation. Restart your computer.17. Download your photos as described in the B350 user manualusing either the MAGPIX Quick Download Utility or Ulead PhotoExpress.***Windows 981. Disconnect the B350 from USB port of PC. Restart yourcomputer.2. If you installed Ulead PhotoExpress, go to Start--> Settings -->Control Panel -->Double click on Add/Remove Programs (If you did not install PhotoExpress, go to step 4).3. Highlight Ulead Photoexpress4.O My Custom Edition on thelist and click Add/Remove - and confirm complete removal of Ulead Photoexpress.4. Insert the installation CD in to the CD-ROM drive. Click “Exit”when the installation menu appears. Go to “My Computer” and right-click on your CD drive and click “Open”. Double click on the folder ‘OTHER’ and double-click on the folder‘DIRECTX8.0’. Then double click on ‘SETUP.EXE’ andMicrosoft’s DirectX will install automatically.If you prefer, you may also download and install DirectX 8.0 from Microsoft on the Internet at:/downloads/release.asp?ReleaseID=277415. Restart your computer.6. Insert the B350 installation CD. When the menu appears, go tothe next step.7. Click "Install MAGPiX B350 Driver ", and complete theinstallation. Click "Finish". (If a "Welcome" window displays, select "Repair" and click "Next".)8. When "InstallShield Wizard Complete" displays, select "Yes"and click "Finish" to restart system.9. Connect the B350 with USB port of your PC. Wait 45 seconds.Windows should build a new driver database.10. Go to Start--> Programs -->Magpix B350 --> Magpix B350.When the window opens, click on the red camera icon to download your photos. To save the pictures you've just downloaded, click on the disk icon. To enlarge the pictures,right-click on the picture you wish to enlarge.11. If you are satisfied with this download, you can also downloadthe pictures using Ulead PhotoExpress. Please follow the installation procedures for PhotoExpress on page 15.Q. Where can I find more help or information on my MAGPIXB350?A. 。
magics rp指南
Magics RP教程该教程介绍了一些Magics RP的工具。
使用该教程将使用户更快的了解和使用本软件。
一、视图和测量visualization and measuring 目测教程所使用的文件是在目录../Magics RP .../demo_files 下的文件―Good.stl‖ 。
打开文件可以用快捷键‗Ctrl + L‘或按按钮文件。
这时也可以到网上浏览,查找STL 格式的图1-1 一个文件可以有不同的显示方式(在View 工具栏里)。
图1-2 试用这些模式。
用'F4'键或图标可以控制视角。
在零件上托动鼠标可以看到零件是如何旋转的。
,指针的移动将转变为零件绕屏幕当指针接近窗口中心时,指针将会变成四角箭头形状的轴转动。
当指针靠近窗口边界时,指针将变成圆弧箭头形状用户同样可以按住鼠标右键来旋转零件。
,零件就可以绕垂直于屏幕的轴转动。
要快速定位可以用默认的视图。
该图标可以在view 工具栏中的Rotate 标签下找到。
本软件预设了七种默认视图:主视、后视、左视、右视、俯视、仰视和ISO 视图。
这些视图可通过点击某一个箭头来切换(当指针移过箭头时箭头会高亮显示)当立方体的所有边界都高亮。
显示时就选中了ISO 视图(在紫色区域内点击,或在边界上点击)。
使用图标,用户可以在窗口平面内托动零件移动(按住鼠标左键不放)。
该功能也可以通过以下方法实现:菜单Main Menu/View/Pan 或用快捷键'Alt + M'。
或同时按着鼠标右键+ SHIFT。
可以用SECTIONS 指令来检查零件内部。
Sections 指令在view 工具栏下的Sections 标签内。
图1-3 用户可以在垂直于X、Y 和Z 轴方向上取得截面。
用户可以隐藏前面部分并让零件挖空显示。
文件的―远程控制‖ 二、修改STL 文件的―远程控制‖Fixing STL Files "remote control" 修改远程控制本教程主要介绍一些STL 修改工具。
Bio-Plex-液相悬浮式蛋白质芯片系统简明操作
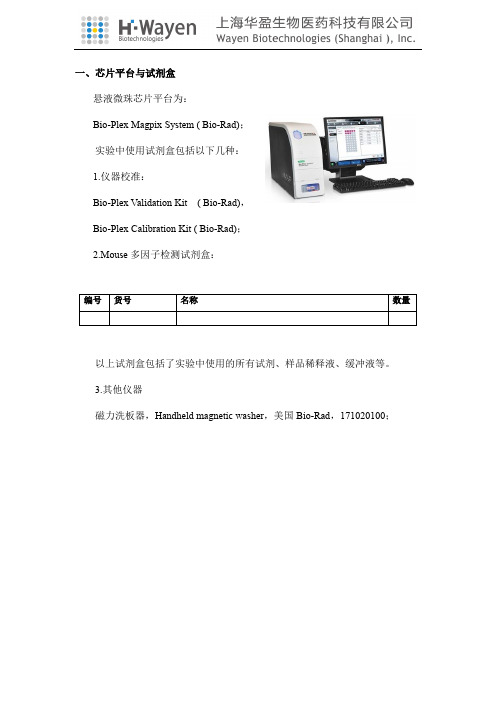
一、芯片平台与试剂盒悬液微珠芯片平台为:Bio-Plex Magpix System ( Bio-Rad);实验中使用试剂盒包括以下几种:1.仪器校准:Bio-Plex Validation Kit ( Bio-Rad),Bio-Plex Calibration Kit ( Bio-Rad);2.Mouse多因子检测试剂盒:以上试剂盒包括了实验中使用的所有试剂、样品稀释液、缓冲液等。
3.其他仪器磁力洗板器,Handheld magnetic washer,美国Bio-Rad,171020100;二、样品与标准品准备按照试剂盒操作手册推荐,样本处理方法如下:标准品稀释:向标准品瓶中,加入500ul Standard diluents,涡旋5秒,冰浴30分钟。
然后按照以下稀释。
样品准备:(冰上操作)样本解冻后,按照客户要求进行稀释。
三、检测操作1、取微珠在振荡器上1400rpm振荡30s,按说明书上提示比例,用Assay Buffer稀释微珠。
2、按照说明书要求,稀释液重悬标准品、轻轻混匀,放置于冰上30min以保证其充分溶解。
3、用标准品稀释液对标准品进行稀释,本次实验共计稀释8个梯度,S1-S8。
4、将稀释完的微珠用vortex1400rpm震荡30s,每孔50ul的量加入96孔板中。
5、使用磁力洗板器洗涤两次。
6、加入稀释好的标准品和样品,每孔50ul,贴上封口膜,放置在平板摇床上850rpm振荡避光室温孵育30-60min。
7、使用磁力洗板器洗涤三次。
8、采用Detection Antibody Dilute Buffer按说明书要求稀释度稀释DetectionAntibody。
9、加入稀释好的用biotin标记的抗体,每孔25ul,贴上封口膜,放置在平板摇床上850rpm振荡避光室温孵育30min。
10、使用磁力洗板器洗涤三次。
11、用Assay Buffer按说明书要求稀释Streptavidin-PE。
MagixMaX 操作规程
MagicMaX 操作规程一、MagicMaXMagicMaX 可用于评价X光机(包括普通X光机、透射机、乳腺机和牙科机等)及CT机的射线质量。
一次曝光可便可方便得到电压、剂量、剂量率、曝光时间、总滤过和半。
主机与探测器的连接采用标准的USB接口,通过专业MagicMaX软件,。
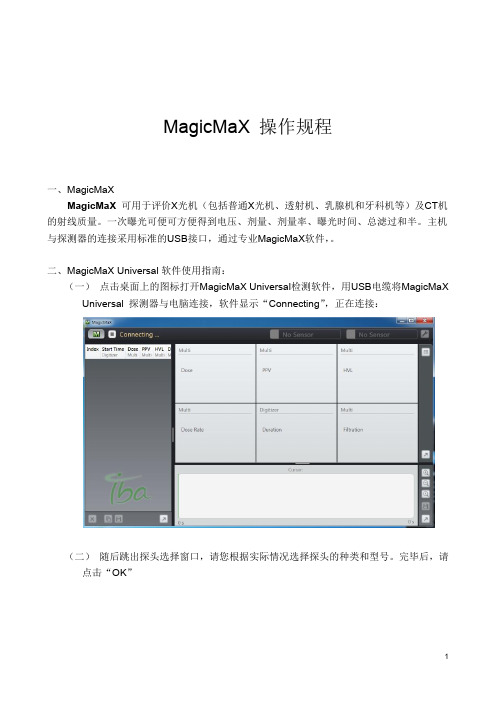
二、MagicMaX Universal软件使用指南:(一)点击桌面上的图标打开MagicMaX Universal检测软件,用USB电缆将MagicMaX Universal 探测器与电脑连接,软件显示“Connecting”,正在连接:(二)随后跳出探头选择窗口,请您根据实际情况选择探头的种类和型号。
完毕后,请点击“OK”以下为九孔插口上接入的探头信息以下为Lemo插口上接入的探头信息探头信息,请注意核对型号选择射线质量,通常使用“Auto Cal.”选择X射线管类型,对于乳腺机,请根据阳极/滤过类型选择选择此探头为触发探头。
选中后,软件将会以被选中的探头的信号作为开始/结束测量的依据。
如果只有一个探头,它会自动成为触发探头。
电流计不能作为触发探头。
(三)软件将自动对探头进行背景环境修正:(四)背景补偿完成后,进入测量主界面,设备状态显示为“Ready”:测量完成后,测量结果如下:具体说明如下:•按钮功能选择显示窗口类型删除一行测量结果复制一行测量结果保存测量数据窗口最大化波形放大波形缩小显示所有波形保存波形• 主菜单功能 点击显示主菜单(五) 输出测量结果到Excel点击,软件将自动弹出“Export to Excel ”的窗口建立一个新的Excel 表:选择“Create a new file ” 输出到一个已有的Excel 表:选择“Append to a file ” 然后点击“OK ”系统将自动将结果导入Excel您也可以根据自己的需要设计模板,请将您自己的模板保存到C盘- Users - [User's folder] – AppData- Roaming – Microsoft – Windows – Templates - MagicMaX 目录下。
写真机操作规程
写真机操作规程一、引言写真机是一种用于拍摄照片的设备,具有重要的应用价值和广泛的使用范围。
为了确保写真机的正常运行和照片质量的稳定性,制定本操作规程。
二、适用范围本操作规程适用于所有使用写真机的人员,包括专业摄影师和普通用户。
三、写真机基本知识1. 写真机的组成部分:- 机身:包括相机的主体部分,用于安装镜头和控制拍摄功能。
- 镜头:用于调节景深和聚焦,影响照片的清晰度和效果。
- 快门:控制光线进入相机的时间,影响照片的曝光程度。
- 感光元件:用于接收光线并转换为电信号,记录照片的图像信息。
- 存储卡:用于存储照片的介质。
2. 写真机的基本操作:- 打开/关闭电源:按下电源开关,写真机将开启或关闭。
- 调整拍摄模式:根据需要选择自动模式或手动模式。
- 调整曝光:根据光线条件调整快门速度和光圈大小。
- 调整对焦:通过调整镜头对焦环,确保照片清晰。
- 按下快门:按下快门按钮,完成一次拍摄。
四、写真机操作步骤1. 准备工作:- 确保电池电量充足或连接电源适配器。
- 插入存储卡,并确保存储空间足够。
- 检查镜头是否清洁,如有污垢需及时清理。
2. 打开写真机:- 按下电源开关,等待相机启动。
- 确认屏幕上显示的信息,如日期、时间等。
3. 调整拍摄模式:- 根据拍摄需求选择自动模式或手动模式。
- 自动模式适用于普通拍摄,手动模式适用于专业摄影。
4. 调整曝光:- 自动模式下,相机会自动根据光线条件调整曝光。
- 手动模式下,根据光线条件选择合适的快门速度和光圈大小。
5. 调整对焦:- 使用取景器或屏幕上的对焦点,将焦点对准拍摄对象。
- 通过调整镜头对焦环,确保照片清晰。
6. 拍摄照片:- 确认构图和光线条件,按下快门按钮进行拍摄。
- 在连拍模式下,可以按住快门按钮连续拍摄多张照片。
7. 查看照片:- 拍摄完成后,可以通过屏幕或取景器查看照片。
- 确认照片质量和效果,如有需要可进行后期处理。
8. 关闭写真机:- 拍摄结束后,按下电源开关关闭相机。
Magic XPA 操作指南
目录1.基本介绍----快捷键的使用文档 (2)Magic XPA 通用快捷键 (2)1.1单一快捷键 (2)1.2组合快捷键针对程序行的快捷操作: (2)2.软件界面的介绍 (3)2.1 新工程的创建和运行 (3)2.2开发平台结构介绍 (4)2.2.1.Models (4)2.2.2.Data项目中的数据源即数据表管理 (5)2.2.3.Task 程序行(即程序开发管理) (7)2.3 Demo的部署和发布----部署发布文档 (9)2.4发布功后在android虚拟机上运行测试---android测试说明文档 (17)3.做一个例子-----增删改Demo (20)3.1按钮—事件的触发 (20)3.2控件的说明 (20)3.2.1 基本控件说明文档 (20)3.2.2 Combox说明文档 (25)3.3 逻辑的编写 (27)3.4数据的导出和打印 (27)3.5筛选功能的实现 (27)1.基本介绍----快捷键的使用文档Magic XPA 通用快捷键:MagicXPA 为提高编程效率提供了大量的快捷键功能主要用到的功能键如下:1.1单一快捷键F1 打开帮助文档F2 编辑节点F3 删除行(XPA 采取行编程模式)F4增加行;F5(Zoom)相当与双击F6 显示全部内容F7 执行程序行F8 检查设计行编码错误红色表示为常用快捷操作1.2组合快捷键针对程序行的快捷操作:Ctrl+J:跳转程序行;Ctrl+Shift+R:复制程序行Ctrl+Shift+M:移动程序行;Ctrl+Shift+O:覆盖其他程序行;Ctrl+Shift+E:导入导出程序,可以针对单个程序单个表以及models 等以XML的形式导出,也可以进行全部工程的导出2.软件界面的介绍2.1 新工程的创建和运行Magic Xpa启动与创建工程①新建一个工程:File→New Project,添加工程名,选择存储位置,确定。
②也可以打开任何一个现有的示例工程项目:③打开软件首先对其环境进行设置,选择菜单Options→Settings→Environment→System→8 Deployment mode,有两个选项Online和Background,当程序只是在本机调试可选择Online,当工程开发完毕,部署或运行整个工程使选择Background,如图所示:2.2开发平台结构介绍现在选择项目Rich Internet Demo,双击打开项目,主要来看Repositories这一项,对新开发人员来说先主要了解Models、Data和Programs这三项。
喷绘机简易操作流程
喷绘机简易操作流程
一、电脑转图
1.将做好的文件转为tif格式文件。
特别推荐:在Photoshop软件中检查字边缘及颜色问题。
2.打开“蒙泰”(DTMP)软件,新建文件,以文件实际出图尺寸来设定纸张大小。
载入图片,设定实际长宽,打印存为prn格式文件。
(需要在打印窗口中点击“自动调整纸张”。
)一般存在桌面即可.
二、机器操作
1.开机:电源开关从左至右挨个打开。
(最后一个为送纸轮的进退键,一般向下“进布")
2。
清洗喷头:取掉喷头上的保护膜、纸等,用吸嘴在喷头吸墨导引。
须顺着每个喷头方向,纵向吸墨。
下垫纸,可观察喷头出墨印迹情况。
3.放入喷绘布,注意打印面在上,布须在监控头部位,拉紧压下右边的压纸轮。
三、电脑喷绘操作
1。
打开Ultrah8controlcenter.从喷头架左边缘量至布左边缘的尺寸,加上欲留白尺寸,在“测量”—“设定左右尺寸中填入,确定。
打印一般从卡的铁片中间位置起喷,倒布,使之合适位置。
2。
打开刚才转的prn文件,开始喷绘,在电脑上可随时暂停观察喷绘效果及清洗喷头。
四、喷绘完成关机
1。
裁布.
2。
用稀释药水注在喷头表面及喷头平台(非线板)上(戴手套操作,以防手部腐蚀)。
3。
用保鲜膜喷头台下面向上包好,好纸垫顶紧,以防止喷头干凝。
4。
关机:电源开关从右至左挨个关闭。
五、保养事项:
1.每天需给喷头注射药水,保持喷头湿润抗凝。
- 1、下载文档前请自行甄别文档内容的完整性,平台不提供额外的编辑、内容补充、找答案等附加服务。
- 2、"仅部分预览"的文档,不可在线预览部分如存在完整性等问题,可反馈申请退款(可完整预览的文档不适用该条件!)。
- 3、如文档侵犯您的权益,请联系客服反馈,我们会尽快为您处理(人工客服工作时间:9:00-18:30)。
MagPix简易操作说明
日常维护
1.开机前检查鞘液和废液。
(*以下3-4步操作,也可以根据xPONENT软件自带的Revive after storage自动完成。
)
2.进入Maintenance界面,点击Cmds&Routines
3.选择合适的加液槽分别选中Alcohol Flush和Wash。
4.在对应的加液槽中分别加入70%乙醇和去离子水,点击Run,完成清洗操作2次。
5.如果需要,调整探针高度:
进入Maintenance界面,点击Probe Heater, 自定义实验板名,分别在实验板、加液槽和Strip条上选择三个孔做为校验孔,并分别在滤膜板和磁力板中加入一块垫片,然后点击Auto Adjust Height,最后点击Save Plate保存。
(*每次更换不同型号的实验孔板时,需要重新调整探针。
)
6.如果需要,对仪器进行校准。
(仪器的正常校准每月进行一次。
)
7.对实验孔板进行读数分析。
(*以下8-9步操作,也可以根据xPONENT软件自带的Shutdown Routine自动完成。
)8.实验结束后,加样槽中加入10%或者20%的自制漂白液清洁系统,Maintenance界面
下选择Cmds&Routines点击Sanitize。
9.在加样槽中加入去离子水,Maintenance界面下点击Wash,点击Run,清洗系统2
次。
10.退出软件,关闭系统。
注意事项
1.每次实验前进行一次Verification校验(如实验频繁,一周只需一次Verification 验
证即可)
2.每月定期进行一次Calibration校正。
3.每月进行一次全系统清洗,Maintenance界面下点击Cmds&Routines,选择
Sanitize和Wash,清洗系统3次。
4.如果在校验和校正中遇到任何问题,请随时与我们联系。
技术中心电话:400-889-1988。