CS276BText Information Retrieval, Mining, and Exploitation
浅探关节镜下盘状半月板损伤的治疗

Similar results for LLSF (regression).
Results
Why is selecting common terms a good strategy?
Dimension reduction: each dimension is a unique linear combination of all words (linear case)
Dimension reduction is good for generic topics (“politics”), bad for specific classes (“ruanda”). Why?
CS276B
Text Information Retrieval, Mining, and Exploitation
Lecture 5 23 January 2003
Recap
Today’s topics
Feature selection for text classification Measuring classification performance Nearest neighbor categorization
Term clustering Dimension reduction: PCA / SVD
Word Rep. vs. Dimension Reduction
Word representations: one dimension for each word (binary, count, or weight)
W78E58B中文资料

8? ? ? ?ቤተ መጻሕፍቲ ባይዱ?
目 录:
1. 概述.................................................................................................................................. 3 2. 特性.................................................................................................................................. 3 3. 管脚配置........................................................................................................................... 4 4. 管脚描述........................................................................................................................... 5 5. 方块图 .............................................................................................................................. 7 6. 功能描述........................................................................................................................... 8
MSI笔记本CPU微代码更新问题解答说明书

FAQ No. 01868CPU Microcode update issueAffected model: This issue only affects the notebook whose original BIOS version is listed below or older. If you want to update to the latest BIOS, please read the following instruction to flash the BIOS twice with the built-i n “UEFI BIOS Update” utility in the BIOS setup.Q:What should I do if my notebook can't boot in system after I update new BIOS? A:To fix this issue, you need to flash the BIOS twice with the built-in “UEFI BIOS Update” utility. Please check the BIOS update guide below and follow all of steps.The first BIOS update process will update the built-in “UEFI Bios Update” utility and the second BIOS update process will update all parts of the BIOS (including the new CPU microcode).If your BIOS is newer than listed or your notebook isn’t listed you only have to update the BIOS once (Please always check BIOS update instructions for your particular notebook model on MSI website).Things to prepare:✓USB Flash Drive✓Laptop/NB system✓NB default power supply✓Internet connectionA.Visit MSI official website and download BIOS for your NB.B.Extract the downloaded file to the root directory of your USB drive.C.Please shut down system directly by pressing [Shift] key and click [shut down]option.D.Power up your NB with AC adapter. Please make sure that NB is running withAC Power during entire update process.E.Power on NB and press [DEL] button when MSI logo is displayed.F.Please select [Advanced] -> [UEFI BIOS Update]. Then, press the [Enter] key tocontinue.G.Press [Enter] key again to start the process.H.Please select the USB flash which includes the downloaded BIOS ROM.I.Please select the folder which includes the downloaded BIOS ROM. If you putthe BIOS ROM under the root directory of your USB flash. Please jump to next step directly.J.Find the BIOS ROM and press [Enter] to continue.K.Select [Yes] to continue.L.System will start rebooting when you press the [OK] button.M.System will reboot to BIOS Utility. Please press [Enter] key to proceed with flash update.N.If BIOS update is complete, press [OK] to restart the system.O.In order to update the microcode of Intel processor completely, please repeat step E till step N to flash BIOS again.。
Inovonics EN1223D EchoStream Double-Button Panic A

© Inovonics, 2009 - EN1223D EchoStream ® Double-Button Panic AlarmInstallation and Operation Manual - 05583A, April 29, 20091 OverviewInovonics EN1223D panic alarm transmitters are our smallest, lightest, and most versatile pendants.Note: For UL installations, refer to the EN4216R Installation and Operation Manual .1.1 Inovonics Wireless Contact InformationIf you have any problems with this procedure, contact Inovonics Wireless technical services:•E-mail:*********************•Phone: (800) 782-2709; (303) 939-93361.2 Inovonics Wireless Contact InformationIf you have any problems with this procedure, contact Inovonics Wireless technical services:•E-mail:*********************•Phone: (800) 782-27091.3 Transmitter ComponentsFigure 1 Transmitter components 2 Installation and Startup2.1 Installation Notes•These products are designed to be maintained by professional security technicians.•Products are intended for indoor use.•Manually test all products weekly.2.2 Install/Replace the Batteries1.If present, remove the 3 three housing screws on the back of thetransmitter.2.Open the housing.3.Install the new batteries, ensuring the positive terminals (+) face theindicated side of the holder.2.3 Select the Frequency BandEchoStream products are able to use a range of radio frequencies, and must be configured for your geographic area. To configure the transmitter:1.Place a selection jumper on the appropriate frequency band selectionpins.•Place the jumper on the top two pins, marked NZ, to set the frequency range to 921-928 MHz for New Zealand.•Place the jumper on the bottom two pins, marked AU, to set the frequency range to 915-928 MHz for Australia.•Leave the jumper off the pins to set the frequency range to 902-928 MHz for North America.Note: Only devices set for use in North America are configured for UL installations.2.Press the Reset button to complete configuration.Caution: When pressing the Reset button, make sure you don’t also touch the frequency band selection pins. Touching the frequency band selection pins while pressing the Reset button can inadvertently set the transmitter to the wrong frequency band.2.4 Register the TransmitterThe transmitter must be registered with the system in order to be monitored and supervised. When supervised, the transmitter will send a check-in message to the serial receiver or network coordinator every three minutes.Each transmitter has a unique factory-programmed identification number. Refer to the receiver’s installation instructions for details on registering a transmitter.1.When prompted by the receiver to reset transmitter, press the Resetbutton.Caution: The transmitter should be tested after registration to ensure operation. To test the transmitter, activate each of the conditions and ensure an appropriate response.3 Operate the TransmitterTo activate single button transmitters, press the button for at least one second. To activate double button transmitters, press both buttons simultaneously. Alarm signals are transmitted multiple times and areindicated by the blinking transmission LED. When the buttons are released, the transmitter sends an alarm restoral signal.To test a transmitter, activate the alarm by pressing the button(s).4 SpecificationsDimensions: 5.6 x 4.8 x 1.8 cm (2.2 x 1.9 0.72”)Operating temperature: 0 to 60°C (32 to 140°F), 90% relative humidity, noncondensingTypical battery life: 3-5 yearsBattery type (BAT609): Renata CR2450, Panasonic CR2450Power requirement: 3 VDC, 60 mAUL listings: UL 1023, ULC/ORD-C1023-74Compatible receiver: EN4216RNote: Specifications and data are subject to change without notice.5 Warranty and DisclaimerNote: Changes or modifications to this unit not expressly approved by Inovonics Wireless Corporation may void the installer's authority to operate the equipment as well as the product warranty.Inovonics Wireless Corporation ("Inovonics") warrants its products("Product" or "Products") to conform to its own specifications and to be free of defects in materials and workmanship under normal use for a period of thirty-six (36) months from the date of manufacture. Within the warranty period, Inovonics will repair or replace, at its option, all or any part of the warranted Product. Inovonics will not be responsible for dismantling and/or reinstallation charges. To exercise the warranty, the User ("User", "Installer" or "Consumer") must work directly through their authorized distributor who will be given a Return Material Authorization ("RMA") number by Inovonics. Details of shipment will be arranged directly through the authorized distributor.This warranty is void in cases of improper installation, misuse, failure to follow installation and operating instructions, alteration, accident or tampering, and repair by anyone other than Inovonics.This warranty is exclusive and expressly in lieu of all other warranties, obligations or liabilities, whether written, oral, express, or implied. There is no warranty by Inovonics that Inovonics product will be merchantable or fit for any particular purpose, nor is there any other warranty, expressed or implied, except as such is expressly set forth herein. In no event shall Inovonics be liable for an incidental, consequential, indirect, special, or exemplary damages, including but not limited to loss of profit, revenue, or contract, loss of use, cost of down time, or interruption of business, nor any claim made by distributor's customers or any other person or entity.This warranty will not be modified or extended. Inovonics does notauthorize any person to act on its behalf to modify or extend this warranty. This warranty will apply only to Inovonics Poducts. Inovonics will not be liable for any direct, incidental, or consequential damage or loss whatsoever, caused by the malfunction of Product due to products,accessories, or attachments of other manufacturers, including batteries, used in conjunction with Inovonics Products.Note: *******************************************************Conformity.A Transmit LEDB Activation buttonsC Frequency band selection pinsD Reset buttonEBatteryCBA DE。
MiniGUI图形界面实验

学习移植 MiniGUI-STR(for uC/OS-II)软件到 SmartARM2200 开发板的基本方法,然后 编写一个简单的 MiniGUI 应用程序,使用 MessageBox 函数创建一个消息框,消息框中显示 字符串“Hello MiniGUI!” 。 4. 实验预习要求 (1) 仔细阅读<<ARM 嵌入式系统实验教程(二)>>第 1 章的内容,了解 SmartARM2200 开发板的硬件结构,注意 TFT 液晶接口电路和键盘电路。 (2) 阅读 MiniGUI 的文档 <<MiniGUI 用户手册 >> 和 <<MiniGUI 编程指南 >> ,了解 MiniGUI 的基本特点和应用配置选项,以及应用程序的编写。 5. 实验原理 (1) MiniGUI 简介 MiniGUI 项目的最初目标是为基于 Linux 的实时嵌入式操作系统提供一个轻量级的图形 用户界面支持系统,发展到今天,MiniGUI 已进入成熟和稳定阶段,并且所支持的操作系统 已不仅仅限于 Linux,它还可以在 uClinux、uC/OS-II、eCos、VxWorks 等系统上运行。 MiniGUI 为应用程序定义了一组轻量级的窗口和图形设备接口, 利用这些接口, 每个应 用程序可以建立多个主窗口,然后在这些主窗口中创建按钮、编辑框等控制。MiniGUI 还为 用户提供了丰富的图形功能,以显示各种格式的位图并在窗口中绘制复杂图形。 MiniGUI 和嵌入式操作系统的关系如图 1.1 所示,基于 MiniGUI 的应用程序一般通过 ANSI C 库以及 MiniGUI 自身提供的 API 来实现自己的功能。
4
广州周立功单片机发展有限公司 }
Tel: (020)38730976
unrecognized relocation 0x2b in section

unrecognized relocation 0x2b insection“unrecognized relocation 0x2b in section”这个错误信息通常出现在编译或链接程序时,尤其是在处理共享库或动态链接库时。
这个错误表明链接器(linker)在尝试解析符号引用时遇到了一个它不理解的重定位类型(relocation type)。
重定位是链接过程中的一个关键步骤,它负责将程序中的符号引用(比如函数调用或变量引用)转换为它们在运行时的实际地址。
这个过程通常涉及到各种复杂的转换和调整,以确保程序能够在不同的内存布局和操作系统环境中正确运行。
错误“unrecognized relocation 0x2b in section”中的“0x2b”是一个十六进制的重定位类型代码,它对应于某种特定的重定位类型,但链接器不识别这个类型。
这可能是由于以下几个原因造成的:工具链不兼容:你可能正在使用一个与你的目标平台或操作系统不兼容的工具链(比如编译器、链接器等)。
这种情况下,你需要检查你的工具链是否支持你正在尝试编译或链接的代码。
二进制文件不兼容:如果你正在尝试链接的库或对象是为不同的平台或操作系统编译的,可能会出现这种不兼容的情况。
确保你链接的所有二进制文件都是为相同的平台和操作系统编译的。
编译选项错误:有时候,编译或链接选项的设置不正确也可能导致这种错误。
检查你的编译和链接选项,确保它们是正确的,并且适用于你的目标平台。
代码或库的问题:在某些情况下,代码本身或你正在尝试链接的库可能存在问题,导致链接器无法正确处理重定位。
这可能需要你检查代码或库的来源,或者尝试使用不同的版本。
解决这个问题通常需要仔细检查你的编译和链接环境,确保所有的工具和文件都是兼容的,并且正确设置了所有必要的选项。
同时,查阅相关的文档和社区论坛也可能提供有用的信息和建议。
HP Color LaserJet Enterprise MFP M776用户指南说明书
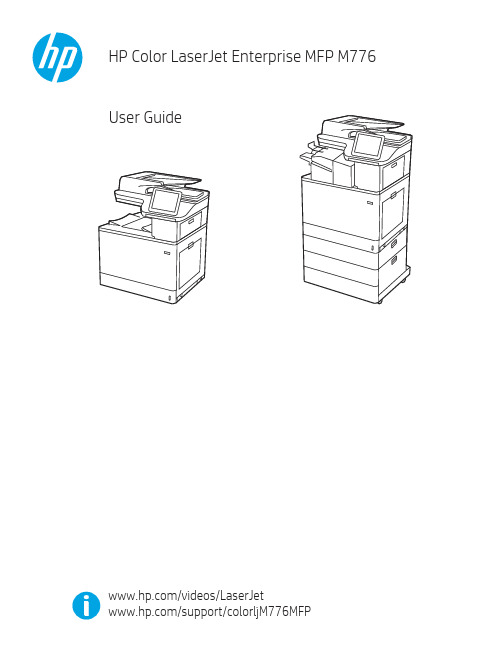
Legal informationCopyright and License© Copyright 2019 HP Development Company, L.P.Reproduction, adaptation, or translation without prior written permission is prohibited, except as allowedunder the copyright laws.The information contained herein is subject to change without notice.The only warranties for HP products and services are set forth in the express warranty statementsaccompanying such products and services. Nothing herein should be construed as constituting anadditional warranty. HP shall not be liable for technical or editorial errors or omissions contained herein.Edition 1, 10/2019Trademark CreditsAdobe®, Adobe Photoshop®, Acrobat®, and PostScript® are trademarks of Adobe Systems Incorporated.Apple and the Apple logo are trademarks of Apple Inc., registered in the U.S. and other countries.macOS is a trademark of Apple Inc., registered in the U.S. and other countries.AirPrint is a trademark of Apple Inc., registered in the U.S. and other countries.Google™ is a trademark of Google Inc.Microsoft®, Windows®, Windows® XP, and Windows Vista® are U.S. registered trademarks of MicrosoftCorporation.UNIX® is a registered trademark of The Open Group.iiiT able of contents1 Printer overview (1)Warning icons (1)Potential shock hazard (2)Printer views (2)Printer front view (2)Printer back view (4)Interface ports (4)Control-panel view (5)How to use the touchscreen control panel (7)Printer specifications (8)T echnical specifications (8)Supported operating systems (11)Mobile printing solutions (12)Printer dimensions (13)Power consumption, electrical specifications, and acoustic emissions (15)Operating-environment range (15)Printer hardware setup and software installation (16)2 Paper trays (17)Introduction (17)Load paper to Tray 1 (multipurpose tray) (17)Load Tray 1 (multipurpose tray) (18)Tray 1 paper orientation (19)Use alternative letterhead mode (24)Enable Alternative Letterhead Mode by using the printer control-panel menus (24)Load paper to Tray 2 (24)Load Tray 2 (24)Tray 2 paper orientation (26)Use alternative letterhead mode (29)Enable Alternative Letterhead Mode by using the printer control-panel menus (29)Load paper to the 550-sheet paper tray (30)Load paper to the 550-sheet paper tray (30)550-sheet paper tray paper orientation (32)Use alternative letterhead mode (35)Enable Alternative Letterhead Mode by using the printer control-panel menus (35)ivLoad paper to the 2 x 550-sheet paper trays (36)Load paper to the 2 x 550-sheet paper trays (36)2 x 550-sheet paper tray paper orientation (38)Use alternative letterhead mode (41)Enable Alternative Letterhead Mode by using the printer control-panel menus (41)Load paper to the 2,700-sheet high-capacity input paper trays (41)Load paper to the 2,700-sheet high-capacity input paper trays (41)2,700-sheet HCI paper tray paper orientation (43)Use alternative letterhead mode (45)Enable Alternative Letterhead Mode by using the printer control-panel menus (45)Load and print envelopes (46)Print envelopes (46)Envelope orientation (46)Load and print labels (47)Manually feed labels (47)Label orientation (48)3 Supplies, accessories, and parts (49)Order supplies, accessories, and parts (49)Ordering (49)Supplies and accessories (50)Maintenance/long-life consumables (51)Customer self-repair parts (51)Dynamic security (52)Configure the HP toner-cartridge-protection supply settings (53)Introduction (53)Enable or disable the Cartridge Policy feature (53)Use the printer control panel to enable the Cartridge Policy feature (54)Use the printer control panel to disable the Cartridge Policy feature (54)Use the HP Embedded Web Server (EWS) to enable the Cartridge Policy feature (54)Use the HP Embedded Web Server (EWS) to disable the Cartridge Policy feature (55)Troubleshoot Cartridge Policy control panel error messages (55)Enable or disable the Cartridge Protection feature (55)Use the printer control panel to enable the Cartridge Protection feature (56)Use the printer control panel to disable the Cartridge Protection feature (56)Use the HP Embedded Web Server (EWS) to enable the Cartridge Protection feature (56)Use the HP Embedded Web Server (EWS) to disable the Cartridge Protection feature (57)Troubleshoot Cartridge Protection control panel error messages (57)Replace the toner cartridges (58)T oner-cartridge information (58)Remove and replace the cartridges (59)Replace the imaging drums (62)Imaging drum information (62)Remove and replace the imaging drums (63)Replace the toner-collection unit (66)T oner-collection unit information (66)vRemove and replace the toner-collection unit (67)Replace the staple cartridge (M776zs model only) (70)Staple cartridge information (70)Remove and replace the staple cartridge (71)4 Print (73)Print tasks (Windows) (73)How to print (Windows) (73)Automatically print on both sides (Windows) (74)Manually print on both sides (Windows) (74)Print multiple pages per sheet (Windows) (75)Select the paper type (Windows) (75)Additional print tasks (76)Print tasks (macOS) (77)How to print (macOS) (77)Automatically print on both sides (macOS) (77)Manually print on both sides (macOS) (77)Print multiple pages per sheet (macOS) (78)Select the paper type (macOS) (78)Additional print tasks (79)Store print jobs on the printer to print later or print privately (79)Introduction (79)Create a stored job (Windows) (79)Create a stored job (macOS) (80)Print a stored job (81)Delete a stored job (81)Delete a job that is stored on the printer (81)Change the job storage limit (82)Information sent to printer for Job Accounting purposes (82)Mobile printing (82)Introduction (82)Wi-Fi, Wi-Fi Direct Print, NFC, and BLE printing (82)Enable wireless printing (83)Change the Wi-Fi Direct name (83)HP ePrint via email (83)AirPrint (84)Android embedded printing (85)Print from a USB flash drive (85)Enable the USB port for printing (85)Method one: Enable the USB port from the printer control panel (85)Method two: Enable the USB port from the HP Embedded Web Server (network-connectedprinters only) (85)Print USB documents (86)Print using high-speed USB 2.0 port (wired) (86)Method one: Enable the high-speed USB 2.0 port from the printer control panel menus (86)Method two: Enable the high-speed USB 2.0 port from the HP Embedded Web Server (network-connected printers only) (87)vi5 Copy (88)Make a copy (88)Copy on both sides (duplex) (90)Additional copy tasks (92)6 Scan (93)Set up Scan to Email (93)Introduction (93)Before you begin (93)Step one: Access the HP Embedded Web Server (EWS) (94)Step two: Configure the Network Identification settings (95)Step three: Configure the Send to Email feature (96)Method one: Basic configuration using the Email Setup Wizard (96)Method two: Advanced configuration using the Email Setup (100)Step four: Configure the Quick Sets (optional) (104)Step five: Set up Send to Email to use Office 365 Outlook (optional) (105)Introduction (105)Configure the outgoing email server (SMTP) to send an email from an Office 365 Outlookaccount (105)Set up Scan to Network Folder (108)Introduction (108)Before you begin (108)Step one: Access the HP Embedded Web Server (EWS) (108)Step two: Set up Scan to Network Folder (109)Method one: Use the Scan to Network Folder Wizard (109)Method two: Use Scan to Network Folder Setup (110)Step one: Begin the configuration (110)Step two: Configure the Scan to Network Folder settings (111)Step three: Complete the configuration (118)Set up Scan to SharePoint (118)Introduction (118)Before you begin (118)Step one: Access the HP Embedded Web Server (EWS) (118)Step two: Enable Scan to SharePoint and create a Scan to SharePoint Quick Set (119)Scan a file directly to a SharePoint site (121)Quick Set scan settings and options for Scan to SharePoint (122)Set up Scan to USB Drive (123)Introduction (124)Step one: Access the HP Embedded Web Server (EWS) (124)Step two: Enable Scan to USB Drive (124)Step three: Configure the Quick Sets (optional) (125)Default scan settings for Scan to USB Drive setup (126)Default file settings for Save to USB setup (126)Scan to email (127)Introduction (127)Scan to email (127)Scan to job storage (129)viiIntroduction (129)Scan to job storage on the printer (130)Print from job storage on the printer (132)Scan to network folder (132)Introduction (132)Scan to network folder (132)Scan to SharePoint (134)Introduction (134)Scan to SharePoint (134)Scan to USB drive (136)Introduction (136)Scan to USB drive (136)Use HP JetAdvantage business solutions (138)Additional scan tasks (138)7 Fax (140)Set up fax (140)Introduction (140)Set up fax by using the printer control panel (140)Change fax configurations (141)Fax dialing settings (141)General fax send settings (142)Fax receive settings (143)Send a fax (144)Additional fax tasks (146)8 Manage the printer (147)Advanced configuration with the HP Embedded Web Server (EWS) (147)Introduction (147)How to access the HP Embedded Web Server (EWS) (148)HP Embedded Web Server features (149)Information tab (149)General tab (149)Copy/Print tab (150)Scan/Digital Send tab (151)Fax tab (152)Supplies tab (153)Troubleshooting tab (153)Security tab (153)HP Web Services tab (154)Networking tab (154)Other Links list (156)Configure IP network settings (157)Printer sharing disclaimer (157)View or change network settings (157)Rename the printer on a network (157)viiiManually configure IPv4 TCP/IP parameters from the control panel (158)Manually configure IPv6 TCP/IP parameters from the control panel (158)Link speed and duplex settings (159)Printer security features (160)Introduction (160)Security statements (160)Assign an administrator password (160)Use the HP Embedded Web Server (EWS) to set the password (160)Provide user access credentials at the printer control panel (161)IP Security (161)Encryption support: HP High Performance Secure Hard Disks (161)Lock the formatter (161)Energy-conservation settings (161)Set the sleep timer and configure the printer to use 1 watt or less of power (161)Set the sleep schedule (162)Set the idle settings (162)HP Web Jetadmin (163)Software and firmware updates (163)9 Solve problems (164)Customer support (164)Control panel help system (165)Reset factory settings (165)Introduction (165)Method one: Reset factory settings from the printer control panel (165)Method two: Reset factory settings from the HP Embedded Web Server (network-connectedprinters only) (166)A “Cartridge is low” or “Cartridge is very low” message displays on the printer control panel (166)Change the “Very Low” settings (166)Change the “Very Low” settings at the control panel (166)For printers with fax capability (167)Order supplies (167)Printer does not pick up paper or misfeeds (167)Introduction (167)The printer does not pick up paper (167)The printer picks up multiple sheets of paper (171)The document feeder jams, skews, or picks up multiple sheets of paper (174)Clear paper jams (174)Introduction (174)Paper jam locations (174)Auto-navigation for clearing paper jams (175)Experiencing frequent or recurring paper jams? (175)Clear paper jams in the document feeder - 31.13.yz (176)Clear paper jams in Tray 1 (13.A1) (177)Clear paper jams in Tray 2 (13.A2) (182)Clear paper jams in the fuser (13.B9, 13.B2, 13.FF) (188)ixClear paper jams in the duplex area (13.D3) (194)Clear paper jams in the 550-sheet trays (13.A3, 13.A4) (199)Clear paper jams in the 2 x 550 paper trays (13.A4, 13.A5) (206)Clear paper jams in the 2,700-sheet high-capacity input paper trays (13.A3, 13.A4, 13.A5, 13.A7) (213)Resolving color print quality problems (220)Introduction (220)Troubleshoot print quality (221)Update the printer firmware (221)Print from a different software program (221)Check the paper-type setting for the print job (221)Check the paper type setting on the printer (221)Check the paper type setting (Windows) (221)Check the paper type setting (macOS) (222)Check toner-cartridge status (222)Step one: Print the Supplies Status Page (222)Step two: Check supplies status (222)Print a cleaning page (222)Visually inspect the toner cartridge or cartridges (223)Check paper and the printing environment (223)Step one: Use paper that meets HP specifications (223)Step two: Check the environment (223)Step three: Set the individual tray alignment (224)Try a different print driver (224)Troubleshoot color quality (225)Calibrate the printer to align the colors (225)Troubleshoot image defects (225)Improve copy image quality (233)Check the scanner glass for dirt and smudges (233)Calibrate the scanner (234)Check the paper settings (235)Check the paper selection options (235)Check the image-adjustment settings (235)Optimize copy quality for text or pictures (236)Edge-to-edge copying (236)Improve scan image quality (236)Check the scanner glass for dirt and smudges (237)Check the resolution settings (238)Check the color settings (238)Check the image-adjustment settings (239)Optimize scan quality for text or pictures (239)Check the output-quality settings (240)Improve fax image quality (240)Check the scanner glass for dirt and smudges (240)Check the send-fax resolution settings (242)Check the image-adjustment settings (242)Optimize fax quality for text or pictures (242)Check the error-correction setting (243)xSend to a different fax machine (243)Check the sender's fax machine (243)Solve wired network problems (244)Introduction (244)Poor physical connection (244)The computer is unable to communicate with the printer (244)The printer is using incorrect link and duplex settings for the network (245)New software programs might be causing compatibility problems (245)The computer or workstation might be set up incorrectly (245)The printer is disabled, or other network settings are incorrect (245)Solve wireless network problems (245)Introduction (245)Wireless connectivity checklist (245)The printer does not print after the wireless configuration completes (246)The printer does not print, and the computer has a third-party firewall installed (246)The wireless connection does not work after moving the wireless router or printer (247)Cannot connect more computers to the wireless printer (247)The wireless printer loses communication when connected to a VPN (247)The network does not appear in the wireless networks list (247)The wireless network is not functioning (247)Reduce interference on a wireless network (248)Solve fax problems (248)Checklist for solving fax problems (248)What type of phone line are you using? (249)Are you using a surge-protection device? (249)Are you using a phone company voice-messaging service or an answering machine? (249)Does your phone line have a call-waiting feature? (249)Check fax accessory status (249)General fax problems (250)The fax failed to send (250)No fax address book button displays (250)Not able to locate the Fax settings in HP Web Jetadmin (250)The header is appended to the top of the page when the overlay option is enabled (251)A mix of names and numbers is in the recipients box (251)A one-page fax prints as two pages (251)A document stops in the document feeder in the middle of faxing (251)The volume for sounds coming from the fax accessory is too high or too low (251)Index (252)xiPrinter overview1Review the location of features on the printer, the physical and technical specifications of the printer,and where to locate setup information.For video assistance, see /videos/LaserJet.The following information is correct at the time of publication. For current information, see /support/colorljM776MFP.For more information:HP's all-inclusive help for the printer includes the following information:●Install and configure●Learn and use●Solve problems●Download software and firmware updates●Join support forums●Find warranty and regulatory informationWarning iconsUse caution if you see a warning icon on your HP printer, as indicated in the icon definitions.●Caution: Electric shock●Caution: Hot surface●Caution: Keep body parts away from moving partsPrinter overview1●Caution: Sharp edge in close proximity●WarningPotential shock hazardReview this important safety information.●Read and understand these safety statements to avoid an electrical shock hazard.●Always follow basic safety precautions when using this product to reduce risk of injury from fire orelectric shock.●Read and understand all instructions in the user guide.●Observe all warnings and instructions marked on the product.●Use only a grounded electrical outlet when connecting the product to a power source. If you do notknow whether the outlet is grounded, check with a qualified electrician.●Do not touch the contacts on any of the sockets on the product. Replace damaged cordsimmediately.●Unplug this product from wall outlets before cleaning.●Do not install or use this product near water or when you are wet.●Install the product securely on a stable surface.●Install the product in a protected location where no one can step on or trip over the power cord.Printer viewsIdentify certain parts of the printer and the control panel.Printer front viewLocate features on the front of the printer.2Chapter 1 Printer overviewPrinter front view3Printer back viewLocate features on the back of the printer.Interface portsLocate the interface ports on the printer formatter. 4Chapter 1 Printer overviewControl-panel viewThe control panel provides access to the printer features and indicates the current status of the printer.NOTE:Tilt the control panel for easier viewing.The Home screen provides access to the printer features and indicates the current status of the printer.screens.NOTE:The features that appear on the Home screen can vary, depending on the printerconfiguration.Control-panel view5Figure 1-1Control-panel view?i 12:42 PM6Chapter 1 Printer overviewHow to use the touchscreen control panelPerform the following actions to use the printer touchscreen control panel.T ouchT ouch an item on the screen to select that item or open that menu. Also, when scrolling T ouch the Settings icon to open the Settings app.How to use the touchscreen control panel 7SwipeT ouch the screen and then move your finger horizontally to scroll the screen sideways.Swipe until the Settings app displays.Printer specificationsDetermine the specifications for your printer model.IMPORTANT:The following specifications are correct at the time of publication, but they are subject to change. For current information, see /support/colorljM776MFP .T echnical specificationsReview the printer technical specifications.Product numbers for each model ●M776dn - #T3U55A ●Flow M776z - #3WT91A ●Flow M776zs - #T3U56APaper handling specificationsPaper handling features Tray 1 (100-sheet capacity)Included Included Included Tray 2 (550-sheet capacity)IncludedIncludedIncluded8Chapter 1 Printer overview550-sheet paper trayOptional Included Not included NOTE:The M776dn models accept one optional550-sheet tray.Optional Included Included2 x 550-sheet paper tray and standNOTE:The M776dn models accept one optional550-sheet tray that may be installed on top of thestand.Optional Not included Not included2,700-sheet high-capacity input (HCI) paper trayand standNOTE:The M776dn models accept one optional550-sheet tray that may be installed on top of theoptional printer stand.Printer standOptional Not included Not included NOTE:The M776dn models accept one optional550-sheet tray that may be installed on top of theoptional printer stand.Inner finisher accessory Not included Not included Included Automatic duplex printing Included IncludedIncludedIncluded Included Included10/100/1000 Ethernet LAN connection with IPv4and IPv6Hi-Speed USB 2.0Included Included IncludedIncluded Included IncludedEasy-access USB port for printing from a USBflash drive or upgrading the firmwareIncluded Included Included Hardware Integration Pocket for connectingaccessory and third-party devicesHP Internal USB Ports Optional Optional OptionalOptional Optional OptionalHP Jetdirect 2900nw Print Server accessory forWi-Fi connectivity and an additional Ethernet portOptional IncludedIncludedHP Jetdirect 3100w accessory for Wi-Fi, BLE, NFC,and proximity badge readingPrints 45 pages per minute (ppm) on Letter-sizepaper and 46 ppm on A4-size paperEasy-access USB printing for printing from a USBIncluded Included Includedflash driveT echnical specifications9Included Included Included Store jobs in the printer memory to print later orprint privatelyScans 100 pages per minute (ppm) on A4 andIncluded Included Included letter-size paper one-sidedIncluded Included Included 200-page document feeder with dual-headscanning for single-pass duplex copying andscanningNot included Included Included HP EveryPage T echnologies including ultrasonicmulti-feed detectionNot included Included Included Embedded optical character recognition (OCR)provides the ability to convert printed pages intotext that can be edited or searched using acomputerIncluded Included Included SMART Label feature provides paper-edgedetection for automatic page croppingIncluded Included Included Automatic page orientation for pages that haveat least 100 characters of textIncluded Automatic tone adjustment sets contrast,Included Includedbrightness, and background removal for eachpageIncluded Included Includedfolders on a networkIncludedSend documents to SharePoint®Included IncludedIncluded Included Included NOTE:Memory reported on the configurationpage will change from 2.5 GB to 3 GB with theoptional 1 GB SODIMM installed.Mass storage: 500 GB hard disk drive Included Included IncludedSecurity: HP Trusted Platform Module (TPM)Included Included IncludedT ouchscreen control panel Included Included IncludedRetractable keyboard Not included Included Included 10Chapter 1 Printer overviewFax Optional Included IncludedSupported operating systemsUse the following information to ensure printer compatibility with your computer operating system.Linux: For information and print drivers for Linux, go to /go/linuxprinting.UNIX: For information and print drivers for UNIX®, go to /go/unixmodelscripts.The following information applies to the printer-specific Windows HP PCL 6 print drivers, HP print driversfor macOS, and to the software installer.Windows: Download HP Easy Start from /LaserJet to install the HP print driver. Or, go tothe printer-support website for this printer: /support/colorljM776MFP to download the printdriver or the software installer to install the HP print driver.macOS: Mac computers are supported with this printer. Download HP Easy Start either from /LaserJet or from the Printer Support page, and then use HP Easy Start to install the HP print driver.1.Go to /LaserJet.2.Follow the steps provided to download the printer software.Windows 7, 32-bit and 64-bit The “HP PCL 6” printer-specific print driver is installed for this operating system aspart of the software installation.Windows 8.1, 32-bit and 64-bit The “HP PCL-6” V4 printer-specific print driver is installed for this operating systemas part of the software installation.Windows 10, 32-bit and 64-bit The “HP PCL-6” V4 printer-specific print driver is installed for this operating systemas part of the software installation.Windows Server 2008 R2, SP 1, 64-bit The PCL 6 printer-specific print driver is available for download from the printer-support website. Download the driver, and then use the Microsoft Add Printer tool toinstall it.Windows Server 2012, 64-bit The PCL 6 printer-specific print driver is available for download from the printer-support website. Download the driver, and then use the Microsoft Add Printer tool toinstall it.Windows Server 2012 R2, 64-bit The PCL 6 printer-specific print driver is available for download from the printer-support website. Download the driver, and then use the Microsoft Add Printer tool toinstall it.Windows Server 2016, 64-bit The PCL 6 printer-specific print driver is available for download from the printer-support website. Download the driver, and then use the Microsoft Add Printer tool toinstall it.Windows Server 2019, 64-bit The PCL 6 printer-specific print driver is available for download from the printer-support website. Download the driver, and then use the Microsoft Add Printer tool toinstall it.Supported operating systems11macOS 10.13 High Sierra, macOS 10.14 MojaveDownload HP Easy Start from /LaserJet , and then use it to install the print driver.NOTE:Supported operating systems can change.NOTE:For a current list of supported operating systems and HP’s all-inclusive help for the printer, go to /support/colorljM776MFP .NOTE:For details on client and server operating systems and for HP UPD driver support for this printer, go to /go/upd . Under Additional information , click Specifications .●Internet connection●Dedicated USB 1.1 or 2.0 connection or a network connection● 2 GB of available hard-disk space ●1 GB RAM (32-bit) or2 GB RAM (64-bit)●Internet connection●Dedicated USB 1.1 or 2.0 connection or a network connection●1.5 GB of available hard-disk spaceNOTE:The Windows software installer installs the HP Smart Device Agent Base service. The file size is less than 100 kb. Its only function is to check for printers connected via USB hourly. No data is collected. If a USB printer is found, it then tries to locate a JetAdvantage Management Connector (JAMc) instance on the network. If a JAMc is found, the HP Smart Device Agent Base is securelyupgraded to a full Smart Device Agent from JAMc, which will then allow printed pages to be accounted for in a Managed Print Services (MPS) account. The driver-only web packs downloaded from for the printer and installed through the Add Printer wizard do not install this service.T o uninstall the service, open the Control Panel , select Programs or Programs and Features , and then select Add/Remove Programs or Uninstall a Programto remove the service. The file name isHPSmartDeviceAgentBase.Mobile printing solutionsHP offers multiple mobile printing solutions to enable easy printing to an HP printer from a laptop, tablet, smartphone, or other mobile device.T o see the full list and to determine the best choice, go to /go/MobilePrinting .NOTE:Update the printer firmware to ensure all mobile printing capabilities are supported.●Wi-Fi Direct (wireless models only, with HP Jetdirect 3100w BLE/NFC/Wireless accessory installed)●HP ePrint via email (Requires HP Web Services to be enabled and the printer to be registered with HP Connected)●HP Smart app ●Google Cloud Print12Chapter 1 Printer overview。
霍尼韦尔Vista-128BPT报警主机编程说明常用版-工程服务部编辑

Honeywell霍尼韦尔VISTA系列报警主机编程说明深圳市麦驰物联股份有限公司整理编辑-工程服务部目录一、设备认识 (3)Vista系列报警主机(以Vista 128BPT为例) (3)Vista系列报警主机控制键盘(6160) (7)4193SN/SNP单地址码两回路模块(已停产) (7)4293SN单防区扩充模块 (8)4101SN V-Plex单防区总线继电器模块 (9)4204ECP总线继电器模块 (9)4208SN V-Plex总线8防区扩充模块 (10)4297总线延伸器 (10)4232AP 32路继电器模组 (12)VPlex-VSI总线监测/隔离模块 (13)IP-2000 2.0网络接口模块 (14)二、主机编程 (17)防区编程: (17)删除防区: (21)子系统编程: (23)1.子系统数量划分: (23)2.子系统跳转功能设置: (23)3.防区子系统划分及布防延时更改 (24)继电器输出设备编程: (25)1.4101SN单防区继电器模块编程 (25)2.防区列表编程 (29)3.查看防区列表 (30)4.4232AP 32路继电器模块编程设置(VISTA 128BPT) (30)4100SN与IP2000模块编程: (31)三、键盘日常使用操作 (33)1.布撤防操作 (33)2.子系统跳转 (33)四、主机常见问题解析 (34)一、设备认识Vista系列报警主机(以Vista 128BPT为例)(图1)由原安定宝、C&K打底建立的Honeywell安防是全球最大的报警器材制造商,其制造的VISTA系列报警主机是业界最早、认可度最高的大型总)1(图线制报警主机,主要用来接收处理前端探测器发送回来的报警信号,是先进的多功能控制主机。
功能框图常规接线方式Vista - 128BPT总线接线方式Vista -128BPT.无线接线方式Vista - 128BPT总线连接图Vista -128BPT.表格(一):总线负载电流、线径与总线驱动距离的关系Vista系列报警主机控制键盘(6160)(图2)6160键盘用来给报警主机编程和防区布撤防相关操作)2(图4193SN/SNP单地址码两回路模块(已停产)4193SN用于总线扩充,可以扩展成2个回路:白色线与黄色线组成一个10K电阻监测的回路或者黄色线与黑色线组成常闭回路;这两个回路任选其一,都是第一个防区;绿、黑线组成常闭形式的第二个防区,在编程时要注意防区回路选择。
- 1、下载文档前请自行甄别文档内容的完整性,平台不提供额外的编辑、内容补充、找答案等附加服务。
- 2、"仅部分预览"的文档,不可在线预览部分如存在完整性等问题,可反馈申请退款(可完整预览的文档不适用该条件!)。
- 3、如文档侵犯您的权益,请联系客服反馈,我们会尽快为您处理(人工客服工作时间:9:00-18:30)。
see paper for detailed statement
What’s high probability?
Over the samples not the matrix entries
What’s error – how do you measure it?
Ûij = Uij , with probability 1/s, Ûij = 0 with probability 1-1/s.
The sampling parameter s has some technical conditions, but think of it as a constant like 100. Interpretation: Û is the sample of user utilities that we’ve managed to get our hands on
should two items become “closer” simply because one user rates them both similarly?
Vector vs. network formulations
Some advantages – e.g., proximity between users with no common ratings – can be engineered in a vector space
Norms of matrices
Frobenius norm of a matrix M:
|M|F2 = sum of the square of the entries of M
Let Mk be the rank k approximation computed by the SVD Then for any other rank k matrix X, we know
Use SVD’s, vector space clustering
Network formulations are good for intuition
Questionable for implementation Good starting point then implement with linear algebra – as we did in link analysis
Items
Type 1
Users
Type 2
… Atypical users
Type k
Matrix reconstruction
Given some utilities from the matrix Reconstruct missing entries
Suffices to predict biggest missing entries for each user Suffices to predict (close to) the biggest For most users
Clickstreams - do sequences matter? HMM’s to infer user type from browse sequence
e.g., how likely is the user to make a purchase? Meager improvement in using sequence relative to looking only at last page
Not the atypical ones
Intuitive picture
Items
Samples
Type 1
Users
Type 2
… Atypical uction:
Achlioptas/McSherry
Let Û be obtained from U by the following sampling: for each i,j
Predict which (unseen) utilities are highest for each user i
User types
If users are arbitrary, all bets are off
Assume matrix U is of low rank a constant k independent of m,n
|M- Mk|F ≤ |M-X|F
Thus, the SVD gives the best rank k approximation for each k
Norms of matrices
The L2 norm is defined as
|M|2 = max |Mx|, taken over all unit vectors x
I.e., users belong to k well-separated types
(almost) Most users’ utility vectors are close to one of k well-separated vectors
Intuitive picture (exaggerated)
Privacy
What info does a recommendation leak?
E.g., you’re looking for illicit content and it shows me as an expert
What about compositions of recommendations? “These films are popular among your colleagues” “People who bought this book in your dept also bought … ”
Introduced utility formulation
Today’s topics
“Clean-up” details from last time
Implementation Extensions Privacy Network formulations
Recap utility formulation Matrix reconstruction for low-rank matrices Compensation for recommendation
Similarly for items, etc.
Recommendation from networks
Look for docs near a user in the graph
“horting”
What good does this do us? (In fact, we’ve already invoked such ideas in the previous lecture, connecting it to Hubs/Auths)
Implementation details
Don’t really want to maintain this gigantic (and sparse) vector space Dimension reduction Fast near neighbors Incremental versions
Measuring recommendations: Recall utility formulation
m × n matrix U of utilities for each of m users for each of n items: Uij
not all utilities known in advance (which ones do we know?)
Then for any other rank k matrix X, we know
|M- Mk|2 ≤ |M-X|2
Thus, the SVD also gives the best rank k approximation by the L2 norm What is it doing in the process?
Network formulations
Advantages
Can use graph-theoretic ideas
E.g., similarity of two users based on proximity in graph Even if they’ve rated no items in common Good for intuition
From past transactions (that’s a lot of samples)
How do we reconstruct U from Û?
First the “succinct” way
then the (equivalent) intuition
Find the best rank k approximation to sÛ
CS276B
Text Information Retrieval, Mining, and Exploitation
Lecture 11 Feb 20, 2003
From the last lecture
Recommendation systems What they are and what they do A couple of algorithms Going beyond simple behavior: context How do you measure them? Begin: how do you design them “optimally”?
Disadvantages
With many rating transactions, edges build up Graph becomes unwieldy representation E.g., triangle inequality doesn’t hold