SUBSET-026-4_Modes and Transitions v330
柔性检查作用域套件-USB 产品说明书
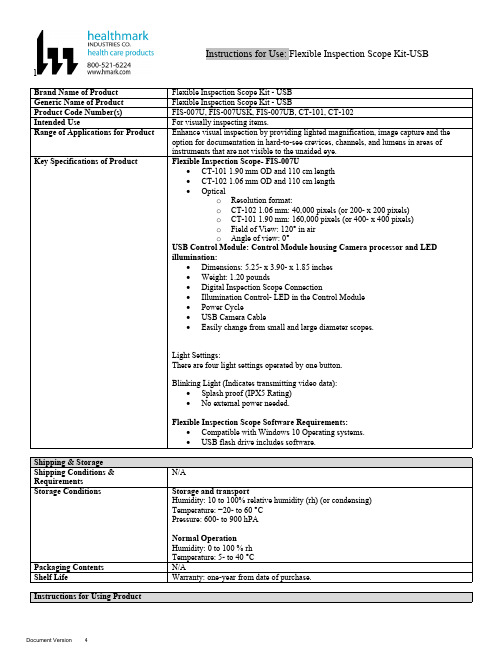
lInstructions for Use: Flexible Inspection Scope Kit-USB Brand Name of ProductFlexible Inspection Scope Kit - USB Generic Name of ProductFlexible Inspection Scope Kit - USB Product Code Number(s)FIS-007U, FIS-007USK, FIS-007UB, CT-101, CT-102Intended UseFor visually inspecting items.Range of Applications for ProductEnhance visual inspection by providing lighted magnification, image capture and the option for documentation in hard-to-see crevices, channels, and lumens in areas of instruments that are not visible to the unaided eye.Key Specifications of Product Flexible Inspection Scope- FIS-007U∙CT-101 1.90 mm OD and 110 cm length∙CT-102 1.06 mm OD and 110 cm length∙Opticalo Resolution format:o CT-102 1.06 mm: 40,000 pixels (or 200- x 200 pixels)o CT-101 1.90 mm: 160,000 pixels (or 400- x 400 pixels)o Field of View: 120° in airo Angle of view: 0°USB Control Module: Control Module housing Camera processor and LEDillumination:∙Dimensions: 5.25- x 3.90- x 1.85 inches∙Weight: 1.20 pounds ∙Digital Inspection Scope Connection∙Illumination Control- LED in the Control Module∙Power Cycle∙USB Camera Cable∙Easily change from small and large diameter scopes.Light Settings:There are four light settings operated by one button.Blinking Light (Indicates transmitting video data):∙Splash proof (IPX5 Rating)∙No external power needed.Flexible Inspection Scope Software Requirements:∙Compatible with Windows 10 Operating systems.∙USB flash drive includes software.Unpacking Flexible Inspection Scope:Carefully inspect for shipping damage. If there is any damage contact the shipping carrier and Heatlhmarkcustomer service 800-521-6224 immediately.USB Control Module: (Fig. 1).1.Digital Inspection Scope Connection 2.Illumination Control 3.Power Cycle B (Type C) on the right side of the boxFigure 1Flexible Inspection Scope™: (Fig. 2).∙CT-101 1.90 mm O.D. and 110 cm length ∙CT-102 1.06 mm O.D. and 110 cm lengthLarge1.90 mmSmall 1.06 mmFigure 2Flexible Inspection Scope™ Features3214Light/Illumination Settings: (Fig. 3).∙Five (5) light settingso Light on control indicats setting levelo Fifth setting is OFF∙Press light button to advance to next setting.∙Fifth setting turns the light OFF.Figure 3Power Cycle ButtonPress button to RESET camera (Fig. 4).Figure 41.Flexible Inspection Scope™ Plug (Fig. 5).Contains camera video connection as well as LED Light for illumination.1Figure 52.Flexible Working Length (Fig. 6).The portion of the Flexible Inspection Scope™ that is inserted into an item during visual inspection.The measuring scale markings on the Flexible Working Length are in centimeters (accuracy = ± 0.5 cm)2Figure 63.Distal Camera (Fig. 7).Distal portion of Flexible Inspection Scope™ that contains the camera lens3Figure 7SOFTWARE INSTALLATION:Note: This section is done only once when connecting the scope to the computer for the first time.∙System Requirements: MS Windows 10∙Install the Flexible Inspection Scope™ Software from the USB flash drive on a computer.Note: If you have any IT policies that may block this installation, please contact your IT team to give access to Healthmark scope viewer to install.1. Insert the USB Flash drive into your computer, and double click on the Healthmark Scope Viewer installer package to begin installation.2. The “Welcome to the Healthmark Scope Viewer Setup Wizard” screen pops up. Click on Next.3. Select the first tab Typical or setup type of your choice, click Next.4. Click Install and wait for installation to complete.5. Click Finish.STARTING SOFTWARE & CONNECTING SCOPE TO PC:(Fig 8).1.Open the Windows PC viewer software.2.Connect the Control Module to PC using USB Cable.3.Plug the Flexible Inspection Scope into the Control Module.4.In the viewer software, click Settings and Select USB Video Device, click on the desiredresolution, select the preferred Video Output Format, and then Click OK.5.Press the Power Cycle Button.Figure 86.Now you can start using the scope.Verifing OperationFollowing the steps listed below will ensure the proper use and performance of the Flexible Inspection Scope™. The Flexile Inspection Scope™ can be checked for normal operation by connecting it as described in the Startup section of this IFU.Normal operation includes:∙An image appearing on your computer monitor or HDMI Monitor.∙ A blinking light on Control Module near the Power Cycle button that indicates the image feed is transmitting.∙White light emitting from the distal end of the Digital Inspection Scope.∙An LED light on the control module top panel that indicates the light intensity of the device. Using SoftwareHealthmark Scope Viewer Software (Fig. 9).1.Capture button: Captures a Reference Image and saves it to the Reference Image folder.2.Main Image Window: Displays the image from the camera.3.Reference Image Window: Displays a reference image.4.Clear Button: Removes the image from the Reference image window.5.Open Reference Image button: Allows selection of a reference image from the Reference Imagefolder.6.Settings Button: Click to select the video camera and resolution settings.7.File Location Button: Click to change location where captured images are being saved.8.File Location Window: Shows the file path where captured images are being saved currently.9.Capture Image Button: Captures images and adds them to the File Location selected by the user(as shown in the File Location Window).10.Capture Video button: Click to record video. Click again to stop recording video.11.File Prefix: Type in text that you would like included in the file name of Captured Images.Figure 9Selecting Video Device or CameraFollow the directions below to select the video device or camera used to capture images using the Flexible Inspection Scope™ Viewer Software. (Fig. 10).1.Click Settings button in the lower left of the Scope Viewer software to display a list of videodevices or cameras being detected by your computer2.Select a device for capturing images using the Scope Viewera.The example below shows a webcam and USB Video Device in the Settings box. Select theUSB Video Device for the Flexible Inspection Scope™.b.You can also select your preferred Video Output Format from the dropdown box3.Click OK to view the selected Video Device.231Figure 10Capturing Still PicturesFollow the instructions for capturing still pictures from the Main Image Window.Select the Capture Image button. (Fig. 11).Figure 11Note: When an image is captured, “Image Captured” in red text will flash on the lower portion of the screen and a new file will appear in the Files Location.Capturing Video ImagesFollow the instructions below for capturing video from the Main Image Window.1.Select the Capture Video Button (Fig. 12).Figure 122.When the video is recording “Recording…” in red text will appear toward the bottom of thesoftware window.3.To stop recording, click Stop Capture. (Fig. 13).Figure 13Setting File PrefixFollowing the steps below allows you to create a file prefix that will appear after the underscore of image file names save to the File Location specified by the user.1.Click in the field next to File Prefix.2.Enter the characters that you would like to be included in the file name. (Fig 14).Figure 14Setting Location for Saved FilesFollowing the steps below allows you to set the file location of saved images using the Scope Viewer software.1.Click the File Location button.2.Select the file location you want to save captured images. (Fig 15).Figure 15Displaying Reference ImageThere are two ways to display a still image in the Reference Image Window on the Scope Viewer software.1.To display an image currently being displayed in the Main Image Window, click the Capture button. Note: The images will be saved in a file folder titled Reference Images in the designated File Location that the user specified in the File Location field. (Fig. 16).Figure 162.To display a saved image in the Reference Image Window from your File Location:a.Click the Open Reference Image button (Fig. 16 above).b.Select the file you want to display (Fig. 17 below).c.Click the OK Button, to display the image in the Reference Image Window. (Fig. 17).Figure 17Switching to a Different Flexible Inspection Scope™ on the Control Module:1.Press the Power button on the Control Module once.2.Disconnect the current Flexible Inspection Scope from the Control Module.3.Repeat the steps in the “STARTING SOFTWARE & CONNECTING SCOPE TO PC” procedure.Inserting Scope in ItemFigure 1Rotating Device to Avoid ObstacleFigure 2 Performing InspectionWipe down the Flexible Inspection Scope™ with a compatible wipe. Follow the manufacturer’s (Mfr.’s)Instructions for Use (IFU) for appropriate wipe usage. Click here to see the Chemical Compatibility Chart(PDF) for approved cleaning.The Flexible Inspection Scope™ is made of the same material as other common endoscopes. Any wipe,solution, or low temperature (≤ 60 °C [140 °F]) method intended for the reprocessing of endoscopes is likelycompatible with the Generation II Flexible Inspection Scope™ Catheters if used according to the productlabeling.Solutions Containing (Flexible Inspection Scope Only)Alcohol Ethoxylates Neutral or Near-Neutral pH DetergentsEnzymatic Cleaning Solutions Enzymatic DetergentsSodium Borated, Decahydrate Tetrapotassium PyrophosphateFlexible Inspection Scope™ has a fluid ingress protection rating of IPX7 (Waterproof) and can withstandimmersion in fluid up to one (1)-meter in depth for up to 30 minutes.Control Module USB has a fluid ingress protection rating of IPX5 (Water resistant) and can withstand asustained, low pressure water jet spray for up to three minutes.For Thorough Cleaning: CablesFollow the cleaning agent Mfr.’s IFU.1.Unplug and disconnect all components from the Control box prior to cleaning.2.Do not submerge or soak the cable for disinfection (cable is not waterproof).3.Wipe thoroughly with non-linting wipe moistened with facility approved neutral detergent. Use theappropriate brushes with detergent solution to remove any residues from areas that cannot bereached with the wipes.For Thorough Cleaning: Control Module1.Unplug and disconnect all components from the Control box prior to cleaning.2.Do not submerge or soak the cable for disinfection (Control Box is not waterproof).3.Wipe thoroughly with non-linting wipe moistened with facility approved neutral detergent. Use theappropriate brushes with detergent solution to remove any residues from areas that cannot bereached with the wipes.Note: Do NOT soak. Control Module and cables are not waterproof and should not be immersed.N/ACleaning –AutomatedDisinfection Control Module and CablesThese may be cleaned with alcohol based disinfectant wipes.Compatible agents (wipes and solutions) for disinfecting Flexible Inspection Scope™ and ControlModule:∙Hydrogen peroxide∙Isopropyl alcohol (IPA)∙Sodium hypochlorite (Bleach)∙Ortho-phenylphenol∙Quaternary ammonium.High-Level Disinfection (Flexible Inspection Scope™ Only)∙Select only disinfecting solutions listed in the compatible disinfecting methods.∙Follow all recommendations regarding health-hazards, dispensing, measuring, and storage from the Mfr. of cleaning and disinfecting agents.∙Soak the Flexible Inspection Scope™ in selected disinfecting solution per Mfr.’s IFU.∙Rinse the Flexible Inspection Scope™ with critical (sterile) water, again, following the disinfecting solutions Mfr.’s instructions.Reprocessing Chemical Compatibility Chart (PDF): Click here.。
subset-076-0_v223

ERTMS/ETCS – Class 1Test PlanREF : SUBSET-076-0ISSUE : 2.2.3DATE : 04-November-2005Company Technical Approval Management approval ALCATELALSTOMANSALDO SIGNALBOMBARDIERINVENSYS RAILSIEMENS0. M ODIFICATION H ISTORYIssue NumberDateSection Number Modification / Description Author0.0.1,001025All Creation A. Göhler0.0.2,001103All Changes according to review comments A. Göhler0.1.0,15 Nov 00 All Modifications after review meeting,editorial changesA. Göhler0.1.1,05 Feb 01All Update, editorial changes A. Göhler 0.2.0,06 Apr 01All Edition for delivery, editorial changes Ch. Frerichs2.2.0,30 Jul 02 All Editorial changes and commentsreceived from UNISIG partners.E. Fernández2.2.1,15 May 03All Edition for delivery. Jorge Iglesias.2.2.218 June 2003 2.2 and 2.3 Edition for delivery after decisions madein the Control Group Meeting (11 June2003) regarding the official delivery ofthe electronic format (Data Bases) ofboth Test Cases and Test Sequences.Jorge Iglesias2.2.304 November 2005 All Edition for delivery after the review ofthe whole set of Test SpecificationsJorge Iglesias(CEDEX)1. T ABLE OF C ONTENTS0.M ODIFICATION H ISTORY (2)1.T ABLE OF C ONTENTS (3)2.UNISIG T EST S PECIFICATION (4)2.1Introduction (4)2.2Test Specification Documents (5)2.2.1Document Version and Reference Table (5)2.3Contents of the Test Specification Documents (6)2.3.1Subset-076-0: Test Plan (6)2.3.2Subset-076-1: Test Architecture (6)2.3.3Subset-076-2: Methodology to Prepare Features (6)2.3.4Subset-076-3: Methodology of Testing (6)2.3.5Subset 076-4-1: Test Sequences Generation: Methodology and Rules (6)2.3.6Subset 076-4-2: ERTMS ETCS Class 1 States for Test Sequences (6)2.3.7Subset 076-5-1: Feature List (7)2.3.8Subset 076-5-2: Test Cases (7)2.3.9Subset 076-5-3: On-Board Data Dictionary (7)2.3.10Subset 076-5-4: SRS v2.2.2 Traceability (7)2.3.11Subset 076-6-1: Test Cases Data Base (7)2.3.12Subset 076-6-3: Test Sequences (7)2.3.13Subset 076-6-4: Test Case Coverage (8)2.3.14Subset 076-6-5: Test Sequences Data Base (8)2.3.15Subset 076-6-7: Test Sequences Evaluation and Validation (8)2.3.16Subset 076-6-8: Generic train data for Test Sequences (8)2.3.17Subset 076-6-10: Test Sequence Viewer (TSV) (8)2.3.18Subset-076-7: Scope of the Test Specifications (9)2.3.19Subset-094-0: UNISIG Functional Requirements for an on board ReferenceTest Facility (9)2. UNISIG T EST S PECIFICATION2.1 IntroductionThis document is made up from the references to the corresponding versions of the documents comprising the UNISIG Test Specification for the Subset-026 SRS v2.2.2.The technical contents are compiled within the respective document listed in the next chapter.2.2 Test Specification Documents2.2.1 Document Version and Reference TableName M/I Reference number Version (date / issue)Test Plan I SUBSET-076-0 4-November-2005 /2.2.3Test Architecture - SUBSET-076-1 Intentionally deletedI SUBSET-076-2 14-April-03 / 2.2.1Methodology to PrepareFeaturesMethodology of testing I SUBSET-076-3 14-April-03 / 2.2.1Test Sequences Generation:I SUBSET-076-4-1 30-April-03 / 1.0.0Methodology and Rules.ERTMS ETCS Class 1 States forI SUBSET-076-4-2 30-April-03 / 1.0.0Test SequencesFeature list I SUBSET-076-5-1 4-November-2005 / 2.2.2 Test cases M SUBSET-076-5-2 23 September 2005 / 2.2.2 On-board Data Dictionary I SUBSET-076-5-3 30-July-02 / 2.2.0SRS v2.2.2 Traceability I SUBSET-076-5-4 23 September 2005 / 2.2.2 Test Case Data Base I SUBSET-076-6-1 23 September 2005 / 2.2.2 Test Sequences M SUBSET-076-6-3 4-November-2005 / 2.0.0 Test Case Coverage I SUBSET-076-6-4 4-November-2005 / 2.0.0 Test Sequences Data Base - SUBSET-076-6-5 Intentionally deleted. TestSequences Data Bases areincluded in Subset-076-6-3I SUBSET-076-6-7 4-November-2005 / 1.0.0Test Sequences Evaluation andValidationI SUBSET-076-6-8 4-November-2005 / 1.0.0Generic train data for TestSequencesTest Sequence Viewer (TSV) I SUBSET-076-6-10 4-November-2005 / 2.10Scope of the Test Specifications M SUBSET-076-7 18-June-2003 / 1.0.0UNISIG Functional RequirementsM SUBSET-094-0 4-November-2005 / 2.0.0 for an on board Reference TestFacility2.3 Contents of the Test Specification Documents2.3.1 Subset-076-0: Test PlanThis document summarise the set of documents included in the UNISIG Test Specifications.2.3.2 Subset-076-1: Test ArchitectureIntentionally deleted, the document referring to the Test architecture is to be included in Subset-094-0..2.3.3 Subset-076-2: Methodology to Prepare FeaturesFeatures are the basis of the test specification. This document describes how features are to be identified and how a feature list is to be made up. The Feature list was the starting point to create the current Test Specifications. Once the main features were defined, each feature was developed by means of writing the specific set of Test cases for it. Tested requirements are clearly identified in each test case. After writing the test cases, there is a feedback from them to the feature list, in the sense of including inside each feature the tested requirements. The final release of the Feature list is therefore created automatically from the test cases data base.2.3.4 Subset-076-3: Methodology of TestingHere is the procedure to create Test cases given. This methodology is based on a formal description of the Test cases. The Test Case template is described in this document.2.3.5 Subset 076-4-1: Test Sequences Generation: Methodology and RulesTest Cases have been concatenated in Test sequences in order to be tested in a laboratory. This document shows how test sequences are to be built up. Principles and rules are given as a guideline for this process. As it is not possible to test all the Test cases in all the applicable Level/mode combinations, this document describes how the different Mode/Level combinations (states) are tested. The starting point for the creation of the Test Sequences was the methodology of definition of Test Frames and Test Sub-sequence. A Test Frame defines all possible transitions between two states by a set of Test Sub-sequences (concatenated Test cases) starting at the initial state and ending at the final one. The different Frames were classified by its priority and all relevant Frames were taken into account to be included into the Test sequences. This process was followed to create the release 1.0.0 of the Test Sequences. Further on updates of the Test Specification just need to update both Test Cases and Test Sequences. Therefore the review done to update Test Sequences from release 1.0.0 to 2.0.0 has been done by reviewing the Test Cases (2.2.1 to 2.2.2) and including them into the new Test Sequences.2.3.6 Subset 076-4-2: ERTMS ETCS Class 1 States for Test SequencesThis Excel document contains the table with all the possible states (Mode/Level combinations) according to SRS 2.2.2, the equivalent states table and the reduced states table. It also contains thelist of Test Frames, its correspondence with the SRS (Transitions Table 4.6.2), as well as the classification of Test Frames according to its priority.2.3.7 Subset 076-5-1: Feature ListThe list is a means of producing test cases. A Feature is a group of requirements, which fulfilment can be tested at the available interfaces. Features are grouped into hierarchies.2.3.8 Subset 076-5-2: Test CasesTest Cases are the basis of the UNISIG Test Specification. These are the formal, functional and technical descriptions of the test needed in order to prove interoperability, or in other words it is the way of demonstrating the compliance of an ETCS equipment with the SRS 2.2.2. Each Test Case includes the set of requirements tested. Due to their lack of technical description of interfaces, trackside test cases are only functionally described.2.3.9 Subset 076-5-3: On-Board Data DictionaryThe document includes formal definitions of the words and sentences to be used in Test Cases. These definitions are useful to harmonise the Test Cases produced by different companies.2.3.10 Subset 076-5-4: SRS v2.2.2 TraceabilityThe document provides an analysis of traceability between all the requirements of the SRS and the Test Cases. It clearly shows that all testeable requirements are tested in the complete set of Test Cases. To perform this analysis all the requirements included into the SRS 2.2.2 have been classified in several categories: 1) Testeable, non-testeable or non requirement 2)On-Board, Trackside or Driver requirement 3) Level (0,1,2,3,STM) 4) Level transition 5) Balise Infill, RIU or Euroloop.2.3.11 Subset 076-6-1: Test Cases Data BaseThis Data Base is an MS Access document including all Test Cases in an electronic standard format. All Test Cases that constitute the Subset-076-5-2 are included in this Data Base(Subset-076-6-1). The Master document is the Subset-076-5-2, but a complete traceability between both documents is assured. The prior release (1.0.0) contained not only the Test Cases but also the Test Sub-Sequences. However the current version just contains the new release of the Test cases (2.2.2). This is because the original Sub-sequences were used for the first creation of the Test Sequences but not for the further review performed now.2.3.12 Subset 076-6-3: Test SequencesThis document is the final output of the UNISIG WP. A Test Sequence is a set of concatenated Test Cases starting in NP mode and finishing in NP mode. A Test Sequence shall be used for an semi-automatic execution of the test cases, by concatenating them into scenarios which can be run within the test environments defined in the above-mentioned Subset 094. The complete set of TestSequences covers all Test Cases and therefore, all SRS requirements. In the release 2.0.0 is only Level 0, 1 and 2 functionality covered (excluding Loop and RIU). The Test sequences emerge as a complete defined trip, ready to be implemented in a Test Environment. Both the trip speed profile and the messages (radio and balise) sent to and from the On-Board system are completely defined in each trip. The release 2.0.0 contains a zip file per each Test Sequence including the following files: Test Sequence Word file description (.doc), Test Sequence Speed Profile (.bmp) and Test Sequence Data Base (.mdb). Test Sequences Data Bases are generated by means of a tool, which has been used to write down the Test Sequences. In this way, each Test Sequence has been stored in a MS Access Data Base containing all relative information. Both the information contained in the Word files and the one in the Data Base files are identical.2.3.13 Subset 076-6-4: Test Case CoverageThis document shows the traceability between Test Cases and Test Sequences. It gives evidence of how every Test Case has been used at least once in the complete set of Test Sequences. As in the release 2.0.0 of the Test sequences (Subset-076-6-3) only Test Cases for Level 0, 1 and 2 are covered, all Test Cases related to level 3, RIU, Loop and STM, are not included in this set of Test Sequences v 2.0.0. This Test case Coverage release ( v2.0.0) also includes a new column showing the requirements tested in each Test case.2.3.14 Subset 076-6-5: Test Sequences Data BaseIntentionally moved to Subset-076-6-3.2.3.15 Subset 076-6-7: Test Sequences Evaluation and ValidationThis document explain the ranges for validating in an automatic way the steps of a Test sequence, as well all the mainlines for evaluate the result of a test Sequence execution in a laboratory compliant with Subset 094.2.3.16 Subset 076-6-8: Generic train data for Test SequencesThis document describes the generic train data which should be used for the Test sequences. The Reference Lab which will be used for running the Test sequences shall be able to simulate the train behaviour according to the train data specified within this document. This train data is based on the locomotive S-252.2.3.17 Subset 076-6-10: Test Sequence Viewer (TSV)The Test Sequence Viewer is a tool that takes the Test Cases from the Test Cases Data Base (Subset-076-6-1) and gives the operator the possibility of viewing the Test sequences (Subset-076-6-3). The TSV is not able to modify any of the data included in the Test Sequence.2.3.18 Subset-076-7: Scope of the Test SpecificationsThis document explains briefly the Scope of these Test Specifications: Only On-Board requirements for levels 0,1 and 2 are included in these Test Specifications. Requirements related to STM, L3, RIU and Euroloop are excluded.2.3.19 Subset-094-0: UNISIG Functional Requirements for an on board ReferenceTest FacilityThis document provides a thorough description of the Test Architecture, which is to be used to perform the interoperability tests of the On-board equipment built in accordance with the UNISIG SRS Class 1. The natural input for this Test Architecture will be the set of Test sequences included in the Subset-076-6-3 and developed within the Test Specifications WP。
D ATA S H E E T

HostBusAdapter.TheQLE2462istheindustry’sfirst,trueenterpriseclass,4Gbps-to-PCIExpress®x4adapter.TheQLE2462deliversunprecedentedlevelsofperformanceandavailability,aswellasintelligentnetworkingfeaturesspecifictoenterpriseclassdatacenters. EnterpriseClassFeatures.TheQLE2462adapteristhehighestperformingandmostreliableadapterintheindustry.ItdeliversunmatchedperformanceleveragingasingleASICdesign,combininguniquehardwarearchitecturetodeliverover300,000IOPS,nearly1.6GBpsthroughput,andPCIExpressx4busspeeds.Moreimportantly,theQLE2462adapterprovidesnewintelligentstoragenetworkingfeaturesthatredefinetheenterpriseclassadapter,providingincreaseddataprotection,advancedframerouting,andenterprise-widemanagementcapabilities.Setup.Point-and-clickinstallationandconfigurationwizardsadaptersetupprocess.StorageadministratorscanquicklydeployadaptersacrossaSANusingstandardadaptermanagementtoolsutilities.TheQLE2462isfullycompatiblewithSNIAAPIandSMI-S,therebyallowingadministratorstomanageQLogicadaptersusingthird-partysoftwareapplications.ComprehensiveOSSupport.QLogicoffersthebroadestrangeofsupportforallmajoroperatingsystemstoensureOSandhardwareservercompatibility.Driversareavailableforallmajoroperatingsystemsandhardwareserverplatforms.AsingledriverstrategyperOSallowsstorageadministratorstoeasilydeployandmanageadaptersinheterogeneousSANconfigurations.combinedwithagencyandregulatorytesting,ensuresallproductsmeetworldcompliancehardwareandsoftwarespecifications.Alladaptersaretestedextensivelywiththird-partyhardware,alongwithmultiplesoftwareapplications,toensurebest-in-classSANinteroperabilityandcompatibility.YoucanbeconfidentpurchasingQLogicadapterstomeetyourFibreChannelstoragenetworkingneeds.Forover15years,QLogichasbeenatechnologicalcurrentneeds.Inaddition,QLogicprovidesstronginvestmentprotectiontosupportemergingtheindustrywithsuccessfullydeliveringtechnologicalsolutionsthataddresstheneedsoftodayandtomorrow.Corporate Headquarters QLogic Corporation 26650 Aliso Viejo Parkway Aliso Viejo, CA 92656 949.389.6000 Europe Headquarters QLogic (UK) LTD. Quatro House Lyon Way, Frimley Camberley Surrey, GU16 7ER UK +44 (0) 1276 804 670© 2004–2010 QLogic Corporation. Specifications are subject to change without notice. All rights reserved worldwide. QLogic, the QLogic logo, and SANsurfer are registered trademarks of QLogic Corporation. AMD and Opteron are trademarks or registered trademark of Advanced Micro Devices, Inc. Apple, Mac OS, Power Mac, and Xserve are registered trademarks of Apple, Inc. Cisco is a registered trademark of Cisco Systems, Inc. Citrix and XenServer are trademarks or registered trademarks of Citrix Systems, Inc. Linux is a registered trademark of Linus Torvalds. Oracle is a registerd trademark of Oracle Corporataion. PCI Express is a registered trademark of PCI-SIG Corporation. Red Hat is a registered trademark of Red Hat, Inc. Solaris and OpenSolaris are trademarks or registered trademarks of Sun Microsystems, Inc. SPARC is a registered trademark of SPARC International, Inc. SUSE, Novell, and NetWare are registered trademarks of Novell, Inc. VMware, and ESX are trademarks or registered trademarks of VMware, Inc. Windows, Windows Server, and Windows Vista are registered trademarks of Microsoft Corporation. All other brand and product names are trademarks or registered trademarks of their respective owners. Information supplied by QLogic Corporation is believed to be accurate and reliable. QLogic Corporation assumes no responsibility for any errors in this brochure. QLogic Corporation reserves the right, without notice, to make changes in product design or specifications.PX2458003-00P2。
ERTMS-ETCS需求规范 SUBSET-026-4 v330
4.1 Modification History4.2 Table of Contents4.1Modification History (2)4.2Table of Contents (5)4.3Introduction (7)4.3.1Presentation of the document (7)4.3.2Identification of the possible modes (7)4.4Definition of the modes (9)4.4.1Introduction (9)4.4.2General Requirements (9)4.4.3ISOLATION (10)4.4.4NO POWER (11)4.4.5SYSTEM FAILURE (12)4.4.6SLEEPING (13)4.4.7STAND BY (15)4.4.8SHUNTING (16)4.4.9FULL SUPERVISION (18)4.4.10UNFITTED (19)4.4.11STAFF RESPONSIBLE (20)4.4.12ON SIGHT (23)4.4.13TRIP (24)4.4.14POST TRIP (25)4.4.15NON LEADING (27)4.4.16Intentionally deleted (29)4.4.17National System (SN) mode (30)4.4.18REVERSING (31)4.4.19LIMITED SUPERVISION (33)4.4.20PASSIVE SHUNTING (34)4.5Modes and on-board functions (36)4.5.1Introduction (36)4.5.2Active Functions Table (36)4.6Transitions between modes (41)4.6.1Symbols (41)4.6.2Transitions Table (42)4.6.3Transitions Conditions Table (43)4.7DMI depending on modes (47)4.7.1Introduction (47)4.7.2DMI versus Mode Table (47)4.8Acceptance of received information (51)4.8.1Introduction (51)4.8.2Assumptions (53)4.8.3Accepted information depending on the level and transmission media (53)4.8.4Accepted Information depending on the modes (59)4.8.5Handling of transition buffer in case of level transition announcement or RBC/RBC handover (62)4.9What happens to accepted and stored information when entering a given level (65)4.9.1Introduction (65)4.10What happens to accepted and stored information when entering a given mode (66)4.10.1Introduction (66)4.11What happens to stored information when exiting NP mode (70)4.3 Introduction4.3.1 Presentation of the document4.3.1.1 This document defines the modes of the ERTMS/ETCS on-board equipment (seechapter 4.4 “Definition of the modes” and chapter 4.5 “Modes and on-board functions”.4.3.1.2 This document gives all transitions between modes (see chapter 4.6 “Transitionsbetween modes”).4.3.1.3 This document describes the possible exchanged information between the driver andthe ERTMS/ETCS on-board equipment, respect to the mode (see chapter 4.7 “DMIdepending on modes”).4.3.1.4 This document describes how the received information is filtered, respect to severalcriteria such as the level, the mode, etc.. (see chapter 4.8 “Acceptance of receivedinformation”).4.3.1.5 This document describes how the stored information is handled, respect to severalcriteria such as the level, the mode, etc. (see chapter 4.9 “What h appens to acceptedand stored information when entering a given level”, and chapter 4.10 “What happensto accepted and stored information when entering a given mode”).4.3.1.6 All the tables that are included in this document shall be considered as mandatoryrequirements.4.3.1.7 Some notes appear in this document. These notes are here to help the reader tounderstand the specifications, or to explain the reason(s) of a requirement.4.3.2 Identification of the possible modes4.3.2.1 List of the modes:Full Supervision (FS)Limited Supervision (LS)On Sight (OS)Staff Responsible (SR)Shunting (SH)Unfitted (UN)Passive Shunting (PS)Sleeping (SL)Stand By (SB)Trip (TR)Post Trip (PT) System Failure (SF) Isolation (IS) No Power (NP) Non Leading (NL) National System (SN) Reversing (RV)4.4 Definition of the modes4.4.1 Introduction4.4.1.1 For each mode the following information is given:a) The context of utilisation of the mode and the functions that characterise the mode(chapter “Description”).b) The ERTMS/ETCS levels in which the mode can be used (chapter “Used inlevels”).c) The related responsibility of the ERTMS/ETCS on-board equipment and of thedriver, once the equipment is in this mode (chapter “Responsibilities”).4.4.1.2 A complete list of transitions to and from each mode is given in the section 4.6.2“Transitions Table” ).4.4.2 General Requirements4.4.2.1 When the desk is open, a clear indication of the ERTMS/ETCS mode shall be shownto the driver.4.4.2.2 Intentionally deleted.4.4.3 ISOLATION4.4.3.1 Description4.4.3.1.1 In Isolation mode, the ERTMS/ETCS on-board equipment shall be physically isolatedfrom the brakes and can be isolated from other on-board equipments/systemsdepending on the specific on-board implementation.4.4.3.1.2 There shall be a clear indication to the driver that the ERTMS/ETCS on-boardequipment is isolated.4.4.3.1.3 To leave Isolation mode, a special operating procedure is needed (no transition fromIsolation is specified). This procedure shall ensure that the on-board equipment is onlyput back into service when it has been proven that this is safe for operation.4.4.3.1.4 Note: for the list of main functions related to this mode, refer to chapter 4.5 “Modesand on-board functions”.4.4.3.2 Used in levels4.4.3.2.1 Used in all levels: Level 0, level 1, level 2, level 3 and level NTC.4.4.3.3 Responsibilities4.4.3.3.1 Isolation of the ERTMS/ETCS on-board equipment is performed by the driver under hiscomplete responsibility.4.4.3.3.2 Once the ERTMS/ETCS on-board equipment is isolated, the ERTMS/ETCS on-boardequipment has no more responsibility.4.4.4 NO POWER4.4.4.1 Description4.4.4.1.1 When the ERTMS/ETCS on-board equipment is not powered, the equipment shall bein the No Power mode.4.4.4.1.1.1 Note: in order to ensure cold movement detection function, some parts of theERTMS/ETCS on-board equipment may be fed by an auxiliary power supply.4.4.4.1.2 The ERTMS/ETCS on-board equipment shall permanently command the emergencybrake.4.4.4.1.3 Note: for the list of main functions related to this mode, refer to chapter 4.5 “Modesand on-board functions”.4.4.4.2 Used in levels4.4.4.2.1 Used in all levels: Level 0, level 1, level 2, level 3 and level NTC.4.4.4.3 Responsibilities4.4.4.3.1 The ERTMS/ETCS on-board equipment has no responsibility in this mode, exceptcommanding the emergency brake and (optionally) monitoring cold movements.4.4.4.3.2 The notion of responsibility of the driver is not relevant for the No Power mode.4.4.4.3.3 If it is required to move a loco in NP mode as a wagon, ETCS brake command mustbe overridden by external means.4.4.5 SYSTEM FAILURE4.4.5.1 Description4.4.5.1.1 The ERTMS/ETCS on-board equipment shall switch to the System Failure mode incase of a fault, which affects safety.4.4.5.1.2 The ERTMS/ETCS on-board equipment shall permanently command the EmergencyBrakes.4.4.5.1.3 Note: for the list of main functions related to this mode, refer to chapter 4.5 “Modesand on-board functions”.4.4.5.2 Used in levels4.4.5.2.1 Used in all levels: Level 0, level 1, level 2, level 3 and level NTC.4.4.5.3 Responsibilities4.4.5.3.1 The ERTMS/ETCS on-board equipment is responsible for commanding theEmergency Brakes.4.4.5.3.2 No responsibility of the driver.4.4.6 SLEEPING4.4.6.1 Description4.4.6.1.1 The Sleeping mode is defined to manage the ERTMS/ETCS on-board equipment of aslave engine that is remote controlled.4.4.6.1.2 The desk(s) of a sleeping engine must be closed (since there is no driver, noinformation shall be shown).4.4.6.1.3 As the engine is remote controlled by the leading engine, its ERTMS/ETCS on-boardequipment shall not perform any train movement supervision.4.4.6.1.4 The ERTMS/ETCS on-board equipment shall perform the Train Position function; inparticular, the front/rear end of the engine (i.e., not the train) shall be used to refer totrain front/rear end.4.4.6.1.5 Sleeping mode shall be automatically detected on-board via the train interface.4.4.6.1.6 If possible, the train must not be stopped due to a safety critical fault in a sleepingengine. The ERTMS/ETCS on-board equipment shall therefore try to memorise theoccurrence of such fault(s), which shall be handled when the engine leaves theSleeping mode. The ERTMS/ETCS on-board equipment shall also try to send an errorinformation to the RBC.4.4.6.1.7 If a desk of the sleeping engine is opened while the train is running (this is anabnormal operation), the ERTMS/ETCS on-board equipment shall switch to Stand-Bymode.4.4.6.1.8 If the “sleeping input signal” is lost (no more detection of the remote control), theswitch to Stand-By mode shall be made only if the train is at standstill.4.4.6.1.9 Intentionally deleted.4.4.6.1.10 The ERTMS/ETCS on-board equipment shall open a communication session with theRBC when at least one of the following events occurs:a) in all levels, on receipt of the order to contact the RBC.b) In level 2/3, when entering or exiting Sleeping mode (to report the change of modeto the RBC).c) In level 2/3, when a safety critical fault of the ERTMS/ETCS on-board equipmentoccurs (to report the fault to the RBC).4.4.6.1.11 Note: for the list of main functions related to this mode, refer to chapter 4.5 “Mod esand on-board functions”.4.4.6.1.12 In case of balise group message consistency error (refer to 3.16.2.4.4 and 3.16.2.5.1),the ERTMS/ETCS onboard equipment shall not command the service brake.4.4.6.1.13 When in levels 2 or 3, if no compatible version has been established between the on-board equipment in Sleeping mode and the RBC, the ERTMS/ETCS onboardequipment shall react as specified in 3.5.3.8 b) but no driver‟s indication shall be given.4.4.6.2 Used in levels4.4.6.2.1 Used in all levels: Level 0, level 1, level 2, level 3 and level NTC.4.4.6.3 Responsibilities4.4.6.3.1 The ERTMS/ETCS on-board equipment of an engine in Sleeping mode has noresponsibility for the train protection.4.4.6.3.2 The notion of responsibility of the driver is not relevant for the Sleeping mode.4.4.6.3.2.1 Note:The leading engine is responsible for the movement of the train. It is then theERTMS/ETCS on-board equipment of the leading engine that is fully/partially/notresponsible for the train protection, with respect to its mode.4.4.7 STAND BY4.4.7.1 Description4.4.7.1.1 The Stand-By mode is a default mode and cannot be selected by the driver.4.4.7.1.2 It is in the Stand-By mode that the ERTMS/ETCS on-board equipment awakes.4.4.7.1.3 Data for mission shall be collected in Stand-By (see SRS-chapter 5: “Start of Mission”procedure).4.4.7.1.4 In Stand-By mode, the desk of the engine can be open or closed. No interaction withthe driver shall be possible as long as the desk is closed, except isolation of theERTMS/ETCS on-board equipment.4.4.7.1.5 The ERTMS/ETCS on-board equipment shall perform the Standstill Supervision.4.4.7.1.6 Note: for the list of main functions related to this mode, refer to chapter 4.5 “Modesand on-board functions”.4.4.7.2 Used in levels4.4.7.2.1 Used in all levels: Level 0, level 1, level 2, level 3 and level NTC.4.4.7.3 Responsibilities4.4.7.3.1 The ERTMS/ETCS on-board equipment is responsible for maintaining the train atstandstill.4.4.7.3.2 The driver has no responsibility for train movements.4.4.8 SHUNTING4.4.8.1 Description4.4.8.1.1 The purpose of the Shunting mode is to enable shunting movements. In Shuntingmode, The ERTMS/ETCS on-board equipment supervises the train movementsagainst:a) a ceiling speed: the shunting mode speed limitb) a list of expected balise groups (if such list was sent by the trackside equipment).The train shall be tripped if a balise group, not contained in the list, is passed(When an empty list is sent, no balise group can be passed. When no list is sent,all balise groups can be passed)c) “stop if in shunting mode” information. The train is tripped if such information isreceived from balise groupsd) Intentionally deleted4.4.8.1.2 The Shunting mode shall not require Train Data.4.4.8.1.3 The ERTMS/ETCS on-board equipment shall perform the Train Position function4.4.8.1.4 Intentionally deleted.4.4.8.1.5 When in Shunting mode, the ERTMS/ETCS on-board shall not manage leveltransitions. However, an immediate level transition order or a conditional leveltransition order shall be stored and evaluated only when another mode than Shuntingor Passive Shunting has been entered (i.e. when the Shunting movement isterminated).4.4.8.1.5.1 When receiving a communication session establishment order, the ERTMS/ETCS on-board in Shunting mode shall not establish the communication session, but shall storethe RBC ID/phone number.4.4.8.1.5.2 When in Shunting mode, the ERTMS/ETCS on-board shall not manage RBC-RBChand-over, except for storing the RBC ID/phone number given at the RBC/RBC border.4.4.8.1.6 Shunting mode can be selected by the driver, only accepted when the train is atstandstill, or ordered by the trackside.4.4.8.1.7 In case of selection of Shunting mode by the driver:∙in level 1 operations, the switch to shunting is always accepted by the on-board equipment∙in level 2 and 3 areas, the on-board shall ask the trackside for an authorisation. The switch to shunting is possible only after receiving such authorisation. The tracksidecan send a list of balises, that the train is allowed to pass while in SH, together withthe authorisation4.4.8.1.8 In case of order to switch to Shunting mode from trackside, the order:∙in level 1 is given by a balise group. A list of balises, that the train is allowed to pass after the entry in Shunting, can be sent together with the order∙in level 2 and 3 is sent via radio. A list of balises, that the train is allowed to pass after the entry in Shunting, can be sent together with the order4.4.8.1.9 When the switch to shunting is ordered by trackside, a driver acknowledgement isrequested.4.4.8.1.9.1 Note: in Shunting mode the train is only partially supervised, therefore it is necessarythat the driver takes the responsibility.4.4.8.1.10 The ERTMS/ETCS on-board equipment shall display the train speed and, only ondriver request, the permitted speed. The display of the permitted speed shall also bestopped on driver request.4.4.8.1.11 Intentionally deleted.4.4.8.1.12 Note: for the list of main functions related to this mode, refer to chapter 4.5 “Modesand on-board functions”.4.4.8.2 Used in levels4.4.8.2.1 Used in level 0, NTC, 1, 2 and 3.4.4.8.3 Responsibilities4.4.8.3.1 The ERTMS/ETCS on-board equipment is responsible for the supervision of theshunting mode speed limit, and that the engine with the active antenna is tripped whenpassing the defined border of the shunting area (only if there is a defined border:balise group not in the list given by trackside, or balise group giving the information“stop if in shunting”).4.4.8.3.2 The driver is responsible for:a) Remaining inside the shunting area defined by a procedure or an external systemoutside ERTMS/ETCS (also when the shunting area is protected by balises)b) Train/engine movements and shunting operations4.4.9 FULL SUPERVISION4.4.9.1 Description4.4.9.1.1 The ERTMS/ETCS on-board equipment shall be in the Full Supervision mode when alltrain and track data, which is required for a complete supervision of the train, isavailable on board.4.4.9.1.2 Full supervision cannot be selected by the driver, but shall be entered automaticallywhen all necessary conditions are fulfilled.4.4.9.1.3 To be in Full Supervision mode, SSP and gradient are not required for the wholelength of the train, but shall be at least available from the FRONT END of the train.4.4.9.1.4 Once in Full Supervision mode, if SSP and gradient are not known for the whole lengthof the train, an indication “ENTRY IN FULL SUPERVISION” shall be clearly displayedto the driver until SSP and gradient are known for the whole length of the train.4.4.9.1.4.1 Note: this indication may also be displayed in case the train length has been increased,see 3.18.3.8.4.4.9.1.5 The ERTMS/ETCS on-board equipment shall supervise train movements against adynamic speed profile.4.4.9.1.6 The ERTMS/ETCS on-board equipment shall display the train speed, the permittedspeed, the target distance and the target speed to the driver (this list is not exhaustive– refer to chapter 4.7 “DMI depending on modes”).4.4.9.1.7 Note: for the list of main functions related to this mode, refer to chapter 4.5 “Modesand on-board functions”.4.4.9.2 Used in levels4.4.9.2.1 Used in level 1, 2 and 3.4.4.9.3 Responsibilities4.4.9.3.1 The ERTMS/ETCS on-board equipment is fully responsible for the train protection(except for the 2 situations described below).4.4.9.3.2 The driver is responsible for respecting the EOA when approaching an EOA with arelease speed.4.4.9.3.3 When “ENTRY IN FULL SUPERVISION” is displayed to the driver, the driver isresponsible for respecting speed restrictions that apply for the part of the train that isnot covered by SSP and gradient data.4.4.10 UNFITTED4.4.10.1 Description4.4.10.1.1 The Unfitted mode is used to allow train movements in either:a) Areas that are equipped neither with ERTMS/ETCS track-side equipment nor withnational train control systemb) Intentionally deletedc) Areas that are equipped with ERTMS/ETCS trackside equipment and/or nationaltrain control system(s), but operation under their supervision is currently notpossible4.4.10.1.2 The ERTMS/ETCS on-board equipment shall supervise train movements against aceiling speed: the lowest of the maximum train speed and the Unfitted mode speedlimit for unfitted area (national value).4.4.10.1.2.1 Intentionally deleted.4.4.10.1.3 The ERTMS/ETCS on-board equipment shall also supervise temporary speedrestrictions.4.4.10.1.4 The ERTMS/ETCS on-board equipment shall display the train speed to the driver.4.4.10.1.5 Note: for the list of main functions related to this mode, refer to chapter 4.5 “Modesand on-board functions”.4.4.10.2 Used in levels4.4.10.2.1 Used in level 0.4.4.10.3 Responsibilities4.4.10.3.1 The ERTMS/ETCS on-board equipment supervises a ceiling speed and (if available)temporary speed restrictions.4.4.10.3.2 The driver must respect the existing line-side signals and is fully responsible for trainmovements.4.4.11 STAFF RESPONSIBLE4.4.11.1 Description4.4.11.1.1 The Staff Responsible mode allows the driver to move the train under his ownresponsibility in an ERTMS/ETCS equipped area.4.4.11.1.2 This mode is used when the system does not know the route. For example:a) After the ERTMS/ETCS on-board equipment starts-up (awakening of the train).b) To pass a signal at danger / override an EOA.c) After a trackside failure (for example: loss of radio contact).4.4.11.1.3 The ERTMS/ETCS on-board equipment shall supervise train movements against:a) a ceiling speed: the staff responsible mode speed limitb) a given distance (regarding its origin location see 4.4.11.1.3.1). The ERTMS/ETCSon-board equipment shall supervise braking curves with a target speed of zero tothe end of this distance. If the train overpasses this distance (see next note) theERTMS/ETCS on-board equipment shall trip the trainc) a list of expected balise groups, if this list has been sent by the RBC. The trainshall be tripped if over-passing a balise group that is not in the list. (When anempty list is sent, no balise group can be passed. When no list is sent, all balisegroups can be passed)d) balise groups giving the order …stop if in SR‟. This order shall immediately trip thetrain, unless the over-passed balise group is included in a list of expected balisesas defined in item c)e) running in the direction opposite to the train orientation (reverse movementprotection)4.4.11.1.3.1 The ERTMS/ETCS on-board shall determine the start location of the SR distanceas follows:a) If the National/Default value determines the max permitted distance to run in SRmode, the starting point of this distance shall refer to the estimated position of thetrain front when SR mode was entered, or, already in Staff Responsible mode,when Override was activated.b) If the max permitted distance to run in SR mode is determined by the valuetransmitted by the RBC, or entered by the driver, the start location of the distanceshall refer to the estimated position of the train front when the distance informationis received or entered.c) If the max permitted distance to run in SR mode is determined by the valuetransmitted by EUROLOOP, the distance information transmitted by EUROLOOPshall be referred to one or more reference balise groups. On-board shall evaluatethe distance to run in SR mode by matching the reference balise groups given withthe LRBG.In case the LRBG is, due to a change of orientation, in front of the train when thedistance to run in SR mode is to be determined from the EUROLOOP information,the complete distance to run in SR mode shall be determined as the distancegiven by EUROLOOP plus the distance between the estimated train front end andthe LRBG.4.4.11.1.4 Note: Since the gradient is unknown, the supervision of the braking curves in StaffResponsible mode does not ensure that the train will not pass the given distance.4.4.11.1.5 The ERTMS/ETCS on-board equipment shall give the possibility to the driver to modifythe value of the SR mode speed limit and of the given distance. This shall be possibleonly at standstill.4.4.11.1.5.1 If a train movement is detected while the driver is entering the SR speed/distancelimits, the ERTMS/ETCS on-board equipment shall trigger the brake command.4.4.11.1.6 In level 2/3, the driver shall have the possibility to request a new distance to run inStaff Responsible, by selecting "Start". This triggers an MA request.4.4.11.1.6.1 Note: Once the SR distance is covered, the driver may have to go further.4.4.11.1.6.2 When entering SR mode, the value applicable for SR mode speed limit and thevalue applicable for SR distance shall be the corresponding National/Default values.Exception for SR distance: SR mode is authorised by RBC giving an SR distance.4.4.11.1.6.3 While in SR mode, the value applicable for the SR mode speed limit shall be, ifavailable, the last value entered by the driver.4.4.11.1.6.4 While in SR mode, the value applicable for the SR distance shall be, if available,the last value received by the ERTMS/ETCS on-board equipment amongst:a) the distance to run in SR entered by the driver;b) the distance to run in SR given by trackside.4.4.11.1.6.5 When "Override" is selected, the SR mode speed limit value and the SR distancevalue previously entered by driver or given by trackside, if any, shall be deleted. Thecorresponding National/Default values shall enter in force.4.4.11.1.6.6 If the train is in SR and receives a new distance to run in SR mode from theRBC, the stored list of expected balise groups, if any, shall be deleted or shall bereplaced by the list of expected balise groups sent together with the distance to run inSR.4.4.11.1.6.7 If an ERTMS/ETCS on-board equipment in SR mode, after having received fromEUROLOOP max permitted distance to run in SR mode information, detects the mainsignal balise group being part of this information then it shall ignore any new maxpermitted distance to run in SR mode information from that loop.4.4.11.1.7 The ERTMS/ETCS on-board equipment shall display the train speed and the (whenactive) override (permission to pass a signal at danger, trip inhibited). The permittedspeed, target distance and the target speed shall be displayed only on driver request,until the driver requests to stop their display.4.4.11.1.8 Intentionally deleted.4.4.11.1.9 If receiving a "track ahead free" request from the RBC, the ERTMS/ETCS on-boardequipment requests the driver to enter the "track ahead free" information.4.4.11.1.10 Note: for the list of main functions related to this mode, refer to chapter 4.5 “Mo desand on-board functions”.4.4.11.1.11 Intentionally deleted.4.4.11.2 Used in levels4.4.11.2.1 Level 1, 2 and 3.4.4.11.3 Responsibilities4.4.11.3.1 The ERTMS/ETCS on-board equipment supervises a ceiling speed and a SR distanceif finite (and if level 2/3, might also supervise a list of balises).4.4.11.3.2 The driver must check if the track is free, if points are correctly positioned, and mustrespect the existing line-side information (signals, speed boards etc.).4.4.11.3.3 When using the possibility to modify the value of the SR mode speed limit and of thegiven distance, the driver is responsible for entering reasonable values.4.4.12 ON SIGHT4.4.12.1 Description4.4.12.1.1 The On Sight mode enables the train to enter into a track section that could be alreadyoccupied by another train, or obstructed by any kind of obstacle.4.4.12.1.2 On Sight mode cannot be selected by the driver, but shall be entered automaticallywhen commanded by trackside and all necessary conditions are fulfilled.4.4.12.1.3 The ERTMS/ETCS on-board equipment shall supervise train movements against adynamic speed profile.4.4.12.1.4 The ERTMS/ETCS on-board equipment shall display the train speed to the driver (thislist is not exhaustive). The permitted speed, target distance,target speed and releasespeed (if any) shall be displayed only on driver request, until the driver requests to stoptheir display.4.4.12.1.5 If receiving a "track ahead free" request from the RBC, the ERTMS/ETCS on-boardequipment requests the driver to enter the "track ahead free" information.4.4.12.1.6 To be in On Sight mode, SSP and gradient are not required for the whole length of thetrain, but shall be at least available from the FRONT END of the train.4.4.12.1.7 Once in On Sight mode, if SSP and gradient are not known for the whole length of thetrain, an indication “ENTRY IN ON SIGHT” shall be clearly displayed to the driver untilSSP and gradient are known for the whole length of the train.4.4.12.1.7.1 Note: this indication may also be displayed in case the train length has beenincreased, see 3.18.3.8.4.4.12.1.8 Deleted4.4.12.1.9 Note: for the list of main functions related to this mode, refer to chapter 4.5 “Modesand on-board functio ns”.4.4.12.2 Used in levels4.4.12.2.1 Used in level 1, 2 and 3.4.4.12.3 Responsibilities4.4.12.3.1 The ERTMS/ETCS on-board equipment is responsible for the supervision of the trainmovements.4.4.12.3.2 The driver is responsible for checking the track occupancy when moving the train,because the track may be occupied.4.4.13 TRIP4.4.13.1 Description4.4.13.1.1 Deleted4.4.13.1.1.1 Note: Application of emergency brakes and train trip are two different things. Forexample, exceeding the permitted speed leads to application of the emergency brakes,but as long as the train does not pass the EOA, it is not a train trip.4.4.13.1.2 The ERTMS/ETCS on-board equipment shall command the emergency brakes (nobrake release is possible in Trip mode).4.4.13.1.3 The ERTMS/ETCS on-board equipment shall indicate to the driver the reason of thetrain trip.4.4.13.1.4 The ERTMS/ETCS on-board equipment shall request an acknowledgement from thedriver once train is at standstill (to allow the driver to acknowledge the train trip).4.4.13.1.4.1 Note: This acknowledgement is mandatory to exit from Trip mode.4.4.13.1.5 Note: for the list of main functions related to this mode, refer to chapter 4.5 “Modesand on-board functions”.4.4.13.1.6 Closing the desk while being in Trip mode will not cause a mode change but nointeraction with the driver shall be possible as long as the desk is closed, exceptisolation of the ERTMS/ETCS on-board equipment4.4.13.2 Used in levels4.4.13.2.1 Used in level 0, NTC, 1, 2 and 3.4.4.13.3 Responsibilities4.4.13.3.1 The ERTMS/ETCS on-board equipment is responsible for stopping the train and formaintaining the train at standstill.4.4.13.3.2 The driver has no responsibility for train movements.。
Panasonic WMI Provider GUI Panasonic (PSSNA) 1.00

WMI Provider GUIPanasonic (PSSNA)Version: 1.00 L31Update Notes∙Added CF33 Skylake Main tabs (missing some BIOS options).∙Added support for FZ-Q1, FZ-Q2MK1, FZ-XZ6 (EU), CF-33 and CF20MK2∙Added support for “Secure Boot Control” Setting (Models supported – CF-20MK1+, CF-54MK1+, and FZ-M1MK2System Requirements∙Windows XP, Windows Vista, Windows 7, Windows 8, or Windows 10.∙.NET Framework 3.5∙Panasonic Misc Driver∙Panasonic WMI Provider 3.13 (included in installation)Supported ModelsCF-W8 mk1CF-T8 mk1, mk3, mk4CF-F8 mk1, mk3CF-C1 mk1, mk2CF-C2 mk1, mk2FZ-M1 mk1, mk2FZ-M1V mk1, mk2FZ-G1 mk1, mk2, mk3, mk4FZ-Q1 mk1FZ-Q2 mk1CF-AX2 mk1, mk2CF-AX3 mk1, mk2, mk3CF-LX3 mk2, mk3CF-D1 mk1, mk2, mk3CF-54 mk1, mk2UT-MA6 mk1UT-MB5 mk1FZ-Y1 mk2CF-74 mk4CF-52 mk2, mk3, mk4, mk5CF-53 mk1, mk2, mk3, mk4CF-19 mk3, mk4, mk5, mk6, mk7. mk8CF-30 mk3CF-31 mk1, mk2, mk3, mk4, mk5CF-33Mk1CF-20 mk1CF-U1 mk1, mk2CF-H1 mk1, mk2CF-H2 mk1, mk2, mk3*Special note for some settings in the WMI Tool:∙“Secure Boot Control” Setting– Is read-only, cannot be changed for security reasons∙“UEFI Boot” Setting – Cannot be enabled through WMI, for security reasons∙“Set CSM Support” Setting –Changing setting will fail when “Secure Boot” Setting is enabledWMI - BIOS configuration ToolUsageDouble click "WMI Provider GUI" shortcut to start the utility. WMI Provider GUI is a Windows based utility that can be used to modify BIOS settings on Panasonic Toughbooks. The modifications can be applied on the same unit on which the utility is running, or remotely by exporting a VBS script which is then executed on a remote unit.Operation: Login ScreenThe utility can run in two modes which are selectable at start up.The "Connect to local PC" mode can be used to export BIOS settings on the currently running machine. The "Config only mode" can be used to generate .INI config files which can then be opened later, or it can be used to export VBS scripts.If "Connect to local PC" is selected, the utility will attempt to establish a connection with the BIOS, if the BIOS is protected by a supervisor password, you will be asked to enter it now. The supervisor password is required to make modifications to the BIOS, in the local connection and in the VBS script. Operation: Main Window in local connection modeOnce in the main window, you can change any BIOS settings that are available on the model to which you are connected to. The current values of the settings will be displayed in the window, select the categories under "BIOS" on the left to display the appropriate settings on the right side.The "Apply to BIOS" option must be clicked to apply the BIOS settings to the local machine. Once complete, the message "BIOS settings successfully applied" will be displayed, if any error occurred while applying the settings, a log file is available, called "toughbookwmi.txt" which will contain a detailed description of the error. Please send this file, including a screenshot of the error, to the person from whom you received this utility.Operation: Main Window in config only modeSince in "Config only mode" the model is unknown, it should be selected in the "Filter by model/mark" options at the top of the window. The exported VBS script will remember this model number and will verify it before applying them.Operation: VBS scriptA VBS script can be exported from both config and local connection mode. When executed, this script will apply the settings on the machine on which it is executed on. Administrators can generate specific settings to apply on their units, then export the VBS script, deploy this script along with the installation of WMI Provider, and then execute the script remotely to apply the settings. If a supervisor password is set up on the machine, it must be passed to the script as a command line argument,e.g. ”m yBiosScript.vbs secret”. It is recommended to use the command line utility ”c script”included with Windows to execute the scripts, this will display all output from the script on the console including any errors. The output can also be exported to log a file.Example:cscript myBiosScript.vbs secret > logfile.txtThis command will execute ”m yBiosScript.vbs” with the supervisor password“secret” and write the results to the file ”logfile.txt”.WMI - BIOS configuration Walkthrough1.WMI Tool consists of two parts: WMI GUI and WMI provider library, first the WMI provider must beinstalled, then we will be able to run “ToughBook WMI GUI.exe”. (WMI Tool can be used to modify BIOS settings on Panasonic Toughbook devices: The desired modifications can be applied to a local unit or remote units by exporting VBS script files executed on remote unit.)2.After running the “ToughBook WMI GUI.exe”,you will be prompted to select one of two modes,which are explained below.i.Connect to Local PC ModeConnect to local PC Guide:a.Establishes connection with BIOS (this mode is used to modify BIOS on the currentmachine), if BIOS is protected with Supervisor password, user will be asked to enterSupervisor Password. If prompted to enter password: enter the appropriateSupervisor password assigned to your computer. (Supervisor password is required tomake modification to BIOS in local connection mode and in the VBS scripts)b.After entering password, you are now able to change BIOS parameters by selecting thecategory on the left side, and changing the parameters using the dropdown menu.Once finished selecting the custom BIOS parameters, click on "apply to BIOS" to applyBIOS settings to local machine. Once this operation is completed, you will see "BIOSsettings successf ully applied“, if any error occurs – a log file will be created showingthe details of the occurred error.132ii.Config Only ModeConfig Only Mode Guide:a.This mode can be used to generate .INI files or to export VB scripts (used to create acustom BIOS configuration which can be sent to other machines to apply the selectedsettings). Select the computer model by “F ilter model/mark” menu at the top. (VBscript will remember model number before apply those settings)b.After selecting the model and mark, select the settings you want to change using thecategories on the left and using the dropdown menus.c.When finished selecting the desired settings, the custom configuration can be savedand applied later on a different machine the WMI tool by saving as an “.INI” file. To doso, press on “File”, then “Save as” and choose where you would like to save the file.12 435d.It is also possible to save the configured WMI settings as a VB script (after you haveselected the desired BIOS settings). To do so, press on “File”, then “Export to VBS” and choose where you would like to save the file.12e.The VB scripts created in the previous step can be applied to BIOS using cscript utilityusing syntax shown below, using the Windows command prompt. The commandoutput will be logged into log.txt file and will be found at the specified file location.EXAMPLE COMMAND:(If your .vbs file (VB script) is named “MyCustomBIOS.vbs” and is located at filelocation “C:\MyFolder\” and your BIOS Supervisor password is “secret”. Thecommand should as be as shown below.C:\MyFolder>cscript MyCustomBIOS.vbs secret > log.txtApplying settings using VB script and command prompt.。
Rabbit BL2600 和 RN1100 的 LabVIEW 虚拟仪表板配置说明书

AN408A Web-ConfigurableLabVIEW Virtual Instrumentfor aBL2600 and RN1100This application note (AN408) expands on Application Note 407 (AN407) to describe a more advanced BL2600 application to interface with a PC-based LabVIEW Virtual Instrument (VI). It is recommended that readers examine the AN407 application before considering this one. All application notes are avail-able on the Rabbit website.The application described in AN408 adds the following improvements over the application described in AN407:• Configuration with a web browser• Use of a RabbitNet RN1100 digital expansion board• Web page display of BL2600 and RN1100 I/O data• E-mail alarms for any BL2600 or RN1100 inputs.• Flash storage of configuration parameters• Multiple user IDs and passwords can be defined• Allows different levels of access to several users• Passwords are not transmitted in clear text• Storage of last-entered IP address and user ID in Windows registry• More efficient data transmissionThe configuration pages are created using RabbitWeb™, our rapid application development system for creating web pages that interface with embedded applications. This application is not designed to handle multiple VI users simultaneously, but the web server can serve pages to multiple users concurrent with VI interface usage. Because multiple VIs are not implemented, attempting to access the BL2600 from a sec-ond VI while one is already running will cause a timeout or other TCP/IP error in the VI.Figure 1. LabVIEW/BL2600 Virtual InstrumentIn both the AN407 VI and the AN408 VI you can use switches and other controls to tell the BL2600 to set specific analog or digital outputs. The AN408 VI adds output indicators and more I/O by using theRN1100 expansion board. The AN408 VI reads the outputs from the BL2600, as well as from the RN1100, to set the state of the corresponding indicators. The VI receives the outputs from shadow data, allowing for independent setting of output data by the remote units if some autonomous control heuristics are added to the BL2600 program.The BL2600 program is complete enough that some developers will be able to use it without modification, creating an application entirely in the LabVIEW development environment if local autonomy on theBL2600 is not needed. Others will want to modify the BL2600 program to have autonomy to control pro-cesses or tests when no VI is being used, or to augment human control when using the VI. The versatility of Dynamic C and LabVIEW make it easy to create applications with different degrees of autonomy. A BL2600 program that runs completely autonomously but allows real-time viewing only of data in a VI is another possibility.Because the connection is done with simple TCP/IP socket programming, the same BL2600 program used here could also interface with PC front ends created with such tools as Visual Basic, Delphi, or Windows C++ development packages.Running the Sample ApplicationYou can loop back I/Os on the SBC to see the VI in action, as with AN407, or connect to external input or measurement devices. Read the BL2600 User’s Manual before using the board’s I/Os.The BL2600The sample program to run the SBC is BL2600_VI_02.C. The program can be found in AN408.zip and AN408b.zip, two ZIP files that accompany this document. AN408.zip contains application files and the installation for LabVIEW support. AN408b.zip contains only the application files. Connecting to the NetworkYou must have a free, fixed IP address on your local network to run this application. Connect the BL2600 Ethernet port to a hub or switch, or connect it directly to your computer’s Ethernet port using a cross-over cable. The PC’s IP address must be set to a fixed address different from the IP address for the BL2600. Defining the Default ConfigurationsIf you change nothing in the program BL2600_VI_02.C, you will be able to run the program and con-figure the BL2600 program using the RabbitWeb interface (i.e., the HTTP server provided inBL2600_VI_02.C) in a web browser using the factory default address of http://10.10.6.148. (The HTTP server and VI communications use the same IP address but different ports.)Figure 2. Front page for configuration via browserTo change the default IP address at compile time, the following macros near the top of the program should be changed. These override the IP address setting in TCP_CONFIG.LIB, and are defined in separate macros and variables as a convenience for working with them as RabbitWeb variables.#define IPADDR0 10#define IPADDR1 10#define IPADDR2 6#define IPADDR3 148A number of other default configurations can be changed at compile time. There are too many too list here, and they can all be changed at run-time via the more intuitive browser interfaces.If any default setting is to be changed at compile time, it is important change at least one character in this macro definition:#define DAK_INI_FLAG "00 BL2600 DAAK Z-World/Rabbit Semiconductor 2004"Default configurations are stored in flash memory on program startup whenever the exact string above is not found in the first position in the User block space in flash. The first time the program is run the config-uration parameters, including DAK_INI_FLAG, are written to flash. Thereafter, they are written only if DAK_INI_FLAG is different from the string stored at location 0 in the User block. This method is often called “super-initialization.”All of the following may be changed at compile-time or at run-time via the web browser:• BL2600 analog and digital I/O configuration• RN1100 analog and digital I/O configuration• IP address, LabVIEW port• User account IDs, passwords, and administration rights• E-mail alarms settings for inputs, e-mail alarm recipient addresses and the e-mail alarm interval Read the code comments in the program to learn more about changing default configuration information at compile time.Using the RN1100To add an RN1100 unit, connect the RN1100 power and communication cable as described in the RN1100 manual, go to the “Configure RN1100 web page” and hit the Add button. The application currently han-dles only one RN1100, but most of the program is structured to allow for two. Only some of the target communication needs to be modified to handle the second unit. Modifying the VI and C program to handle a second unit is left as an exercise for the user. The application currently sends and receives dummy data for one RN1100 even if no RN1100 is connected. The design decision that needs to be made to handle a second unit is whether to send dummy data for it, change the VI to handle a change in the size of the data stream while running, or to disallow adding/removing RN1100 units while the VI is running. The first and last choices will be the easier ones to implement.Compile and Run BL2600_VI_02.CCompile the program and run it as you normally would. See the “Getting Started” section of the BL2600 User’s Manual if you have not done this yet.The VIThe Zip file accompanying this document contains the LabVIEW file, BL2600_VI_02.VI. This file is the VI and is modifiable with LabVIEW. The Zip file also contains an EXE version of the VI that runs stand-alone (after installing LabVIEW support) and cannot be modified with LabVIEW. The software needed to create EXE files from VI files is not part of the basic LabVIEW package and must be purchased separately from National Instruments.You can run either version of the VI, BL2600_VI_02.VI or BL2600_VI_02.EXE.Running BL2600_VI_02.VIDouble click on the file, BL2600_VI_02.VI. You must have LabVIEW version 7.1 or later installed to open this VI file. Now, click the Run Continuously button (Figure3) on the LabVIEW control bar.Figure 3.When you start the VI, it will loop waiting for you to click the Start button. But, before pressing the Start button, you must enter a password and user ID. The IP address and the user ID are stored in the Windows registry and will be filled in automatically, but the password must be entered each time the program is stopped and restarted.“BL2600” is a default for both user ID and password programmed into the BL2600. Now, press the Start button within the VI, and once the password is accepted, you can adjust the analog slide controls and flip toggle switches to control output while you view input.Running BL2600_VI_02.EXEBefore you can run the stand-alone VI, BL2600_VI_02.EXE, you must already have LabVIEW or Lab-VIEW support installed, or you need to run the LabVIEW client installation in the /install folder - the installation program there is SETUP.EXE. Once you have run the installation, you can runBL2600_VI_02.EXE by double clicking on it; then, click the Run Continuously button (Figure3) so that it appears black.As described above, when you start the VI, it will loop waiting for you to press the Start button. After you press the Start button, and once the password is accepted, you can adjust the analog slide controls and flip toggle switches to control output.How It WorksThis section describes details of both the LabVIEW VI and the program running on the BL2600 LabVIEW VIThe LabVIEW program is laid out as a large “flat sequence” structure. The operation is very similar to the AN407 VI, so we will focus on the functional changes and additions here. Within LabVIEW, you can look at the block diagram for BL2600_VI_02.VI. You can toggle between the block diagram and the front panel by using the keyboard shortcut, Ctrl+E.The VI discussed here uses some trickier LabVIEW techniques to convert binary data to panel indicator data. It uses “clusters” of indicators and controls so that each indicator and control does not have to be wired on the diagram individually, as in the AN407 VI.InitializationAs with the AN407 VI, the first five frames of the block diagram perform fairly self-explanatory initializa-tion and password verification. The labeling facilities of LabVIEW were heavily used to describe what happens. The new elements are:• Windows registry storage of the panel-entered user ID and IP address - these values are automati-cally put in the text entry boxes on the next run of the program.• Some encoding is done on the password so it doesn’t get sent in clear textFrame 2, shown in Figure4, defines how the stored IP address is retrieved. If there is an error reading the registry, it is assumed that it has not been created yet and the entry is then created with default values writ-ten to it. Writing to the Windows registry is shown in the larger True block in Figure4; the default IP address is 10.10.6.148. If this fails, the default IP address is assigned to the appropriate variable, shown in the small True block located within the larger one, and execution continues.Figure 4. Getting the IP address from the registry (Frame 2)After the Start button has been clicked, whatever was entered for the IP address on the VI panel is written to the Windows registry. This is done in Frame 5 using the same method we just saw in the True block from Frame 2. Writing the user ID to the registry is also done using this same method.The password encoding is done in Frame 4. The relevant portion of Frame 4 is shown in Figure5. Each byte is XOR’ed with its index position added to an arbitrary number. (Not completely arbitrary, a value is chosen such that the high bit will always be set for encrypted alpha numeric characters thus preventing a string-terminating zero from appearing prematurely in the encrypted string, since the password/user ID is sent in ASCII mode.) The rectangle with “x + 165” is a LabVIEW Expression node. The input is the For loop variable i (which is created automatically when a For loop structure is created), so the output isi+165 for each loop iteration.Figure 5. Encryption algorithm in the VI (Frame 4)The properties of the XOR operation allow the exact same method to decode the encoded text on theBL2600 side to check the password (which is appended to the front of the array userid): // Quick & dirty decodingfor(j=0; j<strlen(users[i].pw); j++){userid[j] = (165+j) ^ userid[j];}Main Processing LoopFrame 7 is the main processing frame. The frame’s processing is a While loop that executes as long as the Stop button is not hit, and the boolean variable STOPALL is false. It is set to true when a TCP or other error occurs. The overall operation is like Frame 6 in the AN407 VI, but here we process data in binary format sent from the BL2600; ASCII mode must still be used to send data to the BL2600, because Lab-VIEW Express has no TCP/IP socket write binary mode. We also make use of LabVIEW’s “clusters” of indicators and controls to avoid wiring each channel individually in the block diagram.As with the AN407 VI, the default case is a non-ACK’ed password or TCP/IP error, which causes a dialog error message to display on the VI, and the While loop to exit. An iteration variable is created automati-cally at the lower left when a While loop is created, and here we hook the variable to a VI display indicator to show the number of iterations.The next nested structure is a Case structure with a true and a false case - the LabVIEW equivalent of an if-else construct. The case for no TCP/IP error and an ACK’ed password (output of the string match func-tion equals 5) contains a nested flat sequence structure. The first frame in the sequence, shown in Figure6, reads the VI inputs and forms them into a string. First, the digital input toggle switch clusters are convertedto boolean arrays to integers and finally to two text strings which are concatenated to form the initial string input for the “Format into string” function. The format string function with the “%6.3f %6.3f %6.3f%6.3f” format specifier will look familiar to C programmers. It is used to format the analog output control floating point values. Finally, the RN1100 digital output toggle switches are converted to an ASCII integer and appended to the output string. Again, the use of clusters here makes for a much simpler diagram than if each element had to be wired one at a time.Figure 6. Forming the output data stringThe second frame in the nested flat sequence sends the output string to the BL2600 with a TCP/IP socket write, and the third frame receives a data packet from the BL2600.The third frame in the nested flat sequence receives a binary data string containing both input data and shadow output data from the BL2600 and RN1100. Figure7 shows a part of the conversion from binary data to VI panel output in the fourth frame.Figure 7. Converting binary data to VI panel outputThe conversion for digital values requires extracting the correct number of bytes from the correct offset in the data packet, reversing the byte order if it is a multi-byte value, converting to an unsigned integer of the right size, then to a boolean array which is fed to a cluster of panel indicators. Note that a numeric constant is used to define the type and size of the output of the Type Cast function. The value of the constant is meaningless, the constant’s data type and size are set in the properties dialog of the constant. For analog values, For-loop structures are used to extract one 4-byte floating point value at a time from the data packet and insert it into an array of floating point values which are fed to a of cluster of VI panel indica-tors.More on the BL2600 ProgramThe high-level operation for the BL2600 application is described in the following pseudocode. The struc-ture of the actual code differs somewhat because the LabVIEW Communication task is implemented with a Dynamic C costatement. The If statements shown at the top of the task are actually “waitfor” statements in the code. See the Dynamic C manual for a discussion of multitasking with costatements.B EGIN:I F (FIRST RUN) W RITE ALL PROGRAM PARAMETERS TO FLASHR EAD ALL PROGRAM PARAMETERS FROM FLASHI NITIALIZE BOARD AND I/OI F (RN1100 PRESENT) I NITIALIZE RN1100S ET BL2600&RN1100 OUTPUTS AND SHADOW DATA TO INIT. VALUESR EAD BL2600 & RN1100 INPUTSI NITIALIZE E THERNET AND TCP/IP STACKI NITIALIZE HTTP SERVERD EFINE USER AND ADMIN HTTP ACCESSESW HILE (1)[L AB VIEW C OMMUNICATION T ASK[I F (E THERNET NOT READY) E XIT TASKI F (VI CLIENT HASN'T OPENED SOCKET) E XIT TASKI NITIALIZE L AB VIEW VI SOCKETS ET VI SOCKET TO ASCII MODER EAD USER ID & PASSWORD FROM VI SOCKETV ERIFY USER ID & PASSWORDI F (A CCESS GRANTED)[W HILE (VI SOCKET ACTIVE)[R EAD VI PANEL DATA FROM SOCKETP ARSE RECEIVED DATA AND SET OUTPUT SHADOW DATAF ORM DATA FOR VI FROM LAST INPUT VALUES AND SHADOW OUTPUT DATAW RITE DATA TO SOCKETY IELD TIME TO BACKGROUND PROCESSING]] // E ND I F] // E ND OF L AB VIEW T ASK//**** B ACKGROUND PROCESSING ****R EAD BL2600 AND RN1100 DATAI F (A LARM CONDITION) S END ALARM EMAIL(S)HTTP SERVER TICK CALLI F (MESSAGE RECEIVED FROM BROWSER INTERFACE)H ANDLE CONFIGURATION CHANGESW RITE TO BL2600 AND RN1100 OUTPUTS FROM SHADOW DATA] // E ND W HILEE-Mail AlarmsFrom the page shown in Figure2, click on the link titled “Configure E-Mail Alarms” to go to the page shown in Figure8. As you can see, it is easy to configure an e-mail alarm for any of the I/O channels. The BL2600 will send an e-mail to all of the addresses listed whenever an alarm condition is true. To repeat-edly send e-mails while the alarm condition remains true, type a value other than 0 in the textbox labeled “Interval.” The unit of measure is 15 minutes, so a value of 4 causes an e-mail to be sent every 60 minutes.Figure 8.Multiple Users and Their AccessFrom the page shown in Figure2, click on the link titled “Configure Access” to go to the page shown in Figure9. This configuration page allows you to make runtime changes to the IP addresses, as well as the list of users. By checking the “Admin rights” box when adding a user to the list you can allow additional access to that user. This has some security concerns which are discussed in the section titled, “Security.”Figure 9.Flash Storage of Configuration ParametersAs mentioned previously in the section titled, “Defining the Default Configurations,” configuration param-eters are stored in the User block. This is an area on the primary flash that is accessed with the API func-tions found in the library IDBLOCK.LIB. To examine the code that handles the configuration parameters, look in BL2600_VI_02.C at the function InitializeAll().SecurityConfiguration pages in the web interface are password protected. Up to 16 users may be defined with user-names and passwords that are used for both the web configuration and the VI front panel access. Only users with administration rights may change configurations via the browser interface. The default adminis-trator username and password are both admin1. Two additional default username/passwords are provided without administration rights, BL2600/BL2600 and user01/user01. When you change user accesses at run-time, you will not be able to use the same word for username and password. Other rules and instructions for changing user information and other parameters are shown in the configuration web pages. Whenever security might be an issue, it is advisable to change all the user passwords at compile time or at run-time before deploying.The password protection for the configuration web pages uses digest authentication. It could be modified to use SSL with the purchase of the Dynamic C SSL module. Transmission security for access to theBL2600 through the VI panel is achieved by a quick-and-dirty encoding of the password that would be no challenge to a serious hacker. If more security is desired for TCP/IP within LabVIEW, developers will have to explore what is available from National Instruments or third parties. LabVIEW Express 7.1 has nothing available for enhanced TCP/IP security short of implementing security protocols by hand.If high security is important, disallow users with admin rights use of the VI interface so that admin pass-words are not habitually sent with weak encoding from the VI. The following commented-out line is included in the source code to disallow users with admin rights from using the VI:// Use this if test instead to prevent administrator from// using the LabVIEW VI// if(!strcmp(userid, inbuffer) && users[i].group != admin)Allowing only viewing of data in the VI so that dedicated hackers could not change outputs on the BL2600 remotely is another possible security measure.Distributed VIs can have the block diagram password protected for no write access without a correct pass-word, no read or write access without a password, or no password protection at all. This is done on the LabVIEW file menu.More Information• Rabbit Semiconductor: • National Instruments: 。
西门子技术问题总汇

文档标题
如何设置模拟量输入模板 SM 431-7KF00的温度补偿? 如何解决 SIMATIC BATCH 的 IL43基本设备上 hotfix 安装的问题? 如果通过 PCS7 V6.1 SP1 DVD 单独安装 SIMATIC BATCH Report 需要注意哪些设置? 为什么冗余模拟量输出模块的每个通道只有一半电流输出? 使用WinCC/Web Navigator V6.1 SP1需要什么样的操作系统和软件? 是否 COM PROFIBUS 可以使用所有版本的 GSD 文件? 如何在 WinCC flexible 中组态与S7 控制器的 Profinet 连接? 如何在操作面板上设定定时器时间, 同时如何输出定时器的剩余时间? 数据块初始值与实际值的含义 如何通过窗口对象滚动条步进调节过程值参数? 使用 SINAUT ST7 向电子邮箱接受方发送文本信息 SMS 需要做何设置? 可以使用CPU317-2PN/DP替代在iMap中组态的CPU315-2PN/DP吗? 什么情况下插入C-PLUG卡或者C-PLUG有什么作用? 通过一台PC,可以使用哪种方式访问与IWLAN/PB link PNIO或IE/PB link PNIO连接的PROFIBUS设备? 当在SINAUT网络中使用4线变压器应该注意哪些设置? 在 SINAUT 网络中,使用MD3拨号调制解调器作为专线调制解调器时,要进行哪些设置? 如何安装 DCF77 天线, 当选择 DCF77 天线时需要注意什么? 使用SINAUT ST7向传真机发送文本信息时,需要进行哪些设置? 在 SINAUT 项目中发送短消息必须进行哪些特殊服务的设置? 如何在S7-300 PN CPU和CP343-1之间建立一个open TCP 通讯连接,以及如何进行数据交换? 如何在两个S7-300 PN CPU之间建立一个open TCP 通讯连接,以及如何进行数据交换? 哪些控制系统可以成功与SINAUT ST7一起使用? 使用“零-Modem”电缆连接 TIM 模块应该注意什么? 当用 SINAUT 诊断工具的ST1协议进行诊断时,为什么TIM的状态不能显示? TIM 3V-IE 和 TIM 3V-IE Advanced 模块在以太网上通信时使用哪个端口号? 如何对没有接入网络的S7-200CPU编程? 掉电后,LOGO!的程序会丢失吗? 从 PCS7 V6.1 起,为什么没有分配任何 hierarchy (PH) 的 测量点(变量)通过编译不能在OS中自动创建相应的变量? 在SFC中,如何实现从一个 Sequencer 跳出后回到另一个 Sequencer 的某个固定位置并继续执行? 如何实现过程变量的平均值归档? 存储文件的目标路径和备份可选路径有何作用? WinCC变量归档中如何实现采集周期小于500ms的变量归档? 为什么在 OS 上会显示如下信息“时间跳变通知-永久切换为从站模式”? 在西门子A&D产品支持网站是否可以下载关于ET200M的手册? 在S7-400上怎样安装冗余电源? UDT改变后怎样更新使用UDT产生的数据块。 为什么在FB块中使用OUT变量赋值被调用FB块的IN变量时出现错误信息34:4469? 如何查看4-mation导入-导出错误 不能正确引导8212-1QU IBM/Lenovo M52 ThinkCentre 实时趋势更新缓慢的原因 如何保存变量名字典CSV文件的格式
国际电子(National Instruments)USB-7845R OEM 多功能数字实时接口设

SPECIFICATIONSNI USB-7845R OEMR Series for USB Multifunction RIO with Kintex-7 70T FPGA Français Deutsch日本語한국어简体中文/manualsThis document contains the specifications for the National InstrumentsUSB-7845R OEM device. Specifications are typical at 25 °C unless otherwise noted.Caution Using the NI USB-7845R OEM device in a manner not described in thisdocument may impair the protection the NI USB-7845R OEM device provides. Analog InputNumber of channels8 ............................................................................Input modes DIFF, NRSE, RSE (software-selectable; ............................................................................selection applies to all channels)Type of ADC Successive approximation register (SAR) ............................................................................Resolution16 bits ............................................................................Conversion time 2 µs ............................................................................Maximum sampling rate500 kS/s (per channel) ............................................................................Input impedancePowered on 1.25 GΩ ║ 2 pF....................................................................Powered off/overload 4.0 kΩ min....................................................................Input signal range±1 V, ±2 V, ±5 V, ±10 V (software-selectable) ............................................................................Input bias current±5 nA ............................................................................ ............................................................................Input offset current±5 nAInput coupling DC ............................................................................Overvoltage protection....................................................................Powered on±42 V maxPowered off±35 V max....................................................................Table 1. AI Operating Voltage Ranges Over TemperatureAI Absolute AccuracyAbsolute accuracy at full scale numbers is valid immediately following internal calibration and assumes the device is operating within 10 °C of the last external calibration. Accuracies listed are valid for up to one year from the device external calibration.Absolute accuracy at full scale on the analog input channels is determined using the following assumptions:•TempChangeFromLastExternalCal = 10 °C •TempChangeFromLastInternalCal = 1 °C•number_of_readings = 10,000•CoverageFactor = 3 σ1The minimum measurement voltage range is the largest voltage the NI USB-7845R OEM device is guaranteed to accurately measure.2| | NI USB-7845R OEM SpecificationsTable 2. AI Absolute Accuracy (Calibrated) (Continued)Table 3. AI Absolute Accuracy (Uncalibrated)Calculating Absolute AccuracyAbsoluteAccuracy=Reading⋅(GainError)+Range*(OffsetError)+NoiseUncertaintyGainError=ResidualGainError+GainTempco*(TempChangeFromLastInternalCal)+ReferenceTempco*(TempChangeFromLastExternalCal)OffsetError=ResidualOffsetError+OffsetTempco*(TempChangeFromLastInternalCal)+INL_ErrorNoiseUncertainty=Refer to the following equation for an example of calculating absolute accuracy.NI USB-7845R OEM Specifications| © National Instruments| 3Absolute accuracy at full scale on the analog input channels is determined using the following assumptions:•TempChangeFromLastExternalCal = 10 °C •TempChangeFromLastInternalCal = 1 °C•number_of_readings = 10,000•CoverageFactor = 3 σGainError=104.4ppm+20ppm*1+4ppm*10GainError=164.4ppmOffsetError=16.4ppm+4.18ppm*1+42.52ppmOffsetError=63.1ppmNoiseUncetainty=NoiseUncertainty=7.89µVAbsoluteAccuracy=10V*(GainError)+10V*(OffsetError)+NoiseUncertaintyAbsoluteAccuracy=2,283µVDC Transfer Characteristics ............................................................................INL Refer to the AI Accuracy TableDNL±0.4 LSB typ, ±0.9 LSB max ............................................................................No missing codes16 bits guaranteed ............................................................................CMRR, DC to 60 Hz-100 dB ............................................................................Dynamic CharacteristicsBandwidthSmall signal 1 MHz........................................................................................................................................Large signal500 kHz4| | NI USB-7845R OEM Specifications............................................................................Crosstalk-80 dB, DC to 100 kHzAnalog Output ............................................................................Output type Single-ended, voltage output ............................................................................Number of channels8 ............................................................................Resolution16 bits ............................................................................Update time 1.0 µs ............................................................................Maximum update rate 1 MS/sType of DAC Enhanced R-2R ............................................................................ ............................................................................Range±10 V ............................................................................Output coupling DCOutput impedance0.5 Ω............................................................................NI USB-7845R OEM Specifications| © National Instruments| 5............................................................................Minimum current drive±2.5 mAProtection Short circuit to ground ............................................................................Overvoltage protectionPowered on±15 V max....................................................................Powered off±10 V max....................................................................Power-on state User-configurable ............................................................................Power-on glitch-1 V for 1 µs ............................................................................Table 4. AO Operating Voltage Ranges for Over TemperatureAO Absolute AccuracyAbsolute accuracy at full scale numbers is valid immediately following internal calibration and assumes the device is operating within 10 °C of the last external calibration. Accuracies listed are valid for up to one year from the device external calibration.Absolute accuracy at full scale on the analog output channels is determined using the following assumptions:•TempChangeFromLastExternalCal = 10 °C •TempChangeFromLastInternalCal = 1 °C2The minimum measurement voltage range is the largest voltage the NI USB-7845R OEM device is guaranteed to accurately measure.6| | NI USB-7845R OEM SpecificationsTable 5. AO Absolute Accuracy (Calibrated) (Continued)Calculating Absolute AccuracyAbsoluteAccuracy=OutputValue*(GainError)+Range*(OffsetError)GainError=ResidualGainError+GainTempco*(TempChangeFromLastInternalCal)+ReferenceTempco*(TempChangeFromLastExternalCal)OffsetError=ResidualOffsetError+AOOffsetTempco*(TempChangeFromLastInternalCal)+INL_Error Refer to the following equation for an example of calculating absolute accuracy.Absolute accuracy at full scale on the analog output channels is determined using thefollowing assumptions:•TempChangeFromLastExternalCal = 10 °C•TempChangeFromLastInternalCal = 1 °CGainError=87.3ppm+12.6ppm*1+4ppm*10GainError=139.9ppmNI USB-7845R OEM Specifications| © National Instruments| 7OffsetError=41.1ppm+7.8ppm*1+61ppmOffsetError=109.9ppmAbsoluteAccuracy=10V*(GainError)+10V*(OffsetError)AbsoluteAccuracy=2,498µVDC Transfer CharacteristicsINL Refer to the AO Accuracy Table ............................................................................DNL±0.5 LSB typ, ±1 LSB max ............................................................................Monotonicity16 bits, guaranteed ............................................................................Dynamic CharacteristicsSlew rate-10 V/µs ............................................................................Noise250 µV rms, DC to 1 MHz ............................................................................Glitch energy at midscale transition±10 mV for 3 µs ............................................................................5V OutputOutput voltage 4.75 V to 5.1 V ............................................................................Output current0.5 A max ............................................................................Overvoltage protection±30 V ............................................................................ ............................................................................Overcurrent protection650 mA8| | NI USB-7845R OEM SpecificationsDigital I/OCompatibility LVTTL ............................................................................Logic family User-selectable ............................................................................Default software setting 3.3 V ............................................................................Maximum input 3.6 V ............................................................................NI USB-7845R OEM Specifications| © National Instruments| 9Table 10. Digital Output Logic Levels (Continued)Output currentSource 4.0 mA....................................................................Sink 4.0 mA....................................................................Input leakage current±15 µA max ............................................................................Input impedance50 kΩ typ, pull-down ............................................................................Power-on state Programmable, by line ............................................................................Protection±20 V, single line ............................................................................Digital I/O voltage switching time 2 ms max ............................................................................Note Refer to NI RIO Software Help for more information about switching times.Reconfigurable FPGAFPGA type Kintex-7 70T ............................................................................Number of flip-flops82,000 ............................................................................Number of LUTs41,000 ............................................................................Embedded block RAM4,860 kbits ............................................................................Number of DSP48 slices240 ............................................................................Timebase40, 80, 120, 160, or 200 MHz ............................................................................Timebase accuracy, onboard clock±100 ppm ............................................................................Calibration ............................................................................Recommended warm-up time15 minutesCalibration interval 1 year ............................................................................10| | NI USB-7845R OEM SpecificationsOnboard calibration referenceDC level3 5.000 V (±2 mV)....................................................................Temperature coefficient±4 ppm/°C max....................................................................Long-term stability±25 ppm/1,000 h....................................................................Note Refer to Calibration Certifications at /calibration to generate acalibration certificate for the NI USB-7845R OEM deviceBus Interface ............................................................................USB compatibility USB 2.0 Hi-Speed or Full-Speed4Data transfers DMA, interrupts, programmed I/O ............................................................................Number of DMA channels3 ............................................................................Power RequirementInput voltage9 V to 30 V ............................................................................Max power20 W ............................................................................ ............................................................................Overvoltage protection40 VNote You must use a UL Listed ITE power supply marked LPS with theNI USB-7845R OEM device.PhysicalNote If you need to clean the device, wipe it with a dry, clean towel.Dimensions (PCB)17.5 cm × 16.3 cm (6.9 in. × 6.4 in.) ............................................................................Weight183 g (6.45 oz) ............................................................................I/O connectors Analog- 1 × 50 pin box header, ............................................................................Digital- 3 × 34 pin box header3Actual value stored in Flash memory4Operating on a full-speed bus will result in lower performance and you might not be able to achieve maximum sampling/update rates.NI USB-7845R OEM Specifications| © National Instruments| 11Maximum Working VoltageMaximum working voltage refers to the signal voltage plus the common-mode voltage. Channel-to-earth±12 V, Measurement Category I ............................................................................Channel-to-channel±24 V, Measurement Category I ............................................................................Measurement Category I is for measurements performed on circuits not directly connected to the electrical distribution system referred to as MAINS voltage. MAINS is a hazardous live electrical supply system that powers equipment. This category is for measurements of voltages from specially protected secondary circuits. Such voltage measurements include signal levels, special equipment, limited-energy parts of equipment, circuits powered by regulated low-voltage sources, and electronics.Caution Do not use the NI USB-7845R OEM device for connection to signals inMeasurement Categories II, III, or IV.Note Measurement Categories CAT I and CAT O (Other) are equivalent. Thesetest and measurement circuits are not intended for direct connection to the MAINSbuilding installations of Measurement Categories CAT II, CAT III, or CAT IV. Environmental-40 °C to 70 °COperating temperature ............................................................................(IEC 60068-2-1, IEC 60068-2-2)Storage temperature-40 °C to 85 °C ............................................................................(IEC 60068-2-1, IEC 60068-2-2)10% to 90% RH, noncondensingOperating humidity ............................................................................(IEC 60068-2-56)Storage humidity (IEC 60068-2-56)5% to 95% RH, noncondensing ............................................................................ ............................................................................Pollution Degree2Maximum altitude2,000 m ............................................................................Indoor use only.Online Product CertificationTo obtain product certifications and the DoC for this product, visit /certification, search by model number or product line, and click the appropriate link in the Certification column.12| | NI USB-7845R OEM SpecificationsEnvironmental ManagementNI is committed to designing and manufacturing products in an environmentally responsible manner. NI recognizes that eliminating certain hazardous substances from our products is beneficial to the environment and to NI customers.For additional environmental information, refer to the Minimize Our Environmental Impact web page at /environment. This page contains the environmental regulations and directives with which NI complies, as well as other environmental information not included in this document.Waste Electrical and Electronic Equipment (WEEE)EU Customers At the end of the product life cycle, all products must be sent to aWEEE recycling center. For more information about WEEE recycling centers,National Instruments WEEE initiatives, and compliance withWEEE Directive 2002/96/EC on Waste Electrical and Electronic Equipment, visit/environment/weee.电子信息产品污染控制管理办法(中国RoHS)中国客户National Instruments符合中国电子信息产品中限制使用某些有害物质指令(RoHS)。
- 1、下载文档前请自行甄别文档内容的完整性,平台不提供额外的编辑、内容补充、找答案等附加服务。
- 2、"仅部分预览"的文档,不可在线预览部分如存在完整性等问题,可反馈申请退款(可完整预览的文档不适用该条件!)。
- 3、如文档侵犯您的权益,请联系客服反馈,我们会尽快为您处理(人工客服工作时间:9:00-18:30)。
4.1 Modification History4.2 Table of Contents4.1Modification History (2)4.2Table of Contents (5)4.3Introduction (7)4.3.1Presentation of the document (7)4.3.2Identification of the possible modes (7)4.4Definition of the modes (9)4.4.1Introduction (9)4.4.2General Requirements (9)4.4.3ISOLATION (10)4.4.4NO POWER (11)4.4.5SYSTEM FAILURE (12)4.4.6SLEEPING (13)4.4.7STAND BY (15)4.4.8SHUNTING (16)4.4.9FULL SUPERVISION (18)4.4.10UNFITTED (19)4.4.11STAFF RESPONSIBLE (20)4.4.12ON SIGHT (23)4.4.13TRIP (24)4.4.14POST TRIP (25)4.4.15NON LEADING (27)4.4.16Intentionally deleted (29)4.4.17National System (SN) mode (30)4.4.18REVERSING (31)4.4.19LIMITED SUPERVISION (33)4.4.20PASSIVE SHUNTING (34)4.5Modes and on-board functions (36)4.5.1Introduction (36)4.5.2Active Functions Table (36)4.6Transitions between modes (41)4.6.1Symbols (41)4.6.2Transitions Table (42)4.6.3Transitions Conditions Table (43)4.7DMI depending on modes (47)4.7.1Introduction (47)4.7.2DMI versus Mode Table (47)4.8Acceptance of received information (51)4.8.1Introduction (51)4.8.2Assumptions (53)4.8.3Accepted information depending on the level and transmission media (53)4.8.4Accepted Information depending on the modes (59)4.8.5Handling of transition buffer in case of level transition announcement or RBC/RBC handover (62)4.9What happens to accepted and stored information when entering a given level (65)4.9.1Introduction (65)4.10What happens to accepted and stored information when entering a given mode (66)4.10.1Introduction (66)4.11What happens to stored information when exiting NP mode (70)4.3 Introduction4.3.1 Presentation of the document4.3.1.1 This document defines the modes of the ERTMS/ETCS on-board equipment (seechapter 4.4 “Definition of the modes” and chapter 4.5 “Modes and on-board functions”.4.3.1.2 This document gives all transitions between modes (see chapter 4.6 “Transitionsbetween modes”).4.3.1.3 This document describes the possible exchanged information between the driver andthe ERTMS/ETCS on-board equipment, respect to the mode (see chapter 4.7 “DMIdepending on modes”).4.3.1.4 This document describes how the received information is filtered, respect to severalcriteria such as the level, the mode, etc.. (see chapter 4.8 “Acceptance of receivedinformation”).4.3.1.5 This document describes how the stored information is handled, respect to severalcriteria such as the level, the mode, etc. (see chapter 4.9 “What h appens to acceptedand stored information when entering a given level”, and chapter 4.10 “What happensto accepted and stored information when entering a given mode”).4.3.1.6 All the tables that are included in this document shall be considered as mandatoryrequirements.4.3.1.7 Some notes appear in this document. These notes are here to help the reader tounderstand the specifications, or to explain the reason(s) of a requirement.4.3.2 Identification of the possible modes4.3.2.1 List of the modes:Full Supervision (FS)Limited Supervision (LS)On Sight (OS)Staff Responsible (SR)Shunting (SH)Unfitted (UN)Passive Shunting (PS)Sleeping (SL)Stand By (SB)Trip (TR)Post Trip (PT) System Failure (SF) Isolation (IS) No Power (NP) Non Leading (NL) National System (SN) Reversing (RV)4.4 Definition of the modes4.4.1 Introduction4.4.1.1 For each mode the following information is given:a) The context of utilisation of the mode and the functions that characterise the mode(chapter “Description”).b) The ERTMS/ETCS levels in which the mode can be used (chapter “Used in levels”).c) The related responsibility of the ERTMS/ETCS on-board equipment and of thedriver, once the equipment is in this mode (chapter “Responsibilities”).4.4.1.2 A complete list of transitions to and from each mode is given in the section 4.6.2“Transitions Table” ).4.4.2 General Requirements4.4.2.1 When the desk is open, a clear indication of the ERTMS/ETCS mode shall be shownto the driver.4.4.2.2 Intentionally deleted.4.4.3 ISOLATION4.4.3.1 Description4.4.3.1.1 In Isolation mode, the ERTMS/ETCS on-board equipment shall be physically isolatedfrom the brakes and can be isolated from other on-board equipments/systemsdepending on the specific on-board implementation.4.4.3.1.2 There shall be a clear indication to the driver that the ERTMS/ETCS on-boardequipment is isolated.4.4.3.1.3 To leave Isolation mode, a special operating procedure is needed (no transition fromIsolation is specified). This procedure shall ensure that the on-board equipment is onlyput back into service when it has been proven that this is safe for operation.4.4.3.1.4 Note: for the list of main functions related to this mode, refer to chapter 4.5 “Modesand on-board functions”.4.4.3.2 Used in levels4.4.3.2.1 Used in all levels: Level 0, level 1, level 2, level 3 and level NTC.4.4.3.3 Responsibilities4.4.3.3.1 Isolation of the ERTMS/ETCS on-board equipment is performed by the driver under hiscomplete responsibility.4.4.3.3.2 Once the ERTMS/ETCS on-board equipment is isolated, the ERTMS/ETCS on-boardequipment has no more responsibility.4.4.4 NO POWER4.4.4.1 Description4.4.4.1.1 When the ERTMS/ETCS on-board equipment is not powered, the equipment shall bein the No Power mode.4.4.4.1.1.1 Note: in order to ensure cold movement detection function, some parts of theERTMS/ETCS on-board equipment may be fed by an auxiliary power supply.4.4.4.1.2 The ERTMS/ETCS on-board equipment shall permanently command the emergencybrake.4.4.4.1.3 Note: for the list of main functions related to this mode, refer to chapter 4.5 “Modesand on-board functions”.4.4.4.2 Used in levels4.4.4.2.1 Used in all levels: Level 0, level 1, level 2, level 3 and level NTC.4.4.4.3 Responsibilities4.4.4.3.1 The ERTMS/ETCS on-board equipment has no responsibility in this mode, exceptcommanding the emergency brake and (optionally) monitoring cold movements.4.4.4.3.2 The notion of responsibility of the driver is not relevant for the No Power mode.4.4.4.3.3 If it is required to move a loco in NP mode as a wagon, ETCS brake command mustbe overridden by external means.4.4.5 SYSTEM FAILURE4.4.5.1 Description4.4.5.1.1 The ERTMS/ETCS on-board equipment shall switch to the System Failure mode incase of a fault, which affects safety.4.4.5.1.2 The ERTMS/ETCS on-board equipment shall permanently command the EmergencyBrakes.4.4.5.1.3 Note: for the list of main functions related to this mode, refer to chapter 4.5 “Modesand on-board functions”.4.4.5.2 Used in levels4.4.5.2.1 Used in all levels: Level 0, level 1, level 2, level 3 and level NTC.4.4.5.3 Responsibilities4.4.5.3.1 The ERTMS/ETCS on-board equipment is responsible for commanding theEmergency Brakes.4.4.5.3.2 No responsibility of the driver.4.4.6 SLEEPING4.4.6.1 Description4.4.6.1.1 The Sleeping mode is defined to manage the ERTMS/ETCS on-board equipment of aslave engine that is remote controlled.4.4.6.1.2 The desk(s) of a sleeping engine must be closed (since there is no driver, noinformation shall be shown).4.4.6.1.3 As the engine is remote controlled by the leading engine, its ERTMS/ETCS on-boardequipment shall not perform any train movement supervision.4.4.6.1.4 The ERTMS/ETCS on-board equipment shall perform the Train Position function; inparticular, the front/rear end of the engine (i.e., not the train) shall be used to refer totrain front/rear end.4.4.6.1.5 Sleeping mode shall be automatically detected on-board via the train interface.4.4.6.1.6 If possible, the train must not be stopped due to a safety critical fault in a sleepingengine. The ERTMS/ETCS on-board equipment shall therefore try to memorise theoccurrence of such fault(s), which shall be handled when the engine leaves theSleeping mode. The ERTMS/ETCS on-board equipment shall also try to send an errorinformation to the RBC.4.4.6.1.7 If a desk of the sleeping engine is opened while the train is running (this is anabnormal operation), the ERTMS/ETCS on-board equipment shall switch to Stand-Bymode.4.4.6.1.8 If the “sleeping input signal” is lost (no more detection of the remote control), theswitch to Stand-By mode shall be made only if the train is at standstill.4.4.6.1.9 Intentionally deleted.4.4.6.1.10 The ERTMS/ETCS on-board equipment shall open a communication session with theRBC when at least one of the following events occurs:a) in all levels, on receipt of the order to contact the RBC.b) In level 2/3, when entering or exiting Sleeping mode (to report the change of modeto the RBC).c) In level 2/3, when a safety critical fault of the ERTMS/ETCS on-board equipmentoccurs (to report the fault to the RBC).4.4.6.1.11 Note: for the list of main functions related to this mode, refer to chapter 4.5 “Mod esand on-board functions”.4.4.6.1.12 In case of balise group message consistency error (refer to 3.16.2.4.4 and 3.16.2.5.1),the ERTMS/ETCS onboard equipment shall not command the service brake.4.4.6.1.13 When in levels 2 or 3, if no compatible version has been established between the on-board equipment in Sleeping mode and the RBC, the ERTMS/ETCS onboardequipment shall react as specified in 3.5.3.8 b) but no driver’s indication shall be given.4.4.6.2 Used in levels4.4.6.2.1 Used in all levels: Level 0, level 1, level 2, level 3 and level NTC.4.4.6.3 Responsibilities4.4.6.3.1 The ERTMS/ETCS on-board equipment of an engine in Sleeping mode has noresponsibility for the train protection.4.4.6.3.2 The notion of responsibility of the driver is not relevant for the Sleeping mode.4.4.6.3.2.1 Note: The leading engine is responsible for the movement of the train. It is then theERTMS/ETCS on-board equipment of the leading engine that is fully/partially/notresponsible for the train protection, with respect to its mode.4.4.7 STAND BY4.4.7.1 Description4.4.7.1.1 The Stand-By mode is a default mode and cannot be selected by the driver.4.4.7.1.2 It is in the Stand-By mode that the ERTMS/ETCS on-board equipment awakes.4.4.7.1.3 Data for mission shall be collected in Stand-By (see SRS-chapter 5: “Start of Mission”procedure).4.4.7.1.4 In Stand-By mode, the desk of the engine can be open or closed. No interaction withthe driver shall be possible as long as the desk is closed, except isolation of theERTMS/ETCS on-board equipment.4.4.7.1.5 The ERTMS/ETCS on-board equipment shall perform the Standstill Supervision.4.4.7.1.6 Note: for the list of main functions related to this mode, refer to chapter 4.5 “Modesand on-board functions”.4.4.7.2 Used in levels4.4.7.2.1 Used in all levels: Level 0, level 1, level 2, level 3 and level NTC.4.4.7.3 Responsibilities4.4.7.3.1 The ERTMS/ETCS on-board equipment is responsible for maintaining the train atstandstill.4.4.7.3.2 The driver has no responsibility for train movements.4.4.8 SHUNTING4.4.8.1 Description4.4.8.1.1 The purpose of the Shunting mode is to enable shunting movements. In Shuntingmode, The ERTMS/ETCS on-board equipment supervises the train movementsagainst:a) a ceiling speed: the shunting mode speed limitb) a list of expected balise groups (if such list was sent by the trackside equipment).The train shall be tripped if a balise group, not contained in the list, is passed(When an empty list is sent, no balise group can be passed. When no list is sent,all balise groups can be passed)c) “stop if in shunting mode” information. The train is tripped if such information isreceived from balise groupsd) Intentionally deleted4.4.8.1.2 The Shunting mode shall not require Train Data.4.4.8.1.3 The ERTMS/ETCS on-board equipment shall perform the Train Position function4.4.8.1.4 Intentionally deleted.4.4.8.1.5 When in Shunting mode, the ERTMS/ETCS on-board shall not manage leveltransitions. However, an immediate level transition order or a conditional leveltransition order shall be stored and evaluated only when another mode than Shuntingor Passive Shunting has been entered (i.e. when the Shunting movement isterminated).4.4.8.1.5.1 When receiving a communication session establishment order, the ERTMS/ETCS on-board in Shunting mode shall not establish the communication session, but shall storethe RBC ID/phone number.4.4.8.1.5.2 When in Shunting mode, the ERTMS/ETCS on-board shall not manage RBC-RBChand-over, except for storing the RBC ID/phone number given at the RBC/RBC border.4.4.8.1.6 Shunting mode can be selected by the driver, only accepted when the train is atstandstill, or ordered by the trackside.4.4.8.1.7 In case of selection of Shunting mode by the driver:∙in level 1 operations, the switch to shunting is always accepted by the on-board equipment∙in level 2 and 3 areas, the on-board shall ask the trackside for an authorisation. The switch to shunting is possible only after receiving such authorisation. The tracksidecan send a list of balises, that the train is allowed to pass while in SH, together withthe authorisation4.4.8.1.8 In case of order to switch to Shunting mode from trackside, the order:∙in level 1 is given by a balise group. A list of balises, that the train is allowed to pass after the entry in Shunting, can be sent together with the order∙in level 2 and 3 is sent via radio. A list of balises, that the train is allowed to pass after the entry in Shunting, can be sent together with the order4.4.8.1.9 When the switch to shunting is ordered by trackside, a driver acknowledgement isrequested.4.4.8.1.9.1 Note: in Shunting mode the train is only partially supervised, therefore it is necessarythat the driver takes the responsibility.4.4.8.1.10 The ERTMS/ETCS on-board equipment shall display the train speed and, only ondriver request, the permitted speed. The display of the permitted speed shall also bestopped on driver request.4.4.8.1.11 Intentionally deleted.4.4.8.1.12 Note: for the list of main functions related to this mode, refer to chapter 4.5 “Modesand on-board functions”.4.4.8.2 Used in levels4.4.8.2.1 Used in level 0, NTC, 1, 2 and 3.4.4.8.3 Responsibilities4.4.8.3.1 The ERTMS/ETCS on-board equipment is responsible for the supervision of theshunting mode speed limit, and that the engine with the active antenna is tripped whenpassing the defined border of the shunting area (only if there is a defined border:balise group not in the list given by trackside, or balise group giving the information“stop if in shunting”).4.4.8.3.2 The driver is responsible for:a) Remaining inside the shunting area defined by a procedure or an external systemoutside ERTMS/ETCS (also when the shunting area is protected by balises)b) Train/engine movements and shunting operations4.4.9 FULL SUPERVISION4.4.9.1 Description4.4.9.1.1 The ERTMS/ETCS on-board equipment shall be in the Full Supervision mode when alltrain and track data, which is required for a complete supervision of the train, isavailable on board.4.4.9.1.2 Full supervision cannot be selected by the driver, but shall be entered automaticallywhen all necessary conditions are fulfilled.4.4.9.1.3 To be in Full Supervision mode, SSP and gradient are not required for the wholelength of the train, but shall be at least available from the FRONT END of the train.4.4.9.1.4 Once in Full Supervision mode, if SSP and gradient are not known for the whole lengthof the train, an indication “ENTRY IN FULL SUPERVISION” shall be clearly displayedto the driver until SSP and gradient are known for the whole length of the train.4.4.9.1.4.1 Note: this indication may also be displayed in case the train length has been increased,see 3.18.3.8.4.4.9.1.5 The ERTMS/ETCS on-board equipment shall supervise train movements against adynamic speed profile.4.4.9.1.6 The ERTMS/ETCS on-board equipment shall display the train speed, the permittedspeed, the target distance and the target speed to the driver (this list is not exhaustive– refer to chapter 4.7 “DMI depending on modes”).4.4.9.1.7 Note: for the list of main functions related to this mode, refer to chapter 4.5 “Modesand on-board functions”.4.4.9.2 Used in levels4.4.9.2.1 Used in level 1, 2 and 3.4.4.9.3 Responsibilities4.4.9.3.1 The ERTMS/ETCS on-board equipment is fully responsible for the train protection(except for the 2 situations described below).4.4.9.3.2 The driver is responsible for respecting the EOA when approaching an EOA with arelease speed.4.4.9.3.3 When “ENTRY IN FULL SUPERVISION” is displayed to the driver, the driver isresponsible for respecting speed restrictions that apply for the part of the train that isnot covered by SSP and gradient data.4.4.10 UNFITTED4.4.10.1 Description4.4.10.1.1 The Unfitted mode is used to allow train movements in either:a) Areas that are equipped neither with ERTMS/ETCS track-side equipment nor withnational train control systemb) Intentionally deletedc) Areas that are equipped with ERTMS/ETCS trackside equipment and/or nationaltrain control system(s), but operation under their supervision is currently notpossible4.4.10.1.2 The ERTMS/ETCS on-board equipment shall supervise train movements against aceiling speed: the lowest of the maximum train speed and the Unfitted mode speedlimit for unfitted area (national value).4.4.10.1.2.1 Intentionally deleted.4.4.10.1.3 The ERTMS/ETCS on-board equipment shall also supervise temporary speedrestrictions.4.4.10.1.4 The ERTMS/ETCS on-board equipment shall display the train speed to the driver.4.4.10.1.5 Note: for the list of main functions related to this mode, refer to chapter 4.5 “Modesand on-board functions”.4.4.10.2 Used in levels4.4.10.2.1 Used in level 0.4.4.10.3 Responsibilities4.4.10.3.1 The ERTMS/ETCS on-board equipment supervises a ceiling speed and (if available)temporary speed restrictions.4.4.10.3.2 The driver must respect the existing line-side signals and is fully responsible for trainmovements.4.4.11 STAFF RESPONSIBLE4.4.11.1 Description4.4.11.1.1 The Staff Responsible mode allows the driver to move the train under his ownresponsibility in an ERTMS/ETCS equipped area.4.4.11.1.2 This mode is used when the system does not know the route. For example:a) After the ERTMS/ETCS on-board equipment starts-up (awakening of the train).b) To pass a signal at danger / override an EOA.c) After a trackside failure (for example: loss of radio contact).4.4.11.1.3 The ERTMS/ETCS on-board equipment shall supervise train movements against:a) a ceiling speed: the staff responsible mode speed limitb) a given distance (regarding its origin location see 4.4.11.1.3.1). The ERTMS/ETCSon-board equipment shall supervise braking curves with a target speed of zero tothe end of this distance. If the train overpasses this distance (see next note) theERTMS/ETCS on-board equipment shall trip the trainc) a list of expected balise groups, if this list has been sent by the RBC. The trainshall be tripped if over-passing a balise group that is not in the list. (When anempty list is sent, no balise group can be passed. When no list is sent, all balisegroups can be passed)d) balise groups giving the order ‘stop if in SR’. This order shall immediately trip thetrain, unless the over-passed balise group is included in a list of expected balisesas defined in item c)e) running in the direction opposite to the train orientation (reverse movementprotection)4.4.11.1.3.1 The ERTMS/ETCS on-board shall determine the start location of the SR distanceas follows:a) If the National/Default value determines the max permitted distance to run in SRmode, the starting point of this distance shall refer to the estimated position of thetrain front when SR mode was entered, or, already in Staff Responsible mode,when Override was activated.b) If the max permitted distance to run in SR mode is determined by the valuetransmitted by the RBC, or entered by the driver, the start location of the distanceshall refer to the estimated position of the train front when the distance informationis received or entered.c) If the max permitted distance to run in SR mode is determined by the valuetransmitted by EUROLOOP, the distance information transmitted by EUROLOOPshall be referred to one or more reference balise groups. On-board shall evaluatethe distance to run in SR mode by matching the reference balise groups given withthe LRBG.In case the LRBG is, due to a change of orientation, in front of the train when thedistance to run in SR mode is to be determined from the EUROLOOP information,the complete distance to run in SR mode shall be determined as the distancegiven by EUROLOOP plus the distance between the estimated train front end andthe LRBG.4.4.11.1.4 Note: Since the gradient is unknown, the supervision of the braking curves in StaffResponsible mode does not ensure that the train will not pass the given distance.4.4.11.1.5 The ERTMS/ETCS on-board equipment shall give the possibility to the driver to modifythe value of the SR mode speed limit and of the given distance. This shall be possibleonly at standstill.4.4.11.1.5.1 If a train movement is detected while the driver is entering the SR speed/distancelimits, the ERTMS/ETCS on-board equipment shall trigger the brake command.4.4.11.1.6 In level 2/3, the driver shall have the possibility to request a new distance to run inStaff Responsible, by selecting "Start". This triggers an MA request.4.4.11.1.6.1 Note: Once the SR distance is covered, the driver may have to go further.4.4.11.1.6.2 When entering SR mode, the value applicable for SR mode speed limit and thevalue applicable for SR distance shall be the corresponding National/Default values.Exception for SR distance: SR mode is authorised by RBC giving an SR distance.4.4.11.1.6.3 While in SR mode, the value applicable for the SR mode speed limit shall be, ifavailable, the last value entered by the driver.4.4.11.1.6.4 While in SR mode, the value applicable for the SR distance shall be, if available,the last value received by the ERTMS/ETCS on-board equipment amongst:a) the distance to run in SR entered by the driver;b) the distance to run in SR given by trackside.4.4.11.1.6.5 When "Override" is selected, the SR mode speed limit value and the SR distancevalue previously entered by driver or given by trackside, if any, shall be deleted. Thecorresponding National/Default values shall enter in force.4.4.11.1.6.6 If the train is in SR and receives a new distance to run in SR mode from the RBC,the stored list of expected balise groups, if any, shall be deleted or shall be replaced bythe list of expected balise groups sent together with the distance to run in SR.4.4.11.1.6.7 If an ERTMS/ETCS on-board equipment in SR mode, after having received fromEUROLOOP max permitted distance to run in SR mode information, detects the mainsignal balise group being part of this information then it shall ignore any new maxpermitted distance to run in SR mode information from that loop.4.4.11.1.7 The ERTMS/ETCS on-board equipment shall display the train speed and the (whenactive) override (permission to pass a signal at danger, trip inhibited). The permittedspeed, target distance and the target speed shall be displayed only on driver request,until the driver requests to stop their display.4.4.11.1.8 Intentionally deleted.4.4.11.1.9 If receiving a "track ahead free" request from the RBC, the ERTMS/ETCS on-boardequipment requests the driver to enter the "track ahead free" information.4.4.11.1.10 Note: for the list of main functions related to this mode, refer to chapter 4.5 “Mo desand on-board functions”.4.4.11.1.11 Intentionally deleted.4.4.11.2 Used in levels4.4.11.2.1 Level 1, 2 and 3.4.4.11.3 Responsibilities4.4.11.3.1 The ERTMS/ETCS on-board equipment supervises a ceiling speed and a SR distanceif finite (and if level 2/3, might also supervise a list of balises).4.4.11.3.2 The driver must check if the track is free, if points are correctly positioned, and mustrespect the existing line-side information (signals, speed boards etc.).4.4.11.3.3 When using the possibility to modify the value of the SR mode speed limit and of thegiven distance, the driver is responsible for entering reasonable values.4.4.12 ON SIGHT4.4.12.1 Description4.4.12.1.1 The On Sight mode enables the train to enter into a track section that could be alreadyoccupied by another train, or obstructed by any kind of obstacle.4.4.12.1.2 On Sight mode cannot be selected by the driver, but shall be entered automaticallywhen commanded by trackside and all necessary conditions are fulfilled.4.4.12.1.3 The ERTMS/ETCS on-board equipment shall supervise train movements against adynamic speed profile.4.4.12.1.4 The ERTMS/ETCS on-board equipment shall display the train speed to the driver (thislist is not exhaustive). The permitted speed, target distance,target speed and releasespeed (if any) shall be displayed only on driver request, until the driver requests to stoptheir display.4.4.12.1.5 If receiving a "track ahead free" request from the RBC, the ERTMS/ETCS on-boardequipment requests the driver to enter the "track ahead free" information.4.4.12.1.6 To be in On Sight mode, SSP and gradient are not required for the whole length of thetrain, but shall be at least available from the FRONT END of the train.4.4.12.1.7 Once in On Sight mode, if SSP and gradient are not known for the whole length of thetrain, an indication “ENTRY IN ON SIGHT” shall be clearly displayed to the driver untilSSP and gradient are known for the whole length of the train.4.4.12.1.7.1 Note: this indication may also be displayed in case the train length has beenincreased, see 3.18.3.8.4.4.12.1.8 Deleted4.4.12.1.9 Note: for the list of main functions related to this mode, refer to chapter 4.5 “Modesand on-board functio ns”.4.4.12.2 Used in levels4.4.12.2.1 Used in level 1, 2 and 3.4.4.12.3 Responsibilities4.4.12.3.1 The ERTMS/ETCS on-board equipment is responsible for the supervision of the trainmovements.4.4.12.3.2 The driver is responsible for checking the track occupancy when moving the train,because the track may be occupied.4.4.13 TRIP4.4.13.1 Description4.4.13.1.1 Deleted4.4.13.1.1.1 Note: Application of emergency brakes and train trip are two different things. Forexample, exceeding the permitted speed leads to application of the emergency brakes,but as long as the train does not pass the EOA, it is not a train trip.4.4.13.1.2 The ERTMS/ETCS on-board equipment shall command the emergency brakes (nobrake release is possible in Trip mode).4.4.13.1.3 The ERTMS/ETCS on-board equipment shall indicate to the driver the reason of thetrain trip.4.4.13.1.4 The ERTMS/ETCS on-board equipment shall request an acknowledgement from thedriver once train is at standstill (to allow the driver to acknowledge the train trip).4.4.13.1.4.1 Note: This acknowledgement is mandatory to exit from Trip mode.4.4.13.1.5 Note: for the list of main functions related to this mode, refer to chapter 4.5 “Modesand on-board functions”.4.4.13.1.6 Closing the desk while being in Trip mode will not cause a mode change but nointeraction with the driver shall be possible as long as the desk is closed, exceptisolation of the ERTMS/ETCS on-board equipment4.4.13.2 Used in levels4.4.13.2.1 Used in level 0, NTC, 1, 2 and 3.4.4.13.3 Responsibilities4.4.13.3.1 The ERTMS/ETCS on-board equipment is responsible for stopping the train and formaintaining the train at standstill.4.4.13.3.2 The driver has no responsibility for train movements.。