ProxySG设备维护手册
bluecoat操作手册

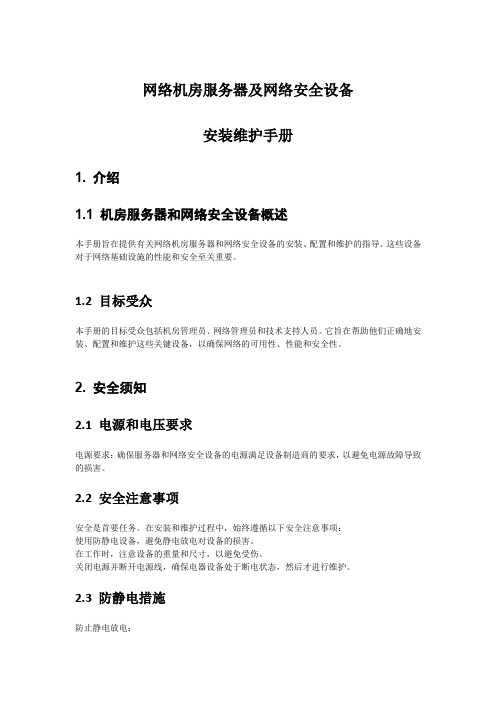
策略选项
策略执行次序
(越前面优先级越低)
上移 下移
缺省策略设置
跟踪所有策略执行 (用于Debugging)
跟踪策略执行
start transaction
CPL Evaluation Trace: <Proxy>
MATCH:
MATCH:
authenticate(islandldap)
ALLOW condition=realstreams condition=GROUP2
分组号 越小优先级越高,高 优先级的Gateway全部失 效,才选用低优先级的
Gateway编辑界面 :由New和Edit生 成
Gateway的IP地址
权重:按权重 比例分配负载
静态路由配置
选择静态路由设置方式
URL 本地文件 文本编辑 安装 显示路由表 显示源路由设置文件
静态路由表是一个文本文件,每行包含:IP地址、子网掩码、网关IP, 例如:192.168.1.0 255.255.255.0 192.168.1.1
改变浏览器提示
直接设定Proxy IP 使用SG中缺省的PAC文 件进行Proxy设置 使用加速的PAC文件进 行Proxy设置 使用URL指定的PAC文 件进行代理设置
用户端浏览器配 置建议
PAC文件
•Default PAC file, URL: https://x.x.x.x:8082/proxy_pac_file
Policy Files:策略文件,所 有策略配置均在系统中对应 到一个策略文件,该选项包 括对文件方式的配置和备份 、恢复等 Visual Policy Manager:可 视化策略管理器,通过可视 化界面配置访问控制策略
网络机房服务器及网络安全设备安装维护手册
网络机房服务器及网络安全设备安装维护手册1. 介绍1.1 机房服务器和网络安全设备概述本手册旨在提供有关网络机房服务器和网络安全设备的安装、配置和维护的指导。
这些设备对于网络基础设施的性能和安全至关重要。
1.2 目标受众本手册的目标受众包括机房管理员、网络管理员和技术支持人员。
它旨在帮助他们正确地安装、配置和维护这些关键设备,以确保网络的可用性、性能和安全性。
2. 安全须知2.1 电源和电压要求电源要求:确保服务器和网络安全设备的电源满足设备制造商的要求,以避免电源故障导致的损害。
2.2 安全注意事项安全是首要任务。
在安装和维护过程中,始终遵循以下安全注意事项:使用防静电设备,避免静电放电对设备的损害。
在工作时,注意设备的重量和尺寸,以避免受伤。
关闭电源并断开电源线,确保电器设备处于断电状态,然后才进行维护。
2.3 防静电措施防止静电放电:使用防静电手环或防静电地板。
将设备存放在防静电袋中。
3. 安装前准备3.1 机房选址和环境要求选择机房位置:确保机房位置干燥、通风良好,远离水源和潮湿环境。
提供足够的空间,以容纳服务器机架和网络安全设备。
电源和冷却要求:安排稳定的电源供应,使用UPS备电源系统以应对突发停电。
实施有效的空调和温度控制措施,以维持适宜的工作温度。
3.2 电源和冷却系统准备安装UPS系统,确保设备在电源故障时有足够的时间来完成安全关机。
确保空调系统运行正常,维持机房内的稳定温度和湿度。
3.3 数据线和网络连接准备确保提供足够的数据线和网络电缆,以连接服务器和网络安全设备到网络。
4. 服务器安装4.1 机架或机柜准备安装服务器机架或机柜,确保它们坚固、稳定,并正确安装在机房中。
4.2 服务器固定和安装使用合适的工具,将服务器正确安装到机架或机柜中,确保固定稳固。
4.3 电源和数据线连接将服务器的电源线插入电源插座,确保连接牢固。
使用适当的数据线连接服务器到网络设备和交换机。
4.4 服务器开机和基本配置启动服务器并按照制造商的说明进行基本配置,包括设置IP地址、子网掩码、网关等。
思科设备维护手册说明书

Maintenance•Reset Device,page1•Reset Options and Load Upgrades,page2•Remote Lock,page3•Remote Wipe,page3•Boot Alternate Image for Cisco DX70,page4•Boot Alternate Image for Cisco DX80,page4•Boot Alternate Image for Cisco DX650,page5•Data Migration,page5•Debugging Log Profiles,page5•User Support,page6Reset DeviceA device reset provides a way to reset or restore various configuration and security settings or provides a wayto recover the device if the device encounters an error.The following procedure describes the types of resets that you can perform.All three reset methods cause deletion of all user data and reset all settings from the device.NoteThe following occurs on a device when you perform a reset:•User configuration settings-Reset to default values.•Network configuration settings-Reset to default values.•Call histories-Get erased.•Locale information-Reset to default values.•Security settings-Reset to default values;this includes deletion of the CTL file and change of the802.1xDevice Authentication parameter to Disabled.Do not power down the device until it completes the factory reset process.Note ProcedureYou can reset the device with any of these operations.Choose the operation that is appropriate for your situation.•Method 1:Cisco Unified Communications Manager Administrator Web GUI1From the Product Specific Configuration Layout area of the device configuration window,enableWipe Device .2Issue an Apply Config,Restart,or Reset command from the Admin GUI to push the wipe to thedevice.•Method 2:Settings application1In the Settings application,choose Backup &reset >Factory data reset .If a PIN or Password is configured on the device,it will need to be entered before the resetcan proceed.Note •Method 3:Key-press sequencesThis method should be used if the device is secured with a PIN or Password lock and the PIN/password has been lost.Follow these steps to reset a Cisco DX70on boot up:1Power on the device and wait for the Mute LED to blink.2Press and hold the Volume Up button until the Mute button is lit red.3Release the Volume Up button,then press and hold the Mute button for 3seconds.Follow these steps to reset a Cisco DX80on boot up:1Press and hold the Volume Up button and power on the device.2Release the Volume Up button when the Mute button is lit red,then press the Mute button.Follow these steps to reset a Cisco DX650on boot up:1Press and hold the #key and power on the device.2When the Message Waiting Indicator (MWI)flashes red once then stays lit,release the #key.Reset Options and Load UpgradesCisco DX Series devices receive configuration changes and load upgrades from Cisco Unified Communications Manager.The following protocol describes how the device handles change requests:•Reset waits for active call to end.MaintenanceReset Options and Load Upgrades•If the device screen is on,user receives a popup dialog box that notifies the user about the changes and the need for restart.The dialog box provides the following options:◦Restart:Dismisses the popup dialog box and restarts the device (default action).◦Snooze:Dismisses the popup dialog box for an hour.The user can set the device to snooze for amaximum of 24hours,after which the device willrestart.The popup dialog box has a countdown timer of 60seconds.The default action beginsif the user does not act.After the user sets the device to snooze,the user has the option to manually reset thedevice at any time from the notifications list.Note ◦If the device screen is off,active audio keeps the request waiting.Remote LockThis feature allows you to lock a device from the Device Configuration window in Cisco UnifiedCommunications Manager.When the device receives a remote lock request,the device immediately terminates any active calls,and the device locks.If the device is not registered with the system at the time of the request,the device is locked the next time that it registers to thesystem.After you issue a remote lock request,the request cannot be canceled.Note Remote Lock Device ProcedureStep 1In the Phone Configuration window for the device,click Lock .Step 2Click Lock to accept the Lock confirmation message.You can view the Lock status in the Device Lock/Wipe Status section of the Phone Configuration window for the device.Remote WipeThis feature allows you to erase the data on a device from the Device Configuration window in Cisco Unified Communications Manager.MaintenanceRemote LockWhen the device receives a remote wipe request,the device immediately terminates any active calls and erases the device data.If the device is not registered with the system at the time of the request,the data is erased the next time that the device registers to thesystem.After you issue a remote wipe request,the request cannot be canceled.Note Remote Wipe Device ProcedureStep 1In the Phone Configuration window for the device,click Wipe .Step 2Click Wipe to accept the Wipe confirmation message.You can view the Wipe status in the Device Lock/Wipe Status section of the Phone Configuration window for the device.Boot Alternate Image for Cisco DX70ProcedureStep 1Power on the device and wait for the Mute LED to blink.Step 2Press and hold the Volume Down button until the Mute button is lit red.Step 3Release the Volume Down button,then press and hold the Mute button for 3seconds.Boot Alternate Image for Cisco DX80ProcedureStep 1Press and hold the Volume Down button and power on the device.Step 2Release the Volume Down button when the Mute button is lit red,then press the Mute button.MaintenanceRemote Wipe DeviceBoot Alternate Image for Cisco DX650ProcedureStep 1Disconnect the power to turn the device off.Step 2Press and hold the *key,then connect the power supply.Step 3Keep the *key held until the message LED becomes solid.Step 4When the message LED flashes 3times,release the *key.The device uses the alternate image to boot.Data MigrationThe data migration feature ensures that a factory reset is not required when data incompatibility exists after a firmwareupgrade.Data may still be lost upon downgrade to an earlier release of firmware.If you upgrade to a newer firmwarerelease,you may not be able to revert to an earlier release without losing data.Note If you downgrade to earlier firmware and the device is not able to migrate data,you receive an alarm.Instruct the user to back up the user data or perform a remote wipe of the device.When the device registers to Cisco Unified Communications Manager,the device detects prior factory resets,overrides migration,downgrades,and reboots.When the device reboots,it loads the downgraded firmware.Debugging Log ProfilesYou can turn on debugging log profiles remotely for a device or group of devices.Set Debugging Log Profile for Call Processing ProcedureStep 1Go to the Product Specific Configuration Layout area of the individual device configuration window or Common Phone Profile window.Step 2Check Log Profile ,and choose Telephony.Step 3Save your changes.Step 4The user is notified that debug logging is enabled in the notification area.The user can expand the messagefor more information,but cannot dismiss the notification.MaintenanceBoot Alternate Image for Cisco DX650Reset Debugging Log Profile to Default ProcedureStep 1Go to the Product Specific Configuration Layout area of the individual device configuration window or Common Phone Profile window.Step 2Check Log Profile ,and select Default to reset all debugs to the default values.This includes debugs that have been set manually from Android Debug Bridge.Step 3Save and apply your changes.Step 4Choose Preset to keep the current debug levels.Step 5Save your changes.User SupportTo successfully use some of the features on their devices,users must receive information from you or from your network team or be able to contact you for assistance.Make sure to provide end users with the names of people to contact for assistance and with instructions for contacting those people.Cisco recommends that you create a web page on your internal support site that provides users with important information about their device.Problem Report ToolUsers submit problem reports to you with the Problem ReportTool.The Problem Report Tool logs are required by Cisco TAC when troubleshooting problems.Note To issue a problem report,users access the Problem Report Tool and provide the date and time that the problem occurred,and a description of the problem.You must add a server address to the Customer Support Upload URL field on Cisco Unified Communications Manager.If you are deploying devices with Mobile and Remote Access through Expressway,you must also add the PRT server address to the HTTP Server Allow list on the Expressway server.Configure Customer Support Upload URLYou must use a server with an upload script to receive PRT files.The PRT uses an HTTP POST mechanism,with the following parameters included in the upload (utilizing multipart MIME encoding):MaintenanceReset Debugging Log Profile to DefaultMaintenanceProblem Report Tool•devicename(example:“SEP001122334455”)•serialno(example:“FCH12345ABC”)•username(the username configured in CUCM,the device owner)•prt_file(example:“probrep-20141021-162840.tar.gz”)A sample script is shown below.This script is provided for reference only.Cisco does not provide supportfor the upload script installed on a customer's server.<?php//NOTE:you may need to edit your php.ini file to allow larger//size file uploads to work.//Modify the setting for upload_max_filesize//I used:upload_max_filesize=20M//Retrieve the name of the uploaded file$filename=basename($_FILES['prt_file']['name']);//Get rid of quotes around the device name,serial number and username if they exist$devicename=$_POST['devicename'];$devicename=trim($devicename,"'\"");$serialno=$_POST['serialno'];$serialno=trim($serialno,"'\"");$username=$_POST['username'];$username=trim($username,"'\"");//where to put the file$fullfilename="/var/prtuploads/".$filename;//If the file upload is unsuccessful,return a500error and//inform the user to try againif(!move_uploaded_file($_FILES['prt_file']['tmp_name'],$fullfilename)){header("HTTP/1.0500Internal Server Error");die("Error:You must select a file to upload.");}>ProcedureStep 1Set up a server that can run your PRT upload script.Step 2Write a script that can handle the parameters listed above,or edit the provided sample script to suit your needs.Step 3Upload your script to your server.Step 4In Cisco Unified Communications Manager,go to the Product Specific Configuration Layout area of the individual device configuration window,Common Phone Profile window,or Enterprise Phone Configurationwindow.Step 5Check Customer support upload URL and enter your upload server URL.Example:/prtscript.phpStep 6Save your changes.Maintenance Take Screenshot From Web BrowserTake Screenshot From Web BrowserProcedureUse your browser to go to this URL:http://<Endpoint IP Address>/CGI/ScreenshotYou receive a prompt that asks for e the associated user ID name and password. Take Screenshot From DeviceProcedurePress the Vol Down button and Power/Lock button for three seconds.Application SupportEvaluate whether the issue is a device issue or a problem with the application.If the problem is applicationrelated,contact the application support center directly.。
G网操作维护指导书

GSM网络操作维护指导书一、例行工作(一)、计费1、例行做计费(1)打开DAIL Y WORK中的CHARGING FOR ALL NES(2)半个小时后看结果,如有THE DISK IS FULL则要换盘。
(3)在维护系统上记录盘号和计费文件,电话通知巡检换盘。
(4)确认盘号正确并格式化。
INMCT:SPG=1;INVOL:IO=OD-1,NODE=A;INVOE:IO=OD-1,NODE=A;INMEI:IO=OD-1,NODE=A,VOL=DGA01X0819;(格式化)END;2、手工做计费(1)挂卷INMCT:SPG=1;INVOL:IO=OD-1,ODE=A;(看卷标)END;(2)COPY到光盘INFMT:SPG=1,DEST=CHARGING,VOL=DGA01X0819;(3)看做了多少文件INFSP:FILE=TTFILE0X,DEST=CHARGING;看硬盘上的文件有否DUMP到光盘INMCT:SPG=1;INVOL:IO=OD-1,NODE=A;INFIP:FILE=OD1A1;看光盘上的文件END;3、常见的问题(1)几种常见得FCFC72:说明未上卷就INFMTFC73:文件识别错,查OD和HD的计费文件,看两边号数对不对FC27:有IOG告警,要先处理IOG问题(2)改卷标名及光盘中的文件名INMCT:SPG=1;INVOL:IO=OD-1,NODE=A;INVOC:VOL1=old,VOL2=new;改卷标INFIC:FILE1=old,FILE2=new;改文件名END;(3)看计费文件是哪天做的INFSP:FILE=TTFILE0X-XXXX,DEST=GSMLINK;4、若立信计费失败,要人工传送(1)看当前做到哪个文件IOIFP:FILE=TTFILE0X;(2)看已发何未发送的子文件序号INFSP:FIEL=TTFILE0X,DEST=GSMLINK;(3)人工传送INFTI:FILE=TTFILE0X-XXXX,DEST=GSMLINK;(4)确认已成功传送INFSP:FILE=TTFILE0X,DEST=GSMLINK;5、若有“COMMON CHARGE OUTPUT ERROR”(计费即将停止),属于重大告警(1)CHODP:FN=ALL;多敲几次,看计费指钟有否停跳,如停则(电话通知室经理和系统管理员):(2)CHOFP:FN=ALL;看当前开的是哪个FN(一般为00)CHOFI:FN=TT,FILEID=01/02/03;临时打开另一计费文件CHODP:FN=ALL;检查,若还不正常再开另一个。
移动通信基站设备维护手册

移动通信基站设备维护手册(一分册)青海盛泰通信网络工程有限公司移动维护中心二O一三年九月基站钥匙管理1?????????概述?????编制背景为更好地做好基站日常维护工作,提高基站维护质量,及时发现和处理基站存在的隐患问题,结合青海移动基站维护的实际情况编写了本手册。
本手册主要针对维护单位基站日常维护巡检编写,力求让每位维护人员根据本手册即可完成基站日常维护巡检工作,随时巡视检查现场,及时发现和排除事故隐患,提高基站维护质量。
?????编制单位青海盛泰通信网络工程有限公司?主要审核人:祁国胜主要起草人:杜常福主编单位:青海盛泰通信网络工程有限公司主要审稿人:祁国胜、杨文忠、赵有元、胡勋。
2?????????基站及配套设备例检维护标准例检周期1.?????对于基站综合维护服务,宏基站每月巡检一次,每月另巡视一次,边际网基站每季度巡检一次,偏远基站按需安排巡检工作。
偏远基站以及其它一些距离维护单位较远、行车不可直达或行车时间较长的基站。
对于室分系统综合维护服务,宏基站每月巡检一次,其它基站每季度巡检一次。
2.?????年检主要是按需安排执行。
巡视要求1.?????巡视基站内各种设备是否正常运行、基站高低压线路、基站卫生、基站内设备及周边环境是否存在安全隐患,主要包括影响机房设施、天线、馈线、屋面立杆、走线架、接地线、机房漏水、机房周边排水,以及铁塔基础周边环境发生施工挖土、打井、挖沟和回填土流失等安全问题。
2.?????负责机房环境安全检查和放置有效的灭火器、挂有进入机房的四十字方针、基站故障处理流程图、灭火流程图及各类警示牌。
3.?????在进行巡视时发现问题,应及时组织检查和排除隐患或故障,同时向移动相关负责人报告。
巡检内容1.????维护人员应严格按要求,完成基站月/季检表中的维护检查测试项目内容,并认真填写维护纪录。
基站综合维护人员必须按计划严格执行日常的例检工作(如确实有特殊原因不能及时完成的,可以前后偏差三天执行,需注明原因)。
精品12中国移动网络设备维护手册-开关电源-中达电通(试行)优秀

中国移动网络设备维护手册 -开关电源-中达电通 (试行)中国移动通信集团网络部1名称 中国移动网络设备维护手册-电源设备-中达电通(试行)编写时间 2011 年 3 月定稿时间 2011 年 7 月版本号 2011-V1总部网络部夏凡超、陈为国、钟亮编写单位 安徽公司 编写人 唐继志福建公司石卫涛审核单位江苏公司、 浙江公司审核人吴维宏、王鹰、颜士军、周平、窦荣启 杨剑宇、胡欢刚、毛松苗、童克波2前言随着中国移动网络规模的不断扩大,几年来纳入代维范围的设备不断增加, 代维工作已经成为网络基础维护工作的重要组成部分。
目前全网 81%的基站、94% 的传输、几乎 100%的集团客户服务支撑工作以及室内分布的维护工作都采用了 代维方式。
代维工作的质量直接决定了中国移动的网络质量,代维工作直接影响 到客户感知和企业形象。
没有规则不成方圆。
制度流程立,则诸事兴,制度流程破,则百事废。
完善 的代维管理制度和流程是做好代维工作的基础。
为此,集团公司组织编制和修订 了中国移动代维管理系列规章。
《中国移动网络设备维护手册-电源设备-中达电 通》由集团公司组织安徽、福建公司编制,共享了设备维护的典型故障案例、例 行维护项目的操作指南、常用板卡的更换要求等。
刘爱力副总裁高度重视代维规范编制工作,要求我们要坚持“问题的提出和 解决方法要从一线中来,形成规范的意见和方法再回到一线中去”的工作方法, 并请省公司主管网络的副总经理对维护手册的完整性、全面性、准确性,以及可 操作性、可执行性进行审核。
从而使规范能够更加切合工作实际,能够有效指导 和服务一线工作。
在此,对参与本手册编写、评审和审核的各位领导和同事表示衷心的感谢! 特别感谢范秉衡、刘晓宇、吴维宏、杨剑宇等同志对本手册进行了精心编制和认 真审核。
《中国移动网络设备维护手册》的发布,将为提升全网代维管理水平、 确保整体网络质量奠定坚实的基础。
我们已经迈出了坚实的第一步,在后续落实过程中,还需要各省公司坚持“有 章必循、违章必究、务求实效”。
客户端设备维护手册
100M RMD PWR
常亮,电路速率为100M;不亮,电路速率10M 常亮,检测到远端设备;不亮,未检测到远端设备 常亮,电源工作正常,反之错误
格林威8M光端机 格林威 光端机A120SMI 光端机
类型
灯的颜色
状态
说明
POWER 电源指示灯 RMA 对端告警灯 NOP 收无光指示灯
红
亮 不亮
为本设备的电源指示灯,当电源开时,电源指示灯亮红灯。 当电源关时,电源指示灯不亮。 为对端告警指示灯,当对端设备正常时,此灯不亮。 当对端有设备异常时,此灯亮,报障碍。 当本端光端机检测到设备光口有光信号输入时,此灯不亮。 当本端光端机检测到设备光口无光信号输入时,此灯亮,报障碍。
指示灯 RLK
指示灯表示收发器状态。 常亮,光口接收链路正常;不亮,接收链路错误。 常亮,光口发送链路正常;不亮,若RLK亮,发送链路错误;闪亮,光口有 数据传输。
光口 光发送链路灯 TLK/ACT
电连接/数据收发 灯 电口 电路速率灯 远端 电源 远端状态灯 电源指示灯
LNK/ACT
常亮,电口链路正常;不亮,链路错误;闪亮,电口有数据传输。
红
亮 不亮
红
不亮 亮
红
不亮 亮
红
不亮 亮
红
亮 不亮
红
不亮 亮
红
不亮 亮
太极34M光端机 光端机OTX-16F(本端设备告警) 太极 光端机 (本端设备告警)
类型 OK 工作正常指示 LB 环回状态指 示。
灯的颜色 绿
状态 亮 不亮
说明 当电源开时,工作正常,指示灯亮绿灯。 当电源关时,指示灯不亮。 有环路时,此绿灯亮 无环路时,此灯不亮。 在本端出现任何一种告警时,此红灯亮 当本端设备正常时,此灯不亮。 当本端光端机检测到设备光口有光信号输入时,此灯不亮。 当本端光端机检测到设备光口无光信号输入时,此灯亮,报障碍。 当本端光端机检测到设备光口光信号失步时,此灯亮,报障碍。 当本端光端机检测到设备光口光信号正常时,此灯不亮。 为光端机无10的-3次方误码。 在光端机有10的-3次方误码时此灯亮,报障碍。 为光端机无10的-6次方误码。 在光端机有10的-6次方误码时此灯亮,报障碍。 为支路告警指示灯,支路的用户设备的2M信号送到光端机设备上,正常。 如有已使用的支路告警灯亮,为用户设备的2M信号没有送到光端机设备上,报障 碍
网络设备维护和维修的步骤和注意事项(七)
网络设备维护和维修的步骤和注意事项引言如今,互联网已经成为人们生活和工作中不可或缺的一部分。
网络设备的正常运行对于保障网络畅通起着至关重要的作用。
然而,由于各种原因,网络设备可能会出现故障,从而导致网络中断。
因此,网络设备维护和维修具有重要的意义。
本文将讨论网络设备维护和维修的步骤和注意事项,帮助读者提高网络维护和维修的效率。
一、设备维护步骤网络设备的维护工作可以分为准备工作、常规维护和应急处理三个步骤。
1. 准备工作在进行设备维护之前,首先需要做好准备工作。
包括:(1)备份配置文件和数据。
在维护设备之前,应该定期备份设备的配置文件和重要数据,以防止数据丢失。
(2)规划维护时间。
维护设备应该根据需要选择合适的时间段,尽量避免对网络正常使用造成影响。
(3)检查备件和工具。
检查备件和工具的完整性和可用性,确保维护过程中有充足的备件和工具支持。
2. 常规维护常规维护是指定期对设备进行检查和保养的工作,以确保设备的正常运行。
常规维护包括:(1)清洁设备。
使用专业工具和设备,清洁设备的外表和内部部件,保持设备的良好通风和散热能力。
(2)检查设备状态。
通过查看日志信息、运行状态和指示灯等,及时发现设备存在的问题,如过热、降频等。
(3)软件维护升级。
定期检查设备的固件和软件版本,及时升级,以修复漏洞和提升设备性能。
3. 应急处理应急处理是指在设备遇到故障和异常情况时的紧急处置手段。
应急处理包括:(1)设备重启。
对于一些轻微的故障,尝试通过重启设备来解决问题。
(2)故障排查。
使用专业的故障排查工具和方法,根据故障的表现和现象进行逐步排查,并及时修复。
(3)设备替换。
如果故障无法修复,考虑将故障设备进行更换,以恢复网络的正常运行。
二、设备维修注意事项在进行网络设备的维修时,需要注意以下事项,以免造成设备进一步损坏或风险:1. 安全意识设备维修需要遵循安全操作程序,确保不会对自身和他人造成伤害。
维修时,应注意佩戴相应的防护装备,遵循相关安全规范。
中国移动网络设备维护手册-传输线路(2011-V1)
中国移动网络设备维护手册-传输线路(2011-V1)中国移动通信集团公司二〇一一年四月目录第一章总则 1 第二章光缆线路日常维护工作内容 1第一节光缆线路维护的主要方法 1 第二节光缆线路障碍点的定位 5 第三节光缆线路障碍点的处理17 第四节光缆线路盯防工作21 第五节光缆线路的维护性修理26 第六节光纤调度原理及方法28 第七节光缆线路割接技术30 第八节光缆线路带业务割接技术33 第九节光缆线路工程竣工测试与验收41第三章光缆线路维护中的安全生产要求63第一节线路勘查与测量安全63 第二节施工现场安全63 第三节施工现场防火65 第四节野外作业安全65 第五节环境保护66第四章编制历史67 第五章附录67第一章总则传输线路维护手册是中国移动通信集团公司代维管理质量规范的重要组成部分。
本手册主要用于中国移动通信集团公司光缆线路代维人员日常维护光缆线路使用,为光缆维护人员日常工作提供工作指南,同时也为日常代维内容管理提供理论依据。
本手册适用于中国移动通信集团一干、省干和本地网的管道、杆路路由及光缆日常维护。
本手册解释权和修改权归属中国移动通信集团公司网络部。
第二章光缆线路日常维护工作内容第一节光缆线路维护的主要方法光缆线路由于敷设方式不同,可分为架空、直埋、管道等几种类型,每种类型都有其不同的特点,其维护工作也同样是不同的。
一、光缆线路维护宣传随着国家经济的发展,基础建设的投入越来越大,开工项目越来越多,由于有些建设施工单位伍在施工中不注意保护光缆线路,加之人为盗窃、恶意破坏等外力事件,已成为光缆线路受损的主要原因,通信阻断的情况日益增多,严重影响了通信网络的正常运行。
特别是人为盗窃、恶意破坏有益日增加的趋势,偷盗破坏手段多种多样,防不胜防,给维护工作造成非常大的压力。
因此在做好日常维护工作外,切实做好护线宣传,提高社会群众的光缆知识,提高群众保护光缆意识,认识保护通信安全畅通的重要性,达到减少光缆故障,确保光缆通信网安全稳定运行的目的。
BlueCoat ProxySG 基本配置及巡检手册
文件编号:LZYQ-2011-Q1-6772-007Blue Coat Proxy SG基本配置及巡检版本:1.2XX网络2011年3月文件说明本程序文件对公司为客户提供的系统集成及相关服务、网络安全服务的实施过程进行了策划和控制。
文件修订记录目录1设备配置 (5)1.1Console初始化 (5)1.2Web基本配置 (10)1.2.1Hostname配置 (10)1.2.2NTP配置 (10)1.2.3Network配置 (13)1.2.4Proxy配置 (16)1.2.5Policy配置 (18)2设备巡检 (21)2.1巡检内容 (21)2.1.1设备信息 (21)2.1.2CPU利用率 (22)2.1.3Memory利用率 (23)2.1.4Disk利用率 (23)2.1.5当前用户数统计 (24)2.1.6缓存内容统计 (24)2.1.7设备健康自检 (25)2.1.8代理流量统计 (26)2.1.9详细协议代理统计 (27)2.1.10会话统计 (27)2.1.11日志查看 (28)2.2巡检命令 (29)1设备配置1.1 Console初始化设备接通电源——加电开机——Console口输出启动信息如下:The default boot system is:1: Version: SGOS 6.1.3.1, Release id: 56222Press the space key to select an alternate system to boot.Seconds remaining until the default system is booted: 0Booting Version: SGOS 6.1.3.1, Release id: 56222Completed major version system upgrade.Press "enter" three times to activate the serial console //连续敲入3次回车键可以激活Console口进行配置Executing image: Version: SGOS 6.1.3.1, Release id: 56222Interface 0:0: MAC address 00:E0:81:77:20:AF, half duplex, 100 megabits/secInterface 1:0: MAC address 00:E0:81:77:20:B0, no linkWelcome to the SG Appliance Serial ConsoleVersion: SGOS 6.1.3.1, Release id: 56222//连续敲入三次回车键,会弹出菜单,如下:------------------------- MENU -----------------------------1) Command Line Interface2) Setup Console------------------------------------------------------------Enter Option:2 //选择2 ,使用Console向导进行设置--------------- CONFIGURATION START ------------------Welcome to the Blue Coat ProxySG 510 configuration wizard.This appliance's serial number: 2107102111---------------------------------------------------------------------You can get field help by entering a question mark ? in the fields.You can move backwards through the steps by pressing the UP arrow.You can exit the wizard without saving your entries by pressing ESC.---------------------------------------------------------------------//注意这里的提示:输入?可以查看每个选项的功能含义解释;输入ESC 可以不保存并退出配置向导。
- 1、下载文档前请自行甄别文档内容的完整性,平台不提供额外的编辑、内容补充、找答案等附加服务。
- 2、"仅部分预览"的文档,不可在线预览部分如存在完整性等问题,可反馈申请退款(可完整预览的文档不适用该条件!)。
- 3、如文档侵犯您的权益,请联系客服反馈,我们会尽快为您处理(人工客服工作时间:9:00-18:30)。
Bluecoat ProxySG设备维护手册目录1.手册适用范围 (3)2.资源检测 (3)2.1.关键参数描述 (3)2.2.关键参数监控 (4)2.3.非关键参数监控 (12)3.常见故障及排查方法 (13)3.1.用户无法访问某个网站 (13)3.2.用户访问网站慢 (14)3.3.配置错误导致问题 (14)4.常用工具与日常操作 (15)4.1.常用维护操作 (15)4.2.常用信息查看命令 (18)4.3.SG内置常用工具 (19)1. 手册适用范围本手册适用于Bluecoat SG产品日常维护与监控,包含资源检测,基本故障排查,维护常用CLI命令。
2. 资源检测2.1.关键参数描述Bluecoat的proxy产品SG包含多种关键资源,对于关键资源,只要有一种资源利用率达到一定程度,都会影响用户的使用。
在日常维护过程中要密切注意这几种资源的情况。
关键参数:1.CPU使用率2.内存使用率3. HTTP worker4. DNS worker5.端口使用率6. License状态非关键参数:1.磁盘状态2.CPU 温度3.主板温度4.电源电平2.2.关键参数监控A.CPU利用率:通常小于90%,突发到90%以上但不持续维持在90%的情况属于正常。
GUI监测方法(日常):点击Statistics-〉System Usage,在右边的窗口的CPU模版上可以看到在一个小时,一天,一个月内的CPU使用情况。
第一个图表,显示的时间刻度为每分钟,CPU取值是每分钟的尖峰CPU使用率第二个图表,显示的时间刻度为每小时,CPU取值是每小时的平均CPU使用率第三个图表,显示的时间刻度为每天,CPU取值是每天的平均CPU使用率监控时,可参考三个图表的CPU使用情况,在出现故障时主要监控第一个图表的内容。
CPU monitor查看具体CPU消耗(高级):CPU Monitor工具是SG内置的一个工具,用于在查看CPU具体为何部分的功能所占用。
CPU Monitor缺省情况下关闭,需要手工打开,同时开启CPU Monitor也会占用CPU资源。
CPU Monitor开启的方法:GUI中Statistics-〉advanced-〉Diagnostics-〉Start CPU monitorCLI:进入SG的config模式,进入Diagnostics模式,运行cpu-monitor enable不用时关闭方法:GUI中Statistics-〉advanced-〉Diagnostics-〉Stop CPU monitorCLI:进入SG的config模式,进入Diagnostics模式,运行cpu-monitor disable检测CPU monitor结果:GUI方式:Statistics-〉advanced-〉Diagnostics-〉CPU Monitor StatisticsCLI方式:进入SG的config模式,进入Diagnostics模式,运行view cpu-monitor事例:CPU MonitorURL_Path /Diagnostics/CPU_Monitor/StatisticsHTTP/1.0 200 OKPragma: No-CacheCache-Control: No-CacheContent-Type: text/plain; charset=utf-8Title CPU Monitor StatisticsCPU Monitor is not running. Enable in diagnostics menuCPU 0 59%HTTP and FTP 17%Object Store 10%Policy evaluation - HTTP 3%Access Logging 3%Authentication 1%Miscellaneous 1%TCPIP 20%可以看到大部分的CPU资源的消耗情况。
B.内存消耗情况(通常在95%以下)SG上只能通过GUI方式来查看内存使用率,SG缺省情况下会将所有内存都分配出去,但正常情况下内存使用率在95%以下。
GUI方式:Statistics-〉Health (memory pressure)C.HTTP workerHTTP worker是SG内部的一个重要资源,不同的SG产品型号支持的最大的HTTP worker数量也不相同。
通常情况下,HTTP worker达到该设备的最大支持数量并持续一段时间就会引起用户不能上网。
确定设备支持最大HTTP worker数量与实施监控当前的HTTP worker的数量,只要在浏览器中键入以下链接:https://<SG-ip address>:8082/HTTP/Statistics在打开的表格中可以看到:Maximum acceptable concurrent client connections为该设备支持的最大HTTP worker数Currently established client connections为当前占用的worker数目(包含Idle 的连接)Client workers currently active (processing HTTP request)为正在处理HTTP请求的worker数目(不含Idle的连接)GUI监控(日常)Statistics-〉HTTP/FTP History-〉HTTP/HTTPS/FTP Clients第一个图表,显示的时间刻度为每分钟,HTTP worker取值是每分钟的尖峰HTTP worker数目。
第二个图表,显示的时间刻度为每小时,HTTP Worker取值是每小时的尖峰HTTP worker数目。
第三个图表,显示的时间刻度为每天,HTTP Worker取值是每天的尖峰HTTP worker 数目。
监控时,可参考三个图表的使用情况,在出现故障时主要监控第一个图表的内容。
CLI方法:在特权用户模式下键入show http-stat查看即时的HTTP worker信息。
D.DNS workerDNS worker主要用于SG访问外网时,作DNS解析的进程数目。
对于目前SG平台来说,DNS worker的数目都是300个,一些低端产品(例如:SG210)为100个。
当SG上所设置的DNS server有故障时,DNS worker可能会出现用满的情况,导致上网很慢。
GUI方式:在浏览器中打开https://<client-ip>:8082/CE/DNS/Statistics,查看DNS worker 的基本情况。
Maximum number of simultaneous DNS server requests supported为最大DNS worker的数目Highest number of simultaneous DNS server requests experienced since last restart为从SG开机以来最多使用DNS worker的数目Number of times the maximum number of simultaneous DNS server requests were experienced since last restart从SG开机以来出现过DNS worker用满这种情况的次数。
如果第三个参数显示有很多次,就要调整DNS。
E.端口使用率端口使用率就是SG物理端口的使用率,通常应该保持在80%以下,如果端口使用率过高可能会导致丢包的情况发生。
需要增加端口或限制到SG的流量。
GUI方式:statistics->health(Interface <port> utilization)F.License情况在SG中license如果过期,SG是无法正常工作的,一般用户只要购买相应的license 就不会过期。
但过期会出现在SGOS大版本的升级过程后,需要重新输入license。
GUI方式:Statistics-〉health(licensing)2.3.非关键参数监控包含开始列出的磁盘状态,CPU/主板温度,电源电平,通过GUI方式下的Statistics-〉health(Status)进行检测3. 常见故障及排查方法具体在SG上工具的使用请参见常用命令与工具部分3.1.用户无法访问某个网站排错定位:1.是否返回SG的policy deny的页面2.用户上网经过SG是否需要认证3.是否使用了Websense或AV产品4.SG是否当时有性能上的问题排错手段:1.使用SG的policy trace功能查看是否用户该请求被SG阻止2.查看用户是否没有通过认证3.在SG上查看是否AV或Websense造成了该故障4.通过对关键参数的监控,看是否有性能问题5.在SG上进行抓包,看用户端到SG,SG到源服务器,DNS解析是否有故障。
3.2.用户访问网站慢排错定位:1.用户上网经过SG是否需要认证2.是否使用了Websense或AV产品3.SG是否当时有性能上的问题排错手段:1.查看用户是否没有通过认证,通过认证时间是多少。
2.在SG上查看是否AV或Websense造成了该故障3.通过对关键参数的监控,看是否有性能问题4.在SG上进行抓包,看用户端到SG,SG到源服务器,DNS解析是否哪一个环节慢。
如果有认证或AV,是否从认证服务器或AV的设备返回响应很慢。
3.3.配置错误导致问题1.端口速度引起的访问速度慢:方法:查看端口状态,是否有大量input/output或CRC error,如果存在错误,在与SG连接的端口和SG的端口手动设置速率与双工模式。
2.丢失登录密码:方法:重起SG,在启动后系统提示键入三次回车,然后选择Setup console,重新设置,需要注意的是在作此步操作前,需要备份SG的config信息,在重设置密码后重新导入。
4. 常用工具与日常操作4.1.常用维护操作配置备份选择General/Archive进入配置备份及恢复页面,如下图示:其中,View File将显示配置,其中Configuration-expanded为全配置,View后选择Save As,可将其保存为本地文件。
其中Install Configration from可以选择从本地文件恢复配置。
注:对于由VPM生成的Policy配置,建议通过Policy配置管理的中的备份和恢复方式。
VPM的Policy备份:需要备份两个文件CPL和XML,在Configuration-〉policy-〉policy files-〉VPM里分别选择”VPM-CPL”和”VPM-XML”按钮,将其中的配置保存为txt文件。