Magento中文操作手册p
Magento(麦进斗)中文开发手册开篇
Magento(麦进斗)是这个星球上最强大的购物车网店平台。
当然,你应该已经对此毫无疑问了。
不过,你可能还不知道,Magento(麦进斗)同样是一个面向对象的PHP框架。
你可以配合Magento(麦进斗)购物车程序强大的功能,开发动态WEB应用程序。
采用高端Magento(麦进斗)电子商务系统可订制对接企业ERP、CRM如:SAP NAV Salesforce Odoo 用友金蝶等,Magento(麦进斗)可对接淘宝、京东、Amazon、eBay、Wish、速卖通等电子商务销售平台,Magento(麦进斗)还可订制对接开发微信商城、移动电商APP。
相较于老的ecshop构架,Magento(麦进斗)作为全球第一电商平台可提供完整核心源代码的电商解决方案,适合品牌企业、跨国企业、跨境电商企业。
麦进斗科技提供上诉完整电商解决方案,欢迎咨询联系麦进斗这是Magento中文开发手册的开篇,我们会在整个手册中介绍绝大部分Magento的开发框架特性。
不要想在这片文章中立刻掌握所有的特性。
这仅仅是个开始,但是足够让你在同行中鹤立鸡群了。
在这片文章中,你将了解到:Magento模块(Magento Modules)代码组织形式配置型MVC架构Magento控制器(Magento Controllers)基于URI的模型实例化(Context-based URI Model Loading)Magento模型(Magento Models)Magento助手(Magento Helpers)Magento布局(Magento Layouts)事件监听(Observers)Magento类重写(Class Overrides)总结开始之前,你可以试着看下Magento MVC模式的一个图形化直观体现。
Magento_MVC.pdfMagento模块中的代码组织形式Magento通过将代码放入独立的模块进行组织。
在一个典型的PHP MVC应用中,所有的控制器会被放在一个文件夹中,所有的模型会被放在另外一个文件夹里,等等。
Magento 2 用户手册 发票 PDF 生成器 Pro 用户手册说明书

USER MANUAL INVOICE PDF GENERATOR PRO-Magento 2 -SET UP IN MAGENTOAfter the install you need to go to the System Configuration area in Magento to enable the module and to enable the email attachments.User Permission SettingsTo set up user permissions, go to System > Permissions > User Roles. If the user can print out the standard Magento PDF invoice he will be able to the same with the custom one from our extension.PDF Print-outs uses Stores -> Settings -> Configurations -> PDF Print-outsDefault permission settings give the Admin access to all Eadesigndev_Invoicepdfgenerator settings. For users with limited roles, you will need to add them (the same as standard Magento).HOW TO USEUsing EaDesign Invoice PDF Generator Pro the admin user can print PDF files with customized printout layouts.The admin user can use the template system from our extension to customize the PDF design in the same way he can customize the email templates. That is a big plus because the store owner can do that for each store.How to start to use the Invoice PDF Generator ProFirst of all you need to know that the Invoice PDF Generator Pro uses the same system to process the template variables and data from the template.1.So, you can go to Marketing -> Email Templates and copytemplate body in area body of PDF templates.2.Select the New Invoice tab from the list to have access to thecontent3.Copy all from the box4.Go to EaDesign -> Manage PDF Templates5.Add a new template from the "Add new template" button. Thiswill prompt you with a set of fields.6.To use it, you need to enable the template in order - Enabletemplate;7.For the current store make the template as default - Defaulttemplate;On the template body tab you can find the source (invoice) you need to load the variables for. This is the actual invoice id, 1 for the first invoice created but you can use the one you need.Using the template variables you can achieve any design and configuration. As you can see in the next 2 images there are a lot of variables to choose from.What are the buttons for?1. Source Variables button contains variables which arestandards Magento for the current entity;2.Standard Variables button contains variables which are thesame as transactional email variables;3.Source Barcode Variables button contains barcode variables.You have a lot of barcodes types but you must to check what barcode you want first;4.Source Depend Variables button contains depend variablesthat check if the value is 0 then return nothing;5.Source Currency Variables button contains currency variables,all the values that contain numbers;6.Source Items Variables button contains variables only foritems, and you can use them only between“##productlist_start##” and “##productlist_end##”. Outside from this area are not recognized.7.Order Items Variables button contains variables only for orderitems and also available between “##productlist_start##” and “##productlist_end##”.8.Customer Variables button contains variables for customerwith all the information about them.9.Order Variables button contains variables only for order type.This is an example for the Depend values variables generated on our development system for the invoice number 1.This is an example for the Currency values variables generated onour development system for the invoice number 1.In CSS section you can create styles for the html like "h1 {color:red;} h2 {color:blue}", it’s not necessary to use the style tag. In the body you can the html you copied from the email templates.In Settings are used to shape the template as you need. The "Template file name" can be made from variables as long as they are ok for file naming {{var invoice.increment_id}}-{{var invoice.id}}-file-invoice. You can modify the orientation of page as landscape or portrait and also the format.In Magento 2 you can localize your template using the trans directive. {{trans "Thank you for your order from %store_name." store_name=$store.getFrontendName()}}{{trans "Once your package ships we will send you a tracking number."}}Using this module you are able to modify the Invoice PDF as you desire using your html and css knowledge only. The extension has multiple features as follows:change the Magento Invoice PDF to meet your needs;add custom CSS to your template to further personalize the PDF;add templates for each store with different design and features;change the file name of the PDF file using variables.。
产品标签 Magento 2 用户指南说明书

Product Labelsfor Magento 2User GuideVersion 1.0Table of ContentsI) Introduction (2)II) Where to Find Extension (3)III) Manage Labels (6)IV) Edit a Label (10)1. General Information (12)2. Design (18)2.1 Product Page (18)2.2 Product List (29)3. Conditions (33)V) Support (35)I) IntroductionProduct Labels for Magento 2is an amazing extension that helps draw customers' attention in the fastest way. Appealing labels along with suitable call-to-action texts like "Hot", "New", "Sale Off", etc can absolutely increase the conversion rate as well as boost the sales.●Configure to display labels freely (On the home page, product list page, productdetail page, etc.)●Create specific labels using 10 predefined variables●Add labels to 21 positions with preview●Flexible conditions for the labels to display●Set time period for labels●Set label priority●Create an unlimited number of labelsII) Where to Find ExtensionFrom the backend interface, go to S tore > Settings > Configuration:On the left panel, span M AGEZON EXTENSIONS, then click on Product Labels. The right section includes General Settings:- Enabled: select Yes or No to enable/disable the extension.- Rounding Method: decide how to round the prices in the labels. There are 3 options to choose.For instance, you have a product of $90 and you apply the sale price of $70 on it. You use the variable {SAVE_PERCENT} to automatically display the sale percent on the label.●Choose N ormal option to display the number with no rounding:●Choose R ounding Down option to round the number down, like this:●Choose R ounding Up option to round the number up, like this:III) Manage LabelsGo to M arketing > Promotions >P roduct Labels to view all created labels:- Click Labels drop-down and you will see the following options:●Add New Label: add a new label.●Manage Labels: go to the l abel grid page.●Settings: access the extension’s c onfiguration.Please note that you can find this dropdown on the l abel edit page as well.- There is a grid containing all labels with such information as label ID, Name, Product Page Label (label on product pages), Product Page Text, Product List Label, Product List Text, Priority, Store View, Status and Action (that allows you to E dit the label).- You can decide which info is displayed in the grid by clicking the C olumns drop-down above the grid. Tick the checkboxes of columns that you want to be visible in the grid. Untick the checkboxes of columns that you want to be invisible in the grid:- Tick the checkboxes of corresponding attachments in the first column, then click A ctionsdrop-down above the grid to:●Delete the chosen labels.●Enable/Disable the chosen labels.- You can filter labels by ID, Store View, Name, Product Page Text, Product List Text, Priority and Status.- To add a new label, click the A dd New Label b utton on the top-right corner and you’ll be redirected to the l abel edit page:IV) Edit a LabelThe edit page will open when you create a new label or edit an existing label.The top of the label edit page contains the following buttons:- B ack: return to the l abel grid page.- D elete: delete the label.- R eset: reset all settings to the last saved ones.-Save and Apply: save the label and apply the label to the chosen products. It means you will see the labels on the frontend.- S ave and Continue Edit: save the label’s settings and stay on the same page.- S ave: save the label’s settings and go back to the label grid page.Note:- By clicking on S ave a nd Continue Edit o r S ave button, you just simply save the label, and the labels will not be displayed on the frontend until you click the S ave and Apply button.- Or you can install cron job and the labels will be displayed on the frontend no matter which kind of save button (Save and Apply, Save and Continue Edit or Save) you click.On the left panel, you’ll see 3 tabs: General Information, Design and Conditions.1. General InformationThis tab lets you configure general settings of a label:- Name: specify a name for the label.- From Date / To Date: set the active time period for the label. Out of this time range, the label will not be displayed on the frontend.- Use for Parent: d ecide whether to assign the label of child products to its parent products. Configurable and group products are the common ones that have parent and children products.For example, the product with SKU ‘WH11’ has a child product that has Green color and S size. And we assign the label M agento t o this child product. If we set U se for Parent toYes, then the label will be assigned to the parent product as well (parent product here is the one with no attribute selected):>> Parent product:>> Child product (with attributes selected):- Hide labels with lower priority: w hen you switch this function to Yes, the labels with lower priority will automatically be hidden.- Store View: C hoose which store views to display the label.- Customer Groups: choose which customer groups to display the label to.For example, choose these following customer groups to display the label to logged in customers only.Let’s check the result:●Not logged in customers:●Logged in customer:- Priority: S et the priority order you want for this label. The lower number, the higher priority. For example, if you have 2 labels with the same position, the label with higher priority will overlap the other.- Status: e nable or disable the label from the frontend.2. Design2.1 P roduct PageThis block is to configure the look of your label on the product detail page.- Image: Choose the image file from your device by clicking on the I nsert Image b utton.- Choose a position you need the label to appear in the L abel Position block. In this case, we place the label on the top left corner of the product image.Let’s check the result:Try another position:And the result:Or, use another image for label and set it like this:The result will be like:Note: If you place the label within the product image, you can preview it in the box on the right:- Label Content:Enter the message you want to display inside the label. You can use the existing variables tosave time. This case, we used “-{SAVE_PERCENT}%” variable.And how it look in the storefront:Or enter another variable:- Design the label using T ext Color, Width (o f the label) and Style fields:And the result:If you want to make the label bigger, set the W idth of the label and the text again:And the result:- URL: when customers click on the label, they will be navigated to the page with the URL you enter in this field. Let's fill the field with our homepage URL:Then see the result:2.2 Product ListAll the settings in this section are similar to those in the P roduct Page section.Let's set the configuration like this:- Choose another I mage and P osition:- Set the L abel Content, Text Color, Width a nd Style like this:And the result will look like this:- URL:Enter the URL of “What is new" page:And the result be like:3. ConditionsBy setting conditions, the label will be applied to the products that meet these conditions.For example, we set the condition A ttribute Set is Bag to apply the label to products that have Bag attribute set.- Product Type: apply the label to products that belong to one of the following types: Latest,N ew Arrival, Best Sellers, Sale, Most Viewed, Wishlist Top, Top Rated, Featured, Free. For example, we choose New Arrival.- Stock Status:apply the label to products that are In Stock or Out of Stock. For example, we choose In Stock.- Use Stock Range:if Yes, you can specify the stock range in D isplay if stock from a nd Display if stock to fields so that the label is applied to products whose stock belongs to this stock range. For example, we set the stock range to be 5-10.Let's see the result:V) SupportIf you have any questions or need any support, feel free to contact us by following ways. We will get back to you within 24 hours since you submit your support request.●Submit c ontact form.●Email us at s******************.●Submit a t icket.●Contact us through S kype:*******************.●Contact us via live chat on our website: .。
Magento 2 自定义产品构建器用户指南说明书

The Custom Product Builder For Magento 2 User Guide. Link to User Guide OnlineRevolutionize your online store! Offer an easy and engaging way to order custom made-to-order products.Our plugin works with png images of the same size with transparent backgrounds. Each png image represents a layer on the product preview. By stacking images representing different product parts on top of each other you can create a full representation of the product and offer a true ‘Build Your Own Product’ experience.This app is very flexible and can work with almost an unlimited number of product types: jewelry, apparel, cars, accessories, musical instruments, furniture, sports equipment etc.. We believe that the world would be a better place if more people could order custom products.Here are some examples of the plugin in action:●Custom Hat●Custom Made Jewelry●Custom Made Controller●Build Your Own Controller●Custom Leggings●Build Your Own Sunglasses●Build Your Own Shoes●Personalized PouchCONFIGURE PRODUCTSIn Admin Panel Catalog/Product add new product. By clicking on «Configure» button you can configure your custom options by adding new panels, categories and options.CONDITIONAL LOGICAlso you can create rules to specify behavior (when panels and categories are visible or hidden)CUSTOM LAYERSCustom layers are one of the main parts of the system. With their help, you can create engraving on objects, upload a custom image to any part of the product, paint parts of the product without loading additional images. And much more …Types of Custom Layers1.Path – This type is used to create click areas and load custom photos on a product, boundedby the layer area.2.Text – This type is used to add text to the product. For example, an inscription on a T-shirt orother object or engraving.3.Image – This type is used to add image whose color can be changed later. Or addingtextures to objects whose colors can also be changed.Create Custom LayersSteps to create “Path” Custom LayerClick button. The form for creating a new layer has been opened.Click button “Add New Custom Layer”. The new layer added. Click it in the Layer Selection Column.Fill in the following fields in the Settings tabTitle: some titleType: PathView: change viewPanel to select: The panel to which to go after clicking on the custom layerNext, if you want to change the shape, the size of the layer and the position on the page, you must drag the layer or individual points with the mouse cursor. To delete unnecessary points, you need to press the Shift and click on it with the mouse.Fill in the following fields in the Advanced tabUse Color Hover– If you want to use color hover, turn on the switch. This functionality is only for painting the layer when it has hovered over the mouseImage Upload– If you want to upload some image, for example, print on a T-shirt, you need turn on the switch.Fill in the following fieldsPanel: the panel in which the necessary category is locatedCategory: the category in which the required option is locatedOption: option with “File Upload” type only.Click Save and collapse settings by pressing the buttonSteps to create “Text” Custom LayerClick button. The form for creating a new layer has been opened.Click button “Add New Custom Layer”. The new layer added. Clickit in the Layer Selection Column.Fill in the following fields in the Settings tab Title: some titleType: TextView: change viewPanel to select: there is no need to fill Text: add some textFill in the following fields in the Advanced tab Font SizeFont FamilyFont ColorPanel: the panel in which the necessary category is located Category: the category in which the required option is located Option: option with “Text Field” type only.Click Save and collapse settings by pressing the buttonIf you want to add several fonts you must to create one Custom Layer for each font.Steps to create “Image” Custom LayerClick button. The form for creating a new layer has been opened.Click button “Add New Custom Layer”. The new layer added. Click it in the Layer Selection Column.Fill in the following fields in the Settings tabTitle: some titleType: ImageView: change viewPanel to select: there is no need to fillImage: You need to upload PNG image with transparency and image positioningFill in the following fields in the Advanced tabColorize image layer– If you want to change colors of any texture, for example, aquaprinting pattern colors on any thing, you need turn on the switch.Fill in the following fieldsPanel: the panel in which the necessary category is locatedCategory: the category in which the required option is located with “Image thumbnail” type only Alpha Transparency: alpha transparency level.Image Upload– If you want to upload some image, for example, print on a T-shirt, you need turn on the switch.Fill in the following fieldsPanel: the panel in which the necessary category is locatedCategory: the category in which the required option is locatedOption: option with “File Upload” type only.Layer colorization and on the fly1.Create a new custom layer with “Image” type. How to do this, see the tab “Custom Layers”.2.Create a new Panel with the “Color thumbnail” category and add some color options.3.Enjoy the resultNow, the functionality is ready to use. Switch colors and your image will be painted in the right color without the need to upload new images.Overlaying texturesChanging the colors of individual elementsInserting user image1.Create a new custom layer with “Path” type. How to do this, see the tab “Custom Layers”.2.Create a new Panel with the “File upload” category and add file upload option.3.Enjoy the resultCustom user textWith the help of this instruction you can not just add text, but give the buyer the opportunity to choose from the options for color, size and font. We present you a powerful tool for working with text layers.One color, one font, one size.For most interesting ideas, you do not need more than one type of font design. And you need to perform just a couple of simple actions.1.Create a new custom layer with “Text” type. How to do this, see the tab “Custom Layers”.2.Create a new Panel with the “Text field” category and add text field option.3.Enjoy the resultAn example can be viewed from t his link. The “Simple color” tab.Multi color, multi font, multi size.Sometimes it is necessary that there are a lot of fonts, colors and the possibility of resizing. In this situation, it takes a little longer, but the result is worth it.1.Create a new custom layers with “Text” type. For each color a separate layer. For each font a separatelayer. For each font size a separate layer. How to do this, see the tab “Custom Layers”.2.Create a new Panel3.For color switching create a new “Color thumbnail” category and add color thumbnail options.4.For font switching create a new “Image Thumbnail” category and add image thumbnail options withuploaded samples of font images.5.For size switching create a new “Text list” category and add text list options.6.Create a new Panel with the “Text field” category and add text field option.7.Set up the rulers in each Custom LayerYou need to make Custom layer shown if the user selects the desired color, size and fontAn example can be viewed from t his link. The “Multi color” tab.This description is just an example. The way you set it up depends entirely on your imagination.Click Save and collapse settings by pressing the buttonGeneral Settings:Select currencySelect layouts:(columns tabs)(columns list) Preview Controls:(buttons)(arrows)Change Themes:Customize CSSIf you know CSS, you can customize the themes by following this l ink. You can override theme classes and ids with custom CSS there.************************************************************************** development.If you want to customize your loading screen you need to make a few simply steps1. Go to your admin panel and go to the store setup2. Upload a new image that you want to use (I used the URL of our logo as an example.)3. Then go to your admin panel and go to the store setup4. Go to Edit Code and find ‘customproductbuilder.css’ file there5. Paste the section /*Loading*/ with your image URL there and save changesResult/*Loading*/.cpb-loading-label{background:url(///s/files/1/1774/1587/files/southern_spun_logo_200x.png?v=1494 899763);background-size: contain;background-repeat: no-repeat;text-indent: -400px;display: block;color: rgba(0, 0, 0, 0);margin-top: 15px !important;}Examples of Custom CSS@font-face {font-family: 'retina';src:url("///s/files/1/1162/8602/t/8/assets/retina.eot?86063878728061505 00");url("///s/files/1/1162/8602/t/8/assets/retina.eot?%23iefix&860638787 2806150500") format("embedded-opentype"),url("///s/files/1/1162/8602/t/8/assets/retina.woff?8606387872806150 500") format("woff"),url("///s/files/1/1162/8602/t/8/assets/retina.ttf?860638787280615050 0") format("truetype"),url("///s/files/1/1162/8602/t/8/assets/retina.svg?86063878728061505 00") format("svg");font-weight: normal;font-style: normal}/* Please use this file to customize the syles of the custom product builder */::selection {background: #FFF7B6;color: black;}#product-builder {width: 100%;min-height: 600px;position: relative;border: none;font-family: Futura, 'Century Gothic', AppleGothic, sans-serif !important;}.product-builder {background: transparent !important;}.product-builder .product-name{font-size: 24px;line-height: 1.5em;margin: 14px 10px;clear: both;font-weight: normal;padding-top: 4px;text-transform: uppercase;margin-bottom: 25px;}.product-builder .builder-wrapper {background: transparent !important;flex-direction: row-reverse !important;}.product-builder a, .product-builder p, .product-builder h1,.title>div,span.price {color: white !important;.builder-layout {margin: 0 !important;padding: 0px !important;}#loading{background:url("///s/files/1/1162/8602/files/website_background_2449dee7-1c79-405c-b490-c20a387477c7_2000x.jpg?v=1503496313") !important;z-index: 9999 !important;;color: #fff !important;;}#loading .content .ball{background-color: #fff !important;}/*Tabs*/.nav-tabs{border-bottom: none !important;}.product-builder .alpine-white .builder-layout .builder-wrapper .panels-container.nav-tabs li{padding: 10px !important;}.product-builder .alpine-white .builder-layout .builder-wrapper .panels-container.nav-tabs li a{padding: 0 !important;font-family: Futura, 'Century Gothic', AppleGothic, sans-serif !important;font-weight: bold !important;font-size: 15px !important;text-transform: uppercase !important;color: #ffffff !important;position: relative !important;display: block !important;letter-spacing: 1px !important;padding-bottom: 8px !important;opacity: 1 !important;}.product-builder .alpine-white .builder-layout .builder-wrapper .panels-container.nav-tabs li.active a:after{background: #416864 !important;}.tab-content{padding: 10px;/*Panels*/.product-builder .builder-layout .builder-wrapper .panels-container .panel .description{ display: none;}/*Categories*/.product-builder .builder-layout .builder-wrapper .panels-container .panel.categories-container .category .title{font-size: 19px !important;line-height: 1.5em !important;margin: 0 auto 15px !important;clear: both !important;font-weight: bold !important;padding-top: 4px !important;}/*Options*/.product-builder .option.option-type-select .option-value select{padding: 6px 16px !important !important;font-family: Futura, 'Century Gothic', AppleGothic, sans-serif !important; background: none !important;border: 1px solid #666 !important;border-radius: 0 !important;font-weight: bold !important;color: #ececec !important;outline: none !important;min-width: 215px;}.product-builder .option.option-type-img{width: 80px !important;height: 80px !important;padding: 5px !important;border: 1px solid transparent !important;display: inline-flex !important;margin: 0px 10px 15px 0 !important;}.product-builder .category-3gc4USis_GgvjR4AQ1s6AFr8 .option.option-type-img{ width: 70px !important;height: 50px !important;}.product-builder .option.option-type-img.active{border-color: #666 !important;}.product-builder .alpine-white .option.option-type-img img{height: 100% !important;width: 100% !important;border: #e2e2e2 1px solid !important;}/*Aside Submit Area*/.product-builder .builder-layout .builder-wrapper .panels-container .builder-actions{ margin: 10px !important;flex-direction: row;border-bottom: 1px solid #ccc;padding-bottom: 24px;}.product-builder .builder-layout .builder-wrapper .panels-container.builder-actions>div{padding: 0 !important;}.product-builder .builder-layout .builder-wrapper .panels-container .builder-actions .cart-container button{background: #416864 !important;border-radius: 5px !important;float: right !important;font-size: 0.9em !important;margin-right: 10px !important;text-transform: uppercase;padding: 6px 16px !important;}.product-builder .builder-layout .builder-wrapper .panels-container .builder-actions .cart-container button:first-child{font-weight: 600 !important;margin-right: 0 !importnant;}.product-builder .builder-layout .builder-wrapper .panels-container .builder-actions .price{font-family: Futura, 'Century Gothic', AppleGothic, sans-serif !important;font-weight: 400 !important;font-size: 18px !important;}.product-builder .builder-layout .builder-wrapper .social-buttons{color: #416864 !important;margin: 10px;}.product-builder .builder-layout .builder-wrapper .social-buttons a{font-size: 18px;padding-left: 10px;position: relative;top: 2px;cursor: pointer;color: #416864 !important;}.product-builder .builder-layout .builder-wrapper .social-buttons[class^="icon-"]:before,.product-builder .builder-layout .builder-wrapper .social-buttons [class*="icon-"]:before {font-family: "retina";font-style: normal;font-weight: normal;speak: none;display: inline-block;text-decoration: inherit;width: 1.01em;margin-right: .2em;text-align: center;font-variant: normal;text-transform: none;line-height: 1em;position: relative;top: 1px;}.product-builder .builder-layout .builder-wrapper .social-buttons .icon-facebook:before {content: "\ea90"}.product-builder .builder-layout .builder-wrapper .social-buttons .icon-twitter:before { content: "\ea96"}.product-builder .builder-layout .builder-wrapper .social-buttons .icon-gplus:before { content: "\e907"}.product-builder .builder-layout .builder-wrapper .social-buttons .icon-pinterest:before {content: "\e906"}.product-builder .builder-layout .builder-wrapper .social-buttons .icon-email:before { content: "\e905"}Custom JSIf you know JS, you can add custom JS that would load within the tool. You can manipulate DOM elements in a similar way that ‘’ does it. It’s a very powerful tool that allows almost any type of theme customizations.Examples of custom JS(function(){function converPriceToKr(){var price=$(shadowNode).find(".price");var value=price.html().split("DKK")[1];if(!value) return;price.html(value+" kr");}setTimeout(function(){var title=document.title;var url=document.location.href;var media=$("meta[property='og:image:secure_url']")[0].content;var html='<span class="social-buttons">Share:<ahref="https:///intent/tweet?text='+title+'&url='+url+'" target="_blank"class="icon-twitter" title="Share this on Twitter"></a><ahref="https:///sharer/sharer.php?u='+url+'" target="_blank"class="icon-facebook" title="Share this on Facebook"></a> <a target="_blank"data-pin-do="skipLink" class="icon-pinterest" title="Share this on Pinterest"href="https:///pin/create/button/?url='+url+'&description='+title+'&media='+media+'"></a> <a target="_blank" class="icon-gplus" title="Share this on Google+"href="'+url+'"></a> <a href="mailto:?subject=Thought you might like '+title+'&body=Hey, I was browsing Hornskov København and found '+title+'. I wanted to share it withyou.%0D%0A%0D%0A'+url+'" target="_blank" class="icon-email" title="Email this to afriend"></a></span>';$(shadowNode).find(".builder-actions").after(html);var title='<h1 class="product-name">Custom Hat</h1>';$(shadowNode).find(".panels-container").prepend(title);converPriceToKr();$(document.body).on("PRODUCT_BUILDER_LAYER_UPDATE", function () {setTimeout(function(){converPriceToKr();},40);});},500);})();。
Magento后台中文操作教程
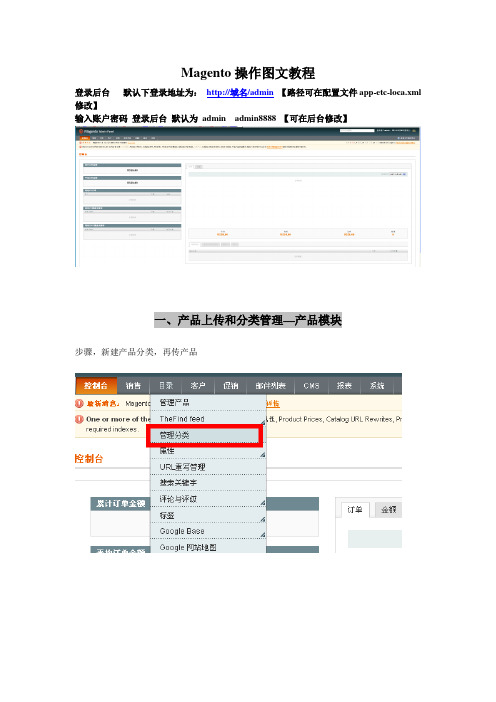
Magento操作图文教程登录后台默认下登录地址为:http://域名/admin【路径可在配置文件app-etc-loca.xml 修改】输入账户密码登录后台默认为admin admin8888 【可在后台修改】一、产品上传和分类管理—产品模块步骤,新建产品分类,再传产品1.新建产品分类导航—目录---管理分类—点进进入分类管理面板中文英文default category 是总目录,在新建分类的时候要先点击选中该分类,【所有产品分类都属于这个目录下】然后在点击添加子目录默认下,我们只需要填写基本信息即可说明: * 必填项目,分类名2.in Active: 是否在前台显示3.Description: 分类描述,可填写可不填写,填写可丰富网站内容、利于客户了解该产品以及利于SEO关键字密度:如下图4.image:分类图片:可浏览从本地导入分类图片,效果举例如下:5.Page Title:可以自己定义网页标题显示的文字,利于SEO优化,举例如下6.Meta Keywords:关键字,网页前台不显示,利于SEO优化7.Meta Description:描述,利于SEO优化8.Include in Navigation Menu:是否显示在导航,这个具体跟模板设计有关系,如果模板是程序指定显示内容,那么该功能无效,如果导航默认为推荐的产品分类,那么该选项有效其他红色框选中模块默认,暂时不用理会。
然后点击右上角的保存分类中文英文OK,一个名为Handbags的分类已经建立好了,(0)该分类下目前0个产品接下来,我们重新点击选中Default Category(0) 新建几个主分类、接下来,新建子分类鼠标单击选中Handbags分类,点击添加子目录填写子分类的分类信息,红色星号为必填选项,其他可填可不填然后右上角点击保存分类继续添加子目录,当然,我们还可以新建三级子目录,步骤一样。
产品分类新建完毕二、产品上传一、看到导航条--- 目录---下拉列表中单击管理产品进入产品管理页面二、看到左侧中间地方有一个增加产品,单击开始上传产品属性组合—默认产品类型-简单产品默认Magento功能比较强大,产品类型有多种类,可以是组合的捆绑的下载的虚拟产品等等我们默认下电子商务单品站一般就直接简单产品,然后继续产品基本信息Name*Description*EditorShort Description*SKU*Weight*Set Product as New from DateSet Product as New to DateStatus*-- 请选择--激活禁用URL keyVisibility*Allow Gift MessageIn feed三、产品价格Prices四、产品meta信息(内置SEO)五、上传图片Browse Files从电脑中选择文件然后Upload Files 六、库存三、商店设置导航---系统---设置一、基本设置--设置商店默认的国家、允许购买的国家、时区语言以及商店名称、联系人电话地址二、电子邮件地址设置---设置contact us的信息三、货币设置Base Currency 基准货币Default Display Currency 默认显示货币Allow Currencies 允许支付的货币设置了货币后我们还需要设置货币汇率导航---系统---管理货币汇率“导入”可以在线导入汇率。
Magento插件安装与使用指南说明书

Magento PluginInstallation and Use GuideContentInstallation Using Composer2 Configuration3Using the Features7 To Process Payments7To Process Pre-authorizations8To Process Refunds10To Manage Subscription Plans11To Manage Card Tokens121.Installation Using ComposerTo install our plugin you only can:1.Run the c omposer require worldnettps/payment-gateway c ommand from your CLI, or;2.Add the dependency“worldnettps/payment-gateway”:“1.0.0”to the“r equire”section ofyour c omposer.json file(root folder of your Magento application)and run the commandcomposer updateon your CLI.FIGURE - Configuration File (Dependencies) - composer.json2.ConfigurationTo configure the plugin you need to navigate to the configuration page:➔STORES > CONFIGURATION > SALES > PAYMENT METHODSFIGURE - Payment Method Configuration - Part 1FIGURE - Payment Method Configuration - Part 2Expand the payment method W orldnetTPS payment e lement and provide the following details.●Enabled: Yes or No. If Yes, this payment method is going to be available for customers.●Payment Action:○Authorize Only:if you use this action,you are going to need to complete theauthorization later on.○Authorize and Capture: This action does not require later completion.●Integration Type:○XML: accepts payment within the e-commerce application premises.○HPP:redirects the customer to a safe PCI compliant webpage to enter the carddetails and perform the payment.●Transaction Type:Depends on the integration type.For more details,searchTRANSACTIONTYPE f ield in:○For XML:https:///doku.php?id=developer:api_specification:xml_payment_features.○For HPP:https:///doku.php?id=developer:api_specification:hpp_payment_features.●Dynamic Descriptor:dynamic descriptor to be used by your acquirer as the identifyingname of a purchase appearing on the monthly cardholder’s credit card statement.●Account Type: Test or Live.●Gateway URL HPP:URL endpoint to which provides the payment integration for thisintegration type. Preferably, mark the “U se system value” option.●Gateway URL XML:URL endpoint to which provides the payment integration for thisintegration type. Preferably, mark the “U se system value” option.●<Test/Live>Primary Currency:Currency to be used.Based on the currency(s)allowedto the terminal indicated by the following Terminal ID.●<Test/Live> Primary Terminal ID: Terminal identification.●<Test/Live>Primary Shared Secret:Terminal secret.Defined on setup.It can bechanged by the merchant using the Merchant SelfCare System.●<Test/Live>Primary Multicurrency:Yes or No.Defines if the terminal is multi-currencyor not.●<Test/Live>Secondary Currency:Currency to be used.Based on the currency(s)allowed to the terminal indicated by the following Terminal ID.●<Test/Live> Secondary Terminal ID: Terminal identification.●<Test/Live>Secondary Shared Secret:Terminal secret.Defined on setup.It can bechanged by the merchant using the Merchant SelfCare System.●<Test/Live>Secondary Multicurrency:Yes or No.Defines if the terminal ismulti-currency or not.●<Test/Live>Third Currency:Currency to be used.Based on the currency(s)allowed tothe terminal indicated by the following Terminal ID.●<Test/Live> Third Terminal ID: Terminal identification.●<Test/Live>Third Shared Secret:Terminal secret.Defined on setup.It can be changedby the merchant using the Merchant SelfCare System.●<Test/Live>Third Multicurrency:Yes or No.Defines if the terminal is multi-currency ornot.●New Order Status:Status for new orders.Verify Magento’s status configurationinstructions to add new options to this list.●Sort Order:Modifying this will change the display order of the payment method if morethan one is available (lower is higher with 0 being displayed on top).●Debug: Yes or No. To activate the debug mode of your e-commerce application.●Email Customer: Yes or No. If yes, the receipt is going to be sent by e-mail to customers.●Merchant’s Email: Merchant’s support e-mail for contact and complaints.●Credit Card Types:Allowed card brands which can be used to accept card payments bythe account. Limited by the terminal used to provide the integration.●Payment From Application Countries: All or Specific List.●Payment From Specific Countries:When selected a specific list,let’s you choose whichcountries.●Minimum Order Total: Minimum order amount to be able to use this payment method.●Maximum Order Total: Maximum order amount to be able to use this payment method.After defining these settings, you can start using the features.ing the FeaturesTo Process PaymentsThe payment processing allows you(O RDERS>Create New Order)and your customers(C heckout) to create new orders and send them to the payment gateway for processing.FIGURE - Payment/ PurchaseThe result can be verified in S ALES > OPERATIONS > TRANSACTIONS.FIGURE - TransactionsTo Process Pre-authorizationsThe difference between processing payments or pre-authorizations depends on the P aymentAction c onfigured in the payment method.In case you configured A uthorize Only,all of the payments generated from your e-commerceplatform will be Pre-authorizations,which requires you to go to each order and“C omplete”thembefore the payment is properly ready for settlement(when you are going to receive the actualpayment in your merchant account). To do that you are going to access:1.SALES > ORDERS >[S elect an Order by clicking on V iew]2.[A t the page top select I nvoice]3.[A t the page bottom, go to I nvoice Totals]4.[I n A mount s elect C apture Online] > Submit InvoiceFIGURE - Complete Pre-authThe default configuration of our plugin is Pre-auth+Completion,so If during configuration youdidn’t explicitly selected P ayment Action as A uthorize and Capture,most likely you are going toneed to complete/ submit each invoice after authorization is confirmed.To Process RefundsThere are cases where you might need to refund a specific purchase for a customer,and in thiscase, you can also use your e-commerce. For this you need to go to:1.SALES > ORDERS > [S elect a successful Order by clicking on V iew]2.[S elect I nvoicestab and choose an I nvoiceby clicking in V iew]3.[S elect C redit Memos] > [I n Refund Totals section, page bottom, enter Amount] > RefundFIGURE - Refund Payment (Credit Memo)To Manage Subscription PlansIf you desire to create a payment plan for your customers,you can use this feature.We call thisfunctionality S tored Subscription.Additionally,any stored subscription you configure is going to be presented to the customerswhen they select to pay using our payment method (see the first feature of this section).All the stored subscriptions and subscriptions“signed”by your customers will be available inSALES>WORLDNETTPS SUBSCRIPTION.You are going to be able to edit or delete them ifdesired.FIGURE - Stored Subscription (Plans)FIGURE - Customers’ SubscriptionsTo Manage Card TokensWhen a customer pays a purchase using our payment method,the plugin gives an option to storethat card as a token.All the tokens generated are presented in S ALES>WORLDNETTPS SECURECARD.Here you cansee the token associated with customers and delete then,when necessary or required by yourcustomers.FIGURE - Customers’ TokensFor more details on our solutions and questions regarding the use of our platform,please contactour Sales team.。
乐罗美林Magento2集成用户手册说明书
Leroy Merlin Integration for Magento 2 User Manualby CedCommerce Products Documentation1. Overview (3)2. Extension Installation (3)3. Configuration Settings (4)4. Manage Profile (10)4.1. Add New Profile (10)4.2. Edit Existing Profile (13)4.3. Submit Actions in Bulk on Profiles (15)5. Manage Products (17)6. Manage Orders (19)7. View Failed Orders (21)8. Leroy Merlin Feed (22)9. Cron Logs (24)10. Activity Logs (25)11. Help and Support (26)1. OverviewLeroy Merlin marketplace a French marketplace famous for home and gardening equipment. It serves in countries like Europe, Asia, Africa, and South America. Leroy Merlin has a customer base of 300 million household customers with a turnover in 2015 of 17.9 billion euros and 3.6% annual growth.Leroy Merlin integration for Magento 2 interacts with the Leroy Merlin stores to integrate the synchronized product listing between the Magento store and the Leroy Merlin marketplace, and hence, saves your time from listing products one-by-one.Key Features:Profile Based Product Upload: The integration facilitates you to create a profile and map the category and attributes to the Magento store. Then, after assigning the products to the profile, you can easilyupload products on Leroy Merlin.Synchronised Inventory: You need not update the inventory every time manually; instead it issynchronized automatically at regular intervals of time. Also, inventory status and inventory stock areupdated.Bulk Upload System: You have the flexibility to upload any number of products on the Leroy Merlinmarketplace using the bulk product upload feature.Notifications: You will receive emails immediately when a new order is created.Rejected Products Notification: If any product gets rejected from the Leroy Merlin due to invalid data, then its information is fetched from the automatic synchronized requests along with the error due to which it is rejected.Real-Time Synchronisation: Easily access real-time reports of order and inventory data to reduce errors and prevent over and under-selling.Streamline Order Processing: Automate the entire sales and purchase of the order process end-to-end with this extension. It also aggregates high volumes of orders from all channels.Product Management: Create products manually with this integration, upload items via CSV or import data from other marketplaces and also easily fix data issues2. Extension InstallationTo install the extension,1.1. Upload and Extract the Leroy Merlin package file inside the app/code/Ced/ directory and add the belowline in Magento root composer.json file autoload psr-4(please check the screenshot)“LeroymerlinSdk\\”: “app/code/Ced/Leroymerlin/leroymerlin-sdk/src/”2.Run the below command from Magento root-composer dumpphp bin/magento setup:upgradephp bin/magento setup:di:compilephp bin/magento setup:static-content:deploy -fphp bin/magento index:reindexphp bin/magento cache:cleanphp bin/magento cache:flush3. Configuration SettingsTo set up the configuration settings,1.Go to the Magento 2 Admin panel.2.On the left navigation bar, click the Leroy Merlin Integration menu.The menu appears as shown in the following figure:3.Click on Configuration.The Configuration page appears as shown in the following figure:4.In the right panel, click the Leroy Merlin Seller/Developer Settings tab.The Leroy Merlin Seller/Developer Settings tab is expanded and the relevant fields appear as shown inthe following figure:5.Under Leroy Merlin Seller/Developer Settings, do the following steps:In the Enabled list, select the Yes option.In the Mode list, select the LIVE option.In the Default Service Url list, select the Live API URL option.In the Api Key box, enter the API Key value copied from the Leroy Merlin seller account.In the Select Store list, select the required store.In Debug Mode, select Yes if you want the log to be created.6.Scroll down to the Leroy Merlin Product Settings tab, and then click the tab.The Leroy Merlin Product Settings tab is expanded and the expanded section appears as shown in the following figure:7.Under Leroy Merlin Products Settings, do the following steps:Click the Leroy Merlin Price Settings tab.The Leroy Merlin Price Settings tab is expanded and the section appears as shown in thefollowing figure:Under Leroy Merlin Price Settings, do the following step:In the Product Price list, select one of the following options:Increase by Fixed Price: If selected, then the Modify by Fix Price field appears.Increase by Fixed Percentage: If selected, then the Modify by Percentage Pricefield appears.Enter the numeric value to increase the price of the Leroy Merlin, product price bythe entered value % of Magento 2 price.For Example,Magento 2 price + 5% of Magento 2 price.Magento 2 Price = 100Select Increase By Fixed Percentage optionModify by Percentage Price = 5100 + 5% of 100 = 100 + 5 = 105Thus, Leroy Merlin Product Price = 105Decrease by Fixed Price: If selected, then the Modify by Fix Price field appears.Decrease by Fixed Percentage: If selected, then the Modifyby Percentage Pricefield appears.Enter the numeric value to decrease the price of the Leroy Merlin product price by the entered value % of Magento 2 priceFor Example,Magento 2 price – 5% of Magento 2 price.Magento 2 Price = 100Select Decrease By Fixed Percentage optionModify by Fix Price = 5100 – 5% of 100 = 100 – 5 = 95Thus, Leroy Merlin Product Price = 95Click the Leroy Merlin Inventory Settings tab.The Leroy Merlin Inventory Settings tab is expanded and the section appears as shown in the following figure:Under the Leroy Merlin Inventory Settings tab, do the following steps:In the Set Inventory on Basis of Threshold list, select the Enable option ifrequired to set the inventory based on a threshold.Note: Only when the admin selects Enable, the other fields appear. Threshold Inventory is the minimum count of an item that the store owner wants tokeep in stock.In the Inventory Threshold Value box, enter the required value.In the Send Inventory for Lesser Than Threshold Case box, enter the requiredvalue.In the Send Inventory for Greater Than Threshold Case box, enter the required value.In Use MSI, select Yes if you want to use multiple inventories.Click on Other Product Settings. The tab is expanded as:Under Other Product Settings do the following steps:In Attributes to Skip Validation, select the attributes from the list for skippingvalidation.In Parents Product Info., select the attributes to configure from parent product.In Merge Parent Product Images, select Yes to merge parent images.In Upload Config as Simple, select Yes if you want to upload simple products.8.Scroll down to the Leroy Merlin Order Settings tab, and then click the tab.The tab is expanded and the section appears as shown in the following figure:9.Under Leroy Merlin Order Settings, do the following steps:In the Leroy Merlin Order Id Prefix box, enter the required order Id prefix.In the Order Notification Email box, enter the required email Id.In Auto Accept Order, select Yes to accept orders automatically.In Hold Order Until Shipping, select Yes to hold till it is shipped.In the Enable Default Customer list, select the Yes option to enable the default customer.In Default Customer Email, enter the mail id of the customer.In Refund Order on Leroy Merlin, select Yes for the order refund.In Refund Reason For Leroymerlin, select the reason for orders refund.In Carrier Mapping, map the Magento carrier with Leroymerlin Carrier and tracking carrier.10.. Scroll down to the Leroy Merlin Cron Settings tab, and then click the tab.The tab is expanded and the section appears as:11.Under Leroy Merlin Cron Settings, do the following steps:In Order Cron, select Enable to enable the order to fetch through crons.In Order Sync Cron, select enable for syncing orders.In Inventory/Price Cron, select Enable to sync inventory and price.In Feed Cron, select Enable to sync feed.In Full Offer Sync Cron, select Enable to sync the full offer.In Order Shipment Cron, select Enable to ship Magento orders automatically.12.Click the Save Config button to save the entered values.4. Manage ProfileTo manage profile, you can perform the following actions:Add a new profileEdit Existing profileSubmit Actions in bulk4.1. Add New ProfileTo add a new profile,1.Go to the Magento 2 Admin panel.2.On the left navigation bar, click the Leroy Merlin Integration menu.The menu appears as shown in the following figure:3.Click Profile Manager.The Manage Profile page appears as shown in the following figure:The Add New Profile page appears as shown in the following figure:5.In the right panel, under General Information, do the following steps:In the Profile Code box, enter a profile code.Note: It is only for the internal use. Use the unique profile code with no spaces. Start with small letters.In the Profile Name box, enter the name of the profile.Note: Use the unique name to identify the profile.In the Profile Status list, select Enabled to enable the profile.Note: The Disabled option disables the profile6.In the left navigation panel, click the Store Categories menu. In the right panel, the section appearswhere you need to select store categories as shown in the following figure:7.Click on L eroy Merlin Category from the left menu and the section will appear as:8.Select the category and depending on it child categories will appear further from where you may choosethe needed ones.9.Click the Save button.The profile gets created and listed on the Manage Profile page4.2. Edit Existing ProfileTo edit the existing profile,1.Go to the Magento 2 Admin panel.2.On the left navigation bar, click the Leroy Merlin Integration menu.The menu appears as shown in the following figure:3.Click Profile Manager.The Manage Profile page appears as shown in the following figure:4.Scroll down to the required profile row.5.In the Action column of the respective row, click the Edit link.6.The profile editing page appears.Do the required changes and click on Save.4.3. Submit Actions in Bulk on ProfilesTo submit the selected action on the selected profiles in Bulk,1.Go to the Magento 2 Admin panel.2.On the left navigation bar, click the Leroy Merlin Integration menu.The menu appears as shown in the following figure:3.Click Profile Manager.The Manage Profile page appears as shown in the following figure:4.On this page, all the available profiles are listed.5.To delete the selected profiles, do the following steps:Select the profiles those are no more required.Click the Arrow button next to the Actions field.The Actions list appear as shown in the following figure:Click the Delete option.A confirmation dialog box appears.Click the OK button.The selected profiles are deleted.To disable the selected profiles, do the following steps:Select the required profiles.Click the Arrow button next to the Actions field.The Actions list appear as shown in the following figure:Click the Disable option.The selected profiles are disabled.To enable the selected profiles, do the following steps:Select the required profiles.Click the Arrow button next to the Actions field.The Actions list appear as shown in the following figure:Click the Enable option.The selected profiles are enabled.5. Manage ProductsTo manage products,1.Go to the Magento 2 Admin panel.2.On the left navigation bar, click the Leroy Merlin Integration menu.The menu appears as shown in the following figure:3.Click on Product Listing.The Product Listing page appears as shown below:4.To edit a product, click on the Edit button in the Actions column.You can now do the required edit in the product details.5.To validate a product, click on the Validate button in the Actions column.The selected product will be validated.To submit bulk actions on products,1.In the Actions list, click the arrow button.A list appears as shown in the figure:2.Select the checkboxes associated with the required products.3.To validate products, click on the Validate Products. Selected Products will be validated.4.To upload products, click on Upload Product(s), selected products will be uploaded.5.To update the inventory and price, click on Update Inventory & Price. The price and inventory will beupdated for selected products.6.To upload products with offers, click on Upload Product with Offer, the selected products will beuploaded along with offers.7.To mark products as inactive, click on Inactive(OutOfStock) on Leroymerlin.6. Manage OrdersTo fetch and view new orders,1.Go to the Magento 2 Admin panel.2.On the left navigation bar, click the Leroy Merlin Integration menu.The menu appears as shown in the following figure:3.Click Order Listing.The Order List page appears as shown in the following figure:4.Click the Fetch Leroy Merlin Orders button.If the order is imported successfully then, a new record is found in the Orders Grid table.Note:Orders are automatically imported through CRON in every 10 minutes.Whenever the latest orders are imported from Leroy Merlin, a Notification appears inthe notification area of the Admin panel for those orders and they are Auto-Acknowledged as soonas they are imported in the Magento 2 store admin panel.If no Order is imported, then check the Failed orders listed on the Leroy Merlin Failed Orderpage.Order is auto-rejected on Leroy Merlin in the following conditions:When Leroy Merlin Product SKU does not exist in Magento 2 store.When Product is Out of Stock in Magento 2 store.When a product is disabled in Magento 2 store.To perform Actions in bulk on Orders,1.To delete orders, select the orders and then click on Delete Orders under the Actions menu.The selected orders will be deleted.2.To synchronise orders, select the orders and then click on Sync Orders under the Actions menu.The selected orders will be acknowledged.3.To mark orders as shipped, select the orders and then click on Mark as Shipped under theActions menu.The selected orders will be marked shipped.7. View Failed OrdersTo view failed orders,1.Go to the Magento 2 Admin panel.2.On the left navigation bar, click the Leroy Merlin Integration menu.The menu appears as shown in the following figure:3.Click Failed Orders.The Failed Order page appears as shown in the following figure:4.This page displays the failed orders with the order id and the reason for the failure.8. Leroy Merlin FeedTo view and manage the product feeds,1.Go to the Magento 2 Admin panel.2.On the left navigation bar, click the Leroy Merlin Integration menu.The menu appears as shown in the following figure:3.Click Feeds.The Feeds page appears as shown in the following figure:4.The page displays the Leroy Merlin feeds.9. Cron LogsTo view Cron Details,1.Go to the Magento 2 Admin panel.2.On the left navigation bar, click the Leroy Merlin Integration menu.The menu appears as shown in the following figure:3.Click Cron Logs.The Cron page appears as shown in the following figure:4.To delete all the cron logs, click the Truncate button.10. Activity LogsTo view Activity details,1.Go to the Magento 2 Admin panel.2.On the left navigation bar, click the Leroy Merlin Integration menu.The menu appears as shown in the following figure:3.Click on Activity Logs.The Activity Log grid appears as:4.The activity details are displayed on this page along with the message.11. Help and SupportTo view Help and Support,1.Go to the Magento 2 Admin panel.2.On the left navigation bar, click the Leroy Merlin Integration menu.The menu appears as shown in the following figure:3.Click Help and Support.The Help and Support page appears as shown in the following:4.You can connect with us via Call, Ticket, Email or Skype chat for any assistance.。
magento使用手册
magento使用手册一、简介Magento是一款强大的开源电子商务平台,提供了丰富的功能和灵活的定制选项,帮助商家建立和管理在线商店。
本使用手册将为您介绍Magento的基本使用和操作方法。
二、安装与配置1. 下载Magento安装包并解压到您的服务器。
2. 创建一个数据库,并将Magento与数据库进行连接。
3. 配置您的商店信息,包括商店名称、网址、货币等。
4. 安装所需的扩展和插件,以增强您的商店功能。
三、后台管理1. 登录后台管理界面。
2. 管理商品目录,包括添加、编辑和删除商品。
3. 配置支付和物流方式,以便客户可以完成购买。
4. 创建和管理客户账户,包括查看订单和处理退款等操作。
5. 使用营销工具进行促销活动,如优惠券、特价商品等。
6. 查看销售报告和统计数据,以便了解商店运营情况。
四、前台展示1. 自定义商店外观和布局,以符合您的品牌形象。
2. 优化商品详情页面,提高客户购买转化率。
3. 创建博客或新闻页面,与客户互动并增加网站流量。
4. 集成社交媒体分享功能,扩大您的商店影响力。
5. 提供多语言支持,吸引不同国家和地区的客户。
6. 确保网站在不同设备上的兼容性,提高用户体验。
五、安全与性能优化1. 定期备份您的数据和文件,以防意外丢失。
2. 使用SSL证书加密传输数据,确保客户信息安全。
3. 优化图片和代码,提高网站加载速度。
4. 使用缓存机制减少服务器负载,提高网站性能。
5. 定期更新Magento版本和插件,以修复潜在的安全漏洞。
6. 配置防火墙和安全插件,防止恶意攻击和入侵。
六、总结与支持本使用手册为您提供了Magento的基本使用和操作方法。
然而,Magento的功能和定制选项非常丰富,可能需要进一步的学习和实践才能充分掌握。
我们建议您参考官方文档和社区资源,以获取更详细的信息和支持。
Magento 支付页面用户指南说明书
Payment Pages - User GuideVersion: 1.1Published: 9 January 2020Payment Pages1.Configure the extension1.Sign in to the Magento administration area.2.Click “Stores” from the options at the admin menu, and then click “Configuration”..3.On the page that loads, collapse “Sales” tab and then select “Payment Methods” on the left sidemenu.4.After that open “OTHER PAYMENT METHODS” section, scroll down and click the “Configure”button for “Secure Trading” method, then collapse “ Payment Pages” section.5.This expands to show two options: “Required settings” and “Optional settings”.2.Required settingsClick “R equired Settings”. This expands to show settings you can configure.2.1 EndpointThe EU gateway currently has the endpoint as , whereas the US gateway will contain the endpoint of .2.2 Test environmentThis field helps you to more easily switch between live and test configuration.2.3 Site ReferenceYou must enter your unique site reference in the “Site Reference” field.When setting up the Magento extension for the first time, it is strongly recommended that your test site reference (e.g. “test_site12345”) is specified. This allows you to test payments to our test bank to ensure your implementation works as expected.When you are ready to go live, you change this to be your live site reference (e.g. “site24680”). (see section 2.2)2.4 Perform Back-Office Operations (recommended)Enable Back-Office Operations to handle capture, cancel or refund transaction in Magento Admin. 2.4.1 Web Services UsernameEnter the webservices username which you had registered to perform Back-Office Operation (see section 2.4)2.4.2 Web services PasswordEnter the webservices username which you had registered to perform Back-Office Operation (see section 2.4)Ensure the “Enabled” field is set to “Yes”.3.Optional Settings3.1 Display settings3.1.1 TitleThe name of this payment method shown to your customers.3.1.2 DescriptionThe description of this payment method shown to your customers.3.1.3 Use IframeEnabling this option will make the Payment Pages load in an HTML iframe element. Using an iframe in combination with parent/child CSS allows you to make it appear as if the Payment Pages are part of your own website.3.1.4 Iframe HeightThe height of the iframe. Enter one or more numbers followed by "px" or "%".3.1.5 Iframe WidthThe width of the iframe. Enter one or more numbers followed by "px" or "%".3.2 Payment pages version settings3.2.1 VersionThe version number is used to change the type of styling used when rendering the Payment Pages.If you are using custom CSS and JS, and would like to upgrade from version 1 to version 2, you will need to click h ereand follow the instructions.3.2.2 ST ProfileThe ST Profile refers to a set of custom HTML files that will be loaded by the Payment Pages instead of the default HTML files used by Secure Trading. These HTML file must be uploaded to the MyST File Manager. See the Payment Pages documentation for more information.3.2.3 Skip Choice PageEnabling this will let your customers select their payment type (Visa etc.) on your website rather than on the Payment Pages.3.3 Other settings3.3.1 Applicable CountriesThis payment method can be enabled for all countries or for a specified subset of countries.3.3.2 Payment ActionEnabling authorize only payments will set the settlestatus of the order to 2. This means the payment will be suspended in the Secure Trading system and will not be captured by your acquiring bank. Then the Admin have to manually create invoice.If Authorize & Capture is set, you should set value for settle status and settle due date. This means the invoice will be created after paying successful.3.3.3 Settle status:This is the settle status that will be applied to this transaction. This should normally be set to 0. It depends on Payment Action (Authorize & Capture is set).3.3.4 Settle Due Date:The settle due date is the day that funds held against your customers' account will be acquired.4.Cron scheduling4.1 How cron worksCancelling orders older than 3 hours that are still in the “Payment Pages” status. These orders aremost-likely abandoned and cancelling them releases the stock reserved, allowing purchase by new customers. This runs every fifteen minutes.And if the pending orders are canceled, they will be added a comment like the below picture:4.2 View logTo view cron log, open Magento_Root_Directory/var/log/securetrading/paymentpage.log file.The log file point out that there are how many orders have been cancelled and print their Increment Id.5.Perform a test payment1.Add an item(s) to your cart and proceed to checkout.2.Register/sign in as appropriate and fill out billing and shipping information.3.If the extension has been configured correctly, it will appear as a payment option in your store(name and description dependent on your configuration settings)4.Select SecureTrading Payment Pages method5.Confirm your order by clicking “Place Order”.6.You will now be redirected to the Payment Pages. By default, this will be shown in an iframewithin your Magento store.If you change iFrame configuration, it is set to No, you will be redirected directly toSecureTrading Payment Pages.7.Providing the test card details you entered were for an authorised response, you will be showna success message. If you entered declining test card details, an error message will be shown,and you’ll be allowed to try different payment details.6.Payment Action Types1.“A uthorize and Capture” – Secure Trading sends a request for payment authorisation, and thefunds will be captured in a subsequent settlement run (normally within 24 hours).After the customers paid successfully, Invoice will be created, the merchant can refund (create credit memo). If the funds have not been settled yet, the transaction will be canceled.Otherwise, it will be refunded.2.“A uthorize only” – Secure Trading sends a request for payment authorisation, but the funds willnot be captured without further action from the merchant.After the customers paid successfully, the merchant have to click Invoice button to create anInvoice and send a request to capture the funds.Moreover, the merchant can cancel/void the order. Then the transaction will be canceled.7.Create an InvoiceIf the payment action is set to “Authorize Only”, the merchant must create Invoice manually.When the merchant create an Invoice, a request will be sent to change the settle status from “2” to “0” or “1”.1.In Order detail page, click Invoice button.2. A new invoice page will be loaded, check and edit its information. After that, scroll down to thebottom, select Capture Online and submit Invoice.3.Performing this action will allow funds to be captured by the acquiring bank (usually occurswithin 24 hours). Once an invoice has been generated for an order, it is not possible to cancel it.Instead, you will need to process a “Credit Memo” (refund).4.Remember that if you don't choose Capture Online, the request will not be sent and then thetransaction will not be updated the settle status (It is still suspended).8.Create an Online Credit MemoThe merchant can create credit memo only when the invoice has been created.8.1 Create an Online Credit MemoThis action will update the transaction in SecureTrading’s system.1.When an invoice has been generated, on Order detail page, click Invoices tab in Order Viewsection.2.After that, select which invoice you want to refund.3.When the invoice detail page is shown, click Credit Memo button on the action bar.4.The merchant will be redirected to a new credit memo page, scroll down and take a look at theRefund Totals section. The merchant can input the Adjustment Fee for a Partial Refund, if they don't adjust to this field, it means a Full Refund will be executed.5.Do not input value for Adjustment Refund, because the total amount should be less than orequal with the captured amount.6.Back to Order detail page, scroll down to the Comment section.If the transaction has not been settled yet, it will be canceled instead of being refunded. And a comment will be added to order (We voided the transaction because it has not settled yet.). 9.Cancel an OrderThe merchant can perform this action only when the order has not invoiced (Authorize Only action).1.Select an order which has not invoiced.2.Click Cancel button on the Action bar.3.Confirm this action.4.Now the order in Magento and the transaction in SecureTrading’s system have been canceled.10.MOTOWhen the merchant receive order from customer via Mail/Telephone. They have to place order in Magento Admin. To start, please follow these steps below:1.Login to Admin, go to Sales -> Orders.2.Click Create New Order button.3.Select/Create the customer who has sent an order request.4.Input order information provided by that customer.5.After adjusting the cart, scroll down to Payment and shipping information section, selectSecureTrading - STPP method.6.Select Shipping method and submit order.7.When the order has been submitted, if Use Iframe configuration is enabled, the merchant willbe redirected to Magento Admin page with SecureTrading iFrame. Otherwise, they will beredirected directly to SecureTrading payment website.8.After paying successfully, the merchant will be redirected to Order Listing page.11.Declined TransactionIf your transaction has been declined, a comment will be added to order. .To see the comment, go to Order Detail page, scroll down to the bottom of the page:。
magento中文操作手册【word版】p
本报告可以按照范围和指定的时间段统计发货信息。范围可以在页面上方的Show Report for下拉菜单中指定。将在每个时期之间有一条线。一个日期段可以是日,月,或一年,可以在页面顶部的Show by下拉菜单中指定。日期段的一些报告中依赖于在顶部指定的日期范围。每一日期段,您可以看到已经有关联发票的总订单数,和总的发票金额,包括多少金额是 获得了多少没有获得。在报告中的最后一行是总计所有的数目的。
四、Mobile
介绍:Mobile支持iPad、iPhone和Android平台。强大的应用,可以使商家为他们的客户在iphone上面创建独特的、品牌性的体验。
五、客户
介绍:可进行客户管理,显示已有的用户进行修改、创建、删除用户。设置客户分组级别。显示在线客户,即时掌握客户相关信息。
六、
目录价格规则:可设置产品以及分类处的一些优惠规则方案
2)税报表
本报告可以按照范围和指定的时间段统计税金信息。范围可以在页面上方的Show Report for下拉菜单中指定。将在每个时期之间有一条线。一个日期段可以是日,月,或一年,可以在页面顶部的Show by下拉菜单中指定。日期段的一些报告中依赖于在顶部指定的日期范围。每一日期段,您可以看到使用此税率的总订单数,和使用此税率所缴纳的税金。在报告中 的最后一行是总计所有的数目的。
四、搜索功能
介绍:搜索功能分为快速搜索以及高级搜索。
1)快速搜索:当进行搜索,将会搜索所有可搜索产品的可搜索属性,并显示结果。因为产品的所有的特点被认为是一种产品属性-如名称、说明和颜色-您可以搜寻任何有关的任何产品。只要确保产品是可搜索的。当客户在搜索框中输入字符并搜索时,如果之前没有人搜索过的话输入的字符将创建一个新的搜索字词。无论有没有返回的结果这个字词都会保存。
- 1、下载文档前请自行甄别文档内容的完整性,平台不提供额外的编辑、内容补充、找答案等附加服务。
- 2、"仅部分预览"的文档,不可在线预览部分如存在完整性等问题,可反馈申请退款(可完整预览的文档不适用该条件!)。
- 3、如文档侵犯您的权益,请联系客服反馈,我们会尽快为您处理(人工客服工作时间:9:00-18:30)。
五、产品
产品可设置为以下几种:
1)简单产品:如一般产品显示一样,包括一些简单属性描述的显示。
2)可设置产品:可创建一些关联属性的产品,如有两个下拉框,一个为颜色下拉框,另一个为大小下拉框,当选择红色时,大小的下拉框则显示红色具有的大小。
后台功能
一、
二、
介绍:销售管理是客户关系管理的有效延伸,能更好的把个性化、差异化服务有机的融入到客户管理去。
这里面包括了:
1)显示订单列表,可进行订单的处理如添加、修改、查询。
2)税务的管理:可设置税收的规则、管理税收的项目
三、
介绍:管理产品、管理分类、设置产品属性、评论与评级管理、标签管理、URL重写管理、网站地图。
5)所有退款
本报告可以按照范围和指定的时间段统计信用备忘信息。范围可以在页面上方的Show Report for下拉菜单中指定。将在每个时期之间有一条线。一个日期段可以是日,月,或一年,可以在页面顶部的Show by下拉菜单中指定。日期段的一些报告中依赖于在顶部指定的日期范围。每一日期段,您可以看到已经有关联信用备忘的总订单数,和总的退款金额,包括多少是 在线退款多少是线下退款。在报告中的最后一行是总计所有的数目的。
2.购物车报表
1)购物车中的产品
此报告列出了商店中的所有产品,包括价格,购物车购物车目前包含此产品的数量,和包含此产品的订单的数额。
2)购物车丢弃的产品
此报告列出了所有在登陆时把产品添加到购物车后,在购物车中还有产品时登出的注册客户信息。对于每个客户,您可以看到购物车中的项目,总数量,产品的总金额,客户可以使用的任何优惠券代码,第一个项目添加到购物车的时间和最近购物车的活动。
2)多语言:适合不同国家不同语言界面的转换,大大方便了各国不同客户对网站的浏览。
3)多种货币:能转换客户相应的货币支付,并且系统具有灵活的税率管理功能。
三、分类排序
介绍:产品可根据分类以及相关的产品属性进行查询显示,例如可根据价格、颜色、大小等属性进行查询,并且各属性间能显示相应的产品数量。(后台属性的设置过程中可根据网站的需要设置分类属性功能的显示与否)
九、投票功能
介绍:通过投票功能网站能从客户中收取到某些信息,例如如何得知本站的、对产品的看法等(通过后台的CMS里的投票设置,可添加或删除投票项)
十、
介绍:客户可通过订阅即时获得网站的最新信息,大大提高了客户与网站的粘性。
(后台能设置Newslette的邮件模板,能结合不同语言的网店设置不同语言的邮件模板,一旦你创建了一个模板,您可以把您的newsletter放入发送的队列中,根据设置的时间进行发送)
2)税报表
本报告可以按照范围和指定的时间段统计税金信息。范围可以在页面上方的Show Report for下拉菜单中指定。将在每个时期之间有一条线。一个日期段可以是日,月,或一年,可以在页面顶部的Show by下拉菜单中指定。日期段的一些报告中依赖于在顶部指定的日期范围。每一日期段,您可以看到使用此税率的总订单数,和使用此税率所缴纳的税金。在报告中 的最后一行是总计所有的数目的。
8)客户标签:显示客户曾经标识过的产品标签,点击标签能查看相应的产品。
9)客户收藏夹:显示客户收藏过的产品。
10)客户的可下载产品
11)NewsLetter订阅信息
二、多网站、多语言、
介绍:系统支持多网站、多语言以及多种货币功能。
1)多网站:系统能建立多个站点,多个店铺,多皮肤(能根据不同的店铺设置不同的皮肤,展现不同的风格具体)。
3)发货报表
本报告可以按照范围和指定的时间段统计发货信息。范围可以在页面上方的Show Report for下拉菜单中指定。将在每个时期之间有一条线。一个日期段可以是日,月,或一年,可以在页面顶部的Show by下拉菜单中指定。日期段的一些报告中依赖于在顶部指定的日期范围。每一日期段,您可以看到使用此包裹/方法的总订单数,和使用此包裹/方法所缴纳的运 费。在报告中的最后一行是总计所有的数目的。
购物车价格规则:可设置购物车的一些优惠规则方案,例如购物券等
七、Newsletter订阅
介绍:设置Newslette的邮件模板,能结合不同语言的网店设置不同语言的邮件模板,一旦你创建了一个模板,您可以把您的newsletter放入发送的队列中,根据设置的时间进行发送。
八、
介绍:magento中的CMS管理模块不是传统意义上的CMS,我们可以理解他为动态静态块, 通俗点讲就是有些HTML代码或者某一个代码块我们可以放入CMS的static block 中,然后再在. Magento中调用CMS静态块 (Static Block) 来优雅的动态显示我们需要显示的内容
6)产品其它功能还包括:产品属性设置、产品详细图放大缩小、gallery相册、推荐给好友功能、加入收藏功能、浏览历史、产品评论功能以及可根据不同会员级别或优惠规则进行价格变动。
六、购物车
介绍:当客户按下购买时,我的购物车模块将显示相应的产品数量以及价格小计,方便了客户即时知道产品的相关信息。
在购物车页面具有如下功能:
6)优惠券报表
本报告可以按照范围和指定的时间段优惠券信息。范围可以在页面上方的Show Report for下拉菜单中指定。将在每个时期之间有一条线。一个日期段可以是日,月,或一年,可以在页面顶部的Show by下拉菜单中指定。日期段的一些报告中依赖于在顶部指定的日期范围。每一日期段,您可以看到使用此优惠券的总订单数,和使用此优惠券的订单的小计,折扣 和总额。在报告中的最后一行是总计所有的数目的。
具体可分为:
页面管理:可根据不同的店面设置onepage,方便前台调用以及管理
静态模块:创建一个或多个静态模块方便前台调用以及管理
部件:挂件可作为扩展性使用
投票:可设置投票项,让浏览者进行投票,获取投票信息
九、
介绍:提供分析与报告,包括销售报告、税费报告、被放弃的购物车报告、访问最多的商品报告、订购最多的商品报告、低库存报告、搜索关键词报告、商品评论报告、优惠券使用报告等。
3)分组产品:将任何产品关联到组合产品,Magento的分组产品(Grouped Product)就像前面的可配置产品(Configurable Product),除非建立了要关联的两个或以上的简单产品,不然分组产品是没有用的。
4)相关产品:设置相关联的产品。
5)推荐销售:设置推荐的产品。
6)交叉销售:它是显示在购物车页面,就如杂货店收银机旁边的杂志和糖果。通常,他们是客户正购买产品时可能会喜欢的产品。如果购物车中有多个项目,每一个都有自己交叉销售产品,交叉销售的产品在每次购物车更新时将轮流显示。
2)客户信息:可对客户信息进行增、删、改操作。
3)客户地址:可对客户地址簿进行增、删、改操作。
4)客户订单:您可以查看所有订单,包括历史和现有的订单记录、订单状态。
5)结算协议:结算协议,是PAYPAL的一个功能,开启PAYPAL后可以在My Account里确定支付协议。
6)退货说明
7)客户对产品的评论显示(评论需后台管理员审核通过后才能显示)
具体内容为:
1.销售方面报表
1)销售报表
本报告可以按照范围和指定的时间段统计销售信息。范围可以在页面上方的Show Report for下拉菜单中指定。将在每个时期之间有一条线。一个日期段可以是日,月,或一年,可以在页面顶部的Show by下拉菜单中指定。日期段的一些报告中依赖于在顶部指定的日期范围。每一日期段,您可以看到总的订单数,总的项目数,小计、税金、运费、折扣、总额等各 类的总金额。在报告中的最后一行是总计所有的数目的。
MEGENTO系统功能
一、会员中心
介绍:会员中心能够使企业与客户间产生互动,为其会员提供的一个功能强大的服务界面和统一的管理平台,会员登录会员中心后,便可在此享受提供的各项服务,例如不同的会员级别有不同的价格优惠等。
会员中心页面具体包括以下功能:
1)客户基本面板:包括客户购买过的最近订单、客户资料、地址、NewsLetter订阅。
十一、邮件发送功能
介绍:会员在注册时、购买完产品、退款、配送、订阅等常用操作时,系统都会自动发送相关的邮件通知客户
(后台可在系统的Transactional email进行不同模板的设置,更显得企业服务的专业性)
十二、SEO
1)100%搜索引擎友好
2)Google 网站地图
3)URL 重写以全面掌控URL
四、Mobile
介绍:Mobile支持iPad、iPhone和Android平台。强大的应用,可以使商家为他们的客户在iphone上面创建独特的、品牌性的体验。
五、客户
介绍:可进行客户管理,显示已有的用户进行修改、创建、删除用户。设置客户分组级别。显示在线客户,即时掌握客户相关信息。
六、
目录价格规则:可设置产品以及分类处的一些优惠规则方案
4)所有发票
本报告可以按照范围和指定的时间段统计发货信息。范围可以在页面上方的Show Report for下拉菜单中指定。将在每个时期之间有一条线。一个日期段可以是日,月,或一年,可以在页面顶部的Show by下拉菜单中指定。日期段的一些报告中依赖于在顶部指定的日期范围。每一日期段,您可以看到已经有关联发票的总订单数,和总的发票金额,包括多少金额是 获得了多少没有获得。在报告中的最后一行是总计所有的数目的。
4)自动生成展示在站点的网站地图
5)自动生成热门搜索关键词页面
十三、CACHE缓存机制
介绍:系统配备了非常完善的缓存管理机制,简单的说常迅速的页面对客户体验也是非常好的,因此也可能会直接或间接地增加您店铺的业绩。它可以完全缓存静态页面和动态页面的绝大部分内容(包括了页面缓存、图片缓存、SESSION缓存等)。