BLAZAR-β嵌入式教学系统使用说明及实验指示书(第1版)
ABClonal Rat IL-1 beta ELISA Kit RK00009说明书

Rat IL-1beta ELISA KitCatalog NO.:RK00009version:2.0This package insert must be read in its entirety beforeusing this productIntroductionThe kit is a sandwich enzyme immunoassay for in vitro quantitative measurement of IL-1beta in rat serum,plasma,cell culture supernatants.Principle of the AssayThis assay employs the quantitative sandwich enzyme immunoassay technique.An antibody specific for rat IL-1beta has been pre-coated onto a microplate.Standards and samples are pipetted into the wells and any IL-1beta present is bound by the immobilized antibody.After washing away any unbound substances, and then a detection antibody specific for IL-1beta is added to the wells and binds to the combination of capture antibody IL-1beta in sample.Following a wash to remove any unbound combination,and enzyme conjugate is added to the wells. Following incubation and wash steps,a substrate solution is added to the wells and color develops in proportion to the amount of IL-1beta bound in the initial step.The color development is stopped and the absorbance is measured.Material Provided&Storage ConditionsUnopened kits can be stored at2-8°C for1year,and opened products must be used within1month.Part Size Cat.No.Storage ofopened/reconstituted materialAntibody Coated Plate 8×12RM00064Put the unused slats backin the aluminum foil bagwith the desiccant andreseal them.They can bestored at2-8°C for1month.Standard Lyophilized 2vials RM00061It is not recommended touse again afterredissolving.Concentrated BiotinConjugate Antibody(100×)1×120ul RM00062Store at2-8°c for1month*Streptavidin-HRP Concentrated(100×)1×120ul RM00063Store at 2-8°c for 1month *Standard/SampleDiluent (R1)1×20mL RM00023Store at 2-8°c for 1month *Biotin-Conjugate AntibodyDiluent (R2)1×12mL RM00024Streptavidin-HRP Diluent(R3)1×12mL RM00025WashBuffer(20x)1×30mL RM00026TMB Substrate1×12mL RM00027Stop Solution1×6mL RM00028Plate Sealers4Strips Specification 1Other Supplies Required1.Microplate reader capable of measuring absorbance at450nm,with the correction wavelength set at630nm or570 nm.2.Pipettes and pipette tips.3.Deionized or distilled water.4.Squirt bottle,manifold dispenser,or automated microplatewasher.5.Incubator.6.Test tubes for dilution of standards and samples.Precautions1.Any variation in diluent,operator,pipetting technique,washing technique,incubation time or temperature,and kitage can cause variation in binding.2.Variations in sample collection,processing,and storagemay cause sample value differences.3.Reagents may be harmful,if ingested,rinse it with anexcess amount of tap water.4.Stop Solution contains strong acid.Wear eye,hand,andface protection.5.Please perform simple centrifugation to collect the liquidbefore use.6.Do not mix or substitute reagents with those from other lotsor other sources.7.Adequate mixing is particularly important for good result.Use a mini-vortexer at the lowest frequency.8.Mix the sample and all components in the kits adequately,and use clean plastic container to prepare all diluents.9.Both the sample and standard should be assayed in duplicate,and reagents should be added in sequence in accordance with the requirement of the specification.10.Reuse of dissolved standard is not recommended.11.The kit should not be used beyond the expiration date onthe kit label.12.The kit should be away from light when it is stored orincubated.13.To reduce the likelihood of blood-borne transmission ofinfectious agents,handle all serum,plasma,and other biological fluids in accordance with NCCLS regulations.14.To avoid cross contamination,please use disposablepipette tips.15.Please prepare all the kit components according to theSpecification.If the kits will be used several times, please seal the rest strips and preserve with desiccants.Do use up within2months.16.This assay is designed to eliminate interference by otherfactors present in biological samples.17.Until all factors have been tested in this assay,thepossibility of interference cannot be excluded.18.The48T kit is also suitable for the specification.Sample Collection&StorageThe sample collection and storage conditions listed below are intended as general guidelines.Sample stability has not been evaluated.Samples containing the correlated IgG as in this kit may interfere with this assay.Cell Culture Supernatant:Remove particulates by centrifugation. Assay immediately or aliquot and store samples at≤-20°C. Avoid repeated freeze-thaw cycles.Serum:Use a serum separator tube(SST)and allow samples to clot for30minutes at room temperature before centrifugation for15 minutes at1000x g.Remove serum and assay immediately or aliquot and store samples at≤-20°C.Avoid repeated freeze-thaw cycles.Plasma:Collect plasma using EDTA or Heparin as an anticoagulant. Centrifuge for15minutes at1000×g within30minutes of collection.Assay immediately or aliquot and store samples at ≤-20℃.Avoid repeated freeze-thaw cycles.(Note:Citrateplasma has not been validated for use in this assay.)Note:It is suggested that all samples in one experiment be collected at the same time of the day.Avoid hemolytic and hyperlipidemia sample for serum and plasma.Reagent PreparationBring all reagents to room temperature before use.If crystals have formed in the concentrate,Bring the reagent to room temperature and mix gently until the crystals have completely dissolved.Standard-Reconstitute the Standard Lyophilized with 1.0mL Standard/Sample Diluent(R1).This reconstitution produces a stock solution of8000pg/mL.Mix the standard to ensure complete reconstitution and allow the standard to sit for a minimum of 15minutes with gentle agitation prior to making dilutions. Use the8000pg/mL standard stock to produce a dilution series (below)with Standard/Sample Diluent(R1).Mix each tube thoroughly and change pipette tips between each transfer(recommended concentration for standard curve:4000,2000,1000,500,250,125,62.5,0pg/mL).Use diluted standards within 60minutes of preparation.Working Biotin Conjugate Antibody -Dilute 1:100of Concentrated Biotin Conjugate Antibody (100x)with Biotin-Conjugate Antibody Diluent (R2)before use,for example:Add 20μL of Concentrated Biotin Conjugate Antibody (100x)to 1980μL Biotin-Conjugate Antibody Diluent (R2)to prepare 2000μL Working Biotin Conjugate Antibody Buffer.Working Streptavidin-HRP -Dilute 1:100of Concentrated Streptavidin-HRP (100x)with Streptavidin-HRP Diluent (R3)before use,for example:Add 20μL of Concentrated Streptavidin-HRP (100x)to 1980μL Streptavidin-HRP Diluent (R3)Std 250μL 250μL 250μL 250μL 250μL 250μL 250μL 250μL 1000pg/mL R11000μL 8000pg/mL 250μL 4000pg/mL 250μL 250pg/mL 250μL 500pg/mL 250μL 125pg/mL 250μL 2000pg/mL 250μL 62.5pg/mL 250μL 0pg/mLto prepare2000μL Working Streptavidin-HRP Buffer.Wash Buffer-If crystals have formed in the concentrate,warm to room temperature and mix gently until the crystals have completely dissolved.Dilute1:20with double distilled or deionized water before use,for example:Add20mL of Wash Buffer Concentrate to380mL of deionized or distilled water to prepare 400mL of Wash Buffer.Assay ProcedureBring all reagents and samples to room temperature before use. It is recommended that all standards,controls,and samples be assayed in duplicate.1.Prepare all reagents,working standards,and samples asdirected in the previous sections.2.Remove excess microplate strips from the plate frame,return them to the foil pouch containing the desiccant pack, and reseal properly.3.Add wash buffer350μL/well,aspirate each well afterholding40seconds,repeating the process two times fora total of three washes.4.Add100μL Standard/sample Diluent(R1)in a blank well.5.Add100μL different concentration of standard or samplein other wells,Cover with the adhesive strip provided.Incubate for2hours at37℃.record the plate layout ofstandards and sample assay.6.Prepare the Concentrated Biotin Conjugate Antibody(100x)Working Solution15minutes early before use.7.Repeat the aspiration/wash as in step 3.8.Add100μL Working Biotin Conjugate Antibody in each well,cover with new adhesive Sealer provided.Incubate for1hour at37℃.9.Prepare the Streptavidin-HRP Concentrated(100x)WorkingSolution15minutes early before use.10.Repeat the aspiration/wash as in step 3.11.Add100μL Working Streptavidin-HRP in each well,coverwith new adhesive Sealer provided.Incubate for0.5hourat37℃.12.Repeat the aspiration/wash as in step 3.13.During the incubation,turn on the microplate reader towarm up for30minutes before measuring.14.Add100μL TMB Substrate to each well.Incubate for15-20minutes at37℃.Protect from light.15.Add50μL Stop Solution,determine the optical density ofeach well within5minutes,using a Microplate reader setto450nm.If wavelength correction is available,set to570nm or630nm.If wavelength correction is not available, subtract readings at570nm or630nm from the readingsat450nm.This subtraction will correct for opticalimperfections in the plate.Readings made directly at450nm without correction may cause higher value and lessaccurate result.Assay Procedure SummaryPrepare the standard and reagentsWash3times↓Add100ul of standards or test samples to each well Incubate for2hours at37℃,then wash3times↓Add100ul Working Biotin Conjugate AntibodyIncubate for1hour at37℃,then wash3times↓Add100ul Working Streptavidin-HRPIncubate for0.5hour at37℃,then wash3times↓Add100ul Substrate SolutionIncubate for15-20min at37℃under dark condition↓Add50ul Stop Solution↓Detect the optical density within5minutes under450nm.Correction Wavelength set at570nm or630nmCalculation of Results1.Average the duplicate readings for each standard,controland sample,and subtract the average zero standard optical density(O.D.).2.Create a standard curve by reducing the data using computersoftware capable of generating a four-parameter logistic (4-PL)curve-fit.As an alternative,construct a standard curve by plotting the mean absorbance for each standard on the Y-axis against the concentration on the X-axis and draw a best fit curve through the points on a log/log graph.The data may be linearized by plotting the log of the IL-1 beta concentrations versus the log of the O.D.on a linear scale,and the best fit line can be determined by regression analysis.3.If samples have been diluted,the concentration read fromthe standard curve must be multiplied by the dilution factor.Typical DataThe standard curves are provided for demonstration only.A standard curve should be generated for each set of IL-1beta assayed.Detection Range62.5-4000pg/mLSensitivityThe minimum detectable dose(MDD)of IL-1beta typically less than13.22pg/mL.The MDD was determined by adding two standard deviations to the mean optical density value of twenty zero standard replicates and calculating the corresponding concentration.SpecificityThis assay recognizes both recombinant and natural rat IL-1beta. The factors listed below were prepared at50ng/ml and assayed for cross-reactivity.No significant cross-reactivity was observed with the following:Recombinant rat:Recombinant human:IL-10IL-1IFN-γIL-2IL-1αIL-6IL-2IL-4IL-6IL-8TNF-αNote:Limited by current skills and knowledge,it is impossible for us to complete the cross-reactivity detection between IL-1beta and all the analogues,therefore,cross reaction may still exist.PrecisionIntra-plate Precision3samples with low,middle and high level IL-1beta were tested 20times on one plate,respectively.Intra-Assay:CV<10%Inter-plate Precision3samples with low,middle and high level IL-1beta were tested on3different plates,20replicates in each plate.Inter-Assay:CV<15%Intra-Assay Precision Inter-Assay Precision Sample123123 n202020202020 Mean(pg/mL)116522683535116022593542 Standard deviation47.879.4137.975.4162.6219 CV(%) 4.1 3.5 3.9 6.57.2 6.2RecoveryMatrices listed below were spiked with certain level of IL-1beta and the recovery rates were calculated by comparing the measured value to the expected amount of IL-1beta in samples.Sample Average Recovery(%)Range(%)Cell Culture Media(n=5)10495-113 Serum(n=5)9990-108LinearityThe linearity of the kit was assayed by testing samples spiked with appropriate concentration of IL-1beta and their serial dilutions.The results were demonstrated by the percentage of calculated concentration to the expected.Cell Culture Media(n=5)Serum(n=5) //Average of Expected(%)103951:2Range(%)98-10887-102Average of Expected(%)981021:4Range(%)84-11189-114 Average of Expected(%)961001:8Range(%)86-10692-108Average of Expected(%)981061:16Range(%)91-10596-115Trouble ShootingProblem Possible Cause SolutionHigh Background Insufficient washingSufficiently wash plates asrequired.Ensure appropriateduration and number of washes.Ensure appropriate volume of washbuffer in each well.Incorrect incubationprocedureCheck whether the duration andtemperature of incubation are set upas required.Cross-contamination ofsamples and reagentsBe careful of the operations thatcould cause cross-contamination.Use fresh reagents and repeat thetests.No signal or weak signal Incorrect use ofreagentsCheck the concentration anddilution ratio of reagents.Makesure to use reagents in properorder.Incorrect use ofmicroplate readerWarm the reader up before use.Makesure to set up appropriate mainwavelength and correctionwavelength.Insufficient colourreaction timeOptimum duration of colour reactionshould be limited to15-25minutes.Read too late after stopping the colour reaction Read the plate in5minutes after stopping the reaction.Matrix effect ofsamplesUse positive control.Too much signal Contamination of TMBsubstrateCheck if TMB substrate solutionturns e new TMB substratesolution.Plate sealers reusedUse a fresh new sealer in each stepof experiments.Protein concentrationin sample is too highDo pre-test and dilute samples inoptimum dilution ratio.Poor Duplicates Uneven addition ofsamplesCheck the pipette.Periodicallycalibrate the pipette.Impurities andprecipitates insamplesCentrifuge samples before use.Inadequate mixing ofreagentsMix all samples and reagents wellbefore loading.*For research purposes only.Not for therapeutic or diagnostic purposes.。
培训教材(初级版)

黄石市科威自控有限公司——EC/EP系列嵌入式PLC培训教材(初级版)序言电控技术日异月新,市场需求日益苛刻。
作为一家“以复兴民族自动化工业为已任”的科技型公司,只是学习、消化、汲取、实践别人的产品和技术是远远不够的,一定有自己独创的产品,才能在没有硝烟的战场上取获成功。
在董事长龚云生同志的得力领导下,公司公司骨干一直朝着“创新是一个民族的灵魂,是国家兴盛发达的不停动力”的方向奋进。
十余年来,战胜了重重困难,坚韧不拔地走自己的路。
发场团队精神,仔细累积和总结经验;自主创新与借“脑袋”并举。
天道酬勤,科威公司的科技成就不停浮现,特别是2005年,EC/EP系列嵌入式PLC在黄石市科威自控有限公司研发成功了!为我国的自动化工业增加了光彩。
自嵌入式PLC的成就在网上公布后,感兴趣的同仁日新月异,渴求认识其技术性能。
正由于嵌入式PLC刚才问世,知者甚少,为此,科威公司决定创办嵌入式PLC培训班。
这是切合“科学发展观”的要求的。
培训班的教材内容,由表及里,由浅入深。
因受时间和要求所限,不系统,重视实践。
希望对初学者,有所补益。
卫工08 年5月一、嵌入式PLC简介1、开发背景工控系统有大系统和小系统,特别是小系统,范围广,几乎覆盖了全部行业,并且要求是千差万其余。
控制器件有DCS、IPC和PLC等。
广大工控设计人员在器件选型时十分疑惑。
在数据办理上要求像IPC,在靠谱性上要求达到或超出PLC,在价位上力求便宜,好像单片机;在二次开发(应用程序)方面要求语言普通化、易学易懂易掌握。
谁都梦想有一款新式的工控产品能代替、包括IPC、PLC和单片机。
经过艰辛的努力,嵌入式PLC在科威公司问世了。
嵌入式PLC已列入国家科技攻关计划项目的阶段成就。
项目代号为2005BA206C。
2、什么是嵌入式PLC?嵌入式PLC是将通用的PLC梯形图语言、CANbus现场总线协议嵌入到单片机中,使其更具个性化、差别化,应用更宽泛、更灵巧,对用户更方便。
Blackburn ABB Burndy 工具交叉参考说明书
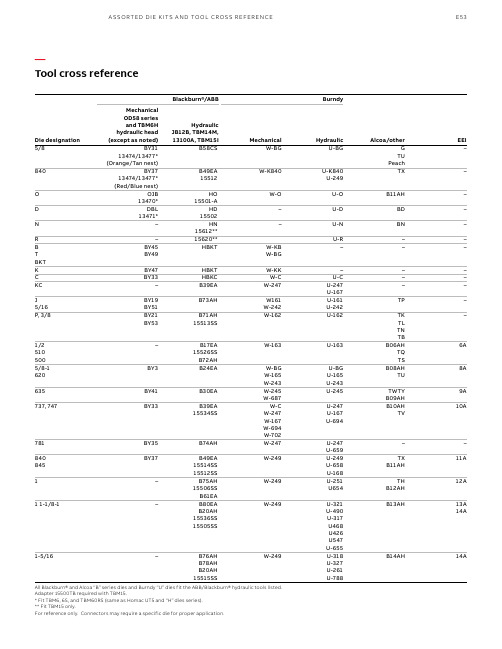
E53—Tool cross referenceBlackburn®/ABB BurndyDie designationMechanicalOD58 seriesand TBM6Hhydraulic head(except as noted)HydraulicJB12B, TBM14M,13100A, TBM15I Mechanical Hydraulic Alcoa/other EEI5/8BY3113474/13477*(Orange/Tan nest)B58CS W-BG U-BG GTUPeach–840BY3713474/13477*(Red/Blue nest)B49EA15512W-K840U-K840U-249TX–O OJB13470*HO15501-AW-O U-O B11AH–D DBL13471*HD15502–U-D BD–N–HN15612**–U-N BN–R–15620**U-R––BT BKT BY45BY49HBKT W-KBW-BG–––K BY47HBKT W-KK–––C BY33HBKC W-C U-C––KC–B39EA W-247U-247U-167––J5/16BY19BY51B73AH W161W-242U-161U-242TP–P, 3/8BY21BY53B71AH15513SSW-162U-162TKTLTNTB–1/2 510 500–B17EA15526SSB72AHW-163U-163B06AHTQTS6A5/8-1 620BY3B24EA W-BGW-165W-243U-BGU-165U-243B08AHTU8A635BY41B30EA W-245W-687U-245TWTYB09AH9A737, 747BY33B39EA15534SSW-CW-247W-167W-694W-702U-247U-167U-694B10AHTV10A781BY35B74AH W-247U-247U-659––840 845BY37B49EA15514SS15512SSW-249U-249U-658U-168TXB11AH11A1–B75AH15506SSB61EA W-249U-251U654THB12AH12A1 1-1/8-1–B80EAB20AH15536SS15505SS W-249U-321U-490U-317U468U426U547U-655B13AH13A14A1-5/16–B76AHB78AHB20AH15515SS W-249U-318U-327U-261U-788B14AH14AAll Blackburn® and Alcoa “B” series dies and Burndy “U” dies fit the ABB/Blackburn® hydraulic tools listed. Adapter 15500TB required with TBM15.* Fit TBM6, 6S, and TBM60RS (same as Homac UT5 and “H” dies series).** Fit TBM15 only.For reference only. Connectors may require a specific die for proper application.A SSO RTED D IE K ITS A N D TO O L CR OSS R EFER EN CEE54B L ACK B U R N/CO LO R-K E Y E D/H O M AC TO O L S, D I E S A N D K ITS—Tool cross reference (continued)Tool type Blackburn®/ABB Burndy Kearny Anderson/Huskie Homac®AlcoaMechanical OD58OD581ODFODF1ODF3ODBODB1ODB3MD5 seriesMD6 seriesMD7 seriesOS49 seriesOS50 series061 series062 series063 seriesO68 seriesND series UT5––TBM-250 TOOL MY28 seriesMY29 series––UT3––TBM55S66S88STBM60RS(For colour codecopper and aluminumseries only except asnoted on die chart)MD5 seriesMD6 seriesMD7 series(only to 4/0)––UT5–Self-contained hydraulicJB12BTBM14MY35Y39Y750WH2WH3–––Remote hydraulic13100A,TBM15,TBM6HY35BHY39BHY750BHY45Y46PH13-10PH14EP series–12A12ACBattpac™battery-powered compression and cuttingTBM6PCR-LITBM14CR-LITBM15CR-LITBM58PCTS-LITBM54CT-LITBM40BSCT13950PIBAT500BCT500BAT35BAT750Y700DC-1B–EP series UT1512HA12HACTools may have limits on connector range capabilities. Consult your ABB regional sales office if necessary.All hydraulic heads listed are for 10,000 psi systems only.TBM8-750 and TBM8-750M-1 are dieless, indent-type crimp hydraulic tools equivalent to the Anderson Versa-Crimp tools and the Burndy Y644. Consult your ABB regional sales office for application if necessary.。
ABBi-bus方案共19页

瑞士阿西亚.布朗.勃法瑞(ABB)i-bus智能控制系统给您带来高品质的工作与生活!XXXX工程A B B i-b u s E I B智能型安装系统方案目录一.ABB I-BUS智能控制系统与EIB (2)1.1 系统简介 (2)1.2系统特点 (2)1.3应用场合 (3)1.4产品概览 (3)二.XXXX项目概况............................................................................................................. 错误!未定义书签。
2.1西直门枢纽与城市空间布局..................................................................................... 错误!未定义书签。
2.2西直门枢纽与交通网络............................................................................................. 错误!未定义书签。
三.ABB I-BUS智能安装系统在XXXX项目的主要功能 . (3)1、智能照明控制 (4)2、安保报警系统 (5)3、智能控制系统与其他系统联动和集成 (6)4、ABB I-BUS系统中央监控平台 (6)四.I-BUS在XXXX中控制的对象与功能实现 (7)3.1大会议室、领导办公室、多功能厅 (9)3.2一楼大厅 (9)3.3报告厅 (11)3.4电梯厅 (11)3.5公共通道 (12)3.6园林照明 (12)3.7室外泛光照明 (12)3.8车库智能照明系统 (14)3.9集成接口 (16)3.10综控系统 (16)五.系统结构 (16)1.I-BUS系统拓扑结构 (16)2.I-BUS工作原理 (17)六.XXXX I-BUS智能安装系统配置与报价 (18)七.设备功能和特性 (18)八.主要案例 (19)一.A B B i-b u s智能控制系统与E I B阿西亚。
伯沙安全系统 视频系统版1-3 商品说明和常见问题解答说明书

Intrusion Detection with FW 6.60 Technical NoteTable of contents1Introduction31.1Applications (3)1.2Common product platform (CPP) (3)1.3Limitations (3)2Technical Background & FAQ32.1What is an intruder? (3)2.2How can I distinguish intruders from animals? (3)2.3What is a camera calibration and when do I need it? (4)2.4Where do false alerts in trees come from? (4)2.5Why are objects detected so late? (5)2.6How should I set up the camera view? (5)2.7How far into the distance can Intelligent Video Analytics / Essential Video Analytics detect objects? (5)3Setup63.1General advice (6)3.2Small, controlled environments, e.g. indoor (6)3.3Climbing walls or throwing across walls (6)3.4Façade protection (7)3.5Medium areas (7)3.6Large areas (7)3.7Infrared illumination & insect swarms (7)3.8Shaking / vibrating camera (8)3.9Optimization via forensic search (8)1IntroductionThis technical note describes the best practices for and answers commonquestions regarding intrusion detection using Intelligent Video Analytics orEssential Video Analytics with FW 6.60.1.1Applications④Perimeter protection④Sterile zones④Warehouse after hours④Solar plants④Façade protection④… and wherever and whenever no one is supposed to be within an area during a certain time1.2Common product platform (CPP)Bosch cameras can be clustered by their common product platform. As different platforms offer a different amount of processing power, this can make differences in the performance. For an overview of the different product platforms and the cameras belonging to them, see the tech note on Video Content Analysis (VCA) Capabilities per Device.1.3Limitations④Different performance and setup options on Intelligent Video Analytics on CPP4 and Essential Video Analytics on theone hand, and Intelligent Video Analytics on CPP6/7/7.3 on the other hand④Does not work for well-populated and crowded scenes④Does not work on elevators or other conveyance belts④Does not work if camera is moving2Technical Background & FAQ2.1What is an intruder?If we talk about intruders, we typically mean people entering areas which are off-limits to them. Depending on the application, however, the people may also sit in vehicles or bikes. Furthermore, professional intruders typically do not walk into the area, but crawl or roll to present the camera the least view of them that is possible.2.2How can I distinguish intruders from animals?You can’t. It is possible to separate standing and walking people from smaller animalslike dogs, foxes or rabbits by their size, but if we talk about professional intruderscrawling or rolling into the scene, then most of the time the difference to the animal in question is not large enough for a robust classification. There is currently no videoanalytic for intrusion detection on the market that can really solve this problem. If youare only interested in walking / standing persons, the automatic object classification canbe used. See the tech note on object classification for configuration details.Intruders: Walking, crawling, rollingA crawling person looks similar to a dog2.3 What is a camera calibration and when do I need it?A camera calibration teaches the camera about the perspective in the scene. Due to perspective, in the rear of the video images the persons appear smaller, they cover less pixel in the image, though their real size is the same. Perspective is thus needed whenever the real size and speed of objects is needed, as well as an automatic perspection correction of object sizes. Calibration becomes more important the larger the area covered by a single camera is. For small areas (10-20m distance), the perspective effect is typically neglectable, for larger areas, it becomesessential for robust performance. Note that the longer the distance, the less reliable object sizeand speed estimations become, as less pixel are available per meter.To calibrate, the position of the camera in relation to a single, planar ground plane is described by the elevation of the camera, the angles (tilt, roll) towards the ground plane and the focal length of the lens. As calibration is only done in reference to a single, planar ground plane, scenes with stairs, escalators, several ground levels, facades or rising ground cannot be calibrated correctly. If the rising ground only differs a little from the planar ground plane, a best effort calibration can be tried. In all other cases, please refrain completely from using a calibration and set the object size filters, if needed, for the different image regions by hand.Further information on calibration can be found in the VCA tech note on geolocation.2.4 Where do false alerts in trees come from?All video analytics algorithms for intrusion detection are based on three coretechnologies: Change detection, motion estimation and background subtraction.∙ Change detection evaluates per block whether the content of the block has changeswithin the last second. This technology is used in MOTION+. The disadvantage isthat every change in the image, be it an illumination change or actual motion,triggers the blocks as changed. Note that the after-image of the object also triggers the blocks.∙ For motion estimation, also called optical flow, it is evaluated for every part in theimage where this part was in the last image, or a second ago. Flow is based primarily on this technology.∙ For background subtraction, one, multiple or stochastic background images arelearned over time and updated continuously. Every difference to the learnedbackground is then extracted as a moving foreground object and tracked over time.Intelligent Video Analytics and Essential Video Analytics use this technology in combination with motion estimation.Manual object size filter (yellow) can also compensate perspective Perspective: Objects in the rear appear smaller ChangedetectionMotionestimationBackgroundsubtraction & trackingNow for all three technologies, if the wind moves a branch, then there is a distinct change to the position of the branch a second ago and the branch is detected as a potential change / motion / moving object. By combining the different technologies, tracking the objects over time and evaluating the consistency of motion, robustness can be achieved to suppress these kind of moving objects the user is typically not interested in.2.5 Why are objects detected so late?Objects are actually detected as soon as they appear, however, to validate that they are interesting objects with consistent motion and not spurious detections by wind in trees or flags or the falling of rain drops and snowflakes, Intelligent Video Analytics and Essential Video Analytics hold the detection back for a few frames. To get the objects as soon as theyappear, please go to MetadataGeneration->Tracking and disable the noise suppression. For Intelligent Video Analytics on CPP6/7/7.3, in addition raise the sensitivity to max.2.6 How should I set up the camera view?If possible make sure that intruders cross the field of view instead of walking towards the camera. Due to the perspective, a person walking toward the camera does not cross as many pixel in the image and does not have much apparent motion as a person crossing the camera view. Thus it is more difficult to detect and separate from noise. Higher elevation is preferred due to the same reason. Though higher poles are more expensive and prone to shaking, the lower a camera is mounted the less apparent motion objects walking toward the camera have, and the harder they are to detect. Note also that the more area is covered by the selected lens, the farther an object must travel to cross the same amount of pixel.2.7 How far into the distance can Intelligent Video Analytics / Essential VideoAnalytics detect objects?A general answer cannot be given, as this depends on the chosen camera, the chosen video aspect ratio, the camera perspective, on the focal length and on the light and weather conditions. Furthermore, both Intelligent Video Analytics and Essential Video Analytics are not directly computed on the original camera resolution but on a reduced one due to computational power limits. For an overview of which resolution is used on which camera, please see the tech note on VCA Capabilities per Device.Generally, a larger focal length indicates a larger zoom factor and a smaller width of the field of view. So one can see farther into the distance but less far to the left and right than with a smaller focal length. Furthermore, with a larger focal length, the unobserved area in front of the camera is much larger as well. Another trade-off for the larger detection range of larger focal length is that motion towards the camera takes longer to detect.The detection distance also depends on the size of the object, with longer detection ranges for larger objects. Wind in trees: branches moveConsistency of motionMotion towards thecamera is lessDistance resolution is best near the camera, and degrades heavily into the distance where a single pixel in the internal resolution often covers several meters of ground. Here an example for Essential Video Analytics:Use the Bosch Video Analytics and Lens Calculator at /LensCalculator/html/lens-calculator.html to determine video analytics detection distances for specific cameras, lenses and focal lengths.3SetupConfiguration of intrusion detection is separated into several applications, which all have their own characters and require different optimizations. For detection of intruding ships, please see the tech note on IVA 6.10 Ship Tracking. If you are interested in an application where you need to be alerted already if only a part of the intruder, like a hand or an arm, trespasses into the alarm zone, please see the tech note on Museum Mode FW 6.30.3.1General advice-Alarm field preferable to line crossing: For a line crossing to trigger, the object needs to be detected before and after the line. In combination with challenging situations like storm in trees, where detection can be delayed in favour of false alarm suppression, the placement of the line needs to be done with care. An alarm field, which triggers whenever an object is detected inside, covers larger areas and is thus inherently more robust.-Scheduling: This is available on DINION & FLEXIDOME cameras. Configure one or both VCA profiles, then change the VCA configuration to “Scheduled” and define the times where which VCA profile should run.-Alarm-based recording / adjustment of recording frame rates: Can be triggered by any alarm. Configurable via Recording -> Profiles, or via the alarm task editor for full flexibility3.2Small, controlled environments, e.g. indoor-Object size: Intelligent Video Analytics and Essential Video Analytics do not know whether a small object in the image is actually a small object, or a large object that is far away. Therefore they will detect and track even the smallest objects like leaves and small garbage blown by the wind in the foreground or small animals in the default settings. To avoid that, set the min object size, either in the MetadataGeneration -> Tracking, where it will completely suppress them, or filter them out in your alarm task.-Calibration: Perspective correction of the object size is not necessary for small environments for intrusion detection. -Fast object detection: In indoor applications, always go to MetadataGeneration->Tracking, disable the noise suppression and (Intelligent Video Analytics on CPP6/7/7.3) raise the sensitivity to max. Noise suppression and object validation is only needed for outdoor environments. In controlled, small outdoor applications, that is much tarmac and no trees, this can also be disabled.3.3Climbing walls or throwing across walls-Calibration: Don’t use any calibration. Flying and climbing objects will not be detected & tracked well if camera is calibrated.3.4Façade protection-Calibration: As the façade is vertical, calibration is not possible at all.-Fast object detection: As the façade is mostly tarmac, and if no trees are nearby who’s shadows can fall on the façade, then you don’t need noise suppression and object validation. Go to MetadataGeneration->Tracking, disable the noise suppression and (Intelligent Video Analytics on CPP6/7/7.3) raise the sensitivity to max.3.5Medium areas-Calibration: If the ground is more or less flat, then add calibration to teach the camera about perspective. Only thus is the most robust detection possible.-Noise suppression: Noise suppression is enabled by default and should stay that way. Use Intelligent Video Analytics on CPP6/7/7.3 cameras with noise suppression STRONG for best noise suppression.-Use scenario default “Intrusion (one field)” available from FW 6.60 onwards. Automatically enables 3D tracking, sets noise suppression to STRONG, and adds object filters targeted for suppressing non-persons. Needs calibrated camera.3.6Large areas-Calibration: If the ground is more or less flat, then add calibration to teach the camera about perspective. Only thus is the most robust detection with largest detection ranges possible.-Noise suppression: Noise suppression is enabled by default and should stay that way. Use noise suppression MEDIUM where available for longest detection distances while still suppressing many false alerts.-Double detection distance: For Intelligent Video Analytics on CPP6/7/7.3 with FW ≥6.30, detection distance for moving objects can be doubled by calibration the camera, using a 3D tracking mode, and setting noise suppression to OFF or MEDIUM.-Use scenario default “Intrusion (two fields)” available from FW 6.60 onwards. Automatically sets 3D tracking and noise suppression to MEDIUM where available and STRONG otherwise, thus enabling longest detection distances.Also adds a second detection field which also needs to be entered by alarm objects as well as object filters targeted for suppressing non-persons to further false alarm suppression. Needs calibrated camera.3.7Infrared illumination & insect swarmsInsects are drawn to the light of infrared illuminators. If the infrared illuminators are included in the camera or positioned close nearby, this means that a myriad of insects will flutter through the video and cause false alerts. Therefore always position the illuminator in at least 80cm distance to the camera.Though false alerts due to insects cannot be suppressed completely, they are already greatly reduced in Intelligent Video Analytics on CPP6/7/7.3 cameras from FW 6.10 onward. With Intelligent Video Analytics on CPP4 cameras, with Essential Video Analytics, or to generally further reduce false alerts, use multi-line crossing or combine several single alarm rules and detection via VCA task script language. From FW 6.60 onwards, alarming on an object inside, entering or leaving up to three alarm fields in a specified order is possible directly via the GUI, and also part of the scenario default “Intrusion (two fields)”. For FW <6.60, VCA task scripting is needed.For scripting, go to the video analytics configuration and open the task page. Right-click on the video and select Advanced -> VCA Task Editor. A separate popup with the current VCA task script will appear. Here is an example configuration, which can be copied and pasted into the VCA task script editor. Further information about VCA tasks script language and example scripts are available in the VCA task script language manual and a separate tech note.VCA task script example: Alarm if an object enters field and afterwards, within 30 seconds, crosses the line in the middle of the field://Definition of task primitivesResolution := { Min (-1, -1) Max (1, 1) };Field #1 := { Point (-0.6, 0.95) Point (-0.25, -0.95)Point (0.25, -0.95) Point (0.6, 0.95) DebounceTime (0.50) };Line #1 := { Point (0.0, -0.95) Point (0.0, 0.95)DebounceTime (0.50) };//@Task T:0 V:0 I:1 "Enter Field and Line" { external Event #1:={EnteredField #1before (*,30) CrossedLine #1 where first.oid == second.oid };//@}3.8 Shaking / vibrating cameraWhen the camera shakes, the content of the whole image shakes with it. The effects are especially visible around edges, as these cause the most change. Thus, false alerts can occur and the tracking of existing objects can be disrupted.Compensation of shaking and vibrating cameras within Intelligent Video Analytics on CPP6/7/7.3 cameras was introduced with FW 6.10 and perfected with FW 6.20. It is always active there. With Intelligent Video Analytics CPP4 cameras and with Essential Video Analytics, no compensation for shaking cameras from video analytics side is possible.3.9 Optimization via forensic searchThere are two parts of the configuration of Intelligent Video Analytics and Essential Video Analytics. The first part defines the object detection and tracking, also called metadata generation. This includes camera calibration, selection of thetracking mode, masking areas from the processing and defining idle / removed debounce times. This first part needs to be done initially and cannot be changed afterwards.The second part of the configuration evaluates the metadata and includes tasks like line crossing, object in field and more. This second part can be fully evaluated and optimized using forensic search. To do so, record video including the events to be detected. Then use a forensic search capable viewing client. Define or adapt your alarm tasks, and evaluate whether all events are detected correctly and how many false alerts are still left.Bosch Sicherheitssysteme GmbH Robert-Bosch-Ring 585630 GrasbrunnGermany© Bosch Sicherheitssysteme GmhH, 2018。
ABBalphaSET软件中文使用说明

A1350读表和设置工具 Alpha SET 用户手册版权声明本手册版权© 2004归ABB电力仪表(中国)销售服务中心广州沃基诺电力电子工业科技有限公司所有。
保留所有权力。
未经ABB和沃基诺公司书面许可,不得以电子、机械、照相及任何手段和形式盗版、传送、处理或记录,或者翻译,转送给第三方。
声明ABB和沃基诺公司保留对该手册中所描述的产品进行修改的权利,以获得更高可靠性,功能或设计。
此处描述的参数和信息可以不经声明进行更改。
并非所有在安装,使用和维护过程中设备可能出现的各种情况都包含在本手册中。
ABB和沃基诺公司对于本文档中的错误或由此导致的机械伤害或错误的使用手册不承担责任。
ABB和沃基诺公司对由于错误安装、运行或使用手册的行为的导致的事故或损坏不承担责任。
更多信息,参考以下:ABB 电表中国支持 Tel:020-8230 6029ABB 电表中国支持 E-mail:foru@ABB 电表网页:目录1 概述 (7)1.1 系统概述 (7)1.2文档版本 (7)2 参考文献 (7)3 介绍/ 简单描述 (8)3.1 什么是alphaSET工具 ? (8)3.2 系统要求 (8)3.3 安装 / 升级alphaSET (8)3.4 启动软件和用户权限 (11)3.4.1 用户权限 (11)3.4.1.1 用户权限“BAHN” (12)3.4.1.2 用户权限浏览 (12)3.4.2软件使用 (13)3.4.2.1图标目录 (14)3.5 软件版本介绍 (15)4 用户设置 (16)4.1 通讯 (16)4.1.1 用户权限“BAHN” (17)4.2 Modem (17)4.2.1 初始化字符串 (18)4.3 文件 (19)4.4 读寄存器 (19)4.5负荷曲线 (20)4.6其他设置 (21)4.7用户语言 (22)4.8 IEC 1107 地址 (23)4.9改变电表密码 (24)5.1 读寄存器 (24)5.2 读取服务列表(第二套显示列表) (25)5.3读取电表设置 (26)5.4 读负荷曲线 (28)5.5读取电表瞬时值 (30)5.6读取事件记录 (31)5.7 读取电表故障 (32)5.8 读取通讯报文 (33)6电表的配置 (34)6.1 打开参数文件 (34)6.2 保存参数文件 (35)6.3调用配置文件配置电表 (35)6.3.1 费率切换时段 (36)6.3.2程序 (36)6.3.3 程序和参数定义 (37)6.3.3.1参数文件不含校准数据 (37)6.3.3.2参数文件含校准数据 (37)6.4 修改参数文件 (37)7 改变电表配置 (38)7.1 识别码 (39)7.2 费率时钟源 (40)7.3 费率时段 (41)7.3.1 日类型 (41)7.3.2 季节改变定义 (42)7.3.3 费率时段表 (42)7.3.4 假日列表 (43)7.3.5 夏令时定义 (44)7.4 费率源定义 (45)7.5 需量复位定义 (46)7.7 波特率定义 (47)7.8 同步 (48)7.9 电能质量 (50)7.9.1电能质量选项 (50)7.9.2 电能质量的负荷曲线 (51)7.10 脉冲输入 (51)7.11 电表时钟 (52)7.12 显示 (53)7.12.1显示设置 (53)7.12.1.1 服务列表(第二套显示列表) (53)7.12.1.2 显示时间 (55)7.12.2 显示参数 (56)7.12.2.1 显示列表 (56)7.12.2.2 显示列表的通用设置 (57)7.12.2.3 冻结值的设置 (57)7.13 脉冲常数 (58)7.14 负荷曲线/事件记录-参数 (59)7.14.1 负荷曲线–参数 (59)7.14.2 事件记录–参数 (60)7.15 电量 / 需量计量 (61)8电表格式化命令 (62)8.1 使用W2命令设置电表的日期/时间 (63)8.2 使用VDEW命令读取和设置时间/日期 (64)8.3 脉冲常数的设置 (66)8.4 DCF77信号解码的激活 (66)8.5 复位需量最大值 (67)8.6 复位电表错误状态 (68)8.7 复位电能质量负荷曲线 (69)8.8 复位断电/失压次数 (69)8.10 复位寄存器 (70)8.11设置寄存器值(脉冲输入) (71)8.12 复位负荷曲线+事件记录 (71)9 集成载波接收器 (72)10 测试 (73)10.1 读取电表错误信息 (73)10.2 电能质量 (73)10.3 测试模式 (76)11 调制解调器 (78)11.1 电话簿 (78)11.1.1 创建一个新的电话号码 (79)11.1.2 更改电话簿条目 (79)11.1.3 创建一个新的电话簿或保存一个现有的电话簿 (79)11.2 挂断 (79)11.3 拨号不工作!怎么办? (79)1 概述1.1 系统概述本手册描述了软件AlphaSET(版本3)的安装,技术参数,软件的使用和功能。
嵌入式视频智能小车实验指导书V1.0(2015)
blazar开发板
blazar学习板使用教程第一章 购买与选购拍下3天就寄过来也很快,深圳发货,到货就去楼下菜鸟拿了过来:盒子也不大,但是板子很大,能放得下吗?打开看看就知道。
相信很多同学找不到吧,找了好久终于找到你了-- Blazar a-Board,在学堂在线看了这么久,也学也这么久,该动手试试了,主要某宝太恶心了,可以店家也没有给他付费流量,直接搜“Blazar ”出来一大堆的鞋子,听买过的同学说直接搜产品“Blazar a”,搜店铺“Bluechip 蓝芯科技”就出来了,上图给你们看看,肯定很多同学找了好久:第三个就是了:a 版本,b 版本都在这里了。
塑料盒保护包装,又安全又携带方便,工具一应俱全,下面一步一步打开看看。
手机有问题了,拍出是低是蓝色的:a- Board 正面非常简洁,8个机械按键,四个三色LEDs ,双排扩展接口孔,可以接2.8寸TFT LCD ,也可以换成6位数码管:a- Board 正面是整个板子的电子元器件布局区域,主要由NXP MKL25Z128微控制器以及各种Sensor 传感器电路与丰富接口插座部分组成:有亮度传感器,温度传感器,可调电位器,报警的蜂鸣器。
另外,板子也兼容WiFi 模块,GPS 模块,老师讲到的HMC5883L,等可以玩更多好玩东西,如下图:看来这个暑假有得忙了。
后面还有螺丝固定:可以固定LCD , 6位数码管。
*塑胶螺丝有讲究的,第一不会破坏电路板。
第二,不会短路其它电路。
再来详细看每个传感器:作为学生或者入门级的工程师来说,外部Jlink OB 一款简单方便调试器,以后工作也可以用到,不用再设置OpenSDA那么麻烦,到今天我都不想去用它,只要安装jlink 驱动就可以了。
可以到SEGGER 官网去下载;https:///downloads/jlink/这里有最新版本,下6.46 就可以,太新可能不支持现在调试器。
老师官网也有链接直接下载:https:///downloads/jlink/JLink_Windows_V618.exeJlink 就4条线,VCC, SWD,CLK ,GND.还有CDC uart 虚拟串口,调试真的很方便。
瑞萨嵌入式系统专题实验指导书(修改版)
嵌入式系统专题实验指导书交通大学电信学院“嵌入式系统专题实验”课程组2010年5月目录第一章嵌入式系统专题实验概述 (1)第二章M16C/62P嵌入式系统实验箱及嵌入式C语言的基本编程方法 (4)第三章M16C/62P嵌入式系统的集成编译环境和仿真调试环境实验 (5)第四章基础模块设计实验 (14)第五章综合设计实验 (25)第一章嵌入式系统专题实验概述1、实验概貌中文名称:嵌入式系统专题实验英文名称:Experiment of Embedded System课程编号:COMP4329实验学时:32学时学分:1学分适用专业:自动化、信息、电信(硕)先修课程:程序设计基础、微机原理与接口技术开课学院:自动化系开课学期:第6学期2、实验课性质、目的和任务嵌入式系统专题实验是以培养学生动手能力为主的实践性教学环节,提高学生对程序设计技术、微机原理与接口技术等知识的综合应用能力,加深对嵌入式系统知识的理解和掌握。
本专题实验具有工程实践性和较强的综合性等特点,旨在培养学生分析问题、解决问题的能力,培养学生的创新意识。
性质:以培养学生动手能力和创新意识为主的综合性实验。
目的:使学生加深对嵌入式系统知识的理解和掌握,对renesas嵌入式系统有总体的认识。
熟悉并掌握renesas嵌入式系统的开发和调试环境,掌握各基础模块的编程和调试方法。
能够利用以上知识,设计并实现综合实验任务。
通过本专题实验,为学生以后从事嵌入式系统开发和设计奠定实践技术基础。
任务:熟悉renesas嵌入式系统的集成开发环境HEW和仿真调试环境KD30;掌握嵌入式C语言的编程方法;编写各基础模块的应用程序,掌握这些模块的使用和编程方法,进行系统调试并分析运行结果;综合利用各基础模块,实现较为复杂的综合实验任务,完成调试并得到正确的实验结果;观察调试结果,解释实验中出现的问题,给出解决思路和方法,写出实验报告。
3、实验教学基本要求和实验容基本要求:掌握renesas嵌入式系统原理及嵌入式C语言的编程方法。
ABB i-bus EIB KNX 分析型输入 AE S 4.2 智能安装系统用户手册说明书
Product Manual ABB i-bus® EIB / KNXAnalogue InputAE/S 4.2Intelligent Installation SystemsThis manual describes the functionality of Analogue Input AE/S 4.2.Subject to changes and errors excepted.Exclusion of liability:Despite checking that the contents of this document match the hardware and software, deviations cannot be completely excluded. We therefore cannot accept any liability for this. Any necessary corrections will be incorporated into new versions of the manual.Please let us know if you have any suggestions for improvements.E-mail:******************.comContents1 Page1 General (2)1.1 Product and functional overview (3)2 Device technology (4)2.1 Technical data (4)2.2 Circuit diagrams (6)2.3 Dimension drawing (6)2.4 Resolution and accuracy of the individual measuring ranges .72.5 Assembly and installation .......................................................73 Commissioning (9)3.1 Overview .................................................................................93.2 Parameters ..............................................................................103.2.1 Parameter window “General” ..................................................103.2.2 P arameter window“Channel A – Voltage, current and resistance” .......................133.2.2.1 Definition of the measuring range ...........................................143.2.2.2 Parameter window “A – Output” .............................................163.2.2.3 Parameter window “A – Threshold 1” .....................................183.2.2.4 Parameter window “A – Threshold 1 output” ..........................213.2.3 P arameter window“Channel A – Floating contact interrogation” ..........................223.2.3.1 Parameter window “A – Output” .............................................233.2.3.2 Parameter window “A – Threshold 1” .....................................243.2.3.3 Parameter window “A – Threshold 1 output” ..........................263.2.4 P arameter window“Channel A – PT100 2-conductor technology” ......................273.2.4.1 Line fault compensation via cable length ................................293.2.4.2 Line fault compensation via cable resistance .........................303.2.5 P arameter window “Calculation 1” with “comparative”calculation type .......................................................................313.2.6 P arameter window “Calculation 1” with “arithmetic”calculation type .......................................................................343.3 Communication objects ..........................................................363.3.1 Channel A ................................................................................363.3.2 Channels B, C and D ...............................................................373.3.3 Calculation 1 ...........................................................................383.3.4 Calculation 2, 3 and 4 .............................................................383.3.5 General ....................................................................................394 Planning and application ......................................................404.1 Description of the threshold value function.............................404.2 Planning example: “Humidity sensor” (41)4.3 P lanning example: “PT100 2-conductor technology– 30...+ 70 °C” .........................................................................454.4 Planning example: “Air flow measurement” ............................48Appendix ...............................................................................................I A.1 Scope of delivery ....................................................................I A.2 Communication object measured value out of range .............I A.3 T ruth table for the “Status byte - System”communication object.............................................................IV A.4 List of diagrams (V)A.5 List of tables ............................................................................V A.6 Index .......................................................................................VI A.7 Ordering information ...............................................................VII A.8 Notes (VIII)ABB i-bus® EIB / KNX General1 General It is becoming increasingly important to be able to control complex instal-lations in a user-friendly manner. Sensors are used, for instance, in orderto control supply air valves, exhaust air valves and air flow speeds in an airconditioning system, or to control heating using an outside temperaturesensor. Container levels are scanned in order to obtain information aboutwhen the containers need filling. Pipeline temperatures are recorded andevaluated. Sensors to detect the presence of persons in a room are installedin order to optimise the use of energy. Monitoring and security functions relyon the data from sensors. All of these events play a role when it comes tocontrolling complex installations in buildings and houses in a convenient andsecure manner while minimising energy consumption. In making it possibleto record and process four independent analogue input signals, ourAnalogue Input AE/S 4.2 product can help you control your installationsusing ABB i-bus®.This manual provides detailed technical information about the AnalogueInput product, including installation and programming, and explains how touse AE/S 4.2 by way of examples.The manual is divided into the following chapters:• Chapter 1 General• Chapter 2 Device technology• Chapter 3 Commissioning• Chapter 4 Planning and application• Appendix2ABB i-bus® EIB / KNX 1.1P roduct andfunctional overview General34 ABB i-bus ® EIB / KNX 2 Device technology2.1 Technical dataDevice technologyAnalogue Input AE/S 4.2 is used to record analogue data. Four conventional sensors can be connected to AE/S 4.2. The connection to the bus is established using the enclosed bus connection terminal at the front of the device. The device is ready for operation after connecting the mains voltage of 115...230 V AC and the bus voltage. Analogue Input AE/S 4.2 is parameterised using ETS2 V1.3 or higher.Fig. 1: Analogue Input AE/S4.2Power supply – Bus voltage21 … 32 V DC – Power input, bus< 10 mA – Mains voltage U s115 ... 230 V AC (+ 10% – 15%), 50 / 60 Hz – Power consumptionMax. 11 W, at 230 V AC – Power input, mains80/40 mA, at 115/230 V AC – Leakage lossMax. 3 W, at 230 V AC Auxiliary voltage output to supply the sensors – Nominal voltage U n24 V DC – Nominal current I n300 mA Inputs – Number4 independent sensor inputs – Input signal/resolution/accuracy 0 – 1 V / 1 mV / +/– 2% of the upper limitof the effective range (of ULE)0 – 5 V / 5 mV / +/– 2% of ULE 0 – 10 V / 10 mV / +/– 2% of ULE 1 – 10 V / 10 mV / +/– 2% of ULE 0 – 20 mA / 20 μA / +/– 2% of ULE 4 – 20 mA / 20 μA / +/– 2% of ULE0 – 1000 ohm resistance / 2.5 ohm / +/– 2% of ULEP T100 2-conductor technology – 30...+ 70 °C / 0.1 K / +/– 1 K of ULEP T100 2-conductor technology – 200...+ 800 °C / 1.5 K / +/– 10 K of ULEF loating contact interrogation (pulse width min. 100 ms)–I nput resistance to voltage measurement > 50 kohm –I nput resistance to current measurement 260 ohm Connections – EIB / KNX Via bus connection terminal, screwless– Mains voltage Via screw terminals– Supply for the sensors Via screw terminals– Sensor inputs Via screw terminalsConnecting terminals – Screw terminals 0,2 ... 2,5 mm 2 finely stranded0,2 ... 4,0 mm 2 single-core– Tightening torque Max. 0.6 NmOperating and display elements – Programming LED For assigning the physical address– Programming button For assigning the physical addressTable 1: Technical data part 12C D C 071 263 F 0005ABB i-bus® EIB / KNX Device technology56 ABB i-bus ® EIB / KNX2.2 Circuit diagrams2.3 Dimension drawingDevice technologyABB i-bus® EIB / KNX Device technology7ABB i-bus® EIB / KNX Device technologySupplied stateAnalogue Input is supplied with the physical address 15.15.255.The Threshold value measurement/1 application program is preloaded.It is therefore only necessary to load parameters and group addressesduring commissioning. However the complete application program can bereloaded if required.Download behaviourDue to the complexity of the device, it can take up to 1.5 min. during adownload until the progress bar appears, depending on the computer used.Assignment of the physical addressThe physical address, group address and parameters are assigned andprogrammed in the ETS software.CleaningDirty devices can be cleaned using a dry cloth. If this is not sufficient, a cloththat has been dampened slightly with a soap solution can be used. Causticagents or solvents may not be used under any circumstances.MaintenanceThe device is maintenance-free. In the event of damage (e.g. caused duringtransportation or storage), no repairs may be carried out by external staff.When the device is opened, the right to claim under guarantee expires.The maintenance schedule for the sensors must be requested from thesensor manufacturers.83 Commissioning3.1 Overview3.2P arameters Array P arameter window3.2.1“General”Fig. 10: Parameter window “Channel A – Voltage, current and resistance”Use channelOptions: no/yesThis parameter determines the use of channel A.3.2.2 P arameter window“Channel A – Voltage, current and resistance”3.2.2.1 D efinition ofthe measuring rangeFig. 11: Parameter window “Channel A – Definition of the measuring range”The following 4 parameters are dependent on the Send output value asparameter. The preset values change depending on which byte value is set.In addition, the Factor parameter appears if the 2-byte [EIB floating point] or4-Byte [IEEE floating point] option is selected.3.2.2.2 P arameter window“A – Output”Fig. 12: Parameter window “Channel A – Output”Scanning frequencyThe sensor signal of channel A is measured once per second.Filter3.2.2.3 P arameter window“A – Threshold 1”Fig. 13: Parameter window “Channel A – Threshold 1”Use threshold valueOptions: no/yesThis parameter is used to define whether Threshold 1 should be used.19203.2.2.4 P arameter window“A – Threshold 1 output”Fig. 14: Parameter window “Channel A – Threshold 1 output”Send threshold value objectOptions: after a changeafter a change and cyclically213.2.3P arameter window“Channel A – Floatingcontact interrogation”Fig. 15: Parameter window “Channel A – Floating contact interrogation”Use channelOptions: no/yesThis parameter determines the use of channel A.Sensor output223.2.3.1 P arameter window“A – Output”Fig. 16: Parameter window “Channel A – Output”Send output valueOptions: on requestafter a changecyclically233.2.3.2 P arameter window“A – Threshold 1”Fig. 17: Parameter window “Channel A – Threshold 1”Use threshold valueOptions: no/yesThis parameter is used to define whether Threshold 1 should be used. If yes 24253.2.3.3 P arameter window“A – Threshold 1 output”Fig. 18: Parameter window “Channel A – Threshold 1 output”Send threshold value objectOptions: after a changeafter a change and cyclically 2627Abb. 18: Parameterfenster …Kanal A PT100 2-Leiter-Technik –30 ... +70 °C“Fig. 19: Parameter window “Channel A – PT100 2-conductor technology – 30...+ 70 °C”Use channelOptions: no/yesThis parameter determines the use of channel A.3.2.4 P arameter window“Channel A – PT1002-conductor technology”283.2.4.1 L ine fault compensationvia cable lengthFig. 20: Parameter Line fault compensation “via cable length”Length of the cable, single distance [1...255 m]Options: 1...100 (255)For setting the single cable length of the connected temperature sensor3.2.4.2 L ine fault compensationvia cable resistanceFig. 21: Parameter Line fault compensation “via cable resistance”Cable resistance in milliohms [total of forward and return conductors]Options: 0...500 (10000)For setting the cable resistance of the connected temperature sensorFig. 22: Parameter window “Calculation 1, comparative”Use calculationOptions: no/yes3.2.5 P arameter window“Calculation 1”with “comparative” calculation typeFig. 23: Parameter window “Calculation 1, arithmetic”Function Options: Input 1 + Input 2 Input 1 - Input 2 Arithmetic mean value 3.2.6 P arameter window“Calculation 1”with “arithmetic”calculation typeC ommunication3.3objects3.3.1 Channel AFig. 24: Communications objects – “Channel A”3.3.2 Channels B, C and D3.3.3 Calculation 13.3.4 Calculation 2, 3 und 4ABB i-bus® EIB / KNX Commissioning3.3.5 General39ABB i-bus® EIB / KNX 4P lanningand application4.1D escription of thethreshold value function Planning and application40ABB i-bus® EIB / KNX Planning and application4.2P lanning example:“Humidity sensor” The air conditioning and heating in a laboratory is to be controlled in relation to the relative humidity. If the value falls below 20%, the air conditioning should be switched off and the heating should be switched on. If the value rises above 75%, the air conditioning should be switched on and the heating should be switched off. The minimum duration of the underflow or overrange is a maximum of 30 seconds.The relative humidity should not be evaluated below 10% and over 90%.Humidity sensor:Signal output: 0 – 1000 ohmMeasuring range: 0...100%Measurement curve: LinearThreshold 1: Air conditioningThreshold 2: HeatingConnection to channel A.41ABB i-bus® EIB / KNX Planning and application42ABB i-bus® EIB / KNX Planning and application43ABB i-bus® EIB / KNX Planning and applicationSettings for threshold values 1 and 2 for channel A:Fig. 31: Parameter window “Channel A – 0 – 1000 ohm, threshold 1 and 2”44ABB i-bus® EIB / KNX Planning and applicationP lanning example:4.3 Array“PT100 2-conductortechnology – 30...+ 70 °C”45ABB i-bus® EIB / KNX Planning and application4647ABB i-bus ® EIB / KNXFig. 36: Parameter window “Channel A – PT100 2-conductor technology – 30...+ 70 °C, threshold 1 and 2”Planning and application48ABB i-bus ® EIB / KNX Planning and application4.4 P lanning example:“Air flow measurement”。
- 1、下载文档前请自行甄别文档内容的完整性,平台不提供额外的编辑、内容补充、找答案等附加服务。
- 2、"仅部分预览"的文档,不可在线预览部分如存在完整性等问题,可反馈申请退款(可完整预览的文档不适用该条件!)。
- 3、如文档侵犯您的权益,请联系客服反馈,我们会尽快为您处理(人工客服工作时间:9:00-18:30)。
Blazar β 嵌入式教学系统
4 / 57
1.1 MKL26Z256 单片机 NXP 公司的 Kinetis L 系列 MCU 将新型 ARM Cortex-M0+处理器的卓越能效 和易用性与 Kinetis 32 位 MCU 组合的性能、丰富的外设集、支持功能和可扩展 性相结合。Kinetis L 系列 MCU 还与基于 ARM Cortex-M4 的 Kinetis K 系列硬件和 软件兼容,提供了一个向更高的性能、存储器和特性集成度升级的可扩展途 径。Cortex-M0+处理器系列的超低功耗、低成本和易于使用的优点的组合,旨 在满足专门面向电动机控制、汽车、电源管理、嵌入式音频和工业自动化市场 的新兴类别的灵活解决方案。
1 概述............................................................................................................................ 4 1.1 MKL26Z256 单片机 ................................................................................................5 1.2 Blazar Beta 嵌入式教学系统组件 .........................................................................5
2 Blazar 嵌入式教学系统的硬件平台及连接............................................................. 6 2.1 Blazar Beta 嵌入式教学系统的硬件平台 .............................................................6 2.2 Blazar Beta 嵌入式教学系统的硬件连接 .............................................................7
Blazar 嵌入式教学系统
β版-MKL26Z256.使用说明及实验指示书
清华大学 NXP MCU/DSP 应用开发研究中心 蓝宙电子
2016.4
目录
一、 Blazar Beta 嵌入式教学系统使用说明书 .................................................. 4
本教学系统使用的 64 引脚 LQFP 封装的 MKL26Z256 型单片机是 Kinetis L 系 列中的一款,具有 256KB FLASH 空间和 32KB SRAM 空间。
1.2 BLAZAR BETA 嵌入式教学系统组件 Blazar β 嵌入式教学系统包括以下组件: 1) MKL26Z256 实验开发板; 2) 板上集成 OPENSDA 调试器,以及 BDM/SWD 调试接口; 3) USB 电缆; 每一套 Blazar β 嵌入式教学系统可收纳在独立的盒子中,发放给选课学生 带走,让学生在整个学期里可以在自己的机器上、在业余时间随心所欲地钻 研,发挥创意,真正把单片机“玩”起来。 此外,MKL26Z256 实验开发板采用了符合学生兴趣、并且可扩充的设计方 式, MKL26Z256 实验开发板上集成了彩色 LED、按键、通讯接口、OLED 点阵 显示屏、WIFI 通讯等功能模块,同时预留了 ARDUINO 兼容的扩展接口,可以方 便教学中学生的各种功能扩展。例如,无线通讯模块、机械控制模块等,学有 余力的学生可在此基础上进行进一步的学习和创意设计。
2 / 57
Task 3: 让单片机实验底板上的两个 LED 与某两个按键的状态相一致 ....................40 Task 4: 让两个 LED 有交替闪和齐闪两种模式,用某个按键切换这两种模式 ........41 实验二、UART 串口实验 ............................................................................................... 43 Task 1: 让单片机给计算机串口发送完整 ASCII 码表,每 16 个字符换行 ...............43 Task2: 在计算机的“超级终端”程序通过串口给单片机发送一个字符,单片机返 回这个字符对应的 ASCII 码。.......................................................................................47 Task3: 编写一个通过串口实现的猜数字游戏。 .........................................................51
KL26 系列单片机有 32 引脚 QFN 、48 引脚 QFN、64 引脚 LQFP、80 引脚 LQFP、 100 引脚 LQFP、121 引脚 BGA 共 6 种封装可供选择,片内集成了 SPI, I2C,UART, 12/16 位 ADC,12 位 DAC,CMP,RTC,PIT,TPM,电容触摸控制 器 TSI 等多种外围设备。
附录 A、Blazar Beta 嵌入式教学实验板电路原理图........................................... 55
3 / 57
一、 BLAZAR BETA 嵌入式教学系统使用说明书
1 概述
Blazar 嵌入式教学系统是一套注重趣味探索、自由开发的开放教学系统方 案。Blazar 系统倡导开放自由的 PBL 教学模式,引导学生完成自主创意完成趣 味的设计,并在此过程中掌握体会嵌入式系统的设计。同时 Blazar 嵌入式教学 系统希望通过全面开放:硬件平台、教学课件、实验例程、标准中间件、趣味 程序等资源,鼓励分享原创程序和教材,形成一个开放与分享的学习生态圈。
Blazar α 嵌入式教学系统 其中,Blazar α系统是标准版的 Blazar 平台,包括了采用 ARM Cortex M0+ 内核的 NXP 单片机系统及实验板,以及配套的调试下载用的 BDM/SWD 调试器 (支持 S08、S12、ColdFire v1、Kinetis K 系列和 Kinetis L 系列)。 Blazar β 系统则是 Blazar 系列的入门级版本,它采用了 ARM Cortex M0+内 核的 NXP MK26Z256 型 MCU 作为系统核心,在基本功能上与 α 系统保持兼容, 同时加强了物联网应用的开发潜力。
7 / 57
3 CODEWARRIOR 开发软件的下载和安装
3.1 CODEWARRIOR 开发软件的下载 NXP 的官方网站()上提供了 CodeWarrior 的特殊版 本,供用户免费下载和使用,目前最新版本为 Special Edition: CodeWarrior for Microcontrollers 10.5(Eclipse,Online),该版本对 Windows 7 至 Windows 10 操作 系统的支持都很好,通过兼容模式等设置可在 Windows XP 下很好地使用。 3.2 CODEWARRIOR 开发软件的安装 下载后就要进行软件的安装,首先双击 setup 安装文件,进入“解压缩”界 面如下图所示。
2.2 BLAZAR BETA 嵌入式教学系统的硬件连接 进行实验时,实验系统与计算机通过 USB 线直接连接,板上通过 MicroUSB 接口,板载了 OPENSDA 调试器和 USB 虚拟串行通信接口。 此外,板上也预留了 BDM/SWD 调试接口 J2,可使用 USBBDM 调试器进行 开发调试。SWD 接口使用的是标准的 1.27mm 间距的 2 乘 5 双排插针接口。连 接时,需要特别注意 10-pin 插头的方向,不要插反。
3 CodeWarrior 开发软件的下载和安装 ..................................................................... 8 3.1 CODEWARRIOR 开发软件的下载 ..........................................................................8 3.2 CODEWARRIOR 开发软件的安装 ..........................................................................8
5 / 57
2 BLAZAR 嵌入式教学系统的硬件平台及连接
2.1 BLAZAR BETA 嵌入式教学系统的硬件平台
ARDUINO 兼容接口
IO 按键
OLED 点阵显示屏 USB 接口 (虚拟串口)
OPENSDA 调试器
复位按键 RESET
多色 LED 灯
WIFI 模块
MKL26Z256 MCU
Blazar β 嵌入式教学系统
5 在 CodeWarrior 创建一个新 Project 的步骤和使用............................................. 25 5.1 PROJECT 工程建立 ....................................................................................................25 5.2 编译调试工程 ...........................................................................................................28