天龙DENON AVR-1601 1681AV环绕接收机服务手册
YAV 8AD-16高精度采集卡技术手册V17
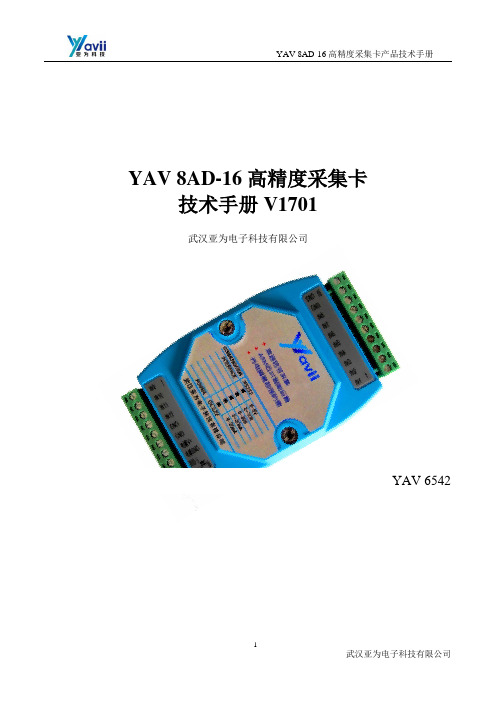
YAV 8AD-16高精度采集卡技术手册V1701武汉亚为电子科技有限公司YAV 6542注意序号版本号编写人编写日期支持对象应用时间特别说明1 1.0 郑先科2014.10 YAV 8AD-16采集卡2 2.0 郑先科2015.01 YAV 8AD-16采集卡3 3.0 郑先科2017.01 YAV 8AD-16采集卡目录功能概述 (5)技术指标 (5)1.模拟信号输入 (5)2.通信总线 ......................................................................................................... 错误!未定义书签。
3.温度条件 ......................................................................................................... 错误!未定义书签。
硬件特点 (6)原理框图 (6)端子信息 (7)1.端子排列 (7)2.端子描述 (8)电气参数 (9)通信 (9)采集卡指示灯 (9)机械规格 (9)模拟量输入功能 (11)模拟量输入 (11)输入采样原理 (11)输入接线 (11)采样值计算 (12)1.无符号整型 (12)2.ADC数据类型 (12)3.模拟量值 (13)通信协议 (14)MODBUS-RTU通信协议 (14)应用实例 (17)采集卡连接 (17)发现硬件 (18)软件功能 (18)软件应用 (18)bVIEW (18)2.MODBUS RTU通信 (19)3.组态及PLC (19)注意事项及故障排除 (22)注意事项 (22)1.存储说明 (22)2.出货清单 (22)3.质保及售后 (22)4.特别说明 (22)故障排除 (23)1.无法正常采集数据 (23)2.VI文件打不开 (23)3.多卡不识别 (24)4.不显示波形 (24)5.采集速度不够 (24)6.软件弹出错误 (24)性能测试 (25)安全规范 (25)耐电压范围测试 (25)环境适应性测试 (26)文档权利及免责声明 (27)联系方式 (28)V智能体验 (29)功能概述模块有12路16位AI,电源电压为12V。
3B S CIENTIFIC 宽带大音频器说明书
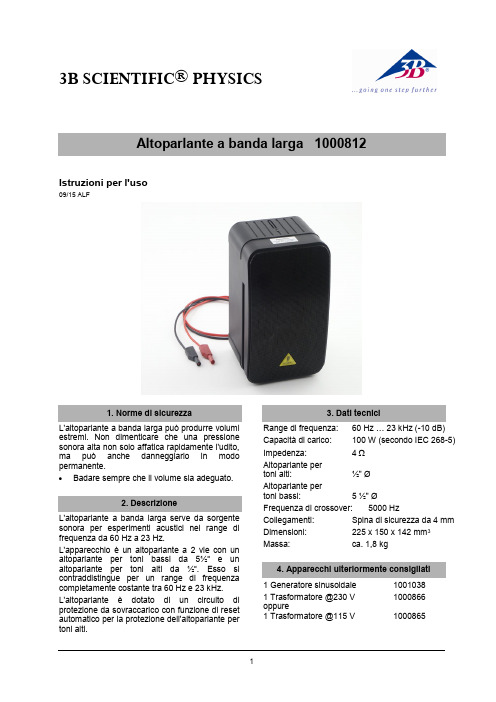
3B SCIENTIFIC ® PHYSICS1Istruzioni per l'uso09/15 ALFL'altoparlante a banda larga può produrre volumi estremi. Non dimenticare che una pressione sonora alta non solo affatica rapidamente l'udito, ma può anche danneggiarlo in modo permanente.∙ Badare sempre che il volume sia adeguato. L'altoparlante a banda larga serve da sorgente sonora per esperimenti acustici nel range di frequenza da 60 Hz a 23 Hz.L'apparecchio è un altoparlante a 2 vie con un altoparlante per toni bassi da 5½“ e un altoparlante per toni alti da ½“. Esso si contraddistingue per un range di frequenza completamente costante tra 60 Hz e 23 kHz. L'altoparlante è dotato di un circuitodi protezione da sovraccarico con funzione di reset automatico per la protezione dell'altoparlante per toni alti.Range di frequenza: 60 Hz … 23 kHz (-10 dB) Capacità di carico:100 W (secondo IEC 268-5)Impedenza: 4 Ω Altoparlante per toni alti: ½" Ø Altoparlante per toni bassi: 5 ½" Ø Frequenza di crossover: 5000 Hz Collegamenti: Spina di sicurezza da 4 mm Dimensioni: 225 x 150 x 142 mm 3Massa: ca. 1,8 kg 1 Generatore sinusoidale 1001038 1 Trasformatore @230 V 1000866 oppure1 Trasformatore @115 V10008653B Scientific GmbH ▪ Rudorffweg 8 ▪ 21031 Amburgo ▪ Germania ▪ Con riserva di modifiche tecniche © Copyright 2015 3B Scientific GmbH∙Non collegare l'altoparlante a una sorgente di tensione continua.Una superficie, che può vibrare leggermente, è inadatta all'altoparlante.∙ Posizionare l'altoparlante fondamentalmentesoltanto su superfici piane, fisse.∙ Non usare questo dispositivo vicinoall'acqua.∙ Badare che attraverso le aperture nell'internodell'alloggiamento non possa giungere nessun oggetto o liquido.∙ Non bloccare alcuna fessura di ventilazione.∙ Collegare l'altoparlante per toni bassi algeneratore sinusoidale.∙ Impostare tutti i regolatori del generatoresinusoidale su zero (battuta a sinistra).∙ Collegare il generatore sinusoidale alla retetramite il trasformatore.∙ Impostare i valori desiderati (frequenza,ampiezza) sul generatore sinusoidale.In caso di funzionamento prolungato nell'intervallo del massimo assorbimento di potenza, il circuito di protezione dell'altoparlante per toni alti può essere spento provvisoriamente. In questo caso non si presentano danneggiamenti.∙ Ridurre l'ampiezza, perché l'altoparlante pertoni alti si inserisca autonomamente.L'assistenza tecnica è necessaria nel caso in cui l'unità sia danneggiata, rovesciamento di liquidi od oggetti caduti nell'apparecchio, esposizione alla pioggia o all'umidità, anomalie di funzionamento o cadute dell'apparecchio.∙ Per l'assistenza tecnica rivolgersi apersonale qualificato.∙Pulire solo con uno strofinaccio asciutto.∙ Smaltire l'imballo presso i centri di raccolta e riciclaggio locali. ∙Non gettare l'apparecchio nei rifiuti domestici. Perlo smaltimento delle appare- cchiature elettriche, rispet- tare le disposizioni vigenti a livello locale.∙Non gettare le batterie esaurite nei rifiuti domestici. Rispettare le disposizioni legali locali (D: BattG; EU: 2006/66/EG).。
Denon 音频系统设置指南说明书
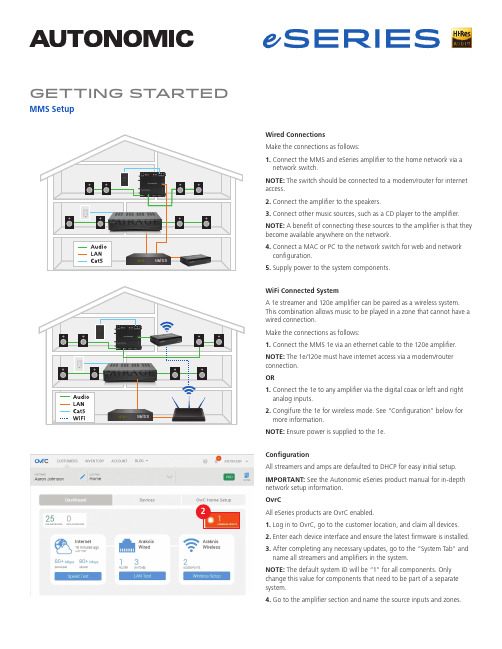
Getting St arted MMS SetupSwitch SwitchWired ConnectionsMake the connections as follows:1. Connect the MMS and eSeries amplifier to the home network via anetwork switch.NOTE: The switch should be connected to a modem/router for internetaccess.2. Connect the amplifier to the speakers.3. Connect other music sources, such as a CD player to the amplifier.NOTE: A benefit of connecting these sources to the amplifier is that theybecome available anywhere on the network.4. Connect a MAC or PC to the network switch for web and networkconfiguration.5. Supply power to the system components.WiFi Connected SystemA 1e streamer and 120e amplifier can be paired as a wireless system.This combination allows music to be played in a zone that cannot have awired connection.Make the connections as follows:1. Connect the MMS 1e via an ethernet cable to the 120e amplifier.NOTE: The 1e/120e must have internet access via a modem/routerconnection.OR1. Connect the 1e to any amplifier via the digital coax or left and rightanalog inputs.2. Congifure the 1e for wireless mode. See “Configuration” below formore information.NOTE: Ensure power is supplied to the 1e.ConfigurationAll streamers and amps are defaulted to DHCP for easy initial setup.IMPORTANT: See the Autonomic eSeries product manual for in-depthnetwork setup information.OvrCAll eSeries products are OvrC enabled.1. Log in to OvrC, go to the customer location, and claim all devices.2. Enter each device interface and ensure the latest firmware is installed.3. After completing any necessary updates, go to the “System Tab” andname all streamers and amplifiers in the system.NOTE: The default system ID will be “1” for all components. Onlychange this value for components that need to be part of a separatesystem.4. Go to the amplifier section and name the source inputs and zones.25. Go to the “Content” tab to enter credentials for online streamingcontent, add network storage or sync computers.Web Configuration1. Open a web browser (IE or Chrome recommended) and enter theMMS Web Configuration URL:http://<Server-IP>/config where “<Server-IP>” is the IP address ofthe MMS. EX: http://192.168.1.113/configNOTE: To find the Server IP address, use any IP sniffer to find the IPaddress of each device on the network.2. Go to the “Firmware” tab to update the MMS to the latest OS.3. Go to the “System Tab” and click the server gear icon in the Systemtab to change the default name, then name all streamers andamplifiers in the system. The name can also be changed on the“Machine Tab” as well.NOTE: The default system ID will be “1” for all components. Onlychange this value for components that need to be part of a separatesystem.4. Go to the amplifier section on the “System Tab”, click the gear iconand name the source inputs and zones.NOTE:• The Output Format, Audio Connections (physical or eAudioCast),Volume and Rate (important for use with 3rd party amps and controlsystems) settings can also be adjusted here as well.• System functionality can be verified at this point by playing the sampletrack. Access the track by entering the streamer IP address in a computer,then click “Loaded Content” to play.5. Go to the “Content” tab to enter credentials for online streamingcontent, add network storage or sync computers.34©2006–2018 Autonomic Controls, Inc. Autonomic and TuneBridge are registered trademarks of Autonomic Controls, Inc. All othertrademarks are property of their respective owners. 180411Controlling PlaybackMMS iOS and Android ControlSupport for iPhone, iPad and Android devices available by downloadingthe Tunebridge app from the Apple App Store or Google Play store.。
ONKYO TX-NR1008 AV接收机 说明书
重要的防护措施
1. 阅读说明。
2. 保存好说明书。
3. 注意所有警告信息。
4. 按照说明进行操作。
5. 不要在靠近水的地方使用本设备。
6. 只能用干布清洁。
7. 不要挡住通风口,根据厂家的指示说明进行安
连接
连接 AV 接收机 .......................................................................................13 连接扬声器................................................................... 13 关于 AV 连接................................................................ 17 将您的设备与 HDMI 连接.............................................. 18 连接您的设备 ............................................................... 19 连接 Onkyo V 设备..................................................... 20 安装天线 ...................................................................... 21 连接电源线................................................................... 21 我该使用哪一种连接方式?.......................................... 22
天龙 AVR-1611中文说明书
天龙功放设置大全
天龙功放设置大全随着近年来高清,HTPC和次世代音频的流行,很多新烧友第一次购入了功放。
而很多资深的发烧友也借着这波次世代的浪潮升级了自己的功放.在几个功放厂商中,天龙以其合适的价格,强劲的功能和火爆的影院效果吸引了很多烧友. 然而天龙的说明书读起来相对晦涩,而设置菜单不但往往为英文,而且做得也不够人性化,以致于很多烧友在新机器到家以后摸索半天,也往往还不能发出美妙的声音。
甚至有些烧友在未能找到最佳设置之前就提前放弃,这样器材就不能发挥所有的潜力,殊为可惜。
本文将从天龙功放简单的连接及设置说起,然后再对某些设置进行详细解释,希望能起到攻略的作用,让各位接触天龙功放不久的烧友们都能合理的设置自己的功放,使其表现能对得起花下去的银子.本文所涉及的设置适用于大多数的天龙功放,然而不同型号之间总有细微不同,如果您发现文中所述与您的功放不一致,只能请您自行钻研说明书了.一、连接新机到家后,不要马上插上电源,先看看机器的背面,是不是类似于下图,只是插口少了一些?什么?您的功放后背和图里的一模一样?先让俺拜一下买得起天龙的旗舰型号的米人!连线时您可能会注意到功放上有很多"DVD”,"HDP”,"AVR"等字样。
这些其实不用理会,在以后是可以在设置里随时更改的.唯一要注意的就是模拟信号不要插错了,比如色差的Y,Cb,Cb等.对于一般的应用,这一步应该是比较简单的。
二、音箱参数设置确定音箱等都连接好了,并且极性无误以后,就可以插上电源线并开机了。
记得把电视机也打开,在进行设置时,看电视机上的OSD 比看功放上的小屏幕要舒服多了。
这一步可以通过两种方式来做,一是自动设置(Auto Setup),二是手动设置(Manual Setup)。
某些初次使用功放的玩家可能不会信任自动设置功能,事实上这是一个相当强大的功能.天龙功放使用的自动设置功能来自于第三方的Audyssey公司.使用方法为将机器带的麦克风置于听音位置,机器发出测试音,然后对麦克风收到的声音进行分析计算后得出适合各声道音箱的设置.对于大多数没有声压计的烧友,笔者都建议至少跑一遍Auto Setup然后手动进行微调。
天龙DENON AVR-1610 中文说明书

× × ×
○ ○ ○
○ ○ ○
○ ○ ○
○ ○ ○
○ ○ ○
附件
×
○
○
○
○
○
备注: ○:在该零部件的所有均质材料中的有毒有害物质的含量不超过在SJ/T11363-2006标准规定的限量要求 ×:在该零部件中至少一种均质材料中的有毒有害物质的含量超过在SJ/T11363-2006标准规定的限量要求(×判定:包括EU RoHS的豁免项目)
1
序言
序言
感谢您选购DENON产品。为确保正确操作,在使用本产品前请仔细阅读操作说明书。 阅读之后,请务必妥善保管以备将来参考。
播放操作流程
请按以下所示顺序执行播放AVR-1610的操作。
连接方法
连接方法
安装/设定扬声器(v第10页)
设定
AudysseyTM Auto Setup(Audyssey自动设置)(v第19页)
此标志是根据2006/2/28颁布的「电子信息产品污染控制管理办法」,以及「电子信息产 品污染控制标识要求」,适用于在中国销售的电子信息产品的环保使用期限。 在此产品相关的安全和使用上遵守注意事项,在从生产日期起计算的此年限内,产品中 的有害物质不会往外泄漏,或者引起突然变异而给环境污染,人体或财产带来重大影响。 另外,包装在一起的电池等消耗品的环保期限是技术寿命5年。 适当地使用完后废弃的情况,请协助遵守各自治体的电子信息产品回收·再利用相关的 法律·规定。
检查状态(Information(信息)) 便捷功能
...................... 43
设定
菜单图 ................................................... 17 屏幕显示和前方显示屏的示例 ............................... 18 自动对所连接的扬声器进行最佳设定 (AudysseyTM Auto Setup(Audyssey自动设置)) ................. 19 进行详细设定(Manual Setup(手动设置)) ..................... 24 进行输入设定(Input Setup(输入设置)) ...................... 30
天龙DENON AVR-1705 1685 AV环绕接收机服务手册

(2) Playback the color-bar 75% of the Test Disc (Title 12) using the DVD Video Player, and check that Y and C levels of the S terminal output are within the specified output levels. If they are out of the specified levels, adjust with the variable resister inside of the unit.
(7) Adjust the Variable Resistors of other channels in the same way.
ௐ
ΦʔσΟΦηΫγϣϯ
ΞΠυϦϯάిྲྀͷௐ
ௐʹඞཁͳଌఆ ثɹ%$7PMUNFUFS
४උ
ηοτΛΫʔϥɺઔ෩ػͷͦͳͲ෩௨͠ͷྑ͍ॴ Λආ͚ɺ௨ৗͷ༻ঢ়ଶʹஔ͖·͢ɻηοτͷपғԹ ʙ ˆɺ࣪ৗ࣪ͱ͠·͢ɻ
ϓϦηοʔΧࢠ
ແෛՙ
εϐʔΧɾμϛʔ߅ͲͳثΛଓ͠ͳ͍ɻ
ௐ
্ΧόʔΛͣ͠ɺύϫʔΞϯϓج൘ͷ 73 73 73 73 73 ͼٴ4633#"$, Ξϯϓج൘ͷ 73 Λ࣌ʹ