TG70-VT1263ED说明书
角头电动螺母扳手产品说明书
C 50 62 62 62 75 106
K 2.5 3.5 3.5 3.5 3.5 5
网站
有关我们的产品、配件、备件和已发布事项的信息,请访问 Desoutter 网站。 请访问:.
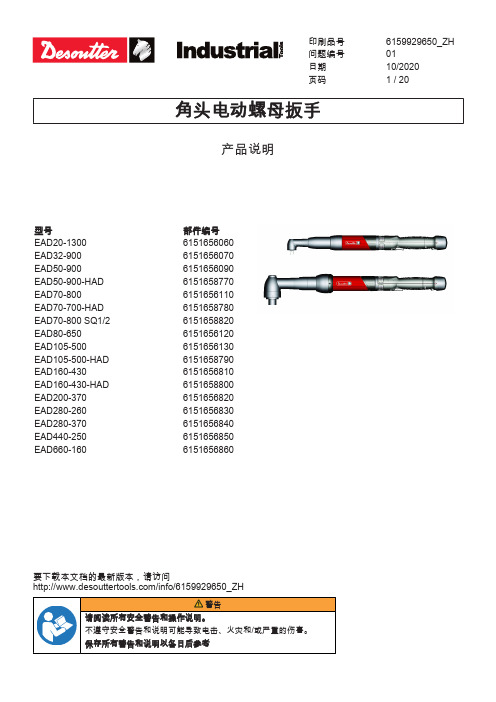
备件信息
若要在 Service Link 中查看分解图和备件列表,请访问: .
10/2020
3 / 20
产品信息
ZH
ØB
D
37
25
37
25
37
28
43
32
43
32
48
40
48
40
H 45.5 45.5 51.1 56.7 62 60.4 60.4
L 481 481 531 544 544 567 567ØC Leabharlann 8 28 35 40 40 45 45
ØA
160-430
66
200-370
66
280-260
66
280-370
质保
• 产品保修在首次启用产品后 12 个月内有效,但无论如何,最迟应在交付产品后 13 个月内过期。 • 保修不包括部件正常的磨损和断裂。
• “正常磨损和断裂部件”是指在工具常规维护期内,需要更换、进行其他调整/大修的部件(以时 间、运行时数或其他形式表示)。
• 产品保修以工具及组件的正常使用、维护和修理为前提。 • 本保修不适用于在保修有效期内因维护保养不当或由 Desoutter及其授权维修服务合作伙伴之外的他方
维修 .................................................................................. 16 维护说明.......................................................................... 16 有关换能器工具的说明 ....................................................... 16 维护前阅读 ................................................................. 16 预防性维护 ................................................................. 16 升级工具 ................................................................... 16 在重新投入使用之前进行检查........................................................ 16 重新调试.......................................................................... 17
GSM 温控器产品说明书

GSM温控器产品说明书深圳市威尔海电子有限公司电话:*************传真:*************①安装尺寸:○2连接方法:输出插座电源输入传感器天线芯片向下本产品支持850M,900M ,1800M ,1900M四频通信,适用全球范围通信。
支持插入移动和联通的SIM卡,不能支持CDMA制式的电信卡. 请在使用过程中保持SIM有效,欠费或停机都会造成温控器报警不成功.本产品可以邦定三个电话号码作为报警时通知号码.邦定方法:按住M1或M2或M3其中一个需要邦定的按键不放,当相对应的LED闪烁,用需要邦定的电话拨打温控器内SIM卡的号码,等电话拨通后,LED停止闪烁转为长亮就表示邦定成功.取消邦定:按住M1或M2或M3其中一个需要取消邦定的按键3秒以上,当相对应的LED闪烁时松开按键,LED熄灭表示已经取消邦定.自定义短信内容:温控器可以自定义短信内容,当多个温控器邦定同一个号码时可以根据短信内容区分出温控器的编号或位置信息.例如可以设定不同的机器的短信内容为:1号机, 2号机, 办公室,车间等,短信内容编程:按住MES按键不放,当相对应的LED闪烁,用已经邦定的电话将编写好的短信内容发送到温控器内SIM卡的号码, LED停止闪烁转为熄灭表示已经编程成功.这时松开MES按键。
短信内容取消:按住MES按键不放,当相对应的LED闪烁时松开按键即可.超温报警:当温控器发生报警时,温控器发出报警声,并轮流拨打已经邦定的号码,呼叫顺序为M1.M2.M3 .如果被邦定号码在通话中或暂时无法接通,温控器会一直重复轮流拨打已经邦定的号码,直到成功拨通其中一个号码并且对方接听为止,并将报警信息发送到该号码.温控器可以手动终止电话报警,在报警时按POWER,SET,UP,DOWN四个按键其中任意一个按键可以手动停止报警,并停止拨打电话报警.温度查询:在正常状态下,用已经邦定的电话拨打温控器内SIM卡,温控器会主动挂断电话,并把当前温度用短信发送到查询的电话.停电报警:当发生停电时,温控器会自动转为备用电池供电,(第一次使用时请保持通电半小时以上为备用电池充电)。
欧圣 手持控制器 HBA 使用说明书

These operating instructions are valid only in connection with the data sheet of the rele-vant hand-held pendant station HBA and with the operating instructions of the relevant HBA handwheel!Correct useMachine installations in manual mode can be operated with hand-held pendant stations.Handwheels are used as part of an overall higher-level control system.Their use, installation and operation are permissible only in conformity with these operating instructions.Incorrect useHand-held pendant stations on their own must not be used as safety components for avoiding hazar-dous states in a machine installation.General functionHand-held pendant stations make it possible to operate a machine installation, for instance, in manual mode.Function of individual componentsThe hand-held pendant station may consist of the following components: HandwheelEMERGENCY-STOP device Enabling switches Selector switches PushbuttonsHBA handwheelThe electronic HBA handwheel is a universal pulse generator for manual shaft positioning.An output of 100 or 25 square-wave pulses per revolution is available. A second phase-shifted output allows the connected controller to detect the direction of movement.The pulses are evaluated in the controller.For details, please see the Electronic HBA handwheel operating instructions.EMERGENCY-STOP deviceThe EMERGENCY-STOP device is designed to be mani-pulation-proof in accordance with IEC 60947-5-1/EN ISO 13850.Enab ling switches, selector switches,pushbuttonsThese components are used to transfer additional information to the higher-level machine controller.AssemblyHand-held pendant stations are not used exclusively at a single site. The stations can be stored using a mounting magnet on the rear of the device or a holder.Electrical connectionAlways shield connecting leads.Ground the shield at the open end of the lead at a central grounding point, e.g. in the distribution board or in the control cabinet, over a large sur-face, with low resistance and with low inductance. In the case of leads with plug connectors, ensure that the connection type is EMC-compliant.Original connecting leads must not be shortened. G iven an extension or other modification to the connection cable, the operator must ensure that the valid EMC protection requirements are observed. Do not install connecting leads in the immediate vicinity of interference sources.Authorization according to:Operation with UL-class 2 power supply only.Connection leads of hand-held pendant stations in-stalled at the application site must be separated from all movable and permanently installed leads and non-insulated active parts of other installation parts which operate with a voltage of over 150 V, in such a way that a constant clearance of 50.8 mm is observed. This does not apply if the movable leads are equipped with suitable insulation materials which possess an identical voltage stability to the other relevant installation parts or higher.Service and inspectionEUCHNER handwheels require no maintenance.Handwheels may only be repaired by the manufac-turer.To clean the handwheels, only use solvent-free cle-aning agents and a soft cloth.Disclaimer of liabilityThe company is unable to accept liability in the following cases:if instructions are not followedif the safety instructions are not followedif the units are electrically connected by unautho-rised personnelif any external intervention occursDo not open hand-held pendant stations!Do not throw or drop the hand-held pendant stati-ons!LISTEDPOW. CONV. EQ.82HAEUCHNER GmbH + Co. KG Kohlhammerstra ße 16D-70771 Leinfelden-Echterdingen Tel. +49/711/75 97-0Fax +49/711/75 33 16www.euchner.de ***************S u b j e c t t o t e c h n i c a l m o d i f i c a t i o n s ; n o r e s p o n s i b i l i t y i s a c c e p t e d f o r t h e a c c u r a c y o f t h i s i n f o r m a t i o n .© E U C H N E R G m b H + C o . K G072850-05-02/12 (T r a n s l a t i o n o f t h e o r i g i n a l o p e r a t i n g i n s t r u c t i o n s )ColourGrey RAL 7040/Black RAL 9004Weight1.3 kg Operating temperature 0 °C ... +50 °C Storage temperature -20 °C ... +50 °CHumidity, max.80 %(condensation not permissible)Degree of protection to the frontIn accordance with EN60529 / IEC529IP 65In accordance with NEMA 250-12Resistance to vibrationVibrations (3 axes)DIN/IEC 68-2-6Shock (3 axes)DIN/IEC 68-2-27EMC protection requirements EN 61000-6-2in accordance with CEEN 61000-6-4Switching elements Max. 2 NC contactsUtilization categoryDC-13according to IEC 60947-5-1U e =24 V / I e= 3 A Resistive loadAC 30 V / 0.4 ADC 30 V / 0.1 A Switching voltage, max.30 V DC Switching current, max.0.1 A Switching capacity, max.1 VA see wiring diagramSwitching voltage, max.25 V Switching capacity, max.0,2 VAwww.euchner.deTechnical data, handwheelSee relevant operating instructions for HBA hand-wheel.AccessoriesSee EUCHNER catalogue for hand-held pendant stations or www.euchner.de.。
施耐德万高D型控制器使用说明

高字节未用
3
--
44
2C
1
故障标志2
BIT7 --空
BIT6 --空
BIT5 --空
BIT4=1 --备用合闸
BIT3=1 --常用合闸
BIT2=1 --故障锁定
BIT1=1 --备用脱扣
BIT0=1 --常用脱扣
3
常用和备用脱扣仅应用于CB级产品
45
2D
1
转换次数
3
次
46
消防联动(无源):短接此两点,机构转到双分位置,开关状态主分备分;(可靠距离10m,WTS-D800~5000系列不具备该项功能)
: 控制器的发电机启动端子在常用电源正常时常闭触点断开,当常用电源故障时常闭触点闭合以接通发电机启动电路;常开触点与之相反,请用户注意。
: 两台断路器的主回路相序必须一致。
附录1 通讯协议
D型控制器配有RS485通讯接口,可与SCADA系统、DCS系统或具有ModBus兼容的监控系统之间进行信息和数据的有效传送。通过监控系统实现对自动转换开关的“四遥”操作,
一、工作参数
通讯接口
RS-485
螺丝式固定端子,便于接线
EIA标准2线微分通讯
控制器出厂默认设置
波特率:9600,1位起始位,8位数据位,2位停止位,无校验
功能码:功能码为每次通讯传送的信息帧的第二个数据帧,告诉子机执行相应功能。本模块利用了两个指令从主机获取要执行的任务及提供的服务。
功能码
定义
03H
读数据
06H
写单个寄存器(遥控)
数据区:数据区是根据不同的功能码而不同。数据区可以是实际数值、设置点、主机发送给从机或从机发送给主机的地址。不同的数据区存储了控制器的不同工作状态及工作参数。如附录地址列表所示。
星光制造业国际有限公司-75HD BD系列热带滚筒烤机产品说明书

2M- Non-Heated Bun Box
Star Manufacturing International, Inc.
32
Fig No 33 34 35
36
37 38 39
2J-Z2329 2J-Z2329 2J-Z3157
Part No 2E-Z1858 2E-Z3156 2R-Z1854 A5-Z2510 2P-Z6455 2I-Z13660 2I-Z13659 2I-Z2175 2P-Z2174 2R-Y5092
1 CONTROL PANEL LABEL
75CBDE-240V/SCBDE/SCHDE
2M-Z9666;RG - Heated & Non-Heated Bun Box
Star Manufacturing International, Inc.
PARTS LIST June 27, 2014, Rev. i
1 CONTROL PANEL
75CBDE/CHDE/SCBDE/SCHDE 75CBD/CHD/SCBD/SCHD
1 CONTROL PANEL LABEL
75CHD/CBD
1 CONTROL PANEL LABEL
75SCHD/SCBD
1 CONTROL PANEL LABEL
75CBDE-120V/CHDE
75CBDE/CHDE/SCBDE/SCHDE manufactured after 11/2010
ELECTRONIC CONTROL, RG 230/240V
75CBDE/CHDE/SCBDE/SCHDE manufactured after 11/2010
1
KIT SERVICE, FRONT PROBE REPL THERMISTOR, FRONT, .250 DIA.
美的 TG70-1210WXS 滚筒洗衣机使用说明书

使用说明书滚筒洗衣机T G 60-1026E (S )T G 80-1226E (S ) T G 70-V 1262E D T G 70-V T 1263E D T G 80-1229E D S T G 80V 20W D X T G 70-1226E (S ) T G 70-1229E D S TG80-color02WDX T G 70V 20W D X T G 80V 20W X T G 80V 61W D X T G 70V 320W D X T G 80V 80W I D X T G 100V 80W I D XT G 70-e a s y 60W X T G 80-e a s y 60W X TG80-easy70WDX TG90-easy70WDX TG80-easy170WDX T G 70-1210W X S T G 80-1410W D X S T G 80-1420W D X G T G 90-1410W D X S TG90-14510WDXG TG90-14610WDXS TG100-1420WDXG T G 100V 80W D X T G 100V 180W D X T G 120V 80W D X目录使用说明服务指南洗涤注意事项 ............................................控制面板介绍 ............................................洗涤剂盒介绍.............................................程序/功能介绍 ...........................................智能配网介绍 ............................................清洁保养 ...................................................故障现象及处理方法 ...................................规格及技术参数 .........................................售后服务 ...................................................包修卡 ......................................................快速入门快速入门 ...................................................安装说明洗衣机简图 ...............................................安装洗衣机 ...............................................安全警示安全警示 ...................................................本说明书适应多个机型,部分内容请对照所购机型查阅!236710111216171820212222注意:本图片仅为示意图,由于产品改进及系列化扩展,您所得到的产品外观,色及功能部 件可能与此图片不一致,请以实际产品为准。
威顿工程自动化 荷兰红灯栏说明书

©1998 Whelen Engineering Company Inc.A u t o m o t i v e : •Proper installation of this product requires the installer to have a good understanding of automotive electronics, systems and procedures.•Whelen Engineering requires the use of waterproof butt splices and/or connectors if that connector could be exposed to moisture.•Any holes, either created or utilized by this product, should be made both air- and watertight using a sealant recommended by your vehicle manufacturer.•Failure to use specified installation parts and/or hardware will void the product warranty.•If mounting this product requires drilling holes, the installer MUST be sure that no vehicle components or other vital parts could be damaged by the drilling process. Check both sides of the mounting surface before drilling begins. Also de-burr the holes and remove any metal shards or remnants. Install grommets into all wire passage holes.•If this manual states that this product may be mounted with suction cups, magnets, tape or Velcro®, clean the mounting surface with a 50/50 mix of isopropyl alcohol and water and dry thoroughly.•Do not install this product or route any wires in the deployment area of your air bag. Equipment mounted or located in the air bag deployment area will damage or reduce the effectiveness of the air bag, or become a projectile that could cause serious personal injury or death. Refer to your vehicle owner’s manual for the air bag deployment area. The User/Installer assumes full responsibility to determine proper mounting location, based on providing ultimate safety to all passengers inside the vehicle.•For this product to operate at optimum efficiency, a good electrical connection to chassis ground must be made. The recommendedprocedure requires the product ground wire to be connected directly to the NEGATIVE (-) battery post (this does not include products that use cigar power cords).•If this product uses a remote device for activation or control, make sure that this device is located in an area that allows both the vehicle and the device to be operated safely in any driving condition.•Do not attempt to activate or control this device in a hazardous driving situation.•This product contains either strobe light(s), halogen light(s), high-intensity LEDs or a combination of these lights. Do not stare directly into these lights. Momentary blindness and/or eye damage could result.•Use only soap and water to clean the outer lens. Use of other chemicals could result in premature lens cracking (crazing) and discoloration. Lenses in this condition have significantly reduced effectiveness and should be replaced immediately. Inspect and operate this product regularly to confirm its proper operation and mounting condition. Do not use a pressure washer to clean this product.•It is recommended that these instructions be stored in a safe place and referred to when performing maintenance and/or reinstallation of this product.•FAILURE TO FOLLOW THESE SAFETY PRECAUTIONS AND INSTRUCTIONS COULD RESULT IN DAMAGE TO THE PRODUCT OR VEHICLE AND/OR SERIOUS INJURY TO YOU AND YOUR PASSENGERS!Warnings to InstallersWhelen’s emergency vehicle warning devices must be properly mounted and wired in order to be effective and safe. Read and follow all of Whelen’s written instructions when installing or using this device. Emergency vehicles are often operated under high speed stressful conditions which must be accounted for when installing all emergency warning devices. Controls should be placed within convenient reach of the operator so that they can operate the system without taking their eyes off the roadway. Emergency warning devices can require high electrical voltages and/or currents. Properly protect and use caution around live electrical connections.Grounding or shorting of electrical connections can cause high current arcing, which can cause personal injury and/or vehicle damage, including fire. Many electronic devices used in emergency vehicles can create or be affected by electromagnetic interference. Therefore, after installation of any electronic device it is necessary to test all electronic equipment simultaneously to insure that they operate free of interference from other components within the vehicle. Never power emergency warning equipment from the same circuit or share the same grounding circuit with radio communication equipment. All devices should be mounted in accordance with the manufacturer’s instructions and securely fastened to vehicle elements of sufficient strength to withstand the forces applied to the device. Driver and/or passenger air bags (SRS) will affect the way equipment should be mounted. This device should be mounted by permanent installation and within the zones specified by the vehicle manufacturer, if any. Any device mounted in the deployment area of an air bag will damage or reduce the effectiveness of the air bag and may damage or dislodge the device. Installer must be sure that this device, its mounting hardware and electrical supply wiring does not interfere with the air bag or the SRS wiring or sensors. Mounting the unit inside the vehicle by a method other than permanent installation is not recommended as unit may become dislodged during swerving; sudden braking or collision. Failure to follow instructions can result in personal injury. Whelen assumes no liability for any loss resulting from the use of this warning device. PROPER INSTALLATION COMBINED WITH OPERATOR TRAINING IN THE PROPER USE OF EMERGENCY WARNING DEVICES IS ESSENTIAL TO INSURE THE SAFETY OF EMERGENCY PERSONNEL AND THE PUBLIC.Warnings to UsersWhelen’s emergency vehicle warning devices are intended to alert other operators and pedestrians to the presence and operation of emergency vehicles and personnel. However, the use of this or any other Whelen emergency warning device does not guarantee that you will have the right-of-way or that other drivers and pedestrians will properly heed an emergency warning signal. Never assume you have the right-of-way. It is your responsibility to proceed safely before entering an intersection, driving against traffic, responding at a high rate of speed, or walking on or around traffic lanes. Emergency vehicle warning devices should be tested on a daily basis to ensure that they operate properly. When in actual use, the operator must ensure that both visual and audible warnings are not blocked by vehicle components (i.e.: open trunks or compartment doors), people, vehicles, or other obstructions. It is the user’s responsibility to understand and obey all laws regarding emergency warning devices. The user should be familiar with all applicable laws and regulations prior to the use of any emergency vehicle warning device. Whelen’s audible warning devices are designed to project sound in a forward direction away from the vehicle occupants. However, because sustained periodic exposure to loud sounds can cause hearing loss, all audible warning devices should be installed and operated in accordance with the standards established by the National Fire Protection Association.Safety FirstThis document provides all the necessary information to allow your Whelen product to be properly and safely installed. Before beginning the installation and/or operation of your new product, the installation technician and operator must read this manual completely. Important information is contained herein that could prevent serious injury or damage.Installation Guide:FastTrax™ System Model(s) FTR3, FTR451 Winthrop RoadChester, Connecticut 06412-0684Phone: (860) 526-9504Internet: Salese-mail:*******************CustomerServicee-mail:*******************®ENGINEERING COMPANY INC.Mounting The Power Supply...While the ISP8HS Strobe/Halogen power supply will be mounted in the vehicle’s trunk, the installation technician should keep the following recommendations in mind:A)The unit should be mounted on a metal surface to aid heat dissipation. Be sure that this surface isnot one that either generates or is exposed to excessive heat during normal operation of the vehicle.B)Do not select a location where the power supply will be exposed to potential damage from anyunsecured or loose equipment in the vehicle.C)Be sure the area selected will not allow the ISP8HS to be exposed to water!D)When routing the wires, it is important to choose a path that will keep these wires away fromexcessive heat and from any vehicle equipment that could compromise the integrity of the wires (ex. trunk lids, door jams, etc.).Using appropriately sized wires, connect the power supply to the battery using the wiring diagram on page 7 as a guide. Be sure to include the specified size fuse, keeping in mind that there should not be more than two feet of wire between the fuse block and the positive battery terminal.WARNING: All customer supplied wires, that connect to the positive (+) terminal of the battery, must be sized to supply at least 125% of the maximum operating current, and fused “at the battery” to carry the load!CAUTION: As it will be necessary to drill holes into the mounting surface, the installer MUST be sure that no vehicle components or other vital parts could be damaged by the drilling process. Check both sides of the mounting surface before drilling begins!Using the hardware provided, secure the power supply to its mounting surface.Vehicle preparation...1.Remove the rear seat back, C-pillar covers and headliner from the vehicle.2.With the headliner removed, locate the roof support cross-brace just ahead of the rear window.3.Locate the brace openings specified in the above illustration. Through the center of these open-ings, drill a 1/8” hole up through the roof of the vehicle.4.From outside the vehicle, locate the holes drilled in the previous step. Using a 1” hole saw, position the pilot bit into these holes and drill four, 1” openings through the roof.5.De-burr these holes and install grommets (included).Cable preparation and routing...Before the lighthead cables can be routed through the vehicle, they must first be prepared. Tag the cables to be used for the strobe lightheads (3-conductor) with the “S ” tags and the cables to be used for the halogen lightheads (2-conductor) with the “H ” tags. This will insure that the light-heads are connected to their proper power supply port. A lighthead’s identity is determined by what power supply port they are to be connected to.Note: Before the cables are routed, theinstaller may wish to apply a light coating of silicone spray to the cable’s outer jacket. This will allow the cables to be routed more easily.The following section demonstrates how these cables should be routed. For example, locate the strobe cable tagged “S1”. This cable (like all of the cables) has one end with pinned terminals on the wires and one end with socket terminals on the wires. Insert the pinned end of the “S1” cable through the roof support cross-brace opening shown below. In this case, it is the opening below the driver side outboard hole drilled previously. Feed this cable through the brace and down through the C-pillar until it enters the trunk area of the vehicle. Continue to feed the cable through this pathway and into the trunk until approximately 18” remain outside of the cross-brace. Repeat this for the remaining cables, using the following illustration as a guide.Fig. 2Feed the remaining 18” cable lengths through their respective, grommeted openings in the roof and apply RTV to the grommet hole to water-proof these openings.Insert the cable wires into their plug connectors as follows:Strobe Cable Halogen CablePin #1 - RED Pin #1 - WHITEPin #2 - BLACK Pin #2 - NO CONNECTIONPin #3 - WHITE Pin #3 - BLACKThe Fast-Trax housing mounting surface will now be prepared.Surface PreparationIMPORTANT NOTICEThe Fast-Trax system housing is secured to the vehicle using 3M™ VHB™ double-sided tape. This tape offers superior bond strength that allows the Fast-Trax™ to be exposed to inclement weather with no adhesion loss. However, the key to successful bonding lies in proper preparation of the mounting surface. The following section will outline the recommended procedure for mounting surface preparation. Your Fast-Trax™ system includes the 3M™ recommended preparation solution. DO NOT USE ANY OTHER SOLUTIONS TO PREPARE THE MOUNTING SURFACE! By following these procedures, your Fast-Trax™ installation will produce a successful bond with lasting adhesion. The outer surface of the vehicle must be at least 65°F before proceding!1.Without removing the protective backing from the mounting tape, position the Fast-Trax housing onto itsmounting surface. The housing is properly positioned when it is centered on the vehicle roof with a 1/8”space between the leading edge of the housing and the windshield gasket.2.Any part of the vehicle that will be in contact with the adhesive tape PLUS an additional inch and a half(1½) wide area on either side of the tape will have to be prepared. This area is called the bonding surface.Remove the Fast-Trax housing from the vehicle.3.The bonding surface must be completely clean and dry. Using a clean lint-free cloth, clean the bondingsurface with an automotive wax and grease remover (ex:Prepsol®). Allow to dry thoroughly.4.Shake the “3M Keel Primer” applicator (included) well before using. Following the instructions attached tothe applicator, apply a thin uniform coating to the bonding surface using the minimum amount that will fully coat the surface. Allow the primer to dry thoroughly. This is usually accomplished in 5 minutes at room temperature. Be sure the primed surface remains free from contaminants.5.Return the housing to the vehicle and connect the strobe/halogen cables to their respective lightheads.Remember that the cables must be connected correctly or the system will not function properly.6.Locate the ends of the adhesive tape strips indicated below. Peel approximately an inch of the protectivebacking away from the tape. Now fold the backing so that it sticks out from under the Fast-Trax housing. 7.Carefully pull the protective backing tabs out from under the Fast-Trax housing. Make sure that thehousing’s position is not disturbed during this process.8.With all of the protective backing strips removed, press down firmly along the edges of the housing topromote adhesion.WARNING!The vehicle should not be driven for a minimum of 24 hours after installation. The adhesive used in this procedure must remain at 65°F (minimum) for 24 hours after installation. Caution should be used if the vehicle must be driven between 24 and 72 hours after installation. The adhesive should be fully bonded after 72 hours.Fig. 5Mounting the Fast-Trax Control Head...1.Locate a suitable mounting location for the control head. Be sure that the control head fits properly and does not interfere with any dashboard components.WARNING! If the vehicle is equipped with air bags, do not mount the control head within the “air bag deployment zone(s)” indicated in the vehicle owner’s manual. Failure to heed this warning could impair the air bag’s ability to function properly which could, in the event of deployment, result in serious injury or death! 2.Position the control head on the proposed mounting location. Using a pencil or other suitable tool, scribe the mounting surface where the holes are to be drilled.CAUTION! As mounting the control head will require drilling, it is absolutely necessary to make sure that no vehicle components could be damaged by the mounting process.Check both sides of the mounting surface before starting and if damage is possible, select a different mounting location.3.Drill the 2 mounting screw holes.4.mounting surface.5.Route the 9-conductor control harness and the modular Diagnostix cable from the control head to the power supply. plug them into the power supply at this time.6.Locate the AMP 9-conductor pin housing. Cut and remove the locking tabs from this housing (see illustration).ing the wire chart in Fig 6, insert the pinned wires on the control harness into their proper location in the pin housing.8.Plug this cable into its port on the power supply.Outer Lens Removal and Installation....1.Locate the center mounting tab on the top section of the clear outer lens.ing a small flat-blade screwdriver, gently pry this tab down and out of the housing. Be careful not to damage this lens’ gasket.3.Alternating from one side to the other and working outwards, repeat this procedure for the remaining upper tabs.4.When all the upper tabs are free from the housing, the lens can be pulled outwards and upwards for removal.5.Installation begins by inserting the outermost tabs on the bottom of the lens into their respective slots. Make absolutely sure that the lens is centered in the housing before proceeding.6.Alternating from one side to the other and working inwards, repeat this procedure for the remaining tabs.7.Insert the outermost upper tabs into their slots and alternating from one side to the other and working inwards, repeat this procedure for the remaining tabs. Do not allow the gasket to be pinched or distorted during installation.A Note On Painting the Fast-Trax Housing...If painting or re-painting your Fast-Trax housing, it is important to keep in mind the following information:•Do not apply paint or primer to any of the black-colored area immediately adjacent to the clear outer lens!•Do not apply paint or primer to the underside of the housing.•Make sure that all surfaces to be painted have been primed using primer that is suitable for ABS plastic.•Be sure to include the leading edges (material thickness) in your painting surfaces.IMPORTANT: The outer surfaces of this product may be cleaned with mild soap and water. Use of any other chemicals may void product warranty. Do not use a pressure washer.Dip Switch Functionality...STROBE SPECIFICATIONS INPUT VOLTAGE - - - - - - 12.8 VDC ± 20% INPUT CURRENT2 STROBES- - - - - 4.5 AMPS (TYP)4 STROBES- - - - - 9 AMPS (TYP)6 STROBES- - - - - 13.5 AMPS (TYP)8 STROBES- - - - - 18 AMPS (TYP) INPUT POWER- - - - - - - - 230 WATTS (TYP) ANODE VOLTAGE - - - - - 450 VDC (MAX) TRIG. VOLTAGE- - - - - - - 150 VDC (MIN) ENERGY PER FLASH- - - 7.9 / 3.8 / 3.8 / 3.8 FLASHRATE- - - - - - - - - - 140 CFPM OUTPUT POWER- - - - - - 22.5 WATTS (TYP) (PER OUTLET)HALOGEN SPECIFICATIONS INPUT VOLTAGE- - - - - - - 12.8 VDC ± 20% INPUT CURRENT2 LAMPS - - - - - - - 4.5 AMPS (TYP)4 LAMPS - - - - - - - 9 AMPS (TYP)6 LAMPS - - - - - - - 13.5 AMPS (TYP)8 LAMPS - - - - - - - 18 AMPS (TYP) INPUT POWER - - - - - - - - 230 WATTS (TYP) OUTPUT VOLTAGE- - - - - INPUT VOLTAGE - 1V ON TIME- - - - - - - - - - - - - 125 mS (TYP)OFF TIME - - - - - - - - - - - - 125 mS (TYP) FLASHRATE - - - - - - - - - - 120 DFPM ±5% OUTPUT POWER - - - - - - 50 WATTS (MAX) (PER OUTLET)Specification Tables...Fig. 9Page 11Page 12。
最新蓝电测试仪使用手册

第一章 简介蓝电系列电池测试系统是针对锂离子、镍氢、镍镉等电池的通用性测试而研制的新一代电池测试系统。
蓝电系列电池测试系统支持电池测试领域的绝大部分应用,包括材料研究、电池化成、容量分选、组合电池测试等等。
第二章 硬件连接一、机箱前后面板示意图(图2.1)(图2.1)二、机箱上...的电池检测端口插座示意图(图2.2)①连接电压检测极的正极②连接电流输出回路的正极 ③连接电流输出回路的负极 ④连接电压检测针的负极(图2.2)三、电池夹具使用说明1、鳄鱼夹具(含大电流设备使用的夹具)每套夹具有大、小各2个鳄鱼夹,分为红、黑2种颜色(如图2.3)。
其中:大红鳄鱼夹为电流输出正极,小红鳄鱼夹为电压检测正极,使用时与电池正极相连。
大黑鳄鱼夹为电流输出负极,小黑鳄鱼夹为电压检测负极,使用时与电池负极相连。
①电源开关②电源及状态指示灯 ③通道工作指示灯 ④电池检测端口插座 ⑤单元编号标识 ⑥电源插座 ⑦通信口插座⑧通信口插座(同⑦)(图2.3)[提示]测试中使用参比电极(即三电极)时,如何连接?●由于大红鳄鱼夹和大黑鳄鱼夹组成电流回路,因而,大红夹接正极,大黑夹接负极。
●小红鳄鱼夹和小黑鳄鱼夹组成电压检测回路,因而,应连接工作电极和参比电极。
对于正极材料:小红夹接工作电极(正极),小黑夹接参比电极。
此时,电压检测值正常。
对于负极材料:小红夹接参比电极,小黑夹接工作电极(负极)。
此时,电压检测值反相。
2、通用电池夹具可以适用于各类圆柱及方形电池的夹持。
3、聚合物电池夹具可以适用于聚合物电池的夹持。
4、扣式电池夹具可以适用于扣式电池的夹持。
第三章 LANDct(控制软件)使用说明一、软件启动用鼠标双击“LAND电池测试”快捷图标(或者用鼠标点击WINDOWS“开始”按钮,从弹出的开始菜单中选取“LAND电池测试”项)运行控制软件.LANDct启动后主界面如图3.1.1。
(图3.1.1)[提示1]软件启动前,应先打开电池测试系统电源,并保证测试系统的通信口与计算机串口连接可靠。