4、BOSCH_ErgoSpin 使用手册
BOGEER博格尔码表使用说明书

BOGEER博格尔YT-***码表使用说明书一、参数设置首先要测量出车轮的周长,测出车轮周长后按住码表●键2秒即可进入参数设置模式,在设置模式中,●键为确定键,▲键为选择或调整键,MODE键为退出键。
按●键2秒进入设置模式后,首先要设置时间:按▲键选择12/24小时制,确定后按●键,然后进入时钟依次按小时、分钟、秒的顺序进行调整,确定后进入(DA)日期设置,按年、月、日进行调整确认,随后进入(TH)摄氏温度/华氏温度的选择,确定后再选择公制(Km)/英制(Mile)单位,然后输入车轮周长(预设为2080MM),确认后进入骑行总里程(ODO)设置,按照个、十、百、千…位输入预设为00000公里/英里,再进入骑车总时间(RAT)设置,以小时为单位输入预设为0000小时,确定后即完成设置并进入自动模式(AUTO)状态。
在设置时如果15秒没有输入或按MODE键将会进入自动模式(AUTO)状态。
二、功能查询1、模式切换码表默认状态为AUTO模式,按DST数据栏和CAL数据栏迴圈切换显示,并附有Auto字样闪烁,连续按MODE键,就会在DST数据栏,ODO数据栏,CAL数据栏,RPM数据栏,AUTO模式数据栏之间进行迴圈显示。
2、数据的查询*当显示DST数据栏时可查询DST(骑车距离),RT(骑车时间),当前时间、SPD(即时速度)。
*当显示ODO数据栏时可查询ODO(累计骑车总距离),RAT(累计骑车总时间),Th(当前温度)、SPD MXS(最高速度)。
*当显示CAL数据栏时可查询CAL(卡路里),TT(行程时间)、DA(当前日期),AVS SPD(平均速度)。
*当显示RPM数据栏时可查询RPM(车轮即时速度),RT(骑车时间)、当前时间,SPD(当前速度)。
三、秒表使用在非设置状态下按●键即可启动秒表(SW),按▲键开始和停止秒表,停止时按●键清零。
在秒表启动时按MODE键可查询各数据栏的即时数据。
注意:在秒表状态下不能进入设置模式。
仕博达户外精英产品详细操作指导

新表处于关机状态,按任意键启动(除了背光灯键)1.0 介绍● 感谢购买本手表。
手表具有能测量和显示户外状况的电子传感器:天气预报、温度、气压、高度和罗盘方向。
● 为你的徒步旅行、野营或其它户外活动(特别是长时间的)提供必要信息。
● 同时手表也包括时间、闹钟、秒表、倒计时、测步计和双时区功能。
● 手表经过精心的设计和生产适合于户外活动。
为了充分利用这些功能,使用前建议遵循以下事项:● 使用手表前请仔细阅读说明书。
● 避免手表暴露在极端条件下。
● 避免用力使用或重压手表。
● 请不要自行打开手表的后盖,因为设备包含精密的电子传感器和元件。
● 经常用软布清洁设备以达到更长的寿命。
● 手表请远离含有磁性元件的磁铁或设备,如手机、扬声器或马达。
● 手表不使用时,请放置在干燥的地方。
2.0 按键介绍3.0 主要功能模式手表共有9大模式:时间模式、闹钟模式、秒表模式、倒计时模式、测步计模式、双时区模式、高度计模式、气压计模式、数字罗盘。
按模式键切换时间菜单,按传感器键切换传感器菜单,长按传感器键从传感器菜单切换到时间菜单。
如下图所示: 4.0 时间模式-功能显示 功能显示● 时间模式包括4种功能显示:星期、温度、高度变化趋势图、海平面气压变化趋势图。
● 首行:按键切换显示星期、温度、高度变化趋势图和海平面气压变化趋势图● 中间:时间● 底行:日期自动切换● 长按键激活自动切换功能,当长按住键,4种功能会逐个显示。
4.1时间模式-天气预报 天气预报● 预测未来天气是手表的一个特殊功能。
通过分析过去大气压变化来预测。
如何预测未来天气● 手表提供4种符号代表不同天气模式键(Mode )切换时间、闹钟、秒表、倒计时、测步计和双时区模式在设定模式下选择设定项目传感键(Sensor ) 切换显示高度计、气压计和罗盘模式 开始/暂停键(Start/Stop) 在同一模式下,切换显示功能在秒表、倒计时和测步计模式下,按此键开始/暂停计时/测步 设置数字时的数值增加键; 切换Yes/No圈数/重置键(Lap/Reset )在秒表模式下,按此键记录圈数或重置计时的功能; 将光标向左移动显示历史数据; 设置数字时的数值减少键;切换Yes/No 背光灯键(Light )启动背光灯约3秒·晴天(Sunny )·晴间多云(Cloudy with Sun ) ·多云(Cloudy ) ·下雨(Raining )注意:由于手表通过大气压变化来预测未来天气,当使用者在同一个地方至少24小时所得的结果会更加准确。
博世go2代说明书

博世go2代说明书
一、各部件名称
1、刀头;
2、连接轴套环;
3、连接调整螺母;
4、扭矩调整螺扣;
5、开关拉杆;
6、正反开转开关;
7、5极插头;
8、连接环;
9、连接器;
10、挂架。
二、使用说明
1、将变压器五极插头插入螺丝刀的指定插孔。
2、选择合适的刀头,推上螺丝刀前端的连接轴套环插入刀头。
3、使用前将正/反转开关设到FOR(正转)、REV(反转)的任何一方,按下开关拉杆确认其旋转情况。
4、在需要扭矩值预先定好的情况下,将扭矩调整螺母套环往上顶后转动,调整设定扭矩。
固定扭矩调整螺母时要对准螺母的红色标志与凹部位置。
5、起动螺丝刀,拧紧螺丝并自动停止后确认螺丝的拧紧情况,
螺丝紧固不足时就将扭矩调整螺母向上方调整,若过紧就稍松开一些螺母,如此一边反复调整一边找到最佳位置。
ErgoPulse PTI产品说明书

Pulse Tool InnovationThe new generation of pulse tools1Up to 5 times longer tool uptime, depending on application.Tired of servicing your tool too often? Interested in having a faster production line? Do you want to have high operator comfort? Don’t look further… We have designed the new PTI Pulse Tool with your needs in mind! The PTI will reduce your total cost of ownership and give you increased value.H ere’s how:• It reduces the need of maintenance • I t improves the production quality throughout • It is designed with superior ergonomicsExcellent ergonomics for the operator… to reduce work related costs due to operator fatigue and injuriesFaster production… with our TorqueBoost ®. The torque built-up is even faster, giving you reduced hours per production unitLonger time between service… with our DuraPulse ® technology. The PTI will be your new work horse that reduces the need of maintenance 1Optimal performance… throughout the lifetime of the tool with the right startup and maintenanceImproved quality... with a more robust and stable shut-off mechanismGood for you, your operators, and for your company’s business9833271219:1–EN©AtlasCopcoAB,Stockholm,Sweden.Production:AtlasCopcoBrandStudio.Print:BrandFactory,Nov.219.AtlasCopcoTools | Industrial tools and solutions I AtlasCopcoToolsModelBoltsizemmSquaredriveinTorque range a Freespeed br/minWeightLengthmmCSdistancemmAir consum-tion underload Rec.hose sizemmAir inletthreadin Ordering No.Nm ft lb kg lb l/s cfmHigh pressure cEP5PTI19 HR10-MT M63/88-196-1473000.9216823 6.51481/48431 0381 30EP5PTI17 HR42-MT M61/4e7-175-1373000.9216823 6.51481/48431 0381 32EP6PTI32 HR10-MT M6-M83/816-3212-2390000.921682361381/48431 0381 40EP6PTI28 HR42-MT M6-M81/4e15-2811-2195000.921682361381/48431 0381 42EP7PTI55 HR10-MT M8-M103/830-5522-407000 1.2 2.517927919101/48431 0381 50EP8PTI70 HR10-MT M103/840-7029-517100 1.3 2.8179271021101/48431 0381 55EP9PTI80 HR13-MT M101/250-8037-595200 1.5 3.3191311328101/48431 0381 60EP11PTI100 HR13-MT M121/270-10052-744200 1.7 3.7201311430101/48431 0381 65EP13PTI150 HR13-MT M12-M141/285-15063-1105300 2.35201361532133/88431 0381 70Low pressure dEP5PTI15 HR10-MT-L M53/87-155-1169000.9216823 6.31381/48431 0382 30EP5PTI13 HR42-MT-L M4-M51/4e6-134-1069000.9216823 6.31381/48431 0382 32EP6PTI25 HR10-MT-L M63/813-259-1882000.921682361381/48431 0382 40EP6PTI25 HR42-MT-L M51/4e11-228-1682000.921682361381/48431 0382 42EP7PTI35 HR10-MT-L M63/823-3517-266200 1.2 2.517927615101/48431 0382 50EP8PTI45 HR10-MT-L M6-M83/833-4524-336300 1.3 2.817927817101/48431 0382 55EP9PTI65 HR13-MT-L M101/243-6532-484500 1.5 3.3191319.520101/48431 0382 60EP11PTI80 HR13-MT-L M10-M121/250-8037-593600 1.7 3.7201311328101/48431 0382 65EP13PTI110 HR13-MT-L M12-M141/263-11046-814000 2.35201361634133/88431 0382 70Accessory Ordering No.Oil filling kit 4250 3220 90Protective cover EP5/6PTI 4250 3209 00Protective cover EP7/8PTI 4250 3206 00Protective cover EP9PTI 4250 3216 00Protective cover EP11PTI 4250 3218 00Protective cover EP13PTI 4250 3214 00Quick Change Chuck4250 3218 00See more of our accessories and spare parts on/en-uk/itba/products/air-line-infrastructurehttps://Protective cover is included for every toola To be used as a guide only, final torque depends on type of joint, accessories used and air pressure.b In full speed modec Air pressure 6.3 bar / 91 psid Air pressure 4 bar / 58 psie Female Hexagon drive, Quick Change Chuck ErgoPulse PTI。
全自动勃式比表面积测定仪操作规程

自动机器人区域检查程序的操作程序
1、将仪器放平,注入水到比例线以下。
,然后将定位球放入U形
压计右端,浮在水面上进行较低的操作。
2、按复位键K2,“H20—”闪动,它表明水位低,从左端缓慢增加。
,只显示“good”停止加水。
3、将制好的标准样品制成试料层,按复位键K2检查U水柱高度
在压力表中是否正常,物料筒是否连接到物料层。
U形压力计上。
4、改变仪器的工作状态K1置于标定状态。
5、将拨码盘B1% 1% 1% 2% 2% 2% 2% 2% 2% 2% 2% 2% 2% 2% 2% 2% 2% 2% 2% 2% 2% 2% 2% 2% 2% 2% 2% 2% 2% 2% 2% 2% 2% 2% 2% 2% 2% 2% 2% 2% 2% 2% 2% 2% 2% 2% 2% 2% 2% 2% 2% 2% 2% 2% 2% 2% 2% 2% 2% 2% 2% 2% 2% 2% 2% 2% 2% 2% 2% 2% 2% 2% 2% 2% 2% 2% 2% 2% 2% 2% 2% 2% 2% 2% 2% 2% 2% 2% 2% 2% 2% 2% 2% 2% 2% 2% 2% 2% 2% 2% 2% 2% 2% 2% 2% 2 2% 2 2,将拨码盘B2的值设置为标准样品的密度。
6、按下测量键K3,测量开始,测量后,仪器显示仪器常数。
K及
测量时间。
7、将仪器显示出的仪器常数K置于拨码盘B1,将样品的密度放在刻度盘上。
B2,然后改变仪器的工作状态K1置于测量状态,开始测量,记录数据。
8、试验完后,关闭电源开关,清洁仪器。
Bosch 辅助设备说明书
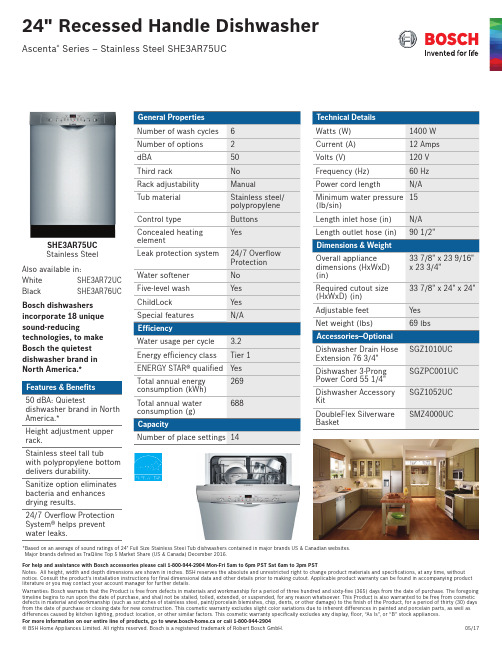
For help and assistance with Bosch accessories please call 1-800-944-2904 Mon-Fri 5am to 6pm PST Sat 6am to 3pm PSTNotes: All height, width and depth dimensions are shown in inches. BSH reserves the absolute and unrestricted right to change product materials and specifications, at any time, without notice. Consult the product’s installation instructions for final dimensional data and other details prior to making cutout. Applicable product warranty can be found in accompanying product literature or you may contact your account manager for further details.SHE3AR75UCStainless SteelBosch dishwashers incorporate 18 unique sound-reducingtechnologies, to make Bosch the quietest dishwasher brand in North America.*50 dBA: Quietestdishwasher brand in North America.*Height adjustment upper rack.Stainless steel tall tubwith polypropylene bottom delivers durability.Sanitize option eliminates bacteria and enhances drying results.24/7 Overflow Protection System® helps prevent water leaks.Also available in:White SHE3AR72UC BlackSHE3AR76UC * B ased on an average of sound ratings of 24" Full Size Stainless Steel Tub dishwashers contained in major brands US & Canadian websites. Major brands defined as TraQline Top 5 Market Share (US & Canada) December 2016.For help and assistance with Bosch accessories please call 1-800-944-2904 Mon-Fri 5am to 6pm PST Sat 6am to 3pm PSTNotes: All height, width and depth dimensions are shown in inches. BSH reserves the absolute and unrestricted right to change product materials and specifications, at any time, without notice. Consult the product’s installation instructions for final dimensional data and other details prior to making cutout. Applicable product warranty can be found in accompanying product literature or you may contact your account manager for further details.Installation DetailsAccessory power cord for receptacleconnectionFor help and assistance with Bosch accessories please call 1-800-944-2904 Mon-Fri 5am to 6pm PST Sat 6am to 3pm PSTNotes: All height, width and depth dimensions are shown in inches. BSH reserves the absolute and unrestricted right to change product materials and specifications, at any time, without notice. Consult the product’s installation instructions for final dimensional data and other details prior to making cutout. Applicable product warranty can be found in accompanying product literature or you may contact your account manager for further details.Installation Details。
博世欧洲精英使用手册
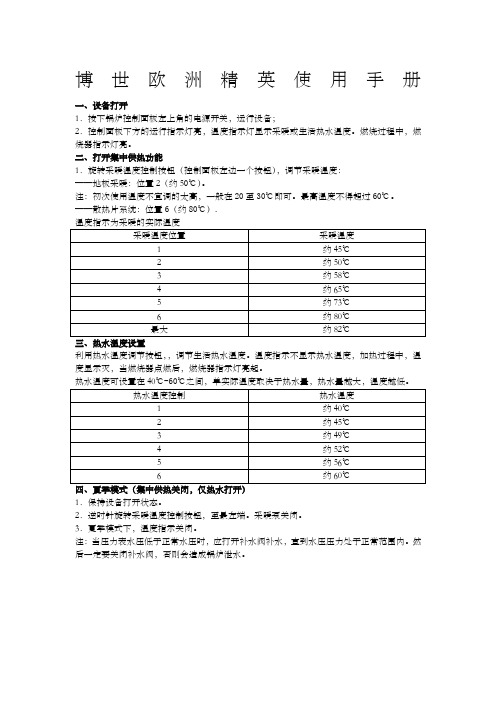
博世欧洲精英使用手册一、设备打开1.按下锅炉控制面板左上角的电源开关,运行设备;2.控制面板下方的运行指示灯亮,温度指示灯显示采暖或生活热水温度。
燃烧过程中,燃烧器指示灯亮。
二、打开集中供热功能1.旋转采暖温度控制按钮(控制面板左边一个按钮),调节采暖温度:——地板采暖:位置2(约50℃)。
注:初次使用温度不宜调的太高,一般在20至30℃即可。
最高温度不得超过60℃。
——散热片系统:位置6(约80℃).利用热水温度调节按钮,,调节生活热水温度。
温度指示不显示热水温度,加热过程中,温度显示灭,当燃烧器点燃后,燃烧器指示灯亮起。
热水温度可设置在40℃-60℃之间,单实际温度取决于热水量,热水量越大,温度越低。
1.保持设备打开状态。
2.逆时针旋转采暖温度控制按钮,至最左端。
采暖泵关闭。
3.夏季模式下,温度指示关闭。
注:当压力表水压低于正常水压时,应打开补水阀补水,直到水压压力处于正常范围内。
然后一定要关闭补水阀,否则会造成锅炉泄水。
五、故障代码博世欧洲之星操作手册一、设备打开1.首先确认燃气阀门已经打开,锅炉电源插头已插上;2.按下锅炉控制面板左上角的电源开关,运行设备;3.显示屏上显示采暖的出水温度二、试运行:1.打开系统散热片的所有阀门;2.打开补水阀,生活冷水阀,注水至1到2巴的压力,然后关闭冷水阀3.散热片排气;4.打开冷水阀,将系统压力重新充注到1-2巴5.打开燃气阀三、打开集中供热功能1.热水温度可设置在45℃至82℃之间;2.若为地板采暖系统,采暖温度不得高于60℃;3.旋转控制面板左下角的采暖控制旋钮,调节采暖温度;(初次使用时不宜调太高)4.采暖类型不同,最大采暖出水温度设置不同:——地板采暖系统:2档(约50℃)1.调节锅炉控制面板右下角的生活热水温度调节旋钮来设置生活热水温度;2.显示屏上显示的仍是采暖出水温度3.生活热水温度可在40℃和60℃之间设置。
但水龙头的世界出水温度取决于进水量的大小,进水量越大,温度越低。
Bosch ErgoMixx和MaxoMixx手提攪拌棒的使用说明书

R e g i s t e r y ou rn e w d e v i c eo nM y B o s c h no w a n dg e t f r e e b e ne fi t s:b o sc h-h o m e.c o m/w e l c o m eErgo Mixx and Maxo Mixx Fresh Vacuum System[en]Instruction manual [ms]Arahan pengendalian [zf]使用說明書[zh]使用说明书[ar]مادختسلاا تاداشرإAccessories (Hand blender) 5 Aksesori (Pengadun tangan) 11配件 (手提攪拌捧) 17附件 (手持式搅拌棒) 22 )اصعلا برضملا( تايلامكلا 32MS6.. MSM6.. MSZV6FS1 MSZV6FSG1 MSZV6FSG2 MS8.. MSM8.. MSZV8FS1ah1 2 3428 291 23 4gb acd be f da b c123AB COFFOFFON ÂmaxON Âmax5672341D5672341EG H123I123FJenIntended use Intended useThis accessory is designed for the ErgoMixx and MaxoMixx hand blenders. Follow the operating instructions for the hand blender. Never use the accessory for other appliances. Only use matching parts together. This accessory is suitable for vacuum-sealing Bosch bags and containers. The accessories are suitable only for the use described in these instructions.Safety informationW Risk of suffocation!■Keep children away from vacuum zipper bags.■Do not allow children to play with vacuum zipper bags.W Warning!■Before attaching or removing accessory, always wait until the appliance has come to a standstill and pull out the mains plug.■Do not operate at no-load.■Never immerse the vacuum pump in liquids and do not clean under running water or in the dishwasher.■All ingredients must be hygienically faultless. During handling, the rules of kitchen hygiene must be observed.■Always allow food to cool down before vacuum-sealing.■Check the quality of food after storage. Do not use food of dubious quality.W Important!■Never reach into sealing elements with sharp, pointed or metal objects.■Storage containers and zipper bags are dishwasher and freezer safe.■Make sure to remove the container lid or to open the zipper bag before microwaving.■In the microwave, food can be re-heated in plastic containers or bags for no longer than 90 seconds at a maximum of 900W.■Plastic storage containers, drip trays and zipper bags are suitable for a temperature range of -18 °C to 85 °C.■The glass storage containers are suitable for a temperature range of -18 °C to 250 °C.■Bags used to store raw meat, fish or poultry cannot be reused.■It is essential to clean the accessory thoroughly after each use or after it has not been used for an extended period. X “Cleaning and maintenance” see page 85en OverviewOverviewX Fig.A1 Vacuum pumpa Vacuum valveb Connection for base unit2 Storage container *a Container made of:– Tritan-plastic *– Glass *b Drip tray *c Lidd Sealing clipse Vacuum sealf Vacuum indicatorg Setting rings for date (day/month)h Lid gasket3 Vacuum zipper bags *a Zip lockb Marking line maxc Vacuum seal* Depending on modelBefore using for the first timeBefore the new accessory can be used,it must be fully unpacked, cleaned and checked.W Warning!Never put a damaged accessory into operation!■Check that all parts are present and examine them for obvious damage.X Fig. A■Thoroughly clean and dry all parts before using for the first time.X “Cleaning and maintenance” seepage 8Parts and controlsStorage containersUse to store food under vacuum to preserve the freshness and extend the shelf life of food contained in them, to marinate food,or to reheat it in the microwave. The glass container is also suitable for use in the oven.Before using the containers in the microwave or oven, make sure you remove the lid.Important!–Do not fill the container higher than 1 cm below the rim.–The glass container can be put in the heated oven directly from the freezer.–Never put a hot container in water. Allow the container to cool slowly.Lid with vacuum sealFor airtight sealing of the containers.The lids of the storage containers are equipped with a vacuum indicator. When the indicator visibly dimples inwards, a vacuum has been attained.To remove a lid with vacuum applied, first grip the vacuum seal at one end and pull it up. Sufficient air has to get inside for the lid to be removed.The lids of the storage containers are equipped with a date indicator. Turn the two rings to set the day and month when the food was added.Drip trayThe drip tray separates the food from liquid that is excreted during storage. Liquid collects under the drip tray.Vacuum zipper bagsUse to store food under vacuum to preserve the freshness and extend the shelf life of food contained in them, to marinate food or for sous-vide cooking.Use only original Bosch vacuum zipper bags.For storing liquids (such as soup) we recommend using containers.6en UseSous-vide cookingSous-vide cooking is a method of cooking under a vacuum at low temperatures.W Health risk!When preparing food for sous-vide cooking it is important that you always follow the application and hygiene instructions below: ■Only use high-quality, perfectly fresh food.■Wash and disinfect your hands.■Take extra care when preparing critical food, such as poultry, eggs and fish.■Always keep work surfaces andchopping boards clean.■Maintain the cold chain. Make sure that you only interrupt it briefly to preparethe food, and then return the food in its vacuum-sealed bag to the refrigeratorfor storage before you cook it.■Once the food is cooked, consume it immediately. Do not store it aftercooking – not even in the refrigerator. It is not suitable for reheating.■Where possible, position the items of food in the bag next to each other andnot on top of each other.■We recommend to keep the vacuum seal out of the water.For professional sous-vide cooking results we recommend to use Bosch vacuum drawer.UseW Warning!–Before attaching or removing vacuum pump, always wait until the drive hascome to a standstill and pull o ut themains p lug.–Do not use hand blender with vacuum pump for more than 10 minutes. Thenleave the base unit and the pump tocool down.–Storage in vacuum is not a substitute for food storage in the refrigerator orfreezer.–Always allow food to cool down before vacuum-sealing.Fitting the vacuum pumpX Fig. B■Place the vacuum pump on the base unit and lock into position. Removing the vacuum pumpX Fig. C■Hold down both release buttons and remove the vacuum pump from the base unit.Vacuum-sealing with containers X Image sequence D1. Add prepared or cooked food to theappropriate container. Do not fill abovethe max mark.2. Make sure that lid gasket is insertedcorrectly. Fit the lid and close securelywith the sealing clips. Set the date using the two rings on the lid.3. Place the base unit with the vacuumpump on the container's vacuum sealand hold securely.4. Press Turbo button Â. The applianceremains switched on as long as thebutton is pressed.5. The vacuum pump draws the air outof the container. When the vacuumindicator visibly dimples inwards, avacuum has been attained.6. Release the button.7. Remove the base unit with the vacuumpump from the container. Disconnect the mains plug.Note: Store the vacuum-sealed container with the lid facing up.Vacuum-sealing with zipper bags X Image sequence E1. Add the food to the bag.Note: Do not overfill the bag. Make sure the area of the vacuum seal is kept clean. Special care is needed when vacuuming juicy, moist or marinated food.2. Place the bag on a flat surface. Lightlypress the air out of the bag and closethe zip lock tightly along the entirelength.7en Cleaning and maintenanceNote: When vacuuming juicy, moist or marinated food, hang the vacuum zipper bag from the worktop. Make sure thatthe vacuum seal rests on the surface.X Fig. FImportant!–The contents must not exceed the max marking line.–The area beyond the max line and both sealing elements must be clean.–If zip lock is not clean and completelly closed, vacuum cannot be generated. 3. Place the base unit with the vacuumpump of the bag's vacuum seal and hold securely.4. Press Turbo button Â. The applianceremains switched on as long as thebutton is pressed.5. The vacuum pump draws the air out ofthe bag. This makes the bag contractand envelop the contents.6. When the bag is sufficiently vacuumed,release the button.Note: Pay special attention if liquid is excreting and approaching the max line. Release the button before liquid crosses the max line.7. Remove the base unit with the vacuumpump from the container. Disconnect the mains plug.Opening containers or zipper bagsX Fig. G■To open a container, grip the vacuum seal at one end and pull it up. Sufficientair has to get inside the container.■Open the sealing clips and remove the lid.X Fig. H■To open a zipper bag, pull the zip lock apart and open completely.■After use, vacuum zipper bags must be cleaned carefully and dried offcompletely.Cleaning and maintenance The appliance and the individual parts used must be thoroughly cleaned after each use. Warning!–Do not use cleaning agents containing alcohol or spirits.–Do not use sharp, pointed or m etal objects.–Do not use abrasive cloths or c leaning agents.–Never immerse the vacuum pump in liquids and do not clean under runningwater or in the dishwasher.–Clean all parts immediately after use.This will prevent residues from dryingon and possibly attacking the plastic(e.g. essential oils in herbs).–When processing food such as carrots, plastic parts may become discoloured,but this can be removed with a fewdrops of cooking oil.In Fig.J you will find a summary of how to clean the individual parts.■Clean the vacuum pump with a damp cloth and dry.■Clean the other accessory parts with a detergent solution and a soft cloth orsponge or place them in the dishwasher.■Vacuum zipper bags which will be reused, should be cleaned carefully and dried off completely. Bags used to store raw meat, fish or poultry should not bereused.■Remove lid gasket for cleaning.X Fig. JRemoving the setting ringsX Image sequence IThe setting rings in the lid of the vacuum container can be removed in order to clean them thoroughly.1. Insert a small screwdriver into one ofthe two recesses of the safety ring andcarefully lever out the ring by applyinglight pressure.8Accessoriesen2. Remove the safety ring and setting ringsas shown. Thoroughly clean and dry allparts.3. Insert the setting rings in the ordershown. Insert the safety ring by applyinglight pressure until it clicks into place.AccessoriesAccessories and spare parts can bepurchased via trade stockists or customerservice. As the product range is beingconstantly extended, it is possible thatthere are meanwhile other accessoriesthat are not listed here. In this case go to to see the latest* T his accessory has been developedfor the Vita Power vacuum mixer butis compatible with the Ergo Mixx andMaxo Mixx fresh vacuum systems.Round storage containers MMZV0S.. do nothave a vacuum indicator. The vacuum timeis 45 seconds.Subject to change.9en TroubleshootingTroubleshootingIn the following table you will find solutions for problems or faults which you can easily10Peraturan pengendalian ms Peraturan pengendalianAksesori ini direka khas untuk pengadun tangan ErgoMixx dan MaxoMixx. Sila ambil perhatian terhadap arahan pengendalian adunan tangan. Dilarang menggunakan alat ini bersama peranti lain. Gunakan bahagian yang dibekalkan sahaja. Aksesori ini sesuai untuk menghasilkan vakum bagi beg atau bekas Bosch yang berkenaan. Aksesori ini hanya sesuai untuk kegunaan seperti yang diterangkan dalam arahan ini.Arahan keselamatanW Risiko lemas!■Jauhkan beg vakum berzip dari kanak-kanak.■Jangan biarkan kanak-kanak bermain dengan beg vakum berzip. W Perhatian!■Pasang dan tanggalkan aksesori hanya apabila pemacu berhenti dan bekalan kuasa diputuskan.■Jangan kendalikan dalam keadaan tanpa beban.■Jangan sesekali merendam pam vakum ke dalam air dan jangan mencuci di bawah air yang mengalir atau di dalam mesin membasuh pinggan.■Semua bahan mesti berada dalam keadaan bersih. Silaberi perhatian terhadap peraturan kebersihan dapur ketika pemprosesan.■Sila biarkan makanan menyejuk dahulu sebelum di vakum.■Periksa kualiti makanan walaupun selepas penyimpanan. Gunakan hanya makanan segar daripada kualiti yang terbaik.W Penting!■Jangan sesekali menyentuh bahan terkedap dengan objek tajam, runcing atau logam.■Bekas simpanan dan beg vakum berzip sesuai untuk mesin membasuh pinggan dan peti sejuk beku.■T anggalkan penutup bekas atau buka paket sebelum menggunakan bekas atau paket itu di dalam ketuhar gelombang mikro.■Makanan di dalam bekas plastik atau paket boleh dipanaskandi dalam ketuhar gelombang mikro selama maksimum 90 saat dengan kuasa maksimum 900 watt.■Bekas simpanan Tritan, gril pengering dan beg vakum berzip sesuai untuk suhu dari -18 °C hingga 85 °C.■Wadah penyimpanan kaca cocok di gunakan untuk kisaran suhu dari -18 °C sampai 250 °C.■Beg yang telah digunakan untuk menyimpan daging, ikan atau ayam mentah tidak boleh digunakan semula.11Arahan keselamatan msSepintas laluX Rajah A1 Pam vakuma Injap vakumb Penyambungan ke unit asas2 Bekas simpanan *a Bekas daripada:– plastik Tritan *– kaca *b Jaringan tos *c Penutup bekasd Klip penutupe Penutup vakumf Paparan vakumg Butang penetapan tarikh (hari / bulan)h Pengedap vakum3 Beg vakum berzip *a Penutup berzipb Garisan penanda maxc Penutup vakum* Bergantung kepada model Sebelum penggunaan pertamaSebelum aksesori baru boleh digunakan,ia mestilah dikeluarkan sepenuhnya, dibersihkan dan diperiksa keadaannya.W Perhatian!Jangan menggunakan aksesori yang rosak!■Periksa keadaan setiap bahagian untuk memastikan tiada kerosakan.X Rajah A■Sebelum penggunaan yang pertama, sila basuh semua bahagian dengan teliti dan keringkan. X “Pembersihan danpenjagaan” lihat halaman 14Bahagian dan elemen kawalanBekas simpananUntuk penyimpanan makanan di bawah vakum dengan tujuan memanjangkan tempoh kesegaran dan jangka hayat makanan, memerap atau memanaskan semula di dalam ketuhar gelombang mikro. Bekas kaca tersebut juga sesuai digunakan di dalam ketuhar.T anggalkan penutup bekas sebelum menggunakannya di dalam ketuhar gelombang mikro atau ketuhar.Penting!–Jangan isi bekas melebihi 1 cm di bawah aras penuh.–Bekas kaca daripada penyejuk beku boleh diletakkan terus ke dalam ketuharyang telah dipanaskan.–Jangan letakkan bekas yang panas ke dalam air. Biarkan bekas sejuk denganperlahan.Penutup bekas dengan vakum Untuk penyimpanan kedap udara. Penutup bekas simpanan dilengkapi dengan penunjuk vakum. Apabila penunjuk melonjak ke dalam, keadaan vakum telah tercapai.Untuk membuka penutup ketika dalam keadaan vakum, pegang penutup vakum pada satu hujungnya terlebih dahulu dan tarik ke atas. Penutup hanya akan terbuka apabila udara telah memenuhi dalaman bekas dengan mencukupi.Penutup bekas simpanan dilengkapi dengan paparan tarikh. Dengan memutar kedua cincin penunjuk, tarikh ketika makanan disimpan dapat dicatatkan.■Bersihkan aksesori secara menyeluruh selepas setiap penggunaan atau selepas lama tidak menggunakannya. X “Pembersihan dan penjagaan” lihat halaman 1412Penggunaan msJaringan tosJaringan tos digunakan untuk memisahkan cecair yang keluar dari makanan ketika penyimpanan. Cecair akan terkumpul di bawah jaringan tos.Beg vakum berzipUntuk penyimpanan makanan di bawah vakum dengan tujuan memanjangkan tempoh kesegaran dan jangka hayat makanan, memerap atau memanaskan semula di dalam ketuhar gelombang mikro. Hanya gunakan beg vakum berzip yang asli dari Bosch.Memasak dengan teknikSous-videT eknik masakan Sous-vide bermaksud makanan …dimasak dalam vakum“ pada suhu rendah.W Risiko kesihatan!Dalam penyediaan makanan secara teknik sous-vide, arahan penggunaan dan kebersihan berikut mesti diikuti:■Gunakan hanya bahan segar daripada kualiti yang terbaik.■Basuh dan disinfeksi tangan.■Bahan makanan segar kritikal seperti Ayam, telur dan ikan perlu diberiperhatian khusus.■Sentiasa menjaga kebersihanpermukaan kerja dan papan memotong.■Patuhi rantaian penyejukan. Rantaian ini hanya boleh diberhentikan untukseketika dalam penyediaan makanandan simpan semula makanan yang divakum di dalam peti sejuk sebelummemulakan proses masakan.■Selepas selesainya proses masakan, terus makan makanan tersebut danjangan disimpan terlalu lama walaupundi dalam peti sejuk. Makanan ini tidaksesuai untuk dipanaskan semula.■Sebaiknya, letakkan makanan di dalam beg secara bersebelahan dan bukansecara bertindih.■Kami mencadangkan agar injap tidak direndam di dalam air.Untuk penghasilan secara profesional dalam memasak dengan teknik sous-vide, kami mengesyorkan laci vakum Bosch.PenggunaanW Perhatian!–Pasang dan tanggalkan aksesori hanya apabila pemacu berhenti dan bekalankuasa diputuskan.–Jangan guna pengadun tangan lebih dari 10 minit dengan pam vakum. Akhirsekali, matikan unit asas bersertadengan pam vakum dan biarkan iamenyejuk.–Penyimpanan dalam vakum bukanlah pengganti untuk menyimpan makanan di dalam peti sejuk atau peti sejuk beku.–Sila biarkan makanan menyejuk dahulu sebelum di vakum.Pemasangan pam vakumX Rajah B■Letakkan tapak pengadun pada unit asas dan kunci kedudukannya. Pembukaan pam vakumX Rajah C■T ekan kedua-dua butang pelepas pada pam vakum dan tanggalkan unit asas. Memvakum bekas simpananX Susunan rajah D1. Isikan bahan makanan yang telahdisediakan ke dalam bekas yangbersesuaian. Beri perhatian pada tandamax.2. Pastikan pengedap penutup diletakkandengan betul. Letakkan penutup dantutup ketatkan dengan klip penutup.T etapkan tarikh dengan dua cincinpenanda tarikh di penutup.3. T ekan unit asas dengan pam vakumke penutup bekas vakum dan ketatkankedudukannya.4. T ekan butang turbo Â. Perkakas akanhidup selagi butang ditekan.13Pembersihan dan penjagaan ms5. Pam vakum akan menyedut udara keluardari bekas tersebut. Apabila penunjukmelonjak ke dalam, keadaan vakumtelah tercapai.6. Lepaskan butang.7. Alihkan unit asas daripada bekastersebut. Cabut palam kuasa. Catatan: Simpan bekas yang di vakum dengan penutupnya menghadap ke atas. Memvakum beg berzipX Susunan rajah E1. Masukkan bahan makanan ke dalambeg.Catatan: Jangan mengisi beg secara berlebihan. Kawasan penutup vakum mesti sentiasa bersih. Perhatian khas diperlukan semasa memvakum makanan berair, lembap atau yang diperap.2. Letakkan beg di atas permukaanyang rata. Udara keluarkan secaraperlahan-lahan dari beg dan tutup rapatkeseluruhan penutup zip.Catatan: Semasa menyedut makanan berair, lembap atau yang diperap,biarkan beg vakum berzip tergantungdari atas meja kerja. Penutup vakummesti berada di bahagian atas meja kerja.X Susunan rajah FPenting!–Kandungan beg tidak boleh melebihi garis penanda max.–Kedua-dua elemen pengedap dan di sekitar garis penanda max mestilahbersih.–Sekiranya penutup zip tidak bersih dan ditutup sepenuhnya, keadaan vakumtidak akan dapat dibuat.3. T ekan unit asas dengan pam vakumke penutup bekas vakum dan tetapkankedudukannya.4. T ekan butang turbo Â. Perkakas akanhidup selagi butang ditekan.5. Pam vakum akan menyedut udara keluardari bekas tersebut. Ini menyebabkanbeg menguncup dan meliputikandungannya.6. Setelah beg mencapai vakumsecukupnya, lepaskan suis.Catatan: Perhatikan sama ada cecair keluar dan ketika menghampiri garis tanda max. Lepaskan suis sebelum cecair melepasi garis penanda max.7. Alihkan unit asas daripada bekastersebut. Cabut palam kuasa. Membuka bekas simpanan atau beg berzipX Rajah G■Untuk membuka bekas simpanan, pegang penutup vakum pada salahsatu hujung dan tarik ke atas. Penutuphanya akan terbuka apabila udara telahmemenuhi dalaman bekas denganmencukupi.■Buka klip penutup dan alihkan penutup bekas.X Rajah H■Untuk membuka beg, tarik zip untuk membuka beg tersebut sepenuhnya.■Selepas digunakan, beg vakum berzip mesti dibersihkan dengan teliti dandikeringkan sepenuhnya. Pembersihan dan penjagaanAlatan perkakas dan segala bahagian yang telah digunakan mesti dibasuh dengan teliti selepas setiap penggunaan.Perhatian!–Jangan gunakan agen pembersih yang mengandungi alkohol.–Jangan menggunakan objek tajam, berbucu atau logam.–Jangan gunakan kain atau agenpembersih yang kasar.14Aksesori ms–Jangan sesekali merendam pam vakum ke dalam air dan jangan mencuci dibawah air yang mengalir atau di dalammesin mencuci pinggan.–Bersihkan setiap bahagian dengan segera selepas digunakan. Dengan itusisa makanan yang kering tidak akanmemberi kesan pada bahan sintetik(contohnya melalui bahan berminyak didalam rempah).–Semasa memproses sebagai contoh lobak merah, ia boleh menyebabkanperubahan warna pada bahagian plastik, yang boleh dihilangkan dengan beberapa titis minyak masak.Rajah J adalah gambaran bagaimana bahagian alatan dicuci.■Bersihkan pam vakum dengan kain yang lembab dan keringkan.■Bersihkan bahagian aksesori lain dengan air sabun dan kain lembut atau spanatau masukkan ke dalam mesin pencucipinggan.■Beg vakum berzip mesti dibersihkan dengan teliti dan dikeringkansepenuhnya. Beg yang telah digunakanuntuk menyimpan daging, ikan atauayam mentah tidak boleh digunakansemula.■T anggalkan penutup pengedap untuk dibersihkan. X Rajah J Tanggalkan cincin pelarasX Susunan rajah ICincin pelaras di penutup bekas vakum dapat dibuka untuk pembersihan secara menyeluruh.1. Masukkan pemutar skru kecil ke salahsatu daripada dua potongan di gelangpengunci dan lepaskan cincin denganberhati-hati dengan tekanan ringan.2. T anggalkan gelang pengunci dan cincinpelaras, seperti yang digambarkan.Bersihkan dan keringkan semuabahagian dengan teliti.3. Pasang semula cincin pelaras mengikuturutan yang ditunjukkan. Masukkangelang pengunci dan tekanan sehinggaia masuk pada tempatnya. AksesoriAksesori dan bahagian gantian bolehdibeli di kedai jualan dan daripada khidmat pelanggan. Oleh kerana rangkaian produk terus berkembang, berkemungkinan terdapat aksesori lain yang tidak disenaraikan di sini. Layari kami di , untuk melihat, aksesori semasa yangditawarkan.* Aksesori ini telah direka untuk pengadun vakum Vita Power, tetapi serasi dengansistem vakum Ergo Mixx dan Maxo Mixx Fresh.Bekas simpanan bulat MMZV0S.. tidak mempunyai penanda vakum. T empoh masa untuk vakum adalah selama 45 saat.Kemungkinan terdapat perubahan.15msPenyelesaian masalahPenyelesaian masalahPenyelesaian untuk masalah atau gangguan boleh didapati di jadual berikut, yang dengan mudah dapat diselesaikan sendiri.Jika masalah atau gangguan tersebut berterusan, silahubungi khidmat pelanggan.16使用須知zf 使用須知本配件需與調理棒 ErgoMixx 和 MaxoMixx 搭配使用。