VCE安装步骤-文档资料
Procast_2014_安装教程.以及VE9.6安装教程
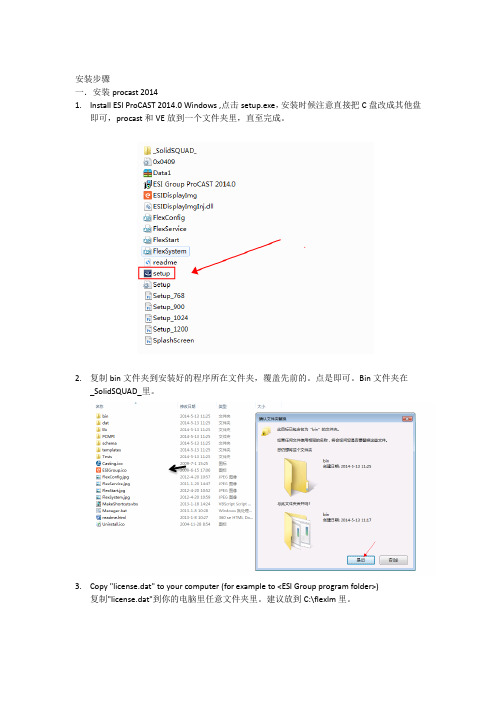
安装步骤一.安装procast 20141.Install ESI ProCAST 2014.0 Windows,点击setup.exe,安装时候注意直接把C盘改成其他盘即可,procast和VE放到一个文件夹里,直至完成。
2.复制bin文件夹到安装好的程序所在文件夹,覆盖先前的。
点是即可。
Bin文件夹在_SolidSQUAD_里。
3.Copy "license.dat" to your computer (for example to <ESI Group program folder>)复制"license.dat"到你的电脑里任意文件夹里。
建议放到C:\flexlm里。
4.Create environment variable PAM_LMD_LICENSE_FILE=<path to the license.dat>创建环境变量PAM_LMD_LICENSE_FILE=<path to the license.dat>,右击计算机——属性——高级系统设置——环境变量——新建系统变量<path to the license.dat>就是你刚刚license.dat 所放的文件夹,如下图所示5.Enjoy二. 安装visual environment9.61. Install ESI VisualEnvironment9.6 Windows,安装之前可以把_SolidSQUAD_文件夹复制到桌面,双击setup.exe,直至安装完成。
2. 安装完成之后,复制文件夹_SolidSQUAD_里的"Windows-x86" and "Windows-x64"文件到安装好的文件里,覆盖原先的。
3. enjoy,选择casting,点击OK。
Polycom VE安装手册
在文件夹根目录home 文件夹下,右键,新建 文件夹,重命名为nfs
输入vi /etc/exports,弹出新的命令行窗口,按i,窗口左下角出现“INSERT”字,输 入/home/nfs *(rw,async,no_root_squash,no_subtree_check) ,按esc,“INSERT” 字消失,输入 :wq,窗口自动退出,回到输入了“vi /etc/expห้องสมุดไป่ตู้rts”的窗口
选择Desktops及Server菜单下的多个选项
Desktops菜单
Servers菜单
最后NEXT就将进入正式安装,无法返回修改
进入安装进程,安装完成, 虚机会自动重启
选择other,输入账号 / 密码(root / terminal),log in进入桌面
点击Application菜单下 打开terminal命令行选 项,弹出命令行窗口。
输入“service nfs restart”,回车,重启nfs 如有“FAILED”反馈,再输入“service nfs restart”,回车,再重启一遍
至此,NFS搭建完毕
安装Media Suite 点击文件 - OVF模板部署,浏览Media Suite OVA文件
OVA导入完成后,启动虚拟机,进入控制台。 按ALT+F2进入LINUX登录界面,账号/密码: polycom / polycom。 选择set IP configuration(菜单第二项),选 择Static IP,输入IP地址、SM、GW
选择Linux,下拉菜单选择Cent 4/5/6 64位, 选择下一步
Agile e6.0.4 安装手册说明书

Agile e6.0.4Installation Manual for Agile e6.0.4 Windows Client Part Number: INSWINCLIENT-604BCopyrights and TrademarksCopyright © 1992, 2007 Oracle and/or its affiliates. All rights reserved.The Programs (which include both the software and documentation) contain proprietary information; they are provided under a license agreement containing restrictions on use and disclosure and are also protected by copyright, patent, and other intellectual and industrial property laws. Reverse engineering, disassembly, or decompilation of the Programs, except to the extent required to obtain interoperability with other independently created software or as specified by law, is prohibited.The information contained in this document is subject to change without notice. If you find any problems in the documentation, please report them to us in writing. This document is not warranted to be error-free. Except as may be expressly permitted in your license agreement for these Programs, no part of these Programs may be reproduced or transmitted in any form or by any means, electronic or mechanical, for any purpose.If the Programs are delivered to the United States Government or anyone licensing or using the Programs on behalf of the United States Government, the following notice is applicable:U.S. GOVERNMENT RIGHTSPrograms, software, databases, and related documentation and technical data delivered to U.S. Government customers are "commercial computer software" or "commercial technical data" pursuant to the applicable Federal Acquisition Regulation and agency-specific supplemental regulations. As such, use, duplication, disclosure, modification, and adaptation of the Programs, including documentation and technical data, shall be subject to the licensing restrictions set forth in the applicable Oracle license agreement, and, to the extent applicable, the additional rights set forth in FAR 52.227-19, Commercial Computer Software--Restricted Rights (June 1987). Oracle USA, Inc., 500 Oracle Parkway, Redwood City, CA 94065.The Programs are not intended for use in any nuclear, aviation, mass transit, medical, or other inherently dangerous applications. It shall be the licensee's responsibility to take all appropriate fail-safe, backup, redundancy and other measures to ensure the safe use of such applications if the Programs are used for such purposes, and we disclaim liability for any damages caused by such use of the Programs.The Programs may provide links to Web sites and access to content, products, and services from third parties. Oracle is not responsible for the availability of, or any content provided on, third-party Web sites. You bear all risks associated with the use of such content. If you choose to purchase any products or services from a third party, the relationship is directly between you and the third party. Oracle is not responsible for: (a) the quality of third-party products or services; or (b) fulfilling any of the terms of the agreement with the third party, including delivery of products or services and warranty obligations related to purchased products or services. Oracle is not responsible for any loss or damage of any sort that you may incur from dealing with any third party.Oracle is a registered trademark of Oracle Corporation. Other names may be trademarks of their respective owners.NOTICE OF RESTRICTED RIGHTS:The Software is a “commercial item,” as that term is defined at 48 C.F.R. 2.101 (OCT 1995), consisting of “commercial computer software” and “commercial computer software documentation” as such terms are used in 48 C.F.R. 12.212 (SEPT 1995) and when provided to the U. S. Government, is provided (a) for acquisition by or on behalf of civilian agencies, consistent with the policy set forth in 48 C.F.R. 12.212; or (b) for acquisition by or on behalf of units of the Department of Defense, consistent with the policies set forth in 48 C.F.R. 227.7202-1 (JUN 1995) and 227.7202-4 (JUN 1995).August 10, 2007iiR EVISIONSdocumentI nitialAllA 31/01/2007B 26/07/2007 All Updated to e6.0.4iiiC ONTENTSChapter 1Introduction 1 Where to Go for More Information 1Chapter 2Preparing the Installation 2 Requirements 2 Setting the Prerequisites 2 Parallel Installation of Agile e5.1 and Agile e6 clients 3 Split Server and Client Installation 3Chapter 3Installing the Windows Client 4 Upgrading from an older Agile e6 Installation 4 Starting the Installation 4 Modify, Repair and Remove Options 10 Repairing the Installation 10Chapter 4Uninstalling the Windows Client 11 Uninstalling the Office Suite component 11 Uninstalling the Client 11Chapter 5OfficeSuite 12 .NET Framework 12 Known problem with the Install Selector 12 Manual OfficeSuite Installation 13 Install Files 13 Installation 13Chapter 6Software Distribution 17 Components 17 Installation notes 17ivChapter 1Introduction This guide describes how to install the Agile e6 Windows Client (also known as the PC Client) and the Agile e6 Java Client on a computer running Microsoft Windows 2003, Windows 2000, or Windows XP.Where to Go for More InformationThe Agile e6 installation program allows you to install any of the Agile e6 components listed below:ClientOffice SuiteServerFile Service (FMS)Database system: OracleThis manual describes only the Windows Client and Windows Java Client installation.Both clients are installed if you select the respective client during installation.Please refer to the Administration Manual for Agile e6 (PLM604_Admin.pdf) for moreinformation about how to use the Java Client with WebStart.After the Client is installed, it should be able to connect to a running Agile e6 Server. For information on installing the Agile e6 Server, refer to one of the following documents, which are provided on the product CD/DVD:Installation Manual for Agile e6.0.4 on Windows Server (PLM604_WindowsServer.pdf) – for installing a PLM Server that runs under Windows and uses an Oracle 10g databasesystem.Installation Manual for Agile e6.0.4 on UNIX Server (PLM604_UnixServer.pdf) – for installing a PLM Server that runs under UNIX and uses an Oracle 10g database system Consult your Agile e6 administrator or Customer Support representative for information on installing other Agile e6 components and optimizing your system with the components.Note:The Agile e6 installation guides are available in the doc directory on theproduct DVD. To view Adobe® Portable Document Format (PDF) files, usethe Adobe Acrobat Reader® software, which is available at no charge at.1Agile e6Chapter 2Preparing the InstallationRequirementsTo install and run the Windows Client and Java Client on a separate machine than the Agile e6 Server, you will need:A Pentium class PC running one of the following Microsoft operating systems:Windows XP Professional with Service Pack 2 or higher Windows 2000 Professional with Service Pack 3 or higherWindows Server 2003 Enterprise Edition with Service Pack 1 or higher024 by 768 pixels or higher 512 MB RAM160 MB disk space, for the installation directoryThe Java client needs a Java 2 Runtime Environment in the Version 1.4.2Windows .NET Framework version 1.1 (for the Office Suite part of the Windows Client)llowing:JAVA_HOME needs to be set to the path where the Java RuntimeEnvironment is installed. Note:This can be done during the installation of the Agile e6 Client Software.4. 6 Java Client, verify that the Java 2 Runtime Environment in5..1 any higher versions of the .NET Framework that is already installed on your computer.Note:o to /fwlink/?LinkId=17153 A Windows display with a resolution of 1 Setting the PrerequisitesBefore starting the installation, do the fo 1. Open the Windows Control Panel.2. Click the Advanced tab on the System properties sheet.3. The environment variableIf you intend to use the Agile e the Version 1.4.2 is installed.If you intend to use the Agile e6 Office Suite, make sure that the .NET Framework Version 1.1is installed as this version is explicitly required. You can install .NET Framework Version 1in parallel toTo download the .Net Framework Version 1.1, gClient, make sure that you have not set the /3GBparameter in the Microsoft boot.ini file.6. If you intend to use the Agile e6 DataView 2Chapter 2 Pr e paring th e InstallationParallel Installation of Agile e5.1 and Agile e6 clientsTo install Agile e5.1 and Agile e6 client in parallel on the same machine, it is required to use separate client settings (profiles) for each version. Before installing the Agile e6 client, copy or rename the settings _Default and _Large because the next installation will change these settings. This can be done using the Agile e5.1 (or e6) client setup dialog. After the parallel installation each client version must be started using the corresponding settings.Note:The Office Suite feature of Agile e5.1 and Agile e6 cannot be installed parallel on the same machine.Split Server and Client InstallationThe combined Server and Client installation was split with Agile e6.0.2 into two packages:Agile e6 Client Agile e6 ServerNote: Due too the nature of this split the two installations cannot share the same installation directory.Note: The new default installation location for the Agile e6 Client is C:\Agile_e6_Client3Agile e6Chapter 3Installing the Windows Client Agile e6 is a client-server application that uses a relational database as the application and data repository. The instructions in this section describe how to install only the Agile e6 Windows Client.Upgrading from an older Agile e6 InstallationPlease refer to Upgrade Guide from e6.0.3 to Agile e6.0.4 (PLM604_Upgrade.pdf).Starting the InstallationNote:Use an account with Windows Administrator privileges to install or uninstall Agile e6.1.Insert the Agile e6 Installation DVD.If the CD/DVD autostart feature is enabled on the machine, the Agile e6 main setup window opens automatically.If the autostart feature is not enabled, open the window manually by double-clicking the file setup.bat in the root directory of the DVD.Note:For the latest information on the Agile e6 installation, click Read This First document on the DVD.2.Click Install/Upgrade Agile e6 Client.This starts a window for selecting the installation language:4Chapter 3Installing the Windows Client3.Select the language you want to use during the installation of Agile e6 and click OK tocontinue.4.Click Next to continue.The License Agreement window is opened.5.After reviewing the license agreement, select I accept the terms in the license agreement andclick Next.5Agile e66.Update your user name and the name of your organization if they are incorrect.7.Select one of the installation options:Anyone who uses this computer (all users) — recommendedOnly for me8.Click Next to continue.9.Select the installation directory and click Next.Note:The installation path must not contain blank spaces.10.Select the Setup Type for the installation.6Chapter 3Installing the Windows ClientNote: A Complete Setup Type will install all features, but will not set theJAVA_HOME environment variable, which has to be set for the Java Client orthe Workflow Editor.11.Click Next and continue with step 17 or change the Setup Type to Custom and follow the nextsteps.The Custom Setup window is opened.The Client program is automatically selected.12.If you want to install the Office Suite, click Office Suite and choose ‘This feature will beinstalled on local hard drive’.Agile e6Note:See Chapter 5 for more information about the OfficeSuite feature.13.Click Next to continue.You will get different dialogs depending on the selected features.14.The Java Runtime dialog will only appear if the Java Client and/or Workflow Editor featureswere enabled.Note:The Installer finds all installed Java Runtime Environments and lets you select one that will be used for Agile e6.Note:It is required that JAVA_HOME is set and pointing to the correct JavaRuntime Environment, either by setting it here or in the system environmentof your Windows Operating System.15.Select the Java 2 Runtime Environment Directory and click Next.16.Click Next to continue.Chapter 3Installing the Windows Client17.Click Install to start the installation.18.After the installation is complete, click Finish to exit the Installation wizard.19.On the main installation window, click Exit to close the setup program.A new entry for Agile e6 Client appears on the Windows Start menu.Note:The first time you click the Mask Generator button in the Windows Client to regenerate a mask, you must be logged into an account that has WindowsAdministrator privileges.For further help, refer to the Agile e6 Read This First document or the online documentation, which can be found under \axalant\hlp\doc_ep\ in the directory where you installed the Agile e6 Client. To view the Online Help, open the file plm.chm.Agile e6Modify, Repair and Remove OptionsIf you start the Agile e6 Client setup program and the Windows installer detects a previously installed version of Agile e6 Client on your system, it presents options for repairing or removing the existing installation. This section provides an overview of what you can and cannot do to change or remove existing Agile e-series installations.You can make any of the following changes to an existing client installation:Add or remove any of the features from the Custom SetupChange the Java RuntimeModify an installationRemove an installationNote:The extra OfficeSuite MSI installations are not affected by any changes for the Agile e6 Client installation. Please refer to the Chapter 5 if you add theOfficeSuite feature after the installation.Repairing the InstallationYou can use the Repair function to fix an Agile e6 Client installation that is not working properly. If the Repair function discovers that the key file for an Agile e6 Client component is damaged or missing, it restores all parts of the component—such as its registry entries, service entries, shortcut, and files.Chapter 4Uninstalling the Windows ClientChapter 4 Uninstalling the Windows Client Agile recommends that you use the Remove option in the Windows Control Panel to uninstall Agile e6.Uninstalling the Office Suite componentThe GDMToolsSetup and GDMAddIn components have to be manually removed from theAdd/Remove Programs Windows Control Panel before uninstalling the Agile e6 client.Uninstalling the Client1.In the Windows Control Panel open Add/Remove Programs.2.Select Agile e6 from the list of currently installed programs.3.Click the Remove button.Note:The Java 2 Runtime Environment is not removed if you uninstall the Agile e6 client.Agile e6Chapter 5 OfficeSuiteThe Agile e6 OfficeSuite installation consists of three parts:Agile e6 Client OfficeSuite featureThis feature installs additional libraries and executables GDMToolsSetupAn extra MSI component for document propertiesGDMAddInAn extra MSI component for the icons in the Office products and for the interconnection with the Agile e product.OfficeSuite feature, or a complete installation was selected for the Agile e6 Client installation.Note: the Install Selector described in Chapter 3 Installing the Windows Client.Note: e d if .NET Framework version 1.1could not be detected on your system.The two GDM MSI files are automatically installed during the start.bat installation, if theThe OfficeSuite will be installed for “All Users” during an installation of the Agile e6 Client with .NET FrameworkThe following window will appear if you have selected to install the OfficSuite, anClick No and install the .NET Framework 1.1 via Windows Update and re-start the manual installation of the OfficeSuite MSIs.installation with the Install Selector f described in Chapter 3 Installing the Windows Client.Known problem with the Install SelectorThis requester will open a second time for the second OfficeSuite MSI if this was anChapter 5 Offic e Suit eClick the Nobutton again and the following window will open.Please follow the description in the next section on how to install the OfficeSuite manually.Manual OfficeSuite InstallationThe GDMAddIn and GDMTools MSI files have to be installed separately if the Agile e6 Client was n of the OfficeSuite.y of the Agile e6 Client axalant\bin\intel-ms-nt5.0The In.msi and GDMTools.msi files can be found in the WinRoot\client subdirectory on the install tion DVD.There ecial Installationrst OfficeSuite MSI by double clicking on the file in the WindowsExplorer. Note:The following screenshots shows the GDMAddIn installation, but the GDMTools installation is very similar and has only one page less then the GDMAddIn installation.2. The Welcome Screen opensdirectly installed with the Agile e6 Client MSI and not with the setup.bat menu or if there was an error during the installatio These two MSI files have to be installed in the following subdirector installation directory: Install FilesGDMAdd a is no sp order required in installing these two MSI files.1. Start the installation of the fiAgile e63.Click Next to continue.4.The Select Installation Folder window opens.5.Change the installation FolderNote:These two MSI files have to be installed in the following subdirectory of the Agile e6 Client installation directory: axalant\bin\intel-ms-nt5.0The OfficeSuite will not work if the MSI files are not installed in this Agile e6Client subdirectory.6.Select one of the installation options:Everyone — recommendedJust meChapter 5 Offic e Suit eThis selection should match the one, which was chosen in Error! Reference source not found.,Step 7 for the Agile e6 Client.7. Click Next to continue.8. The Confirm Installation window opens.Note:The GDMAddIn has the additional Customer Information window where you can enter your user name and organization.9. Click Next to start the installation.The installation is started. .Agile e610.Click Close to finish the installation.11.Install the second OfficeSuite MSI installation by double clicking on the second file and repeatthe described steps.Chapter 6 Softwar e DistributionChapter 6Software DistributionThe Agile e6 client is a MSI based installation with CAB files.ComponentsAll components can be found in the WinRoot\client subdirectory on the installation DVDAgile e6 Client.msiAgile e6 client CAB files:ECI64.cabJClient.cabOfficeS.cab bGDMTools.msiIns vironment variable is only needed for the Java Client and talled separately in the following nt installation directoryaxalant\bin\intel-ms-nt5.0WClient.ca Wfled.cabGDMAddIn.msitallation notesA silent installation will install all CAB files, but does not set the JAVA_HOME environment variable. This en /or for the Workflow Editor.The GDMAddIn and GDMTools MSI files have to be ins subdirectory of the Agile e6 Clie 17。
模拟电子技术基础第6讲《模拟电子技术基础》3233共射极放大电路及图解分析法-文档资料

IB
VCC Rb
12V 100k
120uA
IC IB 80 120uA 9.6mA
VCE VCC Rc IC 12V - 2k 9.6mA 7.2V
VCE不可能为负值,
其最小值也只能为0,即IC的最大电流为:
ICM
VCC
VCES Rc
12V 2k
6mA
此时,Q(120uA,6mA,0V), 由于 IB ICM 所以BJT工作在饱和区。
3.3.2 动态工作情况分析
3. 交流通路及交流负载线
iC
由交流通路得纯交流负载线: VCC
Rvc'eL== -RicL ∥(RRc /c/,RL是)
Rc
交流负载电阻。
ICQ
斜率
1
Rc// RL
斜率 - 1
Q
IBQ
Rc
则交可流求负出交载流线负是载有线交:流输 入信号时Q点的运动轨迹。
VC EQ
VCC vCE
和压降)
解:(1)
IB
VCC VBE Rb
12V 300k
40uA
共射极放大电路
IC IB 80 40uA 3.2mA
VCE VCC Rc IC 12V - 2k 3.2mA 5.6V
静态工作点为Q(40uA,3.2mA,5.6V),BJT工作在放大区。
(2)当Rb=100k时,
截止区特点:iB=0, iC= ICEO。当工作点进入饱和区或截止区时,将产生 非线性失真。
放大区特点:BJT输出特性比较平坦,接近于恒流特性,在这个区域符合
iB=βiC的规律,是放大器的工作部分。
判断三极管工作状态的依据:
饱和区: 发射结正偏,集电结正偏
VE安装说明书_新_

安装说明概述:感谢使用V enus EDIT系列非编,该非编继承了新奥特喜马拉雅非编的优点和特色,具有强大的A8字幕系统,是您进行高标清编辑的利器,将为您的制作编辑节目带来全新的操作体验和感受。
安装软件前的准备:一、 请确认V enus I/O非编板卡硬件已经安装在计算机中,正确安装好操作系统:WINDOWS XP SP2安装好计算机的主板芯片组、声卡、显卡(A卡请安装NET framework 2.0和带媒体控制中心的驱动程序)、网卡驱动,之后的设备管理器如下:黄色问号的设备分别是加密狗和非编卡,该驱动集成在V enus Edit软件安装包中安装,为了保证系统的稳定性,安装软件时请保证是纯净的系统,以免出现不同软件有冲突的情况推荐配置:推荐配置的情况下是经过严格测试的平台,可以保证不存在任何硬件方面的兼容性的问题,供参考二、系统硬盘分区:系统主分区C:30GB NTFS格式备份分区D:30GB NTFS其余为E:NTFS格式素材硬盘:双硬盘组成带区(软raid0)三,安装软件包:软件包采取一键式安装,没有复杂的相关设置,请按照默认路径进行安装,下面是安装过程图解:1,运行光盘对应软件一键式安装包,直接双击运行安装进行过程中开始弹出quicktime播放器安装界面,选择“下一步”完成quicktime播放器安装开始安装WINDOWS MEDIA FORMA T9,选择“是”继续选择“YES”完成安装WMF9弹出GFX_SD安装程序界面,直接点“NEXT”进行安装该安装完成后,再弹出real Alternative 1.43解码器安装程序使用默认路径都使用默认设置,不用更改完成安装加密狗驱动程序安装,安装前请确认加密狗已插入USB接口再选择下一步进行安装完成该安装弹出matrox VFW软件解码器安装按”NEXT”继续,之后完成matrox VFW软件解码器安装,弹出板卡驱动程序安装选择“是”安装非编卡驱动完成非编卡驱动安装后弹出界面,选择“否”暂时不重启开始安装V enus Edit主程序,点“NEXT”进行安装填入任意公司名、序列号,继续安装使用默认路径、选择”NEXT”继续,中间都用默认设置,直接下一步中途弹出MSML 的安装界面,点“下一步”选择接受协议,继续“下一步”选择立即安装完成MSXML安装完成非编软件安装最后重启计算机▲ VenusEdit 400/500/800迈创MOJITO非编卡安装注意事项:1、板卡的安装位置:如今主板一般都带有多个PCI-E插槽,MOJITO非编卡应安装在最靠近CPU那个PCI-E插槽。
考点服务器软件安装及使用手册
考点服务器软件安装及使用手册一、考点服务器要求1.网络要求考点服务器需要ADSL或更高带宽的连接方式接入互联网,同时要求考点服务器与考点的考试机以(百兆)局域网方式联通。
2.系统要求Windows 2000/Windows XP。
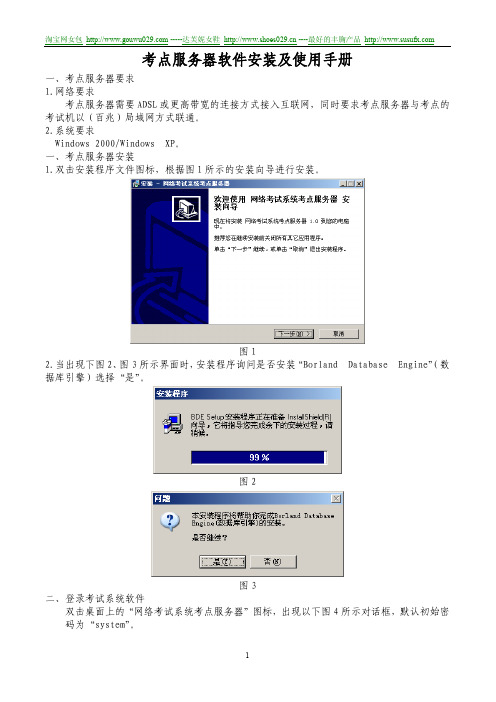
一、考点服务器安装1.双击安装程序文件图标,根据图1所示的安装向导进行安装。
图12.当出现下图2、图3所示界面时,安装程序询问是否安装“Borland Database Engine”(数据库引擎)选择“是”。
图2图3二、登录考试系统软件双击桌面上的“网络考试系统考点服务器”图标,出现以下图4所示对话框,默认初始密码为“system”。
图4成功登录后,软件界的主界面如下:图5图5我们可以选择“选项”菜单的“修改管理口令”来修改软件的登录口令。
四、网络设置在如图6所示的对话框中,进行“中心服务器设置”,输入中心服务器的IP地址及端口号,该数据由中心提供。
图61.考点设置在图7所示的“考点设置”对话框中,输入“考点编号”及“考点密码”等考点基本数据,单击“确定”按钮。
这些数据由考试服务中心提供。
图72.注册考点信息输入“考点编号”及“考点密码”后,选择“系统管理”的“考点注册”,界面如图8所示。
图8如实填写各项信息,填写完毕后,单击“提交注册”按钮。
如图9所示。
单击“是”,如果操作正确,将出如图所示界面。
图10提交注册成功后,关闭考试软件,重新打开该软件,你会发现软件界面的标题栏发生了变化,如图11所示。
图11在首次组织考试或进行第二次考试之前(确保上次考试的数据已经上传成功)需要进行系统初始化。
具体方法是,选择“系统管理”菜单下的“系统初始化”命令。
如图12所示。
图12七、下载考试科目信息选择“系统管理”下的“下载考试科目信息”命令,或选择左侧“系统管理”栏下的“下载考试科目信息”按钮,在图13所示的对话框中,单击“下载科目数据”按钮。
图13八、查询考试计划选择“考务管理”下的“查询考试计划”命令,或选择左侧“考务管理”栏下的“查询考试计划”按钮,在图14所示的对话框中,单击“查询计划”按钮。
cv基本安装
目录目录 (1)1 软件安装前准备 (2)1.1C OMM S ERVE安装前提条件 (2)1.2M EDIA A GENT安装前提条件 (2)1.3 I D ATA A GENT安装前提条件 (2)1.4服务前提条件 (3)1.5必备知识 (3)2 安装COMMSERVE软件 (4)2.1备份服务器安装 (4)2.2安装M EDIA A GENT软件 (11)2.4配置磁盘库 (12)2.5创建备份作业计划 (16)2.6安装I D ATA A GENT软件 (19)2.6.1 在sql群集服务器上安装iDataAgent (20)2.6.2在服务器上安装Image on WindowsiDataAgent (26)2.6.3 在服务器上安装Exchange iDataAgent (31)2.6.4 在服务器上安装Lotus Notes iDataAgent (34)2.6.5 在服务器上安装Active Directory Server iDataAgent (38)2.6.7 在服务器上安装IBM AIX iDataAgent(jtfmisj系统) (41)2.6.8 在服务器上安装IBM AIX iDataAgent(Srv1) (48)3 排错和故障诊断 (58)1 软件安装前准备1.1 CommServe 安装前提条件下面的前提条件适用于CommServe 计算机在执行“安装CommServe 软件”一节中的步骤之前,请仔细核对这些前提条件。
CommServe 软件不能安装在下列服务器上: 运行Microsoft Exchange Server 的服务器已安装了SQL Server 6.5或7.0,为其他应用程序提供服务的服务器确认在安装CommServe 的系统中没有安装Exchange 和SQL 6.5或7.0。
与CommServe 安装一同安装的基于SQL Server的应用程序。
安装 CA ARCserve Backup r16
安装和升级CA ARCserve Backup› 安装CA ARCserve Backup安装CA ARCserve Backup您可以使用安装向导在本地或远程系统上安装CA ARCserve Backup。
安装CA ARCserve Backup1.将CA ARCserve Backup 安装介质插入计算机的光盘驱动器。
注意:如果未显示CA ARCserve Backup 安装浏览器,请从安装介质的根目录运行Setup.exe。
从产品安装浏览器的右列中单击“安装CA ARCserve Backup for Windows”。
“先决条件组件”对话框将打开。
2.单击“安装”以安装先决条件组件。
请注意以下行为:▪仅当安装程序在目标计算机上未检测到CA ARCserve Backup 先决条件组件时,才会打开“先决条件组件”对话框。
▪在Windows Server 2003 系统上,如果安装程序安装Microsoft SQL Server 2008 ExpressEdition,则您必须重新启动计算机并且重复上面的步骤。
注意:如果您正在群集感知型环境中的主动节点上安装CA ARCserve Backup,当主动节点重新启动时,群集资源将从主动节点传输到被动节点。
在主动节点重新启动之后,您应当将群集资源传输回到最初的主动节点。
3.在“许可协议”对话框中,接受许可协议的条款并单击“下一步”。
4.按照提示进行操作,并填写后续对话框中的所有必填信息。
以下列表描述了有关安装CA ARCserve Backup 的对话框特定信息。
“选择安装/升级类型”对话框选择远程安装选项时,您可以将CA ARCserve Backup 安装到多个系统上。
如果采用远程安装,目标远程系统可以由不同类型的ARCserve 服务器和/或不同的CAARCserve Backup 代理和选件组成。
注意:群集计算机的安装程序不支持远程安装CA ARCserve Backup 主产品或CA ARCserveBackup 代理。
ASCO电磁阀样本VCEFCM8551G321
All leaflets are available on: PIC-5-35-GB
SERIES 551-553
SPECIFICATIONS
pipe orifice size size () 1/4 1/4 1/4 1/4 (mm) 6 6 6 6 flow coefficient kv (m3/h) (l/min) 0,66 0,66 0,66 0,66 11 11 11 11 0/2 0/2 0/2 0/2 operating pressure differential (bar) max. (PS) min.(2) air () ~ = 10 10 10 10 10 10 10 10 power level ~/= BP BP LP LP prefix optional solenoids ATEX/IECEx NEMA 7&9 Ex i Ex d Ex e mb Ex mb EF NF NK EM PV IS l m l l l l l l l l l m l m m m EEx nA ZN l m l m IP65 SC l l l l 551A438 551G438 551A338 551G338 551A439 551G439 551A339 551G339 basic catalogue number
3
POWER LEVELS - cold electrical holding valuere differential (bar) max. (PS) min.(2) air () ~ = 10 10 10 10 10 10 10 10 10 10 10 10 10 10 10 10
SOLENOID VALVES
14
4 5
2 3 1 2 3 1
CecOS1.4_虚拟化组件安装配置文档
CecOS Virtualization安装一、介绍CecOS Virtualization(以下简称CecOSvt)由CecOS Virtualization Manager管理系统和CecOS Virtualization Hypervisor组成,以虚拟客户机支持虚拟操作系统。
输入system-config-network命令,打开IP配置界面,选择要配置的设备。
取消DHCP,输入需要配置的IP地址,选择OK进行保存IP并退出配置界面。
执行service network restart 重启网络服务,使配置生效。
绑定主机名:输入vi /etc/hosts,编辑hosts文件。
注:红框选中的内容不能删除,否则在后面配置会出错,连接不到数据库。
●将CecOSvt光盘放入光驱。
●本文档以安装AIO(All in one)为例。
三、安装步骤1. 挂载光盘,安装软件预置环境# mount /dev/cdrom /mnt挂载完成,进入/mnt目录,执行run 命令,建立本地预置环境。
下图所示,表示预置环境源建立完成,系统提示执行“cecosvt-install”命令安装CecOSvt。
2.开始安装组件# cecosvt-install执行后,如图所示根据实际需求选择安装模式,本文以[3]为例。
选择[3]选项以后,开始安装,需要时间稍长,耐心等待。
如下图所示,安装完成。
完成后重新启动机器,系统启动后执行vdsm-tool configure --force,配置vdsm服务。
配置完成后重启vdsm服务:/etc/init.d/vdsmd restart。
四,配置系统# cecvm-setup执行后,首先安装报表系统,根据实际情况选择Yes或No。
本文以安装报表系统为例。
配置本地计算节点、存储域路径及名称、配置本地主机名解析、防火墙。
配置admin用户密码。
配置ISO存储域路径和名称。
配置报表系统密码。
确认配置,确认选择”OK”,如果需要更改配置则选择”Cancel”,重新进行配置,默认OK。