阿尔卡特OXE PBX操作
阿尔卡特OXE系统培训解析

M2 机柜
M3 机柜
19英寸标准机柜
7 | Alcatel-Lucent | December 1, 2006
All Rights Reserved © Alcatel-Lucent 2006
M2机柜图
0
1
2
3
4
5
6
7
8
9
10
11
12
13
e Z 3 2
e Z 3 2
e Z 3 2
e Z 3 2
e Z 3 2
1 2 CPU
UAI16_1
3 4 5 6 7 8
MEX SLI16_1
APA8
APA8
RACK LARGE (2)
SLI16_1
1
2
CPU
UAI16_1
3 4 5 6 7 8
MEX SLI8_1
UAI-8/16板:用于连接专用 的Alcatel数字系列话机 SLI-8/16板:连接模拟话机 APA-8板:用于连接模拟中 继
C P U 7
e Z 3 2
N e e e e P U Z Z Z R A 3 3 3 A 3 2 2 2 E 2
23 24 25 26 27
14
15
20
21
22
M2
8 | Alcatel-Lucent | December 1, 2006
All Rights Reserved © Alcatel-Lucent 2006
e Z 3 2
e Z 3 2
e Z 3 2
e Z 3 2
e Z 3 2
I N T O F 2 B
20
e Z 3 2
e Z 3 2
Alcatel OXE(阿尔卡特)功能表
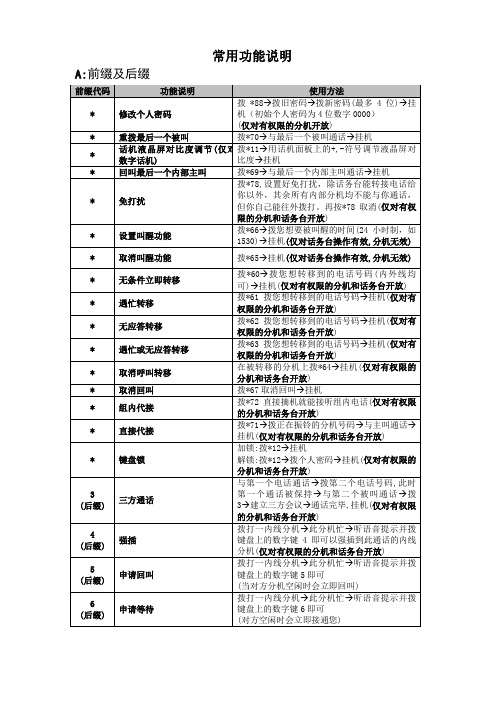
常用功能说明A:前缀及后缀B:数字分机电话拨号及转接:一: 数字分机拨0到话务员或直接拨内线分机号码(如32306)或拨9+外线号码(如9013908047888或986200333)并与之通话;二:数字话机电话转接:外线来电→提起听筒接听→若转内部电话,则直接拨要转接的内线分机号码并挂机即可。
三:数字话机对内线分机三方通话(如数字话机3300)外线来电经过话务员转接到3300分机→3300分机摘机接听→若3300分机将把其他任意一内线分机如3500加入三方通话中→3300分机则直接拨另一分机如3500并与分机3500通话→此时外线来话被保持并听音乐→此时3300分机拨话机键盘上的数字键“3”即可实现三方通话;四:数字话机对外线实现三方通话(如数字话机3300)外线来电经过话务员转接到3300分机→3300分机摘机接听→若3300分机将把其他任意一外线号码如013908047888或86200333加入三方通话中→3300分机则直接拨9013908047888或986200333并与外线通话→此时第一条外线来话被保持并听音乐→3300分机此时拨话机键盘上的数字键“3”即可实现三方通话;C:模拟分机电话拨号及转接:一: 模拟分机拨0到话务员或直接拨内线分机号码(如32306)或拨9+外线号码(如9013908047888或986200333)并与之通话;二:模拟分机电话转接:外线来电→提起听筒接听→若转内部分机,则轻轻的快速拍叉簧听语音提示“请拨您要的分机号码”并直接拨要转接的内线分机号码并挂机即可。
三:模拟分机对内线分机三方通话(如模拟分机3301)外线来电经过话务员转接到3301分机→3301分机摘机接听→若3301分机将把其他任意一内线分机如3500加入三方通话中→3301分机则轻轻的快速拍叉簧听语音提示“请拨您要的分机号码”并直接拨要转接的内线分机号码并与之通话→此时外线来话被保持并听音乐→此时3301分机需要再次轻轻的快速拍叉簧重新与外线通话→此时内线分机被保持并听音乐→3301分机拨话机键盘上的数字键“3”即可实现三方通话;四:模拟分机对外线实现三方通话(如模拟分机3301)外线来电经过话务员转接到3301分机→3301分机摘机接听→若3301分机将把其他任意一外线号码如013908047888或86200333加入三方通话中→则3301分机轻轻的快速拍叉簧听语音提示“请拨您要的分机号码”并直接拨9013908047888或986200333并与外线通话→此时第一条外线来话被保持并听音乐→此时3301分机需要再次轻轻的快速拍叉簧重新与第一条外线通话→此时第二条外线被保持并听音乐→3301分机拨话机键盘上的数字键“3”即可实现三方通话;4400交换机功能板CPU3 CPU5 (20\6榜)主控板 (板上有CPU\硬盘\内存条等主控设备)Z12\Z24 模拟用护板(板上有12-24个模拟端口)VA16\VA32 数字用户板(板上有16—32数字端口)VG 语言板SUVG SU语音板MMSFD (11)软驱板(用于数据的备份和恢复)GPA 功能辅助板(提供29方会议功能及SUVG功能内部链路连接电路板:交换机通过电路板连接多个ACTRT4 (提供一个2M通路)INTOF (提供一个8M通路可接光纤)。
OXE系统介绍

系统概述
上海贝尔阿尔卡特业务通信系统有限公司培训中心
All Rights Reserved © Alcatel-Lucent 2006,
什么是 OmniPCX Enterprise ?
传统交换机
控制系统
新通信模式
通信应用 呼叫服务器 媒体网关设备 媒体网关设备 网络基础 网络基础 通信应用 呼叫服务器
• 电话功能 (Telephone features)
• 内嵌应用 (Embedded applications)
• 增值应用 (Value added applications) 这是运行在外部服务器器上的业务,此时 OmniPCX Enterprise
被看作中央控制服务器。
• 外部应用接口 (Interfaces for external applications) 这些接口用于 OmniPCX Enterprise 和其它产品的解决方案
ACT 机架是基于晶体结构硬件,有几种实施方法:
主 ACT 机架
• 主 ACT 含有 CPU 板,作为通信服务器 外围 ACT 机架
• 这类机架通过 INTOF 或 RT2 连接到主 ACT 。
辅助 ACT 媒体网关 • 辅助 ACT 媒体网关用于安置那些通用硬件不支持的设备。 标准 ACT 媒体网关 • 标准 ACT 媒体网关就是远端 ACT (通过 IP 网络连接)。 通过 INT-IP 连接到服务器。
等)。譬如:一步分机可以是:空闲、振铃或会话。 • 当一个事件发生 (例如:分机摘机), 这事件就被媒体网关通知到呼叫
服务器。呼叫服务器再根据该分机的配置和状态完成相应的操作。
• 在一部空闲分机被摘机的情况下,就发送拨号提示音。服务器的命令 经过IP网络送到网关,网关翻译来自服务器的命令并依次连接目的分 机发送振铃。
阿尔卡特架构及优势
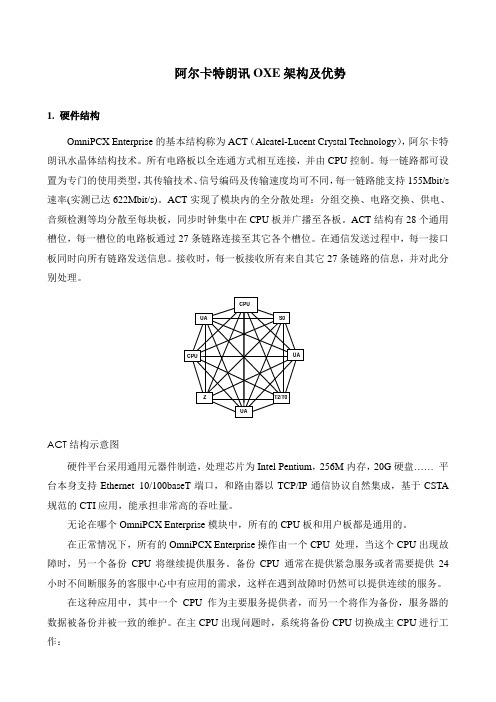
阿尔卡特朗讯OXE架构及优势1. 硬件结构OmniPCX Enterprise的基本结构称为ACT(Alcatel-Lucent Crystal Technology),阿尔卡特朗讯水晶体结构技术。
所有电路板以全连通方式相互连接,并由CPU控制。
每一链路都可设置为专门的使用类型,其传输技术、信号编码及传输速度均可不同,每一链路能支持155Mbit/s 速率(实测已达622Mbit/s)。
ACT实现了模块内的全分散处理:分组交换、电路交换、供电、音频检测等均分散至每块板,同步时钟集中在CPU板并广播至各板。
ACT结构有28个通用槽位,每一槽位的电路板通过27条链路连接至其它各个槽位。
在通信发送过程中,每一接口板同时向所有链路发送信息。
接收时,每一板接收所有来自其它27条链路的信息,并对此分别处理。
ACT结构示意图硬件平台采用通用元器件制造,处理芯片为Intel Pentium,256M内存,20G硬盘……平台本身支持Ethernet 10/100baseT端口,和路由器以TCP/IP通信协议自然集成,基于CSTA 规范的CTI应用,能承担非常高的吞吐量。
无论在哪个OmniPCX Enterprise模块中,所有的CPU板和用户板都是通用的。
在正常情况下,所有的OmniPCX Enterprise操作由一个CPU 处理,当这个CPU出现故障时,另一个备份CPU将继续提供服务。
备份CPU 通常在提供紧急服务或者需要提供24小时不间断服务的客服中心中有应用的需求,这样在遇到故障时仍然可以提供连续的服务。
在这种应用中,其中一个CPU 作为主要服务提供者,而另一个将作为备份,服务器的数据被备份并被一致的维护。
在主CPU出现问题时,系统将备份CPU切换成主CPU进行工作:∙正在通话的呼叫将继续进行∙正在建立的呼叫将丢失∙在切换操作后建立的呼叫将被正常处理两台服务器的数据库完全相同并在维护中保持同步2. 软件结构OmniPCX Enterprise系统全新的软件结构采用Robust多用户/多任务结构,Linux操作系统。
阿尔卡特程控交换机使用说明要点
Shanghai Xundi
交换机功能板简介
NPRAE-2
T2数字中继板式 ,板上有2路T2数字 继通道, 通过交换机后板电缆或同轴电缆接 电信中继. ACT分架接口板 各ACT分架通过此板与主 ACT-CPU分架进行联接. 功能辅助板 提供29方会议功能,并可插闪 存卡,提供系统的语音提示及保留音乐或双 音频接收.
Shanghai Xundi
ALCATEL PBX
程序管理及使用手册
Shanghai Xundi
交换机功能板简介
主控板 (板上有CPU、硬盘、内存条等主 控设备) eZ32、eZ32-2 模拟用户板 ,板上有32个模拟用户端口 通过交换机后板电缆经配线架接普通电话机 UA32、eUA32 数字用户板 板上有32个数字用户端口, 通 过交换机后板电缆接ALCATEL的数字设备, 如:4019话机、4029话机、4039话机及其 他数字设.) NDDI2-2 模拟中继板板上有8个模拟中继端口, 通过 交换机后板电缆接电信中继. CUP7-2
Shanghai Xundi
系统登陆
Cpu20> login: mtcl Password: mtcl Alcatel OmniPCX Enterprise The role of the CPU is MAIN 当前CPU状态(MAIN主用,STANDBY备用) Application software identity R9.1-i1605-21-e-cn-c80s1 Business identification: R9.1 系统版本号 Release: DELIVERY i1605 系统版本 Patch identification: 21 静态补丁 Dynamic patch identification: e 动态补丁 Country: cn Cpu: c80s1 cpu20>
Asterisk PBX 系列产品说明书

fi ac i a e he i a achi e. Y ca da e a f
he a d i g he
ci
ided i / .
Se g he Da e a d T e h V a B
O
e a f , Vi a B ha a a habi f a g i g he da e a d i e f
i a achi e. Ve if ha ha e e ab ed he Ha d a e Cl ck i UTC Ti e i f
. Y ge a $10 c edi
e e -a- i e
ca a d
cha e a $1 a
h h e be i
ch ice f a ea c de . If decide
V IP i f
, d ha e b a hi g e e . A d ca e a
a de
c
e a ead
b i g he Vi a B edi i f I c edib e PBX i h
de .
Ne , d b e-c ic he I c edib e PBX . a i age
de . Be e chec he
b i i ia i e he MAC add e f he i age if e i g a de e i f Vi a B .
The c ic I
. O ce he i
e
i.
e e i e, E
cha i g e
ac i e e
O ce ha e ac i ed e
e DID , a iga e he L
N
ab a d ecif he de i ed SIP F
阿尔卡特OXE分机操作手册
OXE数字程控交换机分机操作简明手册一、普通话机使用简要说明:1、呼叫话务员摘机,拨02、呼叫内线摘机,拨分机号码(话机号码或坐席号码),通话后挂机。
3、呼叫外线摘机,拨9,听二次拨号音后拨外线号码。
如对方为电脑话务员,也可直接拨分机号。
如为数字话机(4035话机),通话后按“DTMF”键,再拨对方分机号。
4、回叫应答如为模拟分机,摘机后可听到“你有一个回叫。
”,如保持摘机,可自动对主叫振铃。
也可在摘机后立即拨*67取消回叫。
如为数字分机,留言灯会闪烁,按此键,会提示有新信息,拨*67可查询到回叫分机号码,不做其他操作,稍后会自动对回叫分机振铃。
5、转接在通话过程中,模拟话机可拍叉(或按R键),将通话方保留,听语音提示后,拨分机号码(数字话机可在通话过程中直接拨分机号码),听回铃音或分机应答后挂机,就可将通话转接到其他分机。
6、转移立即转移—摘机,拨*60,再拨要转去的目的分机号码,挂机。
所有来话均自动转移到设定的目的分机上。
4010分机也可按“转移”键,再输入要转移到的目的分机号码,挂机,转移灯亮,屏幕显示转移到某分机号码。
取消再按“转移”键,提示转移取消。
忙线转移—摘机,拨*61,再拨要转去的目的分机号码,挂机。
本机忙线时所有来话均自动转移到设定的目的分机上。
无应答转移---摘机,拨*62,再拨要转去的目的分机号码,挂机。
本机无人应答时所有来话均自动转移到设定的目的分机上。
取消转移----摘机,听提示时,拨*64,可取消已设定的转移功能。
7、提醒服务设定---摘机,拨*66HHMM,其中:HH—两位数表示的小时,MM--两位数表示的分钟取消---摘机,拨*65。
当系统设定多次叫醒时,*66可用来设定叫醒,也可用来取消设定。
设定---摘机,拨*66按提示输HHMM,其中:HH—两位数表示的小时,MM--两位数表示的分钟。
再次摘机,拨*66,提示已设定的时间,按2,可取消当前提示的时间;按3,可按提示输入下一次叫醒时间。
阿尔卡特OXO PBX详细编程指南
•Lan
•使用LAN链路进入OXO,一般情况 下都采用该方式
默认IP地址:192.168.92.246
第3页
Alcatel OmniPCX Office 编程详解
Numbering
第4页
Alcatel OmniPCX Office 编程详解 拨号方案 拨号方案
Numbering
�Installation Numbers:
Restricted 模式时交换机的外部拨号方案
�Private Numbering Plan…
虚拟组网时交换机的网络拨号方案
三个拨号方案的设置同内部拨号方案 三个拨号方案的设置同内部拨号方案
第14页
Alcatel OmniPCX Office 编程详解
Features in Conversation...
第24页
Alcatel OmniPCX Office 编程详解
Time Ranges
系统时间段划分 系统时间段划分
�Default Attendant Group :定义默认的话务台组 �Number:时间段序号 �Start:起始时间 �End:结束时间 �Call Distribution :呼叫分配(Normal、Restricted)
第8页
Alcatel OmniPCX Office 编程详解
内 内 部 部 拨 拨 号 号 方 方 案 案
Internal Number Plan…
�Resend Last Number:重拨 �Broadcast Group:广播组(Base: 1--8) �Main Trunk Group:主出局组(Base: 0) �Attendant Call:呼叫话务台(Base: 9) �Subscriber:用户分机号码资源 �Account Code New:授权码 第9页
阿尔卡特OXE系统培训解析
调度座席
调度指挥/大型电话会议控制
调度和大型会议中心
WiFi 服务器
WLAN 交换机
WLAN天线
无线IP手机
WLAN 无线VOIP网
All Rights Reserved ? Alcatel-Lucent 2006
OXE的核心---通信控制服务器(e-CS)
通信控制服务器(e-CS)
▼ 一套服务器软件(LINUX) ▼ 三种服务器硬件平台 ▼ 控制通信业务的网络设备
NDDI2板:模拟中继板, 最多连接8根模拟中继
VPU5板:内置4635系列 语音信箱
9 | Alcatel-Lucent | December 1, 2006
M3 (1)
All Rights Reserved ? Alcatel-Lucent 2006
OXE 远端模块机架
2*30B+D 远端模块
13
N D
e Z
e Z
eC ZP
e Z
e Z
e Z
D I 2
3 2
3 2
3U
3
27
2
3 2
3 2
ACT-28 (0)
I N
T O F
2 A
14
15
eR A
P U
E7
18
19
20
N P R A E
21
22
V P U 5
23
24
I
Ne
T O F
Z 3
22
A
25
26
27
INTOF板:用于连接ACT 机架
I
e e e e e eN e e e e e e e
Z 3 2
阿尔卡特朗讯 OXO Connect 公告用户手册说明书
Alcatel-Lucent OXO Connect Announcements User ManualJune 20183EH21069USAC Ed. 1Legal noticeThe Alcatel-Lucent name and logo are trademarks of Nokia used under license by ALE. To view other trademarks used by affiliated companies of ALE Holding, visit: /en/legal/ trademarks-copyright. All other trademarks are the property of their respective owners.The information presented is subject to change without notice. Neither ALE Holding nor any of its affiliates assumes any responsibility for inaccuracies contained herein.© 2018 ALE International. All rights reserved. DisclaimerWhile efforts were made to verify the completeness and accuracy of the information contained in this documentation, this document is provided “as is”. To get more accurate content concerning Cross Compatibilities, Product Limits, Software Policy and Feature Lists, please refer to the accurate documents published on the Business Partner Web Site.In the interest of continued product development, ALE International reserves the right to make improvements to this documentation and the products it describes at any time, without notice or obligation.The CE mark indicates that this product conforms to the following Council Directives:•2014/53/EU for radio equipment•2014/35/EU and 2014/30/EU for non radio equipment (including wired Telecom Terminal Equipment)•2014/34/EU for ATEX equipment•2011/65/EU (RoHS)•2012/19/EU (WEEE)Chapter 1Overview1.1Description of the Announcements (4)Chapter 2Operation2.1Selecting Announcements (5)2.2Creating Announcement Messages (6)2.2.1Recording announcements (.wav) on a PC (6)2.2.2Recording Automatic Call Distribution messages using a phone set (7)2.2.3Converting an announcement file (7)2.2.4Recording Automatic Call Distribution messages using a professional studio (7)This document is the user manual of the Announcements application. It applies to OXO Connect and OXO Connect Evolution.Announcements are broadcast while telephone traffic is being processed. No default announcements are provided by the call center, but default announcements (A-law and µ-law) designed for test purposes are available for download in OMC. For a running system, customized announcements must be created and downloaded.1.1 Description of the AnnouncementsThe different types of announcement are:•Welcome announcement This announcement is broadcast when a call arrives in the group.•Queue announcements (Waiting 1, Waiting 2, Estimated Waiting Time)•Waiting 1 is used when the call joins the queue for the first time; it is broadcast once only.•Waiting 2 is used after Waiting 1 or Estimated Waiting Time; it is broadcast continuously until the call leaves the queue (this announcement may contain music).•Estimated Waiting Time is broadcast to advise the caller that they are likely to have a certain minimum waiting time in the queue before their call is answered.•Deterrence announcement This announcement is broadcast when the queue is saturated. It can also be broadcast when the Automatic Call Distribution ports dedicated to Automatic Call Distribution traffic are saturated (this depends on the configuration of the Automatic Call Distribution ports dedicated to deterrence).•Closing announcement This announcement is broadcast when the Automatic Call Distribution group is closed.•Customer code announcement This announcement is broadcast to ask the caller to enter a customer code.On the system, a set of announcements for each Automatic Call Distribution group is permitted. The minimum and maximum durations of the announcements in a set are shown in the table below.Announcement Minimum Duration Maximum DurationWelcome0 seconds60 secondsWaiting 10 seconds60 secondsWaiting 220 seconds300 secondsEstimated Waiting Time0 seconds60 secondsDeterrence0 seconds60 secondsClosing0 seconds60 secondsCustomer code0 seconds60 seconds2.1 Selecting AnnouncementsTo select the announcement you want to use, do the following:1.Click ACD Voice Messages. The ACD Voice Messages window appears. This window has thefollowing two areas:•The ACD Groups area is used to select the announcements for each group or all the groups.•The Transfer selected messages area is used to import or export announcements to the call center or to the system.The ACD Groups area contains a table allowing you to:•see which announcements are present in the system,•select an announcement to be added or replaced.To change from Transfer mode to Delete mode, click on the button Mode.It is not possible to delete announcements at the same time as adding or replacing announcements.Note:Default messages are available which take into account the coding (A-law or µ-law) used in your country.2.In the Transfer selected messages area, click the button to the right of the field Load from thisdirectory and transfer.The Select Folder window is displayed.The announcements are by default saved in:C:/Program Files/PCXTools/OMC/R500_xxx/VoiceMessages/a_law56 messages are available (7 for each Automatic Call Distribution group). Each message isidentified by a file made up of 3 figures x, y and z and with the extension .wav:•x corresponds to the number of the Automatic Call Distribution group (1 to 8)•y is always equal to 0•z corresponds to the message of the Automatic Call Distribution group (1 to 7)The messages types are as follows:•1 corresponds to the Welcome message•2 to the Waiting 1 message•3 to the Waiting 2 message•4 to the Deterrence message•5 to the Closing message•6 to the Estimated Waiting Time message•7 to the Customer code messageFor example, file 305.wav corresponds to the Closing message for group 3.Remark:on starting the Automatic Call Distribution, the system does not contain any messages. To conduct tests, it is therefore essential to load the default Automatic Call Distribution messages.3.Select the announcements and click the transfer button ( => ). The messages selected aretransferred to the call center.4.Click OK. The ACD Voice Messages window disappears.Note:When deleting an announcement, the action is not executed using the transfer button ( => ) but using the delete button (X) instead (this button is only accessible in Delete mode).2.2 Creating Announcement MessagesTo create your own announcement messages, you can use the recording software available on your PC (Window/Accessories/Multimedia/Sound Recorder) or any multimedia application.2.2.1 Recording announcements (.wav) on a PCProceed as follows:1.On your PC, open a recording tool by clicking Start > Programs > Accessories > Multimedia (orEntertainment) > Sound Recorder. The following window is displayed:In order to record the message, your computer must be fitted with a sound card. Otherwise, a message informs you that the recorder is operating in restricted mode.2.If the sound card is available and configured, start to record your message by clicking on the redbutton in the bottom right of the window.3.To stop the recording, click the rectangular button.4.To check and listen to the recorded message, click the triangular button.5.If you are happy with the message, record it by clicking File > Save. Give it a file name and checkthe message format.Caution:announcements must have the format CCITT A-law/µ-law 8 KHz, 8 bits, mono. The announcements created must have the same name as the default messages.6.If the format is not correct, click Change and select the format CITT A-law/µ-law 8 KHz, 8 bits,mono. Click OK to confirm and OK again to save the message.2.2.2 Recording Automatic Call Distribution messages using a phone setYou can record Automatic Call Distribution messages using any one of the following telephones:•8038 Premium DeskPhone•8058s Premium DeskPhone•8039 Premium DeskPhone,•8068 Premium DeskPhone•8068s Premium DeskPhone•8078s Premium DeskPhoneA special menu allows you to record each announcement message for each Automatic Call Distributiongroup. To access this menu:•on a 8038 Premium DeskPhone/8058s Premium DeskPhone, 8039 Premium DeskPhone, 8068 Premium DeskPhone/8068s Premium DeskPhone or 8078s Premium DeskPhone, follow the path Menu/operator/Advanced/Voice/Automatic Call Distribution.•2.2.3 Converting an announcement fileIf the format of your file is not compatible, convert it using the following procedure:•Open the .wav file to be modified in Sound Recorder and click File > Properties to check the file format.•If the format shown is different from CCITT A-Law/µ-law 8 kHz, 8 bits, mono, click Convert Now....A window opens; select the format CCITT A-Law or CCITT µ-law and click OK to confirm.•Save your file.2.2.4 Recording Automatic Call Distribution messages using a professional studioFor optimum quality, the services of a professional recording studio should be used. If this option is chosen, observe the file format required.。
- 1、下载文档前请自行甄别文档内容的完整性,平台不提供额外的编辑、内容补充、找答案等附加服务。
- 2、"仅部分预览"的文档,不可在线预览部分如存在完整性等问题,可反馈申请退款(可完整预览的文档不适用该条件!)。
- 3、如文档侵犯您的权益,请联系客服反馈,我们会尽快为您处理(人工客服工作时间:9:00-18:30)。
阿尔卡特程控交换机常用操作F1(Ctrl+V)——确定、保存F2(Ctrl+C)——返回、退出Ctrl+W ——屏幕刷新箭头键——通过上下左右键在各菜单项中进行选择回车键——用于进入下层菜单和选中某项菜单项Ctrl +F——向下翻页Ctrl+B——向上翻页Ctrl+I(Tab)——查看当前菜单项的帮助文件Backspace——删除键1.Chcp 437 命令清除乱码界面。
2.Telnet 192.168.0.200 登陆程控交换机IP地址。
登陆账号:mtcl 登陆密码:mtcl.3.Mgr进入系统菜单主页面。
下面是mgr界面选项的一些翻译(1)Shelf 注:ACT架构设置选项(2)Media Gateway 注:媒体网关管理(3)Dect System 注:Dect无线系统(4)System 注:系统设置选项(5)Translator 注:号码编译管理选项(6)Categories 注:类别管理选项(7)Attendant 注:服务总机、话务台设置选项(8)Users 注:分机管理(9)Profiled Users 注:使用模板创建用户(10)Set Profiles 注:模板功能管理(11)Groups 注:组设置选项(12)Abbreviated Numbering 注:缩位拨号设置(13)Phone Book 注:电话本设置(14)Entities 注:实体管理(15)Trunk Groups 注:中继组管理(16)External Services 注:外界服务(17)Inter-Node Links 注:节点互连(18)X25 注:X25管理(19)DATA 注:数据(20)Applications 注:应用4.创建分机号码:在Mgr主菜单下选择Users按下回车,然后选择Creat进入创建用户分机号码界面。
Directory Name:________(设置名称,只支持英文)Directory First Name:______(设置姓,只支持英文)Directory Number:___________(此项为分机号码设置选项)Shelf Address:______(此项默认值为255,由于根据现实情况程控交换机只有两个ACT-28框架,因此我们只能在这选项中设置0或者1,要么ACT0、要么ACT1) Board Address:________(此项默认值为255,选择板位号。
0~27选择,但需注意有些板位是用作CPU、中继、INTOF板等或者是空载没接板。
)Equipment Address:_____(此项默认值为255,选择端口号。
根据现实情况每块板都是32个端口,因此端口号的范围0~31)Set type:ANALOG(注意:默认的情况下是ANALOG模似机电话,如果建立的分机是数字机电话则需要选择数字机的型号类型,目前只使用4029的数字机,因些得选择4029选项)Language id:______(1:代表中文2:代表英文3:代表日文)Associated Set NO:_________(此处设置没有人接听时的关联号码,房间分机通常要设为留言信箱地址*#77。
而不需要的留言信箱的分机可以不用设置此项。
或都当这台分机无人接听时可以转移到另一个分机上。
)Public Network Category:(选择0~3等级,设置电话权限。
0:代表相同组号分机互打。
1:代表可以拨打市话。
2:代表可以拨打国内长途。
3:代表可以拨打国际长途。
)Tel.Facility Category ID:____(设置热线组号与路由号所对应的热键号码) Connection category ID:____(设置分机号到隶属那一个分组,0~31共32个组号选择,此处需留意组与组之间的互打权限问题)Hunting group DIR NO:______(设置连选组,群号)Pick up group name:_________(设置抢接组名,在各分机号上设置相同的组名则可抢接)V oice Mail dir NO:____(4000)Hotel-set Function +Administrative(默认情况下选择Administrative,行政分机。
注意:当创建的分机号码是客房号码时则需要选择ROOM选项,此选项需要跟中软的CHECK IN 、CHECKOUT对口连接后才能做计费系统。
)PIN NO._______(此选项为分机密码设置)Message Led:_______(True/False此处选择是否开留言灯,客房分机需要打开) Clip:_______(True/False此处选择是否开启来电显示)4.1需要特别注意的是,有些酒店客房电话全部为套房模式,含有一部模拟话机以73开头、一部SIP话机以72开头,但是我们在创建的时候还需要创建第3个号码,以8开头的虚拟号码,这个虚拟号码用作主号码,房间check in后我们只要拨打虚拟号码,房间内的两部话机就能同时振铃。
(我们酒店非套房模式,所以不用,仅供参考)我们以701房间为例创建号码:○1创建SIP话机720701,Directory Number : 720701Shelf Address : 255Board Address : 255Equipment Address : 255Set Type + SIP extensionHotel-Set Function + RoomUse Type Of Dir. No. + Multi Occupation○2创建模拟话机730701Directory Number : 730701Shelf Address : 0Board Address : 2 端口地址Equipment Address : 0Set Type + ANALOGHotel-Set Function + RoomUse Type Of Dir. No. + Multi Occupation○3虚拟号码80701Directory Number : 80701Shelf Address : 255Board Address : 255Equipment Address : 255Set Type + ANALOGAssociated Set No. : 4000V oice Mail Dir.No. : 4000 加入语音信箱V oice Mail Type + 4610 (VPS)Hotel-Set Function + RoomUse Type Of Dir. No. + GuestMessage Led + True 开留言灯○4mgr/Applications/hotel/go down/hotel suite/createNode Number (reserved) : 1Instance (reserved) : 1Instance (reserved) : 1Main Directory Nbr : 720701Affected room Directory Nbr[ Add ] [ Remove ] [ Next ] [Previous]Affected room Directory Nbr : 730701○5mgr/Applications/hotel/go down/Static LinksCreate: Static LinksNode Number (reserved) : 1Instance (reserved) : 1Instance (reserved) : 1Room Directory name : 720701Guest Directory name : 807014.2Users/consult/modify下的Directory Number:_________(在此处输入分机号码查看具体分机号码情况)4.3Users/consult/modify/All instances/F1(查看阿尔卡特设备上的所有分机号码情况)4.4Users/delete/Directory Number:_________(在此处输入分机号码然后按F1键则删掉当前分机号码)5:reboot(命令为马上重启交换机),需要注意的是,我们是双CPU,当在主CPU下重启的时候,CPU会自动切换,主、副交换角色。
6:Shutdown –h now(命令为马上关闭交换机,记得把CPU的开关打下来),双CPU如果关机,需要分别登陆主副交换机关机。
7:Config+ACT号+板位号(查看板的信息,硬件状态。
注意:IN SERVICE 正常工作)8:rstcpl+ACT号+板位号(软重启)注意:某些端口出现故障,可以软重启端口所在的板块。
特别注意:如果数字电话端口出现在了一个电话号码接了两台分机时,撤回一台时导致还不能正常工作时,可以选通过重启端口所在板块来解决。
重启的过程中,可以通过Config+ACT号+板位号来查看重启的信息,当SPL STATE选项显示为:IN SEVICE时表示重启完成。
用Config +ACT号+板位号查看板块重启情况INI T 2 RUN处于第二阶段IN SEVRICE重启成功9:Listerm+ACT机架号+板位号(查看具体板块的物理端口的使用情况,Cry显示为ACT机架号,ac显示为板号,term显示为端口号只需要查看0~31端口就OK了,其它的端口信息不需要理会。
Dir nb显示分机号码,typ term显示为T_RESU表示该端口还没有分配使用。
)9:Trkstat -r 0查询中继状态情况。
(F代表:正常状态B代表:忙线HS代表:线路问题没信号的情况)目前我们的数字中继板只有2块,中继组好为0,因此查看中继组代码为0。
10:Termstat +d +分机号码(查看分机号码状态信息)按任意键回车出现选择界面,共有5项,选择Reset the device软重启分机号码。
选择Device Features 查看分机号码信息。
Locked:YES/NO分机长途加锁情况。
PIN分机密码情况。
[1]Device features.[2]Forward informations.[3]Subdevice informations.[4]Demi-com informations.[5]Reset the device. 重启此分机号码11:Mgr/Translator/External numbering Plan/Default DDINum.Tanslator/consult/ Modify/Allinstances 选白F1(查看所有的DID号使用的情况)12:创建DID号与分机号码互绑:Mgr/Translator/External numbering Plan/Default DDI Num.Translator/CreatFirst external number:____________(输入直线号码)First internal number:_____________(输入分机号码)需要注意的是,针对于本中继的配置,为了让绑定DID号码的分机拨外线之后能够显示自己的DID号码,还需进入分机号码处修改两个参数,如下:Mgr/user/consult/modify进入需要设置的分机号码,Use Personal Calling Number+改为true,按F1保存,进入下一界面在Private Calling Number处填入DID号码13:分机给加锁了情况下,需要按*12加默认密码0000来对分机解锁。