ipmitool 中文 帮助 文档
ipmitool命令的执行流程
ipmitool命令的执行流程1.概述i p mi to ol是一种在服务器管理中常用的命令行工具,它允许管理员通过IP MI(I nt el li g en tP la tf or mM ana g em en tI nt er fa ce)接口来监控和管理服务器。
本文将介绍ip mi to ol命令的执行流程,以帮助读者更好地理解和使用这一工具。
2.安装ipm itool在开始使用i pm it oo l之前,首先需要确保已经安装了该工具。
i p mi to ol可以通过包管理器在各种操作系统上进行安装,如下所示:在U b u n t u上安装i p m i t o o ls u do ap t-ge ti ns tal l ip mi to ol在C e n t O S上安装i p m i t o o ls u do yu mi ns ta ll ipm i to ol3.连接到远程服务器要使用i pm it oo l命令,首先需要连接到远程服务器。
使用以下命令连接到具有I PM I功能的服务器:i p mi to ol-H<I P地址>-U<用户名>-P<密码>l an se t1ip add r<新IP地址>其中,`<I P地址>`是服务器的I P地址,`<用户名>`和`<密码>`是使用I PM I访问服务器所需的凭据。
4.执行ipm itool命令一旦连接到服务器,就可以执行各种i pmi t oo l命令来管理服务器。
以下是一些常用的示例:获取服务器信息i p mi to ol fr u此命令将显示服务器的F RU(F ie ld Re pla c ea bl eU ni t)信息,包括制造商、型号和序列号等。
重启服务器i p mi to ol po we rr ese t此命令将重新启动服务器。
监控传感器数据i p mi to ol se ns or此命令将显示服务器上各种传感器的当前状态,如温度、电压、风扇速度等。
ipmitool fru write

ipmitool fru write
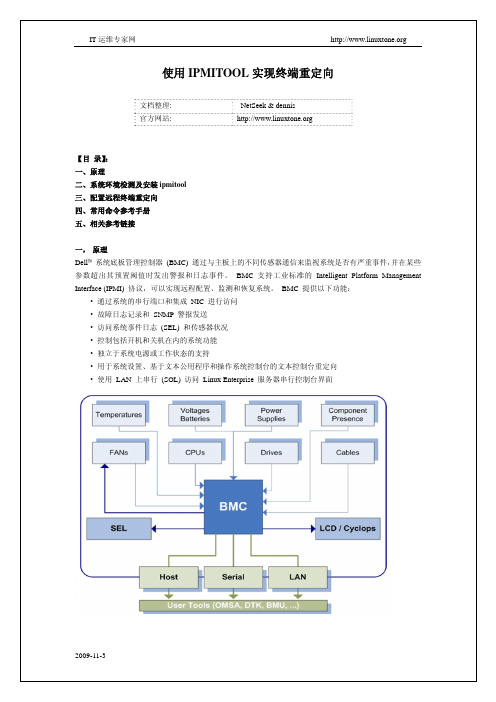
IPMItool是一个非常强大的管理和监控工具,用于管理服务器硬件和系统健康状况。
其中,FRU(Field Replaceable Unit)命令允许用户对服务器的特定硬件组件进行配置和更新。
使用ipmitool fru write命令,用户可以修改FRU的特定参数。
以下是该命令的一般语法:
css
ipmitool fru write [OPTIONS] fru-number data
fru-number:指定要写入的FRU的编号。
data:要写入的数据,可以是十六进制或ASCII格式。
该命令的选项可能包括:
-v:详细输出模式,显示更详细的操作信息。
-P:使用指定的通道连接到IPMI适配器。
-C:使用指定的用户名和密码进行身份验证。
-k:使用指定的加密密钥进行身份验证。
请注意,使用ipmitool命令需要具有适当的权限和知识,并且应该谨慎操作以避免对服务器硬件造成损坏或数据丢失。
在执行任何硬件相关的操作之前,强烈建议备份重要数据并确保您了解正在进行的操作和其潜在风险。
如果您需要更详细的信息或示例,请参考IPMItool的官方文档或向具有相关经验的专业人员咨询。
SMCIPMITool_User_Guide

SMCIPMITool User GuideRelease 1.0aDocument SMCIPMITool_Guide_1.0aSuper Micro IPMITool User GuideRelease: 1.0aDocument: SMICIPMITool_Guide_1.0aDocument status: StandardDocument release date: 1/28/2011Copyright © 2011 Super MicroAll Rights Reserved.This document is protected by copyright laws and international treaties. All information, copyrights and any other intellectual property rights contained in this document are the property of Super Micro. Except as expressly authorized in writing by Super Micro, the holder is granted no rights to use the information contained herein and this document shall not be published, copied, produced or reproduced, modified, translated, compiled, distributed, displayed or transmitted, in whole or part, in any form or media.Contents1 Introduction (10)1.1 Purpose (10)1.2 Set Up (10)1.3 Key Conventions (11)1.3.1 Keyboard Shortcuts (11)1.4 Third Party Software (11)1.4.1 JLine (11)2 Usage and Command (11)2.2 Document Conventions (12)3 Commands (12)3.1 system (12)3.2 failure (14)3.3 blade (14)3.3.1 blade status (14)3.3.2 blade index(es) (15)3.3.2.1 status (15)3.3.2.2 power (16)3.3.2.3 kvm (16)3.3.2.4 uid (16)3.3.2.5 sensor (16)3.3.2.6 bmc (17)3.3.2.6.1 ip (17)3.3.2.6.2 dhcp (17)3.3.2.6.3 vlan (17)3.3.2.6.4 ipmb (17)3.3.2.7 config (17)3.4 gigabit (18)3.4.1 gigabit status (18)3.4.2 gigabit index(es) (18)3.4.2.1 status (18)3.4.2.2 power (19)3.4.2.3.1 ip (19)3.4.2.3.2 netmask (19)3.4.2.3.3 gateway (19)3.4.2.3.4 datetime (19)3.4.2.3.5 username (19)3.4.2.3.6 password (19)3.4.2.4 ipmode (20)3.4.2.5 boot (20)3.4.2.6 restart (20)3.4.2.7 fd (20)3.5 power (20)3.5.1 power status (20)3.5.2 power index(es) (21)3.5.2.1 status (21)3.5.2.2 power (21)3.5.2.3 fan (21)3.6 ib (21)3.6.1 ib status (21)3.6.2 ib index(es) (22)3.6.2.1 status (22)3.6.2.2 power (22)3.7 cmm (22)3.7.1 cmm status (22)3.7.2 cmm index (23)3.7.2.1 status (23)3.7.2.2 dtime (23)3.7.2.3 ntp (23)3.7.2.4 reset (23)3.7.2.5 flash (23)3.7.2.6 ver (24)3.7.2.7 ip (24)3.7.2.9 gateway (24)3.7.2.10 netmask (24)3.7.2.11 syncfg (24)3.7.2.12 opmode (24)3.7.2.13 dhcp (25)3.8 listtemp (25)3.9 sel (27)3.9.1 info (27)3.9.2 list (27)3.9.3 csv (27)3.9.4 clear (27)3.10 allsel (28)3.11 user (28)3.11.1 add (28)3.11.2 list (28)3.11.3 delete (28)3.11.4 level (28)3.11.5 test (29)3.12 vm (29)3.12.1 status (29)3.12.2 stop (29)3.12.3 floppy (30)3.12.4 iso (30)3.13 ipmi (30)3.13.1 sensor (30)3.13.2 power (31)3.13.2.1 up (32)3.13.2.2 down (32)3.13.2.3 softshutdown (32)3.13.2.4 reset (32)3.13.2.5 cycle (32)3.13.3 acpi (32)3.13.4 lan (32)3.13.4.1 ip (32)3.13.4.2 mac (33)3.13.4.3 gateway (33)3.13.4.4 netmask (33)3.13.4.5 snmp (33)3.13.4.6 snmpcomm (34)3.13.4.7 arp (34)3.13.4.8 dhcp (34)3.13.4.9 vlan (34)3.13.5 fru (34)3.13.6 oem (35)3.13.6.1 clrint (35)3.13.6.2 id (35)3.13.6.3 uid (35)3.13.6.4 backup (35)3.13.6.5 restore (35)3.13.6.6 lani (36)3.13.7 reset (36)3.13.8 ver (36)3.13.9 flash (36)3.13.10 flashw (36)3.13.11 raw (36)3.13.12 ipmb (37)3.13.13 ipmboem (37)3.13.14 delsdr (37)3.14 shell (37)3.15 ver (38)3.16 ch (38)3.17 list (38)3.19 found (38)3.20 exec (38)3.21 host (39)3.21.1 list (39)3.21.2 reload (39)3.21.3 add (40)3.21.4 remove (40)3.21.5 rename (40)3.21.6 group (40)3.21.6.1 add (40)3.21.6.2 remove (40)3.21.6.3 rename (40)3.21.6.4 addhost (40)3.21.6.5 removehost (40)3.22 hostrun (41)3.23 sc (41)3.24 pminfo (41)3.25 nm (43)3.25.1 detect (43)3.25.2 ver (43)3.25.3 cap (43)3.25.4 status (44)3.25.5 stat (44)3.25.6 resetStat (44)3.25.7 pstate (44)3.25.8 tstate (45)3.25.9 ptstate (45)3.25.10 alert (45)3.25.11 scanPolicy (46)3.25.12 addPolicy (47)3.25.13 delPolicy (47)3.25.15 enablePolicy (47)3.25.16 disablePolicy (48)3.26 deploy (48)3.26.1 one (48)3.26.2 all (48)3.26.3 check (48)3.26.4 status (48)3.26.5 clear (48)3.27 kvmwa (48)3.28 ukvm (49)3.29 vmwa (49)3.29.1 dev1list (49)3.29.2 dev1drv (49)3.29.3 dev1stop (49)3.29.4 dev2list (49)3.29.5 dev2cd (50)3.29.6 dev2iso (50)3.29.7 dev2stop (50)3.29.8 allstatus (50)3.29.9 status (50)3.29.10 log (50)3.30 dcmi (50)3.30.1 find (50)3.30.2 cap (51)3.31 dr (52)3.31.1 list (53)3.31.2 iso (53)3.31.3 drv (53)3.32 kvm (54)3.33 kvmw (54)3.34 vmw (54)3.34.2 vmw usbkey (54)3.34.3 vmw iso (54)3.34.4 vmw cd (54)3.34.5 vmw stopFloppy (54)3.34.6 vmw stopUsbkey (55)3.34.7 vmw stopISO (55)3.34.8 vmw stopCD (55)3.34.9 vmw status (55)3.35 sol (55)3.35.1 sol activate (55)3.35.2 sol deactivate (55)3.35.3 sol window (56)3.35.4 sol key (56)3.35.5 bitrate (56)Appendix A Command Categories (57)Appendix B VM Command Examples (59)B.1 AMI IPMI Firmware (59)B.2 ATEN IPMI Firmware (60)B.3 Peppercon IPMI Firmware (63)Appendix C Trap Receiver (66)1 Introduction1.1 PurposeIPMI (Intelligent Platform Management Interface) is an Intel-defined standard to allow a user to interface with a computer system to monitor the health of and manage the system.The SMCIPMITool is a Supermicro utility that allows a user to interface with SuperBlade systems and IPMI devices via a CLI (Command Line Interface).1.2 Set UpThis utility requires Sun JRE 1.5.x or above. Please install Java on your platform in advance of initiating SMCIPMITool. To download, please go to the following link:/javase/downloads/index.jspThere are two executable files in the SMCIPMITool utility:∙SMCIPMITool.jar: A jar file only.∙SMCIPMITool.exe : A windows executable wrapper for SMCIPMITool.jarUsers can choose either the jar or a native executable file. For Linux environments, an extra setting to the environment is required, as shown below.Add jre to your PATH line in the .bashrc file: PATH=/usr/java/jre1.5.0_12/bin:$PATHThe "jre1.5.0_12" folder may change depending on your version of Java.1.3 Key Conventions1.3.1 Keyboard Shortcuts1.4 Third Party Software1.4.1 JLineSMCIPMITool uses JLine for command history and tab-completion. JLine is a Java library used to handle console input and is similar in functionality to BSD editline and GNU readline. People familiar with the readline/editline capabilities for modern shells (such as bash and tcsh) will find most of the command editing features of JLine to be familiar.Please refer to /index.html for more information.2 Usage and CommandEnter the console mode and run the following command to start (online help is included): Usage:java -jar SMCIPMITool.jar <IP> <username> <password> [commands ... ]orSMCIPMITool <IP> <username> <password> [commands ... ]2.2 Document Conventions∙The syntax of the CLI command is given in Courier New 11 bold.∙Elements in (< >) indicate the field required as input along with a CLI command, for example < integer (100-1000)>.∙Elements in square brackets ([ ]) indicate optional fields for a command.∙Both “ * “ and “ , ” may be used to specify the numbers for the blade/gigabit/power/ib index(es) commands. For example:CMM> blade 1,2,3 statusCMM> gigabit * status3 CommandsThis section lists the commands available with SMCIPMITool. You must follow the usage protocol as described in the previous section.3.1 systemThe system command displays the system information. In a blade system, this command will also list the modules present (CMM modules, Gb switches, power supplies, etc.).Usage: systemExample Output:Blade Module (20/20)--------------------Blade | Power | KVM | UID | Error | BMC | Watt | MB----- | ----- | --- | --- | ----- | --- | ---- | --Blade 1 | Off | Selected | | | Yes | 350W | B8DTTBlade 2 | Off | | | | Yes | 400W | B8DTTBlade 3 | On | | | | Yes | 350W | B8DTTBlade 4 | On | | | | Yes | 350W | B8DTTBlade 5 | On | | | | Yes | 350W | B8DTTBlade 6 | On | | | | Yes | 350W | B8DTTBlade 7 | On | | | | Yes | 350W | B8DTTBlade 8 | On | | | | Yes | 350W | B8DTTBlade 9 | On | | | | Yes | 350W | B8DTTBlade 10 | On | | | | Yes | 350W | B8DTTBlade 11 | Off | | | | Yes | 400W | B8DTTBlade 12 | Off | | | | Yes | 400W | B8DTTBlade 13 | On | | | | Yes | 350W | B8DTTBlade 14 | On | | | | Yes | 350W | B8DTTBlade 15 | On | | | | Yes | 350W | B8DTTBlade 16 | On | | | | Yes | 350W | B8DTTBlade 17 | On | | | | Yes | 350W | B8DTTBlade 18 | On | | | | Yes | 350W | B8DTTBlade 19 | On | | | | Yes | 350W | B8DTTBlade 20 | On | | | | Yes | 350W | B8DTTGigabit Switch Module (1/2)------------------------GBSW | Power | Error | Init | Switch | 2.5V | 1.25V | Type---- | ----- | ----- | ---- | ------ | ---- | ----- | ----------GBSW 1 | On | | Not | 61C/142F | 2.48V | 1.192V | L3 SwitchPower Supply Module (4/4)--------------------------PS | Power | Fan 1 | Fan 2 | Temp. | Watts | DC | AC | F/W | FRU -- | ----- | ----- | ----- | ----- | ----- | -- | -- | --- | --- PS 1 | On | 5152 | 5152 | 56C/133F | 2000 | N/A | N/A | 2.6 | 01 PS 2 | On | 5381 | 5381 | 54C/129F | 2000 | N/A | N/A | 2.6 | 01 PS 3 | On | 5267 | 5152 | 57C/135F | 2000 | N/A | N/A | 2.6 | 01 PS 4 | On | 7328 | 7099 | 54C/129F | 2000 | N/A | N/A | 2.6 | 01IBQDR Module (1/2)------------------------IBQDR | Power | Temp. Switch | Temp. Board | 3.3V | 1.25V----- | ----- | ------------ | ----------- | ---- | -----IBQDR 1 | On | 57C/135F | 56C/133F | 3.24V | 1.18VCMM Module(1/2)----------------CMM | M/S | Status--- | --- | ------CMM 1 | Master | OKCMM 1 is being managed now3.2 failureThe failure command brings up a failure report, which lists all failure messages from the system.Usage: failure3.3 bladeThe blade command will bring up the following subcommands.3.3.1 blade statusThis command will display the status of all the blade units in the system.Usage: blade statusExample Output:Blade Module (20/20)--------------------Blade | Power | KVM | UID | Error | BMC | Watt | MB----- | ----- | --- | --- | ----- | --- | ---- | --Blade 1 | Off | Selected | | | Yes | 350W | B8DTTBlade 2 | Off | | | | Yes | 400W | B8DTTBlade 3 | On | | | | Yes | 350W | B8DTTBlade 4 | On | | | | Yes | 350W | B8DTTBlade 5 | On | | | | Yes | 350W | B8DTTBlade 6 | On | | | | Yes | 350W | B8DTTBlade 7 | On | | | | Yes | 350W | B8DTTBlade 8 | On | | | | Yes | 350W | B8DTTBlade 9 | On | | | | Yes | 350W | B8DTTBlade 10 | On | | | | Yes | 350W | B8DTTBlade 11 | Off | | | | Yes | 400W | B8DTTBlade 12 | Off | | | | Yes | 400W | B8DTTBlade 13 | On | | | | Yes | 350W | B8DTTBlade 14 | On | | | | Yes | 350W | B8DTTBlade 15 | On | | | | Yes | 350W | B8DTTBlade 16 | On | | | | Yes | 350W | B8DTTBlade 17 | On | | | | Yes | 350W | B8DTTBlade 18 | On | | | | Yes | 350W | B8DTTBlade 19 | On | | | | Yes | 350W | B8DTTBlade 20 | On | | | | Yes | 350W | B8DTT3.3.2 blade index(es)This command is used to check the individual blades in the system. The following subcommands may be used for a specific blade.3.3.2.1 statusUsed to check the status of the individual blade specified.Usage: blade <blade number> statusExample Output:[ 1]:Blade | Power | KVM | UID | Error | BMC | Watt | MB----- | ----- | --- | --- | ----- | --- | ---- | --Blade 1 | Off | Selected | | | Yes | 350W | B8DTT[ 2]:Blade | Power | KVM | UID | Error | BMC | Watt | MB----- | ----- | --- | --- | ----- | --- | ---- | --Blade 2 | Off | | | | Yes | 400W | B8DTT3.3.2.2 powerUsed to access power control for the individual blade specified.Usage: blade <blade number> power [up|down|softshutdown|reset] Example Output:[ 1]:Power: OffAvailable commands: up, down, softshutdown, reset[ 2]:Power: OffAvailable commands: up, down, softshutdown, reset3.3.2.3 kvmRequests a kvm switch for the individual blade specified.Usage: blade <blade number> kvm3.3.2.4 uidUsed to turn a UID LED on or off as specified on an individual blade.Usage: blade <blade number> uid <on/off>3.3.2.5 sensorUsed to get sensor readings from the individual blade specified.Usage: blade <blade number> sensorExample Output:Status | Sensor | Reading | Low Limit | High Limit | ------ | ------ | ------- | --------- | ---------- | OK | CPU1 Temp | 1C/ 34F | N/A | 80C/176F | OK | CPU2 Temp | 1C/ 34F | N/A | 80C/176F | OK | System Temp | 64C/147F | N/A | 80C/176F | OK | CPU1 Vcore | 0.95 V | 0.6 V | 1.38 V |OK | CPU2 Vcore | 0.96 V | 0.6 V | 1.38 V |OK | CPU1 DIMM | 1.53 V | 1.2 V | 1.65 V |OK | CPU2 DIMM | 1.53 V | 1.2 V | 1.65 V |OK | 1.5V | 1.52 V | 1.34 V | 1.65 V |OK | 3.3V | 3.16 V | 2.96 V | 3.63 V |OK | 3.3VSB | 3.36 V | 2.96 V | 3.63 V |OK | 5V | 5.06 V | 4.49 V | 5.5 V |OK | 12V | 12.19 V | 10.75 V | 13.25 V |OK | VBAT | 3.36 V | 2.96 V | 3.63 V |3.3.2.6 bmcThis command will bring up the following subcommands related to the BMC of an individual blade.3.3.2.6.1 ipUsed to get or set the IP address of a blade’s BMC.Usage (to get): blade <blade number> bmc ipUsage (to set): blade <blade number> bmc ip <IP>3.3.2.6.2 dhcpUsed to enable or disable the DHCP (Dynamic Host Configuration Protocol) of a blade. Usage: blade <blade number> bmc dhcp [enable|disable]3.3.2.6.3 vlanUsed to display or enable or d isable an individual blade’s VLAN (Virtual LAN).Usage: blade <blade number> bmc vlan [<enable|disable> >tag>]3.3.2.6.4 ipmbUsed to send a raw IPMI command to an individual blade.Usage: blade <blade number> bmc ipmb <netFn> <cmd> [data]3.3.2.7 configUsed to get the configuration of the individual blade specified.Usage: blade <blade number> configExample Output:MB ID = BDPwr Consumption = 350WCPUs = 2CPU Type = undefinedCPU Speed = 2.90GhzDIMMs = 2Memory Size = 8192MBMemory Speed = 1066MhzLANs = 2LAN 1 MAC = 00:30:48:F7:65:CCLAN 2 MAC = 00:30:48:F7:65:CDMB SN = ????????????????3.4 gigabitEntering the gigabit command will bring up the following subcommands.3.4.1 gigabit statusThis command will display the status of all the Gb switch units in the system.Usage: gigabit statusExample Output:Gigabit Switch Module (1/2)------------------------GBSW | Power | Error | Init | Switch | 2.5V | 1.25V | Type---- | ----- | ----- | ---- | ------ | ---- | ----- | ----------GBSW 1 | On | | Not | 61C/142F | 2.496V | 1.192V | L3 Switch3.4.2 gigabit index(es)This command brings up the following commands related to an individual Gb switch in the system as specified.3.4.2.1 statusUsed to display the status of the gigabit switch specified.Usage: gigabit <gigabit number> statusExample Output:GBSW | Power | Error | Init | Switch | 2.5V | 1.25V | Type---- | ----- | ----- | ---- | ------ | ---- | ----- | ----------GBSW 1 | On | | Not | 61C/142F | 2.48V | 1.192V | L3 Switch3.4.2.2 powerUsed to access power control for the gigabit switch specified.Usage: gigabit <gigabit number> power <on|off|reset>3.4.2.3 wssUsed to access WSS (WebSuperSmart) web configuration control for the gigabit switch specified.3.4.2.3.1 ipUsed to get or set the IP address of a gigabit switch.Usage: gigabit <gigabit number> wss ip [IP]3.4.2.3.2 netmaskUsed to get or set the netmask address of a gigabit switch.Usage: gigabit <gigabit number> wss netmask [netmask]3.4.2.3.3 gatewayUsed to get or set the gateway address of a gigabit switch.Usage: gigabit <gigabit number> wss gateway [gateway]3.4.2.3.4 datetimeUsed to get or set the date and time settings for a gigabit switch.Usage: gigabit <gigabit number> wss datetime [datetime]Example Output:12/29/2010 02:56:023.4.2.3.5 usernameUsed to get or set the username of WSS web for a gigabit switch.Usage: gigabit <gigabit number> wss username [username]3.4.2.3.6 passwordUsed to get or set the password of WSS web for a gigabit switch.Usage: gigabit <gigabit number> wss password [password]3.4.2.4 ipmodeUsed to get or set the IP mode of the gigabit switch specified.Usage (to get): gigabit <gigabit number> ipmodeUsage (to set): gigabit <gigabit number> ipmode <mode>3.4.2.5 bootUsed to get or set the boot image of the gigabit switch specified.Usage: gigabit <gigabit number> boot [image number]3.4.2.6 restartUsed to soft restart the gigabit switch specified.Usage: gigabit <gigabit number> restart3.4.2.7 fdUsed to reset to factory default for the gigabit switch specified.Usage: gigabit <gigabit number> fd3.5 powerEntering the power command will bring up the following subcommands.3.5.1 power statusThis command will display the status of all the power supply units in the blade system.Usage: power statusExample Output:Power Supply Module (4/4)--------------------------PS | Power | Fan 1 | Fan 2 | Temp. | Watts | DC | AC | F/W | FRU -- | ----- | ----- | ----- | ----- | ----- | -- | -- | --- | --- PS 1 | On | 5152 | 5152 | 57C/135F | 2000 | N/A | N/A | 2.6 | 01 PS 2 | On | 5381 | 5381 | 54C/129F | 2000 | N/A | N/A | 2.6 | 01 PS 3 | On | 5152 | 5152 | 58C/136F | 2000 | N/A | N/A | 2.6 | 01 PS 4 | On | 7328 | 7213 | 54C/129F | 2000 | N/A | N/A | 2.6 | 013.5.2 power index(es)This command is used to check the individual power supplies in the blade system and brings up the following commands:3.5.2.1 statusUsed to display the status of the power supply specified.Usage: power <power number> statusExample Output:PS | Power | Fan 1 | Fan 2 | Temp. | Watts | DC | AC | F/W | FRU -- | ----- | ----- | ----- | ----- | ----- | -- | -- | --- | --- PS 1 | On | 5152 | 5152 | 56C/133F | 2000 | N/A | N/A | 2.6 | 013.5.2.2 powerUsed to access power control for the power supply specified.Usage: power <power number> <on|off>3.5.2.3 fanUsed to access fan control for the power supply specified.Usage: power <power number> fan <1|2|3|4|auto>3.6 ibEntering the ib command will bring up the following subcommands.3.6.1 ib statusThis command will display the status of all the InfiniBand switches in the system.Usage: ib statusExample Output:IBQDR Module (1/2)------------------------IBQDR | Power | Temp. Switch | Temp. Board | 3.3V | 1.25V----- | ----- | ------------ | ----------- | ---- | -----IBQDR 1 | On | 57C/135F | 56C/133F | 3.24V | 1.18V3.6.2 ib index(es)This command is used to check the individual InfiniBand switches in the system and will bring up the following subcommands:3.6.2.1 statusUsed to display the status of the InfiniBand switch specified.Usage: ib <ib number> statusExample Output:IB | Power | Init | VVDD | 3.3V Aux | 1.2V | 1.8V | 3.3V | Temp.-- | ----- | ---- | ---- | -------- | ---- | ---- | ---- | -----IB 1 | Off | OK | 1.92V | 2.85V | 0.78V | 1.48V | 2.85V | 0C/32F3.6.2.2 powerUsed to access power control for the InfiniBand switch specified.Usage: ib <ib number> power <on|off|reset>3.7 cmmEntering the cmm command will bring up the following subcommands.3.7.1 cmm statusThis command will display the status of all the CMM in the system.Usage: cmm statusExample Output:CMM Module(1/2)----------------CMM | M/S | Status--- | --- | ------CMM 1 | Master | OKCMM 1 is being managed nowCMM IP address:---------------CMM 1 IP: 172.31.100.2353.7.2 cmm indexThis command is used to check the individual CMM in the system and will bring up the following subcommands:3.7.2.1 statusUsed to display the status of the CMM specified.Usage: cmm <cmm number> statusExample Output:CMM | M/S | Status--- | --- | ------CMM 1 | Master | OKCMM 1 is being managed now3.7.2.2 dtimeUsed to get or set CMM date and time.Usage: cmm <cmm number> dtime [datetime]Example Output:12/29/2010 02:56:02(Data time format for setting: "MM/dd/yyyy HH:mm:ss")3.7.2.3 ntpUsed to synch the time with the NTP servers.Usage: cmm <cmm number> ntp <UTC offset> <NTP1> [NTP2]3.7.2.4 resetUsed to reset the CMM specified.Usage: cmm <cmm number> reset3.7.2.5 flashUsed to flash CMM firmware to the CMM specified with the filename of the flash upgrade noted..Usage: cmm <cmm number> flash <filename>3.7.2.6 verUsed to display the firmware version in the CMM specified. Usage: cmm verExample Output:Version:2.2.64 build 54203.7.2.7 ipUsed to get or set the IP address of the CMM specified. Usage: cmm <cmm number> ip [IP address]IP address format: ###.###.###.###3.7.2.8 macUsed to get or set the MAC address of the CMM specified. Usage: cmm <cmm number> mac [mac address]MAC address format: ###.###.###.###3.7.2.9 gatewayUsed to get or set the Gateway address of the CMM specified. Usage: cmm <cmm number> gateway [gateway address] Gateway address format: ###.###.###.###3.7.2.10 netmaskUsed to get or set the Netmask IP address of the CMM specified. Usage: cmm <cmm number> netmask [netmask address] Netmask address format: ###.###.###.###3.7.2.11 syncfgUsed to sych the configuration to the slave CMM specified.3.7.2.12 opmodeUsed to get or set the operational mode for the CMM specified. Usage: cmm <cmm number> opmode [mode]Mode Choices: 0 = Enterprise 1 = Office3.7.2.13 dhcpUsed to enable or disable the DHCP (Dynamic Host Configuration Protocol) of the CMM.Usage: cmm <cmm number> dhcp [enable|disable]3.8 listtempEntering the listtemp command will display the temperatures of all the modules in the blade system.Usage: listtempExample Output:Status | Module | Sensor | Reading | High Limit |------ | ------ | ------ | ------- | ---------- |OK | Blade 3 | CPU1 Temp | Low | N/A |OK | Blade 3 | CPU2 Temp | Low | N/A |OK | Blade 3 | System Temp | 56C/133F | 80C/176F |OK | Blade 4 | CPU1 Temp | Low | N/A |OK | Blade 4 | CPU2 Temp | Low | N/A |OK | Blade 4 | System Temp | 57C/135F | 80C/176F |OK | Blade 5 | CPU1 Temp | Low | N/A |OK | Blade 5 | CPU2 Temp | Low | N/A |OK | Blade 5 | System Temp | 63C/145F | 80C/176F |OK | Blade 6 | CPU1 Temp | Low | N/A |OK | Blade 6 | CPU2 Temp | Low | N/A |OK | Blade 6 | System Temp | 64C/147F | 80C/176F |OK | Blade 7 | CPU1 Temp | Medium | N/A |OK | Blade 7 | CPU2 Temp | Low | N/A |OK | Blade 7 | System Temp | 62C/144F | 80C/176F |OK | Blade 8 | CPU1 Temp | Low | N/A |OK | Blade 8 | CPU2 Temp | Low | N/A |OK | Blade 8 | System Temp | 63C/145F | 80C/176F |OK | Blade 9 | CPU1 Temp | Medium | N/A |OK | Blade 9 | CPU2 Temp | Low | N/A | OK | Blade 9 | System Temp | 62C/144F | 80C/176F | | Blade 10 | CPU1 Temp | N/A | N/A | OK | Blade 10 | CPU2 Temp | Low | N/A | OK | Blade 10 | System Temp | 59C/138F | 80C/176F | OK | Blade 13 | CPU1 Temp | Low | N/A | OK | Blade 13 | CPU2 Temp | Low | N/A | OK | Blade 13 | System Temp | 60C/140F | 80C/176F | OK | Blade 14 | CPU1 Temp | Low | N/A | OK | Blade 14 | CPU2 Temp | Low | N/A | OK | Blade 14 | System Temp | 60C/140F | 80C/176F | OK | Blade 15 | CPU1 Temp | Medium | N/A | OK | Blade 15 | CPU2 Temp | Low | N/A | OK | Blade 15 | System Temp | 63C/145F | 80C/176F | OK | Blade 16 | CPU1 Temp | Low | N/A | OK | Blade 16 | CPU2 Temp | Low | N/A | OK | Blade 16 | System Temp | 61C/142F | 80C/176F | OK | Blade 17 | CPU1 Temp | Low | N/A | OK | Blade 17 | CPU2 Temp | Low | N/A | OK | Blade 17 | System Temp | 63C/145F | 80C/176F | OK | Blade 18 | CPU1 Temp | Medium | N/A | OK | Blade 18 | CPU2 Temp | Medium | N/A | OK | Blade 18 | System Temp | 65C/149F | 80C/176F | OK | Blade 19 | CPU1 Temp | Low | N/A | OK | Blade 19 | CPU2 Temp | Medium | N/A | OK | Blade 19 | System Temp | 62C/144F | 80C/176F | | Blade 20 | CPU1 Temp | N/A | N/A | OK | Blade 20 | CPU2 Temp | Low | N/A | OK | Blade 20 | System Temp | 62C/144F | 80C/176F | OK | Power 1 | Temp. | 56C/133F | 85C/185F |OK | Power 2 | Temp. | 54C/129F | 85C/185F |OK | Power 3 | Temp. | 57C/135F | 85C/185F |OK | Power 4 | Temp. | 54C/129F | 85C/185F |OK | GBSW 1 | Switch | 61C/142F | 80C/176F |OK | InfiniBand 1 | Temp. | 0C/ 32F | 80C/176F |3.9 selEntering the sel command will bring up the following subcommands for the system event log.3.9.1 infoThis command gives the information on the system event log.Usage: sel infoExample Output:Total Entries: 2SEL Version: 1.5Free Space: 9180bytesRecent Entry Added: 12/20/2010 22:37:33Recent Entry Erased: Pre-Init 00:00:003.9.2 listThis command will display the list of entries to the system event log.Usage: sel list3.9.3 csvThis subcommand will save the system event log as a csv file with the name specified in the filename.Usage: sel csv <filename>3.9.4 clearThis command will clear the system event log.Usage: sel clear3.10 allselEntering the allsel command will save all blade system event logs as a csv file with the name specified in the filename.Usage: allsel <filename>3.11 userEntering the user command will list the following user management subcommands.3.11.1 addUse this command to enter the name of a new user.Usage: user add <user ID> <user name> <password> <privilege>3.11.2 listEntering the list command will display the users.Usage: user listExample Output:Maximum number of Users : 10Count of currently enabled Users : 2User ID | User Name | Privilege Level | Enable------- | --------- | --------------- | ------2 | ADMIN | Administrator | Yes3.11.3 deleteEntering the delete command allows you to delete a user.Usage: user delete <user ID>3.11.4 levelEntering the level command allows you to update the level of a user.Usage: user level <user ID> <privilege>The following levels may be assigned:4: Administrator level∙3: Operator level∙2: User level∙1: Callback3.11.5 testEntering the test command allows you to test logging in as a specific user.Usage: user test <user ID> <password>3.12 vmEntering the vm command will list the following virtual media management subcommands. Refer to Appendix B for more on VM commands.3.12.1 statusUsing the status command lists the status of the drives present in the system.Usage: vm statusExample Output:Drive 1Device Status = CD-ROM image on Windows share setImage Size = 522766336 (bytes)Access Mode = Read-OnlyImage source = //192.168.10.43/iso/cd1.isoDrive 2Device Status = CD-ROM image on Windows share setImage Size = 522766336 (byte)Access Mode = Read-OnlyImage source = //192.168.10.43/iso/cd2.iso3.12.2 stopUsing the stop command allows you to stop the specified drive.Usage: vm stop <drive ID>。
[vip专享]Ittools3使用帮助【图文全】
![[vip专享]Ittools3使用帮助【图文全】](https://img.taocdn.com/s3/m/98911ff61a37f111f0855b49.png)
Ittools3使用帮助文字版【系统说明】ITtools3.0版权声明网站目录说明【帮助目录】一、平台环境安装设置流程1、IIS安装2、.Net支持环境安装3、SQL安装和设置(重要)4、配置Ittools3数据库5、配置ITtools网站(IIS)6、ITtools3故障解决流程7、平台的超级后台简易配置8、Ittools3简易使用实例(我的PS第一课)注:ITtools3是一个网站形式的平台,可以使用普通机器安装2003当服务器使用,教师机器尽量和服务器分开,学生机器只要通过IE访问服务器即可。
二、Ittools3功能详细说明(一)超级后台设置1、系统参设的设置的实际应用①学校名称修改②网盘设置③工作模式设置④文件过滤设置⑤图标和媒体展示设置⑥软件参设设置⑦学生作品、学生站点设置⑧学期维护设置⑨作品课后补交设置⑩代理控制⑾web编辑器切换管理⑿绑定教师设置2、数据库的删除、备份和还原3、教师、学生和课堂教学模块的管理(添加、删除、重置、模块模板)4、机房IP和模型的建立和设置①机房IP的批量导入②机房模型的建立③机房模型的使用(分组模型和班级绑定)5、教师和超级用户的建立6、学生的管理①学生名单批量导入②添加、删除和修改学生③重新分班和批量改名、批量改学籍号④学生毕业设置⑤学生头像采集(二)教师模块的使用(由林超琴老师撰写)1、课堂教学的使用①分组模型的管理②课堂教学的初始化③学习情况的评价2、课程管理①课程的添加、删除②课程的编辑简③课程的打包和导入3、教案管理①教案的添加、删除②教案的编辑③教案的打包和导入4、课程表管理5、课后作业管理①添加、编辑课后作业②课后作业批改③课后作业成绩查询6、课后阅读资料管理7、作业课后批改管理8、成绩查询管理①成绩查询②成绩综合查询③作品打包9、教师网盘和学生网盘管理10、作品评价量规的设计11、固定学生座位设置12、【异常】强制下课处理(三)学生模块的使用(由梁智老师撰写)1、登入平台2、修改个人信息3、登入当前课堂4、查漏补缺(错题集锦)5、课后作业补交6、课后学习心得的使用7、学生个人站定的使用8、查看学习记录(课堂、作品、测验记录)(四)课堂教学模块的使用帮助1、课程的基本属性设置2、课程栏目的添加、删除和编辑3、课程作业的设置4、引用已有模块的使用5、课程模块的应用和介绍⑴首页的使用⑵文本页面⑶调查的使用⑷学生作业提交及互评的使用⑸评价量规的使用⑹课堂测验的使用⑺引用外部页⑻座位表的使用⑼MHT模块的使用⑽课堂学习情况监控⑾自由分组的使用⑿组长的推选的使用⒀分组讨论的使用⒁作品循环展播的使用⒂菜单管理的使用⒃小组合作的使用⒄课内BBS的使用⒅操作题阅卷模块使用教程⒈Flash操作题阅卷详解⒉Access操作题阅卷详解⒊WAVE操作题阅卷详解⒋VB操作题阅卷详解⒌FrontPage操作题阅卷详解 6.阅卷后成绩分析7.学生课后操作题成绩查询三、常见问题集锦1、平台的升级方式2、班级被死锁解决方案3、平台无故退出的解决方案4、文件类型转换失败的原因,及解决方案5、阅卷失败的原因,及解决方案6、学生作品展异常解决方案7、功能模块异常及解决方案8、平台使用中的一些小技巧9、服务器安全设置建议ITtools3.0版权声明(返回)系统开发:ITtools3.0信息技术教学辅助平台| 温岭二中陈斌原创开发功能模块辅助开发:广西宜州一中罗毅(592163950) 浙江黄岩东浦中学池广祥(847893032)技术支持:温岭中学-陈良夫之江高中-林仁蛟网友-温州水乡(QQ33112897)乐清中学-李署强黑龙江-陈战美工设计:温岭信息教研员-安维琪系统测试:温岭二中-林超温岭二中-梁智-------------------------------------------------------------------------------软件授权:免费、半开源、自由传播前提条件:1.操作系统:推荐window2003服务器版2.IIS6.0或以上2.0+AJAX2.04.SqlServer Express2005(兼容sql2000)5.内存512MB或以上(如开启阅卷服务,内存至少1G)常见问题:请看ITtools3故障解决流程.swf免责申明:仅供个人研究与学习使用,任何由使用本软件引起的纠纷一律与开发作者无关。
ipmitool协议

ipmitool协议IPMITool协议模板1. 引言本文档旨在规范IPMITool协议的使用和交流。
IPMITool协议是一种用于管理和监控远程服务器硬件的开放性协议,通过IPMI (Intelligent Platform Management Interface)实现对服务器的远程管理。
本协议的目的是确保IPMITool协议的正确使用和安全性。
2. 定义在本协议中,以下定义适用:•IPMITool协议:指用于管理和监控远程服务器硬件的开放性协议,通过IPMI实现对服务器的远程管理。
•IPMI:指Intelligent Platform Management Interface,一种硬件管理和监控接口,提供了对服务器硬件的远程管理功能。
•远程服务器:指通过网络连接的位于远程位置的计算机服务器。
3. 目标IPMITool协议的目标如下:•提供一种开放、标准的协议,用于远程管理和监控服务器硬件。
•确保对远程服务器的安全访问和管理。
•提供完整、准确的硬件信息和监控数据。
4. 主要功能IPMITool协议提供以下主要功能:•远程服务器管理:通过IPMI命令实现对远程服务器的开关机、重启和电源状态监控等功能。
•硬件信息查询:通过IPMI命令获取远程服务器的硬件信息,包括处理器、内存、硬盘等设备的详细信息。
•传感器数据收集:通过IPMI命令获取远程服务器的传感器数据,包括温度、电压、风扇速度等监控数据。
5. 协议规范使用IPMITool协议时,需遵守以下规范:•安全性:保护远程服务器的安全访问,包括使用安全的认证机制和加密数据传输。
•命令格式:按照IPMI命令格式发送请求和接收响应,确保数据的准确传输与处理。
•错误处理:处理异常情况,包括错误命令、权限问题和通信故障等,提供错误码和错误消息用于定位和排查问题。
•日志记录:记录IPMITool操作日志,包括命令请求和响应,用于追踪和审计操作。
6. 安全措施为确保IPMITool协议的安全使用,推荐以下安全措施:•强密码:设置强密码来保护IPMI远程管理接口的访问。
ipmitool
三,配置远程终端重定向 1. 系统启动,安 F2 进入 BIOS 设置, 设置重定向到 com2
2009-11-3
IT 运维专家网
4) LAN User Configuration—选项配置设置连接管理账号 root 用户的密码
确认没有问题,按一下 ESC 键,出来一个小对话框,让选择,此时选择 Save Changes and Exit 选项进行存盘退
出,此时机器开始继续引导系统
-----------------------------------------------------------------------------------------------------------------
如果你重启 10.10.217.72,你将可以在 10.10.217.32 这台机器上看到相关启动的全部画面:
…….. 2009-11-3
IT 终端重定向配置完成,你也可以为你的老板每台服务器省掉上千元,不用去够买 DELL 的远程控制卡了。利用 ipmitool 这个工具命令行下即可以搞定一切,用他来处理你工作中遇到的一些故障 而不用直接跑到机房。
//掩码
ipmitool lan set 1 access on
ipmitool lan set 1 defgw ipaddr 10.10.217.1 //配置网关
ipmitool user list 1 ipmitool user set password 2 “52linuxtone”
//列出当前用户列表 //其中 2 为要设置密原的用户 ID 号,设置密码为 52linuxtone
IPMItool使用文档
戴尔IPMI默认用户名:root 密码:calvin曙光IPMI默认用户名:admin 密码:admin浪潮IPMI默认用户名:admin 密码:adminH3CIPMI默认用户名:admin 密码:Password@_安装: yum install ipmitool启动服务: service ipmi startlanplus是操作远程机器, 如果要操作本地机器,需要把lanplus换成 open1. 查看开关机状态:ipmitool -H (BMC的管理IP地址) -I lanplus -U (BMC登录用户名) -P (BMC 登录用户名的密码) power status2. 开机:ipmitool -H (BMC的管理IP地址) -I lanplus -U (BMC登录用户名) -P (BMC 登录用户名的密码) power on3. 关机:ipmitool -H (BMC的管理IP地址) -I lanplus -U (BMC登录用户名) -P (BMC 登录用户名的密码) power off4. 重启:ipmitool -H (BMC的管理IP地址) -I lanplus -U (BMC登录用户名) -P (BMC 登录用户名的密码) power reset二、IP网络设置说明:[ChannelNo] 字段是可选的,ChannoNo为1(Share Nic网络)或者8(BMC独立管理网络);设置网络参数,必须首先设置IP为静态,然后再进行其他设置;1. 查看网络信息:ipmitool -H (BMC的管理IP地址) -I lanplus -U (BMC登录用户名) -P (BMC 登录用户名的密码) lan print [ChannelNo]2. 修改IP为静态还是DHCP模式:ipmitool -H (BMC的管理IP地址) -I lanplus -U (BMC登录用户名) -P (BMC 登录用户名的密码) lan set <ChannelNo> ipsrc <static/dhcp>3. 修改IP地址:ipmitool -H (BMC的管理IP地址) -I lanplus -U (BMC登录用户名) -P (BMC 登录用户名的密码) lan set <ChannelNo> ipaddr <IPAddress>4. 修改子网掩码:ipmitool -H (BMC的管理IP地址) -I lanplus -U (BMC登录用户名) -P (BMC 登录用户名的密码) lan set <ChannelNo> netmask <NetMask>5. 修改默认网关:ipmitool -H (BMC的管理IP地址) -I lanplus -U (BMC登录用户名) -P (BMC 登录用户名的密码) lan set <ChannelNo> defgw ipaddr <默认网关>1. 查看FRU信息:ipmitool -H (BMC的管理IP地址) -I lanplus -U (BMC登录用户名) -P (BMC 登录用户名的密码) fru list2. 重启动BMC:ipmitool -H (BMC的管理IP地址) -I lanplus -U (BMC登录用户名) -P (BMC 登录用户名的密码) mc reset <warm/cold>3. 查看SDR Sensor信息:ipmitool -H (BMC的管理IP地址) -I lanplus -U (BMC登录用户名) -P (BMC 登录用户名的密码) sdr4. 查看Sensor信息:ipmitool -H (BMC的管理IP地址) -I lanplus -U (BMC登录用户名) -P (BMC 登录用户名的密码) sensor list。
ipmitool 中文 帮助 文档
ipmitool 中文帮助文档Name(名字)Ipmitool ——对于控制支持IPMI的设备有效.Synopsis(概要)ipmitool [-c|-h|-v|-V] -I open <command>ipmitool [-c|-h|-v|-V] -I lan -H <hostname>[-p <port>][-U <username>][-A <authtype>][-L <privlvl>][-a|-E|-P|-f <password>][-o <oemtype>]<command>ipmitool [-c|-h|-v|-V] -I lanplus -H <hostname>[-p <port>][-U <username>][-L <privlvl>][-a|-E|-P|-f <password>][-o <oemtype>][-C <ciphersuite>]<command>Description(描述)这个程序能够使你通过一个kernel设备驱动或者一个远程系统,利用IPMI v1.5或IPMIv2.0 来管理本地系统的任何一个智能平台管理接口(IPMI)功能。
这些功能包括打印FRU(现场可替换装置)信息、LAN 配置、传感器读数、以及远程机架电源控制。
一个本地系统接口的IPMI管理功能需要一个兼容IPMI的kernel驱动程序被安装以及配置。
在linux中,这个驱动叫做OpenIPMI,他被包括在了标准化分配中。
在Solaris系统中,这个驱动叫做BMC,他被包括在了Solaris 10中。
远程控制的管理需要授权以及配置IPMI-over-LAN接口。
根据每个系统独特的需要,它可以通过系统接口来使LAN接口使用ipmitool。
ipmitool手册
ipmitool手册ipmitool是一个用于管理和配置支持IPMI(Intelligent Platform Management Interface)规范的系统的命令行工具。
以下是ipmitool的使用手册:一、安装1. 查找安装包:在Linux系统上,可以使用yum命令查找ipmitool的安装包。
例如,运行以下命令可以查看ipmitool属于哪个安装包:```yum provides /ipmitool```2. 安装:使用yum命令安装ipmitool。
例如,运行以下命令可以安装ipmitool:```sqlyum install ipmitool –y```3. 检测安装是否成功:安装完成后,可以使用rpm命令查询ipmitool是否已成功安装。
例如,运行以下命令可以查看ipmitool的安装状态:```cssrpm -qa ipmitool```二、使用命令及参数以下是ipmitool的一些常用命令和参数:1. 列出支持的子系统:运行以下命令可以列出ipmitool支持的子系统:```phpipmitool -H <IP地址> -U <用户名> -P <密码> subsystem list```2. 获取系统信息:运行以下命令可以获取系统的基本信息:```phpipmitool -H <IP地址> -U <用户名> -P <密码> system info```3. 获取传感器读数:运行以下命令可以获取指定传感器的读数:```phpipmitool -H <IP地址> -U <用户名> -P <密码> sensor read <传感器类型> <传感器号>```4. 设置BIOS参数:运行以下命令可以设置BIOS参数:```phpipmitool -H <IP地址> -U <用户名> -P <密码> chassis set <参数名称> <参数值>```5. 获取BIOS参数:运行以下命令可以获取BIOS参数:```phpipmitool -H <IP地址> -U <用户名> -P <密码> chassis get <参数名称> ```6. 重启系统:运行以下命令可以重启系统:```phpipmitool -H <IP地址> -U <用户名> -P <密码> power reset```。
ipmitool源码编译使用
ipmitool源码编译使用IPMI工具是一个用于远程管理系统的工具,它支持在本地或远程服务器上访问系统的管理控制器,并提供了诊断和配置功能。
IPMITool源码是开源的,允许用户自行编译和使用。
本文将介绍如何编译和使用IPMITool源码。
准备工作:1. 安装GCC编译器和Make工具。
2. 下载IPMI工具的源码包。
3. 为了使用IPMI工具,您需要有管理控制器访问权限。
编译过程:1. 解压源码包。
2. 进入源码目录。
3. 使用以下命令进行编译:./configuremakemake install4. 编译完成后,您可以使用以下命令查看安装了哪些文件:make installcheck使用方法:IPMI工具可以在命令行中使用。
以下是一些常用命令:1. ipmitool -I lanplus -H [管理控制器IP] -U [用户名] -P [密码] power status这个命令可以检查服务器的电源状态。
2. ipmitool -I lanplus -H [管理控制器IP] -U [用户名] -P [密码] power on这个命令可以打开服务器的电源。
3. ipmitool -I lanplus -H [管理控制器IP] -U [用户名] -P [密码] chassis power cycle这个命令可以重启服务器。
4. ipmitool -I lanplus -H [管理控制器IP] -U [用户名] -P [密码] sensor list这个命令可以列出服务器的传感器信息。
总结:IPMITool是一个非常有用的工具,它可以让您在远程访问服务器时进行诊断和配置。
通过编译和使用IPMITool的源码,您可以更好地控制系统和服务器,提高系统管理的效率和可靠性。
- 1、下载文档前请自行甄别文档内容的完整性,平台不提供额外的编辑、内容补充、找答案等附加服务。
- 2、"仅部分预览"的文档,不可在线预览部分如存在完整性等问题,可反馈申请退款(可完整预览的文档不适用该条件!)。
- 3、如文档侵犯您的权益,请联系客服反馈,我们会尽快为您处理(人工客服工作时间:9:00-18:30)。
ipmitool 中文帮助文档Name(名字)Ipmitool ——对于控制支持IPMI的设备有效.Synopsis(概要)ipmitool [-c|-h|-v|-V] -I open <command>ipmitool [-c|-h|-v|-V] -I lan -H <hostname>[-p <port>][-U <username>][-A <authtype>][-L <privlvl>][-a|-E|-P|-f <password>][-o <oemtype>]<command>ipmitool [-c|-h|-v|-V] -I lanplus -H <hostname>[-p <port>][-U <username>][-L <privlvl>][-a|-E|-P|-f <password>][-o <oemtype>][-C <ciphersuite>]<command>Description(描述)这个程序能够使你通过一个kernel设备驱动或者一个远程系统,利用IPMI v1.5或IPMIv2.0 来管理本地系统的任何一个智能平台管理接口(IPMI)功能。
这些功能包括打印FRU(现场可替换装置)信息、LAN 配置、传感器读数、以及远程机架电源控制。
一个本地系统接口的IPMI管理功能需要一个兼容IPMI的kernel驱动程序被安装以及配置。
在linux中,这个驱动叫做OpenIPMI,他被包括在了标准化分配中。
在Solaris系统中,这个驱动叫做BMC,他被包括在了Solaris 10中。
远程控制的管理需要授权以及配置IPMI-over-LAN接口。
根据每个系统独特的需要,它可以通过系统接口来使LAN接口使用ipmitool。
Options(选项)-a 提示输入远程服务器的密码-A <authtype>当IPMIv1.5会话激活时,指定使用一个认证类型。
-c 使输出格式为CSV(逗号分隔的变量)格式。
但是不是针对所有命令都有效。
-C <ciphersuite>为IPMIv2 lanplus连接使用远程服务器身份验证、完整性和加密算法。
请看IPMIv2说明书中的表格22 -19。
默认的三个格式为:指定RAKP-HMAC-SHA1为验证,HMAC-SHA1-96为完整性,AES-CBC-128为加密算法。
-E 远程服务密码通过环境变量IPMI_PASSWORD来指定。
-f <password_file>指定一个文件,而这个文件中包含了远程服务密码。
如果这个选项没有被使用,或者指定的文件不存在,那么那么密码将默认为NULL。
-h 获取基本帮助-H <address>远程服务地址,可以为ip地址或者是主机名。
Lan和lanplus接口都需要这个操作。
-I <interface>选择使用的IPMI接口。
编译支持的接口都在使用帮助输出中可见。
-L <privlvl>力量会话特权级别。
可以为CALLBACK,USER,OPERATOR,ADMIN。
默认为ADMIN。
-m <local_address>设置本地IPMB(智能平台管理总线)地址。
默认的为0x20。
如果是一般的操作,那么就没有必要更改它。
-o <oemtype>选择支持的OEM(原始设备制造商)类型。
这通常涉及到代码中的小窍门,以解决各种BMC在不同制造商的怪癖到位。
使用命令“-o list”来查看当前支持的OEM类型的列表。
-p <port>设置要连接的远程服务UPD端口,默认为623。
-P <password>在命令行中指定远程服务密码。
如果支持,他将会进程列表中被掩盖。
注意!:不推荐在命令行中指定密码。
-t <target_address>桥接IPMI的请求到远程目标地址。
-U <username>远程服务用户名,默认为NULL。
-v 提高详细输出的级别。
这个操作可以指定多次用来提高调试输出的级别。
如果指定三次,那么你将会得到所有传入和传出的数据包。
-V 列出版本信息。
如果没有密码方法被指定,那么ipmitool将会提示用户输入密码。
如果用户没有输入密码,那么远程服务密码将会设置为NULL。
SECURITY(安全)在使用IPMI LAN 接口之前,有一些需要注意的安全问题。
一个远程控制站有这个能力去控制一个系统的power状态,同样也可以去收集某些平台上的信息。
为了减少脆弱性强烈建议IPMI LAN接口只能用在“trusted”环境中,在这个环境中系统的安全性不是一个问题或存在安全是一个专门的“管理网络”。
此外,我们强烈建议您不要启用没有设置密码的远程访问的IPMI,同时,这个密码不应该与那个系统的其他密码一样。
当利用ipmiv1.5 lan接口改变了远程机器的IPMI密码后,新密码将作为明文用过网络被发送。
这个可以被观察到并且可以被利用来攻击远程系统。
因此建议的IPMI密码管理只有通过IPMIv2.0 lanplus接口或在本地站系统接口完成。
在IPMIv1.5,最大密码长度为16个字符。
超过16字符的密码部分将被去掉。
在IPMI 2.0,最大密码长度为20个字符;较长的密码将被截断。
COMMANDS(指令集)help 这个可以在ipmitool命令行中获取命令行帮助。
也可以写在其他参数后面来选择使用帮助。
ipmitool helpCommands:raw 发送一个RAW(未加工的)IPMI请求然后输出响应。
lan 配置LAN通道。
chassis 获取机架状态并且设置power状态。
event 发送预定义的状态给MC(管理控制器)mc 管理控制器状态和全局是否可使用。
sdr 打印传感数据仓库输入与文本sensor 输出详细的传感器信息。
fru 输出内嵌的FRU(现场可替换装置)和扫描FRU 定位器的SDR(系统定义记录)sel 打印系统事件日志(SEL)。
pef 配置平台事件过滤(PEF)sol 配置IPMIv2.0 Serial-over-LANisol 配置IPMIv1.5 Serial-over-LANuser 配置管理控制器用户channel 配置管理控制器通道session 打印session信息exec 从文件中运行一系列的命令set 为shell和exec设置运行变量。
ipmitool chassis help 机架命令:status, power, identify, policy, restart_cause, poh, bootdevIpmitool chassis power help 机架power状态:status, on, off, cycle, reset, diag, softbmc/mcreset <warm|cold>指示BMC执行一个warm或cold得复位。
Info显示BMC硬件的信息,包括了设备版本、固件版本、IPMI版本支持、制造商id、额外设备支持的信息。
getenables显示一个列表,显示目前BMC的可用的操作选项。
setenables <option>=[on|off]启用或禁用特定的选项。
此命令根据IPMI规范仅支持系统接口。
当前option支持的选项有:recv_msg_intr 接收消息队列中断。
event_msg_intr 事件消息缓冲区满中断event_msg 事件消息缓冲区system_event_log 系统事件日志记录oem0 oem定义选项#0oem1 oem定义选项#1oem2 oem定义选项#2channelauthcap <channel number> <max priv>显示有关选定的信息通道的身份验证功能,在指定的权限级别.可能的特权级别包括:1 Callback level2 User level3 Operator level4 Administrator level5 OEM Proprietary levelinfo [channel number]显示选定的通道的信息。
如果没有给定通道,那么它将显示当前使用的通道的信息。
ipmitool channel infoChannel 0xf info:Channel Medium Type : System InterfaceChannel Protocol Type : KCSSession Support : session-lessActive Session Count : 0Protocol Vendor ID : 7154getaccess <channel number> [userid]将给定的userid作为给定的通道的默认值。
当给定的通道被使用,那么默认的用户就是给定的这个用户id。
setaccess <channel number> <userid>[callin=on|off] [ipmi=on|off] [link=on|off] [privilege=level]在给定的通道下为给定的userid配置用户访问信息getciphers <all | supported> <ipmi | sol> [channel]为给定的应用(ipmi或sol)在给定的通道下显示支持的密码套件列表ChassisStatus显示关于系统机架和主电源子系统的高级别状态的信息。
poh这个命令将会返回power on的时间(单位为小时)。
identify <interval>控制面板标识灯。
默认是15,用0表示关掉。
restart_cause 查询系统最后一次重启的原因。
Policy 设置如果停电时的机架电源策略。
list 显示所有支持的策略always-on 当电源恢复时onprevious 当电源恢复时返回到原先的状态。
always-off 当电源恢复时保持off。
power 执行机架控制命令来查看和更改电源状态。
Status 显示当前状态。
on 电源开off 电源关闭机架到软关闭(S4/S5状态)。
cycle 规定关闭的区间至少为1秒。
当机架电源状态在s4/s5状态时将不会有动作发生,我们建议首先检查电源状态,如果系统电源on或低于S4/S5休眠状态,此时在使用cycle命令。