天得警示灯选型型号说明
航空障碍灯技术参数

航空障碍灯技术参数航空障碍灯是一种用于指示高空障碍物的灯光装置,常见于高大建筑物、电力线路塔杆、桥梁、通信塔、风力发电机组等。
航空障碍灯技术参数是指衡量航空障碍灯性能和规格的一系列参数。
本文将介绍航空障碍灯技术参数的相关内容。
1. 亮度航空障碍灯的亮度是指灯光的强度,用坎德拉(cd)作为单位进行表示。
亮度越高,灯光在远处可见性越好。
一般来说,航空障碍灯的亮度要符合国家的相关标准,以确保飞行器能够及时发现并避开障碍物。
2. 光束角光束角是指航空障碍灯所发出光束的扩散角度。
光束角越大,灯光的覆盖范围就越广。
在设计航空障碍灯时,需要根据实际情况选择合适的光束角,以确保灯光能够有效地照射到周围的空域。
3. 频闪频率频闪频率是指航空障碍灯闪烁的频率,用赫兹(Hz)作为单位进行表示。
频闪频率的选择要考虑到人眼对光的感知特性,以及航空器在飞行时对灯光的识别能力。
常见的频闪频率为20-60Hz,能够有效地吸引飞行器的注意。
4. 工作温度范围航空障碍灯需要在各种环境条件下正常工作,因此其工作温度范围是一个重要的技术参数。
一般来说,航空障碍灯的工作温度范围应符合国家标准,并能够适应高温、低温等恶劣环境条件。
5. 防护等级由于航空障碍灯常安装在户外,需要能够抵御风雨、尘土等自然环境的侵蚀。
因此,航空障碍灯的防护等级是一个重要的技术参数。
一般来说,航空障碍灯的防护等级应达到IP65及以上,以确保其正常工作并具备较长的使用寿命。
6. 电源电压航空障碍灯的电源电压是指其正常工作所需的电压范围。
一般来说,航空障碍灯的电源电压应与所用电源系统相匹配,以确保灯具能够正常工作。
常见的电源电压有AC110V、AC220V等。
7. 寿命航空障碍灯的寿命是指其能够正常工作的时间长度。
寿命长短直接影响到航空障碍灯的使用成本和维护频率。
一般来说,航空障碍灯的寿命应达到一定的要求,以确保其在使用过程中能够持续稳定地工作。
8. 安装方式航空障碍灯的安装方式是指灯具的安装方式,常见的有挂装、侧装、底装等。
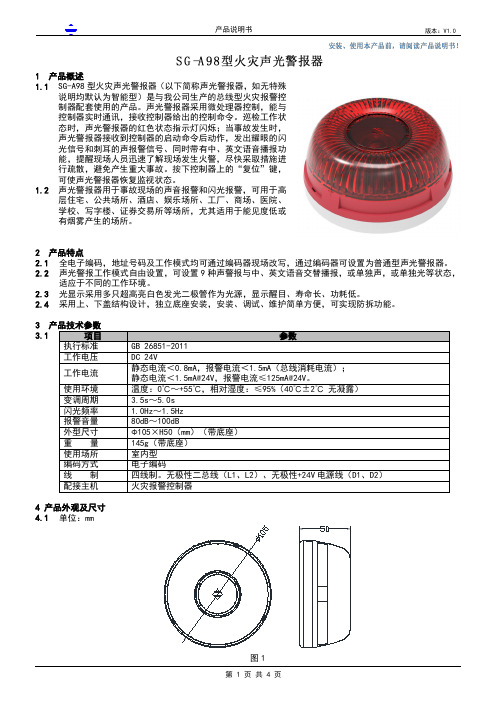
SG-A98 型火灾声光警

1产品概述1.1SG-A98型火灾声光警报器(以下简称声光警报器,如无特殊说明均默认为智能型)是与我公司生产的总线型火灾报警控制器配套使用的产品。
声光警报器采用微处理器控制,能与控制器实时通讯,接收控制器给出的控制命令。
巡检工作状态时,声光警报器的红色状态指示灯闪烁;当事故发生时,声光警报器接收到控制器的启动命令后动作,发出耀眼的闪光信号和刺耳的声报警信号、同时带有中、英文语音播报功能,提醒现场人员迅速了解现场发生火警,尽快采取措施进行疏散,避免产生重大事故。
按下控制器上的“复位”键,可使声光警报器恢复监视状态。
1.2声光警报器用于事故现场的声音报警和闪光报警,可用于高层住宅、公共场所、酒店、娱乐场所、工厂、商场、医院、学校、写字楼、证券交易所等场所,尤其适用于能见度低或有烟雾产生的场所。
2产品特点2.1全电子编码,地址号码及工作模式均可通过编码器现场改写,通过编码器可设置为普通型声光警报器。
2.2声光警报工作模式自由设置,可设置9种声警报与中、英文语音交替播报,或单独声,或单独光等状态,适应于不同的工作环境。
2.3光显示采用多只超高亮白色发光二极管作为光源,显示醒目、寿命长、功耗低。
2.4采用上、下盖结构设计,独立底座安装,安装、调试、维护简单方便,可实现防拆功能。
33.14产品外观及尺寸4.1单位:mm图15产品使用与工程应用5.1配套安装底座(DZ-A98)示意图图2DZ-A98端子定义(无极性二总线、无极性+24V 电源线)1信号端(L1)2电源端(D1)3信号端(L2)4电源端(D1)5.2接线方式:声光警报器通过总线与电源线接入相兼容的火灾报警控制系统,采用无极性连接,控制器的总线L1、L2与配套底座的1端和3端相连;控制器的电源线+24V(D1)、GND(D2)与配套底座的2端和4端相连。
多个声光警报器与控制器连接的示意图如图所示。
图35.3地址编码:如图所示,将声光警报器通过编码器将配套底座(编码配套底座为DZ-A98)接入,L1、L2采用无极性连接,把编码器设定为编码功能,编制正确的地址码,按下“OK”键,完成地址编码设置。
防爆灯型号技术参数大全

防爆灯型号技术参数大全---江苏欧瑞防爆电气有限公司∙∙ourui2009∙1位粉丝∙1楼BLY56防爆荧光灯技术数据!危险区域:可燃性气体和可燃性粉尘可能同时出现或分别出现1区、2区、20区、21区、22区气体或蒸气类别:IIA、II B、II C温度组别:T1 ~ T6适用环境:户内、户外外壳:无铜铝合金压铸,抛丸,聚脂静电喷塑防爆荧光灯外露紧固件:高质量不锈钢透明罩:抗机械冲击,耐热,钢化玻璃内部配置:G13防震双脚灯座结构描述:抽芯式灯芯结构、接线维修须开启部位采用不脱出紧固螺钉引入装置:Exd填料式电统直接引入防爆荧光灯反光罩:碳钢,白色聚脂喷塑安装形式:吸顶式、管吊式、悬臂式、平台式执行标准:GB 3836.1" GB 3836,2、GB12476.1、IEC 60079-0、IEC 60079-1、IEC61241-1-1 防爆标志:Ex d II C T6/DIP A20 TA,T6防护等级:IP66额定工伟电压:AC220V/AC230V光源功率:1 x18W、1 x36W、2x18W\2 x 36W防腐等级:F2进结口螺纹:G3/4电缆外径:φ7~φ14应急时间:≥90min重量:4.1KG、6.7KG、7.5KG、12.2kg∙2010-1-28 15:06∙回复∙∙ourui2009∙1位粉丝2楼BLY57防爆荧光灯技术数据!危险区域:可燃性气体和可燃性粉尘可能同时出现或分别∙出现2区、20区、21区、22区气体或蒸气类别:IIA、II B、IIC温度组别:T1 - T6适用环境:户内、户外外壳:无铜铝合金挤压成型,抛丸,聚脂静电喷塑外露紧固件:高质量不锈钢防爆荧光灯透明罩:抗机械冲击,耐热,钢化玻璃内部配置:G5,G13防震双脚灯座结构描述:接线维修须开启部位采用不脱出紧固螺钉,进线口可为一或二个引入装置:密封圈式防爆电缆引入装置,铠装式防爆电缆密封接头反光罩:高纯铝,高反光率安装形式:吸顶式、管吊式、悬臂式、壁挂式、平台式\嵌入式、L型旋转式、卡口旋转式执行标准:GB 3836.1,GB12476.1、IEC60079-0、I EC61241 -1 -1GB3836.8、IEC60079-15防爆标志:Ex nA II T6jDIP A20 TA,T6防爆荧光灯防护等级:IP66额定工伟电压:AC220V/AC230V光源功率:1 x14W、2x 14W、1 x18W、2x 18W、1 x36、2x36W防腐等级:F2进线口螺纹:M20x1.5电缆外径:φ6.5-φ14应急时间:≥90mi们重量:7.5kg、8kg∙2010-1-28 15:07∙回复∙∙ourui2009∙1位粉丝∙3楼BLY58防爆荧光灯技术数据!危险区域:可燃性气体和可燃性粉尘可能同时出现或分别出现1区、2区、20区、21区、22区/ 2区、20区、21区、22区气体或蒸气类别:IIA、II B、II C温度组别:T1 ~ T6适用环境:户内、户外外壳:玻璃纤维增强聚脂、玻璃铜卡规外露紧固件:高质量不锈钢防爆荧光灯透明罩:聚硅酸脂内部配置:防爆单脚灯座G13防震双脚灯座结构描述:拉出卡规即开盖接线维修、进线口可为一或二个、硅橡胶密封条引入装量:密封圈式防爆电缆引入装置反光罩:高纯铝,高反光率安装形式:吸顶式、管吊式\悬壁式、平台式执行标准:GB 3836.1、IEC 60079-0、GB12476.1,IEC 61241-1-1GB 3836.2、GB 3836.3、GB 3836.9、IEC 60079-1、IEC 60079-7/IEC 60079-18 GB3836.8、I EC60079- 15防爆标志:Ex edm II C T6/DIP A20 TA,T6ιEx nA II T6/DIP A20 TA,T6防爆荧光灯防护等级:IP66额定工作电压:AC220V / AC230V光源功率:1 x20W、2 x 20W、1 x40W、2x40W 1 x 18W、2x18W\1 x36W\2x36W防腐等级:F2进结口螺纹:M20 x 1.5电缆外径:φ6.5 ~φ14应急时间:≥90min重量:7kg、8kg∙2010-1-28 15:07∙回复∙∙ourui2009∙1位粉丝4楼BLY59防爆荧光灯技术数据!危险区域:可燃性气体和可燃性粉尘可能同时出丑或分引∙出现的1区、2区、20区、21区、22区/ 2区20区、21区、22区气体或蒸气类别:IIA、II B、II C温度组别:T1 ~ T6防爆荧光灯适用环境:户内、户外外壳:耐酸不锈钢,抛光或聚脂静电喷塑外露紧固件:高质量不锈钢透明罩:抗机械冲击,耐热!钢化玻璃内部配置:Fa6防爆单脚灯座G13防震双脚灯座结构描述:接线维修须开启部位采用不脱出紧固螺钉(栓),进线口可为一或二个引入装置:密封圈式防爆电缆引入装置防爆荧光灯反光罩:高纯铝,高反光率安装形式:吸顶式、管吊式、悬臂式\壁挂式、平台式、嵌入式执行标准:GB 38361,IEC 60079-0、GB12476.1、IEC61241-1-1GB 3836.2、GB 3836.3、GB 3836,9、IEC 60079-1\IEC60079-7、IEC 60079-18 GB3836.8、I EC60079- 15防爆标志:Ex edm II C T6/DIP A20 TA,T6 Ex nAII T6/DIP A20 TA,T6防护等级:IP66额定工作电压:AC220V /AC230V光源功率:1 x20W、2x20W\1 x40W、2x40W 1 x 18W、2 x 18W、1 x 36W、2 x36W防腐等级:F2进结口螺纹:M20 x 1.5电缆外径:φ6.5 ~φ14应急时间:≥90min重量:14kg、20kg∙2010-1-28 15:08∙回复5楼∙∙ourui2009∙1位粉丝∙BLT56防爆投光灯技术数据!危险区域:可燃性气体和可燃性粉尘可能同时出现或分别出现1区、2区、20区、21区、22区气体或蒸气类别:IIA、川B温度组别:T1 - T3防爆投光灯适用环境:户内、户外外壳:无铜铝合金压铸,抛丸,聚脂静电喷塑外露紧固件:高质量不锈钢透明罩:抗机械冲击,耐热!钢化玻璃内部配置:E40灯座结构描述:耐酸硅橡胶密封垫,水平旋转3600 ,仰角+ 600至-600内可调反光罩:高纯钮,高反光率,抛物面形状执行标准:GB 3836.1、GB 3836.2、GB12476.1 "IEC 60079-0、IEC 60079-1\IEC61241-1-1防爆标志:Ex d II B T3/DIP A20 TA,T3防护等级:IP66额定工作电压:AC220V/AC230V光源功率:150W-500W防爆投光灯防腐等级:F2进结口螺纹:G3/4电缆外径:φ7-φ14光源:高压铀灯、金卤灯\高压汞灯、自镇汞灯、白织灯重量1O.5kg、11.3kg∙2010-1-28 15:08∙回复∙∙ourui2009∙1位粉丝∙6楼BLJ56防爆应急灯技术数据!危险区域:可燃性气体和可燃性粉尘可能同时出现或分别出现1区、2区、20区、21区、22区气体或蒸气类别:IIA、ⅡB温度组别:T1 ~ T6适用环境:户内、户外外壳:无铜铝合金铸造,1抛丸,聚脂静电喷塑外露紧固件:高质量不锈钢透明罩:抗机械冲击,耐热,钢化玻璃内部配置:优质镍镉电池结构描述:耐酸硅橡胶密封塑,可旋转灯头(上60°至下3 0°)执行标准:GB 3836.1、GB 3836.2、GB12476.1、IEC 60079-0、IEC 60079-1、IEC61241-1-1 防爆标志:Ex d II B T6/DIP A20 TA,T6防护等级:IP66额定工作电压:AC220V光源功率:20W防腐等级:F2进结口螺纹:G3/4电缆外径:φ7~φ14应急时间:≥90min充电时间:24h光源:白炽灯∙2010-1-28 15:08∙回复∙∙ourui2009∙1位粉丝∙7楼BLL59防爆照明灯技术数据!危险区域:可燃性气体和可燃性粉尘可能同时出现或分别出现1区、2区、20区、21区、22区气体或蒸气类别:IIA、II B、II C温度组别:T1 - T4适用环境:户内、户外防爆照明灯外壳:耐酸不锈钢,抛光外露紧固件:高质量不锈钢透明罩:抗机械冲击,耐热,钢化玻璃内部配置:E40、E27防爆灯座结构描述:耐酸硅橡胶密封垫,按链式开启反光罩:高纯铝,高反光率安装形式DR顶式、管吊式、壁挂式、平台式、路灯式执行标准:GB 3836.1、GB3836.3、GB 3836.8、G自12 476.1,IEC 60079-0、IEC60079-7、IEC 60079-15、I EC61241-1防爆标志:Ex nIIAT3 - T4/DIP A20 TA,T3 - T4(不适用1区)Ex e II 13 - T4/DIP A20 TA,T3 - T4 防护等级:IP66额定工作电压:AC220V/AC230V功率:28W-300W防腐等级:F2防爆照明灯进线口螺纹:G3/4电缆外径:直径7-直径14光源:高压钠灯、金卤灯、高压汞灯、自镇汞灯、白炽灯、节能灯重量:4.5KG、5.5kg∙2010-1-28 15:09∙回复∙∙ourui2009∙1位粉丝∙8楼BLL56防爆照明灯技术数据!危险区域:可燃性气体和可燃性粉尘可能同时出现或分别出现1区、2区、20区、21区、22区气体或蒸气类别:IIA、II B、II C温度组别:T1 ~T4适用环境:户内、户外外壳:无铜铝合金压铸,抛丸、聚脂静电喷塑外露紧固件:高质量不锈钢透明罩:抗机械冲击,耐热,钢化玻璃内部配置:E40、E27灯座防爆照明灯结构描述:耐酸硅橡胶密封垫反光罩:高纯铝,高反光率安装形式:吸顶式、管吊式、壁挂式、平台式,路灯式执行标准GB 3836.1、GB 3836.2、GB12476.1、IEC 60079-0、IEC 60079-1、IEC61241-1-1防爆标志:Ex d II C T4/DIP A20 TA,T4 防护等级:IP66额定工作电压:AC220V/AC230V防爆照明灯光源功率:28W~300W防腐等级:F2进结口蝶纹:G3/4。
天逸电器JD警示灯产品手册说明书

JD 警示灯Tower Light 安全、值得信赖产品手册TAYEEBrand legend1997200220072012201703JD警示灯产品综述上海天逸电器有限公司一直以创新及产品的高品质在低压主令电器领域享有盛誉。
为了更好的满足机器制造厂家,过程自动化设备制造厂家以及最终用户对高性能产品的需求,天逸电器又推出一系列创新和技术领先的产品――JD系列警示灯。
JD系列警示灯是天逸电器精心筹备多年的新产品,与天逸电器所有产品一样,JD系列警示灯的设计、制造等各个环节始终在公司质量体系的严格检测和监督下进行,确保了产品的高品质。
积木式设计、高防护等级、高亮度、抗振及安装形式多样是此系列产品的显著特点,此系列产品的推出又将使您的设备增添更高价值。
警示灯JD T ower Light目录 / CONTENTSΦ50单体式警示灯 06Φ70单体式警示灯 10JD70AP中心安装警示灯 18Φ90单体式警示灯 20Φ150单体式警示灯 27单体式警示灯 一体式警示灯Φ36mm一体式警示灯 65Φ50mm一体式警示灯 69Φ50F声光一体式警示灯 72JD110P多音报警器 89JD150P多音报警器 91成套报警器Φ50组合式警示灯 33Φ22mm安装警示灯 40Φ70组合式警示灯 42Φ90组合式警示灯 52JD90F方形组合式警示灯 59组合式警示灯Φ50单层多色警示灯 75Φ70单层多色警示灯 79JD90A-C单体多色警示灯 84多色警示灯警示灯JD T ower Light05单体警示灯为了确保产品能够不受限制的应用于各行各业,JD 系列单体式警示灯在设计制造过程中遵循天逸电器一贯的高标准,防护等级最高可达IP65,满足您的高要求。
防护等级竞争的时代需要更多创意,JD 系列单体式警示灯提供多样化的外观供您选择,分别为JD50A 、JD50CA 、J D70A 、J D70C A 、J D90A 、J D90B 、J D150A 、JD150B 让您拥有个性化的产品。
天得16mm按钮开关

压出,护盖三组(六槽)固定槽,每组之间的角度为 45°,上座上 动作位置
端有二个凸块,可依下图三种操作方向插入护盖上三组固定
槽.因接点座跟着上座方向之变化而旋转,故选 S1 及 S2 二种
操作方向时,固定孔距至少为 26m/m.
二段式选择开关/钥匙开关
接点数目排列
2NO+2NC (2a2b)
3NO+3NC (3a3b)
外观尺寸
型号说明
项次
代号
说明
1.固定孔径 TN16 16m/m 系列
2.型式
SS 选择开关 KS 钥匙开关
3.外形
R 圆形 S 方形 L 长方形
4.保护构造 5.色盖
4 IP40 6 IP65 R红 G绿 B黑
1
二段 90°
6.动作方式 2
二段 90°复归
3
三段 180°
性能
接点电阻 50mΩ 以下(初期值)
灯泡规格
灯泡种类 代号 额定电压 代号
操作电压
额定电流 颜色 代号
6.3VAC/DC 6
6VAC/DC
110mA
钨丝灯泡 I 14VAC/DC 14 12VAC/DC
50mA
空白
28VAC/DC 28 24/28VAC/DC 25mA
LED 灯泡 L
6VDC
6
12VDC 12
24VDC 24
6VDC 12VDC 24VDC
使用:-25°C to 55°C 周围温度
保存:-30°C to 80°C
湿度 45% to 80% RH
复归式:2,000,000 次以上 机械寿命
交替式:250,000 次以上
复归式:100,000 次以上(1800 次/小
威兰 LED警示灯产品说明书

For warranty information regarding this product, visit /warranty•Proper installation of this product requires the installer to have a good understanding of automotive electronics, systems and procedures.•Whelen Engineering requires the use of waterproof butt splices and/or connectors if that connector could be exposed to moisture.•Any holes, either created or utilized by this product, should be made both air- and watertight using a sealant recommended by your vehicle manufacturer.•Failure to use specified installation parts and/or hardware will void the product warranty.•If mounting this product requires drilling holes, the installer MUST be sure that no vehicle components or other vital parts could be damaged by the drilling process. Check both sides of the mounting surface before drilling begins. Also de-burr the holes and remove any metal shards or remnants. Install grommets into all wire passage holes.•If this manual states that this product may be mounted with suction cups, magnets, tape or Velcro®, clean the mounting surface with a 50/50 mix of isopropyl alcohol and water and dry thoroughly.•Do not install this product or route any wires in the deployment area of your air bag. Equipment mounted or located in the air bag deployment area will damage or reduce the effectiveness of the air bag, or become a projectile that could cause serious personal injury or death. Refer to your vehicle owner’s manual for the air bag deployment area. The User/Installer assumes full responsibility to determine proper mounting location, based on providing ultimate safety to all passengers inside the vehicle.•For this product to operate at optimum efficiency, a good electrical connection to chassis ground must be made. The recommendedprocedure requires the product ground wire to be connected directly to the NEGATIVE (-) battery post (this does not include products that use cigar power cords).•If this product uses a remote device for activation or control, make sure that this device is located in an area that allows both the vehicle and the device to be operated safely in any driving condition.•Do not attempt to activate or control this device in a hazardous driving situation.•This product contains either strobe light(s), halogen light(s), high-intensity LEDs or a combination of these lights. Do not stare directly into these lights. Momentary blindness and/or eye damage could result.•Use only soap and water to clean the outer lens. Use of other chemicals could result in premature lens cracking (crazing) and discoloration. Lenses in this condition have significantly reduced effectiveness and should be replaced immediately. Inspect and operate this product regularly to confirm its proper operation and mounting condition. Do not use a pressure washer to clean this product.•It is recommended that these instructions be stored in a safe place and referred to when performing maintenance and/or reinstallation of this product.•FAILURE TO FOLLOW THESE SAFETY PRECAUTIONS AND INSTRUCTIONS COULD RESULT IN DAMAGE TO THE PRODUCT OR VEHICLE AND/OR SERIOUS INJURY TO YOU AND YOUR PASSENGERS!A u t o m o t i v e : Warnings to InstallersWhelen’s emergency vehicle warning devices must be properly mounted and wired in order to be effective and safe. Read and follow all of Whelen’s written instructions when installing or using this device. Emergency vehicles are often operated under high speed stressful conditions which must be accounted for when installing all emergency warning devices. Controls should be placed within convenient reach of the operator so that they can operate the system without taking their eyes off the roadway. Emergency warning devices can require high electrical voltages and/or currents. Properly protect and use caution around live electrical connections.Grounding or shorting of electrical connections can cause high current arcing, which can cause personal injury and/or vehicle damage, including fire. Many electronic devices used in emergency vehicles can create or be affected by electromagnetic interference. Therefore, after installation of any electronic device it is necessary to test all electronic equipment simultaneously to insure that they operate free of interference from other components within the vehicle. Never power emergency warning equipment from the same circuit or share the same grounding circuit with radio communication equipment. All devices should be mounted in accordance with the manufacturer’s instructions and securely fastened to vehicle elements of sufficient strength to withstand the forces applied to the device. Driver and/or passenger air bags (SRS) will affect the way equipment should be mounted. This device should be mounted by permanent installation and within the zones specified by the vehicle manufacturer, if any. Any device mounted in the deployment area of an air bag will damage or reduce the effectiveness of the air bag and may damage or dislodge the device. Installer must be sure that this device, its mounting hardware and electrical supply wiring does not interfere with the air bag or the SRS wiring or sensors. Mounting the unit inside the vehicle by a method other than permanent installation is not recommended as unit may become dislodged during swerving; sudden braking or collision. Failure to follow instructions can result in personal injury. Whelen assumes no liability for any loss resulting from the use of this warning device. PROPER INSTALLATION COMBINED WITH OPERATOR TRAINING IN THE PROPER USE OF EMERGENCY WARNING DEVICES IS ESSENTIAL TO INSURE THE SAFETY OF EMERGENCY PERSONNEL AND THE PUBLIC.Warnings to UsersWhelen’s emergency vehicle warning devices are intended to alert other operators and pedestrians to the presence and operation of emergency vehicles and personnel. However, the use of this or any other Whelen emergency warning device does not guarantee that you will have the right-of-way or that other drivers and pedestrians will properly heed an emergency warning signal. Never assume you have the right-of-way. It is your responsibility to proceed safely before entering an intersection, driving against traffic, responding at a high rate of speed, or walking on or around traffic lanes. Emergency vehicle warning devices should be tested on a daily basis to ensure that they operate properly. When in actual use, the operator must ensure that both visual and audible warnings are not blocked by vehicle components (i.e.: open trunks or compartment doors), people, vehicles, or other obstructions. It is the user’s responsibility to understand and obey all laws regarding emergency warning devices. The user should be familiar with all applicable laws and regulations prior to the use of any emergency vehicle warning device. Whelen’s audible warning devices are designed to project sound in a forward direction away from the vehicle occupants. However, because sustained periodic exposure to loud sounds can cause hearing loss, all audible warning devices should be installed and operated in accordance with the standards established by the National Fire Protection Association.Safety FirstThis document provides all the necessary information to allow your Whelen product to be properly and safely installed. Before beginning the installation and/or operation of your new product, the installation technician and operator must read this manual completely. Important information is contained herein that could prevent serious injury or damage.WARNING: This product can expose you to chemicals including Methylene Chloride which is known to the State of California to cause cancer, and Bisphenol A, which is known to the State of California to cause birth defects or other reproductive harm. For more information go to .©1999 Whelen Engineering Company. Form No.13502 (121099)Installation Guide:43 Series Halogen Lighthead51 Winthrop RoadChester, Connecticut 06412-0684Phone: (860) 526-9504Internet: Salese-mail:*******************CustomerServicee-mail:*******************®ENGINEERING COMPANY INC.ing a cutting tool, cut an opening in the mounting surface as indicated on the template.5.Route the cable assembly to your power supply.6.Plug the lighthead into the cable and plug the cable into the power supply. Test operation of the lighthead before securing it to the vehicle.7.Secure the assembly onto the mounting surface with the supplied sheetmetal screws.NOTE: All customer supplied wires that connect to the positive terminal of the battery, must be sized to supply at least 125% of the maximum operating current and fused at the battery to carry the load.Installation:1.Position the lighthead in its approximate mountinglocation to make sure that the lighthead will not interfere with any existing equipment. Also be aware of any and all items on the opposite side of the mounting surface to prevent any possible damage to existing components.2.Remove the lighthead, position the supplied mountingtemplate onto the mounting location and temporarily secureit to the surface. The template must be FLAT against thesurface.NOTE:Before proceeding, place the reflector against thetemplate and confirm that the mounting holes on the template line up with the actual mounting holes on the reflector.3.Using an appropriately sized drill bit, drill the mounting holes as shown on the template.D O N O T P H O T O C O P Y。
深圳市天成照明有限公司 TX1818B 智能外控 LED 光源规格书说明书

地址:深圳市宝安区松岗街道东方大道29573979网址:目录1、产品概述 (3)2、主要应用 (3)3、特征说明 (3)4、产品尺寸 (4)5、产品命名规则 (4)6、引脚功能 (5)7、RGB光电特性 (5)8、绝对最大值 (6)9、IC电气参数 (6)10、开关特性 (6)11、数据传输时间 (7)12、时序波形图 (7)13、数据传输方式 (8)14、24bit数据结构 (8)15、典型应用电路 (8)16、光电特性曲线 (9)17、包装 (10)18、可靠性测试 (11)19、焊接说明 (112)20、注意事项 (113)1.Description(产品描述)TX1818B是一个集控制电路与发光电路于一体的智能外控LED光源。
其外型与一个5050LED灯珠相同,每个元件即为一个像素点。
像素点内部包含了智能数字接口数据锁存信号整形放大驱动电路,电源稳压电路,内置恒流电路,高精度RC振荡器,输出驱动采用专利PWM技术,有效保证了像素点内光的颜色高一致性。
数据协议采用单极性归零码的通讯方式,像素点在上电复位以后,DIN端接受从控制器传输过来的数据,首先送过来的24bit数据被第一个像素点提取后,送到像素点内部的数据锁存器,剩余的数据经过内部整形处理电路整形放大后通过DO端口开始转发输出给下一个级联的像素点,每经过一个像素点的传输,信号减少24bit。
LED具有低电压驱动,环保节能,亮度高,散射角度大,一致性好,超低功率,超长寿命等优点。
将控制电路集成于LED上面,电路变得更加简单,体积小,安装更加简便。
2.Applications(主要应用)LED全彩发光字灯串,LED全彩模组,LED幻彩软硬灯条,LED护栏管,LED外观/情景照明。
LED点光源,LED像素屏,LED异形屏,各种电子产品,电器设备跑马灯。
3.Features(特征说明)单颗IC或灯珠损坏不影响后续数据;默认输出恒流值9mA,便于降低内置灯珠功耗;灰度调节电路(256级灰度可调);双输入串行级联接口(DIN,FDIN);内置高精度和高稳定性振荡器;数据整形:接受完本单元数据自动将后续数据整形输出;数据传输频率可达800Kbps。
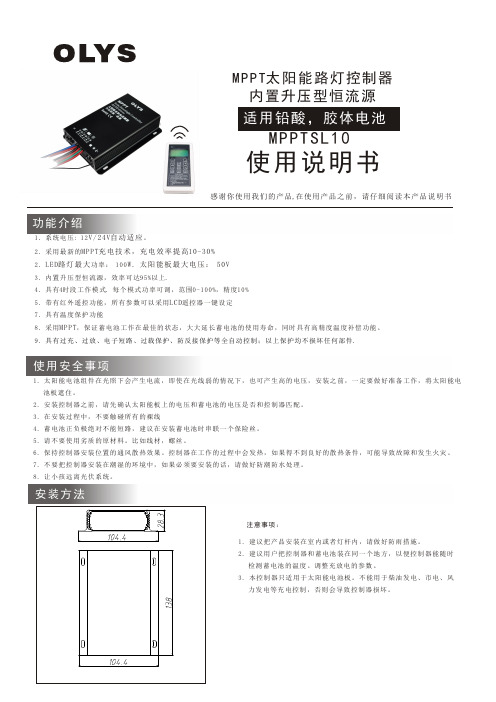
OLYS MPPT太阳能路灯控制器 内置升压型恒流源 MPPTSL 10 使用说明书

1. 系统电压: 12V/24V 自动适应。
2. 采用最新的MPPT 充电技术,充电效率提高10-30%2. LED 路灯最大功率: 100W. 太阳能板最大电压: 50V3. 内置升压型恒流源,效率可达95%以上.4. 具有4时段工作模式. 每个模式功率可调,范围0-100%,精度10%5. 带有红外遥控功能,所有参数可以采用LCD 遥控器一键设定7. 具有温度保护功能8. 采用MPPT ,保证蓄电池工作在最佳的状态,大大延长蓄电池的使用寿命,同时具有高精度温度补偿功能。
9. 具有过充、过放、电子短路、过载保护、防反接保护等全自动控制;以上保护均不损坏任何部件.1. 太阳能电池组件在光照下会产生电流,即使在光线弱的情况下,也可产生高的电压,安装之前,一定要做好准备工作,将太阳能电 池板遮住。
2. 安装控制器之前,请先确认太阳能板上的电压和蓄电池的电压是否和控制器匹配。
3. 在安装过程中,不要触碰所有的裸线4. 蓄电池正负极绝对不能短路,建议在安装蓄电池时串联一个保险丝。
5. 请不要使用劣质的原材料。
比如线材,螺丝。
6. 保持控制器安装位置的通风散热效果。
控制器在工作的过程中会发热,如果得不到良好的散热条件,可能导致故障和发生火灾。
7. 不要把控制器安装在潮湿的环境中,如果必须要安装的话,请做好防潮防水处理。
8. 让小孩远离光伏系统。
MPPT 太阳能路灯控制器内置升压型恒流源使用说明书感谢你使用我们的产品,在使用产品之前,请仔细阅读本产品说明书1. 建议把产品安装在室内或者灯杆内,请做好防雨措施。
2. 建议用户把控制器和蓄电池装在同一个地方,以便控制器能随时检测蓄电池的温度。
调整充放电的参数。
3. 本控制器只适用于太阳能电池板。
不能用于柴油发电、市电、风力发电等充电控制,否则会导致控制器损坏。
注意事项:接线方法1. 本控制器可以适用铅酸电池,胶体电池。
可以用遥控器选择相应的电池2. 温度保护功能:当外部环境温度>65℃,充电停止。
