英文使用手册说明书
产品说明书范文英文版
产品说明书范文英文版电子产品说明书——媒体音响英文说明书范例(中英)便携式多媒体音响 Portable Multimedia Acoustics使用说明书User’s Manual专注于完美音质的追求?? Concentrate on perfect soundpursuit?感谢您使用本公司出品的数码产品,为了让您轻松体验产品,我们随机配备了内容详尽的使用说明,您从中可以获取有关产品的介绍,使用方法等方面的知识。
在您开始使用本机之前请先仔细阅读说明书,以便您能正确的使用本机,如有任何印刷错误或翻译失误望广大用户谅解,当涉及内容有所更改时,恕不另行通知。
Thank you for using this digital product of our company. In order to let you experience the product swimmingly, detailed instruction is provided which you can find the product’sintroduction, usage and other information. Before using this product, please read the manual carefully, so that you can correctly use it. In case of any printing or translation error, we apologize for the inconvenience. As for the content change, we are sorry for no further notice.一、产品概述 General Information本机是一款外观小巧,设计精美、携带方便多媒体小音响,适用于家居、户外旅游、办公室等场所,随时随地享受音乐带来的轻松,为您的电脑、数码音乐播放器、手机等视听产品提供超值完美的音质。
MP1714T 英文说明书l
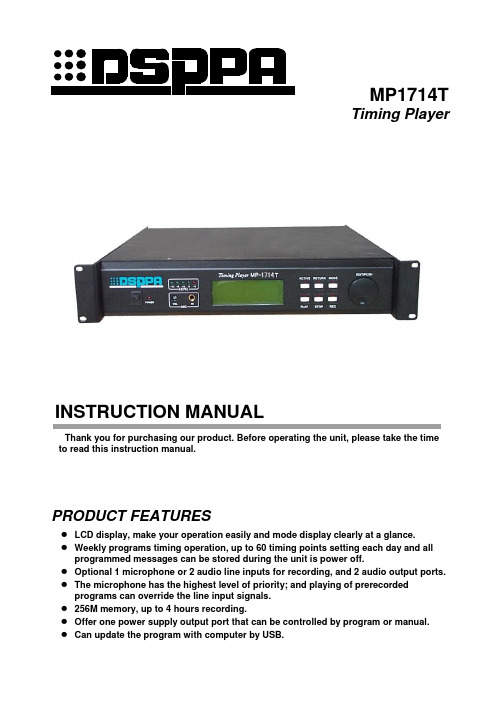
MP1714TTiming PlayerINSTRUCTION MANUALThank you for purchasing our product. Before operating the unit, please take the timeto read this instruction manual.PRODUCT FEATURES●LCD display, make your operation easily and mode display clearly at a glance.●Weekly programs timing operation, up to 60 timing points setting each day and allprogrammed messages can be stored during the unit is power off.●Optional 1 microphone or 2 audio line inputs for recording, and 2 audio output ports.●The microphone has the highest level of priority; and playing of prerecordedprograms can override the line input signals.●256M memory, up to 4 hours recording.●Offer one power supply output port that can be controlled by program or manual.●Can update the program with computer by USB.FRONT PANEL⑴⑵⑶⑷⑸⑹⑺⑻⑼⑽⑾⑿⒀Functions of the buttons or knob:⑴Power switch ⑵Power indicator ⑶Recording levelcontrol ⑷Output Levelindicators⑸Microphone input port ⑹LCD screen ⑺Power supply outputmanual control button ⑻programs playingbutton⑼Return or cancel button ⑽Operation stopbutton ⑾Programs recordingbutton⑿programs playingmode switch button⒀Multi-function operationknobREAR PANEL⑴⑵⑶⑷⑸⑹⑺⑻⑴Audio signal inputports ⑵Audio signal outputports⑶USB port for MP3programs download⑷Remote control datainput and link ports⑸AC fuse for powersupply output port ⑹power supply outputport⑺AC fuse for this unit⑻AC power supply cordCONNECTIONThis method of connection can achieve functions such as manual playing, program-controlled timing playing, emergency paging, external audio signal broadcasting and microphone or external audio signal recording. Microphone has the highest level of priority. It can override any other signals, and programs playing can override external audio signals.FUNCTIONS OPERATIONPIC.1 Main interface screen1 TRACKS PLAYING:Turn the “EDIT/PUSH ” knob to display the track list for selection. Select the tracks you want to play by turning the knob and pressing it, and then the numbers of the tracks you selected will display at the bottom line in LCD screen. If you wand to play the tracks you selected, just pressing “PLAY ” button is OK. The track that last selecting will play at first. During playing, the name of the current playing track and the numbers of selected tracks are displayed alternately at the bottom line in LCD screen. If you want to cancel the selected tracks. You can turn the “EDIT/PUSH ” knob. When the tracks list displays in LCD screen and then pressing “RETURN ” button will cancel the selected tracks step by step. If you want to exit the state of tracks selecting, pressing “STOP ” button is OK. The unit provides two modes for tracks selecting:① Individual selection, it means you can select the tracks what you want step by step. Turn the “EDIT/PUSH ” knob to display the tracks list, then press the “MODE ” button after you start to select the tracks, when the icons such as 31>34>50> are displayed at bottom line on LCD screen, the unit will play the tracks in sequence. (The screen indicated in pic.2 )PIC.2 Individual selection screen PIC.3 Range selection screen② Range selection, it means you can select the tracks in the range of what you want. Turn the “EDIT/PUSH ” knob to display the tracks list, then press the “MODE ” button Power on → SUN. 15:20:56 SUN. 13 :38 :26 ▉ No program listPower on → SUN. 15:20:56 SUN. 13 :38 :26 ▉ 30→35 1 2 Ancient chime Church chime Amplifier External audiosignal Remote control Signal in Signal out Power supply output Remote data in SpeakersPower on → SUN. 15:20:56 SUN. 13 :38 :26 ▉ 23>34>40> 1 2 Ancient chime Church chimeafter you start to select the tracks, when the icons such as 31→34 are displayed atbottom line on LCD screen, the unit will play the tracks in sequence. (The screenindicated in pic.3 )Also, there are two playing modes for option:① Playing in sequence, it means playing tracks in the selection order. In playing statusor in no operation status, press “MODE ” button until the icon “→“ is indicated at themiddle of top line on LCD screen. In this case, the unit will play tracks in a sequencenon-repeatedly. (The screen indicated in pic.4 )PIC.4 Play in a sequence PIC.5 Play in a loop② Playing in a loop, it means the unit will play the selected tracks repeatedly. In playingstatus or in no operation status, press “MODE ” button until the icon “=“ indicated atthe middle of top line on LCD screen. In this case, the unit will play the selectedtracks repeatedly. (The screen indicated in pic.5 )2 PROGRAMMED CONTROL / MANUAL CONTROL:Once the “ACTIVE ” button on the front panel is pressed, the state of the unit will change to manual control mode and the word “on ” or “off ” at the top left corner on LCD screen will flash. When you press the “Play ” button to play the tracks, the unit will also turn to manual control mode automatically. In this mode, the “ACTIVE ” button can switch on or off “power supply output port ” on the rear panel. Timing operation will not be executed in this mode .If you want to change to programmed control mode, just press “RETURN ” button. In this mode, the word “on ” or “off ” on LCD screen will not flash. All timing points are available in programmed control mode. If the “power supply output port ” is set to “on ” status in one timing point, the “power supply output port ” will switch on 30 seconds before the time (Notice: After finishing manual control mode operation, do not forget to press “RETURN ” button for changing the unit to programmed control mode, otherwise timing operation will not be executed .)3 TIMED PROGRAMMING:Press “EDIT/PUSH ” knob to enter into the “Function Option ” screen. (The screen indicated in pic.6) Turn the knob to the “Program ” item and press the knob, the unit will enter into the “Timed programming ” screen. (The screen indicated in pic.7) In it, “Week ” item and “Time ” item are used to set the details of one timing point. Press “Add ” item for next timing set. If you want to review the fixed timing points, you can press “NO.” item and ▲and ▼icons will appear beside the items, then turn “EDIT/PUSH ” knob to review them. For setting the first timing point of one day, please press “Add ” item to clear the timing items.“Open/Close power ” item is used to set the state of the “power supply output port ”. Pressing the knob can switch the status between “open power ” and “close power ”. Pressing “Copy to ” item will bring you into “Copy timing point ” screen. (The screen indicated in pic.8.)You can copy the whole timing contents of one day to any week day. If you want to delete one timing point, press “NO.” item and turn the knob to select the timing point you want to delete, then press “Delete ” item. If you want to delete all timing points in that day, press “Delete all ” item and a question on confirmation will pop up, pressing “YES ” will validate the operation. If you want to select the tracks for a timing point, you can press Power on → SUN. 15:20:56SUN. 13 :38 :26 ▉ 30→35 Power on ≒ SUN. 15:20:56 SUN. 13 :38 :26▉ 30→35“Prog.” blank Items for track selection. In one timing point, the unit provides three tracks for selection. The “Loop ” item provides four modes of track playing in a timing point. If you select “01”, the tracks will be played repeatedly for one time in that timing point. Selecting “02” means repeated playing for two times in the timing point. For selecting “∞”, repeated playing with no limit. If no any timing point has been set on that day, you cannot press other items except for “Week ”, “Copy to ”, “Add ” and “EXIT ” item. Here, all parameters in □ are blank. You can set the time for timing point in the “Time ” item blanks. If the “EDIT/PUSH ” knob is pressed, ▲and ▼icons will appear beside the item. Then you may continue to adjust the parameter by turning the knob. If the knob is pressed again, the parameter setting will validate immediately and quit from the adjusting state. When all parameters are set properly, pressing “EXIT ” item will finish the timed programming operation and back to the “Function OPTION ” screen. If you want to edit or modify the contents of a timing point, press the “PROGRAM ” item in the “FUNCTION OPTION ” screen. Here, you can run the editing or modification operation by entering the new content of the timing point.PIC.6 Function OPTION screen PIC.7 Timed programming screenPIC.8 Copy timing point screen PIC.9 Recording OPTION screen4 RECORDING OPERATION:This device provides the recording function. Audio signal inputting from the MIC input port or audio signal input port will be recorded into the memory. On the “FUNCTION OPTION ” screen, pressing “ProEdit ” item will get into the “Recording OPTION ” screen. (The screen indicated in pic.9.) For recording operation, firstly, pressing “Record ” item will enter into the “Record ” screen,(The screen indicated in pic.10.) then connecting the device to the audio signal resource (MIC input or audio signal input), finally, selecting “Record ” item and press it to start recording. Adjust the “Recording level control ” potentiometer built-in the front panel. The illumination of the fourth “Output level indicator ” indicates the optimum recording level. The recording operation will not work if there is no connector putting into the input ports (MIC input port or audio signal input port) and the unit will remind you to input the signal.The default name of the recorded file is “DSSPA ” plus the current recording serial number. But the current recording file can be renamed by following steps : Select one of the “Name ” items and press, then ▲and ▼icons will appear beside the item. The character of the item will be changed by turning the knob. The range available of each character is: A-Z , 0-9. Press the knob again to validate the current change and exit the changing operation.The current recording time is indicated at the bottom right corner on LCD screen during the recording. (The screen indicated in pic.11.) Also, the unit will indicate the current free space of the memory during recording and the total space of the memory is 128Mbit. Press “Save ” item to save the recording file after finish. During recording, press “Exit ” item to cancel the operation. Here, the unit will exit the “Record ” screen without saving the recording file.To delete the recorded files, on the “Recording OPTION ” screen, pressing “Delete ” item willbring you into “Delete ” screen. (The screen indicated in pic.12.) Select the “NO.” item with the knob. If the knob is pressed , ▲and ▼icons will appear beside the item. Select the serial number of recorded file want to delete by turning the knob. Press the knob again when you make the decision. Then you can press “OK ” item to delete the file. The unit will indicate the current free space of the memory when you delete a file. If you want to exit this operation, just press “EXIT ”.Also, the unit provide the renamed function for recorded files. on the “Recording OPTION ” screen, select “Rename ” item with the knob. Press the knob to enter into “Rename ” screen. (The screen indicated in pic.13.) Select the “NO.” item with the knob. If the knob is pressed , ▲and ▼icons will appear beside the item. Select the serial number of recorded file want to rename by turning the knob. Press the knob again when you make the decision. Then you can modify the file name by changing the characters in the “New name ” item. The range available of each character is: A-Z , 0-9. Finally, press “Save ” item to save the new file name. Press “EXIT ” item will bring you back to the “Recording OPTION ” screen.PIC.10 Record screen PIC.11 Recording screenPIC.12 Delete screen PIC.13 Rename screen5 TIME CALIBRATION:On the “FUNCTION OPTION ” screen, selecting the “Sys time ” item and pressing the knob will bring you into the “Adjust time ” screen. (The screen indicated in pic.14.) If you want to change the week day, you can press the “Week ” item and change the day by turning the knob. Press the knob again to validate the adjustment. Similarly, you can adjust the time with the same method (including hour, minute and second). Press “OK” item for the confirmation of the adjustment and return to the “Function OPTION ” screen.PIC.14 Adjust timeNOTICE●After programming, it is necessary to review the programmed contents to prevent errors. The procedures are listed as follows: Enter into “Timed programming ” screen, adjust “Week ” item and select the specific browsing date. All programmed contents on that day must be browsed promptly by adjusting the parameters of the “NO:” item. ● It is advisable to clean the memory thoroughly before programming to avoid accidentexecution of the outdated programs remained and the arising chaos. The memory may be cleaned by the following two means:Week OKEXIT Adjust time SAT Time: 9 38 48 : :1) In “Timed programming”, set week date to MON, TUE, WED, THU, FRI, SAT and SUNrespectively. In each selection, press “Delete all” item and confirm. All the memory in the whole week will be cleaned off.2) In “Timed programming”, select a week day and delete all contents of programming onthat day, such as MON. Then select “Copy to”item and press the knob to enter into “Copy timing point” screen. In “Copy timing point”, select MON. and copy to the other six days (TUE, WED, THU, FRI, SAT and SUN). By this way, the memory of the week will be cleaned off thoroughly.OTHER FUNCTIONS1) Data protection: Programming does not affect the normal operation of other programs. Theedited programs may be executed immediately and memorized even in case of power failure, deletion and copying process. Time can be memorized when power off.2) Smart main interface: On the situation of manual operation, background light will illuminate.Meanwhile, background light will illuminate automatically before one timing point comes and it will goes out one minute later if no operation is performed during this time. The unit will return to the main interface screen(The screen indicated in pic.1.) automatically after five minutes later if no operation is performed.Program UpdateA total of 50 common programs are attached for the unit upon delivery, including common rings, ring tones, ceremonial programs and gymnastics. You can record special programs as needed. You can also delete unnecessary programs or copy programs that you need if necessary. Any copying or deleting must be performed through the computer. The computer must be configured with USB interfaces, and the operating systems must be WINDOWNS 2000, WINDOWS XP or above. Operation procedure is as follows: (The following procedure must be followed to avoid unexpected hardware errors)1. Turn on the unit, and after the major interface is shown, plug in the USB socket ofthe computer with one end of the USB cable, and plug in the other end into USBsocket of the back panel. (Note: Plugging in the USB cable after the energization is not allowed). Meanwhile there will be indication "New hardware found”, and thecomputer will search the new hardware automatically. At the end of the process,sign will appear at the right and bottom of the task bar, which indicates thecompletion of the installation of new hardware and that the new hardware isapplicable. After these steps have been performed, open the resource manager, and you will find the disk sign of "movable disk”, then you can perform deleting andcopying of MP3 just like using USB mass storage device. There is a directory forDVR, which is used for storing recorded programs and should not be deleted, and, additionally, no MP3 programs should be placed under the directory.2. After the completion of deleting and copying, click the sign at the right andbottom of the task b ar of the computer, an indication “Safely delete USB MassStorage Device—Driver H” will bounces out. Click it and remove USB after theemergence of indication “USB Mass Storage Device can now be removed from the system safely”, turn off the unit power and then turn it on again.3. After the restart, the unit will automatically detect whether the programs have beenupdated. In case the programs are found to be different with the previous ones, the interface shown as Fig 4 will appear, and there will be rolling small block. It takes an extended period to wait for the unit to reread all the information of MP3 programs.After the read, there will be an access to major play interface. In case the programs of the unit are found to be not updated, re-reading of MP3 information will be skipped off, and there will be a quick access to major play interface.Fig4: Reading program information interface4. After the update, it’s necessary to edit timing programs, for the former timingprograms have changed. After the update, there will be changes in the length of time of record.Important Notes on Program Player Operation(I) When does disk format need to be performed? And how to perform it?Due to the possible unpredictable interferences, there may be errors on FLASH disk of the machine, which makes the program unfindable. Disk format needs to beperformed in any of the following cases:●Indication “No program” appears when the unit is under the interface “System isinitializing, please wait” after turning on the machine.●No program is available for selection when turning the digital button to selectprogram, and indication “No program” appears after re-turning on.●Normal play cannot be accessible, and there are mistaken codes and disorderedsigns in some programs.●The computer indicates the necessarity of disk format after being connected withthe machine.Method of Disk Format●Turn off the machine, restart the unit by holding down “ACTIVE” key severalseconds later, and hold on.●Several seconds later, there are indication “Format ting” on the screen. Releasethe key, and the process will be completed automatically several seconds later.Format is completed when there is an indication “Format complete, copy prog.again”.(II) When do the programs need to be copied? And how to copy the programs?Programs need to be copied in following cases:●You can copy the programs from the disk given that all the files (programs) in thedisk will vanish completely after the format of FLASH disk.●None of the programs in the program lists is suitable for use or your needs, andtherefore you need to add in or delete programs.Method for copying programs●Connect the unit to your computer through USB cable, and the unit will become amovable disk sign in the resources manager.●In case of copying programs after the format of FLASH disk, just copy all the filesunder “1 standard programs” in the disk attached to the unit to the root directoryof FLASH disk. Note: All the files to be copied should be selected all at once toensure the correctness of the sequence of files. Following procedure can befollowed: Open the directory of “1 standard program” in the disk, and you willsee over 50 programs under the directory; then press “CTRL+A” to select up allthe programs, and copy them to clipboard by pressing ‘CTRL+C”. After that,click the disk sign of the movable disk shown on the computer, and press“CTRL+V” to paste all the programs to FLASH memory of the unit. Foroperational order of turning-on/off the unit, please refer to “Prog ram Update” inthe User Manual.●For adding or deleting programs, please take note of the following: The unit onlysupports programs in format of MP3 and WMA, and is capable of automaticallyrecognizing different code rates. The documents should only be copied underroot directory of FLASH disk, and essential space should be allocated for thepurpose of recording. A total of 99 programs can be shown at the most. In casethe quantity is beyond 99, there will be failure in serial No. indication, whilenormal play is still available.●Song name should be of a maximum of 20 letters, and no blank is allowedbetween two words. Comma is used to take place of blank, otherwise normalindication would be unavailable.(III) How to handle the non-execution or incorrect execution of timing point?●Check if the machine is in Manual play mode. The flickering of “On/off” switchindicates that the present play mode is Manual. The timing point isnon-executable at this time. To execute the timing point, press “RETURN” toreturn to program-control status.●In case the timing point is non-executable and indication “timing point error”appears during the browsing or editing of the timing point, delete all the timingpoint of the day applied and re-edit the timing point.SPECIFICATIONSDSPPA Acoustic Technology Co., Ltd.。
英文药品说明书

3.音、意合译:
药品英文名称中只有一部分显示化学 基团者采用音意合译。
如:medemycin ; Indobufen; coumadin(coumarrin 香豆素); codein phosphas;
4.中文译名的转化现象: vitamin ; penicillin; hormone; atropine
翻译药名名称注意:
1)药物与酸形成的盐 中文名是酸在前药名在后,英文相反。
2)药物与碱金属形成的盐 中文药名在前而碱金属在后,英文相同 3)考虑化学名称重点字头,又考虑同类药名的名称的系列 化(即相同的词头、词干或词尾) 如:Ceforanide ceforxadine cefotazidime Cefotetan Pefloxacin Norfloxacin Ofloxacin 4)记住一些药品英文名称的常用词首和词尾
tablets 片剂;
solubility 溶解度 injection 注射剂
• solution 溶液; • sterile 无菌的;
• molecular formular 分子式 molecular weight 分子量 • structure 结构; derivative 衍生物;
例1.
Folic acid is a yellowish to orange, crystalline powder; odourless or almost odourless.
例3. Ursosan Tablet 50mg is a white plain tablet which contains 50mg of ursodesoxycholic acid.
熊去氧胆酸片为白色素片,每片含50mg熊去氧胆酸。
例4. Sterile pyrogen-free, orange red, freeze-dried powder in vials containing 10mg and 50mg of doxorubicin hydrochloride with lactose.
使用说明书英文版

User Manual: English VersionIntroductionWelcome to the user manual for the product. This manual provides step-by-step instructions on how to use the product effectively. Please read the instructions carefully to ensure optimum performance.Safety Precautions1.Read all instructions carefully before using the product.2.Keep the product away from children and pets.3.Do not expose the product to extreme temperatures or direct sunlight.4.Avoid using the product near water or other liquids.5.Do not disassemble the product. Contact customer support for anyrepairs or maintenance.e only the recommended power source for the product.Getting Started1.Unpack the product and ensure all accessories are included.2.Connect the product to a power source using the provided cable.3.Switch on the product by pressing the power button.4.Once the product is powered on, follow the on-screen instructions tocomplete the setup process.Basic Operations1.Menu Navigation: Use the arrow keys or touchpad to navigate throughthe menu options.2.Selecting an Option: Press the enter button or tap the screen to selectan option.3.Adjusting Settings: Use the volume buttons to adjust the settings.Follow the on-screen instructions for specific adjustments.4.Power Management: To conserve battery life, use the power-savingmode option available in the settings menu.5.Screen Lock: To protect your privacy, enable screen lock through thesettings menu. Set a passcode or pattern for added security.TroubleshootingIf you encounter any issues while using the product, try the following troubleshooting steps:1.Restart the product by turning it off and on again.2.Check the cable connections to ensure they are secure.3.Update the product’s software to the latest version.4.If the problem persists, contact customer support for furtherassistance.Maintenance1.Clean the product using a soft, lint-free cloth. Avoid using harshchemicals or abrasive materials.2.Keep the product’s screen free from fingerprints and smudges bywiping it regularly.3.Store the product in a cool, dry place when not in use.4.Periodically check for software updates and install them for improvedperformance.5.If the product is not used for an extended period, disconnect it fromthe power source.WarrantyThe product comes with a limited warranty. Please refer to the warranty card included in the package for more details. To avail warranty services, retain the original purchase receipt and contact customer support.ConclusionCongratulations! You have completed the user manual. The instructions provided here will help you use the product effectively and troubleshoot any issues that may arise. If you have any further questions or need assistance, please refer to the contact details provided in the manual or contact customer support.。
药品英文说明书药品英文说明书

药品英文说明书药品英文说明书药品英文说明书药品英文说明书篇一:药品说明书英文翻译英语药品说明书的翻译英语药品说明书由以下12项内容组成,大多数英语药品说明书结构基本相同。
1. pakage insert (insert)说明书2. drug name (medicine) 药品名称3. description 性状4.action 作用 5. indication适应症6. contraindications 禁忌症 7. precaution注意事项 8. side effects副作用 9. dosage and administration 剂量和用法 10. dacking 包装 11.expiry 失效期 12. manufactring date (manu.date)出厂日期 13.reference 参考文献药品名称一、英语药品说明书一般用商品名,由生产厂家向该国政府有关部门申请注册正式名称,受该国政府法律保护,在药品名称的右上角有个?r的符号,意思是已经申请注册的法定名称,不可随意改变名称。
?r=recive 在药品之后有时issued to(for) the medical profession only短语,意:仅供医界参考。
r例:mobic ? issued to(for) the medical prfession.二、译法:分四种译法1. 音译:按英语读音用相应的汉字译出例:mobic莫比可 rifampicin利福平 2. 意译:按药品名称各组成部份的英语意义译成汉语例:streptomycine是由strepto和mycine组成,其中strepto(链球状),mycine(霉素),则按英语意思,译成:链霉素。
因此必须掌握大量前、后缀,才以准确翻译,此种译法多数是抗生素类药物。
nitroglycerine 由nitro(硝基)+glycerin(甘油)组成,则意为硝酸甘油aminophylline由amino+phylline译:氨茶碱 3. 音意并译:按英语药名组成,前面部份按音译,后面部份按意译。
FSL 系列英文说明书

FSL Series Bread Ferment-boxUSER'S MANUALPlease read this instrucation carefully before install and use them.Ⅰ.INTRODUCTIONIt is a important process that the bread roughcast ferments and takes shape in the manufacturing bread process. The paste is consist of the flour, yeast, assistant material and naturally ferment first time, then it cranks out the bread roughcast. After figuration the bread roughcast is fermented again , and it reach a stated volume and figuration. This process is called as second ferment or after-ferment.FSL series bread ferment-boxes are electric heating wares based on the principle of the bread ferment. They are heated the heating pipes to produce the heat controlled by a microcomputer, and cirulate the heat wind, come into being the good condition that relative humidity is 80~85 and the tempertre is 36°C~38°C ,which is very fit for bread ferment. They set up a roomy glass window which the user inspects the ferment easily. And they set up a automatism device which control the water turnover, and there is a activity stainless pipe to be a shelf, it can take down anytime, which the user need. They have advantages over being rational in structure, attractive in form, convenient in operation, dependable to use, etc.They are absolutely necessary matching equipment that manufactures the bread.Ⅱ.TECHNICAL SPECIFICATIONⅢ.INSTALLATION AND OPERA TION DIRECTION1. The products must be laid evenly, far away from the wall about 200mm,install a single-phase supply switch that capacity is right and a creep-age protector, then connect the power supply wire.2.The earth pillar is in rear of the ferment-box, must be connected firmly with a no few than Ф2.5 micrometer copper core and a safe earth wire.3. There is a water tie-in on the rear of the ferment-box and the water in the box must be higher than the electrothermal pipe 4cm at least. It must be linked up to the water pipe.4. The operation is turn on the power (as the Figure 1), then the true temperature will be slow on the temperature control system. If you need change the temperature, press the button until the temperature you need. When you stop press the button, it show the true temperature again. The light near the temperature control system is on , it means the temperature is rising .If the light is off . It means the temperature is dropping or keeping. The humidification operation is the same. When the room temperature is high in summer, you can stop the temperature control system, use the humidification control system to the humidity in the ferment-box.5.The humidification can be turn up between 70%~99%R·H. If it stop reach the setting temperature, but the temperature number of the temperature control system still rise , it is a normal phenomenon.6. There is a light a ferment-box, you can turn on it when it is needed.7. Must turn off the power supply to ensure safety when it is not used.8. There is some drip drop on the dish which is in the below of the ferment-box. The water discharged by the waterspout in the back of the box. The user must buy the equal soft pipe to link to the waterspout. The pipe is reach toward the outside to ensure the sanitation.Ⅳ.CAUTIONS1.The products must be installed and tested by professionals.2.Must use the power supply that is specified on the nameplate.3.If the ferment temperature is too high, the microzyme will not breed normailly , evenly bringon that microzyme seed die off.4.Look into the case of bread ferment via he glass form, adjust the temperature and the humidityto the best.5.Must turn off the power supply to ensure safety when it is not used.6. This product since the date of purchase half year executes 3 packets, but not by use the instructions man-made damage, do not belong to the warranty scope.CAUTION: To safeguard the personal and the safety equipment, the user must firmly street in conformity with the provisions to protect station. Repair and maintenance equipment, must cut off power supply, if do't do it ,caused by users themselves responsible for all the consequences.Figure 1Heating buttonCooling buttonDrop wet buttonHumidifying buttonPower switchLight switch Temperature indicatorHumidity indicatorHumidity displayTemperature displayHumidifying Light Fan PowerKA 1KA 2KA 2KA 1N LMWater PipeMain PipeFanLightKA 2KA 1:RelayEN:Heating TubeM Fan:SANLIDA FSL Series Bread Ferment-box Warranty Card。
iphone5英文使用说明书翻译
每年只要iphone上市,我都不会找黄牛,都自己海淘iphone5,价格便宜,货物实在,有很多人问我,怎么买,我的回答是只要能英语交流就能买。
以下是我整理的购买相关用语,希望对于各位会有帮助!好的话,请大家给我加分,哈哈,谢谢啦,不好,也请多包涵,这些用语不排除有些有语法错误,但总而言之,是可以让老外能看懂的!不要太在意所谓的中国式语法,因为实际交流是没有这么多约束的!想要直接海外采购的,相信对于你来说很有帮助!Perfect condition. 100% functioning.完美的条件。
100%功能。
via USPS.通过美国邮政。
Please send the iphone5 off today.请将我的iphone5于今天发货。
Please advise me when the goods are dispatched.请告诉我何时发货。
i hope you will send them at an early date.我希望你提前发货。
Thank you for your invaluable help.多谢你的宝贵的帮助。
Please enter a valid ship address,This is my ship address:请输入一个有效的船舶地址,这是我的发货地址:Name:Address:City:State:Zip Code:Tel:Thank you, I hope to hear from you as soon as possible.谢谢!我希望尽快收到您的答复.Yes I can mail it today是的我可以邮寄今天Can you deliver the iphone5 today, if I buy now?你可以把iphone5今天,如果我现在买?I am looking forward to your early reply.希望早日得到你的答复。
user manual手机英文说明书
An instruction manualDirectoryFirst,note..................................................................................................... 错误!未定义书签。
1 security matters ....................................................................................... 错误!未定义书签。
1.1 traffic safety first ................................................................................... 错误!未定义书签。
1.2in the hospital should be shut down .................................................. 错误!未定义书签。
1.3on the plane should be shut down..................................................... 错误!未定义书签。
1.4 gas should be shut down.................................................................... 错误!未定义书签。
1.5 in the blasting site near shutdown of................................................. 错误!未定义书签。
2the use of mobile phone......................................................................... 错误!未定义书签。
- 1、下载文档前请自行甄别文档内容的完整性,平台不提供额外的编辑、内容补充、找答案等附加服务。
- 2、"仅部分预览"的文档,不可在线预览部分如存在完整性等问题,可反馈申请退款(可完整预览的文档不适用该条件!)。
- 3、如文档侵犯您的权益,请联系客服反馈,我们会尽快为您处理(人工客服工作时间:9:00-18:30)。
英文使用手册说明书
English Usage Manual
1. Introduction
The English Usage Manual is a comprehensive guide that provides instructions and guidelines for the effective and proper use of the English language. This manual covers various aspects of grammar, punctuation, spelling, and style, and is intended for both native speakers and non-native speakers of English.
2. Grammar
The grammar section of this manual covers the different parts of speech, sentence structure, verb tenses, subject-verb agreement, pronouns, articles, and more. It provides explanations and examples to help users understand and apply the rules of English grammar correctly.
3. Punctuation
Punctuation marks play a crucial role in conveying meaning and clarity in written English. This section of the manual explains the usage of common punctuation marks such as commas, periods, question marks, exclamation marks, quotation marks, and more. It also provides guidelines on how to properly use these marks in different scenarios.
4. Spelling
Correct spelling is essential for effective communication in English. This section offers guidance on the correct spelling of commonly misspelled words, homophones, and frequently confused words. It also provides tips on improving spelling skills and utilizing
resources such as dictionaries and spell-check tools.
5. Style
Style refers to the way in which language is used to convey ideas and information. This section outlines different style guidelines and conventions for writing in English. It covers aspects such as formal and informal writing, tone, word choice, sentence structure, and paragraph development. Users will find tips on how to improve their writing style and make it more coherent, engaging, and appropriate for different contexts.
6. Common Errors
The common errors section addresses typical mistakes made by English learners and provides explanations on how to avoid them. It includes common grammar and spelling errors, as well as errors related to punctuation and style. This section aims to help users recognize and correct their mistakes to enhance their overall proficiency in English.
7. Usage Tips
This section contains various usage tips and recommendations to assist users in making the right choices when using English. It offers guidance on tricky grammar rules, idiomatic expressions, formal and informal language, and more. Users can refer to this section for quick answers to specific usage queries.
8. Conclusion
The English Usage Manual serves as a valuable resource for individuals seeking to improve their English language skills. It provides practical guidelines and explanations for correct grammar,
punctuation, spelling, and style. By following the instructions and advice provided in this manual, users can enhance their proficiency in using English effectively and confidently.。