见证奇迹 点穴手法治疗脑血栓 脑溢血 脑梗塞后遗症有效率100%
用C语言控制灯的亮灭
1100 ~ C
1101 ~ D
1110 ~ E
1111 ~ F
0101 ~ 5
0110 ~ 6
(11010101111101)2=(0011,0101,0111,1101)2=(357D)16 0111 ~ 7
1000 ~ 8
1001 ~ 9
(4B9E)16=(0100,1011,1001,1110)2=(100101110011110)2 1010 ~ A
1011 ~ B
(459)10=(1CB)16
(59)10=(111011)2
11
各种进制之间的转换
0000 ~ 0
二进制转换成十六进制:从右向左,每4位一组(不足4 0001 ~ 1
位左补0),转换成十六进制
0010 ~ 2 0011 ~ 3
十六进制转换成二进制:用4位二进制数代替每一位十 0100 ~ 4
六进制数
0000000B
0000000C
0000000D
0000000E
0000000F
00000010
数制及数制转换
各种进制之间的转换 二进制、十六进制转换成十进制:按权相加
例
(111011
) 2
1 25
1 24
1 23
0 22
1 21
1 20
(59)10
例 (1F 2 A)16 116 3 15 16 2 2 161 10 16 0 (7978)10
什么是单片机
单片机:即单片微型计算机,它是程序的载体。将程 序放入单片机,通过单片机执行程序,从而实现要达 到的目的。
发光二极管电路
0V灭, 5V亮
0V
数制及数制转换
用c语言编写点灯程序

用c语言编写点灯程序点灯程序是一种常见的C语言编程练习题,通过控制硬件设备来模拟点灯的效果。
这种程序通常结合了C语言的基本语法和控制结构,旨在培养程序员的逻辑思维和编程能力。
在开始编写点灯程序之前,我们首先需要了解一些基础知识。
在C 语言中,我们可以使用控制引脚来控制外部硬件设备,例如LED灯。
控制引脚是与计算机的GPIO(General Purpose Input/Output)接口相连的引脚,通过向这些引脚发送电压信号,我们可以控制外部硬件设备的状态。
为了简化程序的编写,我们可以使用开源的硬件库,例如WiringPi 库。
WiringPi是一个适用于树莓派的C语言库,提供了一系列函数来控制GPIO引脚。
通过使用WiringPi库,我们可以轻松地编写点灯程序。
接下来,我们将编写一个简单的点灯程序,使用C语言控制GPIO 引脚来控制LED灯的状态。
首先,我们需要在程序中包含WiringPi 库的头文件,并初始化WiringPi库。
```c#include <wiringPi.h>int main(){// 初始化WiringPi库wiringPiSetup();// 设置GPIO引脚为输出模式pinMode(0, OUTPUT);// 控制LED灯的状态while(1){digitalWrite(0, HIGH); // 点亮LED灯delay(1000); // 延时1秒digitalWrite(0, LOW); // 熄灭LED灯delay(1000); // 延时1秒}return 0;}```在上述代码中,我们首先调用了wiringPiSetup()函数来初始化WiringPi库。
然后,使用pinMode()函数将GPIO引脚0设置为输出模式,以控制LED灯的状态。
接下来,我们使用一个无限循环来控制LED灯的状态。
通过调用digitalWrite()函数,我们可以向GPIO引脚0发送高电平信号(HIGH),从而点亮LED灯。
亮衡 BU99 开发板用户手册说明书
BU99开发板用户手册版权所有上海亮衡信息科技有限公司本资料及其包含的所有内容为上海亮衡信息科技有限公司所有,受中国法律及适用之国际公约中有关著作权法律的保护。
未经上海亮衡信息科技有限公司书面授权,任何人不得以任何形式复制、传播、散布、改动或以其它方式使用本资料的部分或全部内容,违者将被依法追究责任。
文档更新记录目录1引言 (5)1.1 编写目的 (5)1.2 预期读者 (5)1.3 参考资料 (5)2板卡介绍 (6)2.1 BU99主要功能特性 (6)2.2 Flash (6)3板卡接口说明 (7)3.1 板卡接口标识 (7)3.2电源说明 (7)3.3 开关说明 (7)3.4 下载说明 (8)3.4.1硬件环境 (8)3.4.2软件环境 (8)3.4.3驱动安装 (8)3.4.4 Pac包下载 (8)3.5天线接口说明 (8)3.6 LCM接口 (8)3.7 Camera接口 (9)3.8 HDMI接口 (10)3.9 KEY (10)3.10 USB接口 (11)3.11硬盘接口 (11)3.12 Ethernet (11)3.13 Tflash (11)3.14 MINIPCI-e接口 (11)3.15 SIM卡座 (11)3.16 Audio (11)1 引言1.1编写目的本文档介绍BU99开发板的使用说明,包含组成框图、接口说明、操作要求等,为研发人员、研发测试人员、系统集成测试人员、现场测试人员及其他相关人员正确使用硬件板卡提供指导。
1.2预期读者智能模组项目组人员、测试、硬件设计、软件开发人员。
1.3参考资料B100_AI模块产品规格书B100_AI模块硬件接收手册2 板卡介绍2.1 BU99主要功能特性图1 BU99原理框图BU99开发板主要用于验证B100_A 模组的硬件接口和功能特性,同时可供客户在用模组进行开发前先做一些评估测试。
BU99开发板提供各种外设功能的验证,包括Camera、LCM、TF、MINIPCE-e、SATA接口硬盘、耳机、Ethernet、Audio和USB等。
点灯科技按键循环执行代码
点灯科技按键循环执行代码摘要:1.点灯科技简介2.按键循环执行代码的背景和意义3.按键循环执行代码的实现步骤4.按键循环执行代码在点灯科技产品中的应用5.按键循环执行代码的优化和未来展望正文:点灯科技是一家专注于智能照明产品研发和生产的企业,致力于为用户提供高品质、高效能的照明解决方案。
在点灯科技的产品中,按键循环执行代码是一项关键的技术,为用户提供了便捷的操作体验。
按键循环执行代码是一种编程技术,通过循环执行一系列代码,实现对按键的响应。
这种技术在点灯科技的智能照明产品中有着广泛的应用,例如:灯光调节、模式切换、定时控制等。
通过实现按键循环执行代码,点灯科技的产品能够更好地满足用户多样化的需求。
实现按键循环执行代码的步骤主要包括:1.初始化:在程序开始运行时,对按键进行初始化,检测按键是否按下。
2.循环:当按键被按下时,执行相应的代码;当按键释放时,继续等待按键的下次按下。
3.判断:根据按键的组合和按下时间,执行相应的功能。
4.响应:执行完相应的功能后,给出相应的反馈,如灯光变化、提示音等。
在点灯科技的智能照明产品中,按键循环执行代码被用于实现各种便捷的功能。
例如,用户可以通过按键调节灯光的亮度、色温,切换不同的灯光模式,设置定时开关等。
这些功能的实现,都离不开按键循环执行代码的支持。
未来,随着点灯科技产品的不断升级和优化,按键循环执行代码也将得到进一步的改进。
通过优化代码的执行效率,提升产品的性能和用户体验,点灯科技将为用户带来更智能、更舒适的照明体验。
总之,按键循环执行代码在点灯科技的智能照明产品中具有重要的意义,为用户提供了便捷的操作方式。
Infoprint 250 導入と計画の手引き 第 7 章ホスト
SUBNETMASK
255.255.255.128
Type of service...............: TOS
*NORMAL
Maximum transmission unit.....: MTU
*LIND
Autostart.....................:
AUTOSTART
*YES
: xx.xxx.xxx.xxx
: xx.xxx.xxx.xxx
*
(
)
IEEE802.3
60 1500
: xxxx
48 Infoprint 250
31. AS/400
IP
MTU
1
1
IPDS TCP
CRTPSFCFG (V3R2)
WRKAFP2 (V3R1 & V3R6)
RMTLOCNAME RMTSYS
MODEL
0
Advanced function printing............:
AFP
*YES
AFP attachment........................:
AFPATTACH
*APPC
Online at IPL.........................:
ONLINE
FORMFEED
*CONT
Separator drawer......................:
SEPDRAWER
*FILE
Separator program.....................:
SEPPGM
*NONE
Library.............................:
照明设计白皮书系列-点状灯

该灯具为一体式散热灯具,灯体使用铝合金压铸成型,
防腐蚀静电喷塑处理。
LIGHTUP 点亮照明设计
室外点状灯
▽应用案例
△应用案例
LIGHTUP 点亮照明设计
室外点状灯
该灯具是一体化卡扣式无接头防拽连接设计,防水 使用德国进口高导热胶全灌封。
色温为RGB。防护等级为IP65。 光源-LED 功率-1.5W 光通量-156 A-35 B-45 C-56 D-4.5 E-20。E-20
LIGHTUP 点亮照明设计
室外点状灯
色温可选3000K、4500K。防护等级为IP65。 光源-LED 功率-3W 光通量-310 A-70 B-96 C-55 D-119。
该灯具为一体式散热灯具,灯体使用 铝合金压铸成型,防腐蚀静电喷塑处 理。
LIGHTUP 点亮照明设计
室外点状灯
△应用案例
△应用案例
LIGHTUP 点亮照明设计
Lightup点亮照明设计
THANKS
LIGHTUP 点亮照明设计
室外点状灯
色温为RGB。防护等级为IP65。 光源-LED 功率-6W 。 光通量-230 A-100 B-78 C-36
该灯具为一体式散热灯具,灯体使用铝合金压铸成型, 防腐蚀静电喷塑处理。
LIGHTUP 点亮照明设计Leabharlann 室外点状灯△应用案例
△应用案例
LIGHTUP 点亮照明设计
室外点状灯
该灯具是一体化卡扣式无接头防拽连接设计,防水使 用德国进口高导热胶全灌封。
光源led功率6w光通量230a100b78c36室外点状灯lightup点亮照明设计应用案例应用案例室外点状灯lightup点亮照明设计该灯具是一体化卡扣式无接头防拽连接设计防水使用德国进口高导热胶全灌封
QLight QTG50 60 70系列LED信号灯产品说明书
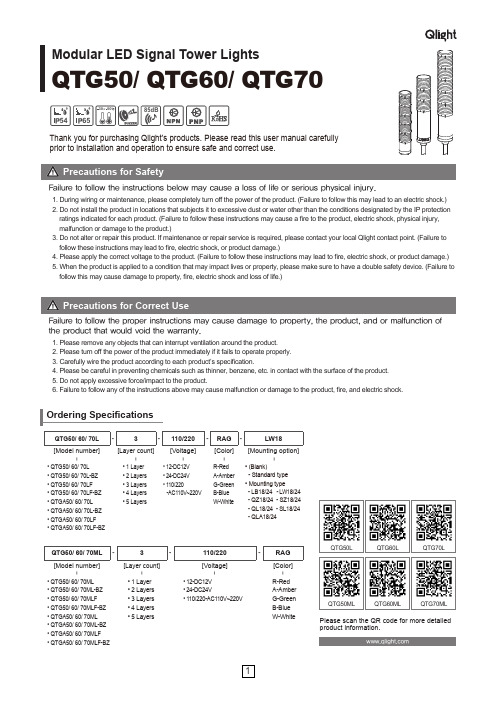
Modular LED Signal Tower LightsQTG50/ QTG60/ QTG70546585dB5030QTG50L QTG50ML QTG60L QTG60ML QTG70LQTG70MLPlease scan the QR code for more detailed product information.QTG50/ 60/ 70L -3-110/220-RAG -LW18[Model number][Layer count][Voltage][Color][Mounting option]|||||• QTG50/ 60/ 70L • QTG50/ 60/ 70L-BZ • QTG50/ 60/ 70LF • QTG50/ 60/ 70LF-BZ • QTGA50/ 60/ 70L • QTGA50/ 60/ 70L-BZ • QTGA50/ 60/ 70LF • QTGA50/ 60/ 70LF-BZ• 1 Layer • 2 Layers • 3 Layers • 4 Layers • 5 Layers• 12-DC12V • 24-DC24V • 110/220-AC110V~220VR-Red A-Amber G-Green B-Blue W-White• (Blank)- Standard type • Mounting type- LB18/24 - L W 18/24 - QZ18/24 - SZ18/24 - QL18/24 - SL18/24 - QLA18/24QTG50/ 60/ 70ML -3-110/220-RAG [Model number][Layer count][Voltage][Color]||||• QTG50/ 60/ 70ML • QTG50/ 60/ 70ML-BZ • QTG50/ 60/ 70MLF • QTG50/ 60/ 70MLF-BZ • QTGA50/ 60/ 70ML • QTGA50/ 60/ 70ML-BZ • QTGA50/ 60/ 70MLF • QTGA50/ 60/ 70MLF-BZ• 1 Layer • 2 Layers • 3 Layers • 4 Layers • 5 Layers• 12-DC12V • 24-DC24V• 110/220-AC110V~220VR-Red A-Amber G-Green B-Blue W-WhiteThank you for purchasing Qlight’s products. Please read this user manual carefully prior to installation and operation to ensure safe and correct use.Failure to follow the instructions below may cause a loss of life or serious physical injury.1. Please remove any objects that can interrupt ventilation around the product.2. Please turn off the power of the product immediately if it fails to operate properly.3. Carefully wire the product according to each product’s specification.4. Please be careful in preventing chemicals such as thinner, benzene, etc. in contact with the surface of the product.5. Do not apply excessive force/impact to the product.6. Failure to follow any of the instructions above may cause malfunction or damage to the product, fire, and electric shock.Failure to follow the proper instructions may cause damage to property, the product, and or malfunction of the product that would void the warranty.1. During wiring or maintenance, please completely turn off the power of the product. (Failure to follow this may lead to an electric shock.)2. Do not install the product in locations that subjects it to excessive dust or water other than the conditions designated by the IP protection ratings indicated for each product. (Failure to follow these instructions may cause a fire to the product, electric shock, physical injury, malfunction or damage to the product.)3. Do not alter or repair this product. If maintenance or repair service is required, please contact your local Qlight contact point. (Failure to follow these instructions may lead to fire, electric shock, or product damage.)4. Please apply the correct voltage to the product. (Failure to follow these instructions may lead to fire, electric shock, or product damage.)5. When the product is applied to a condition that may impact lives or property, please make sure to have a double safety device. (Failure to follow this may cause damage to property, fire, electric shock and loss of life.)••QTG60ML : DC QTG60MLF : DC QTG60ML-BZ : DC QTG60ML : AC QTG60MLF-BZ : DC QTG60MLF : AC QTG60ML-BZ : AC QTG60MLF-BZ : ACQTG60L : DCQTG60LF : DC QTG60L-BZ : DCQTG60L : ACQTG60LF-BZ : DCQTG60LF : AC QTG60L-BZ : AC QTG60LF-BZ : ACQTG70ML : DC QTG70MLF : DC QTG70ML-BZ : DC QTG70ML : AC QTG70MLF : AC QTG70ML-BZ : ACQTG70MLF-BZ : DCQTG70MLF-BZ : AC QTG70L : DC QTG70LF : DC QTG70L-BZ : DCQTG70L : AC QTG70LF : AC QTG70L-BZ : AC QTG70LF-BZ : DCQTG70LF-BZ : ACQTG50ML : DC QTG50MLF : DC QTG50ML-BZ : DC QTG50ML : AC QTG50MLF-BZ : DC QTG50MLF : AC QTG50ML-BZ : AC QTG50MLF-BZ : ACQTG50L : DCQTG50LF : DC QTG50L-BZ : DCQTG50L : ACQTG50LF-BZ : DCQTG50LF : AC QTG50L-BZ : AC QTG50LF-BZ : AC• QTG50(M)L• QTG60(M)L• QTG70(M)L■Wiring using external contact• In case of wiring with external contacts, refer to the wiring diagrams below according to your product’s type and voltage setting.• DC steady type cable specification: External power/ signal line - UL1007 AWG22(0.3sq) 400mm• AC steady, AC/DC steady/flashing type cable specification : External power line - UL1015 AWG18(0.75sq) × 2C 400mm,External signal line - UL1007 AWG22(0.3sq) 400mm■Wiring using transistor• When using a transistor, please choose between the NPN or PNP type transistor which best matches the voltage and product type, then connect them correctly according to the wiring diagrams below.• DC steady type cable specification: External power/ signal line - UL1007 AWG22(0.3sq) 400mm• AC steady, AC/DC steady/flashing type cable specification : External power line - UL1015 AWG18(0.75sq) × 2C 400mm,External signal line - UL1007 AWG22(0.3sq) 400mmParts DefinitionPipe(AL)Installation Environment and Protection Rating• This product is designed for indoor use with protection rating of IP65(standard type) and IP54(buzzer type).• If the product is installed in locations that subject it to excessive dust or water other than the designated IP protection rating indicated(IP65), it may cause malfunction or damage to the product.• For further information, please visit our website ().How to Change Lens Kit• Disassembling lens kits① Twist the upper lens kit in a counter-wise direction so the “I” mark from both kits align.② Disassemble by removing the upper lens kit from the lower one.• Assembling lens kits① Put the two lens kits together by aligning the upper lens’ “I” mark and the lower lens’ “I” mark together.② Lock the two kits by twisting the upper lens kit in a counter -wise direction so the upper lens’ “◁” mark aligns with the lower lens’ “I” mark.Lens modules are connected through cone-shaped contact point. In case the contact point is damaged, it may cause a contact failure.※CautionsContact Point① Machine holes on the mounting surface referring to thediagram below.② First, remove the flange nuts from bolts and place the productthrough the mounting surface holes.③ F asten the flange nuts on the opposite side of the mountingsurface until the product is tightened securely.■ QTG50M/ QTG60M/ QTG70M - Direct Mounting Type ModelBuzzer volume is reduced by sliding the volume control lever to the left as show in the diagram to the left.( Min. 65±4dB/m )Raise/ Increase the buzzer volumeby sliding the control lever to the right as shown in the diagram to the left.( Max. 85±4dB/m )• Please refer to the dimensions below for installation of mounting brackets.■ QTG50ML/ QTG60ML/ QTG70ML - Direct Mounting Type ModelQTG70M• Buzzer type model with 2 different sounds of long beeping sound and short beeping sound is available upon request.■ 2 Sound Buzzer Type■ QTG50L/ QTG60L -Pole Mounting Type Model■ QTG70L - Pole Mounting Type Model• Qlight products are designed to meet strict quality and technical standards. Thus, the Qlight brand is widely recognized for its high quality and technical innovations from leading institutions around the world.QlightCo.,|*******************Head Offi ce | A-412, 579, Gyeongin-ro, Guro-gu, Seoul, Korea T el. +82-80-328-2222 Fax : +82-2-2679-6154Factory | 185-25, Mukbang-Ro, Sangdong-Myeon, Gimhae-si, Gyeongsangnamdo, Korea T el. +82-80-328-1111Qlight Overseas Sales Dept | 185-25, Mukbang-Ro, Sangdong-Myeon, Gimhae-Si, Gyeongsangnam-Do, Korea T el : +82-55-328-4082Qlight Public Relations & Marketing T eam Offi ce | Nakdong-daero, Sasang-gu, Busan, Korea(Eomgung-Dong) T el : +82-51-245-0017QlightUSA,|*******************3003 North First Street, Suite #341, San Jose, CA 95134 USA T el. +1.408.519.5740 Fax. +1.408.519.5739SHANGHAIQlightElectronicCo.,|*******************China Factory/ Shanghai Sales Offi ce | #19, Nanda Road, Baoshan Area, Shanghai, China T el. +86.21.6651.7100 Fax. +86.21.6315.3929 For your safety Specifi cation and dimensions listen in this catalogue subject to change wuthout notice for product quality improvemont.The newest prouct information is available on our web site.()Please read the instruction Manual attached to the product carefully before installation and use.EN-1904A。
keil中的变量和常量定位问题
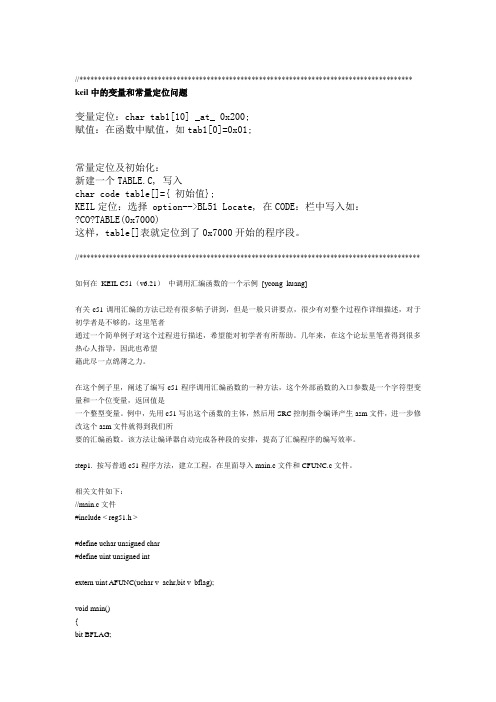
//***************************************************************************************** keil中的变量和常量定位问题变量定位:char tab1[10] _at_ 0x200;赋值:在函数中赋值,如tab1[0]=0x01;常量定位及初始化:新建一个TABLE.C, 写入char code table[]={ 初始值};KEIL定位:选择 option-->BL51 Locate, 在CODE:栏中写入如:?CO?TABLE(0x7000)这样,table[]表就定位到了0x7000开始的程序段。
//******************************************************************************************* 如何在KEIL C51(v6.21)中调用汇编函数的一个示例[ycong_kuang]有关c51调用汇编的方法已经有很多帖子讲到,但是一般只讲要点,很少有对整个过程作详细描述,对于初学者是不够的,这里笔者通过一个简单例子对这个过程进行描述,希望能对初学者有所帮助。
几年来,在这个论坛里笔者得到很多热心人指导,因此也希望藉此尽一点绵薄之力。
在这个例子里,阐述了编写c51程序调用汇编函数的一种方法,这个外部函数的入口参数是一个字符型变量和一个位变量,返回值是一个整型变量。
例中,先用c51写出这个函数的主体,然后用SRC控制指令编译产生asm文件,进一步修改这个asm文件就得到我们所要的汇编函数。
该方法让编译器自动完成各种段的安排,提高了汇编程序的编写效率。
step1. 按写普通c51程序方法,建立工程,在里面导入main.c文件和CFUNC.c文件。
相关文件如下://main.c文件#include < reg51.h >#define uchar unsigned char#define uint unsigned intextern uint AFUNC(uchar v_achr,bit v_bflag);void main(){bit BFLAG;uint mvintrslt;mav_chr=0xd4; BFLAG=1;mvintrslt=AFUNC(mav_chr,BFLAG);}//CFUNC.c文件#define uchar unsigned char#define uint unsigned intuint AFUNC(uchar v_achr,bit v_bflag){uchar tmp_vchr;uint tp_vint;tmp_vchr=v_achr;tp_vint=(uint)v_bflag;return tmp_vchr+(tp_vint<<8);}step2. 在Project 窗口中包含汇编代码的 C 文件上右键,选择“Options for ...”,点击右边的“Generate Assembler SRCFile”和“Assemble SRC File”,使检查框由灰色变成黑色(有效)状态;step3. 根据选择的编译模式,把相应的库文件(如Small 模式时,是Keil\C51\Lib\C51S.Lib)加入工程中,该文件必须作为工程的最后文件;step4. build这个工程后将会产生一个CFUNC.SRC的文件,将这个文件改名为CFUNC.A51(也可以通过编译选项直接产生CFUNC.A51文件),然后在工程里去掉库文件(如C51S.Lib)和CFUNC.c,而将CFUNC.A51添加到工程里。
- 1、下载文档前请自行甄别文档内容的完整性,平台不提供额外的编辑、内容补充、找答案等附加服务。
- 2、"仅部分预览"的文档,不可在线预览部分如存在完整性等问题,可反馈申请退款(可完整预览的文档不适用该条件!)。
- 3、如文档侵犯您的权益,请联系客服反馈,我们会尽快为您处理(人工客服工作时间:9:00-18:30)。
见证奇迹点穴手法治疗脑血栓脑溢血脑梗塞后遗症有效
率100%
8月31号,接到安徽葛叔叔的电话说明天要来三个患者,我们一听很是吃惊,没想到一下子来三个,但也没办法了既然来了就想办法治疗吧。
9月1号上午他们来了,一位中年男子,两位老阿姨,我们大体给介绍一下,让先休息,下午给与检查,经过仔细的检查拍视频,我们心里有了一个大概的治疗方案。
让晚上开始尝试治疗。
晚上7点左右他们来了,我们又大概的讲了一下治疗理念和方法让其明白和配合。
我给一个67岁的杨阿姨治疗,她有好几年的脑血栓后遗症病史了,由于时间太长出院证明病例都丢了,所以只能尝试治疗。
她的具体症状:手举不过肩膀,手上没劲,拿不动东西,语言障碍,说话很低没有底气,面黄肌瘦,脚不能转动,脚趾不能弯曲,膝盖弯曲有障碍,走路需拄拐棍,拖脚走,有时需人扶。
一提起自己的事就泪流满面,一看家境就非常的难,让人看到就会升起怜悯之心。
所以我们在一起商量,要他们尽快康复早早回家。
开始治疗,脚上的穴位很是正常的到了腿部悬中就是打不开,我打了5次,还是没打开,最后还是让路大夫来打,
他又打了两次,才打通把我们累坏了,衣服都湿透了,全部打完后,封穴后,我重点给予踝关节修复,一段时间后,再看看脚腕可以小幅度的转动了,脚趾可以小幅度的活动了。
家属看到了非常高兴,其实这都在我们预料之内。
我又让阿姨做蹬腿动作,做了50下,休息一下让其下来走走我看看她的耐力。
奇迹就在这一刻发生了,叔叔给阿姨穿上鞋,她自己一下子站起来走出去在走廊里走,我们都没反应过来,她走的和正常人一样,但是我又看到门口的拐杖,我惊叫起来:阿姨您怎么不拄拐杖了,叔叔也惊叫起来,隔壁的患者家属,姐,都出来看,她真的自己走了,而且还是迈腿走(以前是托腿走)。
我们都惊奇的围绕着,让她再走走,她也傻笑着,好像不知怎么回事似的。
来回走了好几圈,让其坐下休息,她竟不自觉地翘起二郎腿,这又让我们哈哈大笑,这是得病以来没有的事,我让其站起来,她不扶椅把一下子就站起来了,天呢,这让我太不敢相信了。
就在我眼皮下,就在我的手上出现了谁都不会相信的奇迹。
我服了,服老师了,真是神奇的点穴手法,我都觉得像吹嘘了,但这确实是事实,没有看到的会说我瞎说。
今晚让我高兴,让我兴奋,也让患者,家属高兴一回,听说老师做过很多例但我还没做过,今天让我也尝试了一回。
感恩感恩。
真的感恩如果不是老师我又能见证什么呢,如果不是患者我们又能证明什么呢。
希望更多的朋友认识这套手法运用这套手法。
我把治疗方法介绍一下仅供大家参考。
根据患者所能承受力度开穴:足底开穴,肾上腺、肾脏、输尿管、膀胱。
足底配穴胃、胰脏、脾脏、心脏、肝脏、胆囊、性腺、肺脏、、三叉神经、鼻窦、按揉额窦、脑垂体、颈项、头、眼、耳、鼻、咽喉部。
足部颈椎、胸椎、腰椎。
腿部,点按悬钟、承山、足三里、阳陵泉,修复活动膝关节,伏兔、环跳。
点按上肢天宗穴,肩髎,曲池,内外关,合谷穴
封穴,肾上腺、肾脏、输尿管、膀胱、腹腔神经丛。
加上下身淋巴。
最后修复踝关节。
全部完成治疗结束。
其实,治疗中有更多的奇迹只要我们用心做,我们总会发现的。
后续。
2010-9- 1 小山东。