佳能闪光灯 430EX-II 中文说明书
580EXII仅中文说明书

全自动闪光拍摄
将相机的拍摄模式设置为<V> (程序自动曝光)或<U> (全自动) 时,E-TTL II/E-TTL全自动闪光会使闪光摄影变得和<V>模式及<U>模 式下的普通自动曝光摄影一样简单。
1 将闪光灯设置为<a>。 按下<D>按钮以显示 <a>。
2 对被摄体对焦。 半按快门按钮进行对焦。 快门速度和光圈值将会显示在取景器 中。 检查<Q>图标是否出现在取景器中。
5
液晶显示屏
<9> ,62ᛳܝᑺ ࡼ䮾ܝ䕧ߎ㑻߿ 䮾ܝᲱܝ㸹ٓ䞣 䮾ࣙܝೈᲱܝ㸹ٓ䞣
<c> 催䗳ৠℹ )3䮾 ܝ
<g> 䮾ࣙܝೈᲱܝ
<8/a/b> 㞾ࡼ䚼⌟(ܝ 77/ OO 77/㞾ࡼ 䮾ܝ
<d> ࡼব⛺
ܝ 䮾ࣙܝೈᲱܝ⢊ᗕ 乥䮾䮾ܝ᭄ 乥䮾䮾ܝ乥⥛ ࡼ䮾ܝḷ䞣ᣛ冫 㞾ᅮНࡳ㛑㓪ো 㞾ᅮНࡳ㛑䆒㕂
7
安装电池
安装4节AA型电。
1 打开电池仓盖。 用您的拇指按电池仓锁定杆,然后按 照箭头所示方向c说明书滑动电池仓 锁定杆将电池仓盖打开。
2 安装电池。 按电池仓中的指示确保电池的正负触 点朝向正确。
3 关闭电池仓盖。 按箭头所示方向滑动电池仓盖将其关 闭。 在电池仓盖发出咔嚓声的位置,电池 仓盖将被锁定。
请使用4节相同品牌的新电池。更换电池时,请同时更换4节。 也可以使用AA型镍氢(Ni-MH)或锂电池。
8
把闪光灯安装到相机上
1 安装闪光灯。 滑动闪光灯固定座使其完全插入相机 的热靴插座。
佳能数码相机使用说明书
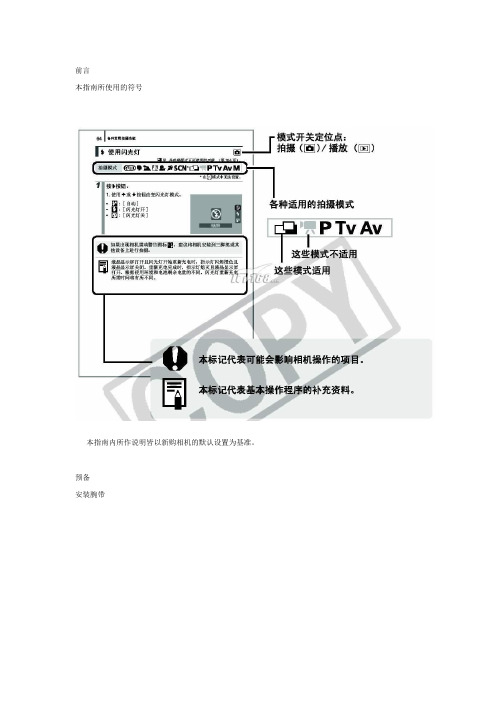
前言本指南所使用的符号本指南内所作说明皆以新购相机的默认设置为基准。
预备安装腕带为防止相机在使用过程中掉落,建议使用腕带。
安装电池1. 将电池仓盖锁扣推向箭头(1) 的方向,定住锁扣不放,此时将电池仓盖推向箭头(2) 方向,然后以箭头(3) 方向将电池仓盖向上打开。
2. 装入两颗电池。
3. 关闭电池仓盖(1),然后将电池仓盖向下按着推向(2),直到咔一声到位为止。
插入存储卡1. 将电池仓盖锁扣推向箭头(1) 的方向,定住锁扣不放,此时将电池仓盖推向箭头(2) 方向,然后以箭头(3) 方向将电池仓盖向上打开。
2. 装入存储卡直到咔一声到位为止。
3. 关闭电池仓盖(1),然后将电池仓盖向下按着推向(2),直到咔一声到位为止。
存储卡插入相机前,请先确定其方向正确。
若存储卡以反方向插入,相机则无法识别该卡或导致故障。
要取出存储卡用手指推存储卡直至听到咔哒声,然后松开存储卡。
设置日期和时间首次开启相机电源时,即会出现日期/ 时间设置菜单。
请依照下面说明的第3 及4 步骤设置日期及时间。
1. 按电源按钮。
2. 选择[ 日期/ 时间]。
3. 选择年、月、日和时间及显示的排列方式。
您可在图像上加印所设置的日期及时间。
设置显示的语言您可变更显示在液晶显示屏菜单及信息所使用的语言。
拍摄静止图像1. 按电源按钮。
(1) 将播放起动声音,液晶显示屏上将显示起动图像。
(2) 再次按电源按钮关闭电源。
2. 选择拍摄模式。
3. 将相机对准拍摄主体。
4. 轻按( 半按) 快门按钮进行对焦。
(1) 相机对焦时,相机鸣响两次,指示灯亮为绿色(使用闪光灯时亮为橙色)。
(2)在液晶显示屏的对焦点上会出现绿色自动对焦框。
5. 不作其他任何变动,将按钮按到底( 全按) 拍摄。
(1) 将播放一次快门声音并记录图像。
(2) 图像被录入存储卡时,指示灯将呈绿色闪烁。
静音设置拍摄后立即查看图像( 拍摄预览)拍摄所录制的图像随即在液晶显示屏上出现约2 秒。
580EXII闪光灯,中国牛人详尽解释,秒杀说明书

580EXII闪光灯,中国牛人详尽解释,秒杀说明书580EXII闪光灯中国牛人详尽解释秒杀说明书580EXII闪光灯中国牛人详尽解释秒杀说明书580EXII闪光灯中国牛人详尽解释秒杀说明书580EXII闪光灯中国牛人详尽解释秒杀说明书580EXII闪光灯中国牛人详尽解释秒杀说明书580EXII 闪光灯中国牛人详尽解释秒杀说明书580EXII闪光灯中国牛人详尽解释秒杀说明书580EXII闪光灯中国牛人详尽解释秒杀说明书580EXII闪光灯中国牛人详尽解释秒杀说明书580EXII闪光灯中国牛人详尽解释秒杀说明书本文111 BWANG7贡献pdf文档可能在WAP端浏览体验不佳。
建议您优先选择TXT或下载源文件到本机査看。
580EXII和430EXII有什么区别或者说580EXII值不值得买不考虑预算答我觉得回答这个月经问题要考虑两个方面1、两者的重量、体积区别。
580EXII 体积非常大比430EXII重和大见下图。
长时间手持和经常外出必须要考虑重量和体积的问题这是要首先考虑的。
2、要是你不怕重量那好我们再看看两者的功能区别主要见下表。
主要你要弄清楚需不需要更大的指数、频闪功能还有无线主控功能。
搞明白了也就可以做出判断了。
奎尔萨拉斯上传了这张照片:五、想玩离机闪以上提到的那么多闪光灯中哪些可以做主控单元下文统称主灯那些可以做从属单元下文统称副灯答可以做主控单元580EXII、580EX、550EX、ST-E2 引闪器。
可以做从属单元580EXII. 580EX、550EX、430EXII. 430EX、420EX 即将上市的320EX、270EXII第二部分佳能闪光灯实物说明及基本术语解释好了拿到闪光灯我们自然要弄明白各个按钮和部位是干什么的我拍了四张430、580EXII的实物图片作为说明。
这张是430EXII的正面奎尔萨拉斯上传了这张照片:这张是430EXII的背面奎尔萨拉斯上传了这张照片:这张是580EXII的正面奎尔萨拉斯上传了这张照片:这张是580EXII的背面奎尔萨拉斯上传了这张照片:一、什么是A-TTL、E-TTL、E-TTLII闪光测光模式答1、A-TTL闪光测光模式英文全称Advanced ThroughThe Lens意为“高级透过镜头”闪光测光。
佳能 EOS 30D DIGITAL数码单镜头反光相机 说明书
“打印/共享”按钮和 丰富的 PictBridge 功能
EOS 30D 新增了“打印 / 共享”按钮,相机连接 打印机时,按此按钮可以方便的进行直接打印; 相机连接电脑(已安装了相机随机软件)时,按此 按钮可以便捷的直接传输图像并将图像下载到电 脑里。 EOS 30D 支持 PictBridge ,和佳能新打印 机连接,可以实现更加丰富的直接打印功能:增 加了新的纸张尺寸选择;扩展了打印效果选择:
A. EOS 30D机身 A B C B. EOS数码处理光盘 C. 软件使用手册光盘 D E F G H D. 电源线 E. 充电器CB-5L F. 锂离子充电电池BP-511A G. 接口连接电缆IFC-400PCU(USB线) H. 视频电缆VC-100 I I. 相机宽背带EW-100DGR * J. EF-S 17-85mm f/4-5.6 IS USM镜头
85
85
拍摄时,错误代码会同时出现在相机的 LCD 显示 屏和 LCD 液晶监视器上,而且在 LCD 液晶监视器 上会显示出故障解决方法,非常方便摄影师排除 故障。
水平方向
85
。
E-TTL II 自动闪光
20 60 。
EOS 20D 可视角度 EOS 30D 可视角度
测光对构图区域内特定部分进行控制测光,测光 覆盖了取景器中央约 9% 的圆形面积。点测光对 需要严格测光的构图区域内特定部分进行控制测 光,测光范围仅覆盖取景器中央约 3.5% 的圆形 面积。中央重点平均测光,有经验的摄影师喜欢 的一种测光模式,考虑整个构图,将重点放在图 像的中心部分。 EOS 30D 全自动拍摄模 式优化了相机的各种设置, 可用于拍摄时的特殊场景。 安装在相机顶部左侧的 控制转盘上可轻松地找
厂商建议价格(RMB): 11,580.00 (机身) 17,280.00 (套机)
详解:佳能闪光灯SPEEDLITE430EXIII

详解:佳能闪光灯SPEEDLITE430EXIII使用简便、功能充实的多用途闪光灯SPEEDLITE 430EX III-RT是一款功能充实,基本性能优秀,同时又小巧易操控的闪光灯。
无线闪光同时支持无线电传输及光学脉冲传输,无线电传输方式下,可作为主控单元或从属单元,方便用户驾驭多灯闪光,享受闪光的艺术。
闪光灯还附带反射闪光适配器与色彩滤镜,提供更加灵活的拍摄体验。
■1.可应对多种拍摄场景的宽广覆盖范围与大光量拥有最大闪光指数约43※的大光量。
闪光覆盖范围在正常闪光时约24-105mm ,使用广角散光板时可覆盖超广角的14mm。
可根据与被摄体之间的距离自动调节闪光量,获得适宜的光量。
除了微调闪光量的闪光曝光补偿外,还可以设置闪光灯光线照射范围内的光线分布特性。
光线分布特性有自动设置的“标准”,闪光覆盖范围收窄优先闪光距离的“闪光指数优先”,以及拓展闪光覆盖范围抑制周边光量降低的“均匀覆盖”3种类型。
当然也可进行根据拍摄场景调整光量与闪光覆盖范围的手动闪光。
灯头可旋转角度向上约45-90°,向左约60-150°,向右约60-180°,便于利用天花板或墙壁进行跳闪拍摄。
※ISO 100下闪光覆盖范围设为105mm时,以米为单位。
■2.无线电传输功能使拍摄更加自由无线闪光拍摄同时支持光学脉冲和无线电传输方式。
无线电传输方式不易受到障碍物的影响,可实现全方位360°、最远约30米的信号传输,从属闪光灯可配置在其后方。
且无线电传输模式下既可作为主控单元又可作为从属单元,作为主控单元时可控制5组(15个)支持无线电传输的从属闪光灯。
并可使用联动拍摄功能,最多令16台相机(主控相机及从属相机)同时释放快门拍摄※。
另外光学脉冲方式下,闪光灯只能作为从属单元。
※当使用2012年和之后发售的EOS数码相机EOS-1D X等(EOS 1300D / 1200D除外)时,可以进行联动拍摄。
全景闪光灯专家用户手册说明书
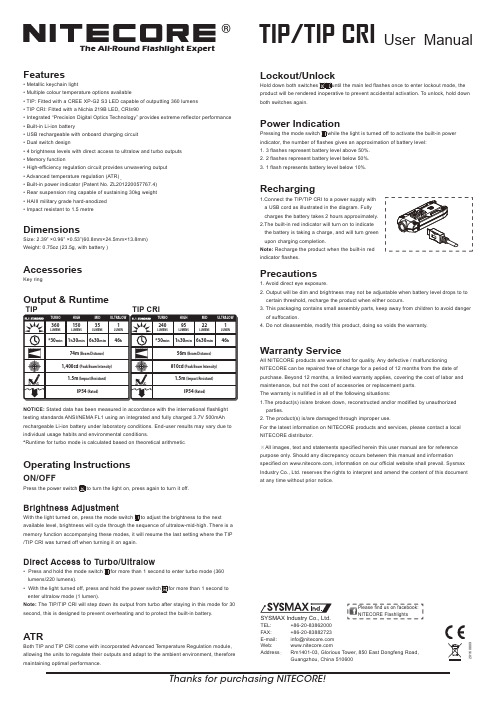
®The All-Round Flashlight ExpertUser ManualTIP/TIP CRIFeaturesMetallic keychain lightMultiple colour temperature options availableTIP: Fitted with a CREE XP-G2 S3 LED capable of outputting 360 lumens • TIP CRI: Fitted with a Nichia 219B LED, CRI≥90Integrated “Precision Digital Optics Technology” provides extreme reflector performance Built-in Li-ion batteryUSB rechargeable with onboard charging circuit Dual switch design4 brightness levels with direct access to ultralow and turbo outputs Memory functionHigh-efficiency regulation circuit provides unwavering output Advanced temperature regulation (ATR)Built-in power indicator (Patent No. ZL201220057767.4) Rear suspension ring capable of sustaining 30kg weight HAIII military grade hard-anodized Impact resistant to 1.5 metreDimensionsSize: 2.39” ×0.96” ×0.53”(60.8mm×24.5mm×13.8mm)Weight: 0.75oz (23.5g, with battery )AccessoriesKey ringOutput & RuntimeNOTICE: Stated data has been measured in accordance with the international flashlight testing standards ANSI/NEMA FL1 using an integrated and fully charged 3.7V 500mAh rechargeable Li-ion battery under laboratory conditions. End-user results may vary due to individual usage habits and environmental conditions.*Runtime for turbo mode is calculated based on theoretical arithmetic .Operating InstructionsON/OFFPress the power switch to turn the light on, press again to turn it off.Brightness AdjustmentWith the light turned on, press the mode switch to adjust the brightness to the next available level, brightness will cycle through the sequence of ultralow-mid-high. There is a memory function accompanying these modes, it will resume the last setting where the TIP /TIP CRI was turned off when turning it on again.Direct Access to Turbo/UltralowPress and hold the mode switch for more than 1 second to enter turbo mode (360 lumens/220 lumens).With the light turned off, press and hold the power switch for more than 1 second to enter ultralow mode (1 lumen).Note: The TIP/TIP CRI will step down its output from turbo after staying in this mode for 30 second, this is designed to prevent overheating and to protect the built-in battery.ATRBoth TIP and TIP CRI come with incorporated Advanced Temperature Regulation module, allowing the units to regulate their outputs and adapt to the ambient environment, therefore maintaining optimal performance.Lockout/UnlockHold down both switches until the main led flashes once to enter lockout mode, the product will be rendered inoperative to prevent accidental activation. To unlock, hold downboth switches again.Power IndicationPressing the mode switch while the light is turned off to activate the built-in power indicator, the number of flashes gives an approximation of battery level:1. 3 flashes represent battery level above 50%.2. 2 flashes represent battery level below 50%.3. 1 flash represents battery level below 10%.RechargingPrecautions1. Avoid direct eye exposure.2. Output will be dim and brightness may not be adjustable when battery level drops to to certain threshold, recharge the product when either occurs.3. This packaging contains small assembly parts, keep away from children to avoid danger of suffocation.4. Do not disassemble, modify this product, doing so voids the warranty.Warranty ServiceAll NITECORE products are warranted for quality. Any defective / malfunctioning NITECORE can be repaired free of charge for a period of 12 months from the date of purchase. Beyond 12 months, a limited warranty applies, covering the cost of labor and maintenance, but not the cost of accessories or replacement parts.The warranty is nullified in all of the following situations:1.The product(s) is/are broken down, reconstructed and/or modified by unauthorized parties.2. The product(s) is/are damaged through improper use.For the latest information on NITECORE products and services, please contact a local NITECORE distributor.※All images, text and statements specified herein this user manual are for reference purpose only. Should any discrepancy occurs between this manual and information specified on , information on our official website shall prevail. Sysmax Industry Co., Ltd. reserves the rights to interpret and amend the content of this document at any time without prior notice.Thanks for purchasing NITECORE!SYSMAX Industry Co., Ltd.TEL: +86-20-83862000 FAX: +86-20-83882723 E-mail: *****************Web: Address : Rm1401-03, Glorious Tower, 850 East Dongfeng Road,Guangzhou, China 510600Please find us on facebook: NITECORE Flashlights201608091.Connect the TIP/TIP CRI to a power supply with a USB cord as illustrated in the diagram. Fully charges the battery takes 2 hours approximately.2.The built-in red indicator will turn on to indicate the battery is taking a charge, and will turn green upon charging completion.Note: Recharge the product when the built-in red indicator flashes.150360351*30min 1h 30min 6h 30min 46h 74m (Beam Distance)1,400cd (Peak Beam Intensity)IP54 (Rated)1.5m (Impact Resistant)95240221*30min 1h 30min 6h 30min 46h56m (Beam Distance)810cd (Peak Beam Intensity) IP54 (Rated)1.5m (Impact Resistant)TIPTIP CRI。
佳能照相机使用手册2
1 将相机电源开关设置为 <ON>。
2 设置相机的 [ 数据传输设置 ]。 ● 如下表所示设置您相机型号的 [ 数据传输设置 ]。
5D 30D 20D 10D 350D 300D
菜单 [ 数据传输设置 ] [ 数据传输设置 ] [ 数据传输设置 ]
[ 数据传输设置 ] [ 数据传输设置 ] [ 数据传输设置 ]
相机通信软件
EOS Utility
Ver. 2.4
1D Mk II N 1Ds Mk II 1D Mk II 1Ds
1D
5D
30D 20D 10D
400D 350D 300D D60 D30
使用说明书
● 本使用说明书的内容
● EU 用于表示 EOS Utility。 ● 每个相机型号都显示为一个图标。
● 连接 400D 和计算机 ( 右侧所述 )
● 使用 [ 数据传输设置 ] 设置连接相机和计算机 (p.6)
5D
30D 20D 10D 350D 300D
● 连接 1D Mk II N 1Ds Mk II 1D Mk II 和计算机 (p.7)
● 连接 1Ds
1D 和计算机 (p.8)
● 连接 D60 D30 和计算机 (p.9)
● 使用无线文件发送器 WFT-E1 进行拍摄并实时查看图 像
➜ p.52
● 从 EU 启动 WFT-E1 软件
➜ p.53
● 从 EU 启动原始数据安全套装 OSK-E3 软件
➜ p.53
简介
内容概述
1下载图像 2相机设置 3远景拍摄 4首选项
参考
索引
3
1 下载图像至计算机
此处介绍如准备下载图像至计算机 ( 连接相机和计算机 )、启动 EU、从 相机下载图像至计算机和退出 EU 等的基本操作。
闪光灯使用指南说明书
1. For best flash photography results, set your ISO to 200 and above in both indoor and outdoor conditions.2. After each picture, wait for at least 4-5 seconds for the flash to be fully charged before taking the next shot even when the ready light is on. This will help to prolong the lifespan of the flash tube and help attain the full charging capacity of the flash capacitor for precise flash photography.3. For precise flash output, it is best to wait until an intermittent humming sound is heard before depressing the shutter.4. Maintain at least 2m away from your subject.5. Always set the flash zoom head position according to the zoom position of your camera lens.6. In the event that the flash exposure is incorrect (over or under- exposed or green auto check light does not light up), you should do one of the following: (1) move closer to the subject (2) readjust your bounce or swivel angle (3) adjust flash zoom head (4) Increase ISO setting.7. Bounce or swivel should only be used on light color ceiling or white walls with zoom head set at the 50mm position. Note that when using this feature, 2-3 F stops of light will be lost due to reflection.8. Always use a fresh set of 4 batteries of the same brand and type when old batteries are depleted. Mixing and matching batteries of different types/brands will greatly deteriorate flash performance.9. When flash is not being used for extended period of time (>2 weeks), remove all batteries to prevent battery leakage. After batteries removal, do not expose the flash unit and batteries to excessive heat. 10. Charge up and test fire the flash unit at least once per monthto maintain the optimal performance of the flash tube and charging capacitor.SpecificationsNOMENCLATURE • Guide No: 92ft/28m (ISO100@50mm) • Flash ready indicator in viewfinder • Full digital TTL dedication • Autofocus assistance beam• Zoom, bounce and swivel construction • Automatic standby after 3 minutes • Automatic shutter speed setting • Auto check (OK) indicator • Red eye reduction*• Second/rear curtain synchronization* •Slow synchronization (For Nikon only)• Dedication: ETTL II (Canon), iTTL (Nikon),ADI / PTTL (Sony), 4/3 TTL (Olympus/Panasonic)* Camera dependent features. Please check your camera operating instruction manualZOOM SCALEBASEAUTOFOCUS PROGRAM TTL (P) / AUTO MODEThis flash unit provides automatic Through-The-Lens (TTL) control of the flash exposure when used with dedicated digital cameras. When using this mode, the flash unit will automatically emit the flash output for a balance illumination of the subject and background. The built-in assistance beam will turn on automatically to assist the camera to focus in low lighting conditions.TTL AV, TV AND M MODEWhen this flash unit is used in AV, TV or M mode, the flash exposure will be automatically controlled by the camera based on the combination of shutter speed and aperture value.*For TV mode, do not exceed the maximum camera’s flash synchronization speed. In AV mode, setting at a slow speed will usually result in blurry pictures caused by handshake. In such situation, the use of tripod is recommended.SECOND/REAR CURTAIN SYNCHRONIZATIONThis mode permits you to release the flash just before the shutter closes during slow shutter speed shooting. In this way, a trail of lighting can be taken behind the main subject when slow shutter speed is being used.*For rear curtain synchronization setting, referto your camera instruction manual.AUTO STANDBYWhen the flash is not used for approximately 3 minutes, it will automatically switch to standby mode. Under this mode, the flash will stop charging the capacitor. Even though the flash is in standby mode, it will still consume a small amount of power. To conserve battery power, turn the ON/OFF switch to the OFF position.RED EYE REDUCTIONWhen red eye reduction is activated on the DSLR body,the flash unit will activate a series of pre-flash before the main flash to reduce the possibility of red-eye occurrence during digital photography.USING ZOOM HEADFor proper angle coverage, set the flash zoom position according to the zoom position of the camera lens.USING BOUNCE AND SWIVEL HEADVarious combination of bounce and swivel angle can beused to eliminate unwanted shadow or for softening effect.BATTERIES INSTALLATIONEnsure that the ON/OFF is in the OFF position. Insert 4 new AA batteries according to the battery polarity indicated inside the battery compartment.MOUNTING THE FLASH ON THE CAMERAEnsure that the On/OFF switch is at the OFF position. Slide the flash hotshoe base onto the camera’s hot shoe contact and fasten the lock ring in an anti-clockwise motion. Slide the ON/OFF Switch to the ON position. When the Ready Light lights up, the flash is ready to fire. Pressing the Test Button will fire the unit.For Sony Alpha DSLRs, slide the flash hotshoe onto the camera hotshoe contact until the release button pops up. To detach,simply depress the release button and slide the flash out of the camera hotshoe contact.AUTO CHECK INDICATORThe green auto check indicator located on the back of the flash is used to confirm that your subject is within the effective TTL range of the flash unit. If your subject is within the effective TTL flash range after shooting, the green Auto Check Light will illuminate for approximately 2 seconds.IMPORTANT NOTES FOR FLASHPHOTOGRAPHY AND MAINTENANCEPLEASE READ BEFORE YOU USE THE FLASHFLASH FEATURES© 2012 Energizer Energizer and other marks, including graphics, are trademarks of Energizer and used under license by Bower , Inc. All other trademarks, brand names or product names are the property of their respective owners and are not affiliated with Energizer or Bower , Inc.。
新增无线电主控佳能430EXIII闪灯评测
新增无线电主控佳能430EXIII闪灯评测在热靴闪光灯内部配备无线电引闪器已然成为闪光灯的一种趋势,一众国产厂商也比较早地进行了尝试。
而在原厂方面,此前仅有佳能公司在2012年推出的旗舰级热靴闪光灯SPEEDLITE 600EX-RT闪光灯上具备有支持TTL主控和从属的无线电引闪器。
相比传统的可见光无线TTL引闪,无线电TTL引闪系统可以说是优势巨大,引闪成功率也更高,用户完全不用担心因为遮挡导致从属闪光灯无法接收主控闪光灯发出的可见光引闪信号。
可以说无线电TTL引闪系统将会取代可见光TTL引闪,成为未来TTL闪光灯的标配。
佳能公司在发布了SPEEDLITE 600EX-RT热靴闪光灯和ST-E3-RT无线电引闪器之后,又在今年7月份正式发布了旗下第二款支持无线电TTL引闪的热靴闪光灯——SPEEDLITE 430EX III-RT(以下简称佳能430EX III-RT闪光灯),充实了自家无线电TTL引闪闪光灯的阵容的同时,还完成了08年发布的前代产品SPEEDLITE 430EX II的更新。
更新后的佳能430EX III-RT闪光灯整体配置水平更加强大,在各家原厂中端级别热靴闪光灯中处于领先水平。
这款闪光灯配备有无线电TTL主控和从属引闪功能,相比前两代430EX闪光灯只有从属闪光没有主控功能,佳能430EX III-RT在机顶使用时,可以通过无线电TTL引闪功能,引闪处于从属TTL无线电引闪功能的SPEEDLITE 600EX-RT或430EX III-RT闪光灯。
除此之外,相比前代产品,这款闪光灯还增加了眼神光板、原厂标配柔光罩和CTO色温校正滤镜,提升的幅度可谓巨大。
佳能430EX III-RT闪光灯外包装盒采用经典的红白配色设计佳能430EX III-RT闪光灯的外包装盒采用红白配色,包装盒正面印刷有该闪光灯的正面外观,相比已经逐渐换装的银黑色产品包装盒,红白色设计更加简洁,也更加经典。
闪光灯商品说明书
Fan Umbrella Holder
Fuse Holder
Power Input Connector
Counterweight Holder
FLASH 1/32 1/16 1/8 1/4 1/2 FULL
MODEL
Quick Change Levers (Front of Light)
Digital Display
Power Switch
Sync Outlet Optical Slave Sensor
Ready Light
Fan Umbrella Holder
Fuse Holder
Power Input Connector
Counterweight Holder
Quick Change Levers (Front of Light)
Flash Power Control
Modeling Lamp Power Control
Modeling Lamp Controls
FLASH 1/32 1/16 1/8 1/4 1/2 FULL
MODEL
WARNING! DO NOT OPERATE
WITHOUT GLASS LAMP COVER IN PLACE.
Digital Display
Power Setting Buttons Flash/Modeling Lamp Adjust Button
Test Button
WARNING! DO NOT OPERATE WITHOUT GLASS
LAMP COVER IN PLACE.
ADJUST
l 2
TRACK SET
Power Setting Buttons Flash/Modeling Lamp Adjust Button