XNND-042-908 PDS NSX300R500R V4 0
芜湖德豪润达各型号对应的光罩、产品编码
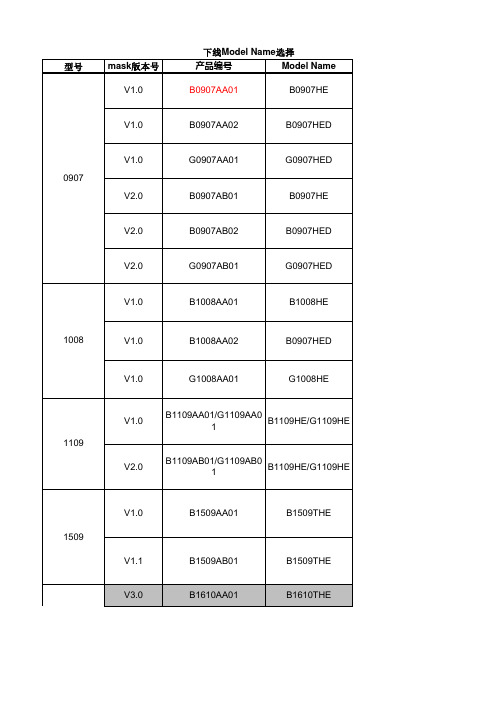
型号mask 版本号产品编号Model Name V1.0B0907AA01B0907HE V1.0B0907AA02B0907HED V1.0G0907AA01G0907HED V2.0B0907AB01B0907HEV2.0B0907AB02B0907HEDV2.0G0907AB01G0907HEDV1.0B1008AA01B1008HEV1.0B1008AA02B0907HEDV1.0G1008AA01G1008HEV1.0B1109AA01/G1109AA01B1109HE/G1109HE V2.0B1109AB01/G1109AB01B1109HE/G1109HEV1.0B1509AA01B1509THE V1.1B1509AB01B1509THEV3.0B1610AA01B1610THE1109下线Model Name 选择100809071509V4.1B1610AB02B1610THE V4.1B1610AB03B1610THE V4.1B1610AB04B1610THE V4.2B1610AC04B1610THE V1.0B2109AA01B2109THE V2.0B2109AB01B2109THEV1.0B2020AA01B2020THMV1.1B2020AA01B2020THMV1.2B2020AB01B2020THM无标注B2410AA01B2410SLV3.0B2410AB02B2410THEV3.0B2410AB03B2410THE210920201610V3.0B2410AB04B2410THE 2410V3.0B2410AB05B2410THEV3.1B2410AC04B2410THEV3.2B2410AD04B2410THEV4.0B2410AE05B2410THEV3.0B2812AA01B2812THEV3.0B2812AA02B2812THEV3.0B2812AA03B2812THEV3.0B2812AA02B2812THE 2812V4.0B2812AB01B2812THEV4.1B2812AC02B2812THERDV1.0B2812AD04B2812THEV5.0B2812AD01B2812THEV2.0B2626AA01B2626THMV2.1B2626AB02B2626THMV2.1B2626AB03B2626THM 2626V2.2B2626AC01B2626THM V2.2G2626AC01G2626THM V1.0B3030AA01B3030THM V1.0B3030AA02B3030THMV2.0B3030AB01B3030THMV2.1B3030AC01B3030THMV2.2B3030AD01B3030THMV1.0B3434AA01B3434THM26263030V1.0B3434AA02B3434THM 3434V2.0B3434AB01B3434THMV2.1B3434AC01B3434THMV1.0B4222AA01B4222THEV2.0B4222AB01B4222THE 4222V2.1B4222AC01B4222THEV1.0B4040AA01B4040THMV1.1B4040AA01B4040THMV2.0B4040AA01B4040THM 4040V2.1B4040AB01B4040THMV1.0B4545AA01B4545THMV1.1B4545AA01B4545THMV2.0B4545AB01B4545THM 4545V2.1B4545AC01B4545THMV1.0B5050AA01B5050THM 5050V2.0B5050AB01B5050THMV1.0B6060AA01B6060THMV2.0B6060AB01B6060THM 6060V2.1B6060AC01B6060THM状态图形备注量产在用普通蓝光非量产在用RGB蓝光非量产在用RGB绿光非量产在用普通蓝光非量产在用RGB蓝光非量产在用RGB绿光非量产在用普通蓝光非量产在用RGB蓝光非量产在用RGB绿光非量产TR在用非量产PIE在用非量产在用非量产在用非量产不在用量产停用Lapping:150um+/-5um量产停用Lapping:130um+/-5um量产在用在ITO和Metal酸洗前增加Wait站别量产在用非量产不在用非量产在用非量产不在用非量产在用非量产在用不在用量产ER、1BH停用Lapping:150um+/-5um量产ER、1BH停用Lapping:130um+/-5um量产ER、1BH在用在ITO和Metal酸洗前增加Wait站别量产Aixron 使用PV recipe改为:PV-test-S200非量产在用非量产在用非量产在用PV:P5000量产ER、1BH停用Lapping:150um+/-5um量产ER、1BH停用Lapping:130um+/-5um量产ER、1BH在用在ITO和Metal酸洗前增加Wait站别非量产在用非量产在用非量产在用非量产在用PV:P5000非量产在用非量产不在用量产停用量产在用在ITO和Metal酸洗前增加Wait站别非量产在用非量产在用绿光量产在用量产在用测试电流由120mA改为350mA 非量产在用非量产在用非量产在用量产停用量产在用在ITO和Metal酸洗前增加Wait站别非量产在用非量产在用非量产不在用非量产在用非量产在用非量产不在用非量产不在用非量产在用非量产在用非量产不在用非量产不在用非量产在用非量产在用非量产不在用非量产在用非量产不在用非量产在用非量产在用。
★MDM300.I.S★

英国密析尔MICHELL 仪表制造商露点变送器,dewpointmeters ,冷/冷镜湿度计,相对湿度传感器,过程水分测定仪,碳氢露点分析仪,液体分析仪中的水分和氧气分析仪,是一家国际领先的高精度传感与结束在该领域有30多年的经验。
我们的产品范围的高精度电容湿度传感器,帮助客户测量微量水分,在其过程中的应用,而我们的相对湿度变送器,相对湿度和温度传感器被广泛应用于HV AC 应用,药品储存等生产流程控制的环境条件是至关重要的。
,再加上我们的参考露点湿度计,湿度校准系统使客户能够进行校准便携式湿度计和相对湿度的仪器内部的,节省费用和停机时间。
我们提供高速测量中的应用范围,包括发电站,燃烧优化控制CO 2的水平啤酒厂,清洁气体的过程,如硅片生产和纯气体生成氧气。
天然气行业和发电厂的客户节省数百万美元的维修和停机时间,通过使用我们的康达迈科Condumax II 烃露点分析仪,以确保传输的天然气质量在贸易交接,防止燃气燃烧器故障,延长寿命过程的设备。
我们在烃类液体中的水分分析仪适用于防爆,本质安全和实验室版本,并允许范围广泛的烃类液体,包括变压器油,液压油,石油馏分和纯烃中的水分含量的连续测量。
一个高速的便携式露点仪,提供快速的现场检查在许多应用中,包括压缩空气,天然气和高电压开关淬气露点或水分含量测量。
这款轻巧,ATEX ,IECEx 认证,FM ,CSA ,GOST 认证产品比其他任何同类产品让更多的测量每工作小时。
硬质耐磨,但符合人体工程学的情况下和一个易于使用的接口,可以在恶劣的工业环境中的舒适和实际操作。
产品特点∙ 在低压下从T95至-60℃,小于15分钟时间反复快速的测量∙ 更高的压力测量成为可能 - 高达350巴 ∙ 电池寿命长:长达48小时的典型使用费用之间∙ 直观的应用套件,允许快速和简单的连接到您的采样点∙ 耐用,易于处理和操作:专为在工业环境中使用∙ 4-20 mA 外部设备输入变送器校准和验证∙ 轻量级:小于1.5公斤 ∙13点可溯源校准证书MDM300的MDM300采样选项MDM300 MDM300要获得最佳性能,它是为您的测量点有适当的样品调节至关重要。
NETGEAR Wireless N 300+ Powerline AV Router WNXR20
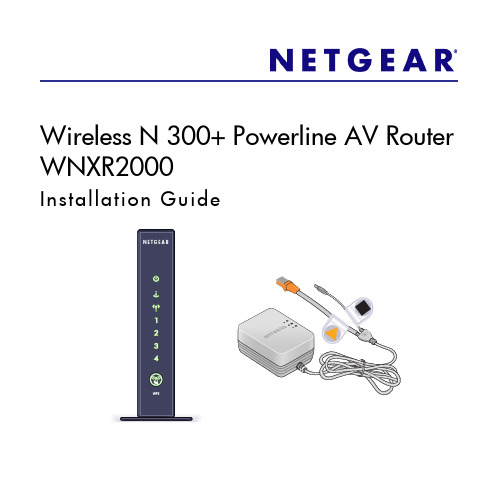
Wireless N 300+ Powerline AV Router WNXR2000Inc. All rights reserved.©2010 NETGEAR,Technical SupportThank you for selecting NETGEAR products.Locate the serial number on the label of your product and use it to register your product at /register. Registration is required before you can use the telephone support service. Registration at the NETGEAR website is strongly recommended.Go to for product updates and Web support. For complete DoC please visit the NETGEAR EU Declarations of Conformity website at:/app/answers/detail/a_id/ 11621/TrademarksNETGEAR, the NETGEAR logo, ProSafe, Smart Wizard, and Auto Uplink are trademarks or registered trademarks of NETGEAR, Inc. Microsoft, Windows, Windows NT, and Vista are registered trademarks of Microsoft Corporation. Other brand and product names are registered trademarks or trademarks of their respective holders.Statement of ConditionsIn the interest of improving internal design, operational function, and/or reliability, NETGEAR reserves the right to make changes to the products described in this document without notice. NETGEAR does not assume any liability that may occur due to the use or application of the product(s) or circuit layout(s) described herein.Resource CDAbout Your WNXR2000The WNR2000 router works with the XAVP1000 Y-cableadapter to help you create a Powerline and wireless network.To set up your network, do the following:• Set Up the XAVP1000 Adapter• Connect the WNXR2000 Powerline AV RouterSet Up the XAVP1000 AdapterFollow these steps to connect the XAVP1000 adapter to therouter:1. Plug the network connector on the Y-cable adapter into oneof the orange Ethernet ports on the router.2. Plug the Power connector on the Y-cable adapter into thepower inlet on the router.3. Plug the XAVP1000 adapter into an electrical outlet.Make sure that:• You do NOT plug the adapter into a Power Strip.• The electrical outlet is not controlled by a wall switch to avoid someone unknowingly turning off the power tothe outlet.4. Power on the router using the Power On/Off button on theback of the router.5. Check that the power lights on both the XAVP1000 adapterand on the router are lit. For more information on the status lights, see “WNXR2000 Router Status Lights” on page15 and “XAVP1000 Adapter LEDs and Buttons” on page17.6. When the router indicates that the Ethernet port connected tothe Y-cable adapter is linked and active (the LED for theEthernet port on the front of the router will be solid green), check that the Ethernet and Powerline LEDs on the adapter are also on and blinking.Connect the WNXR2000Powerline AV RouterFollow the connection instructions as shown in the drawing on the next page.Step 4:Power on your router.Wait until the wireless LEDturns on.Power on your modem.Wait until your modemcycles on (approximately2 minutes).Note: If you have a modem with a battery-backup, remove and re-insert the battery before connecting your modem to power.Resource CDStep 6:This drawing (Room 1) shows how the Y-cable Powerline adapter and WNR2000 router might fit into an existingSetting Up Internet Access1. In the address field of your browser, type http:// and click Enter.2. Enter the router User Nameadmin and default Passwordpassword to open yourrouter’s main settings page.3. When the main settingspage opens, you will beasked if you want to “Checkfor Update.” Click Cancel.You can always check for newfirmware later after you are connected to the Internet.4. Select the first menu item on the left: Setup Wizard. Makesure Yes is selected. Then click Next and follow the prompts to complete the Setup Wizard.When the Setup Wizard has completed detecting yourconnection, the Basic Settings page displays showing your settings. You are now connected to the Internet.Note: If your ISP requires that you enter a User Name or Password, you will be prompted to enter this information.If you do not have this information, contact your ISP. After connecting to the Internet, you can check for firmware updates by selecting Router Upgrade and following the on-screen prompts.Setting Up the Wireless SecurityYou should set up a secure wireless network. Once your router security is established, your wireless laptops, gaming devices (such as Wii or Play station 3 with wireless), or other wireless equipment can safely and securely connect to the Internet.1. From the main menu page, select Wireless Settings.**Your router menu may display different or additional featuresnot shown2. First, name your wireless network. Choose a name that iseasy for you to remember. You might want to write it down here: ___________________________ (the default name is NETGEAR).3. Select your security method. NETGEAR recommends WPA-PSK (TKIP) +WPA2-PSK (AES). Then, enter a Passphrase. In the example, we entered HomeNetwork.You might want to write your Passphrase downhere:________________________.Note: Both your Network Name (SSID) and Passphrase arecase sensitive. Your Network name, Security method andPassphrase must be the same on all the wireless devicesconnected to your router.4. Click Apply and close your browser.Connecting Wireless Devices to Your RouterIf you don’t remember your Passphrase, type http:// into your browser and log in by(defaultis entering your User Name admin and Passwordpassword). Then, select Wireless Settings to retrieve your Passphrase.You can add wireless computers and other equipment to yourwireless network:1. Open the wireless software that manages your wirelessconnections on the wireless device (iPhone, laptopcomputer, gaming device) that you want to connect to your router.2. The wireless software will scan for all wireless networks inyour area. Look for your network—the one you named when you set up your router. Select it.3. If you set up security, you will be prompted for a Passphraseor network key. Enter the Passphrase you selected and click Connect.If your wireless device supports WPS (WiFi Protected Setup)—NETGEAR calls this method Push 'N' Connect—you might be prompted to press a WPS button on the router instead of entering a Passphrase. Then:1. Press the WPS button on the router. It will look similar toor .2. Within 2 minutes, follow the wireless software instructionson the wireless device to complete the WPS process.The device will then be connected to your router. Repeat this process to add other wireless devices.LED and Button Descriptions WNXR2000 Router Status LightsInternetWireless(Ports 1 – 4)XAVP1000 Adapter LEDs and Buttons PowerlineLEDLEDWarning: Do not press the Security button on the Powerline adapter until installation is complete and the adapters are communicating with each other (indicated by the blinking Powerline LED). Pressing this button too soon can temporarily disable Powerline communication. If this should occur, use the Factory Reset button to return the Powerline adapter to its factory default settings.Troubleshooting TipsTechnical SupportThank you for selecting NETGEAR products.After installing your device, locate the serial number on thelabel of your product and use it to register your product at h ttp:// /register. Registration is required before you can use our telephone support service. Registration via ourwebsite is strongly recommended.Go to for product updates and Web support. For additional information about setting up, configuring and using your WNXR2000, see the User Manual.GPL may be included in this product; to view the GPL license agreement go to ftp:///files/GPLnotice.pdf.TroubleshootingFor troubleshooting information, see the WNXR2000 UserManual. A link is located on the Resource CD.This symbol was placed in accordance with the European Union Directive2002/96 on the Waste Electrical and Electronic Equipment (the WEEEDirective). If disposed of within the European Union, this product should betreated and recycled in accordance with the laws of your jurisdictionimplementing the WEEE Directive.© 2010 by NETGEAR, Inc. All rights reserved. NETGEAR and the NETGEAR logo are registered trademarks of NETGEAR, Inc. in the United States and/or other countries. Other brand and product names are trademarks or registered trademarks of their respective holders. Information is subject to change without notice.NETGEAR, Inc.350 East Plumeria Drive San Jose, CA 95134 USASeptember 2010。
Motorola 3.5 kHz 产品说明书

RVN4126 3.59100-386-9100-386/T DEVICERVN41772-CD2-3.5MCS/MTSRVN41821-CD2-3.5XTS3000/SABER PORTABLE YES RKN4046KHVN9085 3.51-20 R NO HLN9359 PROG. STAND RVN4057 3.532 X 8 CODEPLUG NO3080385B23 & 5880385B30 MDVN4965 3.59100-WS/T CONFIG KITRVN4053 3.5ASTRO DIGITAL INTERFACE NO3080385B23RVN41842-CD RKN4046A (Portable) 2-3.5ASTRO PORTABLE /MOBILE YES3080369B73 or0180300B10 (Mobile) RVN41831-CD3080369B732-3.5ASTRO SPECTRA MOBILE YES(Low / Mid Power)0180300B10 (High Power) RVN4185CD ASTRO SPECTRA PLUS MOBILE NO MANY OPTIONS; SEESERVICE BRIEF#SB-MO-0101RVN4186CD ASTRO SPECTRA PLUS MANY OPTIONS;MOBILE/PORTABLE COMB SEE SERVICE BRIEF#SB-MO-0101RVN4154 3.5ASTROTAC 3000 COMPAR.3080385B23RVN5003 3.5ASTROTAC COMPARATORS NO3080399E31 Adpt.5880385B34RVN4083 3.5BSC II NO FKN5836ARVN4171 3.5C200RVN4029 3.5CENTRACOM SERIES II NO VARIOUS-SEE MANUAL6881121E49RVN4112 3.5COMMAND PLUS NORVN4149 3.5COMTEGRA YES3082056X02HVN6053CD CT250, 450, 450LS YES AAPMKN4004RVN4079 3.5DESKTRAC CONVENTIONAL YES3080070N01RVN4093 3.5DESKTRAC TRUNKED YES3080070N01RVN4091 3.5DGT 9000 DESKSET YES0180358A22RVN4114 3.5GLOBAL POSITIONING SYS.NO RKN4021AHVN8177 3.5GM/GR300/GR500/GR400M10/M120/130YES3080070N01RVN4159 3.5GP60 SERIES YES PMLN4074AHVN9128 3.5GP300 & GP350RVN4152 3.5GP350 AVSRVN4150 3.5GTX YES HKN9857 (Portable)3080070N01(Mobile) HVN9025CD HT CDM/MTX/EX SERIES YES AARKN4083/AARKN4081RiblessAARKN4075RIBLESS NON-USA RKN4074RVN4098H 3.5HT1000/JT1000-VISAR YES3080371E46(VISAR CONV)RVN4151 3.5HT1000 AVSRVN4098 3.5HT1000/ VISAR CONV’L.YES RKN4035B (HT1000) HVN9084 3.5i750YES HLN-9102ARVN4156 3.5LCS/LTS 2000YES HKN9857(Portable)3080070N01(Mobile) RVN4087 3.5LORAN C LOC. RECV’R.NO RKN4021ARVN4135 3.5M100/M200,M110,M400,R100 includesHVN9173,9177,9646,9774YES3080070N01RVN4023 3.5MARATRAC YES3080070N01RVN4019 3.5MAXTRAC CONVENTIONAL YES3080070N01RVN4139 3.5MAXTRAC LS YES3080070N01RVN4043 3.5MAXTRAC TRK DUPLEX YES3080070N01RVN4178CD MC SERIES, MC2000/2500DDN6124AW/DB25 CONNECTORDDN6367AW/DB9 CONNECTOR RVN41751-CD Rib to MIC connector 1-3.5MCS2000 RKN4062BRVN41131-3.5MCS2000RVN4011 3.5MCX1000YES3000056M01RVN4063 3.5MCX1000 MARINE YES3000056M01RVN4117 3.5MDC/RDLAP DEVICESRVN4105 3.5MOBILE PROG. TOOLRVN4119 3.5MOBITEX DEVICESRVN4128 3.5MPT1327-1200 SERIES YES SEE MANUALRVN4025 3.5MSF5000/PURC/ANALOG YES0180355A30RVN4077 3.5MSF5000/10000FLD YES0180355A30RVN4017K 3.5MT 1000YES RTK4205CRVN4148 3.5MTR 2000YES3082056X02RVN4140 3.5MTRI 2000NORVN41761-CD MTS2000, MT2000*, MTX8000, MTX90001-3.5*programmed by DOS which is included in the RVN4176RVN4131 3.5MTVA CODE PLUG FIXRVN4142 3.5MTVA DOCTOR YES3080070N01RVN4131 3.5MTVA3.EXERVN4013 3.5MTX800 & MTX800S YES RTK4205CRVN4097 1-CD MTX8000/MTX9000,MTS2000,MT2000*,* programmed by DOS which is included in the RVN4176HVN9067CD MTX850/MTX8250MTX950,MTX925RVN4138 3.5MTX-LS YES RKN4035DRVN4035 3.5MX 1000YES RTK4203CRVN4073 3.5MX 800YES RKN4006BHVN9395 P100, P200 LB, P50+, P210, P500, PR3000RVN4134 3.5P100 (HVN9175)P200 LB (HVN9794)P50+ (HVN9395)P210 (HVN9763)P500 (HVN9941)PR3000 (HVN9586)YES RTK4205HVN9852 3.5P110YES HKN9755A/REX1143 HVN9262 3.5P200 UHF/VHF YES RTK4205RVN4129 3.5PDT220YVN4051 3.5PORTABLE REPEATER Portable rptr.P1820/P1821AXRVN4061C 3.5PP 1000/500NO3080385B23 & 5880385B30 RVN5002 3.5QUANTAR/QUANTRO NO3O80369E31RVN4135 3.5R100 (HVN9177)M100/M200/M110/M400YES0180358A52RVN4146 3.5RPM500/660RVN4002 3.5SABER YES RTK4203CRVN4131 3.5SETTLET.EXEHVN9007 3.5SM50 & SM120YESRVN4039 3.5SMART STATUS YES FKN5825AHVN9054 3.5SOFTWARE R03.2 P1225YES3080070N01HVN9001 3.5SOFTWARE R05.00.00 1225LS YES HLN9359AHVN9012 3.5SP50RVN4001N 3.5SPECTRA YES3080369B73 (STANDARD)0180300B10 (HIGH POWER) RVN4099 3.5SPECTRA RAILROAD YES3080369B73RVN4110 3.5STATION ACCESS MODULE NO3080369E31RVN4089A 3.5STX TRANSIT YES0180357A54RVN4051 3.5SYSTEMS SABER YES RTK4203BRVN4075 3.5T5600/T5620 SERIES NO3080385B23HVN9060CD TC3000, TS3000, TR3000RVN4123 3.5VISAR PRIVACY PLUS YES3080371E46FVN4333 3.5VRM 100 TOOLBOX FKN4486A CABLE &ADAPTORRVN4133 3.5VRM 500/600/650/850NORVN4181CD XTS 2500/5000 PORTABLES RKN4105A/RKN4106A RVN41002- 3.5XTS3000 ASTRO PORTABLE/MOBILERVN4170 3.5XTS3500YES RKN4035DRIB SET UPRLN4008E RADIO INTERFACE BOX (RIB)0180357A57RIB AC POWER PACK 120V0180358A56RIB AC POWER PACK 220V3080369B71IBM TO RIB CABLE (25 PIN) (USE WITH XT & PS2)3080369B72IBM TO RIB CABLE (9 PIN)RLN443825 PIN (F) TO 9 PIN (M) ADAPTOR (USE W/3080369B72 FOR AT APPLICATION) 5880385B308 PIN MODULAR TO 25 PIN ”D” ADAPTOR (FOR T5600 ONLY)0180359A29DUPLEX ADAPTOR (MOSTAR/TRAXAR TRNK’D ONLY)Item Disk Radio RIB Cable Number Size Product Required Number Item Disk Radio RIB Cable Number Size Product Required NumberUtilizing your personal computer, Radio Service Software (RSS)/Customer Programming Software (CPS)/CustomerConfiguration Software (CCS) enables you to add or reprogram features/parameters as your requirements change. RSS/CPS/CCS is compatible with IBM XT, AT, PS/2 models 30, 50, 60 and 80.Requires 640K RAM. DOS 3.1 or later. Consult the RSS users guide for the computer configuration and DOS requirements. (ForHT1000, MT/MTS2000, MTX838/8000/9000, Visar and some newer products —IBM model 386, 4 MEG RAM and DOS 5.0 or higher are recommended.) A Radio Interface Box (RIB) may be required as well as the appropriate cables. The RIB and cables must be ordered separately.Licensing:A license is required before a software (RVN) order is placed. The software license is site specific (customer number and ultimate destination tag). All sites/locations must purchase their own software.Be sure to place subsequent orders using the original customer number and ship-to-tag or other licensed sites; ordering software without a licensed customer number and ultimate tag may result in unnecessary delays. To obtain a no charge license agreement kit, order RPX4719. To place an order in the U.S. call 1-800-422-4210. Outside the U.S., FAX 847-576-3023.Subscription Program:The purchase of Radio ServiceSoftware/Customer Programming/Customer ConfigurationSoftware (RVN & HVN kits) entitles the buyer/subscriber to three years of free upgrades. At the end of these three years, the sub-scriber must purchase the same Radio Service Software kit to receive an additional three years of free upgrades. If the sub-scriber does not elect to purchase the same Radio Service Software kit, no upgrades will be sent. Annually a subscription status report is mailed to inform subscribers of the RSS/CPS/CCS items on our database and their expiration dates.Notes:1)A subscription service is offered on “RVN”-Radio Service Software/Customer Programming/Customer Configuration Software kits only.2)“RVN” software must only be procured through Radio Products and Services Division (RPSD). Software not procured through the RPSD will not be recorded on the subscription database; upgrades will not be mailed.3)Upgrades are mailed to the original buyer (customer number & ultimate tag).4)SP software is available through the radio product groups.The Motorola General Radio Service Software Agreement is now available on Motorola Online. If you need assistance please feel free to submit a “Contact Us” or call 800-422-4210.SMART RIB SET UPRLN1015D SMART RIB0180302E27 AC POWER PACK 120V 2580373E86 AC POWER PACK 220V3080390B49SMARTRIB CABLE (9 PIN (F) TO 9 PIN (M) (USE WITH AT)3080390B48SMARTRIB CABLE (25 PIN (F) TO 9 PIN (M) (USE WITH XT)RLN4488ASMART RIB BATTERY PACKWIRELESS DATA GROUP PRODUTS SOFTWARERVN4126 3.59100-386/9100T DEVICES MDVN4965 3.59100-WS/T CONFIG’TN RVN41173.5MDC/RDLAP DEVICESPAGING PRODUCTS MANUALS6881011B54 3.5ADVISOR6881029B90 3.5ADVISOR ELITE 6881023B20 3.5ADVISOR GOLD 6881020B35 3.5ADVISOR PRO FLX 6881032B30 3.5BR8506881032B30 3.5LS3506881032B30 3.5LS5506881032B30 3.5LS7506881033B10 3.5LS9506881035B20 3.5MINITOR III8262947A15 3.5PAGEWRITER 20008262947A15 3.5PAGEWRITER 2000X 6881028B10 3.5TALKABOUT T3406881029B35 3.5TIMEPORT P7308262947A15 3.5TIMEPORT P930NLN3548BUNIVERSAL INTERFACE KITItem Disk Radio NumberSize Product。
R.STAHL 单通道安全屏障系列 9001 说明书

Single-Channel Safety BarriersSeries 900109965E00 R.STAHL safety barriers INTRINSPAK series 9001 are used for various applications in the arena of automation. Based on the broad range of versions and the possibility of various interconnections it offers for almost all tasks.The safety barriers enable the intrinsic safe operation of HART transmitter, proximity switches, potential-free contacts and temperature sensors, strain gauge, solenoid valves, indicators e.t.c. The compact design allows a space saving and flexible installation in the cabinet. The mounting is very comfortable and easy due to the fact that installation on the DIN-rail and the contact to the potential equalization is made in one step.ATEX / IECEX / NEC 505NEC 506GOST Class IZone012202122Zone012202122 Ex i interfaces x x x x x x Ex i interfacesInstallation in x x Installation in x xSingle-Channel Safety BarriersSeries 9001Explosion ProtectionGlobal (IECEx)Gas and dust IECEx PTB 09.0001XEx nA [ia Ga] IIC T4 Gc[Ex ia Da] IIICEurope (ATEX)Gas and dust PTB 01 ATEX 2088 XE II 3 (1) G Ex nA [ia Ga] IIC/IIB T4 GcE II (1) D [Ex ia Da] IIICUSA (NEC)Gas and dust3011002 (FM)CL. I, DIV.2, GP. A,B,C,D, T4 AND CL. I, ZONE 2, GP. IIC/IIB T4,INTRINSICALLY SAFE CONNECTIONS FORCL. I,II,III, DIV. 1, GP. A,B,C,D,E,F,G AND CL. I, ZONE 0, GP. IIC/IIBE81680 (UL)CLASS I, DIV. 2, GROUPS A,B,C,DCLASS II, DIV. 2, GROUPS F,GCLASS IIIRussia (GOST-R)Gas[Exia Ga] IIC/IIB/IIAExnA [iaGa] IIC/IIB/IIA T4 GcCertificates and approvalsCertificates IECEx, ATEX, Canada (CSA), Kazakhstan (GOST-K), Russia (GOST-R), Serbia (SRPS),Ukraine (GOST-U), USA (FM, UL), Belarus (GOST-B)Further parametersInstallation in Zone 2, Division 2 and in safe areaFurther information see respective certifcate and operating instructionsTechnical dataElectrical dataTransmissioncharacteristicLeakage current at U N( 2 m A (if not stated otherwise)Temperature effect( 0.25 % / 10 KTransmissionfrequencyAt resistive currentlimitationI m( 50 mA( 50 kHzI m) 50 mA( 100 kHz( 10 kHzAt electronic currentlimitationAmbient conditionsAmbient temperature-20 ... +60 °C / -4 ... +140 °FStorage temperature-20 ... +75 °C / -4 ... +167 °F95 % mean, no dewingMaximum relativehumidityMechanical dataIngress protectionaccording to IEC 60529terminal enclosure IP20Casing IP40Enclosure material Polyamide 6 GFConnection 4 cage terminals, each maximum 1.5 mm2 flexible / solid2 PA-terminals, each maximum 4 mm2 flexible / solidWeight approx. 0.115 kgA2A2A2A2A2A2A2A2A2A2A2A2A2A2Single-Channel Safety Barriers Series 9001Selection Table Version DescriptionType Page Single-channel barriers•Earthed electric circuit•Current limiting to < 100 mA9001/014•Earthed electric circuit•Connection to regulated power supply U N 9001/015•Application for floating contacts •Nominal current limited to < 40 mA •Earthed electric circuit•Connection to unregulated power supply U N between + 20 and 35 V DC 9001/017•Application for floating contacts •Nominal current limited to < 40 mA •Earthed field device•Connection to unregulated power supply U N between + 20 and 35 V DC9001/018•Application for solenoid valves, LEDs or audible signals •Earthed electric circuit•Connection to unregulated power supply U N between + 20 and 35 V DC 9001/019•Earthed electric circuit•Connection to regulated power supply U N9001/0010•Earthed electric circuit•Suitable for alternating current and direct current 9001/0211•Earthed electric circuit•Suitable for alternating current and direct current •Current limiting to < I max9001/0213•Earthed electric circuit•For the evaluation of direct current signals •Current limiting to < I max9001/0314•Application for HART transmitters •Earthed field device•Connection to unregulated power supply U N between + 20 and 35 V DC 9001/5115•Application for transmitters •Earthed field device•Connection to unregulated power supply U N between + 20 and 35 V DC9001/5117Single-Channel Safety Barriers for Positive Potential Series 9001/01Single-Channel Safety Barriers for Positive Potential Series 9001/01Single-Channel Safety Barriers for Positive Potential Series 9001/01Single-Channel Safety Barriers for Positive Potential Series 9001/01Single-Channel Safety Barriers for Positive Potential Series 9001/01Single-Channel Safety Barriers for Positive Potential Series 9001/01Single-Channel Safety Barriers for Negative Polarity Series 9001/00Single-Channel Safety Barriers for Alternating Polarity Series 9001/02Single-Channel Safety Barriers for Alternating Polarity Series 9001/02Single-Channel Safety Barriers for Alternating Polarity Series 9001/02Single-Channel Diode Return Barriers for Positive Polarity Series 9001/03Single-Channel Safety Barriers for Transmitters Series 9001/51Single-Channel Safety Barriers for Transmitters Series 9001/51Single-Channel Safety Barriers Series 900109919E0009920E0009921E0009922E0009924E0003856E0009926E0009926E0009927E0009928E00Single-Channel Safety Barriers Series 9001。
SJ-D主轴参数
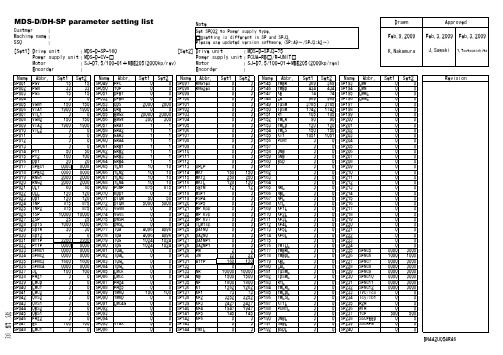
Revision
PY1 PY2 DDT SPEC1 SPEC2 RNG1 RNG2 OLT OLL OD1 INP INP2 TSP ZSP SDTS SDTR SDT2 MTYP PTYP SFNC1 SFNC2 SFNC3 SFNC4 JL FHz1 LMCD LMCT LMC2 OVS2 OVS1 OBS2 OBS1 FHz2 EC LMC1
Name
SP049 SP050 SP051 SP052 SP053 SP054 SP055 SP056 SP057 SP058 SP059 SP060 SP061 SP062 SP063 SP064 SP065 SP066 SP067 SP068 SP069 SP070 SP071 SP072 SP073 SP074 SP075 SP076 SP077 SP078 SP079 SP080 SP081 SP082 SP083 SP084 SP085 SP086 SP087 SP088 SP089 SP090 SP091 SP092 SP093 SP094 SP095 SP096
SP001 SP002 SP003 SP004 SP005 SP006 SP007 SP008 SP009 SP010 SP011 SP012 SP013 SP014 SP015 SP016 SP017 SP018 SP019 SP020 SP021 SP022 SP023 SP024 SP025 SP026 SP027 SP028 SP029 SP030 SP031 SP032 SP033 SP034 SP035 SP036 SP037 SP038 SP039 SP040 SP041 SP042 SP043 SP044 SP045 SP046 SP047 SP048
电梯5342调试说明书
XMCB板快速调试方法:1.所有机械部件安装完毕,控制柜内无短接线;2. 确认安全回路的每一个安全开关均有效,每一层的厅门门锁有效。
观察XMCB电子板上的指示灯,检查输入信号是否正确:注:如果上电后,指示灯的状态和表中所列出的状态不一致,请检查相关的电路和参数(通常参数在电梯出厂时已设定好)。
3. 用ERO或TCI全程运行电梯,检查门区1LV、2LV,强迫减速1LS、2LS等井道信号:查看主板指示灯。
4. 按照控制柜粘贴的简易调试步骤进行井道自学习。
或是按照以下步骤操作均可。
5.确认XMCB驱动部分的M-3-3-1-9中RUN ENABLE参数应为0,M3-3-5中RUN SOURCE SVT应为1。
6.将ERO及TCI拨到正常位置,用服务器操作驱动部分M-3-3-4起动井道自学习。
7.电梯将低速运行至底层平层位置,然后以自学习速度向上进行井道自学习,到达顶层平层后,自学习完成。
8.自学习成功后将RUN ENABLE 参数改成1。
井道位置信息存于M-3-1-4菜单中,请检查是否正确。
对重平衡系数检查确认对重重量是否满足平衡系数的要求4 0~50%之间,通常做到45%。
把平衡负载(45%额定负载)放入轿厢。
进入服务器M3-1-1监控Output current电梯上行及下行的电流值,并把轿厢与对重在中间楼层相遇时的电流记录下来。
如电梯已处于平衡状态,则所记录的上行及下行的电流值应相等(相差不超过1安培)。
否则,往对重架增减对重铁块,直至电梯处于平衡状态。
固定对重架内的重块。
也可以采用手动盘车的方法,靠左右方向用力大小来判断平衡。
微动开关调整调整前,轿厢需要保持清空至少半个小时。
调整过程需要持续进行,不能中断。
依次放入10%,80%,100%的额度载重的砝码,来调节10%防捣乱开关,80%满载开关,100%超载开关。
调整开关时,可以通过服务器的菜单来检验每个开关信号是否正常。
当100%载重时超载开关到作,轿底4个防压螺丝应有1-2mm间隙,此时轿门滑块不能脱出地坎槽。
FD系列电源分配箱说明书
FD20124 Note) 1 station 24 stationsSS5Q1308StationsElectrical entryOptionDManifold mountingD EDIN rail mounting Direct mounting……1(P), 3(R) port sizeNil 1(P), 3(R) port ø8 One-touch fittings 1(P), 3(R) portø5/16" One-touch fittingsCE-compliantNil Q—CE-compliantKit typeFD0FD1FD2FD3PD0PD1PD2PD3PDCJD0LD0 (N)LU0 (N)LD1 (N)LU1 (N)LD2 (N)LU2 (N)SDF SDH SDJ1SDJ2SDQ SDR1SDR2SDVD side D side D sideD sideD side U side D side U side D side U sideCable/SI unit specificationsLead wire kit with 0.6 m cable Lead wire kit with 1.5 m cable Lead wire kit with 3.0 m cableFlat ribbon cable (20P)PC wiring system compatibleD-sub connector (25P) kit, without cable D-sub connector (25P) kit, with 1.5 m cable D-sub connector (25P) kit, with 3.0 m cable D-sub connector (25P) kit, with 5.0 m cable Flat ribbon cable (26P) kit, without cable Flat ribbon cable (26P) kit, with 1.5 m cable Flat ribbon cable (26P) kit, with 3.0 m cable Flat ribbon cable (26P) kit, with 5.0 m cable Flat ribbon cable (20P) kit, without cable NKE Corp.: Fieldbus System NKE Corp.: Fieldbus H SystemPanasonic Industrial Devices SUNX Co., Ltd.: S-LINK (16 output points)Panasonic Industrial Devices SUNX Co., Ltd.: S-LINK (8 output points)DeviceNet ™OMRON Corp.: CompoBus/S (16 output points)OMRON Corp.: CompoBus/S (8 output points)CC-Link1 to 12 stations 1 to 12 stations 1 to 9 stations 1 to 8 stations1 to 12 stations1 to 8 stations 1 to 4 stations 1 to 8 stations 1 to 4 stations 1 to 8 stationsStation (Double wiring)Lead wire connector location24241816—16816816Max. number of solenoids for specialwiring specifications Note 2)—CE-compliantFP JLSNote 1) Specify DIN rail length with D at the end. (Enter the number of stations inside .) The numberof stations that may be displayed is longer than the manifold number of stations. Example: -D09Note 2) When “-B” is selected, a back pressure check valve is included in all stations of the manifold. Ifthe back pressure check valve is used only for the station that need it, then specify the station location in the manifold specification. (“-B” is not necessary)Note 3) Specify “-K” for wiring specification for cases below. (Except L kit)- All single wiring- Single and double mixed wiring.- When there are stations which do not require wiring (e.g. individual SUP spacer), specify the wiring specification in the manifold specification so that the number of solenoids is the maximum number of solenoids or less. (Standard wiring specification is double wiring)Note 4) For specifying two or more options, enter them alphabetically. Example: -BKN00TNil 02 to 24 Note 1)B Note 2)K Note 3)NNoneDIN rail length specified Back pressure check valve Special wiring specifications (Except double wiring)With name plate (Side ported only)Note) The maximum number ofstations depends on the type of electrical entries.kitLead wire kitFlat ribbon cable (20P)(PC wiring system compatible)Serial transmission kitEX140 Integrated-type (For Output) Serial Transmission SystemD-subconnector kitkitkitkitkitU sideD side Flat ribbon cable connector kit26P 20P( )Note 1) Separately order the 20P type cable assembly for the P kit.Note 2) Specify the wiring so that the maximum number of solenoids is not exceeded. (The number of solenoids are counted as: 1 for single solenoids and 2 for type 3P double solenoids.)Note 3) When specifying the negative common specifications of the L kit, suffix “N” to the kit symbol.Note 3)5 Port Solenoid Valve Plug-in UnitS eries 10-SQ1000How to Order Manifold10Clean seriesNote 1)[Option]578A i r P r e p a r a t i o n E q u i p m e n tP r e s s u r e C o n t r o l E q u i p m e n tF l o w C o n t r o l E q u i p m e n tP r e s s u r e S w i t c h e s /P r e s s u r e S e n s o r sD i r e c t i o n a l C o n t r o l V a l v e sA i r G r i p p e r s M o d u l a r F . R .F i t t i n g s & T u b i n gA i r C y l i n d e r sR o t a r y A c t u a t o r s。
施耐德ATV303变频器说明书[1]
3
重要信息
注意
在安装、操作或维护本设备之前,请仔细阅读这些说明,并熟悉本设备。在本手册中或设备上可能会出现下列特殊信息,以告诫潜在的危险 或提醒您注意那些阐明或简化某过程的信息。 “ 危险”或 “ 警告”标签上附加的本符号表示存在电击危险,如果使用者不遵照使用说明进行操作,会造成人身伤害。
这是提醒注意安全的符号。用于提醒您此处存在可能会造成人身伤害的安全隐患。请务必遵循此标志附注的所有安全须知进行操 作,以免造成人员伤亡。
目录
重要信息 ___________________________________________________________________________________________________________________ 4 开始之前 ___________________________________________________________________________________________________________________ 5 设置步骤 ( 参考快速起动 ) _____________________________________________________________________________________________________ 7 设置 - 初步建议 ______________________________________________________________________________________________________________ 8 变频器额定值 _______________________________________________________________________________________________________________ 9 尺寸与重量 ________________________________________________________________________________________________________________ 10 安装 ________________________________________________________________________________________________________________________ 11 接线 ________________________________________________________________________________________________________________________ 12 电源端子 ___________________________________________________________________________________________________________________ 15 控制端子 ___________________________________________________________________________________________________________________ 18 接线 ________________________________________________________________________________________________________________________ 18 检查清单 __________________________________________________________________________________________________________________ 22 出厂设置 __________________________________________________________________________________________________________________ 23 基本功能 __________________________________________________________________________________________________________________ 24 编程 _______________________________________________________________________________________________________________________ 25 参数表结构 ________________________________________________________________________________________________________________ 28 功能兼容性表 ______________________________________________________________________________________________________________ 29 给定模式 rEF _______________________________________________________________________________________________________________ 30 监视模式 MOn _______________________________________________________________________________________________________________ 31 配置模式 ConF _____________________________________________________________________________________________________________ 37 配置模式 - 短菜单 ___________________________________________________________________________________________________________ 38 配置模式 - 完整菜单 (FULL) __________________________________________________________________________________________________ 40 维护 _______________________________________________________________________________________________________________________ 86 诊断和故障检修 ____________________________________________________________________________________________________________ 88 应用说明 __________________________________________________________________________________________________________________ 94 参数索引 __________________________________________________________________________________________________________________ 98
变频器设置表
现场设
电机的额定电压
P2.1.7
现场设
电机的额定频率
P2.1.8
现场设
电机的额定速度
P2.1.9
现场设
电机的额定电流
P2.1.10
现场设
电机的功率因数
P2.1.11
0
启动功能0-斜坡(默认值)
P2.1.12
1
停车功能1=斜坡
P2.1.14
0
I/O参考0=AI1(默认值)
P2.1.19
0.00
默认
Cd06
20
必须
Cd58
100
校准输出
Cd07
0.1
默认
Cd59
0
必须
Cd08
1
必须
Cd60
默认
Cd09
105
默认
Cd61
默认
Cd10
0
默认
Cd62
默认
Cd11
45
必须
Cd63
默认
Cd12
30
冷却风20
Cd64
1
必须
Cd13
0
必须
Cd65
1则初始化
Cd14
100
校准输入
Cd66
1则数据保护,参数不可更改
F301
禁用自动重起动控制选择
0
3
F303
重试(自动重起动)次数选择
0
3
F605
变频器输出相故障检测模式选择
调试时为0
调试完为4
3
F607
电机150%过载时间限制
10
300
秒
F615
变频器过转矩保护:脱扣/报警
- 1、下载文档前请自行甄别文档内容的完整性,平台不提供额外的编辑、内容补充、找答案等附加服务。
- 2、"仅部分预览"的文档,不可在线预览部分如存在完整性等问题,可反馈申请退款(可完整预览的文档不适用该条件!)。
- 3、如文档侵犯您的权益,请联系客服反馈,我们会尽快为您处理(人工客服工作时间:9:00-18:30)。
东软飞利浦医疗设备系统有限责任公司
产品数据单
保密级别:限制文件编号:XNND-042-908
产品渠道:东软
产品名称:X射线诊断设备
产品型号:NSX300R/NSX500R
产品类型:普通摄影平床
实施日期:2007-01- 01 第4.0版编制:产品管理部
批准:Henny in 't Zandt
替代第3.0版
NSX300R型X射线摄影平床的技术描述
床体
产品型号NSX300R
床面板材料中密度板
床面板移动方向横向和纵向移动
面板横向移动范围220mm±10mm
面板纵向移动范围900mm±10mm
床体尺寸(长×宽×高) 1998mm×922mm×610mm 球管焦点到床面板最大距离1180mm±10mm
床面板X射线等效滤过1mmAl
X线管立柱纵向移动范围1380mm±10 mm
床面板承重能力135kg
X射线管
管芯型号 XD51-20,40/125
安装位置床板正上方
热容量140KHU
焦点 1.0mm/2.0mm
最大输出功率小焦点:20KW 大焦点:40KW 最大管电压125KV
最大管电流320mA
固有滤过 1.5mmAl
X射线管上下运动行程
744 mm
(X射线管中心距床面)
X射线管绕水平轴旋转角度±180°
高压发生器
输出功率30kW
输出电压范围 40~125kV
曝光时间范围2~5000ms
曝光mAs范围10-320mAs
管电压最小调节步长1kV
管电压调节方式连续可调
高压操作台
外形尺寸
(长×宽×高)
640mm×320mm×920mm 功能设置活动曝光手柄开关、安全急停开关、高压控制面板
显示内容摄影:KV、mA、ms、mAs
状态显示:准备、曝光、X线管累计热容量
控制操作键高压系统电源开关
曝光技术选择键:(mAs方式;mA、ms方式)带指示灯曝光条件选择键:手动设定KV、mA
滤线栅
栅焦距100cm
栅格比10:1
栅密度40L/cm
滤线栅类型固定栅
片盒与片夹装置
匹配暗盒尺寸8″×10″,10″×12″,11″×14″,14″×14″,14"×17"
暗盒装载方式前端平入
注:全白钢制作的胶片夹;
可放置以上尺寸的暗盒;
限束器
驱动方式手动
照射野形状矩形
平均照度大于100Lux
灯光时间30s±5s
固有滤过 1.0mmAl
附加滤过0.5mmAl
型号HD100
床体运动控制按钮及脚踏开关
功能设置床体运动控制按钮:床体电源开关
X射线管旋转
X射线管所有运动及上下运动脚踏开关:控制床面板横、纵向运动
状态指示X射线管角度指示
床体总电源指示灯
X射线管旋转、水平运动及上下运动对应按键均有状态指示灯
电源要求
产品型号NSX300R
电源容量不小于45kVA
电源视在内阻0.15Ω
电压交流380V 三相五线制电源最大电压变化量标称稳态下不超过±5%
频率50Hz±1Hz
环境要求
4500mm×3000mm(配置立式胸片架) 整机机房最小占地面积 4000mm×3000mm,
整机机房建议占地面积 4500mm×3600mm ,5100mm×3600mm(配置立式胸片架) 室内天花板最低高度2500mm
工作室温度要求 15℃~35℃
工作室湿度要求 30%RH~75%RH(无凝露)
大气压力 50kPa~106kPa
运输和存贮温度要求 -20℃~+50℃
运输和存贮湿度要求 10%RH~100%RH(无凝露)
NSX500R型X射线摄影平床的技术描述
床体
产品型号NSX500R
床面板材料中密度板
床面板移动方向横向和纵向移动
面板横向移动范围220mm±10mm
面板纵向移动范围900mm±10mm
床体尺寸(长×宽×高) 1998mm×610mm×700mm
球管焦点到床面板最大距离1180mm±10mm
床面板X射线等效滤过1mmAl
X线管立柱纵向移动范围1400mm±10 mm
床面板承重能力135kg
X射线管
型号Varian RAD12
安装位置床板正上方
热容量150KHU
焦点0.6mm/1.2m
最大输出功率小焦点:21.5KW 大焦点:50KW 最大管电压150kV
最大管电流630mA
固有滤过 1.5mmAl
X射线管上下运动行程
744 mm
(X射线管中心距床面)
X射线管绕水平轴旋转角度±180°
X射线管绕垂直轴旋转角度±180°
高压发生器
输出功率50KW
输出电压范围 40~150KV
曝光时间范围2~6300ms
曝光mAs范围500mAs
管电压最小调节步长1KV
管电压调节方式连续可调
高压操作台
外形尺寸
(长×宽×高)
640mm×320mm×920mm
功能设置活动曝光手柄开关、安全急停开关
高压控制面板
显示内容
摄影:KV、mA、ms、mAs
状态显示:准备、曝光、X线管累计热容量
控制操作键
高压系统电源开关
曝光技术选择键:(mAs方式;mA、ms方式)带指示灯曝光条件选择键:手动设定KV、mA
滤线栅
栅焦距100cm
栅格比10:1
栅密度40L/cm
滤线栅类型固定栅
片盒与片夹装置
暗盒尺寸8″×10″,10″×12″,11″×14″,14″×14″,14"×17"
暗盒装载方式前端平入
注:全白钢制作的胶片夹;
可放置以上尺寸的暗盒;
限束器
驱动方式手动
照射野形状矩形
平均照度大于100Lux
灯光时间30s±5s
固有滤过 1.0mmAl
附加滤过0.5mmAl
型号HD100
床体运动控制手柄及脚踏开关
功能设置床体运动控制手柄:床体电源开关
X射线管旋转
X射线管左右运动及上下运动脚踏开关:控制床面板横、纵向运动
状态指示X射线管角度指示
床体总电源指示灯
X射线管旋转、水平运动及上下运动对应按键均有状态指示灯
电源要求
产品型号NSX500R
电源容量不小于80kVA
电源视在内阻0.15Ω
电压交流380V 三相五线制电源最大电压变化量标称稳态下不超过±5%
三相不平衡度不超过5%
频率50Hz±1Hz
地线要求小于0.1Ω
环境要求
整机机房最小占地面积 4000mm×3000mm,
4500mm×3000mm(配置立式胸片架) 整机机房建议占地面积 4500mm×3600mm ,5100mm×3600mm(配置立式胸片架) 室内天花板最低高度2500mm
工作室温度要求 15℃~35℃
工作室湿度要求 30%RH~75%RH(无凝露)
大气压力 50kPa~106kPa
运输和存贮温度要求 -20℃~+50℃
运输和存贮湿度要求 10%RH~100%RH(无凝露)
选配配置
功能设置可放置各种尺寸片盒滤线栅的放置
摄影架上有移动标尺
移动范围1000mm±20mm 胸片架中心距
地面最小距离
480mm±10mm
胸片架中心距地面最大距离1490mm±10mm
立式胸片架
外形尺寸 630mm×350mm×1780mm(长×宽×高)
功能设置与立式胸片架配套使用
外形尺寸18″×18″
栅焦距: 180cm
栅格比 10:1
栅密度40L/cm
滤线栅
滤线栅类型固定栅。