锐捷无线AP胖模式(FAT)配置案例
锐捷无线AP胖模式(FAT)配置案例

锐捷无线AP胖模式(FAT)配置案例一、AP trunk 模式1.创建vlan10 vlan20 vlan30AP(config)#vlan 10 创建vlan10AP(config-vlan)#vlan 20 创建vlan20AP(config-vlan)#vlan 30 创建vlan302.创建wlan:10 20 30 联vlan 10 20 30AP(config)#dot11 wlan 10 创建无线网络wlan 10AP(dot11-wlan-config)#vlan 10 关联vlan10AP(dot11-wlan-config)#broadcast-ssid 将ssid名称广播AP(dot11-wlan-config)#ssid ap10 配置ssid广播标识名称为ap10AP(dot11-wlan-config)#exit 退出AP(config)#dot11 wlan 20 创建无线网络wlan 20AP(dot11-wlan-config)#vlan 20 关联vlan20AP(dot11-wlan-config)#broadcast-ssid 将ssid名称广播AP(dot11-wlan-config)#ssid ap20 配置ssid广播标识名称为ap20AP(dot11-wlan-config)#exit 退出AP(config)#dot11 wlan 30 创建无线网络wlan 30AP(dot11-wlan-config)#vlan 30 关联vlan30AP(dot11-wlan-config)#broadcast-ssid 将ssid名称广播AP(dot11-wlan-config)#ssid ap30 配置ssid广播标识名称为ap30AP(dot11-wlan-config)#exit 退出3.创建子接口并封装AP(config)#interface gigabitEthernet 0/创建千兆以太网接口G0/1的子接口G0/AP(config-subif)#encapsulation dot1Q 10 封装协议,并把该端口关联到vlan10 AP(config-subif)#exit 退出AP(config)#interface gigabitEthernet 0/创建千兆以太网接口G0/1的子接口G0/AP(config-subif)#encapsulation dot1Q 20 封装协议,并把该端口关联到vlan20 AP(config-subif)#exit 退出AP(config)#interface gigabitEthernet 0/ 创建千兆以太网接口G0/1的子接口G0/ AP(config-subif)#encapsulation dot1Q 30 封装协议,并把该端口关联到vlan30 AP(config-subif)#exit 退出4.广播信道封装协议关联wlanAP(config)#interface dot11radio 1/0 进入dot11radio1/ 0无线信道接口AP(config-if-Dot11radio 1/0)#mac-mode fat 设置模式为胖(FAT)模式AP(config-if-Dot11radio 1/0)#radio-type 设置无线网络协议类型为AP(config-if-Dot11radio 1/0)#wlan-id 10 关联wlan-id 10(即wlan 10)AP(config-if-Dot11radio 1/0)#wlan-id 20 关联wlan-id 20(即wlan 20)AP(config-if-Dot11radio 1/0)#wlan-id 30 关联wlan-id 30(即wlan 30)AP(config-if-Dot11radio 1/0)#exit 退出AP(config)#interface dot11radio 2/0 进入dot11radio2/ 0无线信道接口AP(config-if-Dot11radio 2/0)#mac-mode fat 设置模式为胖(FAT)模式AP(config-if-Dot11radio 2/0)#radio-type 802.11a 设置无线网络协议类型为802.11a AP(config-if-Dot11radio 2/0)#wlan-id 10 关联wlan10-id 10AP(config-if-Dot11radio 2/0)#wlan-id 20 关联wlan20-id 20AP(config-if-Dot11radio 2/0)#wlan-id 30 关联wlan30-id 30AP(config-if-Dot11radio 2/0)#exit 退出5.广播子接口封装:模式mac-mode fatAP(config)#interface dot11radio 1/ 进入无线信道接口1/0子接口dot11radio1/AP(config-subif)#encapsulation dot1Q 10 封装协议,并把该接口关联到vlan 10 AP(config-subif)#mac-mode fat 设置模式为胖(FAT)模式AP(config-subif)#exit 退出AP(config)#interface dot11radio 1/ 进入无线信道接口1/0子接口dot11radio1/AP(config-subif)#encapsulation dot1Q 20 封装协议,并把该接口关联到vlan 20 AP(config-subif)#mac-mode fat 设置模式为胖(FAT)模式AP(config-subif)#exit 退出AP(config)#interface dot11radio 1/ 进入无线信道接口1/0子接口dot11radio1/AP(config-subif)#encapsulation dot1Q 30 封装协议,并把该接口关联到vlan 30 AP(config-subif)#mac-mode fat 设置模式为胖(FAT)模式AP(config-subif)#exit 退出AP(config)#interface dot11radio 2/ 进入无线信道接口2/0子接口dot11radio2/ AP(config-subif)#encapsulation dot1Q 10 封装协议,并把该接口关联到vlan 10 AP(config-subif)#mac-mode fat 设置模式为胖(FAT)模式AP(config-subif)#exit 退出AP(config)#interface dot11radio 2/ 进入无线信道接口2/0子接口dot11radio2/ AP(config-subif)#encapsulation dot1Q 20 封装协议,并把该接口关联到vlan 20 AP(config-subif)#mac-mode fat 设置模式为胖(FAT)模式AP(config-subif)#exit 退出AP(config)#interface dot11radio 2/ 进入无线信道接口2/0子接口dot11radio2/ AP(config-subif)#encapsulation dot1Q 30 封装协议,并把该接口关联到vlan 30 AP(config-subif)#mac-mode fat 设置模式为胖(FAT)模式AP(config-subif)#exit 退出6. 设置bvi 和dhcpAP(config)#interface bvi 10 进入bvi 10虚接口AP(config-if-BVI 10)#ip add 设置vlan 10网桥的IP地址(网关)AP(config)#interface bvi 20 进入bvi 10虚接口AP(config-if-BVI 20)#ip add 设置vlan20网桥的IP地址(网关)AP(config)#interface bvi 30 进入bvi 30 虚接口AP(config-if-BVI 30)#ip add 设置vlan 30网桥的IP地址(网关)AP(config)#service dhcp 开启dhcp功能AP(config)#ip dhcp pool 10 建立名为10的dhcp地址池AP(dhcp-config)#network 发布网段的DHCPAP(dhcp-config)#default-router 设置默认网关AP(dhcp-config)#dns-server 湖州电信DNSAP(dhcp-config)#exit 退出AP(config)#ip dhc p pool 20 建立名为20的dhcp地址池AP(dhcp-config)#network 发布网段的DHCPAP(dhcp-config)#default-router 设置默认网关AP(dhcp-config)#dns-server 湖州电信DNSAP(dhcp-config)#exit 退出AP(config)#ip dhcp pool 30 建立名为30的dhcp地址池AP(dhcp-config)#network 发布网段的DHCPAP(dhcp-config)#default-router 设置默认网关AP(dhcp-config)#dns-server 湖州电信DNSAP(dhcp-config)#exit 退出二、Ap vlan模式1.创建vlan10AP(config)#vlan 10 创建vlan102.创建wlan 10 关联vlan 10AP(config)#dot11 wlan 10 创建无线网络wlan 10AP(dot11-wlan-config)#vlan 10 关联vlan10AP(dot11-wlan-config)#broadcast-ssid 将ssid名称广播AP(dot11-wlan-config)#ssid ap 配置ssid广播标识名称为ap AP(dot11-wlan-config)#exit 退出3.创建接口并封装AP(config)#interface gigabitEthernet 0/1 进入接口以太网0/1AP(config-if-GigabitEthernet 0/1)#encapsulation dot1Q 10 封装协议,并把该接口关联到vlan10AP(config)#exit4.广播信道封装协议关联wlan10AP(config)#interface dot11radio 1/0 进入1/0无线信道接口AP(config-if-Dot11radio 1/0)#mac-mode fat 设置模式为胖(FAT)模式AP(config-if-Dot11radio 1/0)#wlan-id 10 关联wlan-id 10(即wlan 10)AP(config-if-Dot11radio 1/0)#radio-type 设置无线网络协议类型为AP(config-if-Dot11radio 1/0)#exit 退出5. 设置bvi 和dhcpAP(config)#interface bvi 10 进入bvi 10虚接口AP(config-if-BVI 10)#ip add 设置vlan 10网桥的IP地址(网关)AP(config-if-BVI 10)#exit 退出AP(config)#service dhcp 开启dhcpAP(config)#ip dhcp pool 10 建立名为10的dhcp地址池AP(dhcp-config)#network 发布网段的dhcpAP(dhcp-config)#default-router 设置默认网关AP(dhcp-config)#dns-server 湖州电信DNS地址AP(config)#ip dhcp excluded-address 设置排除地址三、AP时间日期设置AP#clock set 9:21:20 4 22 2011 (时:分:秒月日年)四、AP Telnet配置AP(config)#enable password 0 123456 设置enable密码AP(config)#line vty 0 4 用户数量为4AP(config-line)#password 0 123456 设置telnet密码AP(config-line)#exit 退出五、AP Web模式配置AP(config)#enable service web-server 开启webAP(config)#username abc password 0 123456 (配置用户名abc ,明文密码123456)六、AP无线网络加密配置配置WEP加密方式及密钥AP(config)#wlansec 10AP(wlansec)#security static-wep-key authentication share-key 配置WEP加密方式及密钥AP(wlansec)#security static-wep-key encryption 40 ascii 1 12345 配置WEP密钥加密方式为40位ASCII1,密码为12345配置WPA2加密方式及密钥AP (config)#wlansec 10AP(wlansec)#security rsn enable 启用rsn加密AP(wlansec)#security rsn ciphers aes enable 启用aes加密方式或AP(wlansec)#security rsn akm psk enable 启用psk加密方式AP(wlansec)#security rsn akm psk set-key ascii 配置rsn密钥加密方式为ASCII1,密码为配置WPA加密方式及密钥AP (config)#wlansec 10Ruijie(wlansec)#security wpa enable 启用wpa加密Ruijie(wlansec)#security wpa ciphers aes enable 启用aes加密方式或Ruijie(wlansec)#security wpa akm psk enable 启用psk加密方式Ruijie(wlansec)#security wpa akm psk set-key ascii 配置wpa密钥加密方式为ASCII1,密码为。
锐捷胖AP配置(多个无线信号配置)
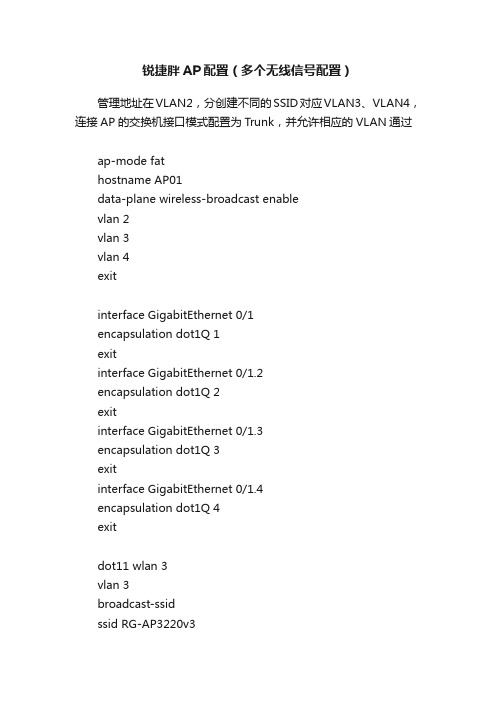
锐捷胖AP配置(多个无线信号配置)管理地址在VLAN2,分创建不同的SSID对应VLAN3、VLAN4,连接AP的交换机接口模式配置为Trunk,并允许相应的VLAN通过ap-mode fathostname AP01data-plane wireless-broadcast enablevlan 2vlan 3vlan 4exitinterface GigabitEthernet 0/1encapsulation dot1Q 1exitinterface GigabitEthernet 0/1.2encapsulation dot1Q 2exitinterface GigabitEthernet 0/1.3encapsulation dot1Q 3exitinterface GigabitEthernet 0/1.4encapsulation dot1Q 4exitdot11 wlan 3vlan 3broadcast-ssidssid RG-AP3220v3dot11 wlan 4vlan 4broadcast-ssidssid RG-AP3220v4exitinterface Dot11radio 1/0.3 encapsulation dot1Q 3 mac-mode fatexitinterface Dot11radio 1/0.4 encapsulation dot1Q 4 mac-mode fatexitinterface Dot11radio 1/0 channel 11wlan-id 3wlan-id 4mac-mode fatexitinterface Dot11radio 2/0.3 encapsulation dot1Q 3 mac-mode fatexitinterface Dot11radio 2/0.4 encapsulation dot1Q 4 mac-mode fat##5GHz模式互不干扰的信道为149、153、157、161、165 interface Dot11radio 2/0channel 161wlan-id 3wlan-id 4mac-mode fatexit##BVI的id要与wlan-id相对应interface BVI 2ip address 172.16.2.20 255.255.255.0exitinterface BVI 3ip address dhcpexitinterface BVI 4ip address dhcpexitip route 0.0.0.0 0.0.0.0 172.16.2.254##wlansec的id要与wlan-id相对应wlansec 3security rsn enablesecurity rsn ciphers aes enablesecurity rsn akm psk enablesecurity rsn akm psk set-key ascii abcd1234exitwlansec 4security rsn enablesecurity rsn ciphers aes enablesecurity rsn akm psk enablesecurity rsn akm psk set-key ascii abcd1234 exitusername mzw privilege 15 password abcd1234 line vty 0 4transport input alllogin localexitendwrite瘦AP模式默认密码:Consle进入用户模式 ruijie用户模式进入特权模式 apdebug胖AP模式默认密码:Consle进入用户模式 admin用户模式进入特权模式无密码。
胖AP使用指南

图 2-2 定义黑白名名单
(2)启用接入控制 如图 2-3 所示,在对应 wifi 中,启用黑白名单。 注意:①当启用白名单时,仅允许白名单内的用户接入该无线网络 ②当启用黑名单时,仅限制黑名单内的用户接入该无线网络
图 2-3 启用黑白名单认证
8
2.1.3 隐藏 SSID
基于安全性考虑,在实际运用过程中,可能需要将 wifi 隐藏。APF1.0 支持 隐藏 SSID 功能。如图 2-4 所示,启用隐藏 SSID,确认生效后,该 wifi 对终端不 可见。
如图 1-5 所示,默认 DHCP 地址池为 192.168.100.2/24-192.168.100.254/24, 根据实际情况更改当前配置。 地址池网关为 LAN 口地址, 且不分配。 默认 DHCP 地支持仅分配给无线终端。
图 1-5 DHCP 配置
5
1.5 创建 WIFI
如图 1-6 所示,点击【网络配置】【无线网络】 ,点击【新增】 。创建 SSID、 选择认证方式,点击保存。 注意:认证方式的选择详见功能配置。
2015 年 9 月 28 日
目录
1 上网设置 ............................................................................................................3 1.1 登陆 AP ....................................................................................................3 1.2 设置 WAN ................................................................................................4 1.3 设置 LAN .................................................................................................5 1.4 设置 DHCP ..............................................................................................5 1.5 创建 WIFI ................................................................................................6 1.6 关闭管理 wifi ...........................................................................................6 2 功能配置 ............................................................................................................7 2.1 网络安全 ..................................................................................................7 2.2 无线设置 ..................................................................................................9 2.3 射频优化 ................................................................................................10 2.4 流控设置 ................................................................................................12 3 系统维护 ..........................................................................................................14 3.1 管理员设置 ............................................................................................14 3.2 胖瘦切换 ................................................................................................14 3.3 版本升级 ................................................................................................14
胖ap配置
实验一:胖AP配置部署正常情况下,应该在网关交换机上配置dhcp服务器,做为用户sta的网关,然后在AP上配置vlan封装,bvi接口配置和出去的默认路由。
配置如下:交换机配置:vlan 10 创建sta的vlanservice dhcp 配置dhcpip dhcp pool sta_testnetwork 172.16.1.0 255.255.255.0dns-server 211.138.151.161default-router 172.16.1.254in gi 0/24ip add 172.16.1.254 255.255.255.0AP配置:interface GigabitEthernet 0/1 配置千兆上联口encapsulation dot1Q 10 对vlan10 的数据封装为dot1Q数据包interface BVI 1/0 bvi接口是桥接接口ip address 172.16.1.253 255.255.255.0ip route 0.0.0.0 0.0.0.0 172.16.1.254 配置默认路由下一条是网关交换机的下联口地址但是由于条件不允许,只能单独在AP上配置发射信号,配置如下:(1)在AP上配置wlan和vlan的映射,并广播ssid配置Ruijie(config)# dot11 wlan 1 创建wlanRuijie(dot11-wlan-config)#vlan 10 绑定vlanRuijie(dot11-wlan-config)#broadcast-ssid 广播Ruijie(dot11-wlan-config)#ssid yangchuan 配置ssid(2)配置radio参数Ruijie(config)#interface Dot11radio 1/0Ruijie(config-if-Dot11radio 1/0)#encapsulation dot1Q 10Ruijie(config-if-Dot11radio 1/0)#mac-mode fat 模式为胖模式Ruijie(config-if-Dot11radio 1/0)#channel 1 信道1Ruijie(config-if-Dot11radio 1/0)#wlan-id 1 匹配上面的wlan结果验证:security rsn enable //开启无线加密功能WS5708(config-wlansec)#security rsn ciphers aes enable //无线启用AES加密WS5708(config-wlansec)#security rsn akm psk enable //无线启用共享密钥认证方式WS5708(config-wlansec)#security rsn akm psk set-key ascii 1234567890 //无线密码,密码位数不能小于8位。
FAT AP

//确认配置正确,保存配置
回顾
FAT AP基本配置讲解
Thanks
8
6、配置WLAN加密 (以rsn加密方式举例,三个enable) Ruijie(config)#wlansec 10 (需要加密WLAN-ID) Ruijie(config-wlansec)#security rsn enable (开启无线加密功能) Ruijie(config-wlansec)#security wpa ciphers aes enable (无线启用AES加密) Ruijie(config-wlansec)#security wpa akm psk enable (无线启用共享密钥认证方式) Ruijie(config-wlansec)#security wpa akm psk set-key ascii ******** (配置无线密码,密码位数不能小于8位)
FAT AP基本配置讲解
1
内容
1 2
• FAT AP的配置思路 • 基本步骤 • 注意事项 • 回顾
3
4
2
FAT AP配置思路
配置思路(声明一下:这些是自己遇到或者总结的问题,不代表所有人)
按照拓扑连接好设备,保证设备运行正常
1、启用FAT模式
2、启用DHCP server,配置DHCP 地址池 3、创建vlan 4、配置接口属性 5、配置WLAN,关联vlan 6、配置WLAN加密 7、配置射频口属性 8、配置AP管地址
3
FAT AP基本配置
1、配置AP模式为FAT Ruijie>ap-mode fat 2、配置DHCP (有些设备默认为FIT模式)
Ruijie(config)#dhcp server (配置dhcp后如果不启用服务是不起效果 的)
ruckus胖ap配置方法
9、升级方法——通过web页升级
胖AP通过WEB页升 级,有很大的概率 会升级失败,提示 升级文件无效。所 以有可能需要选择
命令行方式升级
升级过程中不能拔 网线,不能手工重 启AP,不能升级
1、需要利用SecureCRT(点此下载)工具,通过SSH协议连接AP。在默认状态下,AP的 Telnet服务是关闭的,出于安全性考虑,也不建议开启Telnet服务。点击快速连接按钮,选 择SSH2协议,输入AP的IP地址。
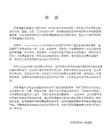
要点
• 管理界面使用HTTPS,浏览器需要启用 SSL2.0、SSL3.0、TLS;
• SSID的密钥加密方式必须使用AES,不能用 TKIP,除非能够确保客户端数量少于26;
• 信道不要用自动模式,也不要用1、6、11, 最好手工指定为4或9
• Web页升级AP固件可能会失败,需要用CLI 方式升级
2、利用ServU或者FileZilla Server(推荐)工 具搭建一个FTP服务器,建立一个用户,将 文件夹设置为AP固件所在的文件夹。
3、在命令行界面,依次输入下面的命令: fw show //查看AP当前的升级参数 fw set user username //重新设置FTP用户名 fw set password password //重新设置FTP密码 fw set control filename.bl7 //指定升级固件的文件名 fw show //确认修改后的升级参数是否正确 fw update main 192.168.0.1 //开始升级,IP地址为AP的管理IP reboot //升级之后重启
能安装在ipad上面
2、按start开始测试
1、先设置ip地址。手机的IP
地址会自动出现在输入框内, 只需要输入AP的ip地址就可 以。方向选择both,协议选 择udp
AP220-E胖(fat)模式实施指导

AP 的摆位
5 . 与用户协商 AP 的安装位置,一般有几种:放在天花板内,天花板外,垂直挂墙。 AP 放在天花板内时,尽量将天花板打几个洞,把天线伸出来。 6 . 测试时 AP 应尽量摆放于将来安装的位置 7 . 当 AP 实在不能摆放在天花板内或高处时,可用手举高或摆放在同一垂直位置的其 他高度 8 . 如果使用 AP 的内置天线,则天线的角度需与地面垂直
通过 show version 命令查看 AP 当前的版本,如果不是稳定版本,请进行升级:
Ruijie#show ver System description By Ruijie Networks. System start time System uptime : 2009-09-10 9:8:34 : 0:0:17:58 : Ruijie Indoor AP220-E (802.11a/n and 802.11b/g/n)
5 / 25
AP220-E、AP220-SE 胖(fat)模式实施指导 式
� � � � � �
一个 10/100/1000Base-T 以太网端口 一个千兆 SFP 端口 一个 console 口 一个 48V 的电源接口 3 个 SMA 的天线接口, 附带 3 个 3dBi 的柱状全向天线
☺
AP 可以通过电源适配器供电,也可以使用 PoE 供电模块或 PoE 交换机进行供电
2.1.2 第二步:现场勘测
现场勘测的目的
� � � � �
由于场地环境复杂,通过现场勘测可以确定 AP 安装位置 通过现场勘测,可以更精确地获得 AP 的实际数量 确定是否需要使用外挂天线以及 AP 安装方式 与客户协商布线,施工细则 确定 AP 安装的进度
测试前准备工作
锐捷胖AP配置(多个无线信号配置)
username mzw privilege 15 password abcd1234
line vty 0 4
transport input all
login local
exit
end
write
瘦AP模式默认密码:
Consle进入用户模式 ruijie
用户模式进入特权模式 apdebug
mac-mode fat
exit
interface Dot11radio 1/0
channel 11
wlan-id 3
wlan-id 4
mac-mode fat
exit
interface Dot11radio 2/0.3
encapsulation dot1Q 3
mac-mode fat
exit
interface GigabitEthernet 0/1
encapsulation dot1Q 1
exit
interface GigabitEthernet 0/1.2
encapsulation dot1Q 2
exit
interface GigabitEthernet 0/1.3
exit
interface Dot11radio 2/0.4
encapsulation dot1Q 4
mac-mode fat
exit
##5GHz模式互不干扰的信道为149、153、157、161、165
interface Dot11radio 2/0
channel 161
wlan-id 3
ip address dhcp
- 1、下载文档前请自行甄别文档内容的完整性,平台不提供额外的编辑、内容补充、找答案等附加服务。
- 2、"仅部分预览"的文档,不可在线预览部分如存在完整性等问题,可反馈申请退款(可完整预览的文档不适用该条件!)。
- 3、如文档侵犯您的权益,请联系客服反馈,我们会尽快为您处理(人工客服工作时间:9:00-18:30)。
锐捷无线AP胖模式(FAT)配置案例一、AP trunk 模式1.创建vlan10 vlan20 vlan30AP(config)#vlan 10 创建vlan10AP(config-vlan)#vlan 20 创建vlan20AP(config-vlan)#vlan 30 创建vlan302.创建wlan:10 20 30 联vlan 10 20 30AP(config)#dot11 wlan 10 创建无线网络wlan 10AP(dot11-wlan-config)#vlan 10 关联vlan10AP(dot11-wlan-config)#broadcast-ssid 将ssid名称广播AP(dot11-wlan-config)#ssid ap10 配置ssid广播标识名称为ap10AP(dot11-wlan-config)#exit 退出AP(config)#dot11 wlan 20 创建无线网络wlan 20AP(dot11-wlan-config)#vlan 20 关联vlan20AP(dot11-wlan-config)#broadcast-ssid 将ssid名称广播AP(dot11-wlan-config)#ssid ap20 配置ssid广播标识名称为ap20AP(dot11-wlan-config)#exit 退出AP(config)#dot11 wlan 30 创建无线网络wlan 30AP(dot11-wlan-config)#vlan 30 关联vlan30AP(dot11-wlan-config)#broadcast-ssid 将ssid名称广播AP(dot11-wlan-config)#ssid ap30 配置ssid广播标识名称为ap30AP(dot11-wlan-config)#exit 退出3.创建子接口并封装AP(config)#interface gigabitEthernet 0/1.10创建千兆以太网接口G0/1的子接口G0/1.10AP(config-subif)#encapsulation dot1Q 10 封装802.1q协议,并把该端口关联到vlan10AP(config-subif)#exit 退出AP(config)#interface gigabitEthernet 0/1.20创建千兆以太网接口G0/1的子接口G0/1.20AP(config-subif)#encapsulation dot1Q 20 封装802.1q协议,并把该端口关联到vlan20AP(config-subif)#exit 退出AP(config)#interface gigabitEthernet 0/1.30 创建千兆以太网接口G0/1的子接口G0/1.30AP(config-subif)#encapsulation dot1Q 30 封装802.1q协议,并把该端口关联到vlan30AP(config-subif)#exit 退出4.广播信道封装协议关联wlanAP(config)#interface dot11radio 1/0 进入dot11radio1/ 0无线信道接口AP(config-if-Dot11radio 1/0)#mac-mode fat 设置模式为胖(FAT)模式AP(config-if-Dot11radio 1/0)#radio-type 802.11b设置无线网络协议类型为802.11b AP(config-if-Dot11radio 1/0)#wlan-id 10 关联wlan-id 10(即wlan 10)AP(config-if-Dot11radio 1/0)#wlan-id 20 关联wlan-id 20(即wlan 20)AP(config-if-Dot11radio 1/0)#wlan-id 30 关联wlan-id 30(即wlan 30)AP(config-if-Dot11radio 1/0)#exit 退出AP(config)#interface dot11radio 2/0 进入dot11radio2/ 0无线信道接口AP(config-if-Dot11radio 2/0)#mac-mode fat 设置模式为胖(FAT)模式AP(config-if-Dot11radio 2/0)#radio-type 802.11a 设置无线网络协议类型为802.11aAP(config-if-Dot11radio 2/0)#wlan-id 10 关联wlan10-id 10AP(config-if-Dot11radio 2/0)#wlan-id 20 关联wlan20-id 20AP(config-if-Dot11radio 2/0)#wlan-id 30 关联wlan30-id 30AP(config-if-Dot11radio 2/0)#exit 退出5.广播子接口封装:模式mac-mode fatAP(config)#interface dot11radio 1/0.10 进入无线信道接口1/0子接口dot11radio1/0.10AP(config-subif)#encapsulation dot1Q 10 封装802.1q协议,并把该接口关联到vlan 10AP(config-subif)#mac-mode fat 设置模式为胖(FAT)模式AP(config-subif)#exit 退出AP(config)#interface dot11radio 1/0.20 进入无线信道接口1/0子接口dot11radio1/0.20AP(config-subif)#encapsulation dot1Q 20 封装802.1q协议,并把该接口关联到vlan 20AP(config-subif)#mac-mode fat 设置模式为胖(FAT)模式AP(config-subif)#exit 退出AP(config)#interface dot11radio 1/0.30 进入无线信道接口1/0子接口dot11radio1/0.30AP(config-subif)#encapsulation dot1Q 30 封装802.1q协议,并把该接口关联到vlan 30AP(config-subif)#mac-mode fat 设置模式为胖(FAT)模式AP(config-subif)#exit 退出AP(config)#interface dot11radio 2/0.10 进入无线信道接口2/0子接口dot11radio2/0.10AP(config-subif)#encapsulation dot1Q 10 封装802.1q协议,并把该接口关联到vlan 10AP(config-subif)#mac-mode fat 设置模式为胖(FAT)模式AP(config-subif)#exit 退出AP(config)#interface dot11radio 2/0.20 进入无线信道接口2/0子接口dot11radio2/0.20AP(config-subif)#encapsulation dot1Q 20 封装802.1q协议,并把该接口关联到vlan 20AP(config-subif)#mac-mode fat 设置模式为胖(FAT)模式AP(config-subif)#exit 退出AP(config)#interface dot11radio 2/0.30 进入无线信道接口2/0子接口dot11radio2/0.30AP(config-subif)#encapsulation dot1Q 30 封装802.1q协议,并把该接口关联到vlan 30AP(config-subif)#mac-mode fat 设置模式为胖(FAT)模式AP(config-subif)#exit 退出6. 设置 bvi 和dhcpAP(config)#interface bvi 10 进入bvi 10虚接口AP(config-if-BVI 10)#ip add 192.168.1.253 255.255.255.0 设置vlan 10网桥的IP地址(网关)AP(config)#interface bvi 20 进入bvi 10虚接口AP(config-if-BVI 20)#ip add 192.168.2.253 255.255.255.0设置vlan20网桥的IP地址(网关)AP(config)#interface bvi 30 进入bvi 30 虚接口AP(config-if-BVI 30)#ip add 192.168.3.253 255.255.255.0设置vlan 30网桥的IP地址(网关)AP(config)#service dhcp 开启dhcp功能AP(config)#ip dhcp pool 10 建立名为10的dhcp地址池AP(dhcp-config)#network 192.168.1.0 255.255.255.0 发布192.168.10.0网段的DHCP AP(dhcp-config)#default-router 192.168.1.254 设置默认网关AP(dhcp-config)#dns-server 61.130.254.34 湖州电信DNSAP(dhcp-config)#exit 退出AP(config)#ip dhc p pool 20 建立名为20的dhcp地址池AP(dhcp-config)#network 192.168.2.0 255.255.255.0 发布192.168.20.0网段的DHCP AP(dhcp-config)#default-router 192.168.2.254 设置默认网关AP(dhcp-config)#dns-server 61.130.254.34 湖州电信DNSAP(dhcp-config)#exit 退出AP(config)#ip dhcp pool 30 建立名为30的dhcp地址池AP(dhcp-config)#network 192.168.3.0 255.255.255.0 发布192.168.30.0网段的DHCP AP(dhcp-config)#default-router 192.168.3.254 设置默认网关AP(dhcp-config)#dns-server 61.130.254.34 湖州电信DNSAP(dhcp-config)#exit 退出二、Ap vlan模式1.创建vlan10AP(config)#vlan 10 创建vlan102.创建wlan 10 关联vlan 10AP(config)#dot11 wlan 10 创建无线网络wlan 10AP(dot11-wlan-config)#vlan 10 关联vlan10AP(dot11-wlan-config)#broadcast-ssid 将ssid名称广播AP(dot11-wlan-config)#ssid ap 配置ssid广播标识名称为apAP(dot11-wlan-config)#exit 退出3.创建接口并封装AP(config)#interface gigabitEthernet 0/1 进入接口以太网0/1AP(config-if-GigabitEthernet 0/1)#encapsulation dot1Q 10 封装802.1q协议,并把该接口关联到vlan10AP(config)#exit4.广播信道封装协议关联wlan10AP(config)#interface dot11radio 1/0 进入1/0无线信道接口AP(config-if-Dot11radio 1/0)#mac-mode fat 设置模式为胖(FAT)模式AP(config-if-Dot11radio 1/0)#wlan-id 10 关联wlan-id 10(即wlan 10)AP(config-if-Dot11radio 1/0)#radio-type 802.11b 设置无线网络协议类型为802.11b AP(config-if-Dot11radio 1/0)#exit 退出5. 设置 bvi 和dhcpAP(config)#interface bvi 10 进入bvi 10虚接口AP(config-if-BVI 10)#ip add 192.168.1.253 255.255.255.0 设置vlan 10网桥的IP地址(网关)AP(config-if-BVI 10)#exit 退出AP(config)#service dhcp 开启dhcpAP(config)#ip dhcp pool 10 建立名为10的dhcp地址池AP(dhcp-config)#network 192.168.1.0 255.255.255.0 发布192.168.1.0网段的dhcp AP(dhcp-config)#default-router 192.168.10.254 设置默认网关AP(dhcp-config)#dns-server 61.130.254.34 湖州电信DNS地址AP(config)#ip dhcp excluded-address 192.168.10.253 192.168.10.254设置排除地址三、AP时间日期设置AP#clock set 9:21:20 4 22 2011 (时:分:秒月日年)四、AP Telnet配置AP(config)#enable password 0 123456 设置enable密码AP(config)#line vty 0 4 用户数量为4AP(config-line)#password 0 123456 设置telnet密码AP(config-line)#exit 退出五、AP Web模式配置AP(config)#enable service web-server 开启webAP(config)#username abc password 0 123456 (配置用户名abc ,明文密码123456)六、AP无线网络加密配置配置WEP加密方式及密钥AP(config)#wlansec 10AP(wlansec)#security static-wep-key authentication share-key 配置WEP加密方式及密钥AP(wlansec)#security static-wep-key encryption 40 ascii 1 12345 配置WEP密钥加密方式为40位 ASCII1,密码为12345配置WPA2加密方式及密钥AP (config)#wlansec 10AP(wlansec)#security rsn enable 启用rsn加密AP(wlansec)#security rsn ciphers aes enable 启用aes加密方式或AP(wlansec)#security rsn akm psk enable 启用psk加密方式AP(wlansec)#security rsn akm psk set-key ascii 12345678 配置rsn密钥加密方式为ASCII1,密码为12345678配置WPA加密方式及密钥AP (config)#wlansec 10Ruijie(wlansec)#security wpa enable 启用wpa加密Ruijie(wlansec)#security wpa ciphers aes enable 启用aes加密方式或Ruijie(wlansec)#security wpa akm psk enable 启用psk加密方式Ruijie(wlansec)#security wpa akm psk set-key ascii 12345678 配置wpa密钥加密方式为ASCII1,密码为12345678(注:可编辑下载,若有不当之处,请指正,谢谢!)。