ChartDirector常见用法(示例代码)
chartseries函数

chartseries函数chartseries函数是一个Excel VBA函数,用于设置图表中的数据系列。
它可以用于添加、修改和删除图表中的数据系列。
语法:ChartSeries(name, categoryLabels, values, plotOrder, plotBy)参数:- name:数据系列的名称。
可以是一个区域、一个单元格、一个包含系列名称的数组或单个系列名称。
- categoryLabels:数据系列的X轴标签。
可以是一个区域、一个单元格、一个包含标签的数组或单个标签。
- values:数据系列的Y轴值。
可以是一个区域、一个单元格、一个包含值的数组或单个值。
- plotOrder:数据系列的绘制顺序。
可选参数,默认为-1(自动选择顺序)。
- plotBy:数据系列的绘制方式。
可选参数,默认为1(按列绘制)。
示例:以下示例演示了如何使用ChartSeries函数在图表中添加一个数据系列。
```Sub AddSeries()Dim chart As ChartDim seriesRange As RangeDim seriesName As String' 获取图表对象Set chart = ActiveSheet.ChartObjects(1).Chart' 设置数据系列的名称seriesName = "Series 1"' 设置数据系列的范围Set seriesRange = Range("A1:A10")' 添加数据系列到图表chart.SeriesCollection.NewSerieschart.SeriesCollection(1).Name = seriesNamechart.SeriesCollection(1).Values = seriesRange' 更新图表chart.RefreshEnd Sub```上述示例中,我们首先获取了活跃工作表中第一个图表对象,然后设置了数据系列的名称为"Series 1",数据系列的范围为A1:A10。
devexpress chartcontrol 用法
devexpress chartcontrol 用法如何使用DevExpress ChartControl?一、简介DevExpress ChartControl是一个功能强大、灵活且易于使用的数据可视化控件,用于创建各种类型的图表,包括线图、柱状图、饼图、雷达图等。
它提供了丰富的图表样式和自定义选项,以满足各种应用程序的需求。
在本篇文章中,我们将一步一步地介绍如何使用DevExpress ChartControl。
二、安装和配置DevExpress ChartControl1. 下载DevExpress首先,我们需要从DevExpress官方网站下载并安装DevExpress。
在官方网站上,您可以找到适用于不同开发环境的DevExpress套件。
选择您正在使用的开发环境,并下载适合您的版本。
2. 添加DevExpress控件在安装DevExpress之后,打开您的开发环境(例如Visual Studio),创建一个新的项目或打开现有的项目。
然后,右键单击工具箱中的一个空白区域,选择“选择项”或“添加”选项。
在选择项对话框中,找到DevExpress组件,并选中“ChartControl”控件。
点击确定按钮,将DevExpress ChartControl添加到工具箱中。
3. 配置DevExpress控件接下来,将DevExpress ChartControl拖放到您的窗体或用户控件中。
然后,选择控件并在属性窗口中进行配置。
您可以设置控件的样式、布局、数据源等属性。
例如,您可以选择图表的风格(如3D或2D),调整图表的尺寸和位置,以及绑定数据源以显示图表数据。
三、创建基本图表1. 添加数据源要创建一个基本图表,首先需要添加一个数据源。
您可以使用任何数据源,例如DataSet、DataTable或自定义集合。
假设我们有一个包含销售数据的DataTable。
为了将数据绑定到图表,您需要设置图表的DataSource属性并指定要用于显示数据的数据源和数据字段。
ChartDirector四步入门

1 <servlet> 2 <servlet-name>GetSessionImage</servlet-name> 3 <servlet-class>ChartDirector.GetSessionImage</servlet-class> 4 </servlet> 5 <servlet-mapping> 6 <servlet-name>GetSessionImage</servlet-name> 7 <url-pattern>*.chart</url-pattern> 8 </servlet-mapping>
65 66//output the chart 67String chart1URL = c.makeSession(request, "chart1"); 68//include tool tip for the chart 69String imageMap1 = c.getHTMLImageMap("#", "", "title='{xLabel}:
</html>
4、布置运行
以上就是 ChartDirector 的使用过程,由于效果图上传不了,大家自己运行试试
3、建立两个文件 getchart.jsp 和 index.jsp
1 <%@page import="ChartDirector.*" %><% 2 try 3{ 4 out.clear(); 5 GetSessionImage.getImage(request, response); 6 if (Math.max(1, 2) == 2) return; 7} 8 catch (IllegalStateException e) 9{ 10 response.sendRedirect(response.encodeRedirectURL( 11 "getchart.chart?" + request.getQueryS3} 14%> 15 16 17<%@ page language="java" contentType="text/html; charset=UTF-8" 18 pageEncoding="UTF-8" import="ChartDirector.*;"%> 19<% 20request.setCharacterEncoding("UTF-8"); 21//以两个系列数据为例 22double[] data = {185, 156, 179.5, 211, 123}; 23double[] data1 = {55, 76, 34.5, 88, 43}; 24//数据列名 25String[] labels = {"一月", "二月", "三月", "四月", "五月"};
chartdirector图表例子(鼠标可拖动)
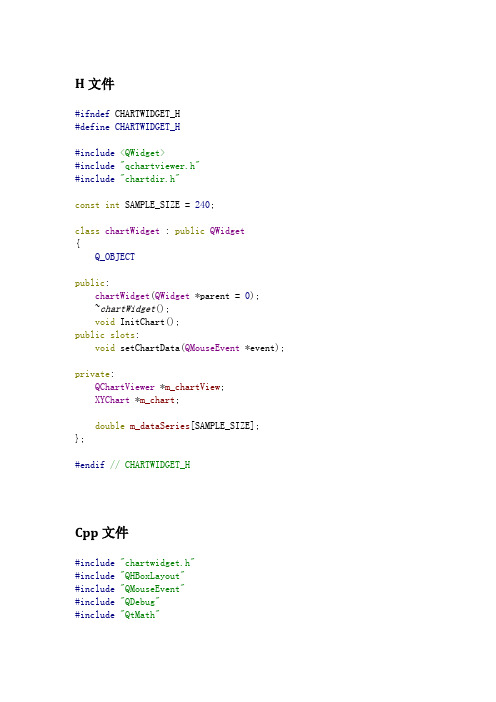
H文件#ifndef CHARTWIDGET_H#define CHARTWIDGET_H#include<QWidget>#include"qchartviewer.h"#include"chartdir.h"const int SAMPLE_SIZE=240;class chartWidget:public QWidget{Q_OBJECTpublic:chartWidget(QWidget*parent=0);~chartWidget();void InitChart();public slots:void setChartData(QMouseEvent*event);private:QChartViewer*m_chartView;XYChart*m_chart;double m_dataSeries[SAMPLE_SIZE];};#endif//CHARTWIDGET_HCpp文件#include"chartwidget.h"#include"QHBoxLayout"#include"QMouseEvent"#include"QDebug"#include"QtMath"chartWidget::chartWidget(QWidget*parent):QWidget(parent){m_chart=new XYChart(600,600,0xaaaafa);m_chartView=new QChartViewer(this);m_chartView->setGeometry(50,50,550,550);InitChart();//在QchartViewer中添加mousePressMove信号connect(m_chartView,SIGNAL(mousePressMove(QMouseEvent*)),this, SLOT(setChartData(QMouseEvent*)));QHBoxLayout*layout=new QHBoxLayout(this);layout->addWidget(m_chartView);setLayout(layout);}chartWidget::~chartWidget(){delete m_chart;}void chartWidget::InitChart(){m_chart->setPlotArea(50,50,500,500,0xcccccc);m_chart->addTitle("this is title");double values[10]={1.0,2.0,3.0,4.0,5.0,6.0,7.0,8.0,9.0};for(int i=0;i<10;++i){m_dataSeries[i]=values[i];}m_chart->yAxis()->setDateScale(0.0,15.0);m_chart->xAxis()->setDateScale(0.0,15.0);BarLayer*barLayer=m_chart->addBarLayer();barLayer->addDataSet(DoubleArray(m_dataSeries,10),0x00ff00);m_chartView->setChart(m_chart);}void chartWidget::setChartData(QMouseEvent*event)double yval=m_chart->getYValue(event->pos().y());double xval=m_chart->getXValue(event->pos().x());qDebug("(%f,%f)",xval,yval);XYChart*chart=new XYChart(600,600,0xaaaafa);chart->setPlotArea(50,50,500,500,0xcccccc);chart->addTitle("this is title");chart->yAxis()->setDateScale(0.0,15.0);chart->xAxis()->setDateScale(0.0,15.0);int pos=qFloor(xval+0.5);if(pos>=0&&pos<SAMPLE_SIZE){m_dataSeries[pos]=yval;}BarLayer*barLayer=chart->addBarLayer();barLayer->addDataSet(DoubleArray(m_dataSeries,10),0x00ff00);m_chartView->setChart(chart);delete m_chart;m_chart=chart;}。
利用pychartdir库生成图表,保存图片,转成字节数据

然后使用 office 办公软件编写所需要的模板 word,另存为 xml 文件 1.使用 office 软件编写一个所需要的 word 模板,编写好之后选择另存, 类型选择为 xml 文件。 2,使用 sublime 或者其他文本编辑打开 xml 文件,在模板相应位置替换成 渲染的数据模型,具体语法和 Django 模板的语法基本一致,如: 三 利用 jinja2 库渲染修改好的模板,然后写入.doc 文件即可 1.导入 jinja2 模块和相应模块 2.加载我们刚刚编辑好的 word 模板 3.打开和渲染模板 其中 w_id 和 w_pname 属性是 word 图片的属性,只要每一张图片 id name
一 利用 pychartdir 库生成图表,保存图片,转成字节数据 1.利用 pychartdir 库生成一个条形图 首先需要导入 pychartdir 库 我们以生成一个条形图为例子: 结果为一张图片: 2.我们在 word 中如果只是引用路径,那幺生成的 word 就会出现找不到图 片,此时,我们应该使用下面这个函数将图片转化为字节数据: 此时我们就拿到了我们想要的数据 我们可以将所需要画图的封装成一个工具类,只留取数据接口比如: 二
唯一即可 全部代码如下: 运行代码,即可生成我们想要的 word 报表 参考资料及其链接: Jinja2 安装: pychartdir 安装: Python 中要使用 pychartdir 的绘图的话需要安装 pychartdir 模块,其安装 方法不同于其他 python 模块的安装。 1.先下载 pychartdir,可从官网 advsofteng/download.html 下载对应的 zip 包 2.解压后的 doc 目录下有一个 pychartdir.chm 帮助文档
winformchart控件之滚动条的放大与缩小功能

winformchart控件之滚动条的放大与缩小功能windows form chart控件功能已经非常强大了,做出来效果也是相当好看。
更重要的是使用起来相当的方便。
现在要介绍的chart图表的放大与缩小功能,当图表要显示的数据量很多的时候,这时就需要这个放大与缩小的功能了。
先上一个图看效果:当有几百个数量并在一起时,能看到一个总体的趋势。
图1放大后的效果,可以看具体某一个值的大小了。
图2图3那么现在就直接上代码啦。
// Zoom into the X axischart1.ChartAreas[0].AxisX.ScaleView.Zoom(2, 3);// Enable range selection and zooming end user interfacechart1.ChartAreas[0].CursorX.IsUserEnabled = true;chart1.ChartAreas[0].CursorX.IsUserSelectionEnabled = true;chart1.ChartAreas[0].AxisX.ScaleView.Zoomable = true;//将滚动内嵌到坐标轴中chart1.ChartAreas[0].AxisX.ScrollBar.IsPositionedInside = true;// 设置滚动条的大小chart1.ChartAreas["Default"].AxisX.ScrollBar.Size = 10;// 设置滚动条的按钮的风格,下面代码是将所有滚动条上的按钮都显示出来chart1.ChartAreas["Default"].AxisX.ScrollBar.ButtonStyle= ScrollBarButtonStyle.All;// 设置自动放大与缩小的最小量chart1.ChartAreas["Default"].AxisX.ScaleView.SmallScrollSize = double.NaN;chart1.ChartAreas["Default"].AxisX.ScaleView.SmallScrollMin Size = 2;(责任编辑:Azura)。
ChartDirector示例手册
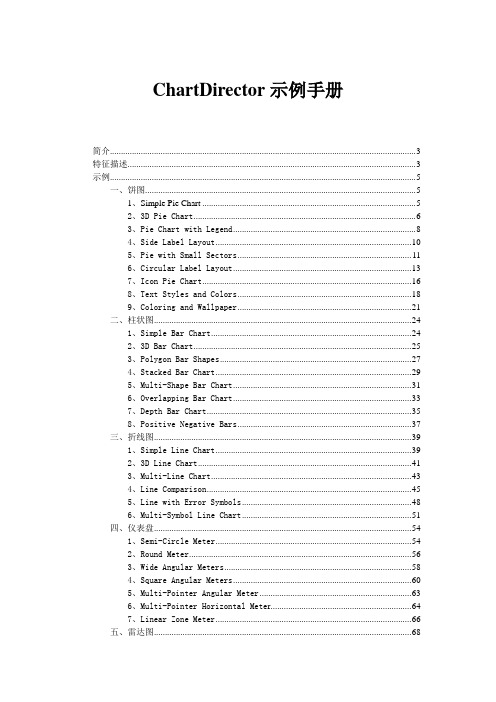
ChartDirector示例手册简介 (3)特征描述 (3)示例 (5)一、饼图 (5)1、Simple Pie Chart (5)2、3D Pie Chart (6)3、Pie Chart with Legend (8)4、Side Label Layout (10)5、Pie with Small Sectors (11)6、Circular Label Layout (13)7、Icon Pie Chart (16)8、Text Styles and Colors (18)9、Coloring and Wallpaper (21)二、柱状图 (24)1、Simple Bar Chart (24)2、3D Bar Chart (25)3、Polygon Bar Shapes (27)4、Stacked Bar Chart (29)5、Multi-Shape Bar Chart (31)6、Overlapping Bar Chart (33)7、Depth Bar Chart (35)8、Positive Negative Bars (37)三、折线图 (39)1、Simple Line Chart (39)2、3D Line Chart (41)3、Multi-Line Chart (43)4、Line Comparison (45)5、Line with Error Symbols (48)6、Multi-Symbol Line Chart (51)四、仪表盘 (54)1、Semi-Circle Meter (54)2、Round Meter (56)3、Wide Angular Meters (58)4、Square Angular Meters (60)5、Multi-Pointer Angular Meter (63)6、Multi-Pointer Horizontal Mete r (64)7、Linear Zone Meter (66)五、雷达图 (68)1、Simple Radar Chart (68)2、Multi Radar Chart (69)3、Polar Line Chart (72)4、Polar Area Chart (75)5、Polar Bubble Chart (77)6、Circular Zones (80)7、Sector Zones (82)简介ChartDirector控件使用方便,快捷,灵活,功能强大,交互性强。
ChartDirector常见用法(示例代码)
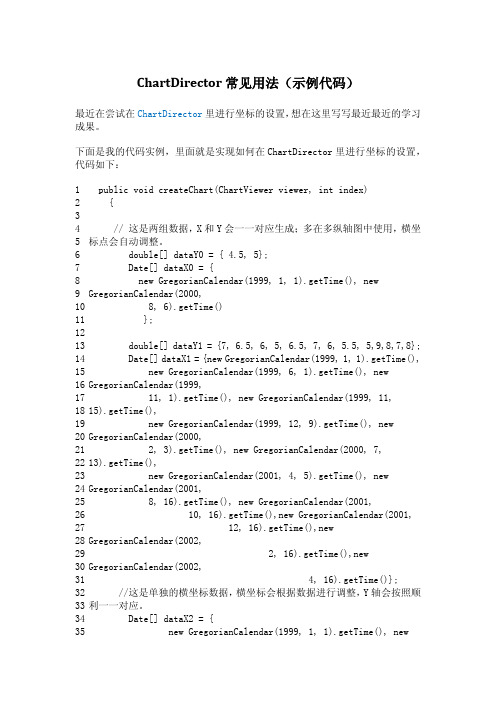
ChartDirector 常见用法(示例代码)最近在尝试在ChartDirector 里进行坐标的设置,想在这里写写最近最近的学习成果。
下面是我的代码实例,里面就是实现如何在ChartDirector 里进行坐标的设置,代码如下:1 2 3 4 5 6 7 8 9 10 11 12 13 14 15 16 17 18 19 20 21 22 23 24 25 26 27 28 29 30 31 32 33 34 35 public void createChart(ChartViewer viewer, int index) {// 这是两组数据,X 和Y 会一一对应生成;多在多纵轴图中使用,横坐标点会自动调整。
double[] dataY0 = { 4.5, 5};Date[] dataX0 = {new GregorianCalendar(1999, 1, 1).getTime(), new GregorianCalendar(2000,8, 6).getTime()};double[] dataY1 = {7, 6.5, 6, 5, 6.5, 7, 6, 5.5, 5,9,8,7,8}; Date[] dataX1 = {new GregorianCalendar(1999, 1, 1).getTime(), new GregorianCalendar(1999, 6, 1).getTime(), new GregorianCalendar(1999,11, 1).getTime(), new GregorianCalendar(1999, 11, 15).getTime(),new GregorianCalendar(1999, 12, 9).getTime(), new GregorianCalendar(2000,2, 3).getTime(), new GregorianCalendar(2000, 7, 13).getTime(),new GregorianCalendar(2001, 4, 5).getTime(), new GregorianCalendar(2001,8, 16).getTime(), new GregorianCalendar(2001,10, 16).getTime(),new GregorianCalendar(2001, 12, 16).getTime(),newGregorianCalendar(2002,2, 16).getTime(),new GregorianCalendar(2002,4, 16).getTime()}; //这是单独的横坐标数据,横坐标会根据数据进行调整,Y 轴会按照顺利一一对应。
- 1、下载文档前请自行甄别文档内容的完整性,平台不提供额外的编辑、内容补充、找答案等附加服务。
- 2、"仅部分预览"的文档,不可在线预览部分如存在完整性等问题,可反馈申请退款(可完整预览的文档不适用该条件!)。
- 3、如文档侵犯您的权益,请联系客服反馈,我们会尽快为您处理(人工客服工作时间:9:00-18:30)。
ChartDirector 常见用法(示例代码)最近在尝试在ChartDirector 里进行坐标的设置,想在这里写写最近最近的学习成果。
下面是我的代码实例,里面就是实现如何在ChartDirector 里进行坐标的设置,代码如下:1 2 3 4 5 6 7 8 9 10 11 12 13 14 15 16 17 18 19 20 21 22 23 24 25 26 27 28 29 30 31 32 33 34 35 public void createChart(ChartViewer viewer, int index) {// 这是两组数据,X 和Y 会一一对应生成;多在多纵轴图中使用,横坐标点会自动调整。
double[] dataY0 = { 4.5, 5};Date[] dataX0 = {new GregorianCalendar(1999, 1, 1).getTime(), new GregorianCalendar(2000,8, 6).getTime()};double[] dataY1 = {7, 6.5, 6, 5, 6.5, 7, 6, 5.5, 5,9,8,7,8}; Date[] dataX1 = {new GregorianCalendar(1999, 1, 1).getTime(), new GregorianCalendar(1999, 6, 1).getTime(), new GregorianCalendar(1999,11, 1).getTime(), new GregorianCalendar(1999, 11, 15).getTime(),new GregorianCalendar(1999, 12, 9).getTime(), new GregorianCalendar(2000,2, 3).getTime(), new GregorianCalendar(2000, 7, 13).getTime(),new GregorianCalendar(2001, 4, 5).getTime(), new GregorianCalendar(2001,8, 16).getTime(), new GregorianCalendar(2001,10, 16).getTime(),new GregorianCalendar(2001, 12, 16).getTime(),newGregorianCalendar(2002,2, 16).getTime(),new GregorianCalendar(2002,4, 16).getTime()}; //这是单独的横坐标数据,横坐标会根据数据进行调整,Y 轴会按照顺利一一对应。
Date[] dataX2 = {new GregorianCalendar(1999, 1, 1).getTime(), new36 37 38 39 40 41 42 43 44 45 46 47 48 49 50 51 52 53 54 55 56 57 58 59 60 61 62 63 64 65 66 67 68 69 70 71 72 73 74 75 76 77 78 79 GregorianCalendar(1999, 4, 1).getTime(),new GregorianCalendar(1999, 8, 9).getTime(), new GregorianCalendar(2000,1, 1).getTime(),new GregorianCalendar(2000, 4, 1).getTime(),new GregorianCalendar(2001, 8, 1).getTime(),};//创建图形的大小为 500 x 270 pixels, with a pale blue// (e0e0ff) background, black border, 1 pixel 3D border effect and roundedXYChart c = new XYChart(700, 500, 0xe0e0ff, 0x000000, 1); c.setRoundedFrame();// 起点坐标是 (55, 60) ,图形大小是520 x 200 pixels, with whitec.setPlotArea(55, 60, 500, 300, 0xffffff, -1, -1, 0xcccccc, 0xcccccc);// Add a legend box at (55, 32) (top of the chart) with horizontal layout.// Use 9 pts Arial Bold font. Set the background and border color to// Transparent.c.addLegend(55, 32, false, "Arial Bold",9).setBackground(Chart.Transparent);// Add a title box to the chart using 15 pts Times Bold Italic font. The text// is white (ffffff) on a deep blue (000088) background, with soft lighting// effect from the right side.c.addTitle("Long Term Interest Rates", "Times New Roman Bold Italic", 15,0xffffff).setBackground(0x000088, -1,Chart.softLighting(Chart.Right));// 左边的Y 轴c.yAxis().setTitle("value").setAlignment(Chart.TopLeft2);// 右边的Y 轴c.yAxis2().setTitle("Load\n(Mbps)").setAlignment(Chart.Top Right2);c.yAxis2().setColors(0x008000, 0x008000, 0x008000);80 81 82 83 84 85 86 87 88 89 90 91 92 93 94 95 96 97 98 99 100 101 102 103 104 105 106 107 108 109 110 111 //左边距图形50的Y 轴Axis leftAxis = c.addAxis(Chart.Left, 50);leftAxis.setTitle("Temp\n(C)").setAlignment(Chart.TopLeft2);leftAxis.setColors(0x0000cc, 0x0000cc, 0x0000cc);// 右边距图形50的Y 轴Axis rightAxis = c.addAxis(Chart.Right, 50);rightAxis.setTitle("Error\n(%)").setAlignment(Chart.TopRig ht2);rightAxis.setColors(0xcccccc, 0xffffff, 0xffffff);//加载两组数据(XY 是一一对应的,同时添加的)LineLayer layer0 = c.addLineLayer(dataY0, 0xff0000, "Country AAA");layer0.setXData(dataX0);layer0.setLineWidth(1);LineLayer layer1 = c.addLineLayer(dataY1, 0x0000ff, "Country BBB");layer1.setXData(dataX1);layer1.setLineWidth(2);layer1.setUseYAxis(leftAxis);// 横坐标步长c.xAxis().setLabelStep(2);// // 统一给横坐标设值// c.xAxis().setLabels(dataX2);// 横坐标的标题c.xAxis().setTitle("Hour of Day");// output the chartviewer.setImage(c.makeImage());//{x|mmm dd, yyyy}横坐标的时间格式化viewer.setImageMap(c.getHTMLImageMap("clickable", "","title='{dataSetName} change to {value}% on {x|mmm dd, yyyy}'"));}public static void main(String[] args){11 2 11 3 11 4 //Instantiate an instance of this demo moduleDemoModule demo = new multiaxes();//Create and set up the main windowJFrame frame = new JFrame(demo.toString());frame.addWindowListener(new WindowAdapter() {public void windowClosing(WindowEvent e) {System.exit(0);} });frame.getContentPane().setBackground(Color.white);// Create the chart and put them in the content pane ChartViewer viewer = new ChartViewer();demo.createChart(viewer, 0);frame.getContentPane().add(viewer);// Display the windowframe.pack();frame.setVisible(true);}这个例子演示了各种方法来表现缺失的数据点,这也表明在绘图区的ChartDirector会自动调整大小以适合图表。