RATIONAL scc万能蒸烤箱使用手册
伊莱克斯 KVAAS21WX 嵌入式低温慢煮蒸汽烤箱 使用说明书
KVAAS21WXEN Steam oven User ManualWE’RE THINKING OF YOUThank you for purchasing an Electrolux appliance. You’ve chosen a product that brings with it decades of professional experience and innovation. Ingenious and stylish, it has been designed with you in mind. So whenever you use it, you can be safe in the knowledge that you’ll get great results every time.Welcome to Electrolux.Visit our website to:Get usage advice, brochures, trouble shooter, service and repair information:/supportRegister your product for better service:Buy Accessories, Consumables and Original spare parts for your appliance:/shopCUSTOMER CARE AND SERVICEAlways use original spare parts.When contacting our Authorised Service Centre, ensure that you have the following data available: Model, PNC, Serial Number.The information can be found on the rating plate.Warning / Caution-Safety informationGeneral information and tipsEnvironmental informationCONTENTS1. SAFETY INFORMATION (3)1.1 Children and vulnerable peoplesafety (3)1.2 General Safety (4)2. SAFETY INSTRUCTIONS (5)2.1 Installation (5)2.2 Electrical connection (6)2.3 Use (6)2.4 Care and cleaning (7)2.5 Steam Cooking (8)2.6 Internal lighting (8)2.7 Service (8)2.8 Disposal (8)3. PRODUCT DESCRIPTION (9)3.1 General overview (9)3.2 Accessories (9)4. HOW TO TURN OVEN ON AND OFF (10)4.1 Control panel (10)4.2 Display (11)5. BEFORE FIRST USE (12)5.1 Initial Cleaning (12)5.2 First connection (12)5.3 How to set: Water hardness (12)6. DAILY USE (13)6.1 How to set: Heating functions (13)6.2 Water drawer (14)6.3 How to use: Water drawer (15)6.4 How to set: Steamify - Steamheating function (15)6.5 How to set: Assisted Cooking (17)6.6 Heating functions (17)6.7 Notes on: Moist Fan Baking (20)7. CLOCK FUNCTIONS (21)7.1 Clock functions description (21)7.2 How to set: Clock functions (21)2/488. HOW TO USE: ACCESSORIES (24)8.1 Inserting accessories (24)8.2 Food Sensor (24)9. ADDITIONAL FUNCTIONS (26)9.1 How to save: Favourites (26)9.2 Automatic switch-off (27)9.3 Cooling fan (27)10. HINTS AND TIPS (27)10.1 Cooking recommendations (27)10.2 Moist Fan Baking (28)10.3 Moist Fan Baking -recommended accessories (28)10.4 Cooking tables for test institutes..2911. CARE AND CLEANING (29)11.1 Notes on cleaning (30)11.2 How to remove: Shelf supports (30)11.3 How to use: Steam Cleaning (31)11.4 Cleaning Reminder (31)11.5 How to clean: Water drawer (32)11.6 How to use: Descaling (32)11.7 Descaling reminder (33)11.8 How to use: Rinsing (34)11.9 Drying reminder (34)11.10 How to use: Drying (34)11.11How to remove and install: Door (34)11.12 How to replace: Lamp (35)12. TROUBLESHOOTING (36)12.1 What to do if (36)12.2 How to manage: Error codes (38)12.3 Service data (39)13. ENERGY EFFICIENCY (39)13.1 Energy saving (39)14. MENU STRUCTURE (40)14.1 Menu (40)14.2 Submenu for: Cleaning (41)14.3 Submenu for: Options (41)14.4 Submenu for: Setup (41)14.5 Submenu for: Service (42)15. IT'S EASY! (42)16. TAKE A SHORTCUT! (44)Subject to change without notice.1. SAFETY INFORMATIONBefore the installation and use of the appliance, carefully read the supplied instructions. The manufacturer is not responsible for any injuries or damage that are the result of incorrect installation or usage. Always keep the instructions in a safe and accessible location for future reference.1.1 Children and vulnerable people safety•This appliance can be used by children aged from 8 years and above and persons with reduced physical, sensory or mental capabilities or lack of experience and knowledge if they have been given supervision or instruction concerning the use of the appliance in a safe way and understand the hazards involved. Children of less than 8 years of age and persons with very extensive and complex disabilities shall3/48SAFETY INFORMATIONSAFETY INFORMATIONbe kept away from the appliance unless continuously supervised.•Children should be supervised to ensure that they do not play with the appliance.•Keep all packaging away from children and dispose of it appropriately.•WARNING: Keep children and pets away from the appliance when it operates or when it cools down. Accessible parts become hot during use.•If the appliance has a child safety device, it should be activated.•Children shall not carry out cleaning and user maintenance of the appliance without supervision.1.2 General Safety•Only a qualified person must install this appliance and replace the cable.•Do not use the appliance before installing it in the built-in structure.•Disconnect the appliance from the power supply before carrying out any maintenance.•If the mains power supply cable is damaged, it must be replaced by the manufacturer, its Authorised Service Centre or similarly qualified persons to avoid an electrical hazard.•WARNING: Ensure that the appliance is switched off before replacing the lamp to avoid the possibility of electric shock.•WARNING: The appliance and its accessible parts become hot during use. Care should be taken to avoid touching heating elements.•Always use oven gloves to remove or put in accessories or ovenware.•Use only the food sensor (core temperature sensor) recommended for this appliance.4/48SAFETY INSTRUCTIONS•To remove the shelf supports first pull the front of the shelf support and then the rear end away from the side walls. Install the shelf supports in the opposite sequence.•Do not use a steam cleaner to clean the appliance.•Do not use harsh abrasive cleaners or sharp metal scrapers to clean the glass door since they can scratch the surface, which may result in shattering of the glass.2. SAFETY INSTRUCTIONS2.1 Installation•Remove all the packaging.•Do not install or use a damaged appliance.•Follow the installation instructions supplied with the appliance.•Always take care when moving the appliance as it is heavy. Always use safety gloves and enclosed footwear.•Do not pull the appliance by the handle.•Install the appliance in a safe and suitable place that meets installation requirements.•Keep the minimum distance from other appliances and units.•Before mounting the appliance, check if the oven door opens without restraint.•The appliance is equipped with an electric cooling system. It must be operated with the electric power supply.•The built-in unit must meet the stability requirements of DIN 68930.2.2 Electrical connection•All electrical connections should be made by a qualified electrician.•The appliance must be earthed.•Make sure that the parameters on the rating plate are compatible with the electrical ratings of the mains power supply.•Always use a correctly installed shockproof socket.•Do not use multi-plug adapters and extension cables.•Make sure not to cause damage to the mains plug and to the mains cable. Should the mains cable need to be replaced, this must be carried out by our Authorised Service Centre.•Do not let mains cables touch or come near the appliance door or the niche below the appliance, especially when it operates or the door is hot.•The shock protection of live and insulated parts must be fastened in such a way that it cannot be removed without tools.•Connect the mains plug to the mains socket only at the end of the installation. Make sure that there is access to the mains plug after the installation.•If the mains socket is loose, do not connect the mains plug.•Do not pull the mains cable to disconnect the appliance. Always pull the mains plug.•Use only correct isolation devices: line protecting cut-outs, fuses (screw type fuses removed from the holder), earth leakage trips and contactors.•The electrical installation must have an isolation device which lets you disconnect the appliance from the mains at all poles. The isolation device must have a contact opening width of minimum 3 mm.•This appliance is supplied only with a main cable.2.3 Use•This appliance is for household (indoors) use only.•Do not change the specification of this appliance.•Make sure that the ventilation openings are not blocked.6/48SAFETY INSTRUCTIONSSAFETY INSTRUCTIONS •Do not let the appliance stay unattended during operation.•Deactivate the appliance after each use.•Be careful when you open the appliance door while the appliance is in operation. Hot air can release.•Do not operate the appliance with wet hands or when it has contact with water.•Do not apply pressure on the open door.•Do not use the appliance as a work surface or as a storage surface.•Open the appliance door carefully. The use of ingredients with alcohol can cause a mixture of alcohol and air.•Do not let sparks or open flames to come in contact with the appliance when you open the door.•Do not put flammable products or items that are wet with flammable products in, near or onthe appliance.•To prevent damage or discoloration to the enamel:–do not put ovenware or other objects in the appliance directly on the bottom.–do not put aluminium foil directly on the bottom of cavity of the appliance.–do not put water directly into the hot appliance.–do not keep moist dishes and food in the appliance after you finish the cooking.–be careful when you remove or install the accessories.•Discoloration of the enamel or stainless steel has no effect on the performance of the appliance.•Use a deep pan for moist cakes. Fruit juices cause stains that can be permanent.•This appliance is for cooking purposes only. It must not be used for other purposes, for example room heating.•Always cook with the oven door closed.•If the appliance is installed behind a furniture panel (e.g. a door) make sure the door is never closed when the appliance operates. Heat and moisture can build up behind a closedfurniture panel and cause subsequent damage to the appliance, the housing unit or the floor.Do not close the furniture panel until the appliance has cooled down completely after use.2.4 Care and cleaning•Before maintenance, deactivate the appliance and disconnect the mains plug from the mains socket.•Make sure the appliance is cold. There is the risk that the glass panels can break.•Replace immediately the door glass panels when they are damaged. Contact the Authorised Service Centre.•Be careful when you remove the door from the appliance. The door is heavy!•Clean regularly the appliance to prevent the deterioration of the surface material.•Clean the appliance with a moist soft cloth. Use only neutral detergents. Do not use abrasive products, abrasive cleaning pads, solvents or metal objects.•If you use an oven spray, follow the safety instructions on its packaging.7/48SAFETY INSTRUCTIONS2.5 Steam Cooking•Released Steam can cause burns:–Be careful when you open the appliance door when the function is activated. Steam can release.–Open the appliance door with care after the steam cooking operation.2.6 Internal lighting•Concerning the lamp(s) inside this product and spare part lamps sold separately: These lamps are intended to withstand extreme physical conditions in household appliances, such as temperature, vibration, humidity, or are intended to signal information about theoperational status of the appliance. They are not intended to be used in other applications and are not suitable for household room illumination.•Use only lamps with the same specifications.2.7 Service•To repair the appliance contact the Authorised Service Centre.•Use original spare parts only.2.8 Disposal•Contact your municipal authority for information on how to dispose of the appliance.•Disconnect the appliance from the mains supply.•Cut off the mains electrical cable close to the appliance and dispose of it.8/48•Remove the door catch to prevent children or pets from becoming trapped in the appliance.3. PRODUCT DESCRIPTION3.1 General overviewControl panel DisplayWater drawerSocket for the food sensor Heating element Lamp FanDescaling pipe outlet Shelf support, removableShelf positions3.2 AccessoriesWire shelfFor cookware, cake tins, roasts.Baking trayFor cakes and biscuits.Grill- / Roasting panTo bake and roast or as a pan to collect fat.9/48PRODUCT DESCRIPTIONHOW TO TURN OVEN ON AND OFF Food sensorSteam set Array One unperforated and one perforated foodcontainer.The steam set drains the condensing water awayfrom the food during steam cooking. Use it toprepare vegetables, fish, chicken breast. The setis not suitable for food that needs to soak in thewater e.g. rice, polenta, pasta.4. HOW TO TURN OVEN ON AND OFF4.1 Control panelHOW TO TURN OVEN ON AND OFF 4.2 Display5. BEFORE FIRST USE5.1 Initial Cleaning5.2 First connectionThe display shows welcome message after the first connection.You have to set: Language, Display brightness, Buzzer volume, Water hardness, Time of day.5.3 How to set: Water hardnessWhen you connect the oven to the mains you have to set the water hardness e the test paper supplied with the steam set.BEFORE FIRST USEThe table shows water hardness range (dH) with the corresponding level of Calcium deposit and the water classification. Adjust the water hardness level according to the table.When the tap water hardness level is 4, fill the water drawer with still bottled water.6. DAILY USE6.1 How to set: Heating functionsDAILY USETake a shortcut!6.2 Water drawerA.LidB.Wave-breakerC.DrawerD.Water-filling openingE.ScaleF.Front coverDAILY USEDAILY USE 6.3 How to use: Water drawer6.4 How to set: Steamify - Steam heating functionDAILY USEDAILY USETake a shortcut!6.5 How to set: Assisted CookingEvery dish in this submenu has a recommended function and temperature. You can adjust the time and the temperature.For some of the dishes you can also cook with:•Food SensorThe degree to which a dish is cooked:•Rare or Less•Medium•Well done or MoreTake a shortcut!DAILY USE STANDARDDAILY USE SPECIALSDAILY USESTEAM6.7 Notes on: Moist Fan BakingThis function was used to comply with the energy efficiency class and ecodesign requirements according to EU 65/2014 and EU 66/2014. Tests according to EN 60350-1.The oven door should be closed during cooking so that the function is not interrupted and the oven operates with the highest energy efficiency possible.When you use this function the lamp automatically turns off after 30 sec.For the cooking instructions refer to "Hints and tips" chapter, Moist Fan Baking. For general energy saving recommendations refer to "Energy Efficiency" chapter, Energy Saving.7. CLOCK FUNCTIONS7.1 Clock functions description7.2 How to set: Clock functionsCLOCK FUNCTIONSCLOCK FUNCTIONSTake a shortcut!Take a shortcut!CLOCK FUNCTIONSHOW TO USE: ACCESSORIES8. HOW TO USE: ACCESSORIES8.1 Inserting accessoriesA small indentation at the top increases safety. The indentations are also anti-tip devices. The8.2 Food SensorFood Sensor- measures the temperature inside the food. You can use it with every heating function.HOW TO USE: ACCESSORIESThe oven calculates an approximate end of cooking time. It depends on the quantity of food, the set oven function and the temperature.How to use: Food SensorTake a shortcut!9. ADDITIONAL FUNCTIONS9.1 How to save: FavouritesYou can save your favourite settings, such as the heating function, the cooking time, the temperature or the cleaning function. You can save 3 favourite settings.ADDITIONAL FUNCTIONS9.2 Automatic switch-offFor safety reasons the oven turns off after some time, if a heating function works and you do not change any settings.The Automatic switch-off does not work with the functions: Light, Food sensor, End time, Slow Cooking.9.3 Cooling fanWhen the oven operates, the cooling fan turns on automatically to keep the surfaces of the oven cool. If you turn off the oven, the cooling fan can continue to operate until the oven cools down.10. HINTS AND TIPS10.1 Cooking recommendationsHINTS AND TIPSHINTS AND TIPS10.2 Moist Fan Baking10.3 Moist Fan Baking - recommended accessoriesUse the dark and non-reflective tins and containers. They have better heat absorption than the light colour and reflective dishes.CARE AND CLEANING10.4 Cooking tables for test institutesInformation for test institutesTests according to EN 60350 and IEC 60350.11. CARE AND CLEANINGCARE AND CLEANING11.1 Notes on cleaning11.2 How to remove: Shelf supports Remove the shelf supports to clean the oven.CARE AND CLEANING 11.3 How to use: Steam Cleaning11.4 Cleaning ReminderCARE AND CLEANING 11.5 How to clean: Water drawer11.6 How to use: Descaling11.7 Descaling reminderThere are two reminders which prompt you to descale the oven. You cannot disable the descaling reminder.CARE AND CLEANING11.8 How to use: Rinsing11.9 Drying reminderAfter cooking with a steam heating function the display prompts to dry the oven.Press YES to dry the oven.11.10 How to use: DryingUse it after cooking with a steam heating function or steam cleaning to dry the cavity.11.11 How to remove and install: DoorYou can remove the door and the internal glass panels to clean it. The number of glass panels is different for different models.CARE AND CLEANING11.12 How to replace: Lamp CARE AND CLEANINGTROUBLESHOOTINGTop lamp12. TROUBLESHOOTING12.1 What to do if...TROUBLESHOOTINGPower cut always stops cleaning. Repeat cleaning if it's interrupted by power failure.12.2 How to manage: Error codesWhen the software error occurs, the display shows error message.In this section, you will find the list of the problems that you can handle on your own.TROUBLESHOOTINGWhen one of these error messages continues to appear on the display, it means a faulty subsystem may have been disabled. In such a case contact your dealer or an AuthorizedService Centre. If one of these errors occurs, the rest of the oven functions will continue to work as usually.12.3 Service dataIf you cannot find a solution to the problem yourself, contact your dealer or an Authorised Service Centre.The necessary data for the service centre is on the rating plate. The rating plate is on the front frame of the oven cavity. Do not remove the rating plate from the oven cavity.13. ENERGY EFFICIENCY13.1 Energy savingMake sure that the oven door is closed when the oven operates. Do not open the oven door too often during cooking. Keep the door gasket clean and make sure it is well fixed in its e metal cookware to improve energy saving.ENERGY EFFICIENCYMENU STRUCTUREWhen possible, do not preheat the oven before cooking.Keep breaks between baking as short as possible when you prepare a few dishes at one time. Cooking with fanWhen possible, use the cooking functions with fan to save energy.Residual heatIf a programme with the Duration or End Time selection is activated and the cooking time is longer than 30 min, the heating elements automatically turn off earlier in some oven functions. The fan and lamp continue to operate. When you turn off the oven, the display shows the residual heat. You can use that heat to keep the food warm.When the cooking duration is longer than 30 min, reduce the oven temperature to minimum 3 -10 min before the end of cooking. The residual heat inside the oven will continue to cook.Use the residual heat to warm up other dishes.Keep food warmChoose the lowest possible temperature setting to use residual heat and keep a meal warm. The residual heat indicator or temperature appears on the display.Cooking with the lamp offTurn off the lamp during cooking. Turn it on only when you need it.Moist Fan BakingFunction designed to save energy during cooking.When you use this function the lamp automatically turns off after 30 sec. You may turn on the lamp again but this action will reduce the expected energy savings.Standby modeAfter 2 min the display goes to standby mode.14. MENU STRUCTURE14.1 MenuPress to open Menu.MENU STRUCTURE 14.2 Submenu for: Cleaning14.3 Submenu for: Options14.4 Submenu for: Setup41/48IT'S EASY!14.5 Submenu for: Service15. IT'S EASY!42/48IT'S EASY!43/4816. TAKE A SHORTCUT!Here you can see all the useful shortcuts. You can also find them in the dedicated chapters in the user manual.How to set: Heating functions44/48IT'S EASY!TAKE A SHORTCUT! How to set: Steamify - Cooking with a steam heating functionHow to set: Assisted cookingHow to delay: Start and end of cooking45/48ENVIRONMENTAL CONCERNS17. ENVIRONMENTAL CONCERNSRecycle materials with the symbol . Put the packaging in relevant containers to recycle it.46/4847/48/shop867362934-A -132021。
2018-东菱烤箱说明书-范文word版 (12页)

本文部分内容来自网络整理,本司不为其真实性负责,如有异议或侵权请及时联系,本司将立即删除!== 本文为word格式,下载后可方便编辑和修改! ==东菱烤箱说明书篇一:ICE0808东菱冰淇淋机说明书冰淇淋机ICE-0808 使用说明书目录一、重要的安全指引······················································二、产品部件名称························································三、产品规格····························································四、产品功能····························································五、首次使用前··························································六、冰淇淋桶的冷冻······················································七、操作步骤说明·························································八、安全注意事项························································九、故障分析····························································十、清洁与保养··························································十一、制作方法··························································十二、推荐步骤(蛋黄的加入方法)··········································十三、环保······························································十四、食谱推荐··························································一、重要的安全指引在使用冰淇淋机时,请遵循基本的安全措施以减少火灾、触电或损伤等事故给你带来的伤害,其中包括:1、使用之前阅读产品说明书;2、请勿将电源线、插头或电器盒放置在水或其它液体中以免触电;3、本产品不适合由8岁或以下的儿童以及肢体不健全、感觉或精神上有障碍或缺乏相关经验和知识的人使用,除非有人指导他们如何安全使用本产品、监督他们掌握安全使用方法,同时他们已经意识到相关的危险;4、在不使用时,装配或拆开部件及清洗前,请将电源插头拔开;5、请勿与转动部件接触。
RATIONAL scc万能蒸烤箱使用手册

Service✆Info
70
Chef✆Line
70
“类型”设备和软件的识别
71
帮助功能
71
故障报告
72
RATIONAL俱乐部
77
-5-
符号说明
危险!
有直接危险的情况,会造成重伤 或死亡的后果。
警告!
可能危险的情况,可能会造成重 伤或死亡的后果。
小心!
可能危险的情况,会造成轻伤的 后果。
酸性物质
火灾危险!
警告! 日常开机和使用前的检查
- 请按规定锁闭上下导风板 – 转动的通风机叶轮可以导致受伤危险 - 请确保挂架和搁架式平台车按照规定固定在烹饪腔中 – 盛有高温流体的容器可能会倾翻或从烹饪腔中滑
出 – 烫伤危险! - 请 确保使用设备进行烹饪前,烹饪腔内不留有清洁片剂的残留物。如果存在残留物,请清除并用手喷枪彻
检查,养护和维修
危险 – 高压!
- 检查工作,养护工作和维修工作只能由受过专业培训的专业人员进行。 - 在进行清洁(CleanJet®+care+保养清洁除外)、检查、保养和维修工作的时候,必须切断设备的电源供 应。 - 必须限制带轮子的设备(可行驶设备)的活动范围,确保它在移动过程中不会损坏电线、水管和排水管
2年 RATIONAL
质保
请立即获取2年质保以及RATIONAL 俱乐部的免费会员身份。
/warranty
操作说明 SelfCooking Center®
尊敬的客户
恭喜您购买了SelfCooking Center®。我们的直观易懂的操作说明让您无需学习开支和昂贵的使用者培训,轻 轻的动两下手,就能用SelfCooking Center®获得优异的烹饪结果。 在SelfCooking Control®模式下,您只需要选择对应的食品种类和想要的烹饪结果,简单的一按按钮,工作就 完成了!完全不需要输入温度、时间、湿度等常规参数或进行复杂的编程。 当然,SelfCooking Center®也具备组合蒸具的各种功能。 在编程模式下,您能轻松创建自己的烹饪程序。 我们从首次安装之日起提供24个月质量保障。质量保障的前提是正确和完整的进行质保注册。玻璃破损、灯 泡和密封材料以及不按规定的安装、使用、维护、维修和脱钙所造成的损坏不在质保范围内。
英联斯特 TE601BQ1 TE101BQ1 TE201BQ1 万能蒸烤箱 使用说明书

使用设备前应仔细阅读说明书TE601BQ1TE101BQ1TE201BQ1万能蒸烤箱触摸版万能烤箱系列使用说明书生产许可证号粤XK01-302-00013英联斯特(广州)餐饮设备有限公司2017.A尊敬的顾客朋友:首先非常感谢您选用“英联斯特”公司产品,此说明书的所有资讯和指导方针是在遵守适用的规章,其当前工程发展状态与我们长期以来的知识和经验下所编辑而成。
如有特别的结构、附加指定的选项或由于新技术变更,实际供应的范围可能会偏离这里所说的描述和说明。
如您有任何疑问请联络制造商。
为使本产品的性能充分发挥,减少不必要的损失和伤害,开启装置上的任何运作前请先仔细阅读产品说明书,特别是在启动装置前!对于身体、感官或智力上有缺陷,或经验和知识有欠缺的人(包括儿童),本说明书不适用。
制造商对于不遵守操作指南所造成的损害或过失不承担任何责任。
本说明书应直接贮藏在装置上,以便操作装置者能方便取阅。
在改进性能特性和进一步发展的范围内,我们有权保留对产品的技术性变更。
符号说明在此说明书中,符号用于突出所有与设备相关的重要的安全说明和建议。
为避免事故危险、人员伤亡或财产缺失,请特别小心遵守这些说明内容。
:等电位:危险电压:防烫标识2017.A警告◆任何改装、以及不正确的安装,调整、维修或维护都可能导致财产损失或人员伤亡,如需调整或维修应与供应商联络,并由经过训练的专业人员进行。
◆为了您的安全,在使用或操作设备前请仔细阅读产品说明书。
◆本产品附近不要存放或使用易燃易爆气体、液体或物品。
◆此设备不应由生理、知觉或心理机能有障碍或缺乏经验或知识的人(包含儿童)使用,除非有人监督负责他们的安全或给予指导说明如何操作装置。
◆请小心储藏操作指南。
如装置交由第三者使用,请一并附上说明书使用。
所有使用装置者必须坚持遵守操作指南资讯以及安全指导方针。
◆如器具定位于紧靠墙壁、隔板、厨房设备、装饰板等位置,建议这些设备和设施用不可燃材料制作,否则应以适当的不可燃绝热材料加以覆盖,并且密切注意防火规章。
烤箱功能说明
烤:顶部和底部发热管工作。 小贴士:用这个功能来烘烤蛋糕,馅 饼等
解冻:风扇工作 小贴士:用这个功能来解冻食品。
烘烤:顶部发热管工作。 小贴士:使用这个功能来烤牛肉,汉 堡包,鸡胸肉,羔羊肉,猪肉、鱼片、 牛排等
2
ቤተ መጻሕፍቲ ባይዱ
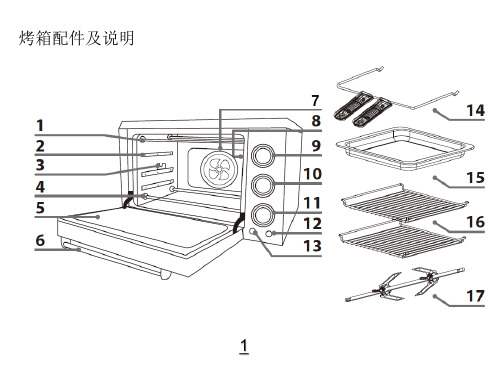
烤箱配件及说明
定时器旋钮 顺时针转动旋钮设置所需时间。当 设定的时间走完,指示灯将关了, 并听到一声铃声。如果烹饪时间比 最大设置时间还长,可以将计时器 转到“STAY ON”的位置,等烘烤结 束时再手动关闭烤箱。 注意:如果烹饪时间少于20分钟, 把旋钮转过去20分钟标记,然后再 转回所需时间。
电源指示灯(红色) 定时器被打开时,红灯亮 烤叉手把:可用烤叉手把把烤叉从热 的烤箱里拿出来 滴油盘:使用烤叉时可放于底部接油。 或用于烤蛋糕,等 烤网:可用于烤肉,烤鱼,等
准备指示灯(绿色) 绿色灯亮时,说明达到了预设温度 小贴士:当选择烘烤功能时,绿色 指示灯是不亮的
旋转烤叉
3
烤箱配件及说明11上发热管烤盘烤网支架导轨转叉支架底部发热管玻璃门门把手风扇和后发热管烤箱灯温度旋钮
烤箱配件及说明
7
1
上发热管 烤盘烤网支架导轨 转叉支架 底部发热管 玻璃门 门把手 风扇和后发热管 烤箱灯 温度旋钮:顺时针转动旋钮去 达到想要的温度 功能旋钮:转动旋钮来设置所 需的功能。
热风对流:底部发热管,后部发热管 和风扇打开同时工作。
蒸箱操作指南说明

蒸箱操作指南说明引言蒸箱是一种常见的厨房电器,广泛应用于家庭和商业厨房中。
它以蒸汽的形式将食物加热和烹饪,既能保留食物的营养价值,又能使食物更加美味。
本文将为您提供一份蒸箱操作指南说明,帮助您正确、安全地使用蒸箱。
1. 安装在开始使用蒸箱之前,首先需要进行正确的安装。
请确保选择一个稳固、平滑的工作台面或厨房柜台来放置蒸箱。
确保蒸箱与电源插座连接的线路符合安全标准,并避免与其他电器设备过于接近。
2. 预热和加水在开始蒸煮食物之前,需要预热和加水。
打开蒸箱盖子,注入适量的清水。
请注意,加水量应根据您要蒸煮的食物而定,一般来说,加水量应该保持在蒸箱最低水位线以上。
然后,将蒸箱插入电源插座并打开电源开关,选择合适的温度和时间设置,开始预热。
3. 放置食物当蒸箱预热完成后,即可放置食物进入蒸箱。
请将食物放置在预先准备好的蒸盘或蒸篮中,确保食物均匀分布。
同时,请确保食物之间留有一定的空隙,以便蒸汽可以充分流通。
对于一些特别粘性的食物,如米饭或面点,请使用蒸布或油纸将其与蒸盘隔离,以防粘连。
4. 设置时间和温度根据食物的种类和厚度,您需要设置适当的时间和温度。
大多数蒸箱都配有预设的烹饪程序,您只需选择合适的程序即可。
如果您需要自定义时间和温度,请根据您所烹饪的食物独立设置。
5. 蒸煮食物一旦时间和温度设置完成,即可开始蒸煮食物。
关闭蒸箱盖子并确保密封良好,蒸箱将会开始产生蒸汽。
请耐心等待食物被蒸烹至熟透。
避免频繁打开蒸箱盖子,以免造成热量流失和延长烹饪时间。
6. 检查食物在烹饪过程中,您可以通过打开蒸箱盖子来检查食物的熟度。
使用烤箱手套或厨房用具小心地打开蒸箱盖子,检查食物是否已经熟透。
如果食物尚未完全熟透,可以继续蒸煮一段时间。
7. 关机和清洁当食物熟透后,可以关闭蒸箱并拔掉电源插头。
在关机后,要小心蒸箱内仍然有热蒸汽,避免用手直接接触热表面。
待蒸箱冷却后,将蒸盘或蒸篮取出并进行清洗。
使用温水和中性洗涤剂轻轻擦拭蒸箱内外,确保蒸箱保持清洁和卫生。
电子烤箱中文说明书

型号:PE5500sense precisenessand 注:用户指南包含重要内容,包括安全和安装要点,这将使您对烤箱能够了解更 多。
请妥善保管,以备参阅。
环境注意事项 2重要安全信息 24 -规格 4 控制面板 4-5 烤箱程序器/定时器显示屏 5 设定和使用烤箱程序器/定时器 5 选择手动操作模式 5 设定时间 5-6 烤箱定时器 6 设定预约烘烤功能 6 设定定时烘烤功能 6-7 设定结束烘烤功能 7 设定起止时间功能 7-8 选择烘烤功能和温度 8 选择烤箱功能 8-9 温度调节控制旋钮 9 烤箱工作灯 10 烘烤指南 10 警告 10-11 附件 1 1 清洁和维护 11 可拆除的烤箱炉腔炉顶衬管 12 更换烤箱灯 12安装 12-13电子连接 13烤箱装入橱柜 13通风要求 14-1515-16常见的问题及解决方法 烤箱主要功能的烘烤指南 16-18目录尊敬的用户:您好!感谢您选购柏翠公司为您精心制造的柏翠系类产品,使用前请通 读本说明书。
您将从中了解正确的操作规范,并享受到全新的下厨乐趣。
环保注意事项烤箱遵守欧洲法令 2002/96/EC 《关于报废电子电气设备的指令》 (WEEE) 确保正确处理产品丢弃,这将有助于防止由于处理本产品废弃物不当对环境和人体健康造成负面影响。
本产品附带的文件或产品上的符号 表示不能把烤箱当作家居废弃物处理。
相反应当作为可回收的电子电气产品进行回收。
本产品的丢弃工作应当按照当地废弃物处理环保法规进行。
更多有关本产品的处理、回收工作,请联系当地城市部门、家居废弃物服务中心或您购买本产品的商店。
柏翠使用的包装材料是环保的,可以进行回收。
重要安全信息注意:若忽视这一标志,并进行错误的操作。
有可能导致人员危险,重伤或引起火灾。
一般信息烤箱适用于家庭,可置于标准橱柜或家用装置中。
冷却风扇七项功能的烤箱控制面板121314“自动”功能符号“预约烘烤”符号“手动操作”符号温度调节控制旋钮可按照客户要求调整。
烤箱设备操作说明书2020

第1页共2页
设备名称
烤箱
设备功能
烘烤产品
文件编号
设备型号
CD-9
厂商
信易
版本
B0
1.操作说明﹕
1.1将主电源开关“2”置于“ON“位置﹐同时打开马达开关“4”﹑加热开关“5”﹑定时开关“6”﹑此时三指示灯亮﹐电流表指针偏转。
1.2根据产品烘烤要求﹐扳动温度控制表“7”上齿块﹐设置相应温度{0-250℃}。当烤箱温度升至设置温度时红灯亮﹐当温度低于设置温度时绿灯亮﹐并开始升温。
核准
审核
制作
日期
设备操作说明书
第2页共2页
设备名称
烤箱
设备功能
烘烤产品ቤተ መጻሕፍቲ ባይዱ
文件编号
设备型号
CD-9
厂商
信易
版本
B0
1.3将时间控制表上拔动键置于“OUTO”,时间控制表“8”齿块向四周散开﹐每一齿块表示15分钟﹐根据需要在任意部位把若干数量的齿块压下﹐顺时针旋转至“红色箭头”﹐当若干数量的齿块随烘烤时间转过“红色箭头”后便自动停止工作。
1.4根据温度控制表设定值﹐调整超温保护器“3”﹐将保护器旋钮数字对准红点。
1.5烤箱设置完毕后﹐拉开烤箱门﹐把需烘烤的产品逐层放入烤箱内之铁盘上﹐关闭烤箱门。
1.6根据产品烘烤需要打开吸风口“1”及烤箱门右边的排风口。
2.注意事项﹕
2.1该烤箱电源电压380V。
2.2若有异常情况应停机通知相关人员处理。
2.3烤箱内产品摆放有序﹐不得重叠。
2.4烤箱内不充许同时烘烤两种不同的胶。
2.5在主机周围内不得放置易燃物品。
2.6设定温度时﹐一定要参考原料的干燥温度配合实际经验进行设定。
- 1、下载文档前请自行甄别文档内容的完整性,平台不提供额外的编辑、内容补充、找答案等附加服务。
- 2、"仅部分预览"的文档,不可在线预览部分如存在完整性等问题,可反馈申请退款(可完整预览的文档不适用该条件!)。
- 3、如文档侵犯您的权益,请联系客服反馈,我们会尽快为您处理(人工客服工作时间:9:00-18:30)。
RATIONAL股份有限公司
我们的客户技术服务一周七天都为您服务,联系电话:+49 8191 327888. 如您有任何应用技术上的问题,您可以拨打 RATIONAL Chef&Line: +41 (0)627973444
经销商
安装工
设备编号: 我们保留因技术升级而进行变更的权利!
安装日期: -3-
Service✆Info
70
Chef✆Line
70
“类型”设备和软件的识别
71
帮助功能
71
故障报告
72
RATIONAL俱乐部
77
-5-
符号说明
危险!
有直接危险的情况,会造成重伤 或死亡的后果。
警告!
可能危险的情况,可能会造成重 伤或死亡的后果。
小心!
可能危险的情况,会造成轻伤的 后果。
酸性物质
火灾危险!
10分钟后再次减少。一旦您接触显示屏或者打开烹饪腔门,显示屏会自动恢复正常显示。 - 在 运行高温煎烤工艺和油炸工艺时(例如炸鸡),必须始终先置入盛油脂的容器。 - 只 可以使用设备制造商的原装耐热配件。 - 请始终在使用前对配件进行清洁。 - 如 果运行间隙时间较长(例如过夜),请适当打开设备门。 - 烹 饪腔门有闭合功能。立式设备的门把手处在竖直位置时,设备门才算完全闭合。 - 如 果运行间隙时间较长(例如休息日),请切断设备的供水、供电和燃气连接。 - 设 备的使用寿命终结时,不得将设备当作普通垃圾处理,也不能交给公共回收站。我们愿意帮助您处理旧
警告! 日常开机和使用前的检查
- 请按规定锁闭上下导风板 – 转动的通风机叶轮可以导致受伤危险 - 请确保挂架和搁架式平台车按照规定固定在烹饪腔中 – 盛有高温流体的容器可能会倾翻或从烹饪腔中滑
出 – 烫伤危险! - 请 确保使用设备进行烹饪前,烹饪腔内不留有清洁片剂的残留物。如果存在残留物,请清除并用手喷枪彻
2年 RATIONAL
质保
请立即获取2年质保以及RATIONAL 俱乐部的免费会员身份。
/warranty
操作说明 SelfCooking Center®
尊敬的客户
恭喜您购买了SelfCooking Center®。我们的直观易懂的操作说明让您无需学习开支和昂贵的使用者培训,轻 轻的动两下手,就能用SelfCooking Center®获得优异的烹饪结果。 在SelfCooking Control®模式下,您只需要选择对应的食品种类和想要的烹饪结果,简单的一按按钮,工作就 完成了!完全不需要输入温度、时间、湿度等常规参数或进行复杂的编程。 当然,SelfCooking Center®也具备组合蒸具的各种功能。 在编程模式下,您能轻松创建自己的烹饪程序。 我们从首次安装之日起提供24个月质量保障。质量保障的前提是正确和完整的进行质保注册。玻璃破损、灯 泡和密封材料以及不按规定的安装、使用、维护、维修和脱钙所造成的损坏不在质保范围内。
30
时间设置
31
空气流动速度
32
加湿器
32
强制冷却
33
编程模式 – 操作元件
34
编程 –SelfCooking Control®模式
35
编程 – 组合蒸具模式
36
启动程序、检查程序步骤
38
更改程序
39
删除所有程序
40
删除程序
40
复制程序
41
创建LevelControl®程序
42
禁止编程
46
更改密码
47
底冲洗 – 有腐蚀危险!
-8-
安全规定
警告! 使用过程中的安全规定
- 如果容器盛放液体或在烹饪过程中装入流体食品,不能放入高于操作者视平线的上料层内 – 否则有烫伤 危险!
- 请始终缓慢开启烹饪腔门(高温蒸气) - 烫伤危险! - 请在穿着防热服的情况下接触高温烹饪腔内的配件和其他物体 – 烫伤危险! - 设备的外部温度可能会超过60 °C,只可以接触操作元件 – 烫伤危险! - 手喷枪和手喷枪内喷射出的水可能是烫的 – 烫伤危险! - 强制冷却运行 – 请只在按规定锁闭导风板的情况下启动冷却功能 – 受伤危险! - 请勿接触风扇滚轮 – 受伤危险! - 清洁 – 具有腐蚀性的化学品 – 有腐蚀危险!
清洁时必须穿戴恰当的防护服、防护眼镜、手套和防护面罩。请注意《安全说明》中“CleanJet®+care+保养 清洁”章节的规定。 - 请勿在设备附近放置任何易燃或可燃物质 – 火灾危险! - 如果可行驶设备和搁架式平台车不用移动的话,请启用设备轮子上的固定刹车装置。设备在不平整的地面 上可能会滚动 – 受伤危险! - 在移动使用搁架式平台车的情况下,请务必锁闭容器。请为盛放液体的容器加盖,以防高温液体溢出 – 烫 伤危险! - 在 餐盘搁架式平台车上下料的过程中,运输车必须按照规定固定在设备上 – 受伤危险 - 搁架式平台车、餐盘搁架式平台车、运输车以及装配滚轮的设备在运输过程中,可能会在斜面或门槛上倾 翻 – 受伤危险!
烧伤危险!
注意:不遵守规定可能会导致材 料损害。
日常使用的提示和窍门。
第一次试运行
在第一次试运行您的全新的智能的SelfCooking Center®时候,您将被要求启动一次全自动的自测。该自测需 时15分钟左右,目的是让SelfCooking Center®适应具体的环境条件。
火灾危险!
清除保障材料、工具包以及烤架 和容器。
警告! 仅适用于燃气设备
- 如果您的设备安装在抽油烟机下方,则抽油烟机必须在设备工作时打开——易燃气体! - 如果您的设备连接一个烟囱,则排起管道必须根据国家规定定期进行清洁 – 火灾危险!
(请联系您的安装师傅) - 请勿在设备的排气管上放置任何物品 – 火灾危险! - 设备底部的地面不可有物品堵塞 – 火灾危险! - 设备只可以在无风的环境中运行 – 火灾危险!
闻到气体味道时的应对方法:
- 立即关闭燃气供给 - 切勿接触任何电气开关 - 为房间通风 - 避免明火和火花 - 请 使用外部电话,立即通知负责的燃气供应商(如果无法联系到燃气供应商,请呼叫负责的消防队)。
-7-
安全规定
请把本操作手册存放在设备的所有使用者都可以随时取阅的地方! 儿童、在身体上、感观上或精神上有障碍的人士或者缺乏经验和知识的人士不可以操作该设备,除非此类人 士处在一位负责安全的人士的监护下。 只允许用双手进行操作。使用尖锐、锋利器具造成的设备损坏不属于质保范围。 为了避免发生事故或设备损坏,必须定期为操作员工进行培训和安全指导。
设备。
各个设备尺寸的最大上料量
6 x 1/1 GN 10 x 1/1 GN 20 x 1/1 GN 6 x 2/1 GN 10 x 2/1 GN 20 x 2/1 GN
30 kg 45 kg 90 kg 60 kg 90 kg 180 kg
(每个上料层最大 15 kg) (每个上料层最大 15 kg) (每个上料层最大 15 kg) (每个上料层最大 30 kg) (每个上料层最大 30 kg) (每个上料层最大 30 kg)
道。移动设备之前,必须先正确切断电源、水管和排水管道的连接。设备移回原位后,必须按规定连接移 动保险装置、电源线、水管和排水管道。 - 为了确保您的设备没有技术问题,至少每年要由授权的服务伙伴进行一次设备维护。
- 10 -
功能部件
设备编号
(打开门才能看见)
过溢保护(选项)
(只适用于燃气设备)
目录
第一次试运行
6
符号说明
6
安全规定
7
免责声明
9
保养、检查、养护和维修
10
功能部件
11
设备使用说明
12
各个设备尺寸的最大上料量
12
核心温度感知器的操作
14
手喷枪操作说明
15
运行模式概述
16
一般操作
17
SelfCooking Control®模式
18
组合蒸具模式
湿蒸
27
干蒸
28
干湿蒸组合
29
ClimaPlus Control®
免责声明
非由经授权之专业人员或者使用非原装正品配件进行的安装或维修,以及未得到制造商许可而对设备进行的 技术更改将无权享受制造商提供的质保和产品责任。
-9-
保养、检查、养护和维修
为了保持不锈钢的高品质,以及出于卫生原因和避免运行故障的考虑,您的设备必须每天或者根据清洁提示 进行清洁。请参照《操作说明书》中“CareControl – CleanJet®+care+保养清洁”章节的规定。
敬告!
如果设备没有经过清洁或清洁不充分,残余的油脂或食品残余物在烹饪腔内可能会燃烧 – 火灾危险! - 为了避免烹饪腔的锈蚀,您的设备必须每天清洁,即使设备只使用湿蒸气进行汽蒸操作。 - 为了避免锈蚀,请定期(约2周一次)在烹饪腔内涂抹植物油或油脂。 - 不可使用高压清洁机清洗设备。 - 不可用酸来处理设备,或者让设备接触酸性蒸气,否则镍铬合金钢的惰性层会损伤,可能导致设备变色。 - 请您只使用设备制造商的清洁剂。其他牌子的清洁剂肯能会导致损伤并损害您的治保权利。 - 请勿使用研磨剂或刮擦性清洁剂。 - 每天用非研磨性清洗剂清洁烹饪腔密封垫可以延长使用寿命。 - 每月一次拆下进气过滤器并清洗(参见家装服务章节)
60
加湿喷头的脱钙
61
USB数据存储器(U盘)
62
食品质量安全识别-记录
63
程序输入和输出
64
软件升级
65
下载服务数据
65
设置
66
实时
66
日期
66
语言
66
实际时间-格式