完整word版,NIS-ElementsF使用说明书.doc
赛力盟电机安全使用说明书(中文版)
本说明书的内容若有更改,恕不另行通知。 本说明书中英文版如有不一致之处,请以中文版为准。 对于任何公司或个人因不正确使用本产品所导致的或相关的任何特殊的、间接的、偶然的, 或结果性的损失,本公司概不负责。 对于未事先征得重庆赛力盟电机有限责任公司的书面许可而改变电动机的运行条件、电动 机结构,或者维修设备所造成的任何损失,本公司概不负责。 在未征得重庆赛力盟电机有限责任公司明确的书面同意之前,不得复制本说明书及其内容, 说明书内容不得透露给第三方,且不得用于未经授权之用途。 重庆赛力盟电机有限责任公司始终努力提高本说明书中提供的信息质量,并欢迎用户提出 任何改进意见。有关联系信息,请参见“产品使用情况反馈表”。
本说明书有关安全注意事项的等级分为“危险”和“注意”两级:
◇! 危险 :错误使用会有危险,可能会致人死亡、残废或重伤。
△! 注意 :错误使用会有危险,可能会造成中度伤害、轻伤或使物质受损。
安全取决于设备的所有操作人员和维修人员的安全意识、关注程度以及审慎的态度。虽然 遵守所有安全程序非常重要,但在机械附近工作时更应谨慎,时刻保持警惕。有时,即使对“注 意”类说明的事项,如不遵守,根据情况,也有可能发生严重后果。所以本说明书阐述的内容 都是很重要的,请务必遵守规定。
ElEmEnT 电池使用说明书

1. RECEIVING BATTERIESImmediately upon receipt of shipment, examine the outside of the packing for signs of rough handling before accepting battery from carrier. If there is evident damage, the receipt should be signed and both copies (carrier’s and receiving copies) marked “Shipment Received Damaged”. The carrier should be called immediately and asked to make a “Carrier’s Inspection for Damage Report”. If “concealed” damage is later detected, the carrier should be called immediately and requested to make a “Carrier’s Inspection for Concealed Damage Report”. After inspection by the carrier, arrangements should be made with the local representative to have the battery repaired before placing it in service.2. PLACING IN SERVICEAll ElEmEnT batteries must be given a freshening charge prior to their use. To accomplish this, connect the battery to the on-board SCR charger and commence charging until the charger indicates that it is in the float stage.3. CHARGINGThe charger is matched to the battery with respect to voltage and ampere-hour capacity. The charger is a GnB-approved high frequency charger with a CC-CV-CC profile which includes automatic charge control features. The constant voltage portion of the curve is set at 2.37 volts per cell.The charger will automatically switch to float voltage of 2.28 volts per cell once the CC-CV-CC standard charge has completed.4. COOL DOWNWhen the battery reaches an 80% depth of discharge, disconnect battery from the lift truck and connect to the on-board SCR charger. The battery will normally reach full charge in 12 to 16 hours. Once the charge is complete, the battery must be allowed to cool down.5. OPPORTUNITY CHARGINGThe ElEmEn T battery is capable of being charged during any breaks or downtime to provide additional capacity within a given shift. Guidelines for opportunity charging are as follows:• B attery in the range of 30% - 60% depth of discharge • Allow for full charge at least once per week•A void duty cycle changes that would allow this battery to sit discharged for periods greater than 24 hours6. SAFETY•W arning: Risk of fire, explosion, or burns. Do not disassemble, heat above 38 degrees Celsius, or incinerate. •W ear appropriate safety equipment when working around electrically live batteries. •U nder no circumstances should you attempt to remove the safety relief-valve vent cap. Such removal shall void the battery’s warranty and seriously impair battery performance. •T he ElEmEn T battery can emit hydrogen gases under some abnormal charging conditions. Whenever possible, charge in a well-ventilated area and keep open flames away from batteries. However, normal warehouse ventilation is adequate for normal usage. •l ift batteries with hoist, crane, lift truck, or similar equipment; move batteries on trucks, conveyors, or rollers. make sure equipment is of ample strength and properly installed. • D isconnect battery from the truck when performingmaintenance and repair on motor or electrical system. •O pen or “break” battery circuit before attempting repairs to charging plug or receptacles.INSTALLATION AND OPERATING INSTRUCTIONSPOW’R PAK VRLAELECTRIC VEHICLE BATTERIES•F amiliarize yourself with batteries and rules for charging and handling. Contact your local Gn B representative for information. •A ssign battery and charger care to properly trained personnel. Review your company safety regulations, and familiarize yourself with industry and government guidelines (OSHA, AnSI, etc.) to help reduce personnel accidents and equipment damage.7. OPERATIONBatteries are rated in ampere-hour and are selected to perform a specific workload within an established period of time. Increasing the work load or time period could result in over discharging, thus shortening battery life. In general, all lead-acid batteries should not be discharged to more than 80% of its six-hour rated capacity. In a typical application, one battery is required per truck per eight-hour shift. If a lift interrupt is used or installed on the lift truck, a minimum interrupt voltage of 1.86 VPC multiplied by the number of cells, should be set to avoid over discharge of the battery.Since an ElEmEn T battery has unremovable vent caps, its state of charge cannot be approximated by specific gravity measurement. However, average cellequal to 2.02 VPC multiplied by the number of cells in the battery.8. TEMPERATUREnormal operating conditions shall be between 60°F and100°F . Operating temperature above 100°F will reducethe battery’s service life. Operating temperature below 60°F results in less capacity and special charging is required.9. MAINTENANCEBecause this is a maintenance-free battery, there is little to do regarding maintenance operations. The top of the battery should be kept clean and dry and maybe dusted to remove any accumulated foreign matter. In the unlikely event of accidental contamination with electrolyte, wash with a neutralizing solution (or one-gallon water mixed with one pound of baking soda or commercial soda ash). Follow with a rinse using clear water. Ensure waste water is disposed of in accordance with Federal, State and local regulations. Blow excess water off the top of the battery using compressed air. In the event of an accident involving a battery, notify your local Gn B representative who is equipped to handle any environmental concern. never attempt to add water to the battery - it has been designed to function without any such additions over its entire life. As previously noted, any attempt to remove the vent caps shall void the warranty.If any time after initial purchase you have changes to your operating conditions, such as extended shifts, increased loads or other changes that alter your initial purchase conditions, please contact your local Gn B representative immediately to ensure you are properly equipped and are not affecting the life of the battery.11. SERVICE Additional information and assistance can be obtained by contacting your local sales representative or in the USA call toll free 1-888-563-6300.GNB Industrial Power –The Industry Leader.f technological innovation,theMotive Power group leads the industry with the most recognized global brands,such as GNB ®FLOODED CLASSIC ®,TUBULAR-HP ®,ELEMENT ®,LIBERATOR ®,GNB ®FUSION ™,ELEMENT ®GEL,and SONNENSCHEIN ®.They have come to symbolize quality,reliability,performance and excellence in all the markets served.GNB Industrial Power takes pride in its commitment to a better environment.Its Total Battery Management program,an integrated approach to manufacturing,distributing and recycling of lead acid batteries,has been developed to help ensure a safe and responsible life cycle for all of its products.ELEMENT ® and ABSOLYTE ® are registered trademarks of Exide Technologies.。
士林SS系列变频器使用说明书
士林SS系列变频器使用说明书说明书导读士林电机SS系列变频器,为符合市面上大部分的应用层面需求,设计了许多复杂的参数功能,对于初次接触变频器的客户,可能会造成使用上的困扰, 因此我们希望读者能够仔细阅读说明书的每一部分,以便充分掌握此变频器的使用方法。
在阅读说明书时,有不明之处,欢迎来电询问。
说明书的第2章详细列出了士林SS系列变频器的规格,2-5节指导客户安装变频器,并且强调使用变频器时应注意的安全事项。
;3-2节说明如何使用第3章指导客户如何使用变频器,3-1节列出了变频器的操作模式操作器;3-3节列出了简单的操作步骤。
第4章对参数作了详细的解释说明。
以下是本说明书的专有名词定义,1. 变频器输出电流的频率,称为「输出频率I。
使用者设定的频率,可使用操作器、多段速选择、电压信号、电流信号,通信设定),称为「目标频率」。
电机启动后,变频器的输出频率会逐渐加速至目标频率,然后在目标频率下稳定运转,此时的输出频率称为「稳定输出频率」。
2. 变频器的参数设定,在第4章中有详细的说明。
当使用者对参数设定不熟悉时,任意地调整参数设定值,往往导致变频器无法正常运作。
参数Pr998,可回复所有参数为默认值,此参数的操作流程,请参考第4章Pr998。
3. 变频器的使用说明分为两大模式,「变频器的操作模式(简称操作模式,」与「操作器的工作模式(简称工作模式,」。
变频器的操作模式,决定运转频率的参考来源与电机启动信号的来源。
士林变频器共有九种操作模式,详细说明请参考3-1节。
操作器主要负责监视数倌、参数设定与运转频率设定,士林操作器共有三种工作模式。
详细说明请参考3-2节。
4. 「端子名称」与「功能名称」的差别,在变频器控制板端子台的附近和主回路板端子台的附近,有打印上去的文字,用以区分各端子,它被称为「端子名称」。
对于「控制端子」与「多功能输出端子」,除了它的端子名称外,仍必须定义它的「功能名称」,功能名称所指的是该端子实际的作用。
西特斯i-cube 3.3 用户手册说明书
Building a safe and secure embedded worldUnit Testing for Software QualityTest in the real environment and document the results> T ESSY and CTETESSY performs automated dynamic module/unit and integration testing of embedded software and determines the code coverage along the way. This kind of test is required for certifications according to standards such as DO-178, IEC 61508, ISO 13849, IEC 62279, or ISO 26262.Integrated with TESSY is the ClassificationTree Editor (CTE), a tool to specify test cases systematically according to the Classification Tree Method (CTM). TESSY is based on Eclipse Rich Client Platform (RCP) thus featuring the well-known Eclipse user interface with views and perspectives.TESSY automatically executes the tests, evaluates the test results, and generates the test reports. TESSY can eliminate manual testing and therefore saves the embedded development engineer a tremendous amount of time. A faster development process ensures the tool recovers its costs quickly, and what‘s more, produces better quality software and documented tests.TESSY is successfully used in large projects with dozens of users in multiple locations across the world. TESSY is used extensively in automotive, aerospace, avionics, railway, medical, military, and industrial applications. Ask for a testimonial!TESSY can be operated without user intervention which is useful for regression testing and continuous integration.The quickest route to a safe application TESSY: the invaluable test tool for safety critical applications TESSY – The invaluable test toolWhat Is Module/Unit Testing?During unit testing the test object is tested rigorously and in isolation from the rest of the application. The test object is a C-level function or a method (in C++). Often unit testing is also called module testing.Rigorous means that testing is tightly focused on the unit in question; the test cases are specific for the unit, demanding, comprehensive, using boundary values and values that are likely to reveal a problem in the unit under test.Isolated means that the test result does notdepend on the behaviour of the other units in the application. It can be achieved by directly calling the unit under test and replacing calls to other units by stub functions.Tested for the unexpected: systematic, rigorous, isolated testingModule / unit testing eliminates errors early on and prevents them from showing up inlater stages of the development process.What are the benefits? 1. Find errors earlyUnit testing can be conducted as soon as the unit to be tested compiles successfully. Therefore errors inside the unit can be detected very soon after their creation.2. Save moneyIt is generally accepted that errors detected late in a project are more expensive to correct than errors that are detected early. Hence unit testing saves money.3. Give confidenceUnit testing gives confidence. After the unit testing, the application will be made up of fully tested units. A test for the whole application will then be more likely to pass.4. Specific for the unitI nstead of trying to create test cases that test the whole set of interacting units, the test cases for unit testing are specific to the unit under test (divide-and-conquer). Test cases can easily comprise of input data that is unexpected by the unit under test, something which may be hard to achieve during system testing.5. Easy defect isolationIf the unit under test is tested in isolation from the other units, detecting the cause of a failed test case is easy. The fault must be related to the unit undertest.A tour around the testing workflow How TESSY worksUnleash it for a test run> TESSY starts off by analyzing the source module and then lets the user select the test object. This can be a function or amethod (in C++). TESSY then identifies the interface of thetest object, such as global variables, parameters, andfunctions/methods called by the test object.> TESSY determines whether a variable of the interface is input, output, or both.> TESSY can be directed to allocate memory to be used as targetfor pointers in the interface.State your caseTESSY provides several ways to specify values for the test cases:> Interactive test data input is accomplished in thetabular Test Data view> Test data import in various file formats (including Excel)> Test cases specified systematically by use of theClassification Tree Method can be imported fromthe Classification Tree Editor (CTE)> TESSY can generate test cases from value ranges> TESSY can generate random test dataMeet your test driverTESSY then generates source code for the test driver, which callsthe test object. If it calls another function/method, TESSY is ableto create a stub function as replacement. This is necessary forunit testing in its strictest sense and useful if the called function/method is not implemented yet.TESSY provides two types of stub functions:One type allowsthe user to specify expected values for the input variables of thestub function which then are compared with the actual values byTESSY. Furthermore this stub function type allows you to specifythe inputs from the stub function to the test object, e.g. the returnvalue. The other type of stub function allows the user to providesource code for the body of the stub.Go TESSY go!Using a cross compiler, TESSY compiles and links the driver sourcecode, the function under test and any stub functions, and thendownloads the resulting executable to the test system. This mightbe an in-circuit emulator in stand-alone mode or one connected toa target system, or a JTAG / BDM / OCDS debug system. This mightalso be a simulation of the target microcontroller running on thehost PC. Testing can also be performed on the host PC using thenative GNU compiler.TESSY executes each test case and then determines, if it haspassed or failed. A comprehensive test report can be created in pdf,word, html, and xml format.The interface separates thetest object from the rest of theapplicationNon-interactive testingTESSY features a command language which allows the user to automate almost all tasks in TESSY.The command language enables the integration of TESSY in Continuous Integration (CI) systems.Dream debuggingIf a test case fails, an easy and efficient debug plan is in place. TESSY is able to re-execute a test case and direct the debugger in use to stop test execution at the beginning of the test object.The debugger’s features now can be used to reveal theculprit. After the source code is changed to fix the bug, the test case in question (and all others) can easily be re-run to verify that the correction operates successfully.Regression testingRegression testing can reveal if new errors have been introduced during further development of the application, such as bug fixes in other sections, rewriting of the tested function, switching to a new compiler version or porting the software to another microcontroller architecture. TESSY’s easy-to-use regression testing ability is an extremely helpful method of checking modified software, therefore ensuring software quality.Trace your requirementsTraceability of requirements to test cases checks if allrequirements have a test case associated with them and also lets you find out which test cases may need adaptation if a requirement has changed. Requirements can be imported / exported and created in TESSY.Why TESSY eases testingSoftware quality needs TESSYRe-use test data and save timeIf any interface element of a tested function has been changed in the course of the development process, TESSY allows the user to re-use test data from the old interface, which considerably aids the regression testing process.Fault injectionTESSY features a faultinjection mechanism allowing comfortable testing of the reaction of the test object to faults from the outside, e.g. defective RAM.This mechanism can also be used to execute theoretically unreachable code parts, hence achieving 100% code coverage.Test case specififcation according to the Classification Tree Method. The CTE (Classification Tree Editor), integrated in TESSY, supports thismethodIntegration testing – check the interactionTESSY can test the interaction of cooperating units even if the units do not call each other, e.g. push() and pop() of a stack. Several units are composed to form a bigger unit, usually called a component. A test case calls the units in a certain order and sets variables of the component. Resulting calls to other components and variable values can be checked by TESSY. Integration test cases can also include simulated time(temporal component testing).The Classification Tree MethodThe Classification Tree Method supports a developer confronted with issues such as:> Finding the ”right” test cases> Minimizing a set of test cases while assuring that none are missing > Estimating the amount of testing required> Defining criteria needed to conclude testing without risking integrity of the test processTransforming requirementsThe Classification Tree Method transforms requirements systematically into a set of error-sensitive, low-redundancy test cases. This method classifies test-relevant aspects using the equivalence partitioning method and leads to test case specifications that can comprise boundary values.Intuitive and easy to learnThe Classification Tree Method is intuitive and easy to learn. It requires and encourages the developer to employ his creativity. Because thinking about the problem specification is at the very beginning, the Classification Tree Method also reveals inconsistencies or omissions in the problem specification.Testing of software variantsTESSY eases the testing of software variants. Test cases for a base software can be transferred andadapted to the software variants. If a base test case changes, the change is applied to the inherited testcases of the variants automatically.Hitex UKHitex (UK) Ltd Millburn Hill RoadUniversity of Warwick Science Park Coventry CV4 7HS United KingdomPhone: +44-24-7669-2066Fax: +44-24-7669-2131Email: info@hitex.c Engineering Testing Training ToolsSoftware Components SystemsManufacturingConsultingHitex Head Office, Germany Hitex GmbHGreschbachstraße 1276229 Karlsruhe GermanyPhone: +49-721-9628-0Fax: +49-721-9628-149Email:*************B -T E S S Y -E 04.i n d d - D EC 2018© Hitex GmbH. All Rights Reserved. This document is intended to give overview information only. Hitex makes no warranties or representations with regard to this content of any kind, whether express or implied,including without limitation, warranties or representations of merchantability, fitness for a particular purpose, title and non-infringement of any third party intellectual property right. Hitex reserves the right to make corrections, deletions, modifications, enhancements, improvements and other changes to the content and materials, its products, programs and services at any time or to move or discontinue any content, products, programs, or services without notice. Trademarks of other companies used in the text refer exclusively to the products of these companies. Hitex is a trademark of Hitex GmbH.TESSY is qualified to be used in safety-related software development according to IEC 61508, ISO 26262, EN 50128, and IEC 62304。
完整word版,NIS-Elements F使用说明书
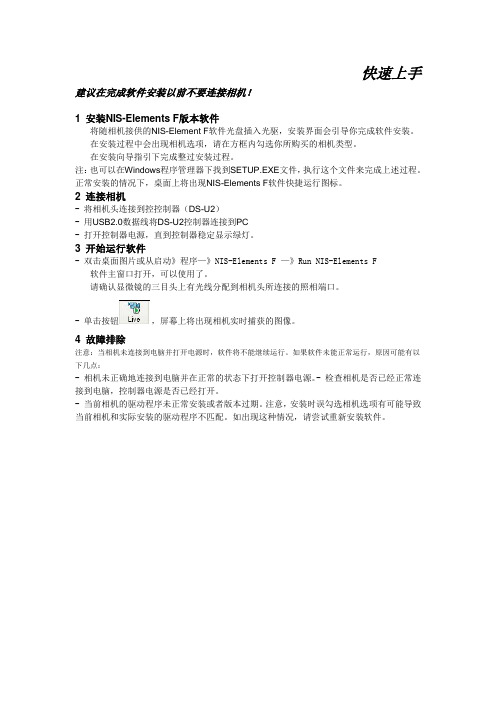
快速上手建议在完成软件安装以前不要连接相机!1 安装NIS-Elements F版本软件-将随相机接供的NIS-Element F软件光盘插入光驱,安装界面会引导你完成软件安装。
-在安装过程中会出现相机选项,请在方框内勾选你所购买的相机类型。
-在安装向导指引下完成整过安装过程。
注:也可以在Windows程序管理器下找到SETUP.EXE文件,执行这个文件来完成上述过程。
正常安装的情况下,桌面上将出现NIS-Elements F软件快捷运行图标。
2 连接相机- 将相机头连接到控控制器(DS-U2)- 用USB2.0数据线将DS-U2控制器连接到PC- 打开控制器电源,直到控制器稳定显示绿灯。
3 开始运行软件- 双击桌面图片或从启动》程序—》NIS-Elements F —》Run NIS-Elements F-软件主窗口打开,可以使用了。
-请确认显微镜的三目头上有光线分配到相机头所连接的照相端口。
- 单击按钮,屏幕上将出现相机实时捕获的图像。
4 故障排除注意:当相机未连接到电脑并打开电源时,软件将不能继续运行。
如果软件未能正常运行,原因可能有以下几点:- 相机未正确地连接到电脑并在正常的状态下打开控制器电源。
- 检查相机是否已经正常连接到电脑,控制器电源是否已经打开。
- 当前相机的驱动程序未正常安装或者版本过期。
注意,安装时误勾选相机选项有可能导致当前相机和实际安装的驱动程序不匹配。
如出现这种情况,请尝试重新安装软件。
NIS-Elements F软件运行界面一、快捷按钮的操作鼠标标准显示符,移动鼠标箭头可以在当前位置激活弹出菜单(单击右键)或调用内部函数(按钮、菜单命令),此外使用鼠标滚轮可以对图像进行缩放操作。
调用放大镜函数,鼠标变成放大镜形状,单击图像的当前位置可以对该位置图像进行局部放大显示。
按下该按钮允许你按照“Tools”的设置插入标注对像。
调用自动测光函数,活动图像中央将出现自动曝光的测光区域,系统将返回区域内的光强度参数以确定自动曝光时间。
雷尼绍使用手册

雷尼绍中文说明书 山善(上海)贸易有限公司技术部一. 雷尼绍测头的标定:测头标定是矫正测头球相对主轴中心线的偏差和测头的长度误差以及探针球的半径误差。
1在以下几种情况下需要标定测头: a 第一次使用测头时。
b 测头上安装了新的探针。
c 怀疑探针弯曲或测头发生碰撞时。
d 周期性地进行标定以补偿机床的机械变化误差。
e 如果测头柄的重新定位的重复性差。
2 将已知内孔经的Master (随测头一起标定用的标准块)置于工作台且靠近主轴的一边。
a. 如图一所示用千分表将Master 沿着X 方向拉平后水平的固定在台 面上;b. 用千分表找正Master标位置(将其置于G54X- Y-中); c.在主轴上安装验棒(Testbar),移动 Z 轴并用块规测量master 的位置如图二所示 d.使w 轴在原点位置,譬如 Testbar 长度=350.311mm块规长度=30.00mm此时Z轴机械坐标为-1148.291mm (图一)(图二) e.设定标定时用的工件坐标系Z=-1148.291+(-30.0)+(-350.311)=-1528.602mm(将其置于G54Z--)f.执行T1M06(因为预先设定T01为测头专用);g.将测头安装到主轴上,擦干净测球并用千分表测量测球的跳动,如果跳动大需要重新调整(测头柄上四个方向均有调整螺丝);h.测头每次安装到主轴孔内时必须一致即不能旋转180度再安装,为了避免误差;3.完整标定测头需要O9801、O9802及其O9803或者O9804程序 标定程序依次说明:1.(O9801)测头长度的标定:格式如下:G65P9801Zz Tt;例题:在G54工件坐标系中设置X、Y、Z的值;O0001G90G80G40G0G54X0Y0G43H01Z100. (因测头通常设定为T01,激活1号补正,定位到100mm处) G65P9832 (旋转开启测头包含主轴定位)G65P9810Z10.F3000(保护定位移动)G65P9801Z0T1 (Z向标定,T1表示刀补号码)G65P9810Z100 (保护定位移动到Z100.0处)G65P9833 (旋转关闭测头)G28Z100. (参考点返回)H00 (取消刀补)M302(O9802)标定探针的X、Y方向偏心:格式:G65P9802Dd Zz上述D是表示标准块的内径值,当使用凸台标定时要使用Zz,省略时表示用孔来标定。
NSeries用户手册

1.1.2.各类标志本书还采用各种醒目标志来表示在操作过程中应该特别注意的地方,这些标志的意义如下:小心、注意:提醒操作中应注意的事项,不当的操作可能会导致设置无法生效、数据丢失或者设备损坏。
警告:该标志后的注释需给予格外的关注,不当的操作可能会给人身造成伤害。
说明、提示、窍门:对操作内容的描述进行必要的补充和说明。
1.2.致谢感谢您使用我们的产品及用户手册,如果您对我们的产品或用户手册有什么意见和建议,您可以通过电话或电子邮件反馈给我们,我们将不胜感谢。
2.环境要求SecBMS 3600 T1000系列产品可在如下环境使用:输入电压: 220~240V温度: -10~50 ℃湿度: 5~90%电源:交流电源110W ~230W为保证系统能长期稳定的运行,应保证电源有良好的接地措施、防尘措施、保持使用环境的空气通畅和室温稳定。
本产品符合关于环境保护方面的设计要求。
保证设备工作在建议的环境要求内,否则可能导致设备损坏或提早老化;设备良好的接地可以有效避免雷击。
3.设备安装与网管3.1.设备安装SecBMS 3600 T1000 设备的安装分以下几个步骤:在后面板电源插座上插上电源线,打开电源开关,前面板的Power灯(绿色,电源指示灯)和Alarm灯(红色,告警灯)会点亮。
大约1-2分钟后Alarm灯熄灭,说明SecBMS 3600 T1000正常工作。
缺省情况下,直接用标准 RJ-45 以太网线将计算机连接到设备的任意接口,网管IP 为:/24,右上角的Link灯亮了,表示连接成功。
1、如果开机5分钟后,红灯还长亮,请关闭电源5分钟,然后重开。
2、如果红灯依旧长亮,请不要关机并等待30分钟。
3、如果仍然长亮,可能设备故障,请联系网神信息技术(北京)股份有限客服部门确认问题。
3.2.网管支持WEB、console、telnet、ssh四种方式。
3.2.4.WEB网管WEB网管支持http和https两种方式,默认为https。
贝丽尼亚101915显示器使用手册说明书
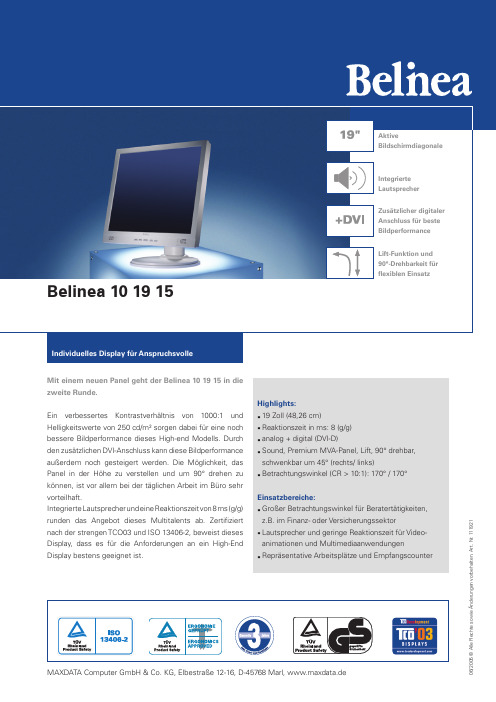
MAXDATA Computer GmbH & Co. KG, Elbestraße 12-16, D-45768 Marl, www.maxdata.de06/2005 © A l l e R e c h t e s o w i e Än d e r u n g e n v o r b e h a l t e n . A r t . N r . 111921Mit einem neuen Panel geht der Belinea 10 19 15 in die zweite Runde.Ein verbessertes Kontrastverhältnis von 1000:1 und Helligkeitswerte von 250 cd/m² sorgen dabei für eine noch bessere Bildperformance dieses High-end Modells. Durch den zusätzlichen DVI-Anschluss kann diese Bildperformance außerdem noch gesteigert werden. Die Möglichkeit, das Panel in der Höhe zu verstellen und um 90° drehen zu können, ist vor allem bei der täglichen Arbeit im Büro sehr vorteilhaft.Integrierte L autsprecher u nd eine Reaktionszeit von 8 ms (g/g) runden das Angebot dieses Multitalents ab. Zertifiziert nach der strengen TCO03 und ISO 13406-2, beweist dieses Display, dass es für die Anforderungen an ein High-End Display bestens geeignet ist.Highlights:§19 Zoll (48,26 cm)§Reaktionszeit in ms: 8 (g/g)§analog + digital (DVI-D)§Sound, Premium MVA-Panel, Lift, 90° drehbar, schwenkbar um 45° (rechts/ links)§Betrachtungswinkel (CR > 10:1): 170° / 170° Einsatzbereiche:§Großer Betrachtungswinkel für Beratertätigkeiten, z.B. im Finanz- oder Versicherungssektor§Lautsprecher und geringe Reaktionszeit für Video- animationen und Multimediaanwendungen §Repräsentative Arbeitsplätze und EmpfangscounterPaneleigenschaftenBildschirmdiagonale19“Bildschirmdiagonale in Zoll (sichtbar) 19Bildschirmdiagonale in cm (sichtbar) 48,26Maximale Bildgröße (B x H) in mm 376 x 301Physikalische Auflösung 1,3 Mega Pixel(1280 x 1024)Pixelabstand (HxV) in mm 0,294 x 0,294PaneltypPrem. MVA Darstellbare Farben16,7 Mio Helligkeit in cd / m2 (typ.) 250Kontrastverhältnis (typ.)1000:1Betrachtungswinkel h/v (CR > 5:1) 170° / 170°Betrachtungswinkel h/v (CR > 10:1) 170° / 170°Reaktionszeit in ms 8 (g/g)Elektrische DatenHorizontalfrequenz in kHz 31-83Vertikalfrequenz in Hz56-75max. Videobandbreite (dot rate) in MHz 135Netzspannung 100-240V , 50-60 Hz•Max. Leistungsaufnahme in Watt (On / Sleep)50 / 4FeaturesLautsprecherHöhenverstellbarkeit in mm 110Drehbarkeit um 90° •Netzteil intern / extern• / –Neigungswinkel nach hinten / vorne 22° / 5°Schwenkbarkeit nach rechts / links 45° / 45°FarbeClassicGrey OSD / EinstellmöglichkeitenHelligkeit / Kontrast • / •Clock / Phase• / •Bildposition (horizontal / vertikal) • / •Auto-Setup / Reset• / •Farbtemperatur (5500K, 6500K, 9300K, User, SRGB) – / • / • / • / –Vollbild / 1:1 Darstellung• / –Frequenzanzeige / Videosignalumschaltung • / •Lautstärke•Monitor Bedienelemente-AutoSetup / Helligkeit / Kontrast • / • / • -Lautstärke / Menü / Power• / • / •Max. Bildwiederholraten in Hz bei Auflösung analog / digital640 x 480 75 / 75800 x 600 75 / 751024 x 768 75 / 751152 x 864 75 / 751280 x 1024 75 / 751600 x 1200– / –Prüfzeichen / StandardsPlug & Play:-DDC 2B / DDC-CI • / •Ergonomie:-TÜV Ergo (ISO 13406-II) / TCO99 / TCO03 • / – / •Sicherheit:-TÜV GS / CE• / •Power Management:-Energy Star / Energy Label / TCO99 / TCO03 • / – / – / •MAC kompatibel •Diebstahlsicherung:-Kensington Lock kompatibel•VESA Mounting kompatibel (Lochabstand in mm) 100 x 100Anschlüsseanalog: D-SUB 15 pin mini •digital: DVI-D (24-pin)•Kopfhöreranschluss / Audio Eingang – / •USB–ZubehörHandbuch (CD / Print) • / –Netzkabel (1,8 m)•Videokabel D-Sub 15 pin mini (1,8 m) •DVI-D Kabel (1,8 m) (optional) • (Art. Nr. 30 86 85)Audiokabel (1,8 m)•Pivot Software (optional)• (Art. Nr. 80 31 64)MaßeAbmessungen (B x H x T) in mm426 x 413 x 210Abmessungen (B x H x T) in mm ohne Fuss 426 x 367 x 63Gewicht netto / brutto in kg6,7 / 8,6Service36 Monate Garantie-Austausch-Service •inkl. Panel und BacklightIhr MAXDATA Fachhandelspartner:Belinea ist die Monitormarke der MAXDATA AG.2 x 1 Watt。
- 1、下载文档前请自行甄别文档内容的完整性,平台不提供额外的编辑、内容补充、找答案等附加服务。
- 2、"仅部分预览"的文档,不可在线预览部分如存在完整性等问题,可反馈申请退款(可完整预览的文档不适用该条件!)。
- 3、如文档侵犯您的权益,请联系客服反馈,我们会尽快为您处理(人工客服工作时间:9:00-18:30)。
快速上手建议在完成软件安装以前不要连接相机!
1 安装 NIS-Elements F版本软件
-将随相机接供的NIS-Element F软件光盘插入光驱,安装界面会引导你完成软件安装。
-在安装过程中会出现相机选项,请在方框内勾选你所购买的相机类型。
-在安装向导指引下完成整过安装过程。
注:也可以在 Windows 程序管理器下找到SETUP.EXE 文件,执行这个文件来完成上述过程。
正常安装的情况下,桌面上将出现NIS-Elements F软件快捷运行图标。
2连接相机
- 将相机头连接到控控制器(DS-U2 )
-用 USB2.0 数据线将 DS-U2 控制器连接到 PC
-打开控制器电源,直到控制器稳定显示绿灯。
3开始运行软件
-双击桌面图片或从启动》程序—》NIS-Elements F —》 Run NIS-Elements F
-软件主窗口打开,可以使用了。
-请确认显微镜的三目头上有光线分配到相机头所连接的照相端口。
- 单击按钮,屏幕上将出现相机实时捕获的图像。
4故障排除
注意:当相机未连接到电脑并打开电源时,软件将不能继续运行。
如果软件未能正常运行,原因可能有以
下几点:
- 相机未正确地连接到电脑并在正常的状态下打开控制器电源。
-检查相机是否已经正常连
接到电脑,控制器电源是否已经打开。
- 当前相机的驱动程序未正常安装或者版本过期。
注意,安装时误勾选相机选项有可能导致
当前相机和实际安装的驱动程序不匹配。
如出现这种情况,请尝试重新安装软件。
NIS-Elements F 软件运行界面
一、快捷按钮的操作
鼠标标准显示符,移动鼠标箭头可以在当前位置激活弹出菜单(单击右键)或调用
内部函数(按钮、菜单命令),此外使用鼠标滚轮可以对图像进行缩放操作。
调用放大镜函数,鼠标变成放大镜形状,单击图像的当前位置可以对该位置图像进
行局部放大显示。
按下该按钮允许你按照“Tools ”的设置插入标注对像。
调用自动测光函数,活动图像中央将出现自动曝光的测光区域,系统将返回区域内
的光强度参数以确定自动曝光时间。
调用感兴趣区域的聚焦指示,状态栏将针对感兴趣区域的聚焦状态给出聚焦参数,
参数值越大表示感兴趣区域的聚焦越准确。
感兴趣的聚焦区域位置可以由鼠标拖动设置。
-从硬盘打开一幅图像。
-将系统捕获的或打开的图像更换名字另外保存到硬盘上。
-打开打印对话框,对当前图片执行打印操作。
-创建一份基本的图像报告,以 PDF文档的格式显示。
报告包括当前图像、文件名、
文件路径、文件大小、文件产生的日期。
-试图将图像调整到充满当前窗口的状态,以使图像的显示尺寸最大化。
-以 1:1 的方式显示当前图像。
-将当前图像放大。
-将当前图像缩小。
- 选择一个缩放比例,调整当前图像的显示大小,缩放范围在10%-1200%之间。
- 在图像的左下角显示比例尺,包括七个预定义的比例尺(2, 4, 10, 20, 40, 60, 100 倍) 。
-按下此按钮可以在图像中显示标注对象。
同时可以选择右边的下拉菜单选择插入
的对象类型
显示水平方向一条线上的光强度轮廓曲线图。
直线的位置可以由用户指定。
-在图像窗口中实时显示图像。
-将实示显示的图像冻结(图像尺寸按快速显示的设置)。
- 将实时图像或冻结图像调入应用窗口,创建一个名为“Captured ”的临时图像文件(图像尺寸按捕获设置的尺寸)
-安装设置的规则将实时图像或冻结的图像自动保存到相应的硬盘路径下。
保存规
则详见 FILE—》 OPTIONS命令执行下的对话框。
几种相机的不同设置
对于不同的相机,NIS-Elements 的界面中的“ Camera setting”区域有不同的设置:DXM1200F相机设置
活动图像尺寸
捕获图像尺寸
自动白平衡增益设置自动曝光
曝光时间R/G/B 值设置
偏移补偿伽玛校正值
DXM1200C 相机设置
黑平衡
CCD 冷却
DS-U1 控制器设置:
测光方式
测光区域大小DS-U2 控制器设置:
下拉菜单操作File 菜单:
Open: 从硬盘打开图像文件
Save: 直接保存文件到硬盘
Save as调用保存文件对话框,可以设置文件命,文
件扩展名
Reload Image:重新调入图像
Delete Current Image :删除当前图像
Print调用打印对话框,可以将当前图像打印
Send调用发送电子邮件对话框,可以将当前图像作
为附件发送
Report调用PDF 报告对话框,电脑内需安装有
Adobe PDF Reader 软件才能操作
Exit: 退出 NIS-Elements 软件操作
Options调用“ Options”对话框
用户可以自定义图像
文件保存的缺省路径、
方件名前缀、标尺的单
位和小数点位数。
Edit 菜单:
Undo :撤消上次操作
Redo:重复上次操作
Resize:调用图像重定义对话框,重新定义当
前图像的像素尺寸
Crop :调用裁剪对话框,对图像进行裁剪
Copy :复制当前图像
Flip Horizontally :水平镜象
Flip Vertically :垂直镜象
Rotate Right :右转图像90 度
Rotate left :左转图像90 度
File Merge: 调用图像融合对话框,该工具可以
将荧光图像的三个通道进行合并,生成彩色
图像。
Camera 菜单:
显示实时图像
冻结图像(临时文件)
捕获图像(临时文件)
自动捕获图像(保存文件到硬盘)
Calibrate 调用手动定标对话框(此功能只对活动图像
有效,活动图像必须是标尺的图像):
在标尺图像上点击两条线,出现以下对话框:在白框中输入两条件之间的真实距离,并选择正确的长度单位。
Preprocess 菜单:
Contrast调用对比度调节对话框
White Balance 调用白平衡校正对话框
Change Saturation调用色调调节对话框
Change Hue调用饱和度调节对话框
缩小
View 菜单:放大
1:1 显示
适配
显示标尺条
标尺条属性
箭头
放大镜
标注
Help 菜单:
帮助内容、
搜索帮助内容、
软件版本信息。