KT板航模遥控飞机F制作图纸
鹰击长空——制作KT板F-15战斗机

暂停 的 纤维 薄管 杖了机 箨的 加强 .因 为这
种材 料 不但 壁量 识轻 ,而 且耐 弯折 的强 度 I I 常大 机 骥上 的 凹槽 是川 H切 出 束的 , / J
凡观 点 ) ,就 星 沫犍 太过 朴
棠 矗遍 昕 有 资料 F l I 5 斗饥 觉 然没 有鲜 些 颤 邑∞ “ 外衣 除 士 槊 带 响前 部鸭 . 水 的空军 蓝 肛色 或空 军低 町视
赍 的 战 斗机 好好 1 个漂 亮 均 表滴 l 装 艟 馀
哈 !说 笑了 ) 。
哈
机 头 和机 身 的制 作
图纸 仍 然是 P) I F恪式 的电 r , 印 出 韫 扣 米 可 【直接 使 用 .飞 饥廿为 机 头和机 身坷 音丹. ̄ 】 ; if l t比较 手 。 饥 郁苛 屯用 K ’ q板措 建出 卜 方形 的盘 r, 青 {块 点撑. 也是 我 } 一 有 过 下想更 新 占的 土哥 围 。 舵机 这 次使 用的 是5
克的馓 躔 帆 .由 Kl 飞机 自重 比较 轻 . _ 报 雎舱 鼠和 机头我 选 用 J比较 案软 的另 一 也不 用像 恺式 飞机 样 凡的 舵而 动作 所以
维普资讯
,
维普资讯
f翼 的删 板时 日 砭 像持垂 直 就O 君 焉 K了 身 讥 主 f部舒 只 用 T很少 的时 就 先成 丁 在制
怍进 气道 的 时 候我忘 记 牯 雌 片很 小的 KT
片切 出 的 槽 截 面妻 是工 世的 V字 形
旬丁
翼 的高 空验 汪 机理 红 蕊 白彩 色 蔷纹 豫装 外 .
其 套全都 是 螗黑 邑 ( I囊 应该建 议 美国 凡 民为他 们 昂 唾
航模图纸-KT板-上单翼-像真-JAS 39 Gripen(All in one)

Sand fuselage corners round as shown below (not to scale)
Sand turtledeck corners round as shown below (not to scale)
Canard servo
Rudder servo (optional) .157" x 8.25" carbon tube pivoting inside three short pieces of 3/16" aluminum tubing
4.62"
4.12"
Cut 45 deg bevel in elevon leading edge and hinge with 3M Satin tape Flaperon servos (with 1/32" music wire pushrods) Cover wing leading edge with a strip of 3M Satin tape for smoothness and durability Balsa missle rails
Cut 45 deg bevel in elevon leading edge and hinge with 3M Satin tape
8
6 Removable canopy mounted with two bamboo skewers forward and two Velcro strips aft Scale in inches Nosecone and canopy made from laminated foam sheets or foam block carved to shape Cut hatch for access to receiver 3/8" sq x 4.5" hardwood motor mount
模型飞机图纸 3DKT板机extra330(A4切割版)

pron triangles for .8mm carbon rod landing gear support/stiffener. Groove foam and glue with order-free (foam friendly) CA or JZ Products Super RC Z 56
3
orcer. the e ng.
EXTRA 330-3 D PARK FLYER SPECS Wing Span....... 36” Length............34.5” Weight............12-13oz Power.............AXI 2212/34 Prop.............. GWS 12x4 Ch................ 4 Battery.......... 3 Cell-700 to 1350mAh-Li-Poly
r
Aileron control horns
CG
Aileron cut line
Landing Gear
Cut side plate (xBrace) from 3mm Depron
6mm Depron optional
Glue scrape Dep extra strength
Wing
Elevator Servo
Rudder Servo
Den
MATERIALS LIST
HINGE DETAIL
Best results are achieved by using 1” wide Du-Bro RC Electric Flyer Hinge Tape (3M Blenderm) for all hinges. Clean all parts with rubbing alcohol before applying.
航模微风机型制作图纸
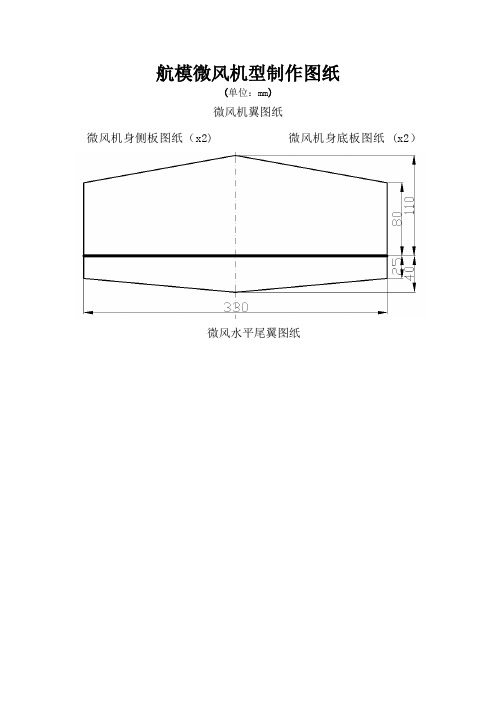
航模微风机型制作图纸
(单位:mm)
微风机翼图纸
微风机身侧板图纸(x2) 微风机身底板图纸 (x2)
微风水平尾翼图纸
微风垂直尾翼图纸
航模微风机型制作图纸从广告店做的KT板写真
用美工刀下料
用倒角刀开槽
机翼的处理方式
垂尾和加强片的制作
倒角处理过的机身精度非常好呀
假装一下
粘接机身
中间夹了一点竹条,增强机头强度,我就爱摔机头
粘接好的样子
尾翼前缘也加了竹条
塑料包装盒的直角部分
放在翼口加强正好
我的机翼是这么搞的
直角部分,机翼前缘有竹丝不用加强了。
前起落架的细节
起落架的总成
后起落架转向偏航总成
拉力线动力总成
作简单
了飞机的重心
舵机和双鱼线的链接,很大程度上减少了虚位
到现在为止,所有的地方都做好了,整体照片!。
KT板-苏27-空机制作教程

酷客航模KT板苏27 空机制作教程
首先,非常感谢您对酷客航模的支持,因为航模我们相识走在了一起。
一声兄弟,一生兄弟。
既然是兄弟就没有解决不了的问题。
感谢兄弟的陪伴,让我们更强大!
副翼、尾翼四个活动面制作
模板边缘有豁口的位置画线。
按照线的位置贴上塑料胶带
正面贴胶布后把模板反过来,同样的位置用美工刀切板子一半厚度割条缝隙,之后掰开,如图
切斜面,刚开始不熟练一定要慢些,刀子锋利注意安全。
用胶带边缘包起来加固一些。
4个舵面上下活动自如,就达到目的了。
全套板材收到机身模板后建议大家从当地广告店里买张KT板来,
按照模板画出来再拿美工刀切割出一套机身板材制作飞机。
模板留下来能做出跟多的机身模板。
首先把机身平铺于平整的桌面上把折叠的部分平铺,然后用透明胶带粘牢
用钢尺画好飞机的筋骨线
把竹签或碳纤管粘在划线位置
垂直固定侧板于线的内侧。
里侧外侧都要用胶固定结实
四周固定胶带
机头用胶重叠粘结一起,胶不要太多,速度要快,防止胶冷却变硬。
把机头插入机身,组合起来
用胶枪粘合机身机头一定要垂直
固定电池的位置
画出两个上尾翼的位置线,装了电子件以后最后装两个上尾翼
空机身制作完成。
简易航模制作步骤
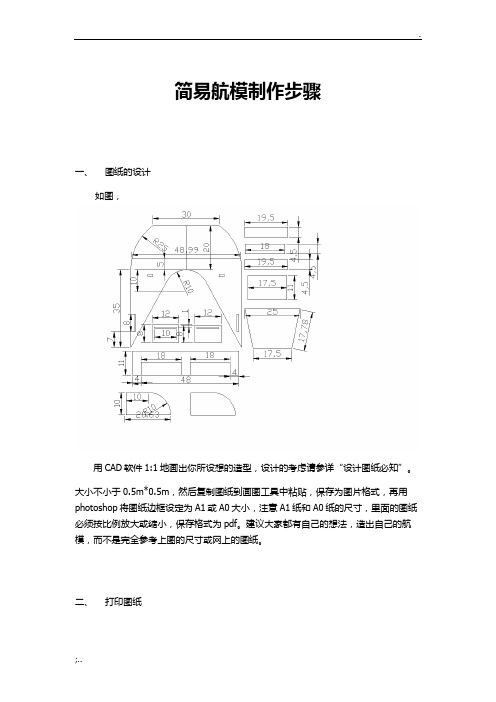
简易航模制作步骤
一、图纸的设计
如图,
用CAD软件1:1地画出你所设想的造型,设计的考虑请参详“设计图纸必知”。
大小不小于0.5m*0.5m,然后复制图纸到画图工具中粘贴,保存为图片格式,再用photoshop将图纸边框设定为A1或A0大小,注意A1纸和A0纸的尺寸,里面的图纸必须按比例放大或缩小,保存格式为pdf。
建议大家都有自己的想法,造出自己的航模,而不是完全参考上图的尺寸或网上的图纸。
二、打印图纸
Copy一份pdf文件到打印店打印,直接说是打印A1或A0的图纸或者是海报(建议打印图纸,比较便宜)。
如图
三、切零件
把打印出来的图纸用透明胶紧贴在kt板上(如上图所示),注意不能有皱折或凸起,不然切出来的零件就不成比例了。
刀具的选择很重要,选择长尖性的刀具最好,切割角度大约在45度左右,大家自己把握好哪个角度切得顺畅。
建议不要用尺子摆正,切的时候会觉得碍手碍脚的。
最后切出来的效果如图所示
四、各个零件、器件的安装
这个不能一概而论的,不同航模造型,安装步骤也各不相同。
在安装之前必须先看“固定翼飞机所需物品”以及相关视频介绍,了解所有物品的作用,然后根据安装的难易程度选择安装顺序吧。
安装好的如图所示。
KT板航模遥控飞机F制作图纸

Control points (Make 4 from old plastic credit card)
Right Elevon
Control point Cut here for rudder (Optional) Cut here for rudder (Optional)
Missile (attach to wing tip) Missile (attach to wing tip)
Battery position
Doublers (For Intake) Doublers (For Intake)
Doublers (For Intake) Doublers (For Intake)
Intake leading edge (Depron or Balsa)
Doublers used in corners
Doublers Doublers
Hatch to acces electronics and battery
Lower Front Fuse
Upper Fuse
CM
0 1 2 3 4 5 6 7 8 9 10
INCH
0
1
2
3
4
3mm or 4mm Carbon rod epoxy into V slot
Right Aileron
Control point
COG 7cm to 8cm from wing break.
Max prop size 6”
Control point Left Aileron
MOTOR MOUNT PARTS
NOTES:Bevel or curve all leading edges. Trim and sand intake to a curve. Use Hot Glue for all parts except carbon rod. Protect lower edge of intake and lower ns with packing tape. Connect both Ailerons and Elevons to a single pair of servos. Paint use colours that will stand out in the sky, don’t leave it white.
自制KT板航模遥控飞机F-22_制作教程
Page 2
1. Begin assembly with the forward fuselage. Start by carefully cutting the beveled edges on all of the forward fuselage pieces as shown on the plans. Draw a reference line on each part that’s inset from the edge the distance indicated on the plans (note you can trace the lines from an identical part onto the opposite part). Then cut the bevel with a sharp hobby knife. You can use a straightedge for the straight segments, but the curved segments will need to be cut by hand. It’s best to practice with some scrap foam first to get the hang of it before cutting the actual parts. Be sure to make mirror-image left- and right-side pieces! The beveled parts should look like the photo at lower left when done (upper forward fuselage side shown).
Page 5
5. Laminate the two fuselage centerline support pieces together (3M 77 spray adhesive recommended). Then cut bevels on the edges of the aft fuselage sides as indicated on the plans. Place the wing on a flat surface, and then glue the two aft fuselage sides and centerline piece onto the bottom of the wing as shown. Use the four temporary bulkheads provided to ensure the fuselage sides are glued on at the proper angle. Note pins can be used to hold everything together while the glues dries. I recommend using a gap-filling glue such as epoxy with microballons or ProBond for this step. Remove the temporary bulkheads once the glue dries.
- 1、下载文档前请自行甄别文档内容的完整性,平台不提供额外的编辑、内容补充、找答案等附加服务。
- 2、"仅部分预览"的文档,不可在线预览部分如存在完整性等问题,可反馈申请退款(可完整预览的文档不适用该条件!)。
- 3、如文档侵犯您的权益,请联系客服反馈,我们会尽快为您处理(人工客服工作时间:9:00-18:30)。
Lower Rear Fuse
Tail
Cut here for rudder (Optional)
Rudder (Optional) Control point Rudder Servo (Optional)
INCH
0
1
2
3
4
3mm or 4mm Carbon rod epoxy into V slot
Right Aileron
Control point
COG 7cm to 8cm from wing break.
Max prop size 6”
Control point Left Aileron
MOTOR MOUNT PARTS
Missile (attach to wing tip) Missile (attach to wing tip)
Battery position
Doublers (For Intake) Doublers (For Intake)
Doublers (For Intake) Doublers (For Intapron or Balsa)
Doublers used in corners
Doublers Doublers
Hatch to acces electronics and battery
Lower Front Fuse
Upper Fuse
CM
0 1 2 3 4 5 6 7 8 9 10
3mm PLYWOOD
Glue Plywood onto Depron
Control points (Make 4 from old plastic credit card)
Right Elevon
Control point Cut here for rudder (Optional) Cut here for rudder (Optional)
Sides (Make 2)
Doublers
F-16C FALCON - EASYBUILD - V1.02
Designed by Nick Cara
Depron = 6mm Wing span = 71cm (28”) Length = 104cm (41”)
SETUP :Weight (painted) = 356g Weight (painted and with battery) = 486g Static thrust = 650g Prop = 6x4 Motor = 2000kv ESC = 25A minimum Battery = 1350mAh 3s1p 25C Li-Po (Can take up to 2170mAh) Radio = 3CH (or 4CH with optional rudder) Aileron throw = +/- 20 degrees Elevon throw = +/- 25 degrees Expo = 45%
NOTES:Bevel or curve all leading edges. Trim and sand intake to a curve. Use Hot Glue for all parts except carbon rod. Protect lower edge of intake and lower ns with packing tape. Connect both Ailerons and Elevons to a single pair of servos. Paint use colours that will stand out in the sky, don’t leave it white.