FreeCars上位机用户手册
Transfer Flow TRAX 4 燃料管理系统用户手册说明书

Fuel Management System forTransfer Flow Auxiliary Fuel Tanks Owner’s Manual ™Table of ContentsTRAX 4™ Fuel Management System (1)TRAX 4™ Mobile App Setup (2)TRAX 4™ Status Guide (4)• Status• Distance to Empty• Fuel Tank LevelsTRAX 4™ Mobile App Diagnostics (6)Manual Fuel Transfer Button (7)Optional In-cab LCD (7)Computer Module Overview (8)Frequently Asked Questions (9)Maintenance and Troubleshooting (10)TRAX 4™ Troubleshooting Table (11)Important Safety Information (12)Transfer Flow Replacement Parts (13)Warranty (13)1444 Fortress Street, Chico, CA 95973(800) 442-0056 • (530) 893-5209Fax (530) 893-0204TRAX 4™ Fuel Management System Transfer Flow’s TRAX 4™ is a computer-controlled, self-diagnosing auxiliary fuel system that automatically transfers fuel from the auxiliary tank to the main tank using our exclusive AutoTrans® technology. The TRAX 4™ system also monitors the vehicle’s fuel system status and the fuel levels of each tank. TRAX 4™ transfers fuel as needed with an electric fuel pump at a rate of one gallon every three minutes.Fuel System OverviewThe TRAX 4™ system will transfer fuel at predetermined fuel levels while the vehicle is in use, based on the individual vehicle fuel system calibration and size of the Transfer Flow auxiliary fuel tank. The fuel level in the main tank and auxiliary tank will decrease at similar rates. If the mobile app is being used,the gallons or percentage of fuel in each tank will be displayed on your mobile device, as well as the operational status of the system, and miles to empty.In normal operations, the message “ALL GOOD” will be displayed under Fuel System Status on your home screen. During fuel transfer, the message “PUMP ON” will be displayed. If there is an issue with the fuel system, the message “ERROR” will be shown.If you prefer not to use the TRAX 4™ mobile app, you may wantto consider our in-cab fuel level monitor LCD. The LCD shows the fuel level of the auxiliary tank with an easy-to-read bar graph that decreases when fuel is transfered to the pickup’s main fuel tank.TRAX 4™ Mobile App SetupApp Setup Menu Follow these easy-to-follow steps to get your TRAX 4™ mobile app and your auxiliary fuel tank system up and running!Step 1Download the TRAX 4™ mobile app from Google Play or iPhone App Store to your smart phone. Step 2Open the app on your mobile device. Press the three white vertical dots located on the blue bar. Step 3Select “Connect/Disconnect” from the drop down menu (fig. 1).Step 4 Select “Connect” from the drop down menu (fig. 2).Step 5 Select the device for your vehicle (TRAX 4™), and click connect. Step 6 If this is the first time setting up, see Bluetooth setup instructions on page 3. Step 7 Select “Setup” from the drop down menu. Step 8The Calibration Information window should open up (fig. 4). Enter the fuel tank part number (see label on the back of this User’s Guide or sales invoice for part number). Step 9Enter the gallons of your main fuel tank (see your vehicle’s User’s Guide for gallon information). Step 10Select “Fuel Display Setting”. Choose either Gallons or Percentage. Step 11Enter your vehicle’s MPG (Miles Per Gallon). Step 12 Make sure information entered is correct, then press the blue Confirm button.fig. 4fig. 2fig. 3fig. 1fig. 5Menu You can access the dropdown menu bar by pressing the three white vertical dots located on the blue bar. Below is a brief description of each item.Home - This is the main screen that displays current Trax 4™ Status, Distance to Empty, and Fuel Tank LevelsSetup – This screen is used to configure Trax 4™.Trouble Shooting – If you have an error with Trax 4™, this screen displays additional trouble shooting details. This is not available if you do not have a currently active error.Connect/Disconnect – Used to connect your mobile phone to Trax 4™.Diagnostics Data – Contains additional diagnostic information about Trax 4™.Quit – Used to quit the Trax 4™ app.Bluetooth Setup Menu The TRAX 4™ mobile app utilizes Bluetooth to connect to the TRAX 4™ module. When the app first opens, it may ask you to turn on Bluetooth and/or pair with the TRAX 4™ module. The screen will look similar to fig. 5. To connect, follow these steps:Step 1Open App Step 2 Click OK to be paired with TRAX 4™. Step 3 Enter PIN 123456 (fig. 6). Step 3 Click OKIn most cases the app should automatically connect to module. If you are not asked to pair to TRAX 4™, select “Connect/Disconnect” from the drop down menu to manually connect to the TRAX 4™ module.Only one device at a time may be paired to the TRAX 4™ module. Make sure no other devices are connected or are attempting to pair.fig. 6TRAX 4™ Status Guide Status Under normal circumstances, and when the system is not transferring fuel, the message “ALL GOOD” will be displayed under the “Status” on your home screen. During fuel transfer, the message “PUMP ON” will be displayed. If there is an issue with the fuel system, a red “ERROR” button will be displayed. Click on this button to see the Diagnostic Trouble Codes (DTCs). Other messages that may appear include “NOT PAIRED”, and “ENGINE OFF”. See fig. 7 below for more information.Distance to Empty Distance to Empty (DTE) calculates the approximate distance you can drive with the combined amount of fuel remaining in the main and auxiliary tanks. This calculation is based off of the average fuel consumption with the amount of fuel left in the fuel tanks. If you do not enter your MPG in the setup screen, “XX” will appear as your distance to empty. DTE is based on a user-entered MPG value. This is meant to be an approximation and should not be trusted in low fuel situations.Fuel Tank LevelsThe TRAX 4™ system will transfer fuel at predetermined fuel levels while the vehicle is in use, based on the individual vehicle fuel system calibration and size of the Transfer Flow auxiliary fuel tank (fig. 8).To change gallons to percentage of fuel in each tank, tap on the gallons/ percentage values or by changing the fuel display settings in the setup screen.TRAX 4™ Mobile App Diagnostics DTC Log The DTC Log screen is accessed via the diagnostics data screen and clicking “View DTC Log”. This screen contains history of error readings and is useful for relaying issues to Transfer Flow’s techsupport.Diagnostic Data The Diagnostic Data screen displays information useful to Transfer Flow’s tech support if you are unable to resolve an issue with your TRAX 4™ operating system. This screen can be accessed by clicking “Show Diagnostic Data” on the troubleshooting screen, or by accessing it through the “Diagnostics Data” menu.Error Codes The Error Codes screen will only be available when there is an error with the TRAX 4™ system. You can access this screen by clicking the error icon on the home screen or through the“Troubleshooting” menu.fig. 10fig. 11When performing any diagnostics on the vehicle through the OBDII port (smog check diagnostics, ECU flashes, and any remote automated ser -vices) the TRAX 4™ system must be disconnected.Important Vehicle Diagnostic NoteOptional In-Cab LCDFuel Level Monitor LCD If you prefer not to use our TRAX 4™ app with your auxiliary tank but still want to know how much fuel is in the auxiliary tank, consider our in-cab fuel level monitor LCD. The LCD shows the fuel level of the auxiliary tank with an easy-to-read bar graph that decreases when fuel is transfered to the pickup’s main fuel tank. The LCD can be used in conjunction with the TRAX 4™ mobile app, or by itself. This item is sold separately.Fuel Level Monitor LCD (part no. 040-01-17100)fig. 14You can use the Manual Fuel Transfer Button (fig. 12) to manually transfer fuel. When the button is pressed, and the main tank is below 85%, the pump will turn on for a five minute cycle or until the main tank’s fuel capacity is at 85% or above. As a safety feature to prevent overfilling, the button will not do anything when the main tank is over 85%. Pressing the button again will turn off the pump. The red light around the button indicates when the fuel pump is on, and fuel is being transferred (fig. 13).If the red light around the button is blinking, the system is in an error mode. To troubleshoot the issue, open the mobile app and consult the trouble shooting tab, or call tech support at (800) 442-0056.Manual Fuel Transfer Button fig. 12fig. 13Computer Module Overviewfig. 15Frequently Asked QuestionsHow accurate is my main tank fuel gauge after installing TRAX 4™? The accuracy of the main fuel gauge will not change.I previously bought a Transfer Flow auxiliary tank. Can I transfer it to my new truck?It depends on the truck you are buying. TRAX 4™ is only available for 2008 to current model years. You may need to purchase a re- installation kit. Call our fuel system experts for more information at (800) 442-0056.Why do I see my fuel level percentage fluctuate ±10% in the first two minutes of operation?The module is rapidly calculating the fuel level in each tank to determine the most accurate value. Fluctuations should slow after a few minutes of operation. Why is “ERROR” displaying when my system is brand new or the filter is clean?This may be due to an individual’s driving habits, driving conditions, or fuel sloshing in the main or auxiliary tank. The “ERROR” condition will reset after 20 minutes or by cycling the ignition (turning it off then on again).The fuel levels displayed on the mobile app change when cornering hard or during other rapid motions. Is this normal?Yes, your Transfer Flow fuel tank system has been designed to keep fuel sloshing to a minimum. However, it is not possible to completely eliminate all fuel sloshing. Many times, you will find that fuel sloshing will be greater in the main tank compared to the Transfer Flow tank. This is because the Transfer Flow tank is fully baffled while most main tanks are not. In either case, you should not see a fuel level change of more than ±10%, except under periods of high cornering, braking, or acceleration loads. If your main tank is close to empty, you may see your vehicle’s low fuel light turn On and Off.If the TRAX 4™ system develops a problem, what do I do?Consult the troubleshooting table on Page 11 or deactivate the system by disconnecting the power to the computer module, located near the OBDII connector/port. Reference the “TRAX 4™ Computer Module Overview” diagram on Page 8; disconnect the red OBDII connector that goes to the Transfer Flow wire harness. The vehicle will now operate from the main tank only. Please call Technical Support at (800) 442-0056 x2 or (530) 893-5209 x2 if you ever have this issue.Maintenance and Troubleshooting Filter MaintenanceTo replace the auxiliary fuel tank filter, remove the cover box to access thein-line filter and fuel hoses. Be certain that the filter is in the right direction. Replace the filter with one listed in Filter Replacement Options below. Replacement after initial installation:The fuel filter should be replaced within 3 to 6 months after installation. Transfer Flow includes an extra filter with your initial purchase.Routine filter replacement:Transfer Flow recommends the filter be replaced every 12 months on vehicles that see normal use. If the vehicle is operated in dusty conditions or driven more than 20,000 miles per year, the filter should be changed every 6 months. Vehicles traveling outside the United States and Canada may be exposed to filling stations containing elevated levels of contaminants. It may be wise to carry spare filters when traveling outside of the country.Filter Replacement Options:Use NAPA 3270, WIX 33270 or Transfer Flow part no. 070-FL-33617.If the mobile app displays “LOW FLOW” after replacing the filter, please call technical support at (800) 442-0056 x2 or (530) 893-5209 x2.“Critical Failure/Disconnect Power”If the app or display shows “CRITICAL FAILURE/DISCONNECT POWER,” the user should deactivate the system by disconnecting the power to the computer module, located at OBDII connector port. Reference the “TRAX 4™ Computer Module Overview” diagram (fig. 13) on Page 8; disconnect the red connector at the OBDII port. Please call Technical Support if you experience this issue.Transfer Flow Technical Support:(800) 442-0056 x2 or (530) 893-5209 x2Manual operation of the TRAX 4™ mobile app or in-cab display while driving could lead to unsafe driving conditions which can cause an accident or a serious injury. Observing the screen should only be done when it is safe to do so. Mounting the TRAX 4™ display and routing the wire harness should be done where the driver’s view or operation of the vehicle cannot be obstructed.Important Safety InformationFilling Fuel Tank:• Never fill a fuel tank near a flame or ignition source which might ignite the fuel vapors. • Never fill the OEM or Transfer Flow auxiliary fuel tank with the engine or ignition turned on. • Avoid breathing fuel vapors or allowing fuel to contact the skin. • Always fill fuel tanks while the vehicle is on a flat level surface. • Always open the fuel cap slowly to allow any pressure to escape. • Never overfill or “top-off” any fuel tank. Overfilling the fuel tank may cause damage to the emissions system, cause dangerous spills and possibly result in a fire. The Transfer Flow TRAX 4™ system may also shut down in the event of a “top off” condition. • Never siphon fuel using the mouth, as this practice is dangerous and potentially fatal. Use an appropriate pump. • Never allow fuel to contaminate soil or waterways. Properly contain and dispose of spilled fuels and cleanup materials.Other Important Safety Information: • Use only Transfer Flow replacement parts. Many parts of our fuel system appear common, but are actually special parts which are critical for safe operation. See Page 9 for more information. • Disconnect the battery before working on Transfer Flow fuel systems. • Never modify or over-pressurize a fuel tank. • Do not grind, torch, weld, cut, or modify a fuel tank. • Do not sleep or let pets stay in a pickup with a camper shell that contains an in-bed fuel tank system. • Do not smoke near a fuel tank. • Never connect a TRAX 4™ system to a previously modified fuel system.TRAX 4™ is designed to work only with Transfer Flow auxiliary fuel tanks. Under no circumstance should TRAX 4™ be used in conjunction with amodified fuel tank system or other aftermarket fuel tank systems.Transfer Flow Replacement Parts Transfer Flow fuel systems are designed to work only with specific components which have been selected for their unique properties. Years of design work have produced the finest auxiliary fuel system available that relies on relatively few, but critical parts. The components used in Transfer Flow fuel systems are not generic or “off the shelf” parts and cannot be replaced with parts that appear to be similar.For example, the in-line fuel pump used with our TRAX 4™ system appears to be a normal fuel pump, but it is actually a high-quality solenoid pump with a critical forward and reverse check feature. Under no condition should any other pump be substituted for the provided pump.This auxiliary fuel system has been outfitted with a replaceable fuel filterthat requires periodic service. The filter is available though automotive parts retailers and is not covered by Transfer Flow’s warranty. The filter should be inspected/replaced every 3–6 months depending on the conditions that the vehicle is operated in and the quality of fuel purchased. Transfer Flow will not honor warranty claims from diagnosis or replacement of obstructed filters.24-Hour Emergency Technical Help:Contact Transfer Flow at (800) 442-0056 x9 or (530) 893-5209 x9 if your Transfer Flow auxiliary fuel system fails to operate properly, or if you have any questions regarding parts replacement.6 Year, Unlimited Mile WarrantyTransfer Flow fuel systems and vehicle accessoriesare covered by a six year, unlimited mile warrantyagainst defects in material and workmanshipthroughout the U.S. and Canada from the unitpurchase date by the original purchaser for theoriginal vehicle the unit was installed in.For specific information regarding part exceptions,exclusions and limitations, warranty claimprocedures, and federal regulatory provisions, please see our fullwarranty details on our website at /warranty.1444 Fortress Street, Chico, CA 95973(800) 442-0056 • (530) 893-5209PRINTED IN USA REV 9/11/2020IMPORTANT SETUP INFORMATION Please use the 10-digit part below when calibrating the TRAX 4™ mobile app to yourspecific vehicle.TFI USE ONLY APPLY 080 LABEL HERE。
Free pascal使用手册

程序设计入门
Free Pascal语言系统的使用 Pascal语言系统的使用
目前,常用的Pascal语言系统有Turbo 目前,常用的Pascal语言系统有Turbo PASCAL 7.0 与Free Pascal1.0.10( Lazarus0.9包含Freepass Lazarus0.9包含 包含Freepass 1.0.10)及 ,下面我们就来学习Free 1.0.10)及Borland Pascal ,下面我们就来学习Free Pascal 1.0.10系统的使用. 1.0.10系统的使用. 1. 系统的启动 在运行系统目录下的bin目录下,启动程序fp.exe, 在运行系统目录下的bin目录下,启动程序fp.exe, 即可启动系统.
程序设计入门
3. 新建程序窗口 按F10进行主菜单,选择FILE菜单,执行其中New命令. F10进行主菜单,选择FILE菜单,执行其中New命令. 就可建立一个新的程序窗口(默认文件名为Noname00.pas或 就可建立一个新的程序窗口(默认文件名为Noname00.pas或 Noname01.pas等). Noname01.pas等). 其他操作:窗口的最大化, 其他操作:窗口的最大化,关闭窗口
Free Pascal使用手册 Pascal使用手册
程序设计入门
Free Pascal的运行环境 Pascal的运行环境
概 况 如何启动 窗口介绍 新建程序窗口 程序的输入,编辑, 程序的输入,编辑,运行 程序的保存与打开 常见问题集锦
为了帮助保护您的隐私,PowerPoint 禁止自动下载此外部图片.若要下载并显示此图片,请单击消息栏中的 "选项",然后单击 "启用外部内容 ".
程序设计入门
Nauticast A2 船舶自动化系统用户手册说明书
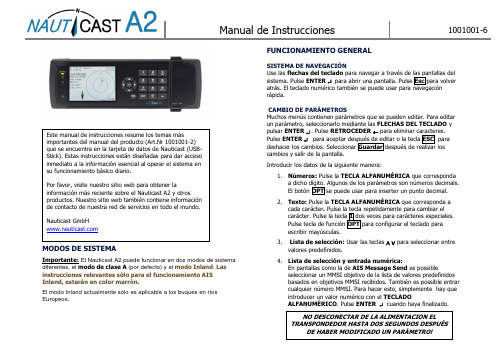
MODOS DE SISTEMAImportante: El Nauticast A2 puede funcionar en dos modos de sistema diferentes, el modo de clase A (por defecto) y el modo Inland . Las instrucciones relevantes sólo para el funcionamiento AIS Inland, estarán en color marrón.El modo Inland actualmente sólo es aplicable a los buques en ríos Europeos.FUNCIONAMIENTO GENERALSISTEMA DE NAVEGACIÓNUse las flechas del teclado para navegar a través de las pantallas del sistema. Pulse ENTER ↵ para abrir una pantalla. Pulse Esc para volver atrás. El teclado numérico también se puede usar para navegación rápida.CAMBIO DE PARÁMETROSMuchos menús contienen parámetros que se pueden editar. Para editar un parámetro, seleccionarlo mediante las FLECHAS DEL TECLADO y pulsar ENTER ↵ . Pulse RETROCEDER ← para eliminar caracteres. Pulse ENTER ↵ para aceptar después de editar o la tecla ESC para deshacer los cambios. Seleccionar Guardar después de realizar los cambios y salir de la pantalla.Introducir los datos de la siguiente manera:1. Números: Pulse la TECLA ALFANUMÉRICA que correspondaa dicho dígito. Algunos de los parámetros son números decimals. El botón OPT se puede usar para inserter un punto decimal. 2. Texto: Pulse la TECLA ALFANUMÉRICA que corresponda acada carácter . Pulse la tecla repetidamente para cambiar el carácter. Pulse la tecla 1 dos veces para carácteres especiales. Pulse tecla de función OPT para configurar el teclado para escribir mayúsculas. 3.Lista de selección: Usar las teclas ∧ ∨ para seleccionar entrevalores predefinidos. 4. Lista de selección y entrada numérica:En pantallas como la de AIS Message Send es possibleseleccionar un MMSI objetivo de la lista de valores predefinidos basados en objetivos MMSI recibidos. También es possible entrar cualquier número MMSI. Para hacer esto, simplemente hay que introducer un valor numérico con el TECLADOALFANUMÉRICO . Pulse ENTER ↵ cuando haya finalizado.Este manual de instrucciones resume los temas más importantes del manual del producto (Art.Nr 1001001-2) que se encuentra en la tarjeta de datos de Nauticast (USB-Stick). Estas instrucciones están diseñadas para dar acceso inmediato a la información esencial al operar el sistema en su funcionamiento básico diario.Por favor, visite nuestro sitio web para obtener lainformación más reciente sobre el Nauticast A2 y otros productos. Nuestro sitio web también contiene información de contacto de nuestra red de servicios en todo el mundo.Nauticast GmbH NO DESCONECTAR DE LA ALIMENTACIÓN EL TRANSPONDEDOR HASTA DOS SEGUNDOS DESPUÉSDE HABER MODIFICADO UN PARÁMETRO!ANTES DEL VIAJEAJUSTAR PARÁMETROS RELACIONADOS CON EL VIAJELos parámetros relacionados con el viaje, se configuran desde la pantallaAIS Voyage, cualse accede desde Menú principal →Travesia →Rumbo AIS .CONVOYS – SÓLO AIS INLANDCuando se cambia la estructura del convoy es necesario actualizar las dimensiones del buque AIS.Ajustar tamaño del convoy “Modo Simplificado ”Introducir cuantas barcazas adjuntas se suman a las dimensiones totales del convoy en la pantalla Menú principal → Travesia → Caracteristicasdel ConvoyAjustes a las dimensiones totales del convoyAjustar tipo del buque ERI o tipo del convoyIntroducir el corriente tipo del buque ERI o tipo del convoy en la pantalla Menú principal → Configuratión → Datos Estáticos.DURANTE EL VIAJEAJUSTAR ESTADO DE NAVEGACIÓNAbra el menú Menú principal →Travesia →Rumbo AIS . Selecciones el correcto Estado de Navegación, pulse Guardar para ajustar el nuevo estado y salga.Alternativamente: Entrar en el menú Menú principal y pulse la tecla OPT para ajustar el Estado de Navegación rápidamente.BRILLO Y ATENUACIÓNAjustar la atenuación de los LCD y LED y los modos día / noche en el menú: Menú principal → Configuratión → Presentación → Visual Pulsar la tecla OPT durante 5s para restablecer los valores de brillo predeterminados.RECONOCIMIENTO DE LAS ALARMAS ACTIVASUse la tecla ENTER para reconocer indicaciones de la alarma en la pantalla.ASIGNAR MODO DE OPERACIÓNBajo ciertas condiciones muy especiales, puede ser necesario desactivar las transmisiones de VHF. No deje el sistema en este estado más tiempo del estrictamente necesario.Desactivar Tx en el softwareAbrir la pantalla Menú principal → Modo de Opereatión y poner Tx Mode en “Silent ”Desactivar Tx en hardwareAlgunas instalaciones NAUTICAST A2 pueden tener un interruptor físico de transmisión externa para este propósito. Tx Mode en la pantalla Menú principal → Modo de Opereatión será “Silent Switch Used ” y el Tx mode sólo puede ser cambiado accionando el interruptor físico. Consultar el manual de usuario completo para detalles relacionados con la instalación y funcionamiento del interruptor externo.MANEJO DE SRM & MENSAJES DE TEXTOLos mensajes relacionados con seguridad (SRMs) y mensajes de texto se pueden enviar a los objetivos específicos (mensajes dirigidos) o transmitidos a todos los objetivos.La manipulación de los mensajes se hace en la pantalla AIS Messages accesible desde el menú Menú principal→ Mensajes → Mensajes AIS: Un símbolo de carta se mostrará en la barra de estado cuando se reciba un mensaje.VER LISTA DE OBJETIVOS AISAbrir Menú principal→ Lista de BlancosSeleccionar objetivos usando las FLECHAS DEL TECLADO.PulseOPTpara escribir un mensaje relacionado con seguridad (SRM) dirigido a un objetivo seleccionado.Pulse ENTER↵ para ver información extendida sobre el objetivo. NOTA: La información extendida sólo puede ser transmitida cada 6minutos. Por lo tanto los objetivos más recientes pueden no tener información completa.VER GRÁFICO DE OBJETIVOS AISAbrir Main Menu→ GraficoEl gráfico puede ser ampliado o reducido con las teclas ∧y ABAJO ∨ en las FLECHAS DEL TECLADO. Usar las teclas > e < para pasar entre los objetivos. Pulse OPT para escribir un mensaje relacionado con seguridad (SRM) dirigido al objetivo seleccionado.SÍMBOLOS OBJETIVO (LISTA DE OBJETIVOS Y GRÁFICO) Buque proprio (vista de gráfico)Buque (Clase A)Buque (Inland, Signo Azul N/A)Buque (Inland, Signo Azul Off)Buque (Inland, Signo Azul On)Buque (Clase B)Estación baseSARAyudas a la navegación (Aton)Virtual ayudas a la navegaciónSARTICONOS DE LA BARRA DE ESTADOSÍMBOLOS DE MENSAJESMensaje AIS no leído (Mensaje relacionado con seguridad o mensaje de texto)Mensaje de largo alcance no leído (respuesta automática) Mensaje de largo alcance no leído (respuesta manual) ESTADO DE NAVEGACIÓN (ICONOS DE EMBARCACIÓN PROPIOS)Estado de navegación indefinido En viaje, motorizadoEl estado de navegación es uno de estos: Sin orden, Capacidad de maniobra limitada, Limitado por la marea, Encallado, Pescando, En viaje, a vela; Reservado para uso futuro. Fondeado o amarrado. SÍMBOLOS VARIOS Alert Status IconAlertas activas (no reconocido)Alertas activas (y silenciada, no reconocido) Alertas activas (reconocido) Activo, Precaución1W modo (Disponible sólo si el tipo de buque es = Tanque / Cisterna, Estado de navegación=Amarradoylavelocidaddelbuque es inferior a 3 nudos.Signo azul OnSigno azul OffModo silencioso activado, ya sea con Tx Mode o interruptor.Menú de árbol del NAUTICAST A2 AISNota: ETA/RTA, niveles de agua y convoy son sólo visibles en modo delAguas Interiores.。
EtherCAT C2S-EC 系列 总线阀岛 用户手册说明书

EtherCATC2S-EC系列总线阀岛用户手册南京实点电子科技有限公司C2S-EC系列总线阀岛用户手册版权所有© 南京实点电子科技有限公司2023。
保留一切权利。
非经本公司书面许可,任何单位和个人不得擅自摘抄、复制本文档内容的部分或全部,并不得以任何形式传播。
商标声明和其它实点商标均为南京实点电子科技有限公司的商标。
本文档提及的其它所有商标或注册商标,由各自的所有人拥有。
注意您购买的产品、服务或特性等应受实点公司商业合同和条款的约束,本文档中描述的全部或部分产品、服务或特性可能不在您的购买或使用范围之内。
除非合同另有约定,实点公司对本文档内容不做任何明示或默示的声明或保证。
由于产品版本升级或其他原因,本文档内容会不定期进行更新。
除非另有约定,本文档仅作为使用指导,本文档中的所有陈述、信息和建议不构成任何明示或暗示的担保。
南京实点电子科技有限公司地址:江苏省南京市江宁区胜利路91号昂鹰大厦11楼邮编:211106电话:4007788929网址:目录1产品概述 (1)1.1产品简介 (1)1.2产品特性 (1)2命名规则 (2)2.1命名规则 (2)2.2型号列表 (3)3产品参数 (4)3.1通用参数 (4)4面板 (5)4.1产品结构 (5)4.2指示灯功能 (6)5安装 (7)5.1外形尺寸图 (7)5.2电磁阀装配顺序 (8)6接线 (9)6.1电磁阀接线 (9)6.2电源接线 (12)6.3总线接线 (13)7使用 (14)7.1控制方式 (14)7.2诊断功能 (15)7.3参数说明 (17)7.3.1输出信号清空/保持功能 (17)7.4组态模块应用 (17)7.4.1在TwinCAT3软件环境下的应用 (17)7.4.2在Sysmac Studio软件环境下的应用 (29)7.4.3在AutoShop V4.8.1.0软件环境下的应用 (39)8FAQ (54)8.1设备在软件中无法找到 (54)8.2设备无法进入OP状态 (54)1产品概述1.1产品简介C2S-EC系列阀岛是一款集阀岛技术和EtherCAT总线技术为一体的控制模块,通过该产品可实现工业现场的分散控制和集中管控,优化系统设计,施工快捷,简化复杂系统的调试、性能检测和诊断维护工作。
停车场收费管理系统用户使用手册
IC卡标准版停车管理系统用户使用手册目录1、概述 (3)2、系统整体说明 (3)2.1、硬件环境: (3)2.2、软件环境: (3)3、停车管理系统数据库SQL Server 2000安装 (3)4、停车系统的安装步骤 (100)4.1软件的安装 (100)4.2创建数据库 (122)5、停车管理系统各个模块的详细说明 (13)5.1、登陆 (13)5.2、关于我们 (13)5.3、系统管理 (14)5.3.1、基本设置 (14)5.3.2、卡类型管理 (15)5.3.3、修改口令 ........................................................................... 错误!未定义书签。
5.3.4、操作员管理 (16)5.3.5、操作日志 (16)5.3.6、数据库维护 (17)5.3.7、系统初始化 (18)5.4、设备管理 (19)5.4.1、设备登记 (19)5.4.2、设备基本设置 (20)5.4.3、费率设置 (21)5.4.5、数据采集 (25)5.4.6、实时采集 (25)6、帐户管理 (26)6.1、帐户开卡 (26)6.2、帐户充值 (27)6.3、修改卡片 (28)6.4、帐户换卡 (29)6.5、卡片注销 (30)6.6、帐户挂失 (31)6.7、帐户解挂 (32)6.8、帐户浏览 (33)6.9、读卡信息 (35)6.10、黑名单 (36)6.11、已销卡回收 (37)7、报表中心 (38)7.1、卡片信息表 (38)7.2、销卡信息表 ........................................................................... 错误!未定义书签。
7.3、换卡信息表 ........................................................................... 错误!未定义书签。
海洛斯操作手册(说明书)

HIROSS恒温恒湿机房精密空调操作手册HIMOD系列北京****科技有限公司技术部2009年01月01日目录第一章HIMOD系列海洛斯空调概述 (2)型号多 (3)控制技术先进 (3)制冷系统 (3)送风系统 (3)加湿系统 (3)加热系统 (4)1.7其它 (4)第二章HIMOD系列海洛斯空调型号含义 (4)第三章有关空调的一些资料 (5)气流组织方式(详见下图) (5)盖板纽开启方式(详见下图) (5)空调重量(单位:Kg) (5)机组尺寸及维护空间 (6)第四章制冷循环管路示意图 (7)风冷却(A型) (7)水冷却(W型) (8)双冷源(D型) (9)单系统(C型) (10)双系统(C型) (10)第五章调速风机调速接线示意图 (11)第六章MICROF ACE概述 (12)概述 (12)面板简介液晶显示屏 (13)液晶显示屏介绍 (13)第七章MICROF ACE面板的操作 (13)第八章控制器的使用 (14)控制器(HIROMATIC)概述 (14)控制器的操作 (15)菜单结构 (17)第九章日常维护及特殊维护 (18)日常维护 (18)特殊维护 (19)第十章常见报警及处理 (20)低压报警 (20)高压报警 (21)加湿报警 (21)失风报警 (21)电加热过热报警 (22)显示器发黑 (22)空调不制冷 (22)附录1:参数列表 (22)附录2:报警内容列表 (26)附录3:各菜单项含义: (28)第一章HIMOD系列海洛斯空调概述HIMOD系列海洛斯空调(HIMOD空调)是当今世界上最先进的机房专用恒温恒湿机房专用精密空调。
随着IT业的突飞猛进的发展,各种布局、面积差别很大的机房如雨后春笋般纷纷出现了,使用环境也不一而同。
为适应各种不同要求的机房,新开发的海洛斯HIMOD系列空调应运而生。
她是在保留她的前一代产品HIRANGE系列机房空调的优点,又应用了当今世界上提高了的制冷技术及制冷部件制造工艺,使用当今最先进的模块化设计理念生产出来的高科技机房空调产品。
Cascade Turn-A-Fork 40D-CTS-190用户操作手册说明书

Parts Manual cFor Technical Assistance call: 800-227-2233, Fax: 888-329-8207 To Order Parts call: 888-227-2233, Fax: 888-329-0234Turn-A-Fork 40D-CTS-190ModelSerial Number cascadeாcorporation40DPART NO.DESCRIPTION669224Service Manual 672944Operator’s Guide680664Servicing Cascade Cylinders-VHS 679929Tool Catalog673964Literature Index Order FormSafety DecalsPart No. 672046681597Base Unit Group – ITA III 12210436Hose - 24.75 in.22210449Hose - 18.25 in.31601377Fitting, 8-8426230Washer 58611288Fitting, 6-862671222Capscrew 724749Capscrew 82555435Cylinder w 927882Roll Pin - Inner 1027961Roll Pin - Outer 111667659Framew See Cylinder page for parts breakdown.Reference:Common Parts Group 675282.128667225Washer 138667644Capscrew 141678679Bumper 152665707Nut, 1/2 NC 162640699Capscrew 174667661Bearing 184667663Bearing 194667662Bearing201680628Mounting Plate - RH ITA III 211680627Mounting Plate - LH ITA III 221674167Frame – Lower40DREF QTY PART NO.DESCRIPTIONREF QTY PART NO.DESCRIPTIONBase Unit GroupCylinder40DREF QTY PART NO.DESCRIPTION555435Cylinder Assembly 126511s Cotter Pin22667667s Nut Retainer32667668s Nut41555436Shell51602580Fitting61558400Piston712716v O-Ring81662454v Seal912787v O-Ring101615130v Back-Up Ring 111667917Retainer121662448v Seal131638243v Nylon Ring 141636853v Wiper151667623Nut161555437Rod171555439Washer181667609Restrictor Cartridge q 191555440Retaining Ring 201671048v Seal Loader, Piston 211671051v Seal Loader, Retainer667995Service Kitv Included in Service Kit 667995.s Included in Nut Service Kit 668925.q Not included in Cylinder Assembly.Ref: S-6055, S-6056.Check Valve676428Valve Group - Sideshift667475Check Valve - Sideshift★11667470Special Fitting212841O-Ring●31667471Spool43609455Fitting51667476Valve Body61667078Relief Valve – 2000 PSI72667516Service Kit●81661347Service Kit●92659058Check Valve - P.O.●Included in Service Kit 668868.★Contains items 1-12 only.■For eliminating regeneration circuit only.101678270Check Valve - V.P.O.111604510Fitting, 6121667510Seal Kit131669999Bracket141670000Guard154670004Capscrew, .5 NC x 1.25 1646232Washer171676343Regeneration Plug■182667609Restrictor Cartridge192604511Fitting40DREF QTY PART NO.DESCRIPTION REF QTY PART NO.DESCRIPTIONRestrictor CartridgeREF QTY PART NO.DESCRIPTION667609Restrictor Cartridge 112701O-Ring21667611Plunger312841O-Ring41667610Plug – Special515716Jam Nut6032688Arm Group – RH6032687Arm Group – LH110607105Capscrew, 3/4 NC x 2.00 GR8 1672041Actuator – RH21672040Actuator – LH31669197Arm Bar – Upper467401Grease Fitting517192Snap Ring61600305Selector71600315Crank81600316Pin92600313Bushing101672043Bell Crank Assembly 111600312Bushing122672047Spring1672051Cover – RH131672050Cover – LH1424780Capscrew, 5/8 NC x 1.25 GR815124309Capscrew, 1/2 NF x 2.25 16126374Lockwasher171669205Bearing1812815O-Ring16032686Arm – RH1916032685Arm – LH201621248Bushing211602025Wear Plate221600318Detent Pin231600319Detent Spring1672037Arm Carrier – RH 241672034Arm Carrier – LH 2525721Nut2623385Capscrew, 3/4 NF x 1.75 271669200Arm Bar – Lower281672045Washer2913128Snap Ring302201816Washer40DREF QTY PART NO.DESCRIPTION REF QTY PART NO.DESCRIPTIONBolt-On Mounting GroupClass IIIREF QTY PART NO.DESCRIPTION678935Lower Hook Group12675969Lower Hook24667225Washer, 5/8 in. ID34667369Capscrew, 5/8 NC x 1.25 GR 5 Reference: S-3197.Mounting Plates with Bolt -On Upper HooksREF QTY PART NO.DESCRIPTION1 1 680627 Mounting Plate Assembly–LH q2 1 680628 Mounting Plate Assembly–RH s3 1 6002745 Upper Hook–LH4 1 211157 Upper Hook–RH5 4 772193 Capscrew, M20 x 35q Includes items 3 and 5.sIncludes items 4 and 5.cDo you have questions you need answered right now? Call your nearest Cascade Parts Department.Visit us online at Cascade Corporation 2501 Sheridan Avenue Springfield, OH 45505Tel:888-CASCADE (227-2233)FAX: 888-329-0234Sales RussiaEMCG Material Handling Equipment MoscowTel: 095-795-2400FAX: 095-795-2475Email:***********Cascade (Singapore)Trading Co.Four Seasons ParkAutumn Block - Apt. 180212 Cuscaden Walk SingaporeTel: 65-834-1935FAX: 65-834-1936Cascade-XiamenNo. 668 Yangguang Rd.Xinyang Industrial Zone Haicang, Xiamen City Fujian Province P.R. China 361026Tel: 86-592-651-2500FAX: 86-592-651-2571Cascade New Zealand 15 Ra Ora DriveEast Tamaki, Auckland New Zealand Tel: 9-273-9136FAX: 9-273-9137Cascade Australia 1445 Ipswich Road Rocklea, QLD 4106AustraliaTel: 1-800227-223FAX: (07) 3373-7333Cascade Korea108B Namdong Ind. Complex 658-3 Gojan-Dong Namdong-GuInchon, 405-310 Korea Tel: 82-32-821-2051FAX: 82-32-821-2055Cascade Japan Ltd.5-5-41,Torikai Kami Settsu, Osaka Japan, 566Tel: 81-726-53-3490FAX: 81-726-53-3497Cascade (Africa) Pty. Ltd.PO Box 625, Isando 160060A Steel RoadSparton, Kempton Park South Africa Tel: 975-9240FAX: 394-1147Sales Poland Targowa 35/6103-728 Warszawa Tel: 022-619 00 49FAX: 022-619 00 49Mobile Phone: 0501-27 29 55Sales Switzerland Fahrzeugbedarf 8810, Horgen SwitzerlandTel: 01-7279797FAX: 01-7279798Sales Portugal FAG Santos Lda Rua do Mercado Lte 6, Loja 2-Tires 2785-630S. Domingos De Rana PortugalTel: 214-448-083FAX: 214-458-098Sales Italy Via Ponzano 1150047 Prato ItalyTel: 0574-571726FAX: 0574-571726Mobile Phone: 0337-673029Cascade Hispania S.A.Carrer 5, Sector C Zona Franca DuaneraPoligono de la Zona Franca 08040 Barcelona SpainTel: 93-264-07-30FAX: 93-264-07-31Cascade France S.A.R.L. MHP1D Rue De Charaintru BP 18,91360 Epinay-Sur-Orge FranceTel: 01-6454-7500FAX: 01-6454-7501Cascade Scandinavia AB Hammarvägen 10PO Box 124S-56723 Vaggeryd SwedenTel: 039-336950FAX: 039-336959Sales ScotlandMacade Systems Ltd.18 Melford Road Righead Ind. Estate Bellshill ML4 3LR ScotlandTel: 01698-845777FAX: 01698-845888Cascade (UK) Ltd.Unit 5, Eden CloseHellaby Lane Ind. Estate Heellaby,Rotherham S66 8RW EnglandTel: 01709-704500FAX: 01709-704501Cascade N.V.Benelux Sales and Service Damsluisweg 56PO Box 30091300 El Almere The Netherlands Tel: 036-5492950FAX: 036-5492974Cascade Finland A. Petreliuksenkatu 301370 Vantaa FinlandTel: 09-8361925FAX: 09-8361935Cascade GmbHDahlener Strasse 57041239 Mönchengladbach GermanyTel: 02166-68230FAX: 02166-682323Cascade Canada Inc.5570 Timberlea Blvd.Mississauga, Ontario Canada L4W-4M6Tel: 905-629-7777FAX: 905-629-7785。
FreeAC AC系统使用手册-V1.2.0

6.3 备份/升级 ....................................................................................................... 14 6.4 重启 ................................................................................................................. 17 七、 网络 .......................................................................................................... 18 7.1 接口 ................................................................................................................. 18 7.2 DHCP/DNS .................................................................................................... 23 7.3 主机名 ............................................................................................................. 23 7.4 静态路由 ......................................................................................................... 23 7.5 网络诊断 ......................................................................................................... 24 7.6 防火墙 ............................................................................................................. 24 7.7 交换机 ............................................................................................................. 27 八、 Natshell .............................................................................................. 27
- 1、下载文档前请自行甄别文档内容的完整性,平台不提供额外的编辑、内容补充、找答案等附加服务。
- 2、"仅部分预览"的文档,不可在线预览部分如存在完整性等问题,可反馈申请退款(可完整预览的文档不适用该条件!)。
- 3、如文档侵犯您的权益,请联系客服反馈,我们会尽快为您处理(人工客服工作时间:9:00-18:30)。
图1-1串口控制窗
串口号在软件启动的时候会自己加载已经存在的串口,供用户选择,也可以手工输 入串口号。系统默认选择上一次选择的串口号,具有记忆功能。如图1-1。
(3)波特率设置
软件已经列出常用波特率,也可以自己输入。默认是上一次使用的波特率。如图11。 (4)串口的开关
有三种方式打开和关闭串口,第一种是直接单击,第二种是按组合键ALT+D,第三 种是按F5(推荐)。
2.6串口调试助手
(1)调试助手界面
(2)如何使用
图1-6 串口调试助手界面
要使用串口调试助手功能,就必须在串口控制窗,即图1-
1,选上允许串口调试助手,选上后,这个串口调试助手的使用和常规串口调试助手 一样,暂时没有提供发送功能。 (3)清空接收区
清空接收区域可以单击按钮或者双击黑色接收框。
2.7常用网站(待加)
2
By 黄杰军 武汉理工大学 All Rights Reserved
(4)命令发送
FreeCars上位机帮助文档
当按下F6~F12等键时,软件发命令到下位机,可以用来做无线遥控小车,车子就不 会跑飞撞坏了。 (5)串口调试助手
只要选上这个功能,调试助手和平时大家用的调试助手是一样的,如图所示。 (6)浏览器
续地比较系统地写出了FreeCars上位机的测试版本。大四的事情比较多,匆匆忙忙算
是比较累,但是想想也算是给广大车友的一个贡献。关于背景还是我QQ空间那篇文 章会更加贴切和详细。(想看的点击这里)
1.2软件说明
FreeCars上位机名字取自Frescale,意思也就是Free
Cars。软件基于.net
(2)万能帐户(注册需要连网)
这个帐户任何人都可以使用,但是不保证它是永远有效的,可能会被远程关闭。用 户名:FreeCarsKey 序列号:ByWHUT_Hjj_AllRightsReserved
(3)WHUT用户(注册需要连网)
WHUT的学弟学妹们可以使用学号和密码登录,系统会读取少量个人信息,不要外 借他人使用。
FreeCars上位机帮助文档
Hjj 武汉理工大学 2013-11
FreeCars上位机帮助文档
目录
1. 软件详情 ............................................................3 1.1软件背景 .........................................................3 1.2软件说明 .........................................................3 1.3功能列表(具体看软件帮助文档) ...................................3 1.4注册方法 .........................................................3 1.5如何获得帮助 .....................................................4 1.6如何下载第一个FreeCars上位机 .....................................4
framework
2.0,因此几乎所有的XP和WIN7电脑都是可以正常使用的,面向飞思卡尔所有组别
和电赛做控制和电源的同学。软件具有联网功能,能够自动检测到新的版本或者下
位机Demo并提示用户下载。而且新的版本的安装使用并不麻烦,它是向下兼容的。
软件一经完全版注册,就可以任意使用随后发布的新版本。
1.3功能列表(具体看软件帮助文档)
(3)数据显示到波形窗
只需要点击打钩复选框就能把该通道数据显示到波形窗,描绘成曲线,总共支持11 个通道的波形显示。点击All off可以取消所有通道的波形观察。如图1-2.
2.3浮点参数发送
(1)发送窗口图
(2)数据发送范围
图1-3 发送窗口图
-32768~32767,小数点精确到1/65536;比如可以发送32767.00002
2.2接收通道数据显示
(1)数据显示窗口
5
By 黄杰军 武汉理工大学 All Rights Reserved
FreeCars上位机帮助文档
(2)通道名修改
图1-2 数据显示窗口
双击通道名就可以输入新的通道名字,可以同时修改多个通道,输入完成后一定要 单击重命名才能保存。通道名前面不需要填写通道编号。
1
By 黄杰军 武汉理工大学 All Rights Reserved
FreeCars上位机帮助文档
1. 软件详情
1.1软件背景
本码农参加了第七届和第八届的飞思卡尔智能车竞赛,第七届在校赛时就悲催了 ,第八届还不算失望,我们在华南赛区能拿到数一数二的成绩是运气也是必然。华 南赛后着手准备电赛,没有再管飞思卡尔的事情,没有去哈尔滨,没有拿到一等奖 也算是比较遗憾,但是电赛的成绩还让人很满意,总算拿了个一等奖。电赛去南京 回来,回想做车的种种过程,觉得自己兴趣还在,因此就从那时开始到现在断断续
(1)波形观察
可以同时观察11个Int16型的数据波形,如图所示。
(2)接收通道数(保存、回放功能稍后添加)
可以在软件配置里面按照需要配置,可以配置11~100个通道,这些配置好的通道可 以以任意组合显示到波形窗口中 (3)参数调试
可以同时发送9个通道的数据到单片机上,整数部分是正负32767,小数精确到1/655 36;
3
By 黄杰军 武汉理工大学 All Rights Reserved
(4)购买序列号
FreeCars上位机帮助文档
虽然得花点钱,但是本码农辛苦凌乱了那么久,种瓜得瓜种豆得豆,也是应该的, 强烈推荐!!一经正式注册,可以永久使用FreeCars的任意版本。
1.5如何获得帮助
(1)到软件更新栏目下载对应版本的帮助文档(推荐) (2)到软件配置栏发送邮件给本码农求助(不推荐) (3)加入FreeCars上位机群(快快加入吧:149168724)讨论获取帮助(推荐)
3. 通信协议 ...........................................................10 3.1下位机上传协议 ..................................................10 3.2下位机接收浮点数据 ..............................................11 3.3下位机接收命令 ..................................................12
主要是便于调试,可以设置通道的名字,如图通道0~2的名字。 (5)数据发送
有三种方式,1是点击Send,2是选中通道的同时按下Enter键,3是选中某个通道,而 且选上SendAtTheSameTime时按下Up或DOWN键。
2.4软件配置窗口
(1)配置图
图1-4-1软件配置图
(1) FreeCars Config
(3)软件更新
到软件更新页面,可以下载自己感兴趣的软件版本和对应版本的MCU例程和简单协 议。下载时只需要双击就可以转到下载页面。
10 By 黄杰军 武汉理工大学 All Rights Reserved
3. 通信协议
3.1下位机上传协议
(1)概述
FreeCars上位机帮助文档
FreeCars上位机通信采用字头识别加尾部校验的策略,先发送251,107,37表示一帧
2. 界面操作 ............................................................4 2.1串口控制 .........................................................4 2.2接收通道数据显示 .................................................5 2.3浮点参数发送 .....................................................5 2.4软件配置窗口 .....................................................6 2.5示波器窗口 .......................................................7 2.6串口调试助手 .....................................................8 2.7常用网站(待加) .................................................8 2.8浏览器(待加) ...................................................8 2.9软件更新 .........................................................8
1.6如ห้องสมุดไป่ตู้下载第一个FreeCars上位机
(1)加入FreeCars上位机群(群号:149168724)到共享栏下载(推荐)
(2)点击这里到金山快盘下载
4
By 黄杰军 武汉理工大学 All Rights Reserved
2. 界面操作
2.1串口控制
(1)串口控制窗
FreeCars上位机帮助文档
(2)串口号
(1)用户可以将平时常用的网站添加到这里
2.8浏览器(待加)
9
By 黄杰军 武汉理工大学 All Rights Reserved
FreeCars上位机帮助文档
(1)主要是为了方便用户查询资料,V1.0仅仅是示例