斑马GKT条码机设置指南
斑马条码打印机的三种测纸设置

斑马条码打印机的三种测纸设置第一篇:斑马条码打印机的三种测纸设置斑马ZEBRA条码打印机提供3种测纸方式:不测纸、开机测纸、关上打印机头测纸,供客户根据实际情况选择采用。
通常在固定打印一种规格条码标签的客户,选择方式。
这种方式可以减少标签因为测纸而造成浪费。
而当客户在同一台标签打印机打印多种规格的条码标签纸时,测纸就是必要的,否则标签将无法正常打印!下面就介绍如何设置ZEBRA条码打印机的测纸方式:一、不测纸方式:按打印机的Menu键进入设置菜单,按翻页到菜单项Medea power up ,选择No Motion选项;翻页到Head Close,选择选项二、开机测纸方式:按条码打印机的Menu键进入设置菜单,按PW翻页到菜单项Medea power up ,选择 Calibration选项;翻页到Head Close,选择No Motion选项三、关上打印机头测纸方式:按条形码打印机Menu键进入设置菜单,按PW翻页到菜单项Medea power up ,选择 Calibration选项;翻页到Head close,选择No Motion选项斑马打印机菜单英文-中文:操作者可根据自己要求选择打印方式,选SETUP进入设置: Print Method---HERMAL TRANS(热转印方式)Tear off----------标签撕离位置Print mode-----PEEL OFF(撕离方式)Darkness--------温度值Media type-----NON-CONTINOUS(不连续纸)Print Width-----打印宽度Label Top--------标签打印位置顶部调节 Left Position---标签左边打印位置调节Media and Ribbon Calibrate------测纸和碳带其他:FEED(走纸),CALIBRATION(测纸),LENGTH(纸长),NO MOTION(不动),BACKFEED(标签回撤),HEAD CLOSE(打印头翻开合上后标签状态的选择)PAUSE 键--暂停与开始打印;FEED 键--走一张纸;CANCEL键--取消;当打印数据传输到打印机时,但不需打印可先按下PAUSE,然后多次按CANCEL直到数据灯关闭为止。
斑马条码打印机设置手册
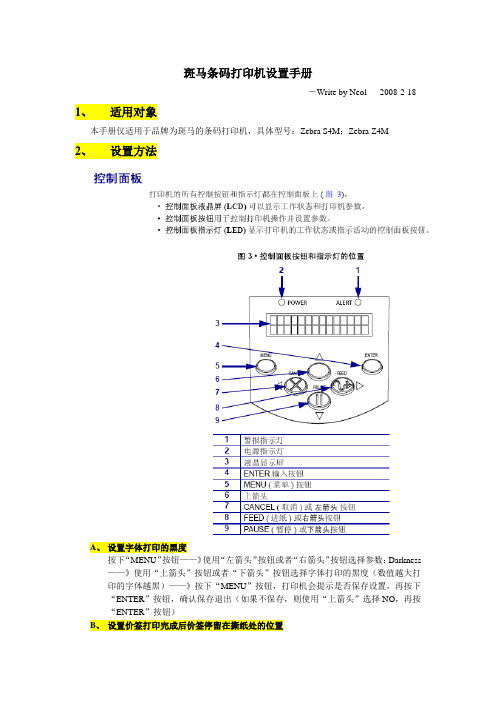
斑马条码打印机设置手册
-Write by Neol 2008-2-18 1、适用对象
本手册仅适用于品牌为斑马的条码打印机,具体型号:Zebra S4M;Zebra Z4M
2、设置方法
A、设置字体打印的黑度
按下“MENU”按钮——》使用“左箭头”按钮或者“右箭头”按钮选择参数:Darkness ——》使用“上箭头”按钮或者“下箭头”按钮选择字体打印的黑度(数值越大打印的字体越黑)——》按下“MENU”按钮,打印机会提示是否保存设置,再按下“ENTER”按钮,确认保存退出(如果不保存,则使用“上箭头”选择NO,再按“ENTER”按钮)
B、设置价签打印完成后价签停留在撕纸处的位置
按下“MENU”按钮——》使用“左箭头”按钮或者“右箭头”按钮选择参数:Tear off——》使用“上箭头”按钮或者“下箭头”按钮选择价签停留的位置(注意:调节此参数数值的同时,价签会同步的前伸或者后退,当发现价签停留的位置合适时,就不要再调节参数值了)——》按下“MENU”按钮,再按下“ENTER”按钮,确认保存退出
C、设置价签定位方式:黑标定位
按下“MENU”按钮——》使用“左箭头”按钮或者“右箭头”按钮选择参数:Media Type——》使用“上箭头”按钮或者“下箭头”按钮选择参数:MARK——》按下“MENU”按钮,再按下“ENTER”按钮,确认保存退出
D、设置打印宽度
按下“MENU”按钮——》使用“左箭头”按钮或者“右箭头”按钮选择参数:PRINTE WIDTH——》使用“上箭头”按钮或者“下箭头”按钮调节参数数值为:832——》按下“MENU”按钮,再按下“ENTER”按钮,确认保存退出。
斑马GKT条码打印机设置指南

斑马GKT条码打印机设置指南斑马G K T条码打印机设置指南集团标准化工作小组[Q8QX9QT-X8QQB8Q8-NQ8QJ8-M8QMN]斑马GK888T条码打印机设置一:安装驱动程序因无法读光驱,官网找到驱动程序安装解压缩安装确定选Unzip,注意此时的C:\ZD2667在识别硬件时手动选择此路径安装驱动确定后弹出如下界面点击下一步选安装打印机如下图:点击安装打印机后如下图:在右边选择框中选择ZSesigner GK888t 之后点击下一步,因为用户已有关个USB设备,故选了usb0003如下图:选择语言:简体中文。
下一步,如下图:点击完成后如下图:点击确定后如下图:点击下一步、下一步、下一步、下一步如下图:驱动安装完成。
二、打印设置1、点击电脑屏幕左下角的开始---打印机和传真,如图将ZDesigner GK888t设置为默认打印机2、右键点击选择属性,如下图:3、点击如下图:在选项中:标签格式选择---毫米、纵向、旋转180大小:宽度高度非打印区域---左完成以上设置后点击4、在高级设置中选择撕纸、热敏、Web检测完成以上设置后点击5、完成以上设置后点击,此时打印机会自动对打印纸进行校正。
6、关闭打印机电源,开启打印机电源(重启打印机)7、斑马打印机GK 888t设置完成。
三、大客户发件平台设置1、从顺丰官网下载顺丰大客户发件管理系统,安装并打开2.选择“设置打印方式”选择“Zabar专用”之后可以正常使用。
如果在使用过程中遇到其它问题欢迎与我们联系!天津区IT服务部。
Zebra Gk888t_SOP

Zebra Zebra Gk888t Gk888t Gk888t 标签打印机的安装与使用说明标签打印机的安装与使用说明一、打印机的安装打印机的安装1、连接打印机连接打印机打印机能够正常运转需要一根电源线、一根打印机线、一台打印机和电源。
连接时确保电源开关处于关闭位置(向下)。
(注:电源开关在打印机背面)A、连接电源线:一端接打印机的电源插孔,另一端接交流电源插座。
B、连接打印机线:一端接打印机,另一端接电脑主机箱的打印机接口。
注:仔细比较插口,不要错插。
安装打印机驱动程序22、安装打印机驱动程序1.打印机正常连接后,在连接打印机的计算机上安装斑马打印机的驱动,因在操作系统Windows 98、2000、XP下安装过程略有不同,安装时请根据使用的电脑的操作系统来安装相应的驱动。
2.Windows XP 驱动安装说明放入Zebra Gk888t打印机驱动光盘,双击运行光盘中的setup.exe 文件,选择“Windows驱动程序”进行驱动安装。
1.进入安装向导后点“next”进入下一步。
2.现在“Manufacturer(生产厂商)”选择框里选中“ZEBRA EPL”,然后在“Printer(打印机型号)”选择框里选中“Zebra Gk888t”,然后点击“next”进入下一步。
3.在“Available Ports”中找到并选中“LPT1”,选中后将在其左边的小框中显示一个小钩,然后点击“next” 进入下一步。
4.使用默认的名称“Zebra Gk888t”,直接点“next”进入下一步。
5.开始安装驱动,这时将弹出该对话框,点击“仍然继续”按钮。
6.之后的选项均采用默认值,点击“next”一步步下去,直到点击“Finish”完成驱动的安装。
安装完成后,点击“开始” →“打印机和传真”,进入后就可以看见“Zebra Gk888t”打印机的图标了。
右击图标,选择“设为默认打印机”。
打印机图标上出现一个“√”即为设置成功。
斑马条码打印机安装以及配置使用说明

斑马条码打印机安装以及配置使用说明安装部分一、准备工作1、操作系统建议windows XP,32位或64位win7。
要用硬装的系统,别用G版的。
2、驱动安装建议使用随机自带的驱动光盘,没有光驱的话可以使用这个光盘的镜像文件:“888tt.iso”。
解压后也可以正常安装。
3、安装时建议关闭其他正在使用的软件。
4、安装的时候关闭斑马打印机电源,或者干脆不连接斑马打印机到电脑。
二、安装过程1、以解压后的安装包为例。
解压后运行目录下的RunCD.exe这个文件。
2、一开始的弹出界面,有个选项,选择:888-TT。
3、之后,弹出界面如下。
5、选择“安装其他软件”。
然后选择“安装Zerbra Setup Utilities”之后按“下一步”,到这个界面勾选下。
安装完成后,保持勾选,点“Finish”。
6、之后弹出的界面,选择“USB”。
7、点击“Finish”完成安装8、之后,点“Close”,关闭这个界面。
9、斑马条码打印机连接电脑,打开电源。
电脑会自动识别到打印机并自动安装好驱动。
10、再次打开这个界面,点击安装“ZebraDesigner”,后面的安装方法跟常规软件一样,直接下一步,直到安装完成。
设置部分准备阶段运行桌面上“ZebraDesigner 2”这个程序,在“欢迎向导”界面点“取消”,不打开程序自带的示范标签。
打开后界面如下:点击“文件”,在下拉菜单里面选择“打开”,选择发过来的“广州条码模板.lbl”。
打开后界面如下:一、快速打印设置鼠标移动到条码上,双击左键,出现如下界面。
起始值就是要打的条码的第一个数字,默认的是每打一个条码,其数值就是上个打印的值+1。
其他的累加法,可以按“下一步”,直接看设置界面的介绍调整设置值。
鼠标移动到条码下面的一排“…”上,双击左键,出现如下界面。
这个界面的起始值和设置情况必须与上面条码的保持一致,因为这个数值实际上就是上面条码的可读说明。
由于客户有排版上的要求,分两个部分处理一个条码的打印信息是不可避免的。
斑马GK420t打印机用户指南说明书

VIF - Maintenance of computer systemsinfrastructureZebra GK420t User Guide VIF-NA-BG-136, V3.0© IZUM, 2016COBISS, COMARC, COBIB, COLIB, IZUM are registered trademarks owned by IZUM.CONTENTS1Introduction (1)2Using the GK420t printer (1)2.1Description of the printer (1)2.2Connecting to power supply and installing printer (3)2.3Cleaning the printhead (4)2.4Placing the media roll and loading black ribbon cartridge (5)2.5Resetting printer (7)2.6Status light (7)3Installing driver (8)4Printer settings (for COBISS3) (10)5Setting logical destinations in COBISS3 (13)6Potential printing problems (15)6.1Printing an extra blank label (15)6.2Printing an extra blank label (17)Zebra GK420t User Guide VIF FIGURESFigure 1: Back side of the printer (1)Figure 2: Front side of the printer (1)Figure 3: Opening the printer (2)Figure 4: Closing the printer (2)Figure 5: Printhead (2)Figure 6: Connecting to power supply (3)Figure 7: USB connection (3)Figure 8: Serial connection (4)Figure 9: Cleaning the printhead (5)Figure 10: Opening the printer and placing the media roll (5)Figure 11: Pushing the media under the media guides (6)Figure 12: Loading black ribbon cartridge (6)Figure 13: Final loading of the black ribbon cartridge (7)Figure 14: Selecting the right model (GK420t) (9)Figure 15: Selecting the right software package with drivers for GK420t (10)Figure 16: Control Panel with Devices and Printers (11)Figure 17: Printing settings (11)Figure 18: Advance printing settings (12)Figure 19: Colour dithering (12)Figure 20: COBISS3 user interface (13)Figure 21: Local destinations editor (13)Figure 22: Setting local destinations (14)Figure 23: Detailed settings (14)Figure 24: Refreshing settings in the COBISS3 user interface (15)Figure 25: Setting the printer (16)Figure 26: Sending factory settings (16)Figure 27: Printer settings (17)Figure 28: Media calibration (18)VIF Zebra GK420t User Guide 1IntroductionThis document presents how the GK420t printer is used in the COBISS system (connecting to power supply, changing paper, etc.).2Using the GK420t printer2.1Description of the printerPower switchPower switchPower OFF Power ONPower switchFigure 1:Back side of the printerFEED button and status lightFEEDbuttonStatuslightFigure 2:Front side of the printerFEED Button– In normal operating mode, the label ribbon advances to the next label.Status light– In normal operating mode the status light is green. If it turns red, an error has occurred: the printer either ran out of label ribbon or black ribbon cartridge or the service is needed because of a more complex error.Zebra GK420t User Guide VIF Opening and closing the printerFigure 3:Opening the printerFigure 4:Closing the printerPrinthead positionFigure 5:PrintheadVIF Zebra GK420t User Guide 2.2Connecting to power supply and installing printerTo connect your printer to a computer use the serial cable or the USB cable supplied with the printer.Connecting to power supplyFigure 6:Connecting to power supplyUSB connectionUSB cableFigure 7:USB connectionZebra GK420t User Guide VIF Serial connectionFigure 8:Serial connectionThe printer comes with a serial and a USB interface. To connect the printer use the appropriate cable.During installation you can use the drivers available:∙on CD supplied with your printer,∙via /id/zebra/na/en/index/products/printers/desktop/gk420t.4.tabs.html,∙via /downloads/drivers/archive/7.2/7.2/Zebra_7.2.exe,To use the printer from several workstations, it is recommended to connect it only to one workstation enabling shared use of the printer to other workstations. For help, call +386 (0)2 2520 333 (Call center) or send an email to ********************.2.3Cleaning the printheadTo clean the printhead, use the cleaning pen supplied with your printer containing the cleaning solution. Use the cleaning pen tip to remove debris and dust that has built-up on the heater element of the thermal printhead.The cleaning pen can be used only once and make sure that you use it only for this purpose. If you use it once again, the contaminants from previous uses may damage the printhead. Instead of a cleaning pen, you can also use a soft cloth and pure alcohol.VIF Zebra GK420t User GuideFigure 9:Cleaning the printhead2.4Placing the media roll and loading black ribboncartridgeGo through the following steps of the procedure:1.Open the printer lid. Place the media roll on the green roll holder.Figure 10:Opening the printer and placing the media rollZebra GK420t User Guide VIF2. The media roll must go under both media guides.Figure 11: Pushing the media under the media guides3. Place a new ribbon roll on the inner holder. Then, place an empty ribbon core, remained from the ribbon, on the front holder. Pay attention to lock the notches of the ribbon core properly. Attach the adhesive strip of the black ribbon cartridge to the empty ribbon core. Prior to use, pull the ribbon cartridge tight across the printhead.Figure 12:Loading black ribbon cartridgeUnder media guidesFigure 13: Final loading of the black ribbon cartridge2.5 Resetting printerOnce the media roll is placed and the black ribbon cartridge loaded, go through the following steps (make sure that the printer’s cover is closed and the status lig ht is green): 1. Turn off the printer.2. Press and hold the FEED button.3. Turn on the printer.4. The green status light flashes in sequences: once, then in the two-flash-, three-flash- and four-flash sequence.5. Release the FEED button after the four-flash sequence.6. The printer starts calibration process and advances the label ribbon to the next label.7. Once the calibration process is complete, turn off and on the printer.2.6 Status lightTable 1:Status light3Installing driverIf the original or the latest version of the driver for Zebra GK420t is not installed on your local computer, which is connected to the printer, install the driver or upgrade it. Drivers are available on Zebra’s official web page/id/zebra/na/en/index/drivers_downloads.html or on the user’s CD supplied with your printer.When the downloading web page opens, select GK420t Desktop Printer from the Printer Support drop-down list (see Figure 14).Figure 14:Selecting the right model (GK420t)Then, select the Drivers tab and click Download under "Zebra Setup Utilities" to download the drivers to your computer (see Figure 15).Figure 15:Selecting the right software package with drivers for GK420tBefore downloading the driver package, the confirmation window will open and ask if you agree to the specified terms. Click the field to start the download:After the package has been downloaded, run the package (administrator privileges are required for the installation of drivers) and follow the instructions (select ZDesigner GK420t if asked for which printer model you wish to install the driver).4Printer settings (for COBISS3)Once you have installed the drivers, update Zebra GK420t printer settings before you start printing labels. Go to Control Panel and select Devices and Printers. All available printers aredisplayed. Select ZDesigner GK420t and right-click the icon. Select Printing Preferences from the option list (see Figure 16).Figure 16:Control Panel with Devices and PrintersWhen you click Printing Preferences, a new window will appear in which you can set up parameters as illustrated in Figure 17. In the Options tab, pay particular attention to fields in the red boxes.Figure 17:Printing settingsOnce you set up parameters under the Options tab, click the Advanced Settings tab and make sure that Thermal Transfer is selected under "Media Type" (see Figure 18).Figure 18:Advance printing settingsAt the end, check if Smooth is selected under the Dithering tab (see Figure 19).Figure 19:Dithering5Setting logical destinations in COBISS3In COBISS3, select a printer for printing labels for the material in logical destinations. Select System/Settings/Logical destinations (see Figure 20).Figure 20:COBISS3 user interfaceA new Local destinations editor window will open in which you will select Label – material: [default local printer] and click Edit (see Figure 21).Figure 21:Local destinations editorThe User destinations window will open in which you will click Add printer. In the new window select ZDesigner GK420t from the drop down list which you intend to use to print labels for the material (see Figure 22).Figure 22:Setting local destinationsOnce you select the printer, click the Details button to check if these detailed settings are correct for this type of printer (as shown in Figure 23):Figure 23:Detailed settingsWhen all settings are set, click the OK button to confirm each choice. At the end, in the System menu, select Refresh settings (see Figure 24). If this option is not available, refresh the newly configured settings by first logging out and then logging in to the COBISS3 software.Figure 24:Refreshing settings in the COBISS3 user interfaceNow, you can start printing labels for the material.6Potential printing problems6.1Printing an extra blank labelIf labels cannot be printed properly after installing the drivers and setting the logical destinations (e.g. printing an extra blank label), the factory settings should be sent to the printer via original drivers.The procedure is as follows: Go to Control Panel and click the Devices and Printers icon. Find the printer, that is the Designer GK420t icon and right-click on it.Select Printer properties from the list of options. A new window should pop up in which you will click the Preferences... button (see Figure 25).Figure 25:Setting the printerBy clicking the Preferences… button a new window with additional settings should pop up again, then select the Tools tab (see Figure 26).Figure 26:Sending factory settingsVIF Zebra GK420t User Guide Select Action under Command type and Load factory defaults under Command Name, then click the Send button. This command sends the default factory settings to the printer. After that retry printing a label.6.2Printing an extra blank labelIf the settings do not resolve problems with an extra blank label, you can try with label calibration. You can use this method even if the printer prints one extra blank label besides the label for the material.The procedure is as follows: go to the Control panel and click the Devices and Printers icon. Find the printer, that is the Designer GK420t icon and right-click on it. Select Printer properties from the drop-down menu.When a new window pops up, click the Preferences... button (see Figure 27).Figure 27:Printer settingsBy clicking the Preferences… button a new window with additional settings should pop up again, then select the Tools tab (see Figure 28).Zebra GK420t User Guide VIFFigure 28:Media calibrationSelect Action under Command type and Calibrate media under Command name as shown in Figure 28. By clicking the Send button new re-calibration parameters are sent to the printer. After that retry printing a label.。
斑马GK888T条码打印机设置指南
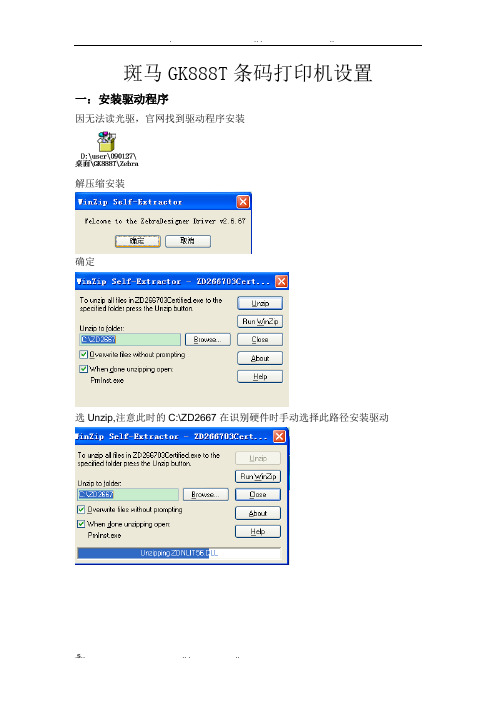
斑马GK888T条码打印机设置一:安装驱动程序
因无法读光驱,官网找到驱动程序安装
解压缩安装
确定
选Unzip,注意此时的C:\ZD2667在识别硬件时手动选择此路径安装驱动
确定后弹出如下界面
点击下一步选安装打印机如下图:
点击安装打印机后如下图:
在右边选择框中选择ZSesigner GK888t 之后点击下一步,因为用户已有关个USB设备,故选了usb0003如下图:
选择语言:简体中文。
下一步,如下图:
点击完成后如下图:
点击确定后如下图:
点击下一步、下一步、下一步、下一步如下图:
驱动安装完成。
二、打印设置
1、点击电脑屏幕左下角的开始---打印机和传真,如图将ZDesigner GK888t设置为默认打印机
2、右键点击选择属性,如下图:
3、点击如下图:
在选项中:标签格式选择---毫米、纵向、旋转180大小:宽度97.5.00高度131.3.00
非打印区域---左 5.00
完成以上设置后点击
4、在高级设置中选择撕纸、热敏、Web检测完成以上设置后点击
5、完成以上设置后点击,此时打印机会自动对打印纸进行校正。
6、关闭打印机电源,开启打印机电源(重启打印机)
7、斑马打印机GK 888t设置完成。
三、大客户发件平台设置
1、从顺丰官网下载顺丰大客户发件管理系统,安装并打开
2.选择“设置打印方式”选择“Zabar专用”
之后可以正常使用。
如果在使用过程中遇到其它问题欢迎与我们联系!
天津区IT服务部
IT服务热线4006633333。
斑马 Zebra GK420t 打印机使用手册
980602-001 Rev.AEnsure that the appropriate power cord with a three (3) prong plug and an IEC 60320-C13connector is used at all times. This power cord must bear the relevant certification mark of the country in which the product is being used.Utilisez toujours un cordon d'alimentation approprié comportant une fiche femelle à 2 pôles + terre et un connecteur C.E.I. 60320-C13. Ces cordons d'alimentation doivent porter la marque de certification en vigueur dans le pays où ils sont utilisés.Das Gerät darf nur über ein dreiadriges Stromkabel (mit Erdung) und einen Netzstecker gemäß IEC 60320-C13 an das Stromnetz angeschlossen werden. Das verwendete Stromkabel muss zudem das Zertifizierungszeichen einer Prüforganisation des Landes aufweisen, in dem das Gerät betrieben wird.Asegúrese de que en todo momento se utilicen el cable de alimentación eléctrica con un enchufe de tres (3) patas y el conector IEC 60320-C13 que sean apropiados. Estos cables de alimentación eléctrica deben tener la marca de certificación pertinente del país en el cual se está utilizando el producto.Assicurarsi che venga utilizzato un appropriato cavo di alimentazione con spina tripolare e che sia sempre utilizzato un connettore IEC 60320-C13. Questi cavi devono riportare il marchio di certificazione del paese nel quale il prodotto viene utilizzato.Verifique se o cabo de alimentação apropriado com um plug de três (3) pinos e um conector IEC 60320-C13 está sendo usado todo o tempo. Esses cabos de alimentação devem ter a marca de certificação relevante para o país em que o produto está sendo usado.Убедитесь, что используется шнур питания с трехконтактной штепсельной вилкой и разъемом IEC 60320-C13. На данных шнурах питания должна быть нанесена эмблема сертификата страны, в которой они используются.항상 3구 플러그와 IEC 60320-C13 커넥터가 달린 적절한 전원 코드를 사용해야 합니다.이러한 전원 코드는 제품이 사용되는 국가의 해당 인증 마크를 부착해야 합니다.请确保一直在使用对应的带有三相插头的电源线和 I EC 60320-C13 接头。
- 1、下载文档前请自行甄别文档内容的完整性,平台不提供额外的编辑、内容补充、找答案等附加服务。
- 2、"仅部分预览"的文档,不可在线预览部分如存在完整性等问题,可反馈申请退款(可完整预览的文档不适用该条件!)。
- 3、如文档侵犯您的权益,请联系客服反馈,我们会尽快为您处理(人工客服工作时间:9:00-18:30)。
斑马G K T条码机设置指
南
Company number【1089WT-1898YT-1W8CB-9UUT-92108】
斑马G K888T条码打印机设置一:安装驱动程序
因无法读光驱,官网找到驱动程序安装
解压缩安装
确定
选Unzip,注意此时的C:\ZD2667在识别硬件时手动选择此路径安装驱动确定后弹出如下界面
点击下一步选安装打印机如下图:
点击安装打印机后如下图:
在右边选择框中选择ZSesignerGK888t之后点击下一步,因为用户已有关个USB设备,故选了usb0003如下图:
选择语言:简体中文。
下一步,如下图:
点击完成后如下图:
点击确定后如下图:
点击下一步、下一步、下一步、下一步如下图:
驱动安装完成。
二、打印设置
1、点击电脑屏幕左下角的开始---打印机和传真,如图
将ZDesignerGK888t设置为默认打印机
2、右键点击选择属性,如下图:
3、点击如下图:
在选项中:标签格式选择---毫米、纵向、旋转180
大小:宽度97.5.00高度131.3.00
非打印区域---左5.00
完成以上设置后点击
4、在高级设置中选择撕纸、热敏、Web检测
完成以上设置后点击
5、完成以上设置后点击,此时打印机会自动对打印纸进行校正。
6、关闭打印机电源,开启打印机电源(重启打印机)
7、斑马打印机GK888t设置完成。
三、大客户发件平台设置
1、从顺丰官网下载顺丰大客户发件管理系统,安装并打开
2.选择“设置打印方式”选择“Zabar专用”
之后可以正常使用。
如果在使用过程中遇到其它问题欢迎与我们联系!
天津区IT服务部。