使用LIFECYCLE更新戴尔服务器
戴尔 Lifecycle Controller 1.3 版本概览说明书

Dell™ Lifecycle Controller 1.3 版本概览Unified Server Configurator 和 Unified Server Configurator - Lifecycle Controller Enabled远程服务器功能故障排除和常见问题注和小心本说明文件中的信息如有更改,恕不另行通知。
© 2009 Dell Inc. 版权所有,翻印必究。
未经 Dell Inc. 书面许可,严禁以任何形式复制这些材料。
本文中使用的商标:Dell 和 DELL 徽标是 Dell Inc. 的商标;Microsoft 、Windows 和 Windows Server 是 Microsoft Corporation 在美国和/或其它国家/地区的注册商标;Red Hat 、Red Hat Linux 和 Red Hat Enterprise Linux 是 Red Hat, Inc. 在美国和其它国家/地区的注册商标;SUSE 是 Novell, Inc. 在美国和其它国家/地区的注册商标;Intel 是 Intel Corporation 在美国和其它国家/地区的 注册商标;Broadcom 是 Broadcom Corporation 的商标。
本说明文件中述及的其它商标和产品名称是指拥有相应商标和产品名称的公司或其制造的产品。
Dell Inc. 对其它公司的商标和产品名称不拥有任何所有权。
2009 年 12 月注: "注"表示可以帮助您更好地使用计算机的重要信息。
小心: "小心"表示如果不遵循说明,就有可能损坏硬件或导致数据丢失。
vFlash 或虚拟闪速更新是什么?vFlash 是插入 iDRAC6 Enterprise 中的格式化 SD(安全数字)卡。
可以通过iDRAC 格式化和启用 vFlash,使之像 USB 闪存盘一样可以访问,以便在其中存储数据。
戴尔 Lifecycle Controller 嵌入式系统管理技术 使用说明书
使用 Dell Lifecycle Controller 设置 Dell PowerEdge 服务器Dell Lifecycle Controller 是一种先进的嵌入式系统管理技术,借助这种技术,可以通过 integrated Dell Remote Access Controller (iDRAC) 来实现远程服务器管理。
在使用 Lifecycle Controller 的情况下,可以通过本地或基于 Dell 的固件存储库更新固件。
Lifecycle Controller 中的操作系统部署向导可用于部署操作系统。
本说明文件概述了使用 Lifecycle Controller 设置 PowerEdge 服务器的步骤。
注: 在开始之前,请确保按照服务器随附的服务器使用入门说明文件对服务器进行设置。
要使用 Lifecycle Controller 设置 PowerEdge 服务器,请执行以下操作:1.将视频电缆连接至视频端口,将网络电缆连接至 iDRAC 和 LOM 端口。
图 1: 视频端口、iDRAC 端口和远端控制管理 (LOM) 端口2.开启或重新启动服务器,然后按F10即可启动 Lifecycle Controller。
图 2: 启动 Lifecycle ControllerRev. A002016 - 03注: 如果错过了按F10的机会,则按住电源按钮 3 秒即可重新启动服务器。
注: 仅在首次启动 Lifecycle Controller 时才会显示初始设置向导。
3.选择语言和键盘类型,然后单击下一步。
图 3: 语言和键盘选择页面4.阅读产品概览并单击下一步。
25.配置网络设置,等待直至应用设置,然后单击下一步。
图 5: Lifecycle Controller 网络设置页面6.配置 iDRAC 网络设置,等待直至应用设置,然后单击下一步。
37.验证应用的网络设置,然后单击完成以退出初始设置向导。
戴尔远程访问控制器9版本3.21.21.21用户指南说明书

Integrated Dell Remote Access Controller 9 Version 3.21.21.21 User's Guide注意、小心和警告: “注意”表示帮助您更好地使用该产品的重要信息。
: “小心”表示可能会损坏硬件或导致数据丢失,并告诉您如何避免此类问题。
: “警告”表示可能会导致财产损失、人身伤害甚至死亡。
版权所有 © 2018 Dell Inc. 或其附属公司。
保留所有权利。
Dell、EMC 和其他商标均为 Dell Inc. 或其附属公司的商标。
其他商标均为其各自所有者的商标。
Chapter 1: 概览 (15)iDRAC 配合 Lifecycle Controller 一起使用的优点 (15)主要功能 (16)此发行版中的新功能 (18)如何使用本指南 (18)支持的 Web 浏览器 (18)支持的操作系统和虚拟机监控程序 (18)iDRAC 许可证 (19)许可证类型 (19)获取许可证的方法 (19)许可证操作 (20)在 iDRAC9 中的已许可功能 (20)访问 iDRAC 的界面和协议 (25)iDRAC 端口信息 (27)您可能需要的其他说明文件 (28)联系 Dell (28)从 Dell 支持站点访问说明文件 (29)Chapter 2: 登录 iDRAC (30)以本地用户、Active Directory 用户或 LDAP 用户身份登录 iDRAC (30)使用智能卡作为本地用户登录 iDRAC (31)使用智能卡作为 Active Directory 用户登录 iDRAC (31)使用单一登录登录 iDRAC (32)使用 iDRAC Web 界面登录 iDRAC SSO (32)使用 CMC Web 界面登录 iDRAC SSO (32)使用远程 RACADM 访问 iDRAC (32)验证 CA 证书以在 Linux 上使用远程 RACADM (33)使用本地 RACADM 访问 iDRAC (33)使用固件 RACADM 访问 iDRAC (33)查看系统运行状况 (33)使用公共密钥验证登录 iDRAC (34)多个 iDRAC 会话 (34)使用 SMCLP 访问 iDRAC (34)安全默认密码 (34)在本地重设默认的 iDRAC 密码 (35)远程重设默认 iDRAC 密码 (36)更改默认登录密码 (36)使用 Web 界面更改默认登录密码 (36)使用 RACADM 更改系统将显示默认登录密码 (37)使用 iDRAC 设置公用程序更改默认登录密码 (37)启用或禁用默认密码警告消息 (37)IP 阻止 (37)使用 Web 界面启用或禁用 OS 到 iDRAC 直通 (38)使用 RACADM 启用或禁用警报 (38)Contents3Chapter 3: 设置受管系统 (39)设置 iDRAC IP 地址 (39)使用 iDRAC 设置公用程序设置 iDRAC IP (40)使用 CMC Web 界面设置 iDRAC IP (42)启用配置服务器 (43)使用自动配置功能配置服务器和服务器组件 (43)使用散列密码提供更高的安全性 (48)修改本地管理员帐户设置 (49)设置受管系统位置 (50)使用 Web 界面设置受管系统位置 (50)使用 RACADM 设置受管系统位置 (50)使用 iDRAC 设置公用程序设置受管系统位置 (50)优化系统性能和功耗 (50)使用 iDRAC Web 界面修改散热设置 (50)使用 RACADM 修改散热设置 (52)使用 iDRAC 设置公用程序修改散热设置 (55)设置管理站 (55)远程访问 iDRAC (56)配置支持的 Web 浏览器 (56)配置 Internet Explorer (56)配置 Mozilla Firefox (57)配置 Web 浏览器以使用虚拟控制台 (57)查看 Web 界面的本地化版本 (60)更新设备固件 (61)使用 iDRAC Web 界面更新固件 (62)计划自动固件更新 (63)使用 RACADM 更新设备固件 (65)使用 CMC Web 界面更新固件 (65)使用 DUP 更新固件 (65)使用远程 RACADM 更新固件 (65)使用 Lifecycle Controller 远程服务更新固件 (66)从 iDRAC 更新 CMC 固件 (66)查看和管理分阶段更新 (67)使用 iDRAC Web 界面查看和管理分阶段更新 (67)使用 RACADM 查看和管理分阶段更新 (67)回滚设备固件 (67)使用 iDRAC Web 界面回滚固件 (67)使用 CMC Web 界面回滚固件 (68)使用 RACADM 回滚固件 (68)使用 Lifecycle Controller 回滚固件 (68)使用 Lifecycle Controller 远程服务回滚固件 (68)恢复 iDRAC (68)备份服务器配置文件 (69)使用 iDRAC Web 界面备份服务器配置文件 (69)使用 RACADM 备份服务器配置文件 (70)计划自动备份服务器配置文件 (70)导入服务器配置文件 (71)使用 iDRAC Web 界面导入服务器配置文件 (71)使用 RACADM 导入服务器配置文件 (72)4Contents使用其他系统管理工具监测 iDRAC (72)支持服务器配置配置文件 — 导入和导出 (72)使用 iDRAC Web 界面导入服务器配置配置文件 (73)使用 iDRAC Web 界面导出服务器配置配置文件 (73)BIOS 设置或 F2 中的安全引导配置 (73)BIOS 恢复 (74)Chapter 4: 配置 iDRAC (75)查看 iDRAC 信息 (76)使用 Web 界面查看 iDRAC 信息 (76)使用 RACADM 查看 iDRAC 信息 (77)修改网络设置 (77)使用 Web 界面修改网络设置 (77)使用本地 RACADM 修改网络设置 (77)配置 IP 筛选 (78)FIPS 模式 (79)启用 FIPS 模式 (79)禁用 FIPS 模式 (80)配置服务 (80)使用 Web 界面配置服务 (80)使用 RACADM 配置服务 (80)启用或禁用 HTTPS 重定向 (80)配置 TLS (81)使用 Web 界面配置 TLS (81)使用 RACADM 配置 TLS (81)使用 VNC 客户端管理远程服务器 (81)使用 iDRAC Web 界面配置 VNC 服务器 (82)使用 RACADM 配置 VNC 服务器 (82)设置带 SSL 加密的 VNC 查看器 (82)设置不带 SSL 加密的 VNC 查看器 (82)配置前面板显示屏 (83)配置 LCD 设置 (83)配置系统 ID LED 设置 (84)配置时区和 NTP (84)使用 iDRAC Web 界面配置时区和 NTP (84)使用 RACADM 配置时区和 NTP (84)设置第一引导设备 (85)使用 Web 界面设置第一引导设备 (85)使用 RACADM 设置第一引导设备 (85)使用虚拟控制台设置第一引导设备 (85)启用上次崩溃屏幕 (85)启用或禁用 OS 到 iDRAC 直通 (86)支持 OS 到 iDRAC 直通功能的卡 (87)支持 USB NIC 的操作系统 (87)使用 Web 界面启用或禁用 OS 到 iDRAC 直通 (88)使用 RACADM 启用或禁用 OS 到 iDRAC 直通 (88)使用 iDRAC 设置公用程序启用或禁用 OS 到 iDRAC 直通 (88)获取证书 (88)SSL 服务器证书 (89)Contents5上载服务器证书 (90)查看服务器证书 (91)上载自定义签名证书 (91)下载自定义 SSL 证书签名证书 (92)删除自定义 SSL 证书签名证书 (92)使用 RACADM 配置多个 iDRAC (92)禁用访问以修改主机系统上的 iDRAC 配置设置 (93)Chapter 5: 查看 iDRAC 和受管系统信息 (94)查看受管系统运行状况和属性 (94)查看系统资源清册 (94)查看传感器信息 (95)监测 CPU、内存和输入输出模块的性能指标 (96)使用 Web 界面监测 CPU、内存和输入输出模块的性能指标 (97)使用 RACADM 监测 CPU、内存和输入输出模块的性能指标 (97)检查系统的新鲜空气符合性 (97)查看历史温度数据 (97)使用 iDRAC Web 界面查看历史温度数据 (98)使用 RACADM 查看历史温度数据 (98)配置入口温度的警告阈值 (98)查看主机操作系统上可用的网络接口 (99)使用 Web 界面查看主机操作系统上可用的网络接口 (99)使用 RACADM 查看主机操作系统上可用的网络接口 (99)查看 FlexAddress 夹层卡光纤连接 (99)查看或终止 iDRAC 会话 (100)使用 Web 界面终止 iDRAC 会话 (100)Chapter 6: 设置 iDRAC 通信 (101)使用 DB9 电缆通过串行连接与 iDRAC 进行通信 (102)针对串行连接配置 BIOS (102)启用 RAC 串行连接 (102)启用 IPMI 串行连接基本和终端模式 (103)使用 DB9 电缆时在 RAC 串行和串行控制台之间切换 (105)从串行控制台切换到 RAC 串行 (105)从 RAC 串行切换到串行控制台 (105)使用 IPMI SOL 与 iDRAC 进行通信 (105)针对串行连接配置 BIOS (105)配置 iDRAC 以使用 SOL (106)启用支持的协议 (107)使用 LAN 上 IPMI 与 iDRAC 通信 (110)使用 Web 界面配置 LAN 上 IPMI (110)使用 iDRAC 设置公用程序配置 LAN 上 IPMI (110)使用 RACADM 配置 LAN 上 IPMI (110)启用或禁用远程 RACADM (111)使用 Web 界面启用或禁用远程 RACADM (111)使用 RACADM 启用或禁用远程 RACADM (111)禁用本地 RACADM (111)启用受管系统上的 IPMI (111)6Contents为 RHEL 6 引导期间的串行控制台配置 Linux (112)允许在引导后登录到虚拟控制台 (112)在 RHEL 7 中配置串行终端 (114)从串行控制台控制 GRUB (114)支持的 SSH 加密方案 (115)对 SSH 使用公共密钥验证 (116)Chapter 7: 配置用户帐户和权限 (119)iDRAC 用户角色和权限 (119)建议使用的用户名和密码字符 (120)配置本地用户 (120)使用 iDRAC Web 界面配置本地用户 (121)使用 RACADM 配置本地用户 (121)配置 Active Directory 用户 (122)对 iDRAC 使用 Active Directory 验证的前提条件 (122)支持的 Active Directory 验证机制 (124)标准架构 Active Directory 概览 (124)配置标准架构 Active Directory (125)扩展架构 Active Directory 概览 (127)配置扩展架构 Active Directory (129)测试 Active Directory 设置 (136)配置通用 LDAP 用户 (136)使用 iDRAC 基于 Web 的界面配置通用 LDAP 目录服务 (137)使用 RACADM 配置通用 LDAP 目录服务 (137)测试 LDAP 目录服务设置 (137)Chapter 8: 系统锁定模式 (139)Chapter 9: 配置 iDRAC 以进行单一登录或智能卡登录 (140)Active Directory 单一登录或智能卡登录的前提条件 (140)将 iDRAC 注册为 Active Directory 根域中的计算机 (140)生成 Kerberos Keytab 文件 (141)创建 Active Directory 对象并提供权限 (141)为 Active Directory 用户配置 iDRAC SSO 登录 (141)使用 Web 界面为 Active Directory 用户配置 iDRAC SSO 登录 (141)使用 RACADM 为 Active Directory 用户配置 iDRAC SSO 登录 (142)为本地用户配置 iDRAC 智能卡登录 (142)上载智能卡用户证书 (142)上载智能卡的信任 CA 证书 (142)为 Active Directory 用户配置 iDRAC 智能卡登录 (143)启用或禁用智能卡登录 (143)使用 Web 界面启用或禁用智能卡登录 (143)使用 RACADM 启用或禁用智能卡登录 (143)使用 iDRAC 设置公用程序启用或禁用智能卡登录 (143)Chapter 10: 配置 iDRAC 以发送警报 (145)启用或禁用警报 (145)使用 Web 界面启用或禁用警报 (145)使用 RACADM 启用或禁用警报 (145)Contents7使用 iDRAC 设置公用程序启用或禁用警报 (146)筛选警报 (146)使用 iDRAC Web 界面筛选警报 (146)使用 RACADM 筛选警报 (146)设置事件警报 (146)使用 Web 界面设置事件警报 (147)使用 RACADM 设置事件警报 (147)设置警报复现事件 (147)使用 RACADM 设置警报复现事件 (147)使用 iDRAC Web 界面设置警报复现事件 (147)设置事件操作 (147)使用 Web 界面设置事件操作 (148)使用 RACADM 设置事件操作 (148)配置电子邮件警报、SNMP 陷阱或 IPMI 陷阱设置 (148)配置 IP 警报目标 (148)配置电子邮件警报设置 (150)配置 WS 事件 (152)配置 Redfish 事件 (152)监测机箱事件 (152)使用 iDRAC Web 界面监测机箱事件 (152)使用 RACADM 监测机箱事件 (152)警报消息 ID (152)Chapter 11: iDRAC 9 Group Manager (156)Group Manager (156)摘要视图 (157)管理登录 (157)添加新用户 (157)更改用户密码 (158)删除用户 (158)配置警报 (158)导出 (158)查找到的服务器视图 (159)作业视图 (159)作业导出 (160)Group Information(组信息)面板 (160)组设置 (160)在所选服务器上的操作 (161)Chapter 12: 管理日志 (163)查看系统事件日志 (163)使用 Web 界面查看系统事件日志 (163)使用 RACADM 查看系统事件日志 (163)使用 iDRAC 设置公用程序查看系统事件日志 (163)查看 Lifecycle 日志 (164)使用 Web 界面查看 Lifecycle 日志 (164)使用 RACADM 查看 Lifecycle 日志 (165)导出 Lifecycle Controller 日志 (165)使用 Web 界面导出 Lifecycle Controller 日志 (165)8Contents使用 RACADM 导出 Lifecycle Controller 日志 (165)添加工作注释 (165)配置远程系统日志记录 (166)使用 Web 界面配置远程系统日志记录 (166)使用 RACADM 配置远程系统日志记录 (166)Chapter 13: 监测和管理电源 (167)监测功率 (167)使用 Web 界面监测 CPU、内存和输入输出模块的性能指标 (167)使用 RACADM 监测 CPU、内存和输入输出模块的性能指标 (168)设置功耗的警告阈值 (168)使用 Web 界面设置功耗警告阈值 (168)执行电源控制操作 (168)使用 Web 界面执行电源控制操作 (168)使用 RACADM 执行电源控制操作 (169)功率限额 (169)刀片服务器中的功率上限 (169)查看和配置功率上限策略 (169)配置电源设备选项 (170)使用 Web 界面配置电源设备选项 (170)使用 RACADM 配置电源设备选项 (170)使用 iDRAC 设置公用程序配置电源设备选项 (170)启用或禁用电源按钮 (171)多向量冷却 (171)Chapter 14: 对网络设备执行资源清册、监测和配置操作 (172)资源清册和监测网络设备 (172)使用 Web 界面监测网络设备 (172)使用 RACADM 监测网络设备 (172)连接视图 (172)资源清册和监测 FC HBA 设备 (174)使用 Web 界面监测 FC HBA 设备 (174)使用 RACADM 监测 FC HBA 设备 (174)动态配置虚拟地址、启动器和存储目标设置 (174)支持 I/O 标识优化功能的卡 (175)支持 I/O 标识优化功能的 NIC 固件版本 (176)iDRAC 设置为 Flex Address 模式或控制台模式时的虚拟地址或 Flex Address 和持久性策略行为 (176)FlexAddress 和 IO 标识的系统行为 (177)启用或禁用 I/O 标识优化功能 (177)配置持久性策略设置 (178)Chapter 15: 管理存储设备 (182)理解 RAID 概念 (183)什么是 RAID (183)为了可用性和性能组织数据存储 (184)选择 RAID 级别 (184)比较 RAID 级别的性能 (190)支持的控制器 (191)支持的机柜 (191)Contents9支持的存储设备功能的摘要 (191)资源清册和监测存储设备 (193)使用 Web 界面监测存储设备 (194)使用 RACADM 监测存储设备 (194)使用 iDRAC 设置公用程序监测背板 (194)查看存储设备拓扑 (194)管理物理磁盘 (194)分配或取消分配物理磁盘作为全局热备用 (195)将物理磁盘转换为 RAID 或非 RAID 模式 (196)擦除物理磁盘 (196)擦除 SED 设备数据 (197)重建物理磁盘 (198)管理虚拟磁盘 (198)创建虚拟磁盘 (199)编辑虚拟磁盘高速缓存策略 (200)删除虚拟磁盘 (200)检查虚拟磁盘一致性 (201)初始化虚拟磁盘 (201)加密虚拟磁盘 (202)分配或取消分配专用热备用 (202)使用 Web 界面管理虚拟磁盘 (204)使用 RACADM 管理虚拟磁盘 (205)管理控制器 (205)配置控制器属性 (205)导入或自动导入外部配置 (208)清除外部配置 (209)重设控制器配置 (209)切换控制器模式 (210)12Gbps SAS HBA 适配器操作 (211)监测驱动器上的预测性故障分析 (211)非 RAID 模式或 HBA 模式下的控制器操作 (211)在多个存储控制器上运行 RAID 配置作业 (212)管理保留的高速缓存 (212)管理 PCIe SSD (212)对 PCIe SSD 进行资源清册和监测 (213)准备移除 PCIe SSD (214)擦除 PCIe SSD 设备数据 (215)管理机柜或背板 (216)配置背板模式 (216)查看通用插槽 (219)设置 SGPIO 模式 (219)设置机柜资产标签 (219)设置机柜资产名称 (219)选择要应用设置的操作模式 (220)使用 Web 界面选择操作模式 (220)使用 RACADM 选择操作模式 (220)查看和应用挂起操作 (221)使用 Web 界面查看、应用或删除挂起操作 (221)使用 RACADM 查看和应用挂起操作 (221)存储设备 - 应用操作方案 (221)10Contents闪烁或取消闪烁组件 LED (222)使用 Web 界面闪烁或取消闪烁组件 LED (222)使用 RACADM 闪烁或取消闪烁组件 LED (223)Chapter 16: BIOS 设置 (224)Chapter 17: 配置并使用虚拟控制台 (226)支持的屏幕分辨率和刷新率 (226)配置虚拟控制台 (227)使用 Web 界面配置虚拟控制台 (227)使用 RACADM 配置虚拟控制台 (227)预览虚拟控制台 (227)启动虚拟控制台 (227)使用 Web 界面启动虚拟控制台 (228)使用 URL 启动虚拟控制台 (228)使用 Java 或 ActiveX 插件禁用虚拟控制台或虚拟介质启动过程中的警告消息 (228)使用虚拟控制台查看器 (229)基于 HTML5 的虚拟控制台 (229)同步鼠标指针 (231)通过 Java 或 ActiveX 插件的虚拟控制台传递所有键击 (231)Chapter 18: 使用 iDRAC 服务模块 (235)安装 iDRAC 服务模块 (235)从 iDRAC Express 和 Basic 安装 iDRAC Service Module (235)从 iDRAC Enterprise 安装 iDRAC Service Module (236)iDRAC Service Module 支持的操作系统 (236)iDRAC Service Module 监测功能 (236)从 iDRAC Web 界面使用 iDRAC Service Module (242)从 RACADM 中使用 iDRAC Service Module (242)将 iDRAC 服务模块用于 Windows Nano OS (242)Chapter 19: 使用 USB 端口进行服务器管理 (243)通过直接 USB 连接访问 iDRAC 界面 (243)使用 USB 设备上的服务器配置文件配置 iDRAC (243)配置 USB 管理端口设置 (244)从 USB 设备导入服务器配置文件 (245)Chapter 20: 使用 Quick Sync 2 (248)配置 iDRAC Quick Sync 2 (248)使用 Web 界面配置 iDRAC Quick Sync 2 设置 (249)使用 RACADM 配置 iDRAC 快速同步 2 设置 (249)使用 iDRAC 设置公用程序配置 iDRAC Quick Sync 2 设置 (249)使用移动设备查看 iDRAC 信息 (249)Chapter 21: 管理虚拟介质 (250)支持的驱动器和设备 (250)配置虚拟介质 (251)使用 iDRAC Web 界面配置虚拟介质 (251)使用 RACADM 配置虚拟介质 (251)Contents11使用 iDRAC 设置公用程序配置虚拟介质 (251)连接的介质状态和系统响应 (251)访问虚拟介质 (252)使用虚拟控制台启动虚拟介质 (252)不使用虚拟控制台启动虚拟介质 (252)添加虚拟介质映像 (253)查看虚拟设备详细信息 (253)重设 USB (253)映射虚拟驱动器 (254)取消映射虚拟驱动器 (255)通过 BIOS 设置引导顺序 (255)启用一次性虚拟介质引导 (255)Chapter 22: 安装和使用 VMCLI 公用程序 (256)安装 VMCLI (256)运行 VMCLI 公用程序 (256)VMCLI 语法 (256)访问虚拟介质的 VMCLI 命令 (257)VMCLI 操作系统 Shell 选项 (257)Chapter 23: 管理 vFlash SD 卡 (258)配置 vFlash SD 卡 (258)查看 vFlash SD 卡属性 (258)启用或禁用 vFlash 功能 (259)初始化 vFlash SD 卡 (260)使用 RACADM 获取上次状态 (260)管理 vFlash 分区 (260)创建空白分区 (261)使用映像文件创建分区 (262)格式化分区 (262)查看可用分区 (263)修改分区 (263)连接或断开分区 (264)删除现有分区 (265)下载分区内容 (266)引导至分区 (266)Chapter 24: 使用 SMCLP (267)使用 SMCLP 的系统管理功能 (267)运行 SMCLP 命令 (267)iDRAC SMCLP 语法 (268)导航 MAP 地址空间 (271)使用 show 动词 (271)使用 -display 选项 (271)使用 -level 选项 (271)使用 -output 选项 (271)用法示例 (271)服务器电源管理 (272)SEL 管理 (272)12Contents映射目标导航 (273)Chapter 25: 部署操作系统 (274)使用远程文件共享部署操作系统 (274)管理远程文件共享 (274)使用 Web 界面配置远程文件共享 (275)使用 RACADM 配置远程文件共享 (276)使用虚拟介质部署操作系统 (276)从多个磁盘安装操作系统 (276)在 SD 卡上部署嵌入式操作系统 (277)在 BIOS 中启用 SD 模块和冗余 (277)Chapter 26: 使用 iDRAC 排除受管系统故障 (278)使用诊断控制台 (278)重设 iDRAC 并将 iDRAC 重设为默认值 (278)计划远程自动诊断 (279)使用 RACADM 计划远程自动诊断 (279)查看开机自检代码 (279)查看引导和崩溃捕获视频 (280)配置视频捕获设置 (280)查看日志 (280)查看上次系统崩溃屏幕 (280)查看系统状态 (281)查看系统前面板 LCD 状态 (281)查看系统前面板 LED 状态 (281)硬件故障指示灯 (281)查看系统运行状况 (282)在服务器状态屏幕上检查错误消息 (282)重新启动 iDRAC (282)使用 iDRAC Web 界面重设 iDRAC (282)使用 RACADM 重设 iDRAC (282)擦除系统和用户数据 (283)将 iDRAC 重设为出厂默认设置 (283)使用 iDRAC Web 界面将 iDRAC 重设为出厂默认设置 (283)使用 iDRAC 设置公共程序将 iDRAC 重设为出厂默认设置 (284)Chapter 27: iDRAC 中的 SupportAssist 集成 (285)SupportAssist 注册 (285)安装服务模块 (286)服务器操作系统代理信息 (286)SupportAssist (286)服务请求门户 (286)集合日志 (286)生成 SupportAssist 收集 (286)使用 iDRAC Web 界面手动生成 SupportAssist 收集 (287)设置 (287)收集设置 (287)联系信息 (288)Contents13Chapter 28: 常见问题 (289)系统事件日志 (289)网络安全性 (290)Active Directory (290)单一登录 (291)智能卡登录 (292)虚拟控制台 (292)虚拟介质 (295)vFlash SD 卡 (297)SNMP 验证 (297)存储设备 (297)iDRAC 服务模块 (297)RACADM (299)永久设置默认密码至 calvin (299)其他 (299)Chapter 29: 使用案例场景 (302)排除受管系统不可访问的故障 (302)获取系统信息和访问系统运行状况 (302)设置警报和配置电子邮件警报 (303)查看并导出系统事件日志和生命周期日志 (303)用于更新 iDRAC 固件的界面 (303)执行正常关机 (303)创建新的管理员用户帐户 (303)启动服务器远程控制台和挂载 USB 驱动器 (304)使用连接的虚拟介质和远程文件共享安装裸机操作系统 (304)管理机架密度 (304)安装新的电子许可证 (304)在一次主机系统重新引导中为多个网卡应用 I/O 标识配置设置 (304)14Contents1概览Integrated Dell Remote Access Controller (iDRAC) 设计用于提高系统管理员的工作效率和 Dell EMC 服务器的整体可用性。
DELL服务器通过F10 Lifecycle Controller安装Windows server系统步骤
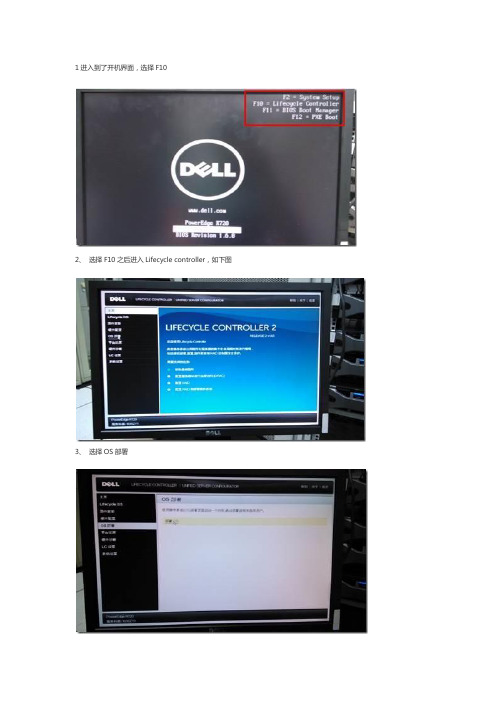
1进入到了开机界面,选择F10
2、选择F10之后进入Lifecycle controller,如下图
3、选择OS部署
4、选择之后看到下面界面:
5、下面就选择直接转至OS部署,因为这里服务器出厂时已经做好了RAID,所以这里就无需再配置RAID了
6、下面第一步
7 接着第二步,选择操作系统此次是以windows sever 2012演示(实际根据自己安装的版本选择)
8、选择好操作系统之后,可能要等待几分钟
9 接着第三步选择引导模式的时候选择BIOS模式
10、选择的是BIOS模式,下面第四步,插入操作系统盘
11、擦如操作系统介质后,点击下一步会有如图界面出现:
12、然后到第五步点击完成重启
13、下面由重启
14、下面就进入到windows的安装界面了
15、直接点下一步
16 选择安装系统的版本,win svr 2008 R2版本的选择enterprise的,而2012的选择datacenter带有GUI的服务器版本,然后点击下一步
17 下面勾选“我接受许可条款‘,这里不接受连下一步都点击不了,然后再点击下一步,进入下面选择系统盘界面
18、选择”驱动器选项“,给磁盘做个分区,分出C盘即可,剩余空间可以再系统安装好之后在磁盘管理里面再分配,好了之后选择下一步
19、下面等着就好了,大概会花个几分钟的。
戴尔生命周期控制器集成 3.3 版发行说明说明书
Dell Lifecycle Controller Integration Version 3.3 for Microsoft System Center Configuration ManagerRelease NotesRelease Type and DefinitionDell Lifecycle Controller Integration for Microsoft System Center Configuration Manager 3.3 Dell Lifecycle Controller Integration (DLCI) for Microsoft System Center Configuration Manager enables the administrators to use the Configuration Manager console to apply the remote enablement capabilities of Dell Lifecycle Controller (LC), available as part of the integrated Dell Remote Access Controller (iDRAC).Version3.3Release DateJanuary 2017Previous Version3.2ImportanceOPTIONAL: Dell recommends the customer review specifics about the update to determine if it applies to your system. The update contains changes that affect only certain configurations, or provides new features that may or may not apply to your environment. Platform(s) AffectedFor information about supported platforms, see “Supported Target Systems and operating systems” under “What is supported.”What is SupportedHardware and Software RequirementsFor information about the hardware and software requirements; installing and uninstalling Dell Lifecycle Controller Integration 3.3, or upgrading from Dell Lifecycle Controller Integration 3.2, see the Installation Guide, which is part of the Dell Lifecycle Controller Integration 3.3 download package.Supported Target Systems and Operating SystemsFor a list of supported Dell systems that you can use as target systems and the operating systems that you can deploy on these target systems, see the “Dell Lifecycle Controller Integration Version 3.3 for Microsoft System Center Configuration Manager User’s Guide”.What’s NewThis release of DLCI for Configuration Manager provides support for the following:•Support for Microsoft System Center Configuration Manager Version 1610.•Support for Agent-free properties for configuration manager.•Support for deployment of Windows 2016, ESXI 6.0 U2, and RHEL 6.8.•Support for 64-bit firmware update.Important Notes•DLCI 3.3 has minimum prerequisite of Windows Server 2008 SP2 for the site systems and server running Dell Provisioning Service (DPS).•When you deploy an operating system on a target system with iDRAC configured in a shared network mode, the Windows PE environment may fail to startup on the network drivers, causing the system to restart before reaching the task sequence.•If the Lifecycle Controller of a system is in use, then the system is not discovered.•If the Lifecycle Controller of the target system is locked by another process, then the following error message is displayed in the following path <Microsoft Configuration Manager installation \XmlStorage\Extensions\DLCPlugin\DLCTaskManager.log file: folder>\AdminConsole "Lifecycle Controller is being used by another process."•If you do not enter the service tag name of the target system correctly, the discovery and handshake fails and the following error message is displayed: "[Server Name] - Handshake - getCredentialsInternal(): [Server Name]: NOT AUTHORIZED: No credentials returned."•During Discovery and Handshake, the DPS.log displays an empty Site code: followed by a cryptography exception. You can ignore this.•During Discovery and Handshake, the DPS.log displays numerous messages createDellCollecions() Either Connection Mgr param is NULL or Collection not yet created. You can ignore this.•The System Viewer utility does not display the latest RAID configuration. To view the latest configuration, re-launch the System Viewer utility.•The modular systems cannot use the hostname in the path to the Common Internet File System (CIFS) share, but monolithic systems can use the hostname. For modular systems use the IP address instead of hostname.•After deploying Non-Windows OS using DLCI the service tag of system name is displayed as hostname in configuration manager console.Limitations•DLCI for System Center Configuration Manager 2012 does not support operating system deployment on Dell PowerEdge R330, R230, T330, and T130 Platforms.•When you deploy Red Hat Enterprise Linux or ESXi OS on servers having iDRAC on shared Lan on Motherboard (LOM), the deployment may fail. To resolve this, disable STP on the PowerEdge switches (ports connecting to the Shared LOM port directly) and enable Rapid Spanning Tree Protocol (RSTP), PortFast, or FastLink on those switches.•If the Windows PE environment is unresponsive while running an operating system deployment, the system may have run out of memory. By default, Windows PE allocates 32 megabytes (MB) of writeable memory, known as scratch space. You can increase the scratch space up to 512 MB.2•Before upgrading to DLCI version 3.3, ensure that all the scheduled firmware update jobs are either completed or deleted.•During installation of DLCI, the Configuration Manager credentials specified are not validated. Installation succeeds, and an errorin import.log indicates the same. Use Dell Provision Service (DPS) configure utility (import.exe) to specify the correctcredentials before proceeding with discovery of servers.•The Advertise option does not display in an existing task sequence after uninstalling and reinstalling DLCI for Configuration Manager. To advertise the task sequence, edit the task sequence and correct if there are any errors.•If Active Directory (AD) authentication is used for communicating with iDRAC on modular servers, ensure that the iDRAC version is upgraded to 3.32. Affected version: DLCI 3.3 with 11G iDRAC 3.30 (or earlier).•If the host system has the Lifecycle Controller version 1.5, ensure that while configuring user name as part of the iDRAC configuration, the user name length is fewer than 16 characters. Affected version: DLCI 3.3 with 11G Lifecycle Controller 1.5.•If the host system is Dell’s 11th generation of the PowerEdge server and has the Lifecycle Controller version 1.5, Redundant Array of Independent Disk configuration of H200 controller using DLCI 3.3 does not work correctly. Upgrade to the Lifecycle Controller firmware version 1.5.1. Affected version: DLCI 3.3 with 11G Lifecycle Controller 1.5.•While applying minimum bandwidth on the Qlogic Partitionable NIC cards, if the summation of minimum bandwidth on all partitions of a port reaches more than 100 the apply operation fails. Ensure that you apply ‘0’ on all partitions as minimum bandwidth before applying any other values.•BIOS Configuration fails when it is completed for the second time if Dell’s 11th generation of the PowerEdge server has either 1.9 (monolithic) or 3.4 (modular) version of the iDRAC firmware. Ensure that you upgrade the iDRAC firmware level to 1.92 (monolithic) or 3.42 (modular).•Dell recommends that you delete and reimport the server from Configuration Manager before installing a Non-Windows operating system on the server which is already having Windows OS installed and Configuration Manager client configured.•If you deploy the Windows server operating systems on Dell’s 11th generation of the PowerEdge servers where drivers were already applied from Lifecycle Controller, then few device drivers may not work or are unavailable. As a workaround, manually update drivers or in Task Sequence in the server where you deployed the OS, as a fallback for the option Apply Drivers from the Lifecycle Controller use option Apply Driver Package.•Before installing the DLCI version 3.3, if the servers were discovered or imported, then after installation must rediscover or reimport the servers. The Node ID Property is displayed on the Dell out-of-band controllers properties page.•DLCI Auto discovery does not work with iDRACs (version 2.10.10.10) Transport Layer Security (TLS) 1.2 protocol. As a workaround, ensure that you have TLS 1.1 available in the system where you have installed DLCI.•DLCI Auto discovery does not work with iDRACs (version 2.10.10.10) TLS 1.2 custom certificate.•Ensure that the password does not contain an @ character in it, while using CIFS share. Else, firmware update may fail.•Auto-discovery job fails with iDRAC version 2.30.30.30 and later, if DPS is installed on Windows 2016. For resolutions, see http://dell.to/2jtcrCG.Software RequirementsConfiguration Manager Version 1610, or System Center 2012 R2 SP1 Configuration Manager, or System Center 2012 SP2 Configuration Manager, or System Center 2012 R2 Configuration Manager, or System Center 2012 SP1 Configuration Manager, or System Center 2012 Configuration Manager.InstallationBrowse to the folder where the files are extracted and see the installation guide.Installation InstructionsExtract Files:1.Click Browse, and then navigate to the self-extractable .zip file that you downloaded.2.Double-click on the .zip file to extract the downloaded package.3.Click Continue.4.Specify the location to extract the files.5.Click OK to extract files. After the files are extracted All files were successfully unzipped message is displayed.6.Click OK to exit.3Installation and Configuration NotesFor installation or update procedure-related information, see the “Dell Lifecycle Controller Integration Version 3.3 for Microsoft System Center Configuration Manager Installation Guide”.Accessing Documents from Dell Support SiteYou can access the required documents in one of the following ways:•Using the following links:–For Enterprise Systems Management documents — /openmanagemanuals–For all Systems Management documents — /softwaresecuritymanuals–For Remote Enterprise Systems Management documents — /esmmanuals–For Client Systems Management documents — /clientsystemsmanagement–For Serviceability Tools documents — /serviceabilitytools–For OpenManage Connections Enterprise Systems Management documents — /OMConnectionsEnterpriseSystemsManagement–For OpenManage Connections Client Systems Management documents — /connectionsclientsystemsmanagement •From the Dell Support site:a.Go to /support/manuals.b.Under General support section, click Software & Security.c.In the Software & Security group box, click the required link from the following:–Serviceability Tools–Enterprise Systems Management–Client Systems Management–Remote Enterprise Systems Management–Connections Client Systems Managementd.To view a document, click the required product version.•Using search engines:–Type the name and version of the document in the Search box.Contacting DellNOTE: If you do not have an active Internet connection, you can find contact information on your purchase invoice, packing slip, bill, or Dell product catalog.Dell provides several online and telephone-based support and service options. Availability varies by country and product, and some services may not be available in your area. To contact Dell for sales, technical support, or customer service issues:1.Visit /support.2.Select your support category.3.Verify your country or region in the Choose a Country/Region drop-down menu at the top of page.4.Select the appropriate service or support link based on your need.Copyright © 2017 Dell Inc. or its subsidiaries. All rights reserved. Dell, EMC, and other trademarks are trademarks of Dell Inc. or its subsidiaries. Other trademarks may be trademarks of their respective owners.4。
Lifecycle Controller 版本 3.21.21.21 远程服务快速入门指南说明书
Lifecycle Controller 版本 3.21.21.21远程服务快速入门指南注意、小心和警告:“注意”表示帮助您更好地使用该产品的重要信息。
:“小心”表示可能会损坏硬件或导致数据丢失,并告诉您如何避免此类问题。
:“警告”表示可能会导致财产损失、人身伤害甚至死亡。
版权所有 © 2018 Dell Inc. 或其附属公司。
保留所有权利。
Dell、EMC 和其他商标均为 Dell Inc. 或其附属公司的商标。
其他商标均为其各自所有者的商标。
章 1: 简介 (4)iDRAC 配合 Lifecycle Controller 一起使用的优点 (4)使用 Lifecycle Controller 远程服务的优点 (5)主要功能 (5)Lifecycle Controller 中的可授权功能 (5)此发行版中的新功能 (6)关于 iDRAC RESTful API 以及 Redfish 和 Web 服务 API (6)关于 Lifecycle Controller API (6)关于一对多管理 (7)章 2: 使用远程服务的操作 (8)部署和配置 (8)监测 (8)维护 (8)章 3: API 使用入门 - 有关资料和链接 (9)WSMAN 配置文件 (9)WSMAN MOF WSDL 和 XSD API 定义 (9)Web 服务接口指南 (9)属性注册表 XML (9)事件消息注册表 XML (9)XML 架构 (10)带 Redfish 的 iDRAC RESTful API (10)API 访问的授权和许可要求 (10)章 4: 整合 Lifecycle Controller API (12)API 客户端 (12)最佳实践流程参考资料 (12)样例脚本和工具 (12)使用 Lifecycle Controller-Remote Services 的应用程序 (12)WinRM 和 OpenWSMAN 的安装与配置 (13)章 5: 社交媒体参考 (14)相关说明文件 (14)从 Dell 支持站点访问说明文件 (15)联系 Dell (15)章 6: 术语和定义 (16)目录31简介Dell Lifecycle Controller 可提供高级嵌入式系统管理功能,以使用图形用户界面 (GUI) 执行各种系统管理任务。
戴尔服务器如何升级硬盘的固件的操作指南
SAS&SATA硬盘Firmware升级指南 - U盘启动升级法
重要信息:
1. 请在升级前确认所有的数据已经备份;
2. 假如硬盘工作在Raid模式下,请确保所有需要升级的硬盘处于Online状态;
3. 假如升级的系统处于Cluster模式,请确保另外一个节点处于关闭的状态;
4. 一旦升级开始,需要等待升级完成,升级过程中不要断电或者重启服务器;
5. 该升级必须在纯DOS下进行,无法在Windows的DOS窗口下运行。
升级前的准备:
从下载SAS Hard Drive Firmware Utility ,
搜索最新的SAS Hard Drive Firmware Utility,按照日志排序。
目前最新版本是A34 SAS_SATA 发布日期: 2012/1/24
/support/drivers/cn/zh/cnbsd1/DriverDetails?DriverId=3TDMY&FileId=2942590 422&productCode=poweredge-r710&urlProductCode=False
源地址/FOLDER00225520M/27/SAS_SATA_A34_ZPE.exe
制作启动媒体:
比如下载的文件名为: DELL_SATA-HARD-DRIVE-FIRMWAR_A00_R214796.EXE,在Windows下双击
DELL_SATA-HARD-DRIVE-FIRMWAR_A00_R214796.EXE运行,然后依次点击Continue/Ok/Yes/OK:。
idrac7升级固件Firmware Update by LifeCycle Controller
Firmware Update by LifeCycle Controller 固件更新
使用此页面可更新 iDRAC、BIOS
1.Raid Controller Firmware Update
查看到固件之前的固件版本是
我们下载DUP包 SAS-RAID_Firmware_9NK40_WN32_20.12.0-0004_A06.EXE.浏览且上传上传完成之后,选,之后去点,查看状态
这个显示已经计划,是在下次重新引导的时候升级。
重启之后进入升级界面
升级完成之后会重启,我们在IDRAC WEB界面查看下,固件更新到了固件版本20.12.0-0004
下载 13.5.6的版本 Network_Firmware_Y9W1K_WN32_13.5.6_A00,方法同上
安装之后重新引导,作业计划里面已经更新OK。
之后由13.56-14.59
升级成功。
Other 升级(升级文件格式参考下面图片)
•iDRAC BIOS LifecycleController 诊断程序操作系统驱动程序包网络接口卡 (NIC) 电源设备PS
Case Issue:
Complete the following steps:。
DellPowerEdge服务器上安装操作系统
DellPowerEdge服务器上安装操作系统如何在Dell PowerEdge服务器上安装操作系统本文介绍如何在Dell PowerEdge服务器上安装操作系统(OS)。
在页面底部提供了操作系统安装视频,例如使用LifeCycle Controller 安装Windows Server 2016。
开始部署操作系统之前,请阅读下面的3点:1. 检查操作系统兼容性请检查您的PowerEdge型号支持的操作系统。
如果需要,本文介绍了如何识别服务器代系。
2. 更新服务器在安装新的操作系统之前,请更新服务器固件以充分利用所有功能本文介绍了如何更新PowerEdge服务器。
3. 前提条件安装操作系统时,服务器必须能够访问安装介质并且存储位置必须可访问。
满足以下先决条件:光学DVD驱动器、USB设备或虚拟介质已连接到服务器。
o文章链接:如何使用iDRAC的虚拟介质在ISO映像上引导如何使用ISO映像创建可引导USB设备已安装软件RAID或PowerEdge RAID控制器,并至少有两个硬盘驱动器可用于创建虚拟磁盘。
在特定情况下,可以将操作系统安装在SD卡上。
安装操作系统有2种方法可用来安装操作系统:1) 使用LifeCycle Controller来安装受支持的操作系统Windows 服务器基于Linux的发行版对于先前的服务器代系(9G和10G),未发布LCC功能。
备用方法是从Systems Management Tools and Documentation DVD(系统管理工具和说明文件DVD)引导,以访问实时部署界面。
查找有关SMTD部署的更多信息。
2) 直接在操作系统介质上引导VMware ESXi发行版在PowerEdge T20 / T30上安装操作系统不支持通过LCC安装的操作系统1)使用LifeCycle Controller这是安装操作系统的首选方法。
LifeCycle Controller可通过OS Deployment (操作系统部署)功能简化操作系统的安装。
戴尔 Lifecycle Controller 2 远程服务版本 1.3 快速入门指南说明书
Dell Lifecycle Controller 2 Remote Services 版本 1.3快速入门指南注、小心和警告注: “注”表示可以帮助您更好地使用计算机的重要信息。
小心: “小心”表示可能会损坏硬件或导致数据丢失,并说明如何避免此类问题。
警告: “警告”表示可能会造成财产损失、人身伤害甚至死亡。
Copyright © 2014 Dell Inc. All rights reserved. This product is protected by U.S. and international copyright and intellectual property laws. Dell™ and the Dell logo are trademarks of Dell Inc. in the United States and/or other jurisdictions. All other marks and names mentioned herein may be trademarks of their respective companies.2013 - 12Rev. A00目录1 简介 (5)iDRAC7 配合 Lifecycle Controller 2 一起使用的优点 (5)主要功能 (5)此版本有哪些新功能? (6)为什么要使用 Lifecycle Controller Remote Services? (6)Lifecycle Controller 中的可授权功能 (6)什么是 Web 服务 API? (7)Lifecycle Controller API 适于何处使用? (7)谁可以使用本 API? (8)一对多管理是如何实现的? (8)您可能需要的其他说明文件 (8)从 Dell 支持站点访问说明文件 (8)联系 Dell (9)2 Remote Services 功能 (11)部署和配置 (11)BIOS 配置 (11)iDRAC 配置 (11)RAID 配置 (11)NIC 配置 (12)操作系统部署 (12)系统配置 XML (13)监测 (13)硬件资源清册 (13)Lifecycle 日志 (13)系统事件日志 (14)固件资源清册 (14)事件警报 (14)维护 (14)固件更新 (14)部件更换 (14)系统配置 XML 文件 - 导出或导入 (15)服务器配置文件 - 导出或导入 (15)服务器许可证 - 导入 (15)自动查找 (15)作业管理 (15)作业类型 (16)系统状态 (16)3 API 使用入门—有关资料和链接 (17)配置文件 (17)用于 PowerEdge VRTX 配置文件的 CMC (17)Lifecycle Controller 相关的配置文件 (18)MOF WSDL 和 XSD API 定义 (21)受管对象文件 (21)Web 服务描述语言 (WSDL) (21)XML 架构说明 (21)Web 服务接口指南 (22)最佳实践指南 (22)属性注册表 XML (22)事件消息注册表 XML (22)XML 架构 (23)API 访问的授权和许可要求 (23)白皮书 (23)CMC for PowerEdge VRTX 白皮书 (24)CMC PowerEdge M1000e 白皮书 (24)Lifecycle Controller 和 iDRAC 白皮书 (24)4 整合 Lifecycle Controller API (25)API 客户端 (25)最佳实践流程参考资料 (25)样例脚本和工具 (25)使用 Lifecycle Controller-Remote Services 的应用程序 (25)WinRM 和 OpenWSMAN 的安装与配置 (26)5 社交媒体参考 (27)系统管理论坛部分 (27)Lifecycle Controller 技术系列学习资料 (27)6 术语和定义 (29)1简介Dell Lifecycle Controller 可提供高级嵌入式系统管理功能。